
This guide will cover all your wizards needs.
Guide to Wizard
Introduction
I’m currently rushing through star system 14 as I’m writing this and thought I might give some tips for those starting out with Wizard, assuming you didn’t transcend yet and only did a few ascensions or none at all. But it also will contain some strategies, which might be helpful for veteran players, too.
Before we start: Don’t worry about choosing the wrong nodes and thinking you need to start a new Wizard. Wizard is way more forgiving than Cid regarding that, technically there is no wrong element and thus you can’t screw up (except you really want to). You can even out “mistakes” with each ascension pretty easily. But more on that later on.
Wizard vs Cid
Most people probably played Cid before and wonder how different Wizard is compared. The only thing they do share is that you can still buy equipment, upgrade it and get items from the shop. Also do both have the Level Graph where they can spend points after each level to learn stuff.
Everything else, except the core gameplay of traversing worlds and star systems, is pretty much different. For the Wizard each Star System has 50 worlds, while Cid has 30.
Cid uses an Automator, which needs to be learned and enhanced through the Level Graph. While the Wizard has a Runecorder, which records all the inputs you do and replay those to your likings. More on the Runecorder later on.
Overall you will spend less or nearly no time at all upgrading things for the Wizard (except in the early game), as most of his gold will be converted to damage through Transmutation (passive effect which enables itself while playing your recordings). You still need to buy new equipment to increase your damage, but that is something you want to automate, too.
The Wizard and his spells can be intimidating at first, but I will explain most of the Wizards’ features from now on to make the start as easy as possible. If you are curious about a specific topic, use the navigation to the right.
Abbreviations
To make my life a bit easier and more understandable for you, I gonna use abbreviations and explain the most common terms here.
- Node: The things you can spend points on in the Level Graph, for example Lightning: Magick Rank 1.
- Combining-Node: Is a node which gives benefits to two elements when learned.
- F, L & I: Fire, Lightning and Ice. I use the initial letter mostly explaining builds later on.
- Tier 1-9: Each element has a rank/tier of the main spell and I will usually refer to it as a tier. So the first Lightning spell would be L1, Fire rank 3 would be F3 and so on.
- Recording: The runes you casted and saved in the Runecorder.
- Group-Recording: Combining several Recordings together in a new Recording, more on that under Runecorder below.
- Set: A collection of several Recordings/Group-Recordings, you have always 3 sets available.
- 1x: Whenever I give rotation examples I will use 1x Energon Cube for example, that means you need to keep the Repeat to 0. Some people might confuse this, so I want to clarify this.
Level Graph
Overview
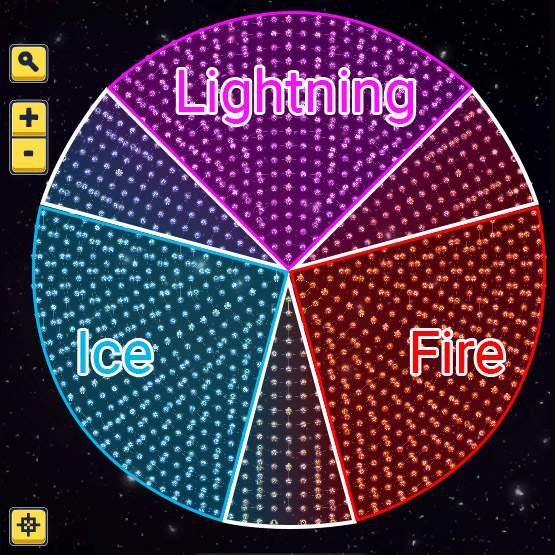
The Wizard has three elements to his disposal: Lightning, Fire and Ice. Each element has a direction on the Level Graph as can be seen here:
In the center at the start you will have 4 basic nodes which you only need to unlock once and then never again:
- Runecorder: Wizards’ Automator, more on that below.
- Cut & Paste: Allows you to record a spell and cast it nearly instantly again as often as you want. Downside is you can only cut one spell and it costs 5 Mana each time you paste it. But it is certainly usefull for long casting spells.
- Energon Cube: Using spells will generate so called Fatigue stacks, which increase your energy consumption. To counter that somewhat Energon Cube exists. It’s a buff which lasts 18s and restores 2.5% energy and with a 20% chance a Fatigue stack every 3s. This buff can stack increasing the energy restored and chance to get rid of Fatigue stacks. Really important buff for Wizard.
- Dark Ritual: Multiplies all your DPS by 1.05 for 60s and can stack up to 20 (2.64x total). It is a nice damage boost, but quite annoying to keep up with a 1min rotation and also does it cost 10 Mana each time.
- Exchange: There is no node for that, but you will learn it automatically after you got all the neutral nodes. Exchange is a spell which neither costs energy or mana and allows you to buy a random catalog item.
Combining-Nodes
The white areas between the elements are Combining-Nodes, which will boost effects/stats for both elements connecting:
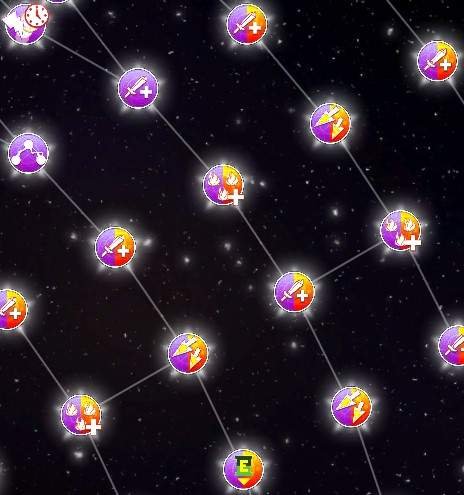
- You can easily tell them apart, because the have two colors instead of one. Combining-Nodes fullfill two purposes:
- You get two node values for the price of one.
- You can add an element trait it hadn’t before. In the screenshot above you see an icon with 3 flames which is the node usually found in the Fire area. It increases the burn damage of Fire spells by 10%. Learning this Combining-Node will add this to Lightning spells, too.
Runecorder
This feature is your bread and butter for optimized gameplay be it active or idle.
Overview

From Left to right: Power on/off to run your Runecorder, the current and needed time for your rotation and lastly your Runecorder sets you can switch between.
Each item is a Recording which you can name in whatever way you want.
When dragging a Recording into your rotation you can see them stacked under each other, they will run in that order. You see a small number which allows you to repeat a certain spell several times if you want to, before going to the next. In this example the rotation would be:
- 1x Energon Cube > 1x Exchange > 8x Tier 1 Lightning spell
After that it would repeat from the beginning.
When recording a new spell or looking at one already created you can see details of the recording here. Each pin color represents a rune you used and the light blue ones are for clicks. Yes, you can record clicks, too. The further to the right a pin is, the less time you needed to stop the recording and thus more efficient. In the picture above you can see the pins of Exchange left and a lot space to the right, that is because I pressed the runes super fast, but the spell still needs it’s one second cast time. So don’t stop the recording after pressing the runes, but wait until the cast is actually done.
Pretty self explaining, you can delete, remove or add a recording here. If you want to re-record an existing recording then select it and press the record button again. It will update every set, where the spell is used, too.
Recording tips
The game doesn’t tell you much about how some of this recording behaviour works, so let me enlighten you with a few tips:
- Before record anything: You can rearrange the 1-8 runes. It’s not obvious since they don’t look like the skills Cid has, but this is still a hotbar. With reordering you minimize the risk of breaking your fingers while trying to cast or record spells.
- When you press record and do nothing, then after a while press a rune, the recorder will ignore any pause you did before that and places the rune at the beginning. So you don’t have to rush pressing your first button after hitting record. Pauses will only be recorded after your first press of a rune.
- Talking about pauses, the exception for the tip above is that you can start recording, do nothing and then stop recording. This will actually record the idle time, even tho you did nothing. You can use something like that as a delay between spells if you need one.
- Generally you should record every new Spell you unlock, but you can ignore tier 4-6 spells in every element. The reason is that only tier 1-3 or 7-9 trigger specific buffs or traits of their element, which makes 4-6 the least desireable spells you want to ever use.
- Recorderception: The best and most useful tip is that you can actually record rotations to a new recording. Yes it sounds confusing, but it is super simple.
- You create and start a new recording, run your rotation you want to save, stop the recording when it’s done and that’s it. This is also helpfull for getting the two clicks for the Zap-Bonus as close as possible to the casted spell. You essentially record for example any Lightning spell and then you record two single clicks as fast as you can. After that you put them together and you have a nearly perfect Lightning + 2 clicks combination. This Runecorderception is required for later on as you more likely hit the Set limit of 20 Recordings.
Elements
Each element has a basic signature:
- Ice: High critical chance and damage. Low energy cost. Good for dealing burst damage.
- Lightning: Chains towards further enemies. Medium energy cost. Good for cleaning up trash monsters.
- Fire: High damage and burn effect. High energy cost. Good for bosses with a lot health dealing constant damage through burning.
Nodes of each element
All elements have a Damage (+5% Ice/Lightning/Fire Spell damage) and Cost Reduction (-2.5% Ice/Lightning/Fire Spell cost) node. Everything else is unique to each element, except the Combining-Nodes which I mentioned above. Also does each Node stack be it time or value wise. Learning 3 “Chain (+10% chance)” Nodes will give you a bonus of +30%.
Talking about stacking, everything above 100% will get you additional tries which is often described in the Node. “Chain” for example will add more monsters to hit after every 100%.
Ice
Ice Traits:
- Crit Chance: +4% critical chance for Ice spells.
- Crit Damage: +8% critical damage for Ice spells.
General Buff (Triggered by a tier 1-3 Ice spell):
- Cool Criticals: Every element critical chance +8% for 10s.
- Chilly Cool Criticals: Additional critical chance +4%.
- Cold Cool Criticals: Additional buff duration +5s.
Ice Buff (Triggered by any Lightning or Fire spell):
- Cold Front: +10% spell damage for Ice spells for 10s.
- Frosty Cold Front: Additional +5% damage.
- Sustained Cold Front: Additonal buff duration +5s.
Special (Triggered by a tier 7-9 Ice spell):
- Shatter: +20% of Ice spell damage will be transfered to the next +3 enemies on death.
- (Learning Shatter several times will increase spell damage and number of targets, so next will be 40% damage to the next 6 enemies)
Combining-Node benefits:
- Lightning > Chain: +10% chance that Ice spells will hit an additonal monster.
- Fire > Corrosion: Monster receives +10% damage by all elements until it dies, applied when hit by any Ice spell.
Lightning
Lightning Traits:
- Zap: +5% damage and no energy cost for the next two clicks after any Lightning spell.
- Chain: +10% chance that Lightning spells will hit an additonal monster.
General Buff (Triggered by a tier 1-3 Lightning spell):
- Flash: The next +3 spells of any Element have a +10% chance to strike the same target again.
- Flashier Flash: Additonal +10% strike chance.
- Lingering Flash: Additonal duration +1 spell.
Lightning Buff (Triggered by any Ice or Fire spell):
- Thunderstorm: +10% spell damage for Lightning spells for 10s.
- Severe Thunderstorm: Additional +5% damage.
- Developing: Additonal buff duration +5s.
Special (Triggered by a tier 7-9 Lightning spell):
- Circuit: Strike the same target again with a chance by (Chain / 2)%, dealing +50% spell damage.
- (Learning Circuit several times increase the spell damage by +50%, the chance only increases with leveling Chain further)
Combining-Node benefits:
- Ice > Crit Chance: +4% critical chance for Lightning spells.
- Fire > Burn: Increase the damage over time effect (burning) by +10% for Lightning spells.
Fire
Fire Traits:
- Corrosion: Monster receives +10% damage by all elements until it dies, applied when hit by any Fire spell.
- Burn: Increase the damage over time effect (burning) by +10% for Fire spells.
General Buff (Triggered by a tier 1-3 Fire spell):
- Combustion: +20% chance that burn will be applied twice for 8s.
- Incendiary Combustion: Additonal +10% chance.
- Seething Combustion: Additonal buff duration +4s.
Fire Buff (Triggered by any Lightning or Ice spell):
- Heat Burst: +10% spell damage for Fire spells for 10s.
- Evaporating Heat Burst: Additional +5% damage.
- Persisting Heat Burst: Additonal buff duration +5s.
Special (Triggered by a tier 7-9 Fire spell):
- Explosion: +50% burn damage will be applied to the next monster after death (Learning Explosion several times increases the burn damage applied by +50%).
Combining-Node benefits:
- Ice > Crit Damage: +8% critical damage for Fire spells.
- Lightning > Zap: +5% damage and no energy cost for the next two clicks after any Fire spell.
Synergy
While learning Combining-Nodes you will notice Synergy spells or buffs which can be learned.
There are 3 types of Synergy nodes:
Synergy Buff (50 Mana, 5min cooldown)
- Combines the traits of two elements for 30s (60s when the 2nd node is learned) for each charge (5 max).
Damage Spell (100 Mana, 2min cooldown)
- A two elemental combined tier 9 spell which gets additionally +50% spell damage for each charge (5 max).
Special
- Lightning-Ice > Thundersnow (100 Mana, 10min cooldown): Strikes the same target with Ice or Lightning again with any spell cast. Affects two spells for each charge (10 max).
- Ice-Fire > Comet Shower (100 Mana, 15min cooldown): Damages the monster 3 times for each charge (10 max).
- Fire-Lightning > Solar Storm (100 Mana, 30min cooldown, Sets Energy to 0, 100 Stacks of Hyperthermia): All monsters lose 1% of their health for each charge (10 max).
Each of these need their own kind of charge, which is always noted in the spell info. To cast the Lightning-Fire Synergy Buff you need 5 of its charges. In this case is one charge a Lightning, Fire and then Lightning Spell in that order. You can shorten the charge gathering up, instead of:
- L > F > L #1
- L > F > L #2
- L > F > L #3
- L > F > L #4
- L > F > L #5
You can do:
- L > F > L #1
- F > L #2
- F > L #3
- F > L #4
- F > L #5
It only matters that they alternate between each other. Also while not being noted in the spell description, they do add additional Fatigue stacks when applied, so keep that in mind with your energy management.
Generally speaking are all Synergy damage spells wasted Mana, that includes especially the special types. The only real good stuff are the buffs, but more on that on strategies further below.
Ascension
Once you finish a world for the first time you’ll get World Crumbs. Those aren’t of any use before you ascend and you just keep on collecting. After you beat a Star System (50 worlds) you will get an item called Starfire (you can view World Crumbs and Starfires under the Stats tab). With this you are allowed to ascend. To do that you need to go to the Level Graph and click on that Ascend button in the bottom right corner. Once done are actually only two things happening:
- The World Crumbs collected will convert into a permanent huge damage boost to the Wizard.
- Your Level Graph will reset.
Your Worlds and Star System, even the World you are currently in will stay the same.
Ascension works for Wizard just like it does for Cid. You keep all the benefits of the nodes you learned, but can traverse the Level Graph from the start again. Only nodes labeled Flamable, which is colored in a red font, will not be kept. Those are usually all active spells you cast or specific buffs like Synergy.
Wizard keeps the neutral and each element Tier 1 spell unlocked after each ascension, so you don’t have to learn those again.
Wizard is way faster to finish Star Systems even tho he needs 20 more worlds compared to Cid, at least before you can transcend. So in general you can get quite far with Wizard and don’t need to ascend every time you collect a Starfire. Only the first ascension will take a while, after that it will speed up significally.
Compared to Cid you should not wait until you can’t go further anymore and then ascend, but you should aim to frequently ascend when you collected a good amount of World Crumbs. The reason for that is, that after each ascend you will be drastically weaker because you can’t use Synergy yet. And in later Star Systems (especially 8+) you will feel that. Then you want to wait as long as possible before getting weak again.
General Tips
- Always add two clicks after Fire and Lightning spells. This should be a no-brainer, but many people forget that Zap exist and this also is something Fire gets when learning Combining-Nodes. So when I give tips for rotations I will always assume that you added the two clicks.
- Energon Cube is a very important buff you will always need in your rotations. The general trick to stack the buff is to create 17s long rotations. Energon Cube costs 25 Mana to cast and to even that out you would need to have a rotation of 20s (20x 1.25 Mana/s), but that is not possible through the cooldown. You will lose 3.75 Mana each rotation this way, but it’s worth it. Never cast several Energon Cubes after each other, that is totally wasted.
- Use Cut & Paste to decrease the time of a Spell to 1-2s. While it cost 5 Mana to cast, it will reduce any cast time of that spell drastically. I wouldn’t recommend using it later on when you need to watch out for Mana using Synergy buffs, but until then it can be very helpful to spam tier 9 spells.
- Don’t use Dark Ritual. Yes it’s a nice damage buff with 20 stacks of it, but it’s really annoying doing rotations being 59s long and also does it cost 10 Mana each time. You can make use of it in the beginning of the game to get you a bit further, but don’t use it when you need to create 5min rotations for Synergies later on as it will meld your Mana.
- The tier 9 Synergy damage/chance spells are somewhat a double edged sword. They sound cool on paper, but the 100 Mana cost, tons of Fatigue stacks and minor temporary damage isn’t worth it at all in the early game. The effects will stack each time you learn them, so they can be usefull once you learned a few several times. The fact that they are always at the end of the Level Graph tho makes them not really smth you should aim for in your main rotation.
- While I will go in detail with it in the progression tips, I want to make aware that you should at least go each element route once to unlock all tier 1-3 and 7-9 buffs. Once done include each tier 1-3 element at least once in your rotation to trigger each buff for a huge damage boost even without Synergy.

Be the first to comment