
This is a guide that will be explaining the Beyond Light raid, also known as the Deep Stone Crypt.
Day 1: Raid Preparation
Weapons
There are different kinds of guns you can get. Right now, it’s hard to make a plan for your character because we don’t know how the game will change later. But, here are some guns you can get pretty easily right now because they drop often.
Primary Slot
For your primary I suggest having something that can clear ads, however, if you also want to run a Warmind Cell Build which can help out a lot, you man want to consider using the Seventh Seraph Weapons such as the handcannon or auto rifle.
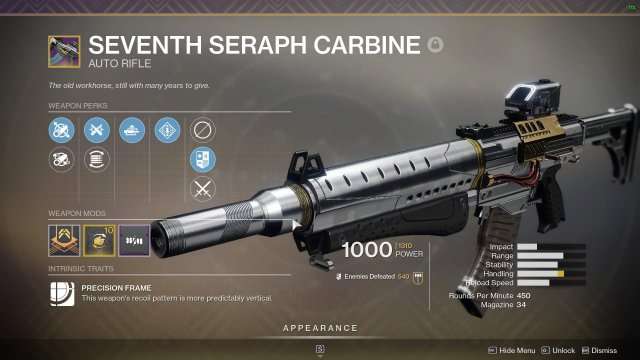

If you choose the handcannon I recommend using minor spec or extended mag, since there is only 9 shots in the magazine.
Secondary Slot
For your secondary I suggest having a Major/Boss damager, something that can take out beefy ads and still be able to be used for damage phase. This would have to be the Ikelos sniper rifle.
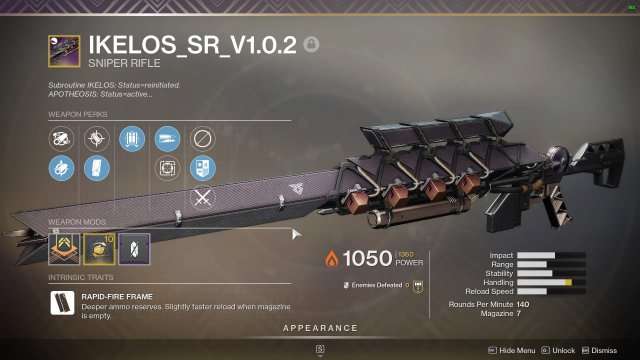
The perks you MUST have on this weapon to be able to make a different is Extended Mags, Fourth Time’s A Charm, and High Impact Reserves. This allows you to have 11 shots (if you hit all critical) and still be able to equip a Boss Spec mod which does even more damage. The masterwork does not really matter, but either reload speed or handling is what you want.
Heavy Slot
For heavy I recommended having a grenade launcher, easy to use and with certain perks allow you to shoot off all your shots before needing to fall back for another round of the encounter.
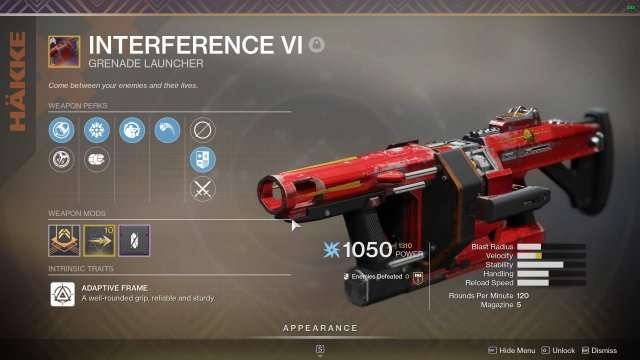
The “God-Roll” is what you see above, these perks consist of Confined Launch, Spike Grenades, Field Prep, and Full Court. From 44 meters away this thing will do about 23k damage per shot. (With Boss Spec, 20k without).
Perks to Look For
It really depends on your build, like I said before, however, there are things that you want to have for certain weapons, if you are doing a Warmind build or a max damage build it is always important to know what to look for.
Let’s start off with the top tier.
- Vorpal Weapon – This is good against bosses and does about 10-15% more damage.
- Rampage/Kill Clip – This is good for clearing ads, and if you are making Warmind cells it is important to get as many as possible on the field.
- Fourth Times A Charm/Triple Tap – These are most for secondary (energy) snipers, but they can allow you to turn your 7 shot magazine into an 11 shot magazine.
- High Impact Reserves – This allows you to pack a little more punch into your shots, when using the Ikelos Sniper it hit just a little bit harder with my last couple of shots doing 1000 to 2000 damage more.
- Full Court – Full court can only be rolled on some grenade launchers and it is very worth it. Will cause about 20k damage per shot from 40+ meters away. (Without Boss Spec)
- Field Prep – More ammo and increased reload stow and ready when crouched, basically a must have if you do not want to sink mods into extra ammo reserves.
- Spike Grenades – Direct impact will cause the most amount of damage out of all the the grenade launcher perks.
Anything else is 100% up to you, there are other perks such as multi-kill clip or autoloading which is nice to have but with maxed out reload (Lunafaction Boots or hunter dodge) there is not points, those extra seconds don’t really matter.
Warmind Cell Builds
Warmind Cells are on of the most broken things that I have seen in a while, and the fact they are not used more is insane. You are able to make cells that allow you to entirely blow past things such as decreased outgoing damage and increased incoming damage.
Let’s start off with the most important fact before starting. Solar and arc mods conflict, do not use them in tandem. Having something like grasp of the Warmind will be cancelled out if you are using any Arc based Warmind mod that “collects” the cell.
An ordered list of most important mods in my opinion.
- Grasp of the Warmind – Allows you to pick up and hold Warminds FOREVER, they will not disappear and resets the timer. (The 15 second timer, Longevity does not stack with Grasp.) However, you can still have 45 total seconds (max) of from 1 Warmind cell. The added affects (extra damage, extra resilience, etc) allows stay when holding a Warmind cell. When throwing the Warmind cell you press M2 (Right click) and it will stick to the enemy until dissipating, make sure you destroy it before it explodes.
- Warmind’s Longevity – Allows the Warmind to stay up for an additional 10 seconds, from 15 seconds to 25 (may be 30 but it’s inconsistent in my testing) This allows to enough time to have the Warmind cell to be used for a damage phase.
- Cellular Suppression – I never see anyone using this and I don’t know why, extremely god tier. This mod allows you to suppress all enemies within the Warmind’s radius for 11 seconds, HOWEVER, it can be reactivated every 4-5 seconds. Which means you can stun lock an entire area. The mod allow makes the cell more resilient to your shots. There is also a hidden perk that activates only once in a while that allows the Warmind cell to follow you after shooting it, but you have to stay close to it. <- This last part might be part of the raid, as I am testing and writing this guide on 10/29/20
- Power of Rasputin – Basically, you do more damage, that is it. 20% I think, might be 15%, I would recommend going to a different mod, unless you are barely getting by.
- Warmind’s Protection – Basically, you take less damage, about 20% I think, might be 15%. But in encounters where you are a 3-4 shot, this mod allows you to survive 5-6, very worth it imo.
There are certain builds that I like to run when doing solo nightfalls, dungeons, or even solo raid encounters such as Kalli. However, these builds overall run very well with other teams as well.
One build would consist of…
- Global Reach – All
- Warmind’s Protection – Void
- Grasp of the Warmind – Void
- Warmind Longevity – Void
- Rage of the Warmind or Fireteam Medic. – Solar (Depending on how many ads there are)
Only 1 person for this build needs to run Grasp, however, you can always switch out either of the two solar mods for High-Fire Energy and Grasp of the Warmind for any Charged with Light, since you do more damage.
Another build would consist of…
- Blessing of the Warmind – Arc
- Warmind’s Light – Arc
- High-Energy Fire – All
- Stacks on Stacks – Void (Dawn Mod, not Warmind)
- Fireteam Medic – Solar
This build is mostly for ad clear. However, it’s mostly for high intensity ad areas, such as Shuro Chi or the slow rooms in the Shattered Throne.
However, the best build that I can think of for a Day 1 Raid group would have to be the following…
- Global Reach – All (only for 1 person, everyone else use Cellular Suppression – Void)
- Warmind’s Protection – Void
- Grasp of the Warmind – Void (only for 1 person, everyone else use Power of Rasputin)
- Warmind Longevity – Void (only for 1 person, everyone else use any Charged with Light mod, I suggest “Taking Charge – All” since this is done by collecting orbs of light which is in almost every fight)
- High-Fire Energy – All (For everyone else expect 1 person)
Something to note: Only 1 player needs to be running a Seventh Seraph Weapon, preferably the person most comfortable using them or the player who has the Grasp of the Warmind Build.
Day 1: Raid Preparation Continued
Class Based Exotics
There are many exotics that people can use, however, this is a team, not for solo play. So make your build around that.
- For Warlock – I suggest running Phoenix Protocol, you can get up to 75% of your super back and it makes orbs for your teammates which let’s your builds do the work (High fire energy or protective light)
- For Titan – You want to be doing damage, and if the supers stay the way they are then you’ll want to be running Crest of Alpha Lupi, creating orbs is what you want. Since that directly activates your High-Fire Energy or Protective Light build.
- For Hunter – I suggest having a good Celestial Nighthawk and a good Orpheus Rigs. You will do a crap load of damage when running CN and when running OR you’ll get 50% of your super back when tethering 10+ enemies.
Note: It is rumored and not confirmed that we get to put seasonal mods on our armor, but in case you are running an exotic you will want to switch out Global reach or Power of Rasputin. Since Charged with Light is a larger damage buff than Power of Rasputin and you can keep it forever until you kill something which is good for damage phases.
There may be other builds that people are more comfortable playing, and that is OK. However, it would take 20+ pages for me to outline just some of the builds you can do, but these are the most reliable if you are running Charged with Light Builds.
Bounties / Economy
Turning in vendor tokens will give you gear that is 20 levels lower, so you don’t need to worry about that. I also suggest that you start collecting as many bounties as you can now. When you get the seasonal artifact, you should turn in all those saved bounties at once.
There’s a set of modifications that lets you deal 140,000 damage without any extra effects and around 200,000 to 250,000 damage with extra effects. This setup does more damage than anything else in the game in the same amount of time.
TL:DR – Farm lost sector wanted enemies until you are 1200 then go and farm Variks missions and story.
Encounter 1: Heat Bubbles
0. DESOLATION – Locate the Deep Stone Crypt

The raid starts out in Eventide Ruins. Head straight ahead, clear the ads, and proceed through the door. You will eventually enter Desolation after a small airlock. Pikes are made available, though they are not necessary.
The concept around this introductory section are heat bubbles which serve to shelter you from the blizzard. Your team must navigate between these heat bubbles to stay alive and reach the end of this area.
Standing in the blizzard grants you the Frostbite debuff, which stacks up to 10x, upon which you will be killed. Prevent this by entering the heat bubbles, granting you the Shelter from the Storm buff, and slowly removing your Frostbite stacks.
Clear the ads around each bubble as you progress. You can choose to Transmat in the center of the safe bubbles, which will send you back one checkpoint, if you need to help your teammates.
You will eventually come across some Brigs defending the final bubble, beyond which is a small airlock that opens to a series of tunnels that lead to Restricted. Continue making your way through these until you reach the entrance to the Deep Stone Crypt, take a right inside, and you will eventually reach the next encounter.
Encounter 2: Light and Dark
1. RESTRICTED – Disable Crypt Security
Roles: Operator, Scanner
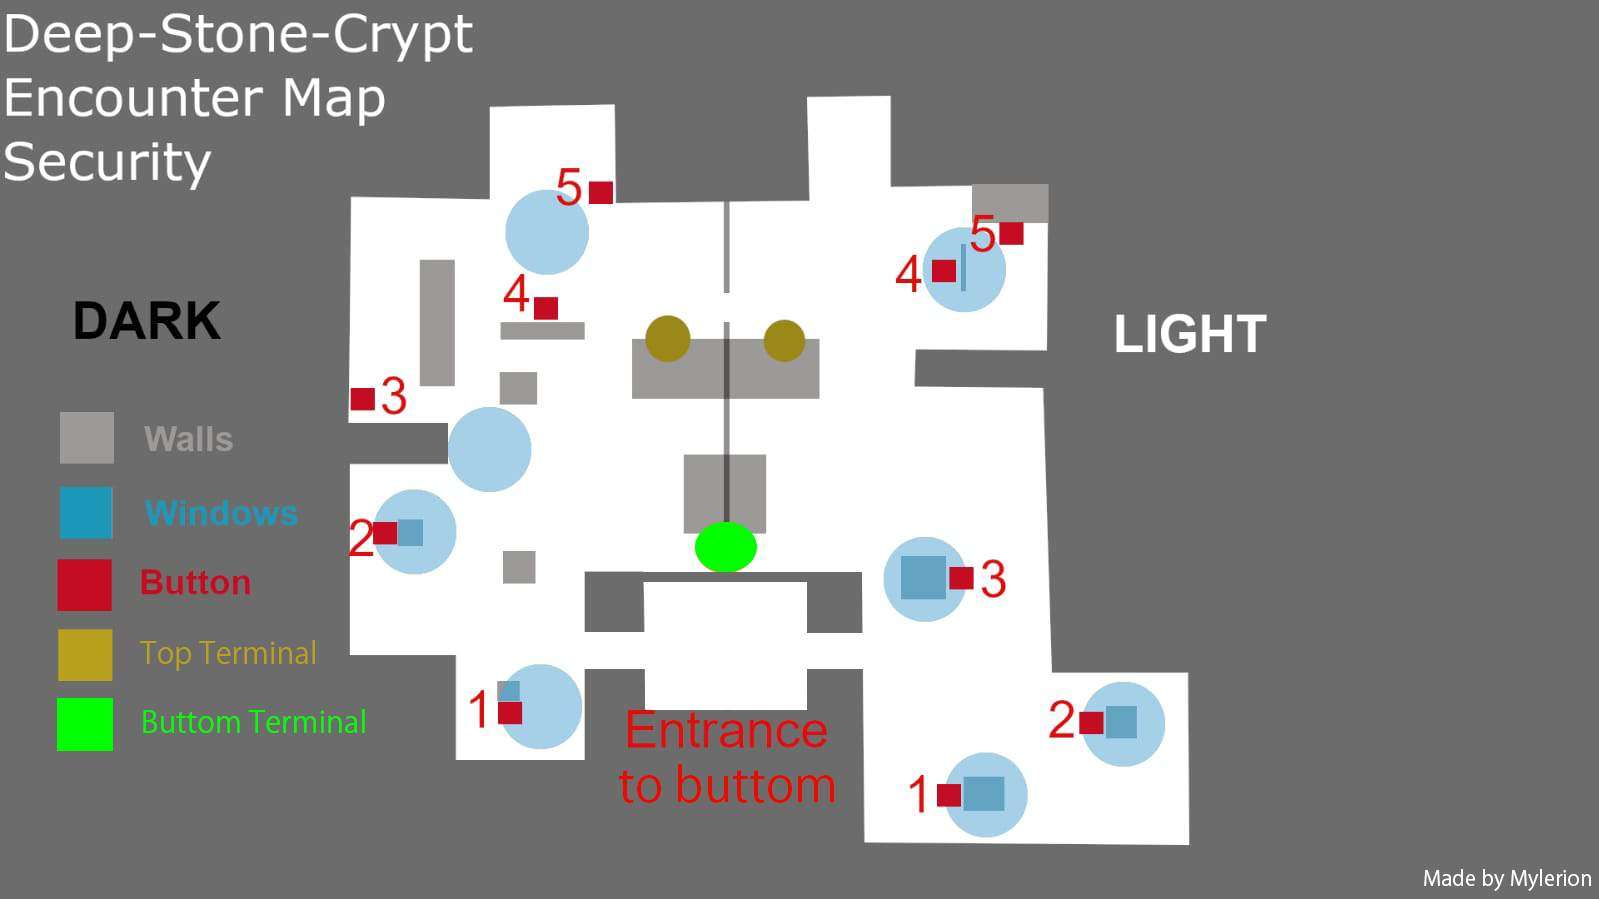
This encounter revolves around the idea of having your Operator in the basement shooting keypads, while Scanners up top guide them.
The room is split into 3 sections: Light (lit side), Dark (unlit side), and Below. Light and Dark each have 4 windows while allow players in either to view keypads below.
Start the encounter by having your chosen Operator pick up the buff from one of the Augmentation Terminals.
The encounter goes as follows:
- A Hacker Vandal will spawn in Dark, from which you can grab the Scanner buff.
- The current Scanner looks through their windows to see which 2 keypads are glowing on their side. Once memorized, they pass the role to the other side by depositing it in their Augmentation Terminal.
- Once all 4 keypads have been located, the Operator can head Below by shooting the keypads next to the central doors. Only the Operator can enter these, and they will not allow passage if someone else is with them.
- When Below, the Scanners guide the Operator to which keypads they need to shoot. Successfully shot keypads will make a sound and show the Operator icon. The Operator has 1 minute to shoot all 4 keypads, or they will be killed.
- The 6 Top Fuses will then be exposed to begin the DPS phase, wherein the Operator needs to trade their role with a Scanner via the Augmentation Terminal in the center of Below, directly in front of the stairs.
- The now-Scanner below checks all 6 smaller Fuses directly below the top ones, and calls out which is glowing. This indicates which the Top team need to shoot, or risk wiping.
- Repeat the last step as each Fuse is destroyed to clear the encounter.
- The top Fuses will be shielded again after a short while, so rince and repeat until the encounter is cleared. In order to get the player Below back out, the current Operator can shoot the keypads next to the doors to release them before they are killed by incineration.
Role Breakdown
Scanner
- Check and memorize which 2 keypads are glowing Below via the windows on your side.
- Send your role to the other side via the Augmentation Terminal.
- Send your role to the Player Below once all 4 keypads have been activated.
- If you’re the Scanner Below, inform your team which fuses are currently glowing for the DPS phase.
Operator
- Shoot the keypads next to the central doors to enter Below once your Scanners have determined which 4 keypads are needed.
- Shoot all 4 keypads within 1 minute, following the guidance of your Scanners.
- Send your role to the Top via the Augmentation Terminal in front of the stairs, and pick up the Scanner role.
Once you’ve cleared the encounter, a door on the Dark side will open to lead you to the next encounter.
Encounter 3: Bottom and Top
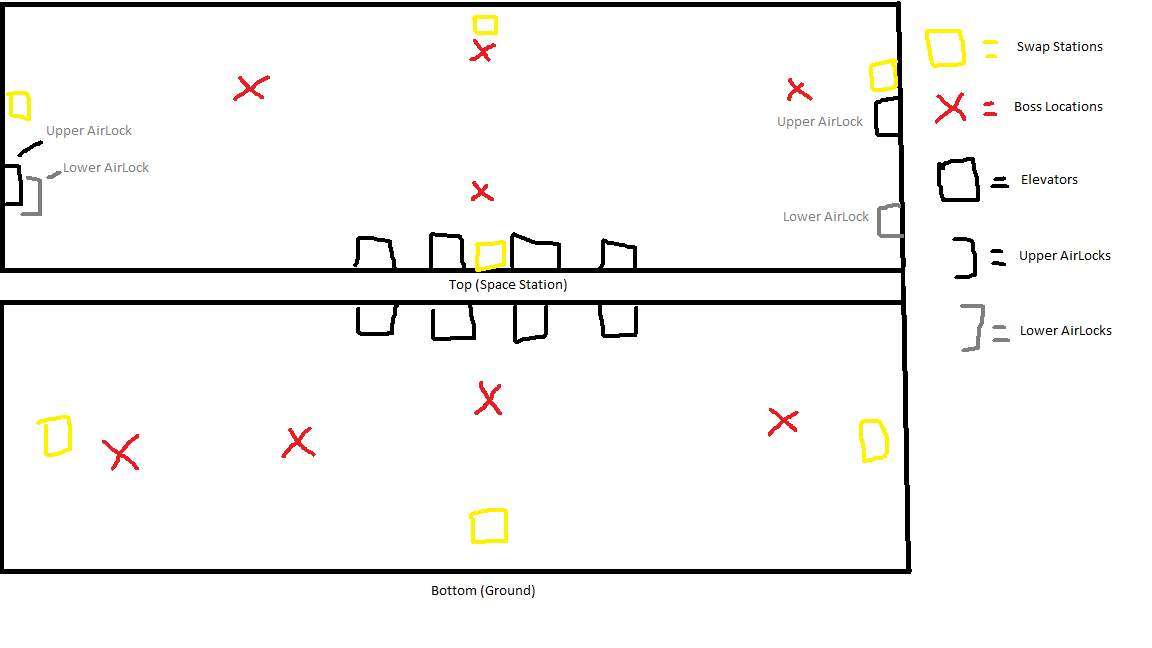
2. CLARITY CONTROL – Defeat Atraks-1
Roles: Operator, Scanner
This encounter revolves around juggling the Scanner role to determine which Replicant of Atraks-1 to shoot.
This encounter takes place in 2 distinct areas: Ground, and Space. A majority of the encounter takes place in Space, with 4 airlocks to evacuate Replicants, as well as where the final stand takes place.
Decide on 2 teams of 3, a Ground team and a Space team.
The encounter starts once somehow walks through the orb at the opposite side of the room from the entrance.
The encounter goes as follows:
- An Operator Vandal will spawn at Ground, while a Hacker Vandal will spawn in Space. 3 Sentinel Servitors will spawn in each zone too, and serve to advance the encounter. Space team can either head up directly via the Launch Pods, or wait to grab the Operator role, then head up, and grab the Scanner role as well.
- Once Space team has both roles, each team needs to kill all 3 Sentinel Servitors in their area to advance the encounter, wherein the Atraks-1 Replicants will begin casting a wipe mechanic. The Scanner in Space needs to spot which of them is glowing yellow, and call out to their team to DPS only that Replicant. Upon dying, it will turn into a purple cloud, which must be picked up by a Player.
- The Scanner then sends their role to the Ground team via any of the Augmentation Terminals available around the room, followed by the Ground team Scanner checking which Atraks-1 Replicant is glowing, DPSing it, and sending the role back.
- The Players that ran through the purple clouds left behind the Replicants will have a debuff called Atraks-1 Replication with a 42 second timer. If this counts down to 0, a copy of Atraks-1 will respawn on top of them, and wipe the fireteam. To control this, Players holding this debuff should head to Space, where the Operator can shoot the glow above them to cause them to drop the Replication, and refresh the timer. The Operator can also call and send Launch Pods by shooting the keypads next to them.
- Once 2 Atraks-1 Replicants have been killed in each section, and their debuffs picked up, all 4 players with the debuff need to group up in front of one of the 4 airlocks in Space. The Operator can shoot the keypad to open the airlock, where all 4 players need to stand inside and allow the Operator to shoot their debuffs to drop them inside, before running out. The Airlocks reset after each set of 4 Replicants, so you could also airlock each player individually instead of 4 at once.
- Senintel Servitors will spawn again, and the killed Atraks-1 Replicants will respawn. Rince and Repeat these steps until you reach the final stand.
- The Final Stands occurs in Space, so have all players head up once you reach this point. It’s simply a rapid-fire version of the encounter, without needing to deal with Replications. The current Scanner just calls out which Atraks-1 Replicant is currently glowing for all the team to DPS, then move on to the next Replicant, until the boss is killed, and the encounter is completed.
Role Breakdown
Operator
- The Operator must always stay in Space.
- Send or call Launch Pods depending on how many people need to change positions.
- Shoot the glowing debuff above players with Atraks-1 Replication to reset their timer and avoid a wipe.
- When all 4 Replications are being carried, shoot the keypad next to an airlock that everyone is gathered at to open it.
- Shoot the 4 players’ debuffs to cause them to drop the Replications inside the airlock.
Scanner
- Call out which Atraks-1 Replicant is the current target in your section of the encounter.
- Send your role to the other team via an Augmentation Terminal.
- During the Final Stand, call out each Atraks-1 Replicant as they glow in order, no trading roles.
A door to the right in Space will open once the encounter is cleared, to allow you to progress further into the raid.
Encounter 4: Decent
DESCENT – Locate the Nuclear Contingency Chamber
More of a mid-encounter transition, this is just a jumping puzzle with some combat. Make your way along the catwalks to the other side, killing ads along the way, while Clovis AI gives talks you down, all to some exquisite music.
The 2nd Hidden Chest can be found here, along the left side of the area, underneath some large fans.
Encounter 5: Rapture
3. RAPTURE- Prevent Europa’s Destruction
Roles: Operator, Scanner, Suppressor
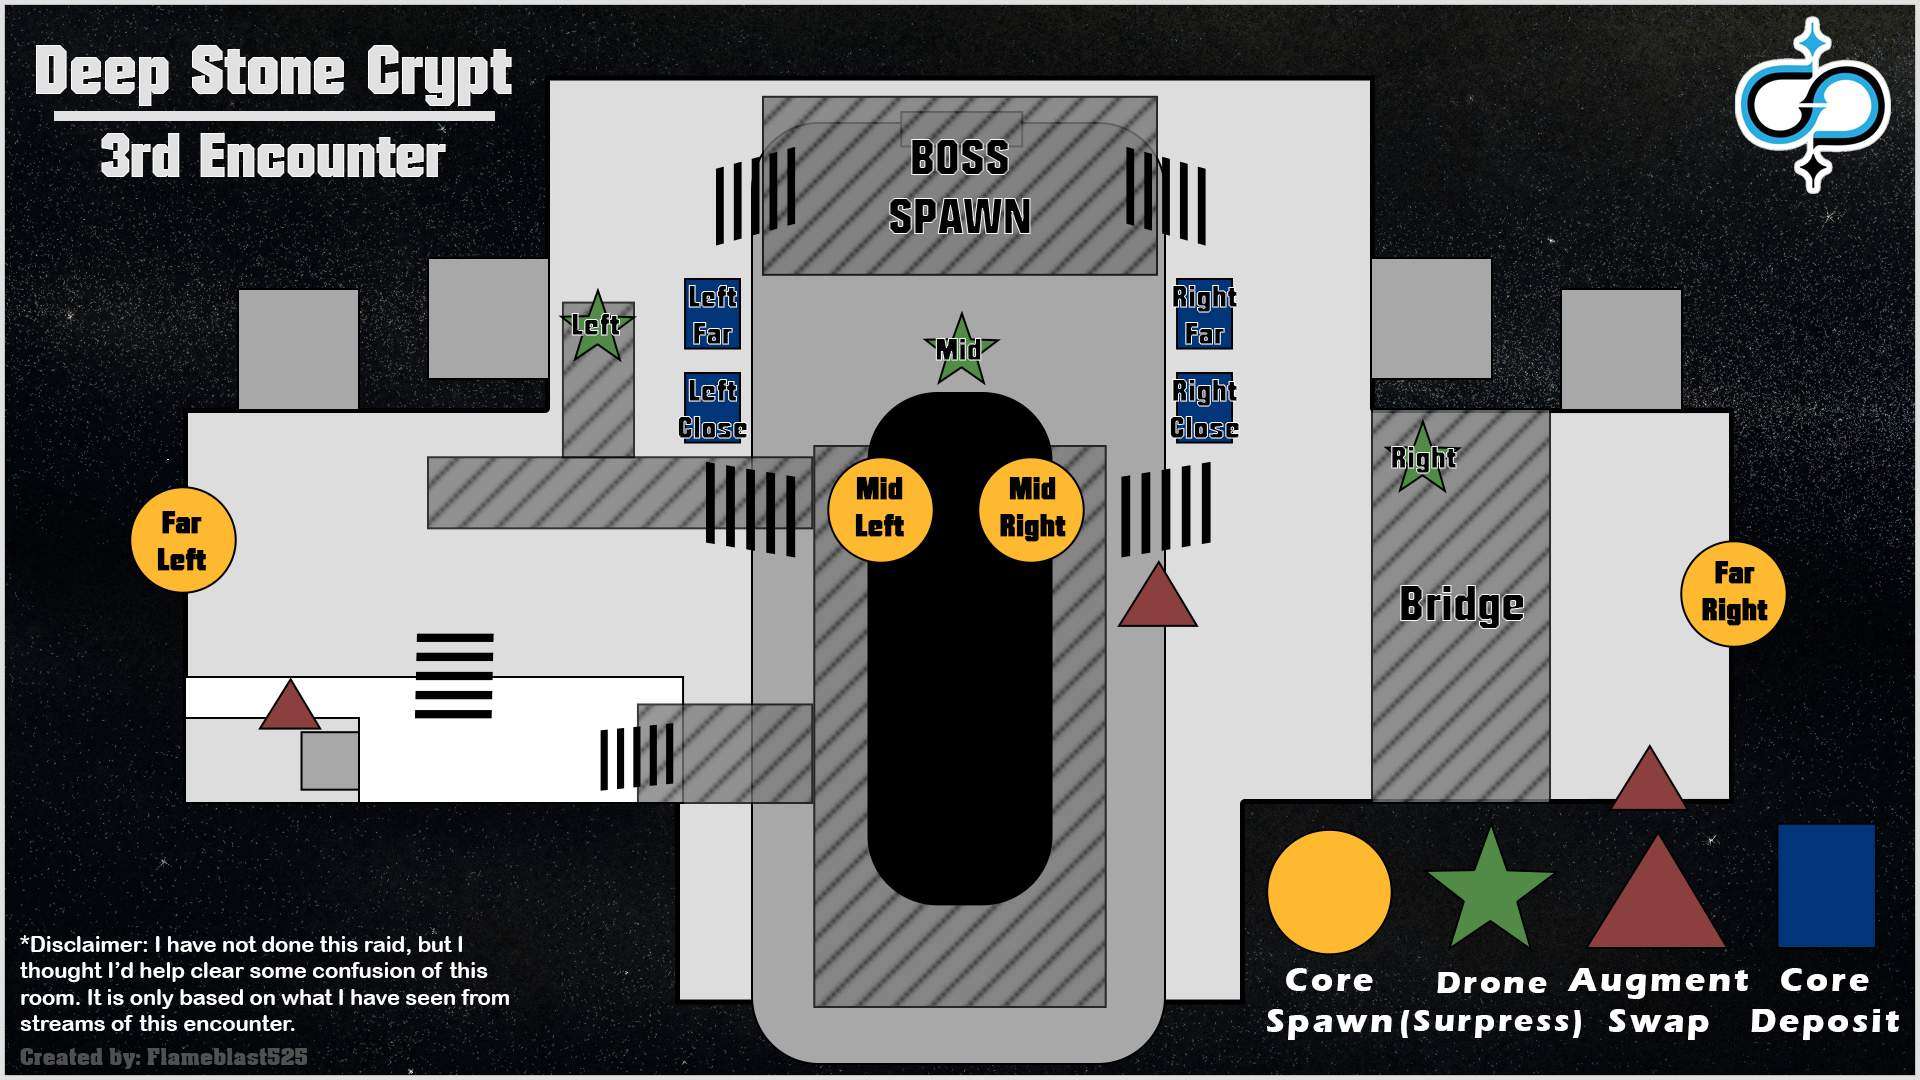
This is the first encounter that now introduces the Suppressor role. While the purpose of the other two roles is generally the same, there are yet again some differences.
This encounter revolves around juggling Nuclear Cores which give a debuff in order to deposit them and increase the progress of the encounter, no real phases here.
The encounter goes as follows:
- Operator, Scanner, and Suppressor can all be picked up from their respective Vandals that will spawn at the start of the encounter.
- The Scanner checks which 2 of the 4 central bins are glowing: These are where the runners will need to deposit the Nuclear Cores. Meanwhile, the Operator shoots the keypads next to either the left or right Core station, spawning Nuclear Cores for the team. The Suppressor stands ready under one of the 3 Security Drones, from which they can shoot Taniks.
- Two players pick up the Nuclear Cores, to then be ready to deposit them in the center of the room. Carrying a Core gives you the Radiation debuff which stacks up to 10x, upon which you will die. Manage this by calling out your stacks of Radiation to your team, and if need be, have someone else interact with you to pick up your core. Stacks of Radiation will decay after a long while, so keep an eye on that if you go to grab a new Core.
- Once all the Cores are being carried, the Suppressor must shoot Taniks from under each of the 3 Security Drones, which will eventually stun him, allowing the Nuclear Cores to be deposited into the glowing bins that the Scanner calls out at the center of the room. Each Bin must receive only one Core. Doing so will advance a progress bar beneath the bins, while also disabling a random Augment. The Player affected by this must drop their Augment at an Augmentation Station to trade it with someone else.
- Repeat this 5 more times to unlock the hatch in the center of the room which leads to the end of the encounter. Once it opens, it’s a sprint to the end of the hallway, as Taniks will be chasing you, and the final door will slowly close. Getting caught by Taniks is an instakill, while missing the door wipes the fireteam.
Role Breakdown
All roles may have to switch with someone else throughout the encounter, as clearing a set of Nuclear Cores will disable the Augment for a random player.
Operator
- Shoot the keypads next to the Core Dispensers to spawn 2 Nuclear Cores for your team.
Scanner
- Check which 2 Deposit Bins in the center of the room are glowing, and call them out to your team.
Suppressor
- Stand under a Security Drone and shoot Taniks once all cores are being carried. He will glow blue when you are in the correct position.
- Repeat for all 3 of the Security Drones in the room.
Core Runner
- Grab a Nuclear Core once they’re summoned.
- If need be, call out to your fireteam when you’ve got high stacks so that someone else can take over for you.
- Deposit the Core in one of the two Depsoit Bins that the Scanner called out.
The encounter is cleared once the Station crash lands on Europa, and the loot chest is available in the wreckage to the left.
Encounter 6: Taniks
4. RESTRICTED – Defeat Taniks, The Abomination
Roles: Operator, Scanner, Suppressor
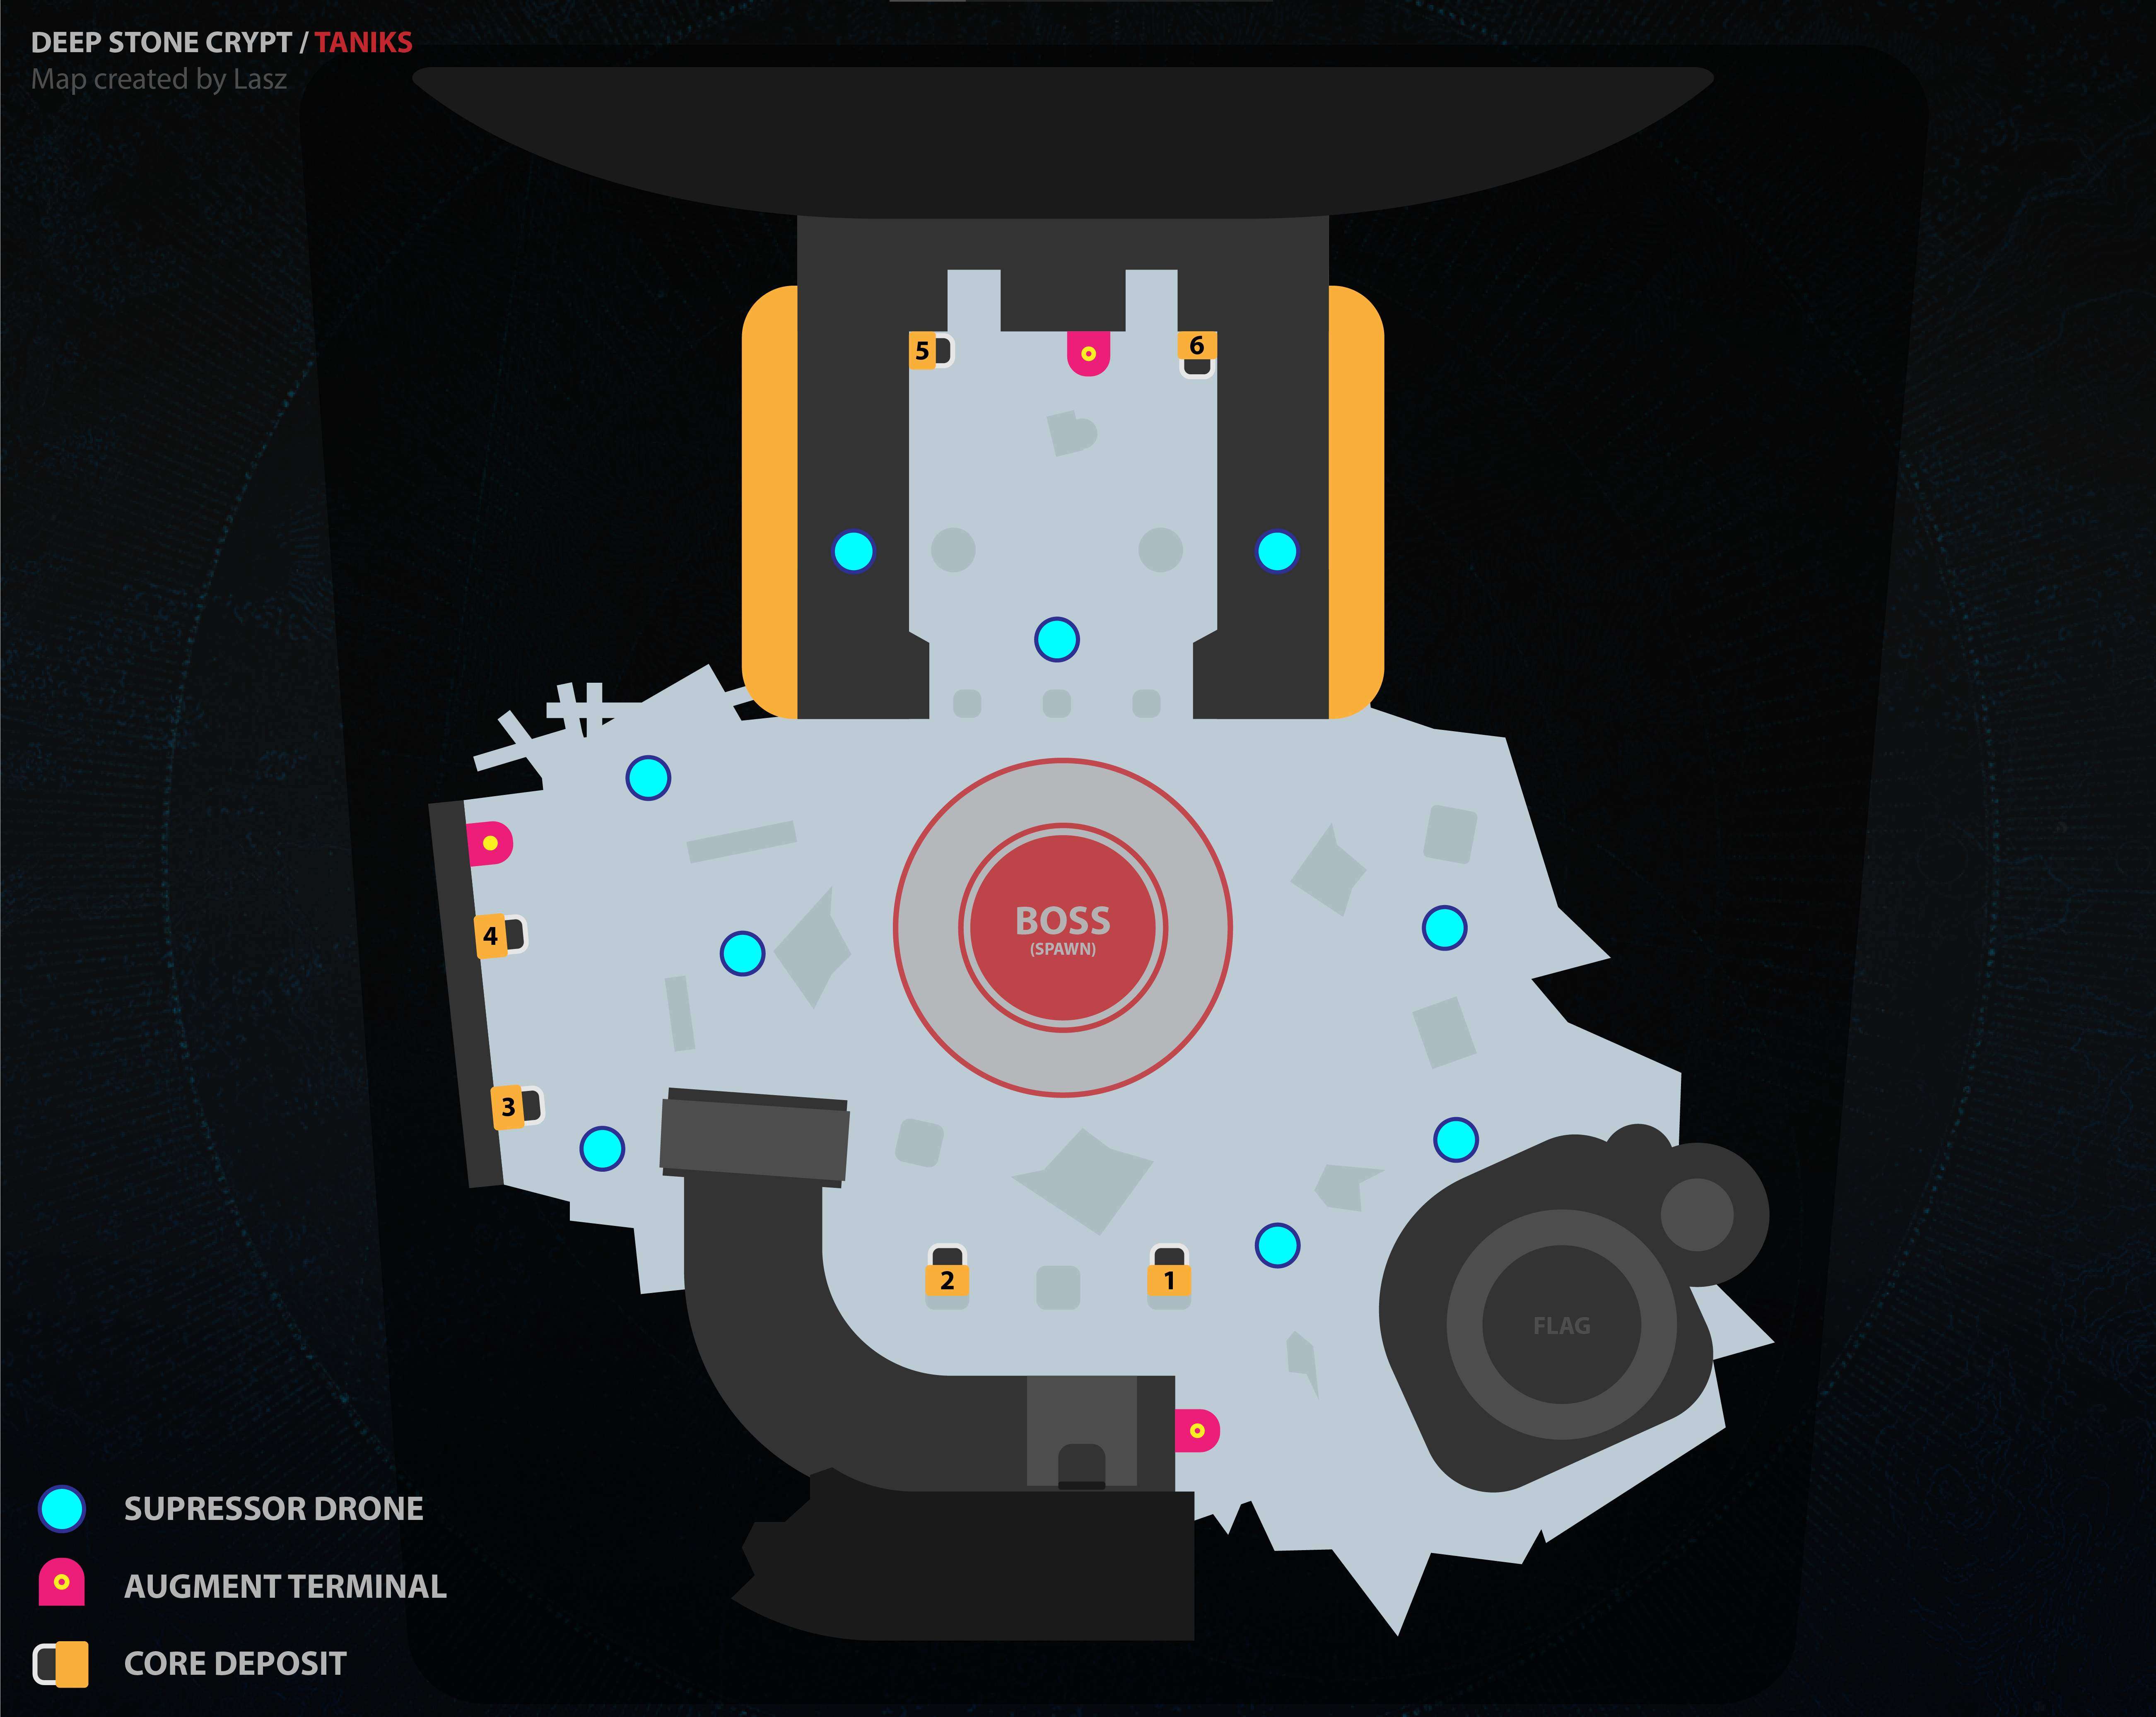
The final encounter of the raid. It shares the exact same mechanics to the last encounter for the most part, with some slight added complexity.
The arena is split into 3 sections: Spawn, Blue, and Orange. Each section as 2 Deposit Bins like the previous encounter, one to the left, and one to the right, along with 3 Security Drones.
Run near or shoot the piles of debris in the center of the arena to start the Encounter.
The encounter goes as follows:
- One Augment Vandal spawns in each section of the arena. Players need to pick up all of these Augments, as expected.
- The Scanner runs around each section, checking which Bins are glowing, and calling them out to the team. Callouts are usually the area, followed by ‘Left’ or ‘Right’. i.e. “Blue Right, Orange Left”
- Taniks will eventually do a Meteor attack (big purple columns), which lets you know that you need to shoot his thrusters. If at least 2 Thrusters aren’t destroyed in time, he will wipe the fireteam. Each thruster will drop 1 Nuclear Core. To facilitate this encounter, it’s recommended to only shoot 2.
- As before, Core Holders will get the Radiation debuff that will kill them at 10x stacks. Swap with other players to avoid this. Taniks will also occasionally trap a player holding a Core in a large purple sphere. The Operator needs to shoot this to free them. Try to stay away from the Operator if you’re holding a Core, as it can trap them as well, where they cannot free you.
- The Suppressor then stands under each Security Drone, shooting Taniks to stun him once all 3 are activated. This allows the Core Carriers to deposit their Cores in the bins that the Scanner had spotted.
- Same as the previous encounter, a random Player will have their augment disabled. Swap with another player via the Augmentation Terminals to mitigate this issue.
- Once all 4 Nuclear Cores have been deposited, this begins the DPS phase. Taniks will summon 2 Arc domes around him, the outermost of which has debris flying around its’ outer edge which must be avoided. In order to DPS him, stand between the outer and inner dome. Standing within the innter dome directly below him causes damage, and will likely kill you. He will occasionally knockback the whole fireteam, so be ready to safely jump back in when this happens.
- When the DPS phase ends, just rinse and repeat these steps until you reach the final stand.
- Once below ~15% HP, Taniks will begin teleporting around the arena, attacking constantly. You can DPS him during this phase, and must deal enough damage to kill him before he wipes the fireteam.


Be the first to comment