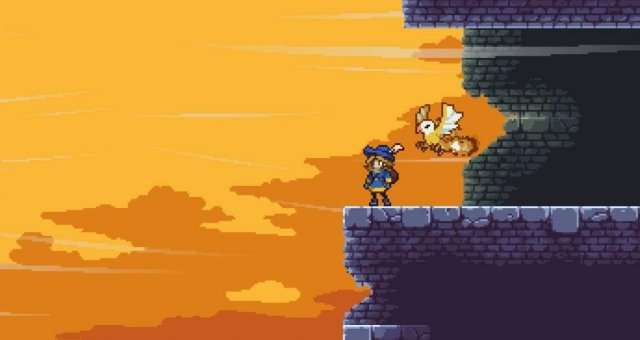
A mediocre guide to defeating the various keeper duels in the Abandoned Tower area of the game.
Foreward
This is a not-at-all-brief guide to the five(!) keeper duels in the final area of the game, the Abandoned Tower.
I’m warning you now: there be spoilers abound. This is the final area of the game. I will not be attempting to hide them.
In the interests of making this guide both useful AND accessible to players seeking help, I have done the following:
- One team to rule them all. Aside from swapping in Sutsune for the final boss (Mad Lord), I used the same lineup for all 5 keeper duels. The same team and equipment was used in progressing through the wild encounters in the Abandoned Tower and capable of 5-starring each fight, as well.
- Only easily-acquirable shifts. I originally wanted to do this without ANY shifts, but the teams I came up with weren’t able to win as reliably as I would have liked. So instead, we have 3 shifted monsters, all from the first two areas of the game: Light Magmapillar, Dark Fungi, and Light Catzerker.
- Easily acquirable monsters. Aside from potentially Sutsune, you’re likely to already have the monsters in question for this guide (though possibly you may need to farm the shifts mentioned above, sorry 🙁 )
- Nothing from the secret area of the game.
- Nothing from Reward Boxes. Aside from a couple level 1s at the beginning of the game, I didn’t even open any.
- No Champion monsters. I didn’t want to risk readers having hatched a champion early in the game and needing to spend like 20 level badges to get it up to snuff.
- Underleveled VS each encounter.
- No ultimate abilities.
- Equipment at +4 or lower, unless acquired from a chest (or possibly an enemy drop in Underworld, I didn’t keep too close of track – sorry). I never upgraded an item to +5 at the smith in this playthrough.
- Food I had on hand, not purchased.
For the gear, the only item that might be a bit difficult to acquire, though I’m not certain, is the large quantity of Bracelets I have equipped. I don’t recall getting any as loot drops. However, if you require more, the Druid Oaks located in the Ancient Forest sometimes drop Bracelets.
As a result, even if you copy the team and strategy that I used and still struggle, I’ve left room for improvement – +5 gear, better food, reward box equipment (especially duplicate uniques), and level 40 with its consequent access to ultimate abilities.
And without further ado, let’s first dive into the team that I used, and then we’ll examine each keeper encounter in turn.
My Team & Overall Strategy (A Sample Composition)
Because I wanted a small core team capable of handling each of the fights in the Tower without much or any adjustment, I had few options in front of me.
I needed a team that stayed alive AND dealt damage regardless of enemy lineup, strengths, and weaknesses.
After some thought, I went with a shielding-heavy team that focused around (like last time in my Zosimos guide) debuff damage, since debuffs deal respectable amounts of damage even against enemies resistant to them.
The Lineup
- Dark-shifted Fungi. You’ll almost assuredly have to farm this guy up, my apologies, but Curse Chain with the number of debuffs he doles out is simply too good to pass up. His combination of Poison damage, Weakness damage mitigation AND Weakness-based damage amplification, with the number of debuffs he can apply to the entire team in a single action (with some luck), is unparalleled. The fact that he auto-heals for a respectable amount AND cleanses one debuff per turn from himself is icing on the case (he is, in fact, the primary healer of the opening lineup!).
- Light-shifted Magmapillar. This little dude is perhaps the strongest shielder in the game, and is easily acquired at that (I had 5 copies of the light-shifted version when I went to make this team!). The light-shifted version’s inherent damage reduction is paramount in keeping it alive against strong ice attacks. Magmapillar will never attack, but that’s OK – with Fire Shield doling out 2 Burn debuffs per use (which, with his Initial Burn passive, ensures a Burn application on each opposing monster on Turn 1), his damage is surprisingly respectable nonetheless.
- Unshifted Arachlich. Either shift would be better for our purposes, but I didn’t want to potentially condemn the readers to trying to farm up a specific shift. Either way, Arachlich’s combination of Multi-Chill, Congeal, and an AOE Chill attack means that he’s immediately both doling out damage and restricting the power of the abilities used by enemy monsters, allowing him, like the other two, to perform both an offensive and a defensive role at the same time.
- Unshifted Imori. Again, either shift would probably be better. Imori’s role in the lineup is to replace a slain Arachlich and continue to dole out Congeal damage and Chill debuff applications. He’s not nearly as good as Arachlich himself for this purpose, but instead serves as a stopgap between Arachlich’s death and your debuffs finishing the fight.
- Light-shifted Catzerker. A heavy-hitter that often fully-heals your entire party? Sign me up. Catzerker’s another fight-finisher, brought in when either Fungi or, heaven forbid, Magmapillar is slain. He’s another stopgap, hoping to keep the party healed while the debuffs applied by the first three monsters finish the fight. His bleed applications certainly don’t hurt, though!
- Unshifted Sutsune / Free space. This monster sees little, if any, use in the keeper duels. You can use whichever monster appeals to you for this space, although I’ll caution you to use Sutsune for the final duel against Marduk – the same team you use against Marduk is ALSO used against the final boss, and Sutsune is paramount in slaying that boss reliably. Until I got Sutsune, I used an unshifted Mad Eye, and was unhappy with its performance. If I did this again, I’d at least consider using a Manticorb instead.
For equipment, food, and skills… I’m just going to post screenshots of what I used.
Equipment & Food
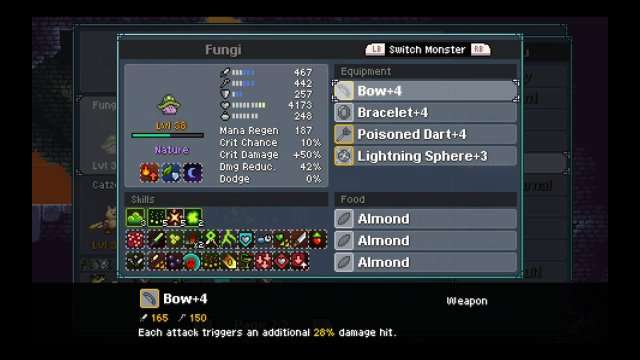





Some notes on Equipment and Food:
- On a do-over, I’d probably drop the Grapes from Arachlich in favor of more HP. The grapes were for helping to 5-star the wild monster trash encounters and for using this guy against Champions.
- I believe Bananas are for sale in the Keeper Stronghold at this point, if you want to really boost up the HP of your monsters. Peanuts are as well, although I had a bunch on hand from clearing the Mystical Workshop.
- If you’re struggling with or don’t want to bother with 4-starring Brutus for the Dumbbell, you can probably use a Coat on Catzerker instead. It’ll lower his base damage (and thus healing), but the crits will be a bit more reliable.
Skills




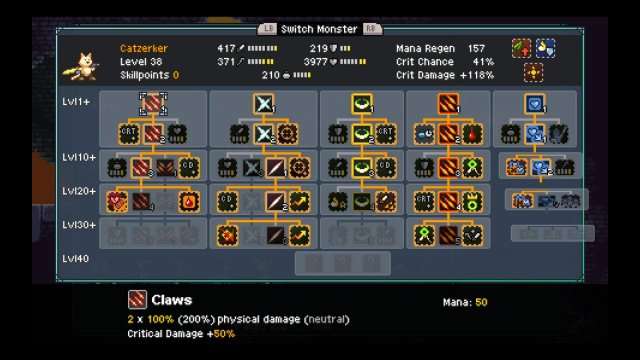

These skill allocations likely aren’t optimal, but they sufficed for my needs, at least. 🙂
Fight Strategy
1) Open with Fungi, Magmapillar, and Arachlich.
2) For turn one, use Fire Shield, then (usually) Ice Storm or (if they have a strong front-load of damage)Shadow Storm.
3) For the remainder of the time that these 3 monsters are alive: Fungi uses either Poison Cloud (if you want the opponents’ health kept relatively even) or Beating (if you want to focus-fire down a specific monster). Magmapillar usually just spams Fire Shield, but may opt to use Sustain if shield levels are high (or regular Shield if he’s been chilled a lot and is having mana issues). Arachlich proooobably spams Shadow Storm to keep blind applications on enemies, but can Encapsulate (when healing is DIRELY needed) or Ice Storm (when Chill applications are paramount).
4) Depending which monster dies first: If Arachlich perishes, bring in Imori. If Magmapillar or Fungi perishes, bring in Catzerker.
5) Imori is likely going to spam Ice Spear Volley to dole out some Bleeds and Chills. Or possibly (if you’re in REALLY bad shape) use some items. Catzerker is almost always going to use Long Slash, or pooooossibly Fire Claws to focus down a single target (note that Fire Claws is NOT going to heal the party as much!). Any remaining members of the original 3 monsters retain the above strategy.
6) If Sutsune enters the party, use Quicken if you can afford it health/debuff wise, and otherwise spam Mass Restore (or, if you really need to purge buffs, Cleansing Fire – although the amount of buffs flying around in most of these duels renders this an unpalatable option).
7) When not using Sutsune, you can use a 6th monster of your choosing. It should probably be defensive in nature, and capable of clearing debuffs – the biggest weakness of this team is debuff management.
This above strategy resulted in at least a 90% win rate against the 5 keeper duels in Abandoned Tower. I believe I lost against Zosimos once or twice, and I fought each keeper for five victories each. I didn’t track my losses, regretfully, but they were few and far between.
Fight Overview: Will

Before you even manage to enter the Abandoned Tower, Will ambushes you from behind with a Keeper Duel!
His team composition includes all the elemental types for both attacking and defending. However, it’s worth noting that he doesn’t have any strong defenses against Water-type attacks, and he also lacks any general resistances or weaknesses to physical, magical, or debuff damage. Because of this, Water damage and status effects like Chill or Congeal will consistently work well against him in this encounter.
Monster Overviews
Light-shifted Frosty
- Weaknesses: Wind damage.
- Resistances: Fire damage.
- Known Attacks: Safecast (almost always used on first turn), Ice Storm, Chill Wind.
- Notable Passives: Multi Chill, Buff Mastery (Frosty can apply 1 extra copy of each buff)
- Kill Priority: High. The rest of the duel becomes problematic if he lands too many chills on your party.
Light-shifted Silvaero
- Weaknesses: Earth damage.
- Resistances: Wind damage.
- Known Attacks: Ice Storm (seriously, I never saw him cast anything else).
- Notable Passives: Holy Presence (each buff action by any party member applies 1 additional random buff)
- Kill Priority: Moderate. He hits hard and applies chill.
Light-shifted Mega Rock
- Weaknesses: Fire damage.
- Resistances: Earth damage.
- Known Attacks: Fiery Punches, Earthquake
- Notable Passives: Age, Utopia (Every monster in party gains 3 charge stacks at the beginning of the turn)
- Kill Priority: Low. Despite him getting stronger every turn with Age and applying charge stacks each turn, he’s actually not a huge threat. If you’re using a debuff-oriented team, he’ll perish to Burn/Congeal without needing to focus-fire him.
Dark-shifted Magmamoth
- Weaknesses: Water damage.
- Resistances: Fire damage.
- Known Attacks: Firestorm, Air Sickle
- Notable Passives: Assault Shielding (Gains a shield for each critical hit he lands), Fuel, Multi Burn
- Kill Priority: Very high. Magmamoth is Will’s heavy hitter, and he WILL kill your monsters if allowed to live.
Light-shifted Megataur
- Weaknesses: Fire damage.
- Resistances: Wind damage.
- Known Attacks: Snow Veil (Never saw him use anything else!)
- Notable Passives: Equipment Mastery (his stats are higher than normal due to, in theory, wearing an additional accessory).
- Kill Priority: Low. I never saw this guy do anything threatening, and his damage was pretty lackluster.
Light-shifted Beetloid
- Weaknesses: Earth damage.
- Resistances: Wind damage.
- Known Attacks: Thunderstorm, Enlighten, Enchantment
- Notable Passives: Leadership (whenever he gains a charge, he applies a charge to another monster in the party), Revenge (gains a charge whenever he takes damage), Multi Sorcery.
- Kill Priority: Extremely low. You want to kill this dude last because, due to the nature of his Revenge/Leadership combo, he powers up his teammates whenever he’s attacked. If Magmamoth is still alive when Beetloid hits the field, the fight can become troublesome.
Fight Overview: Ostanes & Vallalar
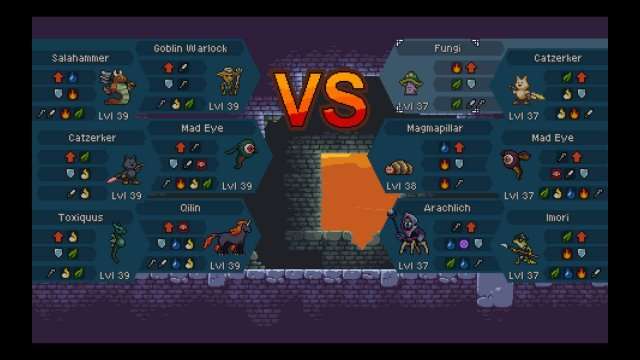
These two claim they have a perfected strategy that nothing can stand against.
They’re mistaken. I found this to be the easiest of the five keeper duels in the Abandoned Tower.
Again, the opposing lineup here runs the gamut of weaknesses and resistances, including, this time, inclusion of resistances and strengths against physical, magical, and debuff damage. In fact, the opening lineup guarantees that at least some of your damage will be resisted.
As far as I can TELL, these two were focusing on a debuff-oriented strategy and using Catzerker as a sweeper against your debuffed-and-weakened party. While in theory that would be a nightmare against my personal strategy (outlined above), the lack of Chill largely allows Magmapillar to out-shield the incoming debuff damage.
Monster Overview
Light-shifted Goblin Warlock
- Weaknesses: Physical damage.
- Resistances: Magical damage.
- Known Attacks: Thunderstorm; never saw him cast anything else. In theory he could also use Thunder Strike, Poison Cloud, and Mass Restore, but I never saw him use anything other than Thunderstorm.
- Notable Passives: Supremacy (Any monster applying a debuff gains 2 charge stacks), Age.
- Kill Priority: High-ish? I’d take him out first just in case he has access to the aforementioned abilities – Mass Restore in particular would be a day-ruiner.
Dark-shifted Mad Eye
- Weaknesses: Magical damage.
- Resistances: Physical damage, debuff damage.
- Known Attacks: Thunderstorm. Again, never saw him cast anything else.
- Notable Passives: Age, Debuff Mastery (Mad Eye can apply 1 additional stack of each debuff).
- Kill Priority: Low-ish. His thunderstorm doesn’t hit very hard, and you’re gonna be at max stacks of Shock before long anyway. Age is a nuisance in allowing him to live a while, but I never saw him become a threat.
Dark-shifted Qilin
- Weaknesses: Debuff damage.
- Resistances: Water damage, Wind damage.
- Known Attacks: Ice Storm. Never saw him use anything else.
- Notable Passives: Shadow Proc (his attacks get an additional strike)
- Kill Priority: Medium, unless he lands chill on your team early – then low. You mostly just want to avoid that Chill, his damage seemed lackluster.
Light-shifted Salahammer
- Weaknesses: Water damage.
- Resistances: Fire damage.
- Known Attacks: Firestorm, Spark Shower, Teamplay. Theoretically he might have Glorycast or Forge, but I never saw them used.
- Notable Passives: Buff Mastery (this monster can apply 1 additional stack of each buff).
- Kill Priority: Low. Salahammer is one of the strongest buffers in the game, but by the time you kill him, the damage will have been done – he’ll have buffed any monsters with him. Just try to kill him before Catzerker comes out to play.
Dark-shifted Catzerker
- Weaknesses: Earth damage.
- Resistances: Wind damage.
- Known Attacks: Long Slash, Support.
- Notable Passives: Assault Shield (gains a strong shield for each critical hit landed), Bleed
- Kill Priority: Very high. This is the alchemists’ main source of damage, and his shielding makes him troublesome to take out. Focus-fire him down as soon as he enters the battle!
Dark-shifted Toxiquus
- Weaknesses: Wind damage.
- Resistances: Earth damage.
- Known Attacks: Apprentice, Gale
- Notable Passives: Debuff Mastery (this monster can apply 1 additional stack of each debuff)
- Kill Priority: Medium to low. He MIGHT have a heal that I just never saw him use, which would increase his kill priority. You can’t prevent him from casting Apprentice, and that’s his main threat – gale doesn’t do much of anything to harm your team.
Fight Overview: Zosimos

One of the more difficult encounters, Zosimos Round 2 causes a lot of grief and strife for new/casual players.
Looking at his team, we see that, like the first fight with Zosimos, physical attackers are going to have a bad time against his lineup. We further see some debuff resistances and some water resistances, meaning Chill/Congeal is also going to falter some in this fight. Also of note is that his team grows more threatening the longer they live, due to Age stacks, and many of them possess the ability to clear buffs off of your monsters.
Further, his opening lineup is brutal – Grummy and G’rulu will apply a TON of regeneration stacks on their entire party every turn (to an easily-achieved maximum of five stacks!!), and his Mad Eye is both applying a lot of Charge stacks to pump up damage and applying a ton of debuffs itself. Even worse, the Elderjel that comes out next hits like a TRUCK, meaning your team (with all the Armor Breaks that a G’rulu can wish for) is going to get hit HARD when it appears. The last two monsters, Nautilid and Mega Rock, are much less of a problem, from what I remember – getting through Zosimos’ opening and back-up salvos are the key to winning this fight.
However, all that said, he’s definitely beatable. His Grummy takes a ton of damage from Burn – a single application, boosted by some debuff-strengtheners, can out-pace its regeneration! And if you can kill his Grummy early, his team kinda crumbles apart.
Monster Overview
Light-shifted Mad Eye
- Weaknesses: Magical damage.
- Resistances: Physical damage, Debuff damage.
- Known Attacks: Thunderstorm, Voltage, Firestorm.
- Notable Passives: Age, Cleanse, Supremacy.
- Kill Priority: Comparatively low. Despite the Age stacks that beef him up over time, he’s probably the 4th priority to kill, behind Grummy, Elderjel, and G’rulu. He doesn’t hit as hard as those monsters, and aside from Burn, his debuffs aren’t as threatening as the Multi-stacked Armor Breaks coming from G’rulu and Grummy.
Dark-shifted Grummy
- Weaknesses: Fire damage.
- Resistances: Water damage.
- Known Attacks: Acid Rain, Restore.
- Notable Passives: Age, Debuff Mastery, Cleanse, Remuneration, Shared Regeneration, Multi Regeneration.
- Kill Priority: Oh so high. His Acid Rain hits very hard, and his Restore heals for a huge amount in addition to clearing your precious debuffs. Also, he’s kinda squishy, despite his enormous regeneration.
Light-shifted G’rulu
- Weaknesses: Wind damage.
- Resistances: Water damage.
- Known Attacks: Acid Tempest, Restore, Solar Burst.
- Notable Passives: Age, Cleanse, Curse Resistance (debuffs are 50% less effective against him), Remuneration, Shared Regeneration, Multi Armor Break, Multi Regeneration.
- Kill Priority: Moderate. He’s got Age, he takes forever to kill with debuffs due to Curse Resistance, and he both applies TONS of Armor Breaks to your team and clears debuffs off of other monsters with Restore. Were he squishier, he’d be threat numero uno, but the effort of focus-firing him down isn’t worth the returns compared to obliterating Grummy.
Dark-shifted Elderjel
- Weaknesses: Neutral damage.
- Resistances: Water damage, Debuff damage.
- Known Attacks: Thunderstorm, possibly Whirlpool, some sort of Fire spell (probably Heat Shimmer).
- Notable Passives: Age, Mana Conflux.
- Kill Priority: Oh so high. Despite favoring an AOE, he simply hits so hard that he’s gotta be killed ASAP, especially since, with Age, he gains more strength the longer he’s alive.
Dark-shifted Nautilid
- Weaknesses: Wind damage, Debuff damage.
- Resistances: Physical damage.
- Known Attacks: Slime Shot, Acid Rain. He’s also got a Wind attack, but I never saw him use it.
- Notable Passives: Age, Debuff Mastery, Blind.
- Kill Priority: Low. He’s annoying, what with the blinds and the double-stacks of Poison, but everything else presents a larger actual threat to your team.
Dark-shifted Mega Rock
- Weaknesses: Fire damage.
- Resistances: Earth damage.
- Known Attacks: Fiery Punches. He’s also got an earth attack, but I never saw him use it.
- Notable Passives: Age, Shadow Proc.
- Kill Priority: Low-ish. More of a threat than Nautilid, less of a threat than… everything else. His Fiery Punches are probably enough to spell the end of any fire-weak monsters you may have, so beware of that.
Fight Overview: Chymes

(Screenshot isn’t my own – I forgot to screenshot Chymes and Marduk. Grabbed those two fight screenshots from Youtube “Let’s Play” video playthroughs by Tran Plays)
The Chymes fight is going to be a bit different for every player – he uses the three spectral familiars that were not selected by the player at the beginning of the game. Because I personally selected Spectral Toad, I don’t know what abilities Chymes’ version uses.
That said, I personally felt that the majority of the challenge against Chymes came from his first three monsters – that lineup is a pretty solid one.
Further, Chymes’ team is entirely comprised of Spirit-typed monsters, with the tribal buffs to go along with them, meaning he’s got synergy in spades. This makes the fight all that much tougher – they apply tons of buffs to one another, get huge amounts of shields in the process, and those buffs are stronger per application.
Finally, the Chymes encounter is almost guaranteed to get 3-4 stacks of Chill on each of your monsters at a rapid pace. You’ll need to bring along a substantial amount of debuff purging and/or stack extra mana regeneration on monsters, especially ones that need to use high-cost abilities without lower-level alternatives (e.g. Magmapillar’s Fire Shield).
Monster Overview
Light-shifted Frosty
- Weaknesses: Wind damage.
- Resistances: Fire damage.
- Known Attacks: Safecast, Chill Wind, Ice Storm, probably Shield and/or Ice Shield.
- Notable Passives: Probably every shield passive in Frosty’s trees, Multi Chill, Buff Mastery, probably Spirit Strength (buffs are 15% more effective on spirits).
- Kill Priority: High. If you don’t drop Chymes’ Frosty, you probably won’t be able to reliably/easily kill his other monsters, due to the sheer amount of shields that Frosty provides in this fight. The chill stacks are a huge problem, as well.
Dark-shifted Specter
- Weaknesses: Magical damage.
- Resistances: Physical damage, Debuff damage.
- Known Attacks: Spectral Wave, Dexterity.
- Notable Passives: Congeal, Debuff Mastery, probably Fatal Upkeep, Trickster Spirit (whenever a Spirit applies a buff, they get a shield).
- Kill Priority: Very high. This guy’s damage is through the roof, and his Trickster Spirit passive allows Frosty/himself/Sycophantom to get HUGE amounts of shields.
Light-shifted Sycophantom
- Weaknesses: Fire damage.
- Resistances: Wind damage.
- Known Attacks: Chill Wind, Snow Veil, Restore, Psychokinesis.
- Notable Passives: Cleanse, Trickster Spirit (again!), Blind, Holy Presence (any allied monster using a buff action applies another, random buff).
- Kill Priority: Moderate to High. Another user of Trickster Spirit, applying tons of shields to buffing monsters. He also applies chill, hits fairly hard, and has Restore, which allows him to cleanse debuffs of his allied monsters.
Dark-shifted Lion
- Weaknesses: Wind damage.
- Resistances: Earth damage.
- Known Attacks: Firestorm.
- Notable Passives: Heroic Assault (gains critical chance the more buffs he has), Multi Burn.
- Kill Priority: Moderate to High. His Firestorm hits pretty dang hard, and Multi Burn makes repeat castings of it a problem. But he’s less threatening than Specter and (if applicable) Eagle, though I’d still try to take out Frosty first if possible/applicable due to the Multi Chill and shielding threats.
Dark-shifted Spectral Eagle
- Weaknesses: Water damage.
- Resistances: Fire damage.
- Known Attacks: Thunderstorm, Explosion, possibly/likely Thunder Strike.
- Notable Passives: Dual Wield (his attack/magic stats are through the roof), Phoenix Affinity (doesn’t die the first time he dies), Multi Shock.
- Kill Priority: Maximum Prejudice. Spectral Eagle is easily capable of one-shotting your monsters (sometimes even with his AOE!!). He’s gotta go down hard, fast, and without mercy. For players torn on what spectral familiar to take, Eagle is a viable choice JUST so you don’t have to face him here.
Dark-shifted Spectral Wolf
- Weaknesses: Earth damage.
- Resistances: Wind damage.
- Known Attacks: Ice Storm.
- Notable Passives: Assault Shield (any time he crits, he gets a shield), Multi Chill, Age, probably others.
- Kill Priority: Low. By the time you get here, you’re probably already fully chilled, and Spectral Wolf simply doesn’t hit as hard as the other monsters in Chymes’ party.
Fight Overview: Marduk

(Again, image is from a screenshot of Tran Plays’ Let’s Play series of Monster Sanctuary).
The final duel.
And, because it’s not the final BATTLE, it’s actually kinda easier than the last two duels you’ve encountered.
This fight consists of two 3-monster teams. The first is an Occult team, comprised of Mad Eye, Sutsune, and Asura. The second is a Dragon team of Dracogran, Dracozul, and Draconoir. The Occult team has zero synergy with the Dragon team and vice versa, meaning one potential key to victory is to prevent the Dragons from appearing with one another as much as realistically possible.
The BIG threat in this encounter is, surprisingly, the Sutsune. She provides the primary buff stealing mechanic for Marduk’s team, buffs her team with annoying buffs, and both heals/purges debuffs from her entire team at once and steals your buffs with her own attacks. Once she’s down, the opposition will no longer fuel themselves with your own buffs, and they have no further methods of removing debuffs from themselves (I think), allowing you to progress semi-smoothly through the rest of the fight.
Monster Overview
Dark-shifted Mad Eye
- Weaknesses: Magical damage.
- Resistances: Physical damage, Debuff damage.
- Known Attacks: Acid Tempest, Spore Cloud.
- Notable Passives: Age, Debuff Mastery, Hex, Cleanse.
- Kill Priority: Veeery low. You actually want this guy, as annoying as he is, to stay alive for a little while – his presence keeps the Dragons from teaming up against you.
Light-shifted Sutsune
- Weaknesses: Earth damage.
- Resistances: Fire damage.
- Known Attacks: Quicken, Mass Restore.
- Notable Passives: Buff Mastery, Buff Steal, Cleansing Sidekick, Multi Sidekick, probably Assistance.
- Kill Priority: Maximum Prejudice. The sooner she’s dead, the less powerful the opposing team will be from commandeering your buffs.
Dark-shifted Asura
- Weaknesses: Water damage.
- Resistances: Fire damage.
- Known Attacks: Fiery Punches, Flurry of Blows, Blessing.
- Notable Passives: Dual Wield (his attack stat is extra high)
- Kill Priority: Moderate to High. Asura hurts, and is squishy. You just don’t want to kill him in such a way that both Dracogran and Draconoir appear at the same time.
Light-shifted Dracogran
- Weaknesses: Physical damage.
- Resistances: Wind damage, Fire damage.
- Known Attacks: Heat Shimmer
- Notable Passives: Equipment Mastery
- Kill Priority: Very High. Dracogran’s Heat Shimmer is potentially powerful enough to one-shot-kill a fully-shielded monster, especially one weak to fire. The more buffs he gets, the more of a threat he becomes.
Dark-shifted Dracozul
- Weaknesses: Physical damage.
- Resistances: Water damage, Wind damage.
- Known Attacks: Iceclaws, Chill Wind, Dragonskin, Quicken.
- Notable Passives: Blacksmithing (improves the stats of other monsters in the party), probably Dragon Mastery, Multi Chill
- Kill Priority: Surprisingly Low. While he buffs the crap out of his fellow dragons, he’s not the one actually one-shotting your party members (though he definitely contributes to the others’ capability to do so). That said, the more AOEs you can safely perform while killing Dracogran/Asura, the better – if you can kill Dracozul along with one or both of those two, it makes Draconoir substantially less threatening.
Light-shifted Draconoir
- Weaknesses: Physical damage.
- Resistances: Earth damage, Neutral damage.
- Known Attacks: Shadow Storm, Soul Beam.
- Notable Passives: Equipment Mastery (again, higher stats than normal).
- Kill Priority: Maximum Prejudice. Shadow Storm hits like a truck AND applies a blind on your party, reducing your damage output and debuff application potential.
Final Notes
There are a couple potential ways to control your opposition on this fight – because the synergies of the second 3 monsters are so high with one another, you want to leave alive any monsters you SAFELY can from the first three to avoid the Dragons from pairing/tripling up on you.
The first is to simply focus-fire them down as best you can, in the order of Sutsune, Dracogran, Dracozul, Draconoir, Asura, and Mad Eye.
The second is to kill Sutsune, then try to use AOEs to kill Dracogran/Mad Eye/Asura as close to one another as possible so you only face 2 Dragons at once at the end.
Asura may hit hard, but Dracogran and Draconoir both hit harder, ESPECIALLY if they have support from Dracozul. You want to do your absolute best to avoid Dracozul appearing with either of his buddies.



Be the first to comment