
A collection of tips and hints to help you complete the Deadly Decadence level of Dark Deception.
Tips and Hints to Complete the Deadly Decadence Level
The Hedge Maze
Map of the Hedge Maze
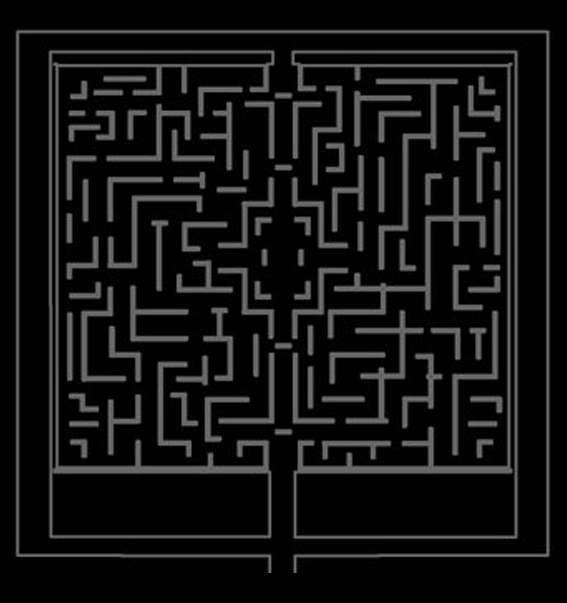
What makes the hedge maze most tricky is the amount of dead ends that there are, plus the traps. Here are my tips and hints whilst you’re moving around the maze.
- If possible, position the two Gold Watchers in the maze close to you, ideally in front. This lets you move through the maze while looking at them, keeping them still. They stay still as long as you look in their general direction, even without a direct line of sight.
- Listen to the traps. After the clang of the spikes going up, there is a few seconds in which you can run over them before the get reset. You’ll know when the reset as there is a distinct metallic click before the spikes are raised. If in doubt wait a little while to allow you to distinguish between the sound cues.
- Move slowly around the maze. There is no rush, taking your time is the best way to avoid unnecessary deaths to traps.
- Start collecting shards on one side of the maze first then the other side. This will allow you to easily and comfortably collect the shards whilst also keeping your direction towards the Gold Watchers.
- Once all the shards are collected, the Gold Watchers in the hedge maze will disappear allowing you to casually and safely travel through the maze (and past the traps) to get to the Manor.
The Manor
Map of the Manor
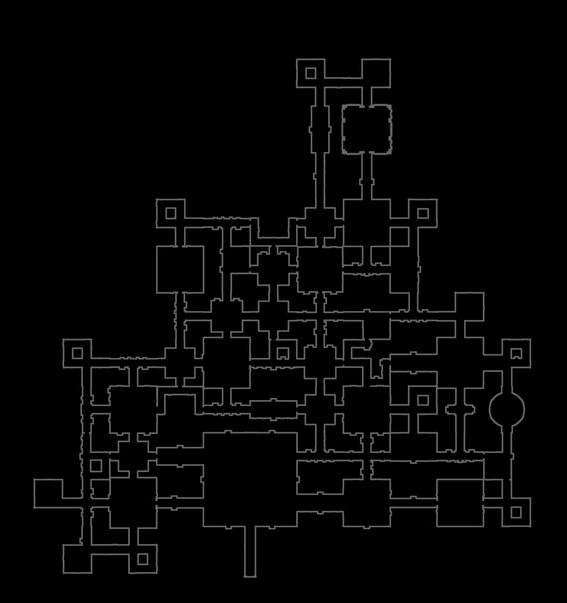
The Manor is the most difficult part of the whole Deadly Decadence level so don’t feel disheartened if it takes a lot of attempts to complete it. You will complete it, it may just take a bit of time and patience. With that in mind, here are tips for the Manor;
- Once you pull either lever on the second floor, you’ll need to pull another lever further in the stage. It’ll be inbetween two sets of spike traps and will be required to open up the gates on the other side of the second floor.
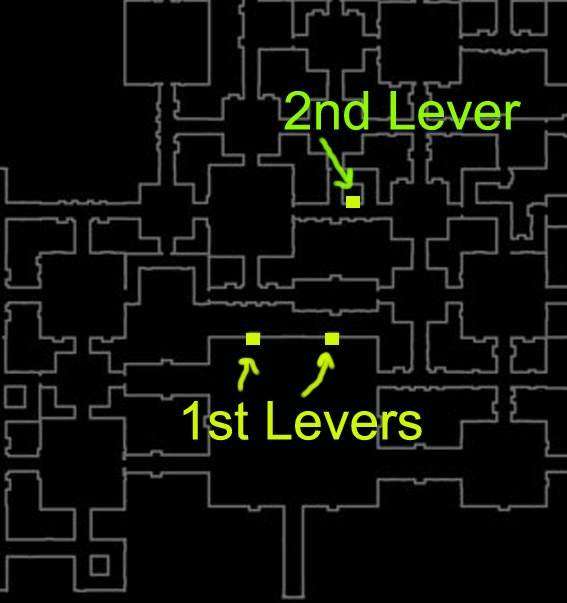
- There are 4 Gold Watchers active during this part of the level and they will actively try to cut ahead of you. It is possible for you to maintain distance from them by running away from them at normal speed (not boosting).
- Boosting is best avoided here unless you have a long corridor with no traps or can time using it to avoid traps.
- There are 3 secrets in the manor; one is a secret room which will stop the Gold Watchers moving and they cannot get into the room whilst you remain inside. Use this room to recharge your powers and/or to plan which route you’re going to collect shards (see Manor Secret Room for map reference).
- Stun orbs are useful to collect shards from a room where there are 4 lots of 4 shards on top of spike traps (the shards themselves are not on the spike traps). Though another tip for this particular room is to keep yourself looking at the Gold Watchers direction, waiting to hear the sound cues of the traps then quickly collecting the shards 1 trap at a time. You can use boost but you can also easily not use it. Using this strategy you’ll normally have enough time to collect the 4 shards then position yourself ready to collect the next 4 shards when the trap next finishes triggering.
- Enemy revealed shards are useful to see where the Gold Watchers are, to allow you to plan ahead if you see 1/2 Gold Watchers trying to cut across your planned path.
My Strategy
I ran away from the Gold Watchers (without boosting) and used the teleport to teleport past any Gold Watchers in my path and past traps if I felt like I may run into them (it was my failsafe to get past long strips of spike traps and through the rooms with the swinging axes if I was being chased).
Manor – Secrets
There are 3 secrets found within the manor, they are as followed:
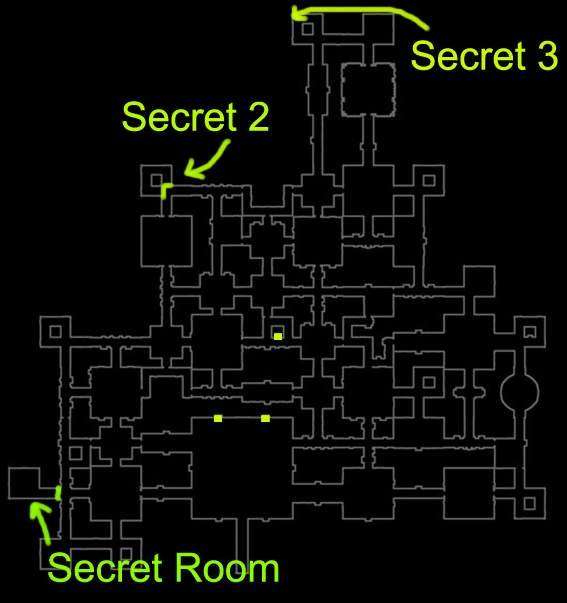
Secret Room (Secret #1)
Clicking on a wall near the bottom left hand side of the map is where this secret is found. Whilst you are inside the room, Gold Watchers cannot move nor enter the room, which allows you to recharge powers and plan your next course of action.

Secret #2
This secret requires you to click on two walls to reveal. The room to the right is an outside axe room.
Secret #3
This secret doesn’t require you clicking on any secret wall/door. The room to the left hallway is a room of statues. Bierce apparently will comment on the room so you’ll know you’re in the right place.
Manor Ending
After collecting all Shards
After collecting all shards the Gold Watchers will not despawn like they did in the hedge maze and will be equally wanting your demise. Malak will also spawn to chase you down.
Be careful when returning to the Ring Altar as there are multiple Gold Watchers around it or on the stairs waiting to get you. Use your teleport to jump past them and quickly grab the ring from the Altar. As soon as you grab the ring, all enemies despawn and you can leave the manor.
The Last Secret (Secret #4)
The last secret in this level is found on the left side of the hedge maze. Don’t worry, you don’t have to go back into the maze and you haven’t missed it.
On the left side of the maze as you exit the manor, you’ll find a gate you can open. Proceeding further down you will come across a few spike traps. Beware you are not alone, there is a Gold Watcher down this path (for me he appeared in front of me after I grabbed the folder and went to return to the manor). Luckily he’s the only one so he’s pretty easy to avoid.
Escaping to the Portal
Once you have completed the Manor, you’ll be placed outside. Luckily you won’t have to go through the hedge maze again.
Secret
- If you are looking for the secret from the hedge maze, this is a perfect time to collect it. Go to the left side gates, through a few traps, to find the secret. Beware: there is a Gold Watcher down this path.
The right side gates lead you back to the section before you entered the maze. During this part, there is a thick fog that obscures your vision and Malak will continue to chase you so be aware that he will be in front of you, as well as many Gold Watchers.
When approaching the gate, Gold Watchers might be nearby. Get as close as possible to the gate while looking at them, then click the gate. I used a boost to click the gate, move away from Malak, and then go through. There’s another gate to open, but it opens quickly.
As you pass through the two gates and down the stairs towards the portal, there will be Gold Watchers surrounding the portal and Malak, once again, will be close. Lure the Gold Watchers far enough away from the Portal and then use the teleport to jump into the portal thus finishing the level.


Be the first to comment