
This guide will help you to understand the game mechanics and more in general.
Guide to Basics
Overview
Bulwark is about the enjoyment of building your own settlement. As it grows, your population will increase alongside it, and as it does this, you will unlock people and events that will improve your settlement further.
You build on the Ursee, a bleak ocean world filled with strife and factional resentment after a 40-year war. You represent a ragtag group of refugees wishing to rebuild, but as your settlement grows you may find people from other factions wishing to join. This will open new options, both to grow and to meet other settlements, opening the option to trade with them.
There is also the option to conquer the world through conflict and war. At its core, this is a building sandbox, and the way forward is up to you. The choice is yours.
Goals
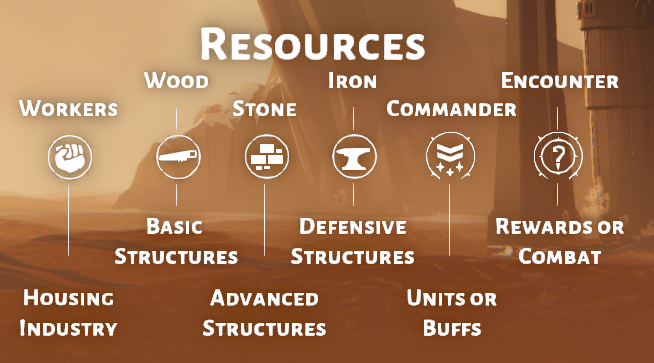
You will need the four Ursee resources to gain access to all building options, these are; workers, wood, stone, and iron.
Their function is fairly straight forward:
- Workers bring life to your settlement, and most importantly, they enable your extractors to produce the other resources listed below. Outposts produce workers. Outposts can later be upgraded into citadels, to produce even more workers!
- Wood enables you to build wooden towers and walkways at your leisure in order to expand your settlement.
- Stone unlocks the ability to upgrade towers, walkways and outposts. It also allows workers to build better housing that can shelter more people.
- Iron allows you to upgrade outposts into Citadels, and to build command towers that reach high into the sky.
- Commanders can be assigned to command towers that can introduce defensive turrets and battlegroup units.
Resources
Resource Extractors are placed using your surveyor, which go on top of an appropriate wood, stone or iron source that you can find scattered around the world. Resources have only one important stat: distribution range.
For example, a woodmill that produces +4 wood can deliver wood up to 4 buildings away from it. Literal quantities are not relevant, only their distance to deliver.
Every building in your settlement consumes 1 resource, except Command Towers, which consume an additional 1 worker per floor. The number of workers a Command Tower is consuming is displayed above it while in resource view.
If a building has access to all resources, you can freely build without limits at that location. You can expand and build freely up until the resource is out of range.
If an extractor is placed on top of a source of wood, rock or iron, then the resource will deplete.
The number shown around the radius of the source indicates how many buildings can consume that resource before the total amount runs out.

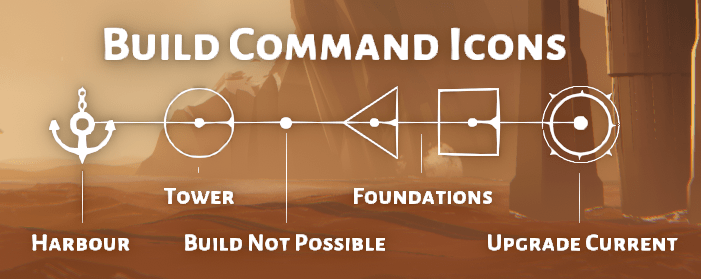
Building
Building in the game is designed to act like a “spoke and wheel”. Buildings act like the centre hub of a wheel, whereby towers are automatically connected using walkways and sky bridges like a spoke. It is also possible to build foundations and balconies that branch out from towers.
Foundations and balconies provide additional space for people to build better houses than they would on the ground.

Commanders also utilise balconies by placing defensive turrets on them. A command tower’s maximum height is affected by its foundations and the access to workers. The more foundations and workers there are, the higher a command tower can reach.
Trade Routes
Ocean-going ships primarily act as transport or combat vessels. You will meet Captains who offer their services in both classes.
Transport Captains will ship one or more resources between two harbours.
Combat Captains will patrol between two harbours and engage any threats in the vicinity of the route.
You can build harbours via the surveyor. Simply drop two, any distance apart, and they will be connected as a pair. Make sure to always place harbours in pairs as the trade route process is automatic.
Command Towers
Command Towers can house some of the Commanders you will meet on the Ursee. These Commanders provide a variety of utility. Most commonly, they spawn units of various classes to add to your battlegroup. Simply fly up to a tower assigned to a Commander and their units will join you. Some Commanders buff resource extractors connected to their tower. Faction Leaders unlock a new set of Captains and Commanders in the Soul Tree.
Random Events
When exploring the world you may encounter buildings, anomalies, and a variety of people. These mainly gain you new Commanders, buildings, random businesses that may populate your settlement, and more. Some of these may lead to hostile encounters as well, especially if you are aggressive to other factions in your actions.
Settlements
Settlements are the remaining other towns and cities on the Ursee, those that survived the war. These aren’t always in the best of shape and all welcome trade from you.
When interacting with a settlement, the screen will show your alignment with the settlement, and their faction, which is the result of your faction alignment. For example, if you have a lot of Bannerless Captains, Commanders and outposts, you will attract a lot of Bannerless population. This will result in a high Bannerless alignment. You may even be identified as a Bannerless settlement if that dominance continues to increase. Settlements respond to your faction alignment. For example, if you’re aligned, you may be given the option to invite them to join your settlement.
The settlement screen also shows intimidation. Intimidation is a military comparison between yourself and their settlement. If intimidation is high, you may be able to force certain options such as a surrendering during a war.

Combat
Combat is fairly straight forward. Your battlegroup will automatically engage any enemy units close to your surveyor and lay waste to them. Once war has been declared they will attack settlement defences as well.
But beware, additional forces may support your enemies during or after combat. The health of your entire battlegroup in comparison to your enemy’s is shown by the health bars during combat.
Your overall battlegroup and each individual units gain experience from every fight, providing them with bonuses to their performance. The total experience of your battlegroup is shown in the inventory. If you lose fighters, your total experience may drop.
If you lose units during a battle, you may gain more by flying up to the Command Tower that houses the Commanders that spawn them, after a short cooldown period. Fresh forces always start off as Rookies and therefore may diminish your battlegroup’s experience.
Map, Soul Tree, and Inventory
The world map shows you where your settlement buildings are. It also allows for fast travel between them, and for giving surveyor destination commands to new, distant areas. The world map also leads to the inventory screen that shows you any constructs (unique buildings) or Resource Extractors you are carrying, all of which can be deployed from your surveyor.
The inventory screen leads to the Soul Tree, which shows you all the Commanders and Captains you have in service per faction. It also shows you potentially free Commanders and Captains, and how much population you need to attract more. You can also dismiss Commanders and Captains from this screen.
Once you have fully unlocked the Soul Tree for a faction, a quest to find a faction’s ‘Wonder’ may appear.

How do you acquire more resource extractors?
AFAIK, there’s a limited number of extractors on the map. Besides the ones you start with, you can get more by getting other settlements with extractors to join you, either by diplomacy or war.
Once a settlement is yours, you can do whatever you want with the extractors – move them or expand their production at their current location. Resources deplete as you expand, so it’s expected that you’ll have to move your extractors around the map in order to expand around new resource nodes more easily.
The number of extractors and trade ships you have at your disposal is the only real bottleneck to your capacity to expand, until you expand so much that you strip the map of all resources.
Also, remember than the getting more extractors is not the only way to get more resources. Building up the area around the resource nodes and assigning commanders that increase production will help you make the most out of the extractors you have.
You find them by exploring resource locations. Suddenly they will have a neutral/enemy extractor and you simply have to take it over. Then you can either keep it there or dismantle it to move it to another location