
This guide will lead you on how to get 100% of the achievements along with providing tips on doing so with minimal effort.
How to Obtain All Achievements
Intro
This guide will not just be a list of achievements and how to get them. Instead I plan to take the games approach of giving you the tools, pointing the way and letting you find out for yourself what happens.
That said, some things will require more instruction to prevent accidents or wasted time and on those things, I will be more straightforward. This will especially go to the tasks that CAN be failed.
I hope you enjoy the guide and let me know in the comments what you thing/what I can improve on.
The Basics – Story Achievements and Alternate Ending
Here is a list of story achievements and as such will have very little said about them beyond that they are part of the story:
- Introductions
- The Key
- They Secret
- The Bond
- The Chains
- The Moment
- Unshackled
The above achievements will be done by the time you complete the game.
You have an in-game map so I won’t provide one here, but the recommended order of going things is
The Marrows > Gale Cliffs > Stellar Basin > Twisted Strand > Devil’s Spine
This will prevent you from not having the necessary tools to proceed easily while doing things but technically you could do them in any order after at least starting Stellar Basin provided you get your upgrades.
Sated
- Complete the game as usual but once you have gotten all of the above achievements, take a trip to the dock in P10 on the map. I believe that any dock with a campfire will do at this point, but P10 is fairly close to The Marrows so it will be a quick trip.
- After talking with the man, return to Greater Marrow and talk with the Lighthouse Keeper. Afterwards, you will have a new option with the Collector.
- Once you’ve taken the new option, talk with the Lighthouse Keeper.
Tip For Easy Game From the Start
This section will make the rest of the game a cakewalk where you never have to worry about selling fish and can instead focus on completing quests and only carrying what you need when you need it.
Easy Money
- Do jobs around The Marrows until you’ve unlocked the Basic Crab Pot at the Fish Market.
- Buy both Basic Crab Pots if you can.
- Go North-East to P12 to find the Charred Pontoon and buy both of their Crab Pots
- Drop the Crab Pots nearby the Charred Pontoon and then rest for 3-6 hours.
- Grab the Crabs, sell them at the Charred Pontoon and buy more Basic Crab Pots if you can.
- Repeat this until you have $4000-5000 and you’ll never worry for money again.
Early Research
I also recommend checking the Shipyard at the Charred Pontoon(or any Pontoon) every time the day changes or to buy Research Parts when they appear. They won’t appear everyday but they can drastically make things easier on you if you can grab a few during this process. If you can’t, no worries.
You can also save > quit > continue the game over and over to make Research Parts appear in the store, but there is no need to do this until after completing all the quests as you will be rewarded for them as well.
Research Order
This is optional, but I recommend grabbing the researches in the following order to prevent sad times later.
Rods: Flexible Fishing Pole > Engines: Improved Outboard Engine > Twin Prop Engine > Rods: Bottomless Lines > Anti-Tangle Line > Fathomless Winch > Heat-Resistant Line > Nets: Improved Trawl Net > Large Trawl Net > Heavy-Duty Trawl Net > Vesatile Rod
After that, finish the engines, then anything you want from there. This order is because it will make it easiest to catch every species of fish in the game as quickly and easily as possible.
Achievements Over Time
These achievements just take time to complete. Play the game and you’ll likely get them done before it’s over and if you don’t you can quickly take care of it after beating the game.
- Lifted From the Deep – Catch 250 fish using rods.
- Trapped by These Walls – Catch 100 crabs in crab pots.
- Tangled in This Web – Catch 150 fish in trawl nets.
- Lives for Profit – Sell a total of $2500 worth of fish.
- Cash for Gold – Sell a total of $1500 worth of trinkets.
- Careless Harvesting – Deplete a total of 25 fishing spots.
- Unwanted – Discard 25 fish.
So catch a lot of fish and crabs manually, catch fish automatically with net, sell fish, dredge up trinkets and sell them and fish spots clean. No extra instructions necessary but I’ll give some tips on how to do this faster.
- Small fish mean you can fish faster and more of them, so The Marrows are a good spot especially once you’ve maxed out your boat and you can discard them in large quantities as well.
- Stellar Basin has both the smallest and the biggest crabs. Once you have the best crab pots, this is cake to do in either The Marrows or Stellar Basin.
- Sell from your trawl net often and you’ll earn that money fast as well as get the fish needed fast.
- Trinkets are all over so whenever you get one, put it in your storage at any dock and then retrieve it to sell once you’re in Little Marrow.
- Big fish have low numbers and are easier to deplete. The ocean has a lot of big fish species like sharks.
Upgrades People, Upgrades!
These achievements come from upgrading your boat and so only require money and a lot of dredging to complete easily.
Hull Upgrades
Performed on the drydock, you’ll need to dredge up a lot of materials for the upgrades, but if you did the tip to make money, you should be able to just store all the materials in their upgrade locations and finish once you have the materials.
- Hull: Improved
- Hull: Refined
- Hull: Advanced
Other Upgrades
These kind of go hand in hand with the Hull Upgrades but may also require some extra research be done into Engines and Rods. The light can be bought from the store directly once you have 3 light slots.
- Swift Reaper – Combined fishing speed of 200%.
- No Time to Linger – Combined engine speed of 75kn.
- Light Up the Night – Combined light strength of 3000 lumens.
Research
Possibly the most time consuming achievements in the game. All they take is Research Parts but the story and quests don’t even give you half of the required Research Parts to complete.
- Researcher: Rods
- Researcher: Engines
- Researcher: Pots
- Researcher: Nets
Easy Research
The easiest way to do this is to get a bunch of money Crab Fishing in Devil’s Spine then follow these steps.
- Go to any Pontoon in any of the areas.
- Check the Shipyard for a Research Part and buy it if it’s there.
- Save and Quit the game and then Continue.
- Check again and repeat this process until you have all the research done.
With Great Power Comes Great Fishing Ability
These are all pretty easy once you’ve gotten the abilities from the story.
- From the Fog – Use your Foghorn ability at night within the fog until you hear a horn call back to you.
- Prey Sighted – Use your Spyglass to see a Coastal, Shallow, Oceanic, Abyssal, Hadal, Mangrove and Volcanic fishing spot. Just use the spyglass in each area and you should get the achievement pretty easy.
- Mixed Results – Use Mixed Bait pretty much anywhere. You need 3 different species of fish to be attracted so rarely you may need more than one bait.
- Cruel Heat – Keep Haste meter above 50% for 10 seconds. This is easy if you just tap Haste quickly then slow down on tapping it when it gets close to 100%.
- Dimensional Bypass – Use Manifest when you are at any of the other 4 fishing locations. Great way to return with a Relic.
- Banisher – Whenever you see danger coming your way, activate Banisher. After you Banish 10 threats you’ll get the achievement.
- Unsustainable Fishing – Use Atrophy when you are nowhere near a fishing spot.
Easy Stuff To Finish
This stuff is easy and you may have finished it naturally but if not then here is how to do so.
- Feeling Prepared – Put Lights, Engines and Fishing Rods/nets into all of their available equipment spaces.
- Perfect Packing – Fill up your cargo hold. Fill it with big fish then use small fish and trinkets to finish filling the empty spaces.
- Safe Havens – Visit every dock in the game. There are obvious ones on the map and 4 campsites.
- Gale Cliffs – South Side
- Stellar Basin – East Side between Gale Cliffs and Stellar Basin
- Twisted Strand – I believe in you. F15 on the North Side of the northernmost island.
- Devil’s Spine – North Side
Medium Stuff to Finish
This stuff is a little more difficult but nothing too bad.
- Servant of the Shrines – Solve the fish shrine puzzles. All fish listed can be caught nearby with one exception.
- J9 – x5 Cod
- D13 – Any Abberation. Atrophy makes this easy.
- O14 – x2 Serpentine Mackerel
- P3 – x2 Rock Crab and x1 Decorator Crab
- H2 – x1 Bronze Whaler, x1 Blacktip Reef Shark, x1 Hammerhead Shark and x1 Ghost Shark. Bronze Whaler is in ocean near The Marrows during day, Blacktip Reef Shark in same area at night. Hammerhead is in ocean near Stellar Basin. Ghost Shark is in Devil’s Spine.
- Providence – Complete or Fail all Side Quests
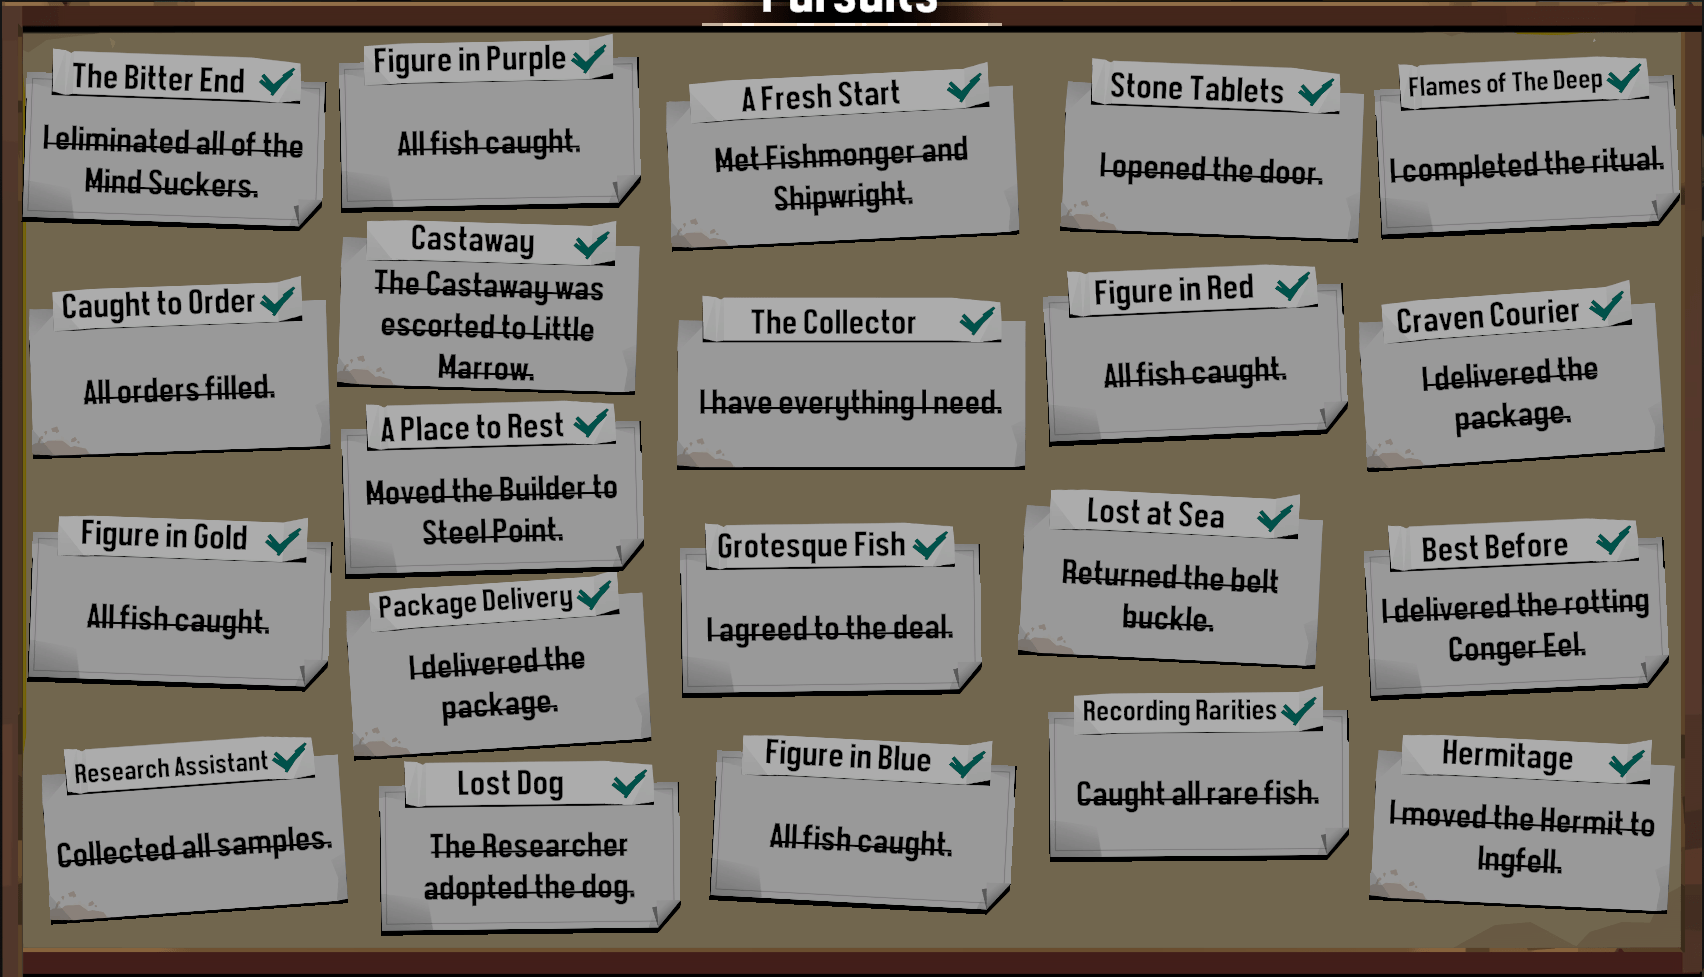
- The Bitter End, A Fresh Start, Flames of The Deep, Caught to Order, The Collector, A Place to Rest, Package Delivery, Grotesque Fish, Lost at Sea, Best Before, Research Assistant, Recording Rarities and Hermitage will be encountered during the course of the story.
- Lost Dog – Find the dog at F2, you will hear him barking, and bring him to the Researcher.
- Castaway – Find SOS camp at L10 and bring the Castaway to Little Marrow.
- Craven Courier – Talk with the boat in I10 and bring the package to Little Marrow.
- Stone Tablets – Dredge the 3 tablets located in N14, P13 and Q13. After dredging them, take them to the Trader in Little Marrow and take the tablet he gives you to the Ancient Lighthouse in O15
- Recording Rarities – Catch the Oarfish in Gale Cliffs, behind the Waterfall in P3. Catch the Gulper Eel in Stellar Basin in F4. Catch the Goliath Tigerfish in Twisted Strand in E12. Catch the Coelacanth in Devil’s Spine in Q12. You’ll need Abyssal, Hadal and Mangrove rods to catch them all.
- Figure in Blue, Gold, Purple and Red – Go to M7, K2, E10 and L14 to talk with the Figures and discover what fish they want. You’ll need Coastal, Shallow, Oceanic, Abyssal, Volcanic and a Crab Pot to catch all of their requested fish. Don’t even talk to them until you have these and the means to travel quickly because their quests can be failed.
The Big One And The Other Big One
Now with all the other stuff out of the way, you should be mostly finished with these but it’s time to finish them off.
- Master Angler – Catch all species of fish
- Aberration Attractor – Catch all aberrations.
The List
- The Marrows – Fish 1 – 12, Aberrations 68 – 85
- Gale Cliffs – Fish 13 – 23, Aberrations 86 – 96
- Stellar Basin – Fish 24 – 39, Aberrations 97 – 109
- Twisted Strand – Fish 40 – 47, Aberrations 110 – 115
- Devil’s Spine – Fish 48 – 56, Aberrations 116 – 121
- Open Ocean – Fish 57 – 63, Aberrations 122 – 128
- Exotic – Fish 64 – 67
How to Catch
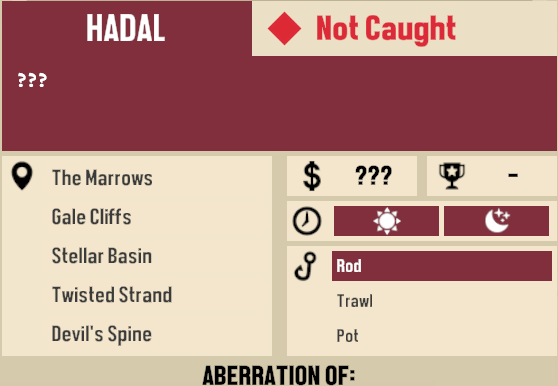
Using the picture above, I will explain how to read the information to catch the specific fish you want.
- Where it says Hadal, that is what fishing method you will need. Crabs instead say Depth and that will determine what depth is needed to catch them when dropping the pots.
- Where it says the locations on the map, that is where you will find it. An absence of location like this one means it is in the Open Ocean and can be found anywhere that isn’t anywhere else.
- Where it has a clock tells you at what time of day it can be found. Day is 0600-1800 and Night is 1800-0600.
- Where it has the fishing hook, that is what method you need to use to catch it. Trawls are passive so always use the correct trawl while hunting the other fish in a given area.
- Where it says ‘Aberration Of:’, it could also say Aberrations:. I recommend looking at it area by area when fishing to grab all the aberrations of that area before leaving.
The Easy Method
An interesting thing is that if you catch an aberration, it counts as the regular species as well. With that in mind there is an ability that will help get both achievements at once. Atrophy. It looks scary in it’s description but Atrophy will help you fly through this achievement.
- Pick an area.
- Drop a bunch of Crab Pots at the depths needed for all crab species in the area.
- Equip the appropriate Trawl for the area and let it into the water.
- Pick a fish you don’t have in your encyclopedia.
- Find the fish you are looking for, the scope will help as will using Mixed Bait in the area as it draw in all types randomly from the area.
- Get next to the fish and use Atrophy. If using Mixed Bait, fish from the bait until the fish you want appears and then use Atrophy.
In my experience, Atrophy has a good 75% chance of getting you at least 1 Aberration when used. By dropping a bunch of Crab Pots, you can catch all the needed crabs and they never have Aberrations. And by using the appropriate Trawl while you search for the other fish, you have a higher likelihood of catching the Aberration of the fish you want.
I was going to aim for a 100%…..until one of the figures died. Didnt even know it was a timed non repeatable quest. That is so shit. Poor game design choice.
Any miss-able achievements?
As far as I understand, no. Even the stuff you fail to do, like the side quests, counts towards the achievement.