
Pact
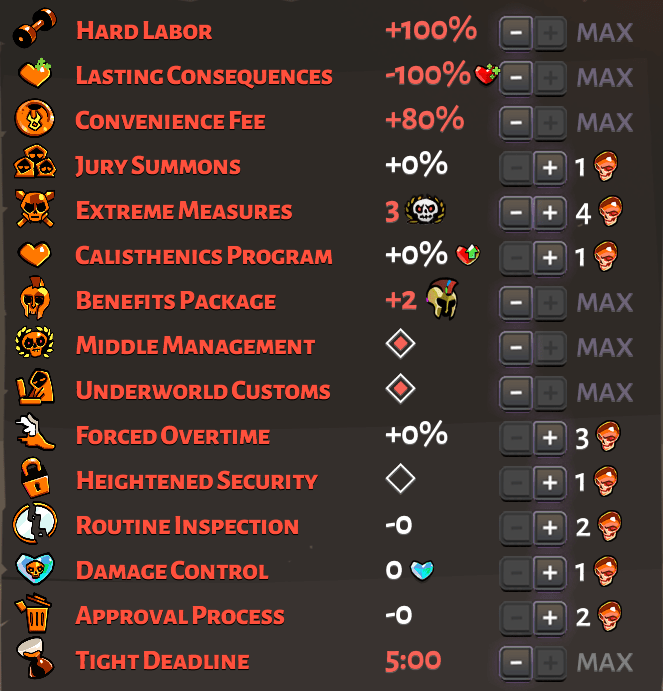
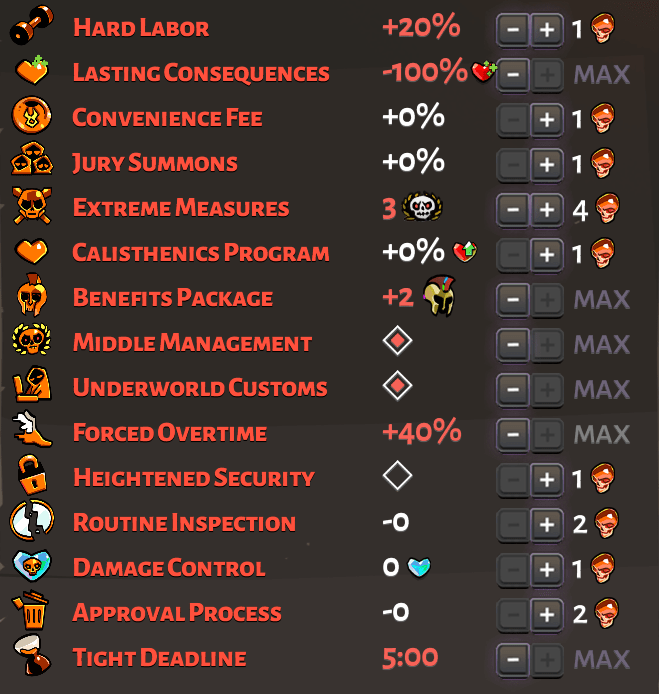
I’ll go over the pact first because getting that heat number to show 32 is the main goal here. There’s a bunch of different pacts you can take at 32 heat. Some are going to be much easier than others. These are 2 variants that are pretty consistent. You’re free to modify the pacts below or use your own, but these two have seen the most consistency.
I’ll go more in depth about certain pacts, but everything else that doesn’t have a specific section is more or less considered “free heat” and is just something you should take on every pact.
The end of this section will have a subsection for working your way up to 32 heat, since not everyone is at this point yet. I will go more in depth about this in that subsection.
I’ve made some pacts for Hell mode, but I’ve never done Hell mode at 32 heat so these are just guesses. Take these next 2 pacts with a grain of salt.
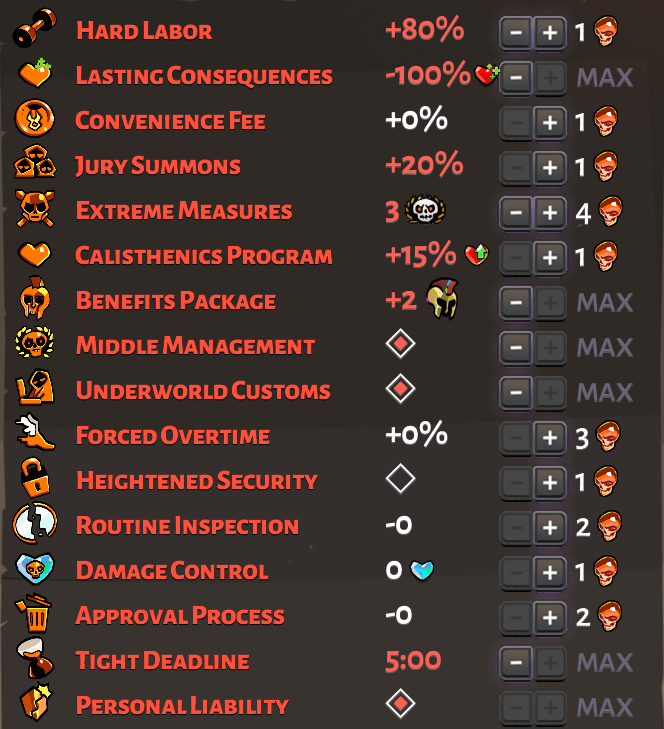
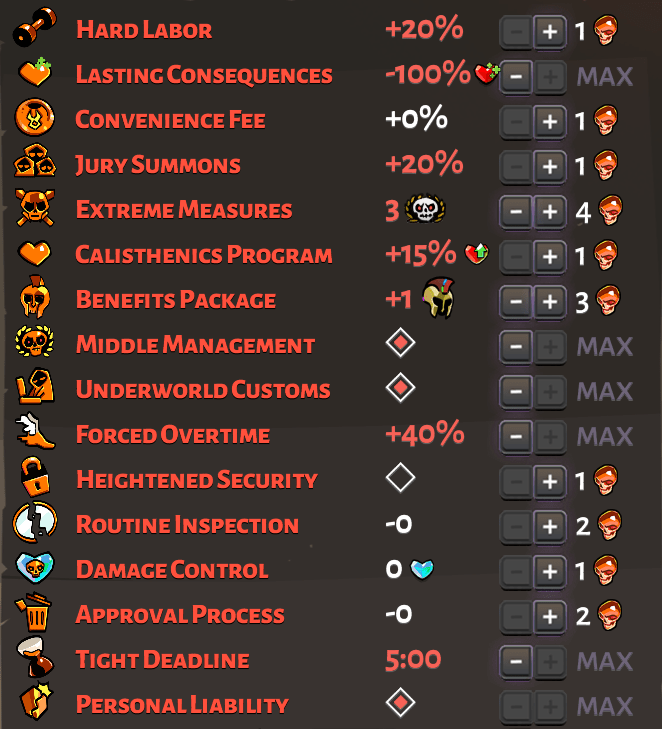
Hard Labor vs Forced Overtime
This choice really depends how comfortable you are with Forced Overtime 2 (FO2). If you can handle the 44% increased attack, movement, and projectile speed (speed is multiplicative lol), then you can take it if you want. On the other hand, you can also not take FO2 and take Hard Labor 5 (HL5) and Convenience Fee (CF2). Basically, either get hit less but get hit harder, or maybe get hit more often for less damage.
Lasting Consequences 4
This seems extremely odd and punishing, but it’s not as bad as it seems. With Lasting Consequences 4 (LC4), you want to take Stubborn Defiance (SD) over Death Defiance (DD) in the mirror. SD is basically a DD that refills at the end of every room, and whenever you die you heal back up to 30%. At this point in the heat levels, the normal rooms are potentially more dangerous than boss fights. Benefit Packages 2 and FO2/HL5 can make for some nasty combos in the normal rooms. LC4 SD gives a lot of room leniency, since you don’t have to save anything for a boss fight other than yourself. You just have to make sure you don’t die as a whole. Boss fights are much more consistent and not as random compared to the normal rooms. Whenever a room ends or is about to end and you haven’t used your SD yet and you’re under 30% hp, have an enemy kill you or die to a trap/magma to restore your hp back up to 30%.
There are ways to give yourself more than 60% effective hp. Touch of Styx from Charon Wells and Touch of Styx Dark from Patroclus makes SD heal for 10% or 50% more hp for 15 encounters, respectively. Because of this, you always want to take Patroclus whenever you see him. If you have the prerequisites, you can get Athena’s DDs, which will be used after SD. Pop your SD before picking up an Athena boon, and if you get one of her DD refills, it’ll carry over. Stacking these can end up to really easy boss fights. If you’re lucky enough to get a Chaos DD, it’ll work as a normal DD and be used after your SD.
If you really don’t want to use LC4 SD, I have seen Haelian use LC2 and Approval Process 1 (AP1) with DDs. I’ve never tried this myself, since I despise AP1 and it’ll make getting the build you want a lot more inconvenient. I think this pact might be easier if you have a good amount of skill and experience to work with what you get (and won’t get).
Tight Deadline 3
This seems hard at first, but with enough practice it is very doable. Getting under this time mainly boils down to a good mirror, pact, and build. Taking pacts that add time will obviously not help towards getting under 20 minutes, which I will go more in depth in the next section. I will go into the mirror and your build later. Just know for now that taking meta picks will drastically increase your DPS and therefore reduce your time.
I have seen some pacts take Jury Summons 3 (JS3) with Tight Deadline 2. I personally don’t like this, but some heat runners prefer it, even at 40 heat, because it gives them more of a time cushion. This is more difficult IMO because it means you need to have more efficient room clearing and have to take more free rooms like Chaos, Midshop, and Story Rooms. I wouldn’t recommend this for a first 32 heat, but you can consider this if you want.
I know speedrunning and heat are completely different things, but it is worth mentioning that being good at one of those can translate pretty well into being good at the other. Knowing and practicing speedrun tactics can make getting under Tight Deadline 3 (TD3) more manageable. It also trains you with FO2, which leads to higher reaction times, which means faster room clearing.
Pacts to Not Take
Most, if not all, of these are bad because they add time to your run. Since we want to be running TD3, we don’t want to take pacts that take more time. The pact choices with * at the end indicate that I have already mentioned them previously as alternatives.
- Convenience Fee (CF)*
- Shops being more expensive are a lot more harmful than they seem. In the HL5 pacts, they all take CF because it needs filler heat, and this is the least harmful things for 1 heat. There are some other aspect dependent filler heat, which will be mentioned later.
- Jury Summons (JS)*
- More enemies = more time needed, pretty straight forward. TD2 JS3 is an option like I said before, but that’s personal preference.
- Extreme Measures 4 (EM4)
- Takes way too much time. A whole extra third phase means you need a bigger cushion for the end and a cleaner fight. It’s also an extremely difficult fight and considered extremely anti-melee. Even with full DDs, you might not even win the fight, and DDs are amazing for boss fights. This pact also isn’t considered until 50+ heat, so don’t take it at 32.
- Calisthenics Program (CP)
- Every enemy having more hp means you’ll need more poms or a higher rarity to hit break points. Each extra hit you have to make means more time you’re wasting. Also, bosses have a massive health pool, and giving them 15% more (per rank) will increase that time. For context, CP1 gives Hades 2.5k more hp per phase, so a total of 5k hp. Not fun, so stay away from this.
- Heightened Security (HS)
- Seems like free heat, definitely not. “Just don’t hit the trap” is a great philosophy until you get 1-shot by a green pot in the Hades fight because that deals 150 damage now. Can instantly end your run by 1 mistake. Obviously mistakes will be punished, like an extra hit or something, but 150 is a lot.
- Routine Inspection (RI)
- Bad. No rerolls and no Dark Foresight will mean a weaker build and therefore a slower time. I will go more in depth with Dark Foresight in the Mirror section, but just know that it is one of the strongest perks in the mirror. Not considered until 45+ heat.
- Damage Control (DC)
- Everyone can agree that acorn is the best defensive keepsake in the game. Nullifying 5 hits is great. So why give it to every enemy in the game? This severely cripples certain aspects like Hestia and Arthur, but on stuff like fists or non-Hestia rail that can handle this better, it’s just extra hits. DC can be free on certain aspects like Zeus or Rama, but I personally prefer to not take DC2 at 32 heat and just stick to the same pact. If you want, you can take LC2 DC2 with one of those two aspects instead of LC2 AP1.
- Approval Process (AP)*
- Limiting your boon choices makes it harder for your build to come online. “Just get the boons” is fine and all until you see the boon you want crossed out 3 times after you rerolled twice. Not necessary for 32 heat in my opinion, and is only considered to be taken at 40+ heat.
Working up to 32 Heat
If you’re just starting out at heat but want to get up to 32 heat at some point, RidiculousHat made a spreadsheet that details the recommended pacts to take 1 by 1 until 32 heat. This progression system isn’t exactly recommended for low heat in my opinion, but it’s extremely geared towards making 32 heat as easy as possible later down the road. This is mainly highlighted by taking EM3 extremely early starting at 6 heat, which is a bit much for that early in heat. However, taking it this early will mean that you’ll learn the fight better and be consistent at it such that it’ll be easy at 32 heat.
Of course, you’re always free to pick whatever pacts you want to complete bounties and whatnot, but if 32 heat is your end goal, this pact progression guide will make it a lot easier to handle. You’re also free to jump heat levels if you want, going 1 by 1 can be tedious and time consuming. It’s up to you to jump or go 1 by 1, both are valid strategies to conquer 32 heat. I know someone who went from 8 heat to 32 heat to 40 heat. I also know someone who went 1 by 1 until 37 heat and then jumped to 40 heat. There’s really no wrong answer, just do what you feel like is more fun.
Mirror
Your mirror should look something like this for 32 heat:
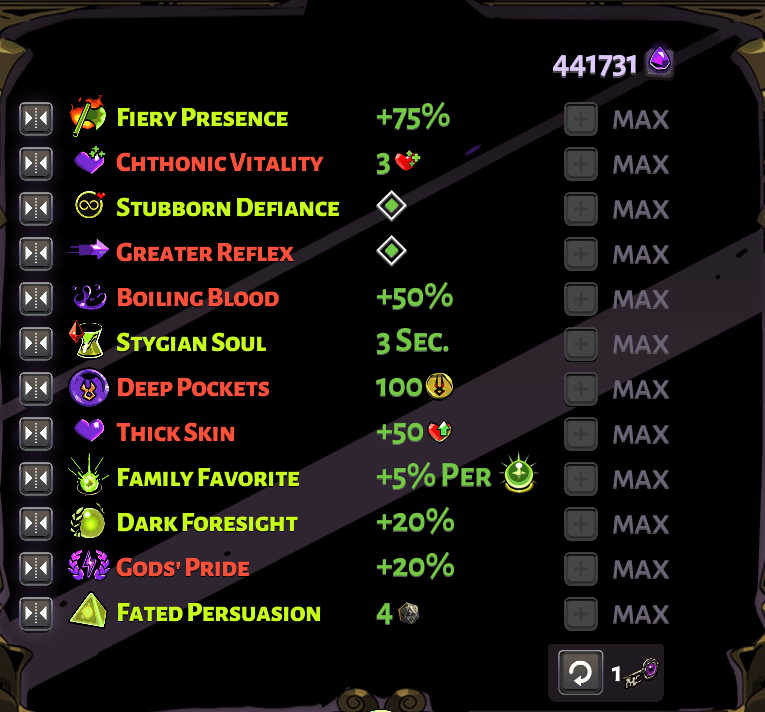
- Fiery Presence
- Nearly every aspect can benefit from the first attack/special damage boost. Going for backstabs are less consistent and lead to slower room clears. Fists can dash-upper for a quick one-shot against witches in Tartarus, for example. Rail special can’t backstab and the extra damage from a backstab on a base 10 damage bullet is worthless. Might as well have the special deal 75% more damage.
- Chthonic Vitality
- Doesn’t really matter because of LC4. If you take LC2, Chthonic Vitality is more consistent healing and will help you in Styx.
- Stubborn Defiance
- Reasoning in LC4 section of Pact
- Greater Reflex
- Dashes give invincibility frames (iframes), so having an extra one is always great. Will also make maneuvering through a room a lot faster and make it easier to dodge Hades’ big swings. Ruthless Reflex is only considered at extremely high heat (55+) on shields when you need the extra damage to make time or on Gilgamesh.
- Boiling Blood
- More damage = good. The bonus damage can help burn through armored enemies faster, especially if they have increased armor from Benefit Packages.
- Stygian Soul
- This gives slightly better odds for getting your preferred Hermes, which will be elaborated on later in this guide. Infernal Soul has Flurry Cast and Quick Reload. Stygian has Auto Reload.
- If you’re on a cast based aspect such as Achilles, Hera, Poseidon, or Beowulf, take Infernal Soul. The burst damage Infernal provides is much more important than slightly better Hermes odds.
- Deep Pockets
- Being able to buy from the Tartarus Midshop can be really good. Extra heart, pom, or locking in a god into your god pool is important. Getting your secondary god in Tartarus could mean a very early duo boon.
- Thick Skin
- More hp = good. High confidence will never be up because of LC4 unless you get Touch of Styx Dark, which you can’t get until Elysium.
- Family Favorites
- You get the 5% boost immediately off the first boon. This can help hit break points and will lead to a faster early game. Certain builds can use Privileged Status, which will be mentioned in the builds section. Otherwise, 95% of the time you want to use Family Favorites.
- Dark Foresight
- The best and most influential perk in the mirror. This shifts the Gold:Blue laurel ratio 20% more in favor of Gold. This means seeing poms, hearts, gold, and boons 20% more often. Also you’re more likely to get an early hammer. Each biome has a different Gold:Blue ratio, but this is incredibly strong. From rough experience, Tartarus will have maybe 3 Blues, Asphodel will have maybe 1, and Elysium will have maybe 1. I’m not entirely sure about those numbers, but either way, Blue laurels won’t help you in a run.
- Olympian Favor for 40% more rare boons is great, especially with Hermes and Chaos, but Dark Foresight is just much stronger. Also, rarity won’t matter too much if you don’t see that many boons.
- Gods’ Pride
- Very few duos are make or break in a build. Epic Hermes or Chaos can be massive and so can duos, but it’s not too hard to get a duo in a run. You really only want one duo in your build. The builds that need a duo to work well and want to use Gods’ Legacy will be mentioned in the builds section.
- Fated Persuasion
- Rerolling boon options is stronger than rerolling doors. Rerolling for duos, Hermes, Chaos, and Charon Wells are much more useful. Because of Underworld Customs, you want to save a reroll just in case all the options are important boons. Certain builds can also scale their damage very high with Charon Wells, so if you have some extra rerolls you can use some before Styx.
Builds
Now for the fun part. I’ll go over a bunch of different possible builds for every weapon and most aspects. Some aspects are easier for 32 heat than others, but every aspect can easily do 40 heat with the right build. Before I start, I want to define a few things.
Flat damage refers to external damage sources that don’t modify your damage. This means Ares, Zeus, and Dionysus attack and special. Every dash, cast, and call are also considered flat damage, but whenever I mention flat damage it’ll refer to those 3 gods. These can be very strong, but need a lot of supplements to feel good.
A % modifier is pretty self explanatory, just anything that has “+ ___%” in the description. Aphrodite, Athena, Artemis, Demeter, and Poseidon all give a % modifier to the attack and special. I want to mention right now that Poseidon’s attack is horrible: low % modifier and the knockback is more detrimental than helpful on the attack. Any time I mention a % attack in this section, never consider Poseidon’s attack. The only time you can consider taking his attack is if it’s your very last boon before the Hades fight and you don’t have an attack boon for some reason. At that point, you should consider taking Shattered Shackle into Elysium for DPS.
I’ll only be going over basic builds without going too much in depth with them. All the builds in this guide are pretty barebones, so I highly recommend going through the compendium and larger build guide first for more information. If you want a quick run down, my guide is good enough though.
Keepsakes
The typical keepsake rotation is generally God -> God -> Utility/Defense -> Utility/Defense. The first two gods you force are going to be for your build. The builds listed here generally revolve around 2 central gods, so you want to force them. If you leave Tartarus with everything you want, you could go for a secondary duo boon or force Athena in Asphodel to have a chance at some extra DDs. You can also take Skelly’s Tooth, since the Lernie fight can be a bit difficult. If you finish the fight without using the Tooth, proc it in the magma before you leave Asphodel so you can enter Elysium with 100 hp and take a different keepsake.
Utility generally refers to Hourglass. Hourglass is mainly meant for cast based aspects like Hera, Achilles, Poseidon, and Beowulf. This is because they can scale their damage through Charon Wells. Buying an Atlas Braid for 50% more cast damage or a Prometheus Stone for another cast is extremely strong. Having these last an extra 8 encounters make it very strong and potentially last until the Hades fight if you’re lucky enough in Styx. Additionally, by taking Hourglass into Elysium, you can buy from the Styx Charon Well before switching off to Acorn.
Defense is almost always going to be Acorn. It negates the most damage in boss fights, especially in the final fight. This is even more true if you take the HL5 pact. Of course, this is assuming you don’t get hit by the adds he spawns. Broken Spearpoint can work if you really struggle with Styx, but it’s a lot worse in the Hades fight than Acorn.
Companions
Generally speaking, this section isn’t really important for clearing a run. You can’t blame having the wrong companion for not having a good run really. I just want to go through them all, since some are considered better than others. I will preface this that I only use Battie, so all the others I’m going off of intuition or other players’ experiences.
Battie
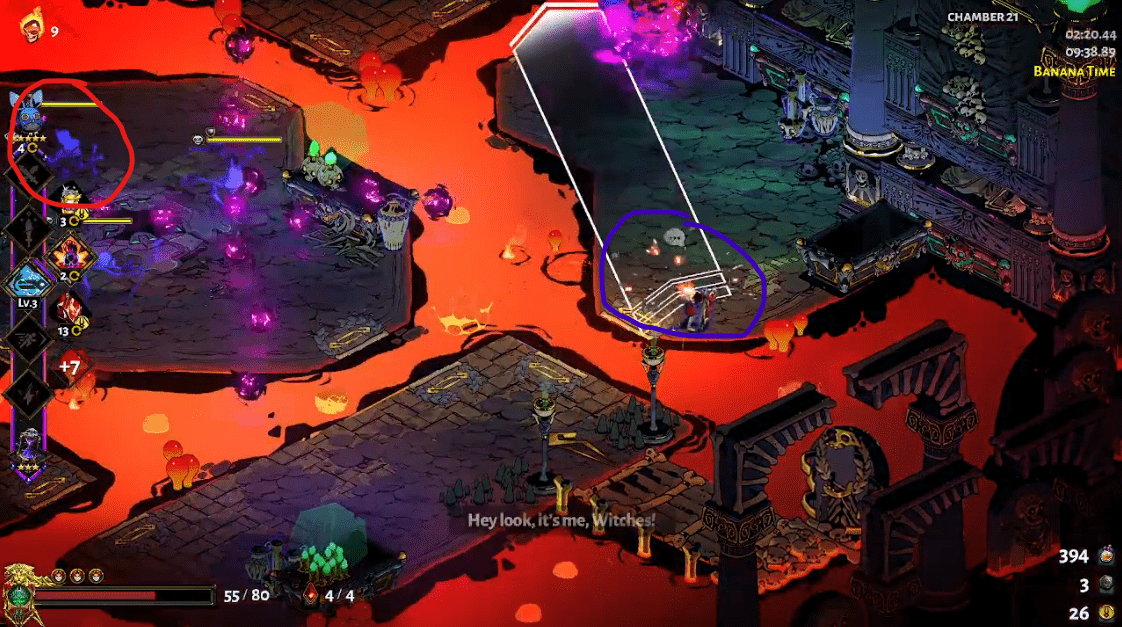
Battie is considered the best overall. Even though it does less damage than Mort and Antos, it’s much faster and covers a whole column. It’s used by every speedrunner and high heat runner because of how fast it drops down. Here’s a timestamped video of how it’s done today (yes, it’s a shameless plug). In the screenshot below, dash over to the blue circle. Aim for the witch that’s on that same island. I’m aiming a bit to the side, but it shouldn’t matter too much. Wait for the last witch to enter the screen, which is circled in red. As soon as you see it enter the screen, summon Meg and it’ll hit all 4 witches.
The typical Meg usages are on every miniboss, Heroes, and on Hades. If you get an extra, you use it for the Styx miniboss.
Mort
Mort isn’t too bad, but it’s just incredibly slow to use. Enemies can run out of it so you whiff completely or you just waste a good portion of the damage because you’ll hit their invincibility bubble. Fun fact, there’s a bug where it can backstab if you get Blinding Flash. Not really practical, but kinda funny. You can learn the timing for Mort and you can use it against Furies, but that’s a bit overkill at that point. Also, if you’re relying for Mort to hit on Furies, your build probably isn’t that great.
Antos
Antos is pretty good and has some niche use cases over Battie. This is mainly for deleting the Sneak miniboss in Tartarus, which can be helpful on aspects like Rama and Chiron that can’t deal with the Sneak’s speed. Other than that, the split damage it does is generally a detriment against certain minibosses and Heroes.
Shady
Shady can be used if you’re not running LC4 on your pact. It gives 40 healing and 30 gold, which can be useful in a pinch. Even on LC2, 20 healing isn’t too bad. This is more versatile in normal rooms, especially starting in Elysium, because some enemies have more than 1000 hp at that point. This can be a measure of added safety and probably the only one I’d consider using over Battie.
Rib
Rib’s only purpose is redirecting attacks, and it does a good job of that for a short bit. I haven’t really used this too much, but I’d assume that it’d only be good starting in Elysium or maybe Asphodel. Just use it whenever you feel like it really. Skelly’s trying his hardest.
Fidi
I’m going to be completely honest here, I’ve never used or have seen anyone use Fidi. It technically does the most damage if you get every projectile to hit, but it shoots out projectiles pretty slow. I’d assume you’d just use it on every boss except Furies and maybe the Elysium and/or Styx miniboss. It may or may not apply a movement speed debuff, but I have no idea.
Poms
This feels like a very basic topic, but there’s a bit more than just “pom good boon for damage”. Not every boon is treated equally. Some boons have better pom scaling than others. Later in this guide, I’ll mention how you want Aphrodite attack or epic Athena/Demeter. This is because Aphrodite has the highest % modifier and better pom scaling. A level 4 common Aphrodite attack will pass a level 4 rare Athena/Demeter attack. It’s important to make sure your poms go in the right place in order to maximize your damage output.
More boons doesn’t always mean a stronger build. Some builds can function at full power on 3 boons and 2 Hermes boons. Too many random junk boons means that your pom selection might get clogged. A clogged pom pool might mean having way too many poms in a place you don’t want. Granted, you do have to take fodder boons for Underworld Customs, but keeping your boon count to a minimum will ensure you get your poms to the right place.
Because of this, keep an eye out for unpommable boons. This will keep your pom pool open and you might be able to still sell it for Underworld Customs, depending on the boon. Listed below are unpommable boons from every god.
| Aphrodite | Ares | Artemis | Athena |
| Life Affirmation Broken Resolve Blown Kiss | Blood Frenzy Engulfing Vortex Dire Misfortune | None | Sure Footing Deathless Stand Last Stand |
| Demeter | Dionysus | Poseidon | Zeus |
| Rare Crop Nourished Soul Ravenous Will Arctic Blast Killing Freeze | Premium Vintage Strong Drink After Party | Ocean’s Bounty Sunken Treasure | None |
Italicized Boons mean they are a tier 2 boon and have a prerequisite.
Duo Boons
A lot of builds here will revolve around a certain duo boon. Like mentioned before, not many of these are make or break, and certain ones will be noted on when to use Gods’ Legacy. However, you still want to shoot for them regardless. Whenever you shoot for a duo, try not to open extra duos. This will make it harder to get the duo you want. For example, if I have Artemis attack and Poseidon cast currently and want to get Mirage Shot, I don’t want to take Athena’s special because it will open Deadly Reversal and Unshakable Mettle. However, I can safely take Athena’s dash because that won’t open those two duos. Always check with the Codex to make sure you’re making the right choice and not opening unwanted duo boons.
Hermes
Your preferred Hermes are going to be really consistent across every build. Hyper Sprint into Rush Delivery (RD) is going to amp your damage up by a ton. There’s a build archetype called “Flat Damage Soup” or FDS, which hinges on getting RD. I won’t go into depth about FDS because of how inconsistent it is, but do know that Hyper Sprint + RD can save a run sometimes.
Greatest Reflex is a more consistent and better option most of the time. Only needing one boon makes it more consistent than going for Hyper Sprint and RD. You’ll have more mobility and iframes, which is always nice. Most of the time, you’d generally want to pick this over Hyper Sprint when offered, especially if Greatest Reflex is rare or epic. If the choice is between RD or this, most of the time you’ll pick RD if your first Hermes was Hyper Sprint.
Try not to pick up a call before your two Hermes boons, since Quick Favor and Second Wind only open up once you get a call. This will lower your chances of getting good Hermes boons.
Chaos
Chaos will always be build dependent. I just want to highlight certain things that are important. The -hp per attack/special/cast curses are obviously bad, try not to take a relevant one. A Roiling curse will always be bad, since more enemies = more time needed. Enshrouded curses can be fine at the end of a biome, but taking them anywhere else is very risky. Missing a shop, story room, or stumbling into a trial can suck. A Slippery curse should always be avoided if you’re doing a cast based build.
For cast builds, you want to prioritize getting +1 cast before a % cast bonus unless that % is either rare or epic. The utility of 4 casts is extremely useful and will make room clearing a lot easier. Don’t roll over a % cast bonus for an extra cast though. This is mainly if it’s +1 versus % cast bonus. Once you have 4 casts, cast % scaling will be more important.
Merciful End
Considering there are a good number of melee weapons in this game, it’s worth mentioning one of the strongest duo boons in the game. A case can be made to run Gods’ Legacy here so you actually get the duo, since without it the damage is really sad. However, Gods’ Pride can lead to massive damage scaling with good Hermes boons like more dashes or RD. Personal preference here.
Every sword, spear, and fist can run ME. Zag shield, Chaos, Zeus, and Spread Fire Zag rail can also run ME. I will provide alternate builds later in this guide for these aspects.
Components:
- Ares attack
- Must be rare or epic. One of the few boons where rarity is important. For context, a level 7 common doom is the same as a level 3 epic doom. This is also why Gods’ Pride is preferred.
- Athena special
- The main purpose is to open ME. It’s still good supplemental damage, but for certain aspects where the special isn’t useful, it just exists and can be used for boon fodder after you get ME.
- Merciful End
- Self explanatory
- Athena Dash
- This will allow dash strikes to proc ME immediately. Without it, your build is basically nonexistent for most aspects. Even if you have the duo, without this you basically don’t have a duo.
- Zeus shield can get away with not needing the dash. In fact, Ares can go either on the attack or special.
- On Zag fists and Demeter (and maybe Talos but not sure), you can proc ME in the same dash before you get Divine Dash. You can fit a dash strike and a dash upper in the same dash, which will proc ME. Practice this on Skelly so you can get the hang of it.
- Impending Doom
- Massively increases your damage scaling. The increased drop time doesn’t matter because ME lets you drop it immediately. Basically a free damage boost once you get ME going.
This build is very RNG dependent. You might not get ME, you might not get the dash, etc. This may be extremely strong, but don’t be surprised if your build doesn’t go right.
Divine Dash Start
It’s the safest dash in the game, so you can start with it if you want. However, this hinges on you getting good damaging boons as soon as possible. You can get away with it on pretty much every weapon except for Fists and non-Hestia Rail since every other weapon generally wants a % modifier. You could go for Merciful End on melee aspects from this point, but you’d be losing out on doom poms and you can’t guarantee a good rarity on it. Starting Divine Dash means you have the safety but not the DPS unless you luck into something good in Tartarus.
Despite me talking about how inconsistent this is, it’s still worth mentioning this idea. The guaranteed safety of Divine Dash is too good to pass up, but do keep in mind that there’s a chance you’ll be wasting poms and have to luck into a build listed here or work with what you get.
Sword
Your standard damage rotation is going to be special -> 2x dash strikes -> repeat. You’ll want Lunge or Strike boons from Chaos, but Flourish boons aren’t too bad either. Standing strikes are slow, so this rotation will maximize DPS. Preferred hammers are below, made by WantedByTheFBI.
Nemesis
- Heart Rend
- Aphrodite/Artemis attack
- Artemis/Aphrodite on the special (opposite of attack)
- Can cope with Aphrodite dash if you have Artemis attack
- Hunter’s Mark
- Deadly Reversal
- Artemis attack
- Athena special
- Athena dash is preferred (as always), but the special can deflect pretty easily
- Hunter’s Mark
Poseidon
- Lightning Phalanx
- Use Infernal Soul here
- Athena cast
- Zeus attack/special/call
- Zeus dash is bugged on non-Arthur swords: “If you buffer a second dash strike, no matter which way you input it, the sword will point the same direction as the first dash strike” – from Hades bug document
- You’ll particularly want Static Discharge to supplement your damage
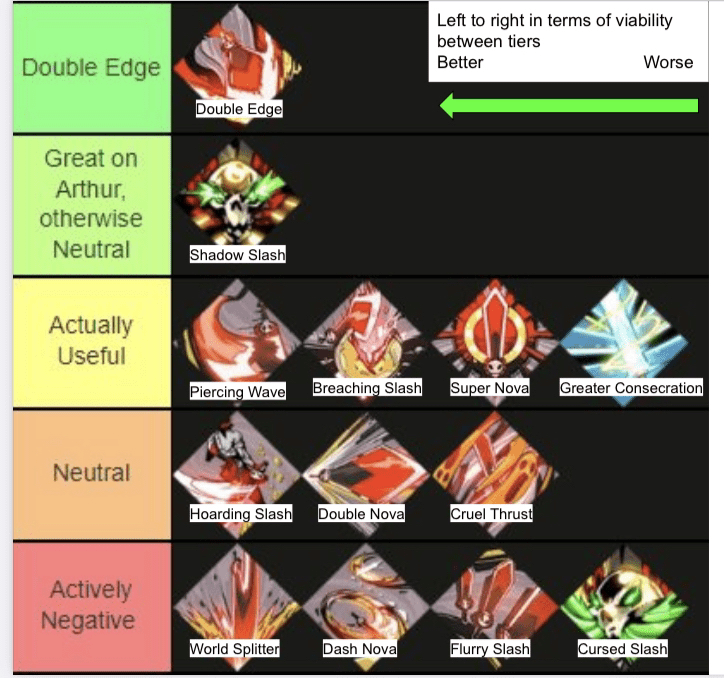
Arthur
- Aphrodite attack (preferably rare+)
- Can do Athena attack, but it should be epic rarity for damage. This can lead to getting extra DDs earlier, but if it isn’t epic you’ll be lacking damage.
- Any % special
- Zeus call
- Static Discharge and every Zeus boon under the moon
- Smoldering Air
- Hitting the call button gives you some iframes, so more survivability. Pretty sure it’s longer than a dash. You’ll also get a lot of damage out of it
- Dionysus call can also work, just put your Zeus core somewhere else
A weird and fun thing with Arthur is that you can infinitely dash strike with Arthur due to it’s delay and length of the dash strike. You can hold down the attack and every time you dash, it’ll be a dash strike. I personally don’t hold down the attack, but it is something you can do. Practice this on Skelly so you can hit these accurately and easily. This strategy relies on getting Double Edge, so it’s not really recommended unless you can guarantee it. It’s a fairly simplistic and minimal build, but it’s considered faster than the standard Arthur build/playstyle since there’s very little wind up.
- Aphrodite attack
- Artemis dash
- Smoldering Air
- Same deal as the other build. Zeus call will open up Lightning Rod because of Artemis’ dash if you want to use Infernal Soul, which is pretty good as well.
Spear
This is one of the most hammer dependent weapons in the game and my least favorite weapon in the game. It has middling damage output, but it can have some strong builds. The hammers for each aspect are different, so they will be listed under their own section.
It is worth mentioning that Zag Spear and Hades Spear are much worse than the two listed here, but I will talk about them briefly. Those are just considered ME aspects or Exploding Launcher + Charged Skewer special spam aspects. Zag Spear can run Flurry Jab and a full attack based build, but at that point you should just run Achilles and get the 150% bonus from Raging Rush. Hades spear can take a % modifier on the attack and go for spins and dash strikes. Look for Quick Spin if you do a spin based Hades build. It’s more intuitive and faster to buff yourself than debuff enemies, which makes Achilles better than Hades, but you can still use Hades if you want.
Achilles
Make sure to use Infernal Soul on your mirror. Your damage rotation is to hit special quickly twice to apply Raging Rush -> 2x dash strikes -> repeat. When you get your cast build going, special 2x -> cast -> finish Raging Rush buff with dash strikes -> repeat. Raging Rush duration doesn’t stack with itself, so you have to use it all before you can refresh the counter.
Your preferred hammers are going to be Flurry Jab or Serrated Point. Take one or the other, never both unless you don’t like iframes. Flurry Jab is better than Serrated Point. Your second hammer doesn’t really matter too much, but Extending or Triple Jab are nice.
These builds can all start Tidal Dash, as that’s what speedrunners like to do. It provides a lot of early game AOE, and the Raging Rush boost can carry itself in Tartarus and kind of Asphodel. It’ll make getting the duo you want harder generally, but can lead to stronger and faster runs.
- Hunting Blades
- Ares cast
- Artemis attack is preferred, but any prerequisite will work
- Zeus attack also works, especially if you get Static Discharge, but you will be opening Lightning Rod, which makes it harder to pick up your casts. Clogging your duo pool is risky, but can work out
- Hunter’s Mark
- Lightning Phalanx
- Athena cast
- Zeus attack
- Static Discharge and every Zeus boon under the moon
- Crystal Clarity
- Demeter cast
- Artemis attack
- Glacial Glare, pom it as much as possible
- Arctic Blast can be a good supplement to this
- Use Stygian Soul here.
Guan Yu
The -50% hp and healing is extremely punishing, but Guan Yu can be a very safe aspect. It’s used for hitless runs because of how strong it can be. It’s best part is the special, which has the Exploding Launcher hammer built into it basically. It has a wind up time, but Charged Skewer gets rid of that and adds a massive damage buff. This is the only hammer you realistically need for Guan Yu. Your damage rotation can just be special spam, or you can do special -> 2x dash strikes -> repeat. Kinda plays like a weird bow/Hestia hybrid.
- Special Spam
- Kinda needs Charged Skewer to feel good and have damage output past Tartarus
- Aphrodite or Artemis special
- Poseidon works as well, Razor Shoals and Wave Pounding add extra scaling
- Any % attack if you want to use it
- Can spin between waves for healing if you want (goes through LC4)
- Spin Build
- Needs Quick Spin if you want to pull this off
- Aphrodite attack? Maybe Zeus?
- Gonna be honest, I’ve only done this build once and it felt mediocre
Shield
One of the safest weapons in the game because it can block. Don’t touch the special unless you’re playing Zeus shield; very low base damage and the wind up takes a bit. Also you can’t attack or block while it’s gone. Niche case for Chaos if you Bull Rush into a point blank special, but it’s considered the worst of the shields. Still good because it is a shield, but just worse than the others.
The best hammer by far is Charged Shot. This includes Chaos (ignore the special) and kind of Zeus. Pierces shields and incredibly high base damage. You won’t get iframes during your Bull Rush anymore, but the damage is worth it. Zeus wants Explosive Return mainly, but Charged Shot is still a very good hammer.
Zag Shield and Chaos
This is basically the same build as Arthur except the special doesn’t matter too much unless it’s Chaos. I’m lumping these two together because the builds are basically identical. Pulverizing Blow is a good hammer if you don’t get Charged Shot. Dashing Wallop is decent cope pick. If you get any of these, I would just straight up ignore the special on Chaos. Exploding Return on Chaos only procs off the main shield, so it’s not that great, but can basically be your last ditch cope hammer.
- Aphrodite attack
- Dionysus/Zeus special on Chaos if you don’t get Charged Shot or Pulverizing Blow
- Dionysus/Zeus call
- For Dionysus, just pom it a lot
- For Zeus, get Static Discharge and every Zeus boon under the moon
- Smoldering Air
Zeus
King of High Heat, very consistent and safe aspect. Kind of difficult to learn and use, but you can sort of half-ass it at 32 heat and be fine. Knock enemies into your blitz disc and group up enemies as much as possible. I highly recommend watching high heat Zeus gameplay to get an idea of how to play it.
- Zeus2
- Zeus special
- Static Discharge/Double Strike and every Zeus boon under the moon
- Double Strike is bugged to strike more often than what the % says
- Static Discharge/Double Strike and every Zeus boon under the moon
- Any % attack
- Can go for Smoldering Air, Zeus charges call very quickly
- Zeus special
Beowulf
King of Speed and Bugs. Biggest bug to call out is Mirage Shot. It’s bugged to deal 100% damage instead of 30% damage on flares. Cope hammer can be Sudden Rush if you don’t get Charged Shot. Ferocious Guard is pretty solid as well. Take Infernal Soul here.
- Speed
- Take Gods’ Legacy
- Poseidon cast, pom as much as possible
- Artemis attack preferably, but any prerequisite will work
- Mirage Shot
- Just 1-2 cast everything lol
- Consistency
- Aphrodite cast, pom as much as possible
- Snow Burst, Frost Strike, or Mistral Dash
- Ordered from preferred -> cope
- Take Privileged Status in the mirror
- If possible go for Mirage Shot, but not necessary
Bow
The biggest thing to know is that you always want to dash strike no matter what for your power shot. It does a bit less damage, but it charges a considerable amount faster. Dash strikes let you spit out damage a lot faster and makes it into a rhythm game. Look for line ups to pierce multiple enemies.
Your hammers for each bow are pretty different, so I’ll talk about them more in the aspect section. One hammer to note is Sniper Shot, mainly because you never want to take it because of how far its effective range is. Even though bow is a ranged weapon, you’re generally playing close to mid range. Sniper Shot will ideally never proc.
Zag Bow
Your first hammer will want to be either Twin or Triple shot. Doubling or tripling your damage will speed up your fights. Your second hammer will want to be Perfect, Point Blank, Flurry, or Explosive shot. Chain Shot isn’t too bad, but it’d just be relatively useless in boss fights. For the second hammer, it’s ordered from what I most prefer to least, but up to you.
- Heart Rend
- Aphrodite/Artemis attack
- Artemis special/cast if Aphrodite attack, only to open the duo
- Aphrodite dash if Artemis attack
- Speed
- Poseidon dash start for AOE and damage
- Breaking Wave to delete Styx
- Razor Shoals can be neat for early game damage
- Aphrodite attack or epic Demeter/Athena attack
- Force Aphrodite in Asphodel if you have to
- Or use Shattered Shackle if it really comes down to it
- Poseidon dash start for AOE and damage
- Smoldering Air
- Aphrodite attack
- Zeus/Dio call
- Must grab some other Zeus core to open the duo, maybe dash so you can use Static Discharge when you get it
Chiron
One of the slowest aspects in the game, but can be relatively safe and has pretty good single target damage. The only good hammer is Concentrated Volley. Without it, using a % modifier on the special won’t yield great results. It’ll be pretty slow without this hammer. Your follow up hammer would be Relentless Volley. Piercing Volley can be useful, but it makes it so the special can’t target close range that well and shortens your max range a bit. If you don’t get any of those, Flurry, Triple Shot, Point Blank, or Perfect Shot can all work as a cope hammer.
Before I go on, it’s important to mention that Thunder Flourish has an internal cooldown, so putting it on Chiron isn’t as good as it seems. You’ll only get 1-2 bolts per volley, so it’ll be pretty mediocre damage. Granted, a lot of extra Zeus boons can make this stronger, but it’s still not that great, especially against bosses. If it wasn’t for this internal cooldown, Thunder Flourish would probably be one of the best builds on Chiron.
- Consistency
- Use if you can’t guarantee Concentrated Volley
- Dionysus special, every pom should go here
- Aphrodite attack -> Low Tolerance duo
- Ideal Hangover build
- Ares attack or Curse of Vengeance -> Curse of Nausea duo
- Does less damage than Low Tolerance, but it does increase your Hangover damage so why not
- Grab Curse of Vengeance ideally, since it won’t open up extra duos and you can still get Low Tolerance if you’re lucky
- Aphrodite attack -> Low Tolerance duo
- Poseidon dash for much needed AOE
- Breaking Wave to delete Styx because Chiron struggles here a lot
- Heart Rend
- Needs Concentrated Volley or hella Chaos additives
- Artemis special
- Aphrodite attack
- Poseidon dash
- Poseidon special
- Has surprisingly good security because the lump of arrows do a lot of knockback and has the second highest % modifier
- Look for Tidal Dash and Breaking Wave to make Styx easier
- Sea Storm
- Extra damage, Static Discharge for even more
Hera
Queen of Speed, has insanely high burst damage. You don’t want to really power shot because you want to spit those casts out as fast as possible. Because of this, Flurry Shot is the best hammer. However, it’s pretty difficult to get a hang of, especially on keyboard and mouse. Twin, Triple, or Exploding are great alternatives. Hera isn’t really a hammer dependent aspect, so you can just make do without one if need be. Use Infernal Soul here.
- The only good Hera build
- Aphrodite cast, all poms should go here
- One shot everything or instaphase bosses so you get your casts back
- Snow Burst for general AOE and burst damage
- You can use Privileged Status if you want, but all top runners use Family Favorites because the instant 5% boost lets you hit break points easier
- Can go for Mirage Shot if you get a natural Poseidon or Artemis, but Snow Burst is a bigger priority
- Aphrodite cast, all poms should go here
Rama
One of the harder aspects to learn, but insanely good for heat. It has room clearing AOE with Shared Suffering that can make it one-shot rooms. Your preferred first hammer is Twin Shot. Triple can also work, but Twin is a lot safer for Rama. Your second hammer will ideally be Point Blank or Perfect. I personally prefer Perfect Shot because it’s generally more consistent and I’d still be at a safe range. Point Blank is still nice though because sometimes you have to release shots early so you don’t get hit, and this allows you to get a boost out of it. Chain shot is a good cope hammer and can help clear rooms faster, but will add no damage to bosses other than the Heroes. Explosive shot is pretty bad in my opinion, because it makes charging shots impossibly slow, even with dash strikes.
I highly recommend watching ocaml_ocaml’s Rama runs on his YouTube channel, since it’s a lot easier to watch him play than explain how to play. Rama is a tricky aspect that charges slow and hits like a truck, but that slow charge means you’re very susceptible to getting hit. Knowing when to release early so you get some damage out before you get hit stunned is a good skill to learn. He has an astonishing 7:30 50 heat run and held the former world record with a 5:26.
- Attack Start
- Aphrodite or Athena attack
- See Arthur section for reasoning
- Any flat damage on the special
- Artemis or Athena dash
- Artemis for bigger damage, Athena for safety
- Aphrodite or Athena attack
- Special Start (Speed)
- Zeus special
- Get Static Discharge
- Aphrodite attack or epic Demeter/Athena attack
- Force Aphrodite in Asphodel if you have to
- Artemis can work if you have Twin/Triple Shot
- Or use Shattered Shackle if it really comes down to it
- Zeus special
- Special Only (budget Delta Chamber)
- Zeus special
- Static Discharge and every Zeus boon under the moon
- Ideally Relentless Volley
- Zeus special
Fists
To be completely frank, all the fists ideally build the same. There are some variance, but some builds are universal to every build, including Gilgamesh. I won’t list builds for Gilgamesh here because of how unsafe it is for 32 heat, but also because I don’t have a lot of experience with it.
The best hammer is Breaching Cross because of how fast it deletes armor. This comes in extremely handy for minibosses and super armored Benefit Package enemies. Long Knuckle is also pretty good because it gives fists some range and safety. All other hammers are mediocre or aspect specific. Try not to take any special hammers except for the ones listed later in the Demeter section because they either add no damage or make the special worse to use.
The following builds (and ME) can be used on every fist. I’ve added Tidal Dash on all of the builds because it just has a lot of damage, but it’s more or less optional. Knocking enemies out of range can be a hassle to chase down unless you slam them into barriers, but it’s still great damage against bosses and in Styx.
- Zap
- Zeus attack
- Static Discharge and every Zeus boon under the moon
- Aphrodite special if Demeter fists (and maybe Gilgamesh?)
- Or any other core to open up Smoldering Air
- Poseidon dash for AOE and damage
- Breaking Wave to delete Styx
- Razor Shoals can be neat for early game damage
- Zeus/Dionysus call
- Zeus attack
- Drunk
- Not a very fast build, but just a consistent and safe hit-and-run build
- Dionysus attack
- Every pom should go here
- Aphrodite dash
- Low Tolerance
- Poseidon dash for AOE and damage
- Breaking Wave to delete Styx
- Razor Shoals can be neat for early game damage
- Ares special if non-Demeter or Curse of Vengeance
- Curse of Nausea
Zag Fists
The in-built dodge chance can make it so you can make a dodge build. You start with Hermes’ Plume Keepsake and keep it on until the end. I don’t entirely recommend this, since you have to work with what you get and you can’t force in any other gods. However, it is a valid strategy, so it is worth mentioning.
Because of its fast hit and low base damage, you need a flat damage attack, which is what the other 3 builds for fists are. You can do this if your first boon is Zeus attack and just work from there. Additionally, don’t use Ruthless Reflex in the mirror for more dodge. You’ll need the extra dash for speed, mobility, and survivability.
From Hermes, you’d ideally go for Hyper Sprint into RD, since you’ll also be stacking a lot of extra speed from the Plume. Otherwise, Greater Evasion or Greatest Reflex are solid options.
Demeter
Demeter is considered the best fists to use because of the chunky charged upper. Because of this, Explosive Upper is the best secondary hammer for huge AOE and damage. Kinetic Launcher is also pretty good because you can charge it while waiting for a boss to come out of their invulnerability bubble. It also has a shorter wind-up animation, so it’s more snappy. Make sure to grab a % special (that isn’t Poseidon’s) to make use of the charged upper in the general builds above.
Rail
The traditional weapon of ancient Greece. One thing to call out is the reload animation cancel. Whenever you reload, you want to special or dash at the same time. This way, you won’t be stuck in the same place while you reload. You always want to keep moving, so keep this in mind.
Rail is infamous for the Rocket Bomb + Cluster Bomb combo, also known as “clockets”. The reduced damage from Cluster doesn’t apply to rockets, so it’s a base 400 damage explosion point blank. Ideally, you’d shoot for this. Rocket first hammer is better utility wise, since it’s easier to use and a lot faster, but having Cluster as your first hammer will give you slightly better odds at getting clockets (by 1 hammer).
If you can’t get clockets, there are some alternatives. Delta Chamber is great if you’re not playing Hestia. It’s bugged such that you’ll maintain all your iframes during dash strikes. Targeting System is pretty nice, since it gives you a 30% global damage boost. Triple Bomb is always nice. Hazard Bomb is great if you’re not playing Eris.
Zag Rail, Eris, and Lucifer can all kind of build the same. Since Lucifer can’t get clockets, you’ll want Triple Bomb. It’s kinda like budget clockets, but it’s at full strength with 1 hammer unlike clockets. Lucifer doesn’t need a secondary hammer, but Targeting System for the global boost can be nice. The attack based hammers specific to Lucifer are all kind of mediocre, but none are bad. Losing the ramp up with Eternal Chamber can be a loss of DPS though.
- General Rail Build
- Zeus attack
- Static Discharge and every Zeus boon under the moon
- Artemis/Aphrodite special
- Demeter/Athena also work, preferably epic but doesn’t matter too much
- Posiedon can work in a pinch
- Poseidon dash
- Used to pop the Hellfire specials on Lucifer, although any dash can work. Poseidon’s just has a bigger AOE and more damage
- Breaking Wave to delete Styx
- Zeus attack
Hestia
The safest aspect in the game. Despite needing to reload every shot, it’s still a very fast aspect. I highly recommend reading The Ultimate Hestia Guide by Zyruvias as it goes into detail how to maximize damage. Considering clockets need pretty high RNG to get, there are other alternative hammers. Ricochet is the best attack hammer for Hestia. Piercing is pretty solid if you line up your enemies. As mentioned earlier, Hazard Bomb is great here and is the best alternative to clockets.
Dash strikes exist on Hestia, so make sure to look out for Lunge boons from Chaos as well as Strike and Flourish boons. Unlike other weapons, dash strikes on rail don’t decrease your base damage, so don’t be afraid to use them.
Don’t take a cast that can’t stay in enemies. The extra 50% from Boiling Blood is great for extra damage. Use this to your advantage against armored enemies and bosses. The extra 50% is also great for early game when your build isn’t fully online yet.
- Attack start
- Aphrodite or Athena attack
- See Arthur section for reasoning
- I prefer Aphrodite because Hestia is already very safe, so just one shot them with a higher % attack
- Artemis/Aphrodite special
- Demeter/Athena also work, preferably epic but doesn’t matter too much
- Posiedon can work in a pinch
- Poseidon, Athena, or Artemis dash
- Poseidon for AOE and damage
- Athena for safety
- Artemis for bigger damage number
- Aphrodite or Athena attack
- Speed
- Poseidon dash start for AOE and damage
- Breaking Wave to delete Styx
- Razor Shoals can be neat for early game damage
- Aphrodite attack or epic Demeter/Athena attack
- Force Aphrodite in Asphodel if you have to
- Or use Shattered Shackle if it really comes down to it
- Artemis/Aphrodite special
- Demeter/Athena also work, preferably epic but doesn’t matter too much
- Posiedon can work in a pinch.
- Poseidon dash start for AOE and damage

Be the first to comment