
Guide to Fists
By Ananke
This guide assumes you have a basic level of knowledge about speedrunning Hades in general, so that we can move onto Fists specifics.
Flawless Fists
Why Fists?
If you’re reading this guide, you’ve probably found something you like about the Fists and want to get a little more serious about them, or maybe you just want to optimise your play. That’s great! Many of us in the “Fists gang” are so dedicated because the weapon has fun and smooth movement. Owing to the Merciful End build, they have a welcoming ‘easy to learn, hard to master’ curve, with nuance that feels true to the weapon. I put a lot into this guide so that there’s hopefully something for everyone, whether new or experienced.
For those newcomers, a very important preface is this: The Fists are probably the worst weapon in the game. Close is the Sword, which is carried by Nemesis. And Gilgamesh sits among the worst speedrunning Aspects altogether. Knowing that, the Fists are fortunately still highly capable. In modded terms, numerous runners have achieved sub-6 IGT with its Aspects, and the strongest Aspect Demeter also reached sub-13 RTA. Demeter in particular is clearly a strong and capable weapon, albeit less reliable than the most traditionally effective group of Nemesis, Achilles, Beowulf, Hera, Hestia and Eris.
Perhaps the most crucial information of all is simply that this weapon demands heavy grinding. The infamous Duo Merciful End is the cause, for which Fists are an synergetic vehicle – more on that later. Athena rarely plays nice, and Hermes is always a troublemaker. There’s a healthy mantra for speedrunning Hades, the game which literally puts you in hell, a Sisyphean toil to escape the pits of Tartarus: que sera, sera. Whatever will be, will be. See if you can settle into the grind comfortably; runners often find preferences (tolerance) for some weapons over others. I’ve always found the Fists very fun to try and optimise; distinctive and uniquely challenging, if a bit homogenous among its own Aspects. Nothing quite beats simply throwing aside the fancy armaments and beating the shit out of things with your own two hands.
Category / Format Notes
Additionally, it should be said that Fists are absolutely a single run weapon. They tend to fare poorly in multiwep categories, often placed first in All Weapons for resetting, since Merciful End is so inconsistent. Naturally finding Athena in Tartarus is the classic make-or-break factor, and it comes alongside Curse of Agony rarity, then getting the right Athena cores, ME (typically on God’s Pride) and decent Hermes boons. You want to be able to reset more so than other weapons.
Arguably, Fists are also inherently more of an IGT than RTA weapon. On top of your core build requiring numerous boons (thus boon screens), for which rerolling is often necessary, you additionally want lots of Poms for Curse of Agony and Impending Doom. This is only really a ‘peak optimisation’ problem, but the principle is there.
Common Concepts
Starter Summary
I’ll usually refer to Curse of Agony as ‘Doom attack’ or just ‘Doom’ from now on.
In Tartarus you start with Ares’ keepsake, preferably get Epic Curse of Agony (Doom attack) and eventually put about 4-6 Poms into it. Your first hammer is ideally Breaching Cross, which helps you shred armour throughout the run. In Tartarus you see Athena, and hopefully get her Special first to unlock Merciful End. Ideally you then see another Ares or Athena to get ME for the Furies fight, since Attack into Dash-Upper procs are still effective, but this is uncommon on a good pace. You might end up with a Cast to fill the core slot and deal extra damage; make sure it doesn’t activate any other Duo boons. You also need Athena’s Divine Dash, and the sooner the better.
For Asphodel you typically take Athena’s keepsake to grab whichever boon you’re missing. If you have everything already, then Zeus and Artemis are your other best friends. Once you have the full core build, you can start dashing through enemies whilst attacking them, which is the goal of most Merciful End builds – utilising the Duo much faster with Deflects from Divine Dash. From Hermes you either want bonus dashes for more procs, or Hyper Sprint into Rush Delivery for a huge damage boost. Impending Doom from Ares is your other biggest damage scaling, which you really want no later than early Elysium, and wants for at least one Pom.
At Elysium you also start thinking about your Call slot; if you already have bonus dashes or both parts of Hyper Delivery, then Sigil of the Dead (“Dad keepsake”) is great, or Zeus’ Aid if you already have Zeus and/or have Hyper Delivery. Otherwise, taking a Call worsens your chances with Hermes by adding more bad boons to his pool. Impending Doom is important at this stage so that your damage keeps up with enemy health.
By Hades you hope to be hitting big Doom procs as you dash through him, supported by crits or Zeus bolts, trying to dodge his attacks to keep up High Confidence for as long as possible… till you win or your health runs out! That’s the whole, basic gameplan summarised for every Aspect of the Fists. Watching a run naturally helps to see all that in action. Now, some more quick and universal Fists tips:
Don’t over-rely on Doom before you have full build; take advantage of your whole kit. Epic Doom dealing a base 100 Damage is a lot compared to Tartarus enemies, no less the Fists’ own numbers, but your other options can still do the job faster in a number of scenarios.
Don’t neglect your Casts! Even without a boon upgrade, readily having a low animation delay projectile with a base 50 Damage is inherently useful early in your run. You can also cancel most of its animation by dashing. Throw it ahead of your dashes, weave it into your regular attacks, use it to gain a small damage boost from Boiling Blood, or just to finish off an enemy faster, lob it to kill that last enemy across the room – countless reasons to get your hands bloody in a slightly different way.
Think about and plan out your Obols. A simple one, but you need quite a lot of boons just to set up your core build, and you want a good number of Poms on top of that. Gold pots are all the more relevant over the run. Missing an Ares, Athena or Hermes can be devastating.
Never stand still for long – mobility is everything, which is why I made another section for it later. Excluding Gilgamesh, the Fists show stronger options in conjunction with their dashes, which are also essential to your damage combo, and simply to maneouvre around at all. Your dashes do it all. But even on the odd occasion when you’re not dashing, both your standing Attack and Special give you the freedom to simultaneously move and reposition, a privilege you shouldn’t squander.
And Divine Dash with intent. That sounds silly, but it doesn’t have a huge hitbox, so careless play can result in missed ME procs. You also don’t want to end up dashing away from the next enemy you’ve got to kill. Speed is distance over time, or something!
Best Boons
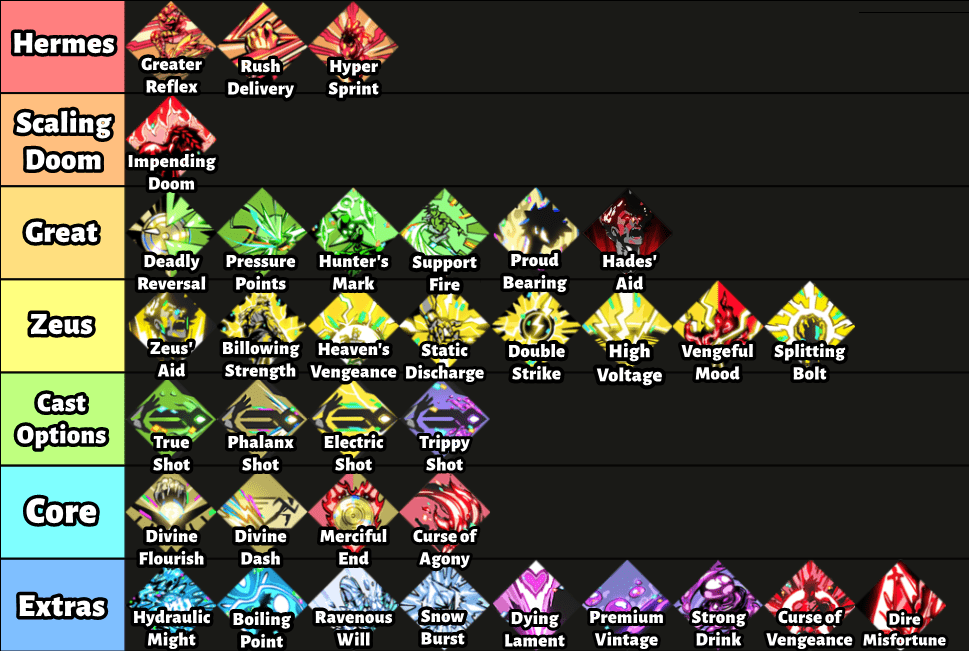
Core – The primary stuff, the core build, the basic necessities.
Cast Options – These are the only worthwhile options. Filling the core slot is valuable for getting the right Athena boons and increasing your chances at ME. Trippy Shot doesn’t enable any other Duos whilst also giving you extra damage to prepare between waves/boss phases. Electric Shot is incredibly good early: it only enables Vengeful Mood if you have a revenge boon, is great for clearing crowds of enemies in Tartarus, and puts Zeus into your god pool. Phalanx Shot, being another Athena boon, doesn’t enable any other Duo (except Lightning Phalanx, but you shouldn’t get Zeus Call early) and can proc ME alongside dealing damage; just hope you don’t get it instead of your Divine Dash. True Shot does enable a Duo in Deadly Reversal, which makes it dangerous to take earlier on, but becomes very useful for extra crit damage later in the run, whilst the Cast itself is good for finishing off faraway enemies.
Zeus – Gets his own category full of boons because his supplementary damage is valuable. If you get a ton of natural Zeus in your run, that can carry your damage output by itself, especially alongside Hyper Delivery. Billowing Strength in particular gives global damage scaling for your Doom. Heaven’s Vengeance always does tons of damage, but note that it can activate Vengeful Mood, which can be dangerous early.
Great – We’ve mentioned Deadly Reversal as an uncommon but impactful second Duo for crit bonuses; Pressure Points and Hunter’s Mark are the equivalents in regular boons, and the primary things you seek from Arty in any run. Crit damage is great for Doom, and Marked is always amazing against the Heroes of Elysium. Support Fire also triggers quickly with Pummels for a little extra damage, but more importantly charges Calls rapidly. The next two usually go hand-in-hand; Proud Bearing brings your Call out faster (Rare needed for an instant Zeus’ Aid), synergetic with Billowing Strength, and notably working out-of-the-box with Hades’ Aid from Sigil of the Dead. Hades’ Aid briefly gives you +100% global damage on use, which of course is ideal for your Doom.
Scaling Doom – Impending Doom, bar Hermes, is your single most important scaling boon. Because you proc Doom instantly, all that bonus damage comes for free.
Hermes – Bonus dashes from Greatest Reflex means more Doom Procs between your Dash and Dash-Strike. The combo of Hyper Sprint and Rush Delivery can give you up to +100% global damage on every dash.
Extra – These are all the additional boons that can provide minor benefits during a run. Hydraulic Might gives a sizeable temporary bonus to Attack and Special damage which fits well with speedrunning in general. Boiling Point situationally compensates your God Gauge a good amount whenever you take damage. Ravenous Will offers conditional global damage with a decent rarity gap if you can find good times to lob your casts. Snow Burst is very good at clearing crowds of weak enemies – Fists don’t usually suffer with this, but it’s great for Witches and Flamewheels. Dying Lament is similar, a classic “chain reaction Numbskull killer”. Premium Vintage is an extra Pom, hopefully for your Doom, with health thrown in. Strong Drink is highly conditional global damage and health restoration. Curse of Vengeance is occasionally an extra Doom proc for getting hit, and revenge boons scale absurdly well with Poms if offered. Dire Misfortune provides bonus Doom damage on extra Attacks, but it’s only useful before you get ME.
Doom Digits
I’ll go into the specific Aspect damage numbers and relevant breakpoints in their respective sections. For now, let’s focus on Doom numbers.
For completeness, boss health totals (for all their phases) are as follows:
| Megaera | 4800 (EM1) | Theseus | 9000 |
| Alecto | 4900 (EM1) | Asterius | 14000 |
| Tisiphone | 5600 (EM1) | Hades | 17000 |
| Lernie | 6000 |
Curse of Agony Rarity & Pom Scaling
| Base | Lv2 +30 | Lv3 +21 | Lv4 +15 | Lv5 +10 | Lv6 +7 | |
| Common | 50 | 80 | 101 | 116 | 126 | 133 |
| Rare | 75 | 105 | 126 | 141 | 151 | 158 |
| Epic | 100 | 130 | 151 | 166 | 176 | 183 |
| Heroic | 125 | 155 | 176 | 191 | 201 | 208 |
Impending Doom Rarity & Pom Scaling
| Base | Lv2 +20% | Lv3 +15% | Lv4 +10% | Lv5 +5% | Lv6 +5% | |
| Common | 60% | 80% | 95% | 105% | 110% | 115% |
| Rare | 65% | 85% | 100% | 110% | 115% | 120% |
| Epic | 70% | 90% | 105% | 115% | 120% | 125% |
| Heroic | 75% | 95% | 110% | 120% | 125% | 130% |
I used minimum 20%, maximum 80% colour formatting on these charts to (hopefully) show what is sufficient. This should demonstrate how Curse of Agony rarity is hugely impactful, while it doesn’t matter for Impending Doom.
25 per rarity level is huge; it’s probably the most significant rarity gap in the whole game. Generally, 60+ is a strong damage number; the Rail’s Rocket Bomb or Shield’s Charged Shot deal 80, which is enough to instakill a Witch in Tartarus, even before applying High Confidence or Fiery Presence. If we say that the ideal minimum Doom number is 150, then you need Lv3 Epic to get there, compared to Lv5 Rare, whilst Common… just doesn’t get there with a reasonable number of Poms. So in an ideal world (i.e. modded IGT) you should always reset for Epic.
On which note, I recommend a minimum of 5 poms in your Curse of Agony and a maximum of 3 poms in your Impending Doom. With a typical +50% global (FF + HC) and assuming both are Epic, you end up with more damage getting Agony to level 5 than Impending to level 4. I’ll spare you the maths this time.
A very important note about Merciful End’s combo damage. The flat +40 Damage bonus is only applied at the end after all calculations – it does not simply get added to your base Doom number, and thus it is not affected by Impending Doom or any global damage buffs or crits. It’s daft and unfortunate for the build that it works as such, but what can you do.
Using the basic Lv3 Epic Doom again, an unpommed Common Impending for +60%, a full +25% from Family Favourites, and +25% from High Confidence, let’s think about complete combo damage. We have a base 151 Damage, multiplied by 2.1 (+110%) to reach 317, plus 40 from Merciful End for 357 Damage on each Attack-Dash proc. Good stuff.
Why ME? Why not ZA(P)?
Merciful End is inconsistent, but it’s also the only way Fists can gain relevant damage scaling to go fast all the way to Hades. This all begins with the awareness that the Fists’ kit has low base damage numbers (see later Aspect sections). ZAP Fists is an explored alternative, standing for Zeus Artemis Poseidon, i.e. the same Lightning Strike, Deadly Flourish, Tidal Dash build that Eris runs. For Demeter it might make sense at first – rapid attacks for chain lightning leading to a strong 6 or 7-hit Special with crits, and sometimes supplementary damage from Tidal Dash, useful for wall slams in Tartarus and Styx.
Ignoring the part where you’re trying to punch things at close range and Tidal Dash makes that insufferably difficult in Asphodel (no walls), the only reason Eris is able to run that build effectively is because of its self-buff equivalent to a Rare Rush Delivery – which makes it hunt for, and scale off, sources of flat damage. And even Eris starts to lack damage by Hades if it doesn’t get Epic RD or Clockets!
As expected then, ZA(P) Fists itself is heavily reliant on RD itself to function. And to be fair on the build, it can achieve decent results with that prerequisite. Jolted (Static Discharge) is always fairly strong, no less Zeus’ Aid with a potential Splitting Bolt on top. However, it struggles to reach the same peaks that ME brings to many weaker weapons.
Mirror Malphon
Here are the Mirror of Night setups. Zagfists and Talos run the same Talents by default, whilst Demeter has one change (though it can also follow suit with those two) and Gilgamesh has its own speciality.
Zagfists & Talos
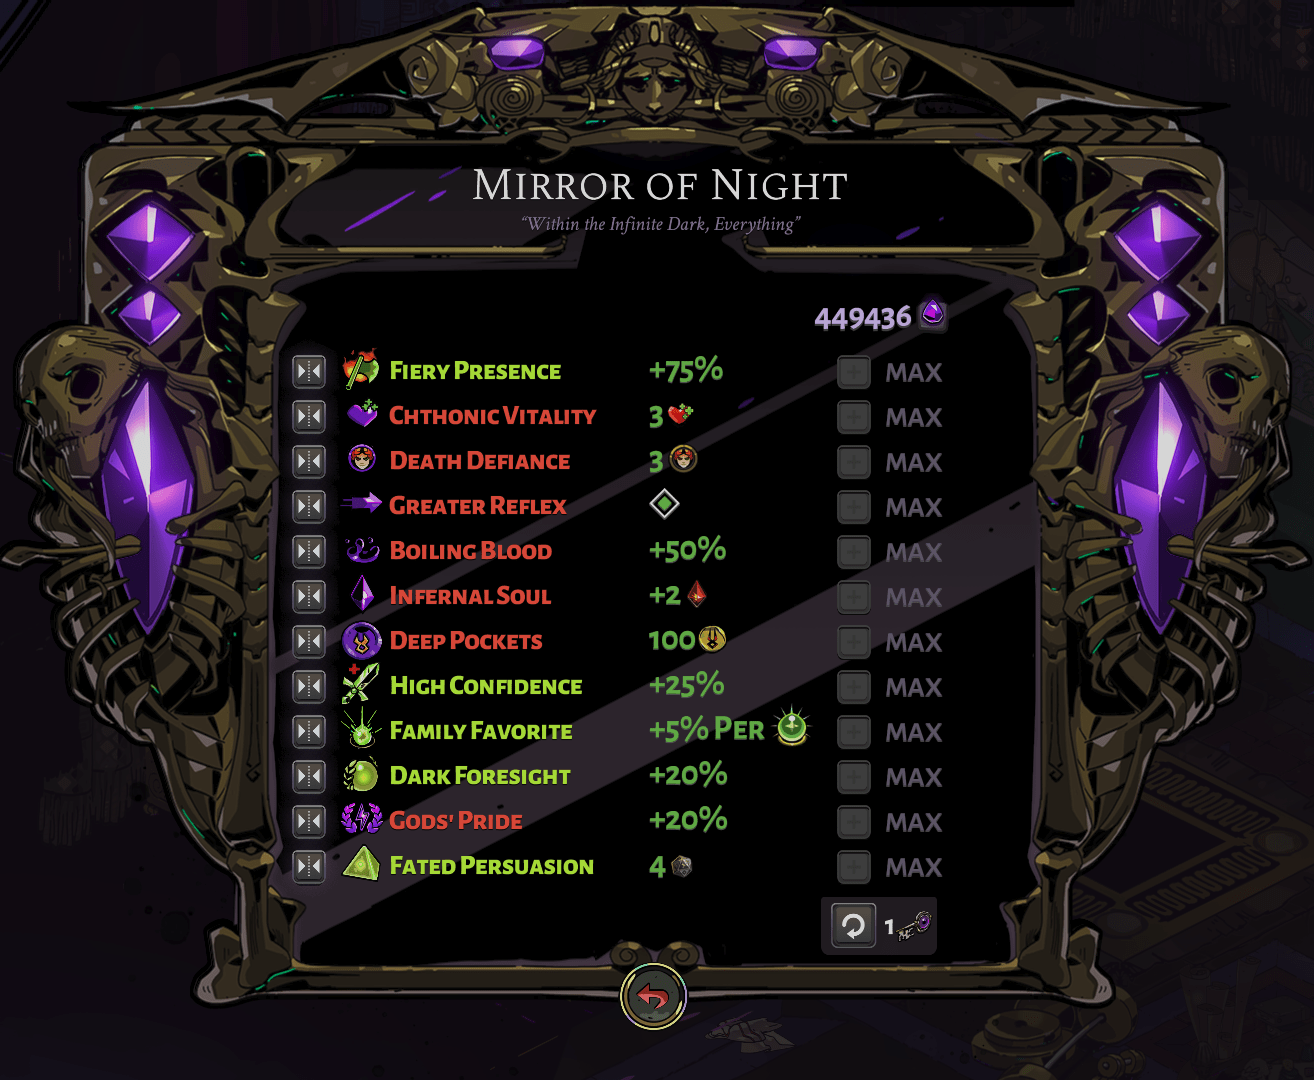
Demeter
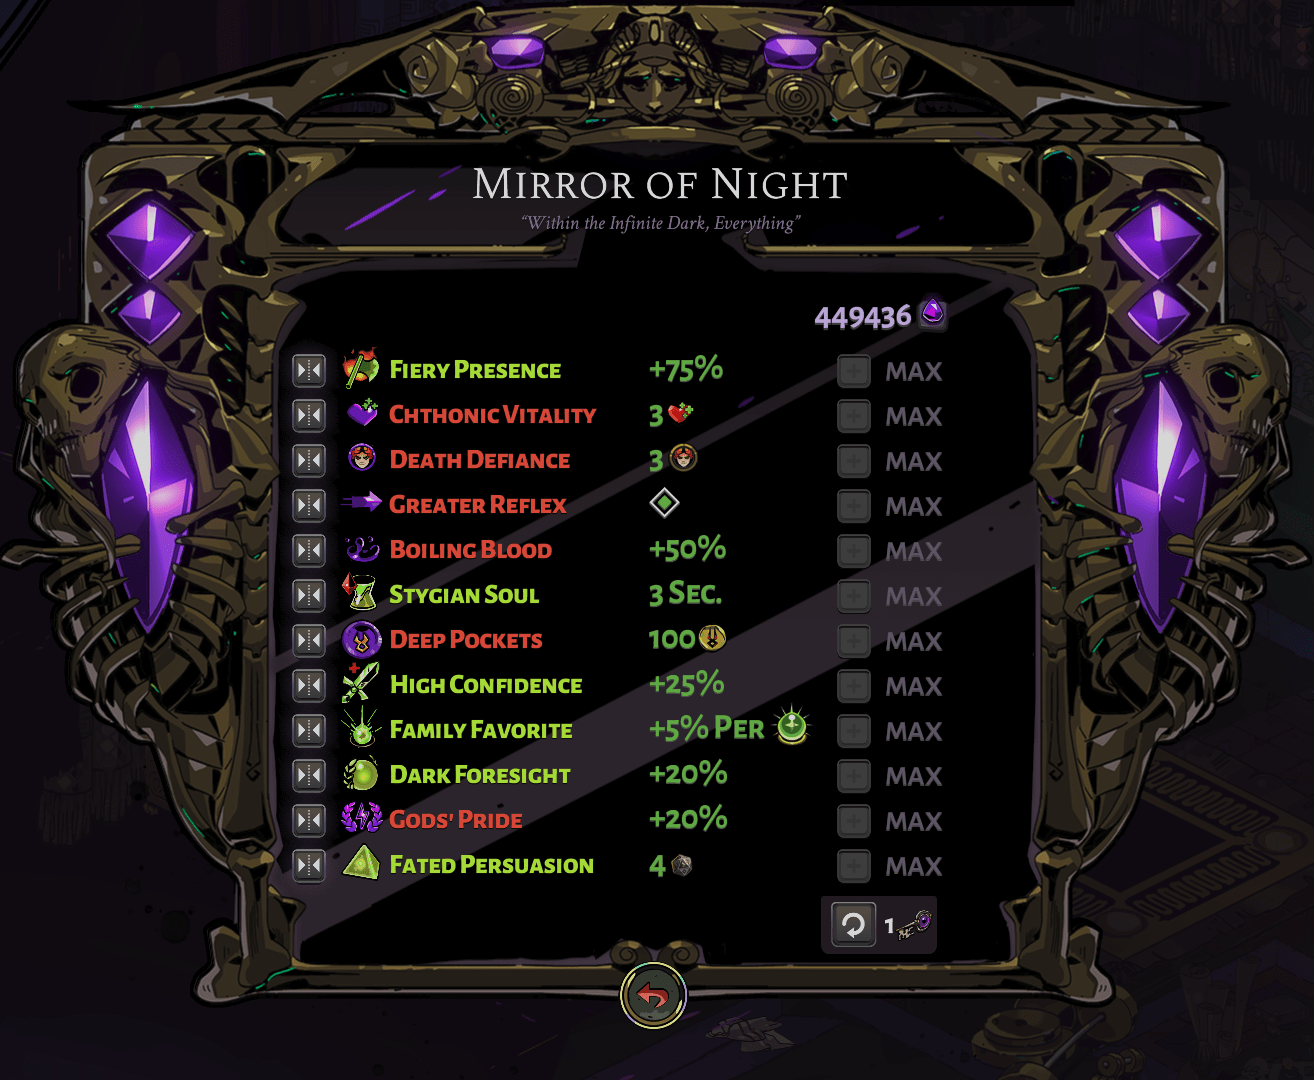
The only difference here is Infernal Soul on Zagfists & Talos and Stygian Soul on Demeter, which highlights the differences between the Aspects: that Demeter doesn’t need the remedial damage of extra Casts, nor synergise with it like Talos. Demeter can choose whether to take Infernal to help with early rooms, or Stygian to increase your chances of a good Hermes boon (by reducing the number of irrelevant Cast boons in his pool). Casts are crucial to your Tartarus gameplay, being your only ranged option, so either choice is still correct for Demeter.
Fiery Presence is one of the most important options here, a favourite for speedrunning on the majority of Aspects because it enables burst and one-shotting. For Fists, this gives your Dash-Strike and Dash-Upper a much-needed boost. You can’t give this up, and don’t want to anyway; Shadow Presence is useless when your Pummel hits so lightly.
Chthonic Vitality is standard in speedrunning as free natural regeneration. Death Defiance likewise gives all weapons more lives, which is more health, which is a resource you trade for speed. Greater Reflex means more general mobility and more dashes to proc ME with. Boiling Blood is the default in speedrunning for more damage, even if Fists can hardly make use of its bonus. Deep Pockets gives you the early Obols to get your build going, the alternative scaling being too slow and, ironically, costly.
High Confidence is the next most important damage bonus, encouraging you to avoid unnecessary damage as much as possible. This is very difficult on Fists, but +25% global damage is huge for optimisation, as it applies to your Doom as well. Alongside Fiery Presence, maintaining this is critical for reaching Tartarus damage thresholds.
Family Favourites is an interesting alternative to Privileged Status, which provides a fair bit more global damage against enemies with 2 status effects, since Doom is one such status curse. FF usually achieves +25% global damage on a 4 god pool plus Hermes, whilst PS is +40% static, either of which increases your Doom damage. The foremost problem is simply getting that second status curse. With Ares and Athena filling your core slots, Exposed (Blinding Flash) is the obvious second choice… but it’s also terribly problematic. Although it has priority as a status curse boon, the effect is otherwise useless for you, you already need 2-3 specific Athena boons just to get your build online, and unlike FF you get zero bonuses until you have it. I personally see that as far too much on top of assembling ME.
Dark Foresight is the preferred choice for speedrunning because gold laurel rewards (Obols, Poms, boons, hammers) are far more desirable, and ideally you’re lucky enough to get your relevant boons as Epic anyhow. Some have explored Olympian Favour’s Rare boost on more frugal Aspect builds, but considering Curse of Agony… not on Fists.
God’s Pride and God’s Legacy are placebo Mirror Talents, but if we choose to believe they do anything, the former is always correct for Fists. You may be thinking that Legacy ought to be better if Merciful End, a Duo boon, is pivotal to the fundamental combo of the build. However, it’s the only Duo you truly need, and if your Doom attack and Hermes boons are Common instead of Epic, you won’t be dealing much damage anyway! The humorous maxim is “Just get ME”, but it’s also unfortunately true. Unlike some other weapons with essential Duos (e.g. Beowulf and Mirage Shot), you don’t have the luxury of taking Legacy because you do care about your boons’ rarities. It’s nice when Pride also makes your supporting boons Epic, but as we reviewed, your very first and most important one needs it the most.
Lastly, Fated Persuasion is the speedrunning go-to. Although many dream about using Fated Authority to change gold laurel exits into Athena, tragically the timer is not paused while you reroll exit doors, making it useless for speedrunning. Beyond that, you still prefer rerolling offer menus – for the specific cores, for more chances at ME, for Hermes, for Impending, even for Poms should you end up with some spare.
Gilgamesh

Gilgamesh is unique among Aspects for preferring Ruthless Reflex over Greater Reflex. Within the speedrunning community, the only other Aspect we’ve associated RR with is Zeus Shield. Of course, Gilgamesh is also the only Aspect to have bonus dashes simply built into its kit! It’s a little awkward to activate, but +50% global damage is sizeable for your Doom if it triggers whilst you’re in the middle of an ME dash-combo-sequence, and you don’t really need another dash when you already start with three.
Everything else is the same. Gilgamesh also enjoys Infernal Soul as a fast and effective damage option.
Hammer Hierarchy
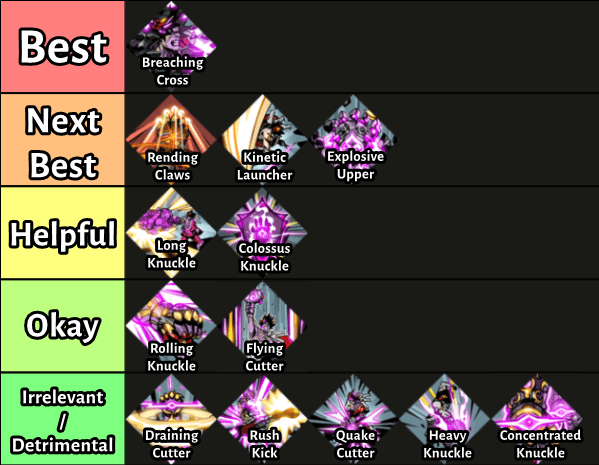
Breaching Cross is simply yoptimal in all situations because +900% damage to Armour is a very big number. You theoretically stop “needing” it once you have the full ME build, but that armour shredding never stops being useful. It even gives your Dash-Strike a piercing effect on top, a minor addition to apply Doom more efficiently. In modded versions, this should be your guaranteed first hammer.
Rending Claws is exclusive to Gilgamesh, and it makes Maimed enemies take +25% damage (on top of the usual +25%) and move 30% slower. It’s simply even more damage scaling, adding to Gilgamesh’s ability to melt bosses and some beefier enemies.
Kinetic Launcher, only available on Zagfists and Demeter, makes your Special a ranged and charged projectile dealing 50 Damage. That’s already a good boost, but it also has a very quick animation with no need to charge it, making your supplementary Specials much better. If you ever have ME without Divine Dash, Kinetic Launcher makes it feel smooth to do Attack into Special procs.
Explosive Upper makes your Special deal +100% damage in an blast radius. That’s more damage scaling and an AoE effect, incredibly synergetic with Demeter’s 6 or 7-hit Giga Cutter, but generally making all Specials better.
Long Knuckle gives your Attack more range and +10% damage. The latter is a largely irrelevant bonus, since your Pummels do so little anyway, but the extra range is great on a melee weapon that needs careful movement and positioning. Incompatible with Gilgamesh.
Colossus Knuckle gives you Sturdy while using your Attack or Special. Sturdy means you take -30% damage and can’t be interrupted, which is helpful for rapid Doom procs and keeping High Confidence up in close quarters. Hyper Sprint also provides Sturdy, so you might not want to have both.
Rolling Knuckle gives +60% damage to Dash-Strikes and makes your Pummel sequence loop with an added Dash-Strike. The latter isn’t important because you should never be standing still without dashing for that long, but the minor damage boost on your Dash-Strikes is better than nothing. Incompatible with Gilgamesh.
Flying Cutter allows you to hold your standing Special to increase its range (rectangular hitbox) and damage up to +100%. It’s usable to charge it between enemy waves, primarily with Demeter’s 6 or 7-hit Special, but it’s entirely detrimental on other Aspects if you already have ME. Incompatible with Talos.
Draining Cutter restores 2% of your health whenever you kill an enemy with your Special. This is very specific and inconsequential.
Rush Kick turns your Special into a moving kick that deals 40 Damage twice. It’s good damage, but much slower with an awkward long animation. This makes it detrimental to ME procs if you don’t have Divine Dash yet or have fewer bonus dashes. Gilgamesh, having an inherently clunky kit, CAN take it to decent effect, but there are generally better options like Breaching, Rending or Explosive. Incompatible with Talos.
Quake Cutter lets you hold your standing Special to do 90 Damage in an area where you land. That’s a ton, but it’s way too slow and doesn’t work with ME builds at all. Very fun for casual though. It’s also incompatible with Demeter, which could have made it work in a different world…
Heavy Knuckle makes your Pummels a slower 3-hit sequence, but they deal 40 Damage each. Slower Attacks are not what you want for ME procs. 40 is also just not a high enough baseline to scale for its speed – you’d need a lot of Chaos Attack bonuses.
Concentrated Knuckle gives you +5 Damage for each consecutive hit, but it only lasts for a 5-hit sequence before restarting. Knowing that, your Pummels just don’t deal enough damage to make this worthwhile. Maybe in another world it would’ve stayed at +25… 40 Damage per hit for 5 hits doesn’t sound too bad? Basically Spread Fire, which is decent.
Moving as Melee
You’ve probably noticed that the Fists are one of the four melee weapons out of the six in the game, although modded Beowulf players would have you believe there are three, and Achilles makes the Spear so mobile it doesn’t really count. Anyway, yes that’s obvious, but with such limited range it’s always important to think about how you’re manoeuvring around the room whilst clearing waves. Excess movement is lost time, which is why you always need to think about your next move, and moreover use your whole kit. Casts are immensely valuable for their range, and sometimes you’ll save more time doing either a Dash-Strike or a Dash-Upper.
Spawn manipulation turns this into a careful dance, as you must always be ready to reach the right spot between waves, only to immediately return to the enemies. This is no different when finishing a room – the shorter distance to the exit doors, the better – which means being aware of your limited range when clearing stuff out. Ranged enemies generally take priority, though a Cast sometimes deals with stragglers.
Zagreus & Demeter
Intro: Unfairly Uniform
The Zagreus and Demeter Aspects have an identical basic kit in all but one respect: Demeter’s Special bonus, the 6 or 7-hit Giga Cutter that takes 12 Pummels to charge, a strong asset that makes Demeter the fastest Aspect of the Fists. Comparatively, the +15% dodge chance on Zagfists is a largely unreliable and insignificant bonus for speedrunning, only occasionally helping you maintain health for High Confidence. As such, this is the most obviously homogenous pairing among the Fists. Zagspects don’t tend to have particularly unique qualities; only Zagbow and Zagrail tend to show different playstyles among the lot, and Zagfists is unfortunately run-of-the-mill. Hence, “unfairly uniform” – in speedrunning, little more than a handicapped Demeter (Still fun for casual Plume dodge builds though!).
Nonetheless, Merciful End is something of an equaliser, being the strongest way to play once the core build is online and thereby making the gap subtle. Moreover, these two Aspects still have the same gameplan in the early biomes whilst assembling the build. Giga Cutter is always advantageous against beefier enemies and (mid)bosses, but becomes less impactful once your combo is online. For the most part you only notice Zagfists’ disadvantage in Tartarus, and alongside Talos, the three standard Aspects look similar by the later biomes.
| Pummel | Hold Attack. | 15 Damage per hit. | Hits 5 times before the sequence restarts. |
| Cast | Press Cast. | 50 Damage | Fires your Bloodstones as ammunition. |
| Rising Cutter | Press Special. | 30 Damage per hit. | Hits 2 times in front; you can move during it. |
| Dash-Strike | Press Attack while Dashing. | 25 Damage | Has a frontal semi-circle hitbox. |
| Dash-Upper | Press Special while Dashing. | 40 Damage | Has less animation delay than your Special. |
| Giga Cutter | On Demeter, use Special after landing 12 Pummel strikes. | N/A | Your next Rising Cutter or Dash-Upper hits 5 more times. |
Thresholds
The first three assume you don’t yet have Divine Flourish (your Special boon) and all assume the enemies are ‘naked’, i.e. don’t have armour, though note that Fiery Presence still works on armoured enemies.
- Dash-Strike with just Fiery Presence deals 44 Damage, which kills Numbskulls and Pests.
- Dash-Upper with Fiery Presence and High Confidence deals 80 Damage, exactly enough to kill a Witch. Without High Confidence it deals 70 Damage, which is enough to kill a Brimstone. Notably, they can also be killed by your base Cast with High Confidence, which deals 63 Damage.
- Demeter’s Giga Cutter does a minimum of 210 Damage with your Rising Cutter, or 240 Damage with your Dash-Upper, which kills both Thugs and Louts. With Fiery Presence and High Confidence on your Dash-Upper, it deals 330 Damage, which kills a Bloodless.
- If we now consider the minimum potential damage on an Epic Divine Flourish at +108%, your Dash-Upper now does a base 83 Damage. With Fiery Presence and High Confidence added on (+208%), it does 123 Damage. This kills Skullomats and Dracons.


- Giga Cutter on your Dash-Upper with the same boost does a base 500 Damage. This kills a number more enemies in Asphodel, including Bone-Rakers, Wave-Makers, Skull-Crushers, Slam-Dancers, Burn-Flingers, Inferno-Bombers and even Elysium’s Strongbows. With Fiery Presence (on the first hit) and High Confidence added on, it does 740 Damage. This now also kills Greatshields and Brightswords.
The most awkward range is around 150, out of reach for basic attacks but somewhat excessive for Demeter’s Giga Cutter. Enemies with about that health include Tartarus’ Wringers (and Thugs), Asphodel’s Spreaders and Gorgons, and Elysium’s Exalted Souls. Doom itself is generally better suited for these jobs.
Techniques
- Likely the most valuable thing I have ever tried to teach regarding Fists, applying either to Zagfists or the more popular Demeter, is to use your Special more – especially in Tartarus, but elsewhere too. I mostly recommend it in regard to the Dash-Upper, because it’s your fastest option for the highest damage output, boasting little animation delay so you can immediately follow it up with your next attack.
- Even the standing Special i.e. Rising Cutter has its uses – having Fists’ highest total damage at 60 makes it decent for finishing off bulkier enemies, the animation can be prepared (started) before enemy spawns to offset the delay, and though it has the same range as your Dash-Upper, being able to move during it makes it feel easier to cleave multiple enemies.
- Whether or not you have a charged Giga Cutter, finishing off an enemy with a Dash-Upper to proc ME is sometimes more efficient than spending another dash. And when you only have +1 dash or Hyper Delivery from Hermes, there’s plenty of time to fit an extra Dash-Upper between your dash sequences. As for when you are playing Demeter, hopefully the Giga Cutter thresholds indicated how it can scale up nicely.
- Hades (the game) lets you buffer your inputs, which you can take full advantage of for your Dash-Strike and Dash-Upper. Besides delivering more damage, their low animation delays promote your smooth movement whilst attacking. Similar notions apply to your Cast.
- Likewise, though you can’t cancel the animation of Demeter’s Giga Cutter, you can and should buffer a dash before it ends.
Talos
Intro: Double-Edged Differences
What if, in spite of your limited melee range, you could simply pull the enemies towards you? Doesn’t that sound nice? It does… but the monkey’s paw curls, and for that nifty gimmick Talos pays the price of unforeseen consequences. Namely: a longer Special animation accounting for Magnetic Pull, which does a base 20 Damage. Yet even more (damage) isn’t always merrier when that interrupts Fiery Presence and cannot benefit itself from the buff: suddenly, your Dash-Uppers can no longer one-hit-kill Witches. These combined weaknesses may sound minor on paper, but any Zagfists or Demeter runner who tries out Talos will surely immediately notice the Aspect’s tragic awkwardness.
As a result, Talos changes its Tartarus gameplan considerably. Your Casts become more significant than ever, and you must look to new tricks in lieu of the classics.
| Pummel | Hold Attack. | 15 Damage per hit. | Hits 5 times before the sequence restarts. |
| Cast | Press Cast. | 50 Damage | Fires your Bloodstones as ammunition. |
| Magnetic Cutter | Press Special. | 30 Damage per hit. | Hits 2 times in front; you can move during it. Has a longer animation due to including Magnetic Pull. |
| Dash-Strike | Press Attack while Dashing. | 25 Damage | Has a frontal semi-circle hitbox. |
| Dash-Upper | Press Special while Dashing. | 40 Damage | Has less animation delay than your Special. Has a longer animation due to including Magnetic Pull. |
| Magnetic Pull | Triggered by Magnetic Cutter or Dash-Upper. | 20 Damage | Enemies take 50% more Attack and Cast damage for 6 seconds. |
Thresholds
The biggest problem with Talos is how Magnetic Cutter’s pull breaks Fiery Presence, making it harder to reach any damage thresholds with your Dash-Upper. Instead, you typically focus on what you can get with its +50% buff to Attack and Cast damage, and you must focus on keeping High Confidence active more often.
- Dash-Strike with just Fiery Presence deals 44 Damage, which kills Numbskulls and Pests.
- Magnetic Pull with Dash-Upper deals a base 60 Damage, enough to kill a Brimstone.
- Just hitting Magnetic Pull and a buffed Cast alone does a base 20 + 75 = 95 Damage without HC, enough to kill a Witch.
- With High Confidence, Magnetic Pull does 25, then a buffed Dash-Strike does 44, into 5 buffed Pummels for 130, which makes 199 Damage total, enough to kill a Thug. However, this is a bit slow/awkward.
- An easy alternative is to throw your Cast, then use Dash-Upper on an enemy alongside the Magnetic Pull. With High Confidence, this does a buffed 87 + 45 + 25 = 157 Damage. Without it, it does 75 + 40 + 25 = 140 Damage, which is still enough to kill a Wringer.
Techniques
- Talos, by pressing Special during a dash, not only buffers the following Dash-Upper but crucially activates Magnetic Pull early, effectively cancelling most of the animation. You should virtually always do this to offset the disadvantage of a longer Dash-Upper animation.
- But furthermore, this extended animation actually makes it much easier for Talos to do a certain trick compared to Zagfists and Demeter: cancelling, or rather overriding your dash-buffered input entirely. Those two Aspects have an extremely tight window within which to do so, but they have no real reason to do it in the first place. Talos, on the other hand, becomes able to dash-cancel a Magnetic Pull into a different input, be it Dash-Strike (easier), Cast (harder), or another dash, which will still preserve the initial Dash-Upper unless you cancel it with one of those alternatives.
Welcome to Talos’ ultimate hidden jutsu and bread-and-butter. If you care about optimising your timesave pre-ME in Tartarus, you now have to “high APM” weave Magnetic Pulls alongside your dashes into your combat gameplay routine. Alongside your Casts, which can innately be animation-cancelled and receive a buff from the pull, Talos definitively becomes the Fists Aspect of Animation-Cancelling. And because any standard Special is typically a little slower than normal, exchanging it for alternatives is often the yoptimal play.
In other words: Dear god, it’s so much more complicated.
Gilgamesh
Intro: Clunky & Chunky
One must ask themselves, “Just what would make an Aspect the worst in the game at speedrunning?” And the answer is pleasantly simple: catastrophically slow animations without any inherent solution.
Five out of the six Hidden Aspects in Hades are described as having a “Heavy Attack” in their alternate moveset, Lucifer being the exception – each clearly designed to do more damage at a slower rate. But when the lighter-footed Aspects still find ways to deal sufficient damage at faster speeds, it forebodes that heavy-hitters will lag behind. Among those, Rama and (to a much lesser extent) Arthur overcome the issue with sheer numbers, hunting for whatever circumstances make that efficient. Guan Yu retains an effective Special which synergises well with the Charged Skewer hammer. Beowulf… is a broken Cast weapon, basically.
Gilgamesh likewise gets “big” numbers: 60 Damage on each Attack, and the Maim effect does a whole 400 Damage! …but Maim takes 4 whole seconds, way too long for most enemies, and the Swipes just aren’t big enough; Fists are a made to be multi-hit weapon, and that design limitation hurts when each hit is still slow. Moreover, in actual practice, Fists are a Dash-Strike and Dash-Upper weapon, and Gilgamesh finds both of these options diminished: Dash-Strike only does 20 Damage, and Dash-Upper has a longer animation than usual. Even having +2 dashes built-in comes with a defect: seemingly because only Gilgamesh gets the privilege of holding down the Dash button, your dash cooldown is also a tiny bit longer than any other Aspect in the game. Overall, nothing can truly compensate for Gilgamesh’s intrinsic clunkiness.
…all that said, the chunkiness should not go unmentioned. Maim’s global damage modifier and +2 dashes are both excellent assets for Merciful End, the latter making Gilgamesh synergise with Rush Delivery: you already have extra dashes, so you favour scaling! In exchange for faring worse in combat rooms, Gilgamesh can really melt bosses once it has the full build online. As ever, the biggest obstacle of all is just getting there.
| Swipe | Hold Attack. | 60 Damage per hit. | Hits 5 times before the sequence restarts. Slower, but deals more damage. |
| Cast | Press Cast. | 50 Damage | Fires your Bloodstones as ammunition. |
| Rising Cutter | Press Special. | 30 Damage per hit. | Hits 2 times in front; you can move during it. |
| Dash-Strike | Press Attack while Dashing. | 20 Damage | Has a frontal semi-circle hitbox. Deals less damage. |
| Dash-Upper | Press Special while Dashing. | 40 Damage | Has a unique animation delay after the uppercut. Maims enemies struck. |
| Maim | Applied by Dash-Upper. Lasts for 4 seconds before dealing damage. | 400 Damage | Enemies take +25% damage and deal +50% damage for the duration. |
Thresholds
- Dash-Strike with just Fiery Presence deals 35 Damage, which kills Numbskulls. With High Confidence as well it does 40, enough to kill Pests.
- Dash-Upper with Fiery Presence and High Confidence deals 80 Damage, exactly enough to kill a Witch. Without High Confidence it deals 70 Damage, which is enough to kill a Brimstone. Notably, they can also be killed by your base Cast with High Confidence, which deals 63 Damage.
- Swipe does a base 60 Damage, enough to kill a Brimstone. With Fiery Presence and High Confidence it does 120 Damage, enough to kill Skullomats and Dracons.
- With High Confidence, if you Cast first and then Swipe with the Boiling Blood boost, you deal 62 + 105 = 167 Damage, enough to kill Wringers and Thugs.
Techniques
Rather kindly our resident Gilga-master Cherry has put together a video playlist showing Gilgamesh tech in practice, linked here.
- With your Dash-Strikes dealing so much less damage than your Swipes, it can be completely worthwhile to wait briefly after dashing before you press Attack so you get Fiery Presence on a Swipe instead. Moreover, each of your Swipes has a wide arc to it – the same as your Dash-Strike. Attentive angling can net you more enemies in one hit.
- A noticeable problem with Swipe is how easy it is to accidentally do more than you need, since the buffer window is too generous – effectively the entire long attack animation. To counteract this, both keyboard and controller users ought to consider just clicking/pressing each individual Swipe, or controllers can release the button earlier.
- Your Casts are more important than ever for their low animation times, effective either before a Swipe (taking advantage of Boiling Blood) or after one to finish off an enemy quickly.
- Don’t forget about Ruthless Reflex! Since you want to avoid accidental Dash-Strikes, look for occasional procs while moving from one enemy to another. Note that traps can be easy activation sources!
- Caustic Chaos curses (Inferno-Bombs) can potentially help you trigger Ruthless Reflex more, albeit dangerously – thus you might prefer take this curse into account when choosing your Chaos.
- Caustic Chaos curses (Inferno-Bombs) can potentially help you trigger Ruthless Reflex more, albeit dangerously – thus you might prefer take this curse into account when choosing your Chaos.
- Because Maim lasts exactly 4 seconds, if you have a solid awareness of your DPS, you might find it more efficient to delay using it against bosses to prevent wasting its 400 Damage trigger to a boss’s phase change. However, earlier access to the global damage buff for ME is likely yoptimal further into the run. So, in practice, one can mostly consider using a late Maim against Meg and Alecto, causing it to trigger-loop in the 2nd, 3rd and 4th phase.
Extended Concepts
God Pools & Build Paths
As mentioned prior and implied by the boon list, the ideal god pool for Merciful End Fists is Ares, Athena, Artemis and Zeus. Artemis brings highly beneficial crit damage scaling for your Doom, whilst Zeus offers symbiotic self-scaling significantly supplementary strikes. That is, lightning on top of lightning. Also the only Call you want besides Hades’ Aid.
However, it’s generally unlikely that you get both in one run, and even if you do, you probably won’t see enough of both to get their utmost value. In the vast majority of cases, you’ll simply take what you can get, or rather whatever you end up with.
My recommended list of priority for your side gods is:
- Zeus >< Artemis > Poseidon > Demeter/Dionysus > Aphrodite
However, there’s additional nuance between our best two contenders. Zeus’ Cast Electric Shot is likely the single best boon you can pick up early on that isn’t a part of ME; it fills in a core slot so you’re more likely to get the right Athena boons, thereby removing a core boon priority offer so there are more chances at ME, and gives the Fists a strong ranged option to clear enemies which kills Witches with High Confidence at Rare and above.
Once you already have a Zeus boon, further Zeus boons generally become better options. (Think Static Discharge, Double Strike, Billowing Strength, Splitting Bolt.) Yet conversely, the longer your run goes without a Zeus boon, the weaker it becomes to force Zeus, because it’s less likely and takes longer to end up with more Zeus for your Zeus. Zeus.
Furthermore, filling your god pool is valuable and takes its own precedence. With 4 Olympian gods (excluding Hermes), the game locks in your pool and only offers them to you for the rest of the run – more advantageous odds for Impending, and in the best case scenario, more Zeus or Artemis support boons.
So which keepsake do you take into Asphodel when you already have the core ME build? The answer likewise depends on the circumstances of your run.
- If you have Ares, Athena and any other god, force Artemis to fill your pool.
- If you have Ares, Athena and Artemis, force Zeus to fill your pool.
- If you only have Ares and Athena, take Coinpurse if you lack Obols,
or force Artemis if you don’t. - If you have 4 gods already, take Coinpurse unless one of them is Zeus and you don’t lack Obols, in which case force more Zeus.
The general logic here is that Artemis is the best god to add to your pool for scaling Doom damage, but if you can’t fill your pool and need money, Coinpurse could help you buy an Ares for Impending Doom. Otherwise, if you have Zeus already, guaranteeing more Zeus is a stronger option.
Once you’re at Elysium, two build paths become clear: those that have Zeus’ Aid already or that clearly want it, and those that take Sigil for Hades’ Aid. The latter stick with it to Hades, while the former take Acorn to hold onto High Confidence for a little longer.
Chaos Considerations
While Chaos gates are almost always beneficial to skip a room (at least in IGT), I find that Fists are generally more likely to consider passing on them (also relevant for RTA). Note that this mostly applies to the first ~5 chambers in Tartarus; afterwards skipping a room will almost always be faster.
The most relevant Chaos boon you can get is Favour, which gives you a percentage bonus for Rare boons whilst also adding a flat +10% to Epic and Duo/Legendary boons. That latter part is the most relevant for getting an Epic Hermes boon, and for getting Merciful End itself, while the former bonus is just the cherry on top.
Otherwise, Affluence (Obols) builds more money for Poms on top of boons, and then Flourish (Special) and Lunge (Dash-Upper) are minor damage boosts, especially for Demeter. If you didn’t yet know, that “Dash-Strike” bonus applies to the Fists’ Dash-Upper as well. Aside from Gilgamesh, Strike (Attack) curses aren’t worth it what with the measly numbers on your basic kit.
Despite the benefits, Chaos gates pose a significant problem in their health costs – mostly the initial price to enter one, occasionally from the curse you choose. Maintaining High Confidence is crucial in early Tartarus so that you reach enemy health breakpoints, especially the ability to kill Witches (80 HP) with your Dash-Upper. You can quickly lose more time than you gained from skipping a room.
Besides that, always check what the reward is on the exit door. Too many Athenas have been lost to rash Chaos takers, where the advantage of forming your build can easily and massively offset skipping a room. A particularly lucky combat room can feel just like a skip, and sometimes it’s a free room either way.
Rocks & High-rolling
Fated Persuasion starts you off with 4 reroll “rocks” (dice), and each Chthonic Key room reward you get during the run gives you one extra, making them the default priority among blue laurel exits. Each additional reroll on the same reward costs 1 extra rock.
With so much to look for, it goes without saying that you cannot afford to waste these. Some runs never need them, but most are desperate for more. Even just spending one to get your Epic Doom attack starts you with a deficit; spending three total is a disadvantage that practically spells your own doom. Ha ha.
On the whole, the only thing you can afford to spend 3 rocks on is Merciful End itself – unless you have it and Divine Dash already, in which case Hermes is next in your priority list. Otherwise, try to only roll once on any screen. Sometimes Athena will condemn you, withholding her Special or Dash, and there’s nothing you can do about it but nod.
Once you’ve managed to assemble all the pieces of Exodia (typically by Elysium), spare rolls can be used on Pom screens to try and redirect them to your Curse of Agony or Impending Doom as necessary. A final, lucrative alternative is rolling Elysium Wells for a Light of Ixion, as a late chamber skip can make or break a run.
Handling Hermes
If you have 2 rocks left and your first Hermes offers nothing good, you’re largely safe to reroll knowing that you’ll have another chance later. But when you have only one rock left and/or it’s your second Hermes (perhaps you took Hyper Sprint first), a small bonus like +1 dash becomes objectively sensible compared to the risk of no bonuses at all.
Whenever you can take +2 or +3 dashes on your first Hermes, that’s easily your best choice for immediate value without any further luck involved. But if you’re only offered Hyper Sprint first, you can accept that knowing your second Hermes now has another strong possibility in the pool (RD), even choosing it over +1 dash.
The Great Debate
Solely focusing on Doom, Epic Greater Reflex (+3) has an initial damage advantage, but slightly loses out to Epic Rush Delivery in terms of single-target damage over time. Let’s start with that and (try to) do some.
At a glance, Greatest Reflex wins sizeably: if we imagine the base Doom damage to be 150, a rough +80% Impending, +20% Family Favourites and Epic RD increases it x3.0 to 450 and 2 dashes makes 900, and lastly 980 after ME. With Greatest Reflex, only Impending and FF is x2.0 to 300, and 5 dashes makes 1500, and lastly 1700 after ME.
However, a sequence of 5 dashes takes longer to do that 1700 because the duration of dashes is static, and dash cooldown time (i.e. after you have used up all your dashes, how long until you can dash again) is also static no matter how many you have (excluding Gilgamesh, which unfortunately has a longer one by design). This means that with fewer dashes, you can start your next dash sequence sooner – and Epic RD is doing more damage for each one, allowing it to deal far more over time.
Based on my observations, Epic GR allows you to do five dashes about every 1.5 seconds, whereas without it you can do two dashes about every 0.8 seconds. (This is most likely approx. 0.2 seconds per dash, and a 0.4 second cooldown between dash sequences. Please forgive, then, that my rough maths has given GR a 0.1 second handicap; it was my best attempt at human observation, and makes the following calculations cleaner. Think of it as human error during play with so many dashes.) These sync up at 12 seconds; Epic GR has done (12 / 1.5 =) 8 x 5 = 40 dashes in that time, whereas the base is (12 / 0.8 =) 15 x 2 = 30 dashes.
So in a 12 second window:
- Epic GR: (300 x 40 dashes) = 12,000 + (40 ME x 40 dashes) = 13,600 Damage.
- Epic RD: (450 x 30 dashes) = 13,500 + (40 ME x 30 dashes) = 14,700 Damage. (+1100)
In a 24 second window instead, we get (24 / 1.5 =) 16 x 5 = 80 dashes, compared to (24 / 0.8 =) 30 x 2 = 60 dashes. Therefore:
- Epic GR: (300 x 80 dashes) = 24,000 + (40 ME x 80 dashes) = 27,200 Damage.
- Epic RD: (450 x 60 dashes) = 27,000 + (40 ME x 60 dashes) = 29,400 Damage. (+2200)
The gap has exactly doubled from 1100 to 2200, so Epic RD should theoretically always remain ahead over Epic GR on a set gradient (not exponential).
If we do the same using Rares instead…
Rare GR:
- 150 x 2.0 = 300 x 4 dashes = 1200 and 1360 after ME
Four dashes every 1.2 seconds, 40 dashes in 12 seconds:
- (300 x 40 dashes) = 12,000 + (40 ME x 40 dashes) = 13,600 Damage. (+40)
Or 80 dashes in 24 seconds:
- (300 x 80 dashes) = 24,000 + (40 ME x 80 dashes) = 27,200 Damage. (+80)
Rare RD:
- 150 x 2.75 = 412 x 2 dashes = 824 and 904 after ME
Two dashes every 0.8 seconds, 30 dashes in 12 seconds:
- (412 x 30 dashes) = 12,360 + (40 ME x 30 dashes) = 13,560 Damage.
Or 60 dashes in 24 seconds:
- (412 x 60 dashes) = 24,720 + (40 ME x 60 dashes) = 27,120 Damage.
In this case Rare RD isn’t actually catching up to Rare GR, but rather very slowly falling behind. Lastly, for Commons:
Common GR:
- 150 x 2.0 = 300 x 3 dashes = 900 and 1020 after ME
Three dashes every 1 second, 36 dashes in 12 seconds:
- (300 x 36 dashes) = 10,800 + (40 ME x 36 dashes) = 12,240 Damage.
Or 72 dashes in 24 seconds:
- (300 x 72 dashes) = 21,600 + (40 ME x 72 dashes) = 24,480 Damage.
Common RD:
- 150 x 2.5 = 375 x 2 dashes = 750 and 830 after ME
Two dashes every 0.8 seconds, 30 dashes in 12 seconds:
- (375 x 30 dashes) = 11,250 + (40 ME x 30 dashes) = 12,450 Damage. (+210)
Or 60 dashes in 24 seconds:
- (375 x 60 dashes) = 22,500 + (40 ME x 60 dashes) = 24,900 Damage. (+420)
Yet the gradients change here and RD claims victory again! This gives us a rough idea for a “single-target Doom damage hierarchy” for those second Hermes screens:
- Epic RD > +3 Dashes > +2 Dashes > Rare RD > Common RD > +1 Dash
But naturally, these Doom damage approximations are not the only factor in mind when weighing up Rush Delivery and Greatest Reflex. There are pros to both, as follows:
Epic Rush Delivery
- Better at extended single target damage, such as bossing
- Global damage buff also impacts your Specials and Zeus boons
- Bigger burst damage per dash can be more efficient if little is wasted
Epic Greater Reflex
- Better at shorter, mobile damage, i.e. large combat wave-clearing
- More dashes to distribute damage can be more efficient with lower thresholds
- You can get it first instead for immediate value
…sadly none of this theorycrafting can be easily applied to Gilgamesh, but thankfully the built-in +2 dashes suggests to us that RD is preferable in most situations anyhow.
Waves: Why Wait?
Prior to ME, Doom takes 1.1 seconds to activate (1.6 with Impending). When you tag enemies by pummelling them whilst moving across a room, you don’t “lose time” because the Doom proc is killing the enemies faster than you could with the rest of the Fists kit, making that delay negligible – UNTIL you engage the final (untouched) enemy in a wave/room. At that point, if you can kill the enemy faster than the 1.1 second Doom delay, you’re saving time! Tenths of a second per wave, per room, can absolutely add up to multiple seconds over a whole run.
On the other hand, sometimes Doom will finish the job before you can, particularly Thugs and Louts. In these cases, using the last second to reposition – either towards the exit doors or for spawn manipulation – can be a better use of time than overcompensated damage. As long as you’re certain that last Doom proc is enough!
Reset Thresholds
- Epic Curse of Agony, but if you’re playing unmodded and can’t bear the resets, or playing multiwep, Rare is acceptable.
- Athena in Tartarus is the most basic, classic and universal rule for ME. Completing more of your build is obviously desirable, especially having ME by Furies, but scarcely seen on a good pace. Good runs often fill out the build during Asphodel, with Impending Doom by early Elysium at the latest. “Rooms over boons” is the archetypal Hades maxim, and in this case you prioritise speed with one Athena minimum.
- ME is your “make or break” point, whilst Hermes and Impending affect the quality of the run.
For sub-8 IGT:
- 2:00 Tartarus, 4:00 Asphodel, 6:00 Elysium
For sub-7 IGT:
- 2:00 Tartarus, 3:30 Asphodel, 5:15 Elysium
For sub-6 IGT:
- 1:45 Tartarus, 3:00 Asphodel, 4:30 Elysium
Well Wishes
Let me send you off on a relaxing note: Fists don’t have to worry too much about Charon’s Wells compared to other weapons (especially castspects). As in the Starter Summary, saving sufficient Obols for all your requisite boons and their Poms bears emphasis. Even so, if you have spare Obols, certain goodies will usually make them worthwhile.
Since you do damage through ME first and foremost, the only thing that can directly amplify that is Ignited Ichor (10) alongside Rush Delivery – a cheap and brilliant bonus if both elements appear, since movespeed bonuses are multiplicative.
A Light of Ixion (55) in the right place can make all the difference in the world through a crucial Chaos room skip. They don’t always work out, but when they do, any weapon can make miracles happen.
Also situationally excellent is the Yarn of Ariadne (70), a pricy upgrade to your next boon’s rarity. Especially in Asphodel, this might get you ME or a lovely Epic Hermes boon.
Night Spindles (40), or rather a Night Spindle, can be a crucial purchase. In speedrunning you are generally expected to use 6 Megs a run: Tart midboss, Aspho midboss, Elysium midboss, Heroes, Styx midboss and Hades. So if you don’t get one, you’re forced to skip one of those bosses. If your ME build is fully online alongside Breaching Cross by Aspho midboss, you can easily kill the Witches’ Circle and 1-cycle the Power Couple without a Meg. If it isn’t, you need a Spindle, or else you won’t have a Meg for the Styx midboss.
If you’re missing health for High Confidence and have spare Obols, HydraLite (45) and Life Essence (%) are seldom incorrect.


The most difficult one to speak on is the Stygian Shard (35) owing to the distinct conditions of trap damage. +500% is massive and can easily make traps one-shot enemies or deal huge chunks to bosses, but creating these situations is tricky. I’d recommend to only buy these if you have plenty Obols to spare.
Mainly for Demeter, a Chimaera Jerky (35) is a small +40% Special damage boost sometimes worth considering.
Lastly, Aether Nets are wonderfully cheap (15) in return for a +15% headstart on your Call.


Be the first to comment