
Everything you’d want to reference while in-raid in one color-coded infographic! Area loot by type, vendor & quest npc locations, monster drops and hp, octave’s daily buy list. Additional item, loot, quest, monster and gameplay tips!
General Guide
Map & Infographic – Details & Additional Info
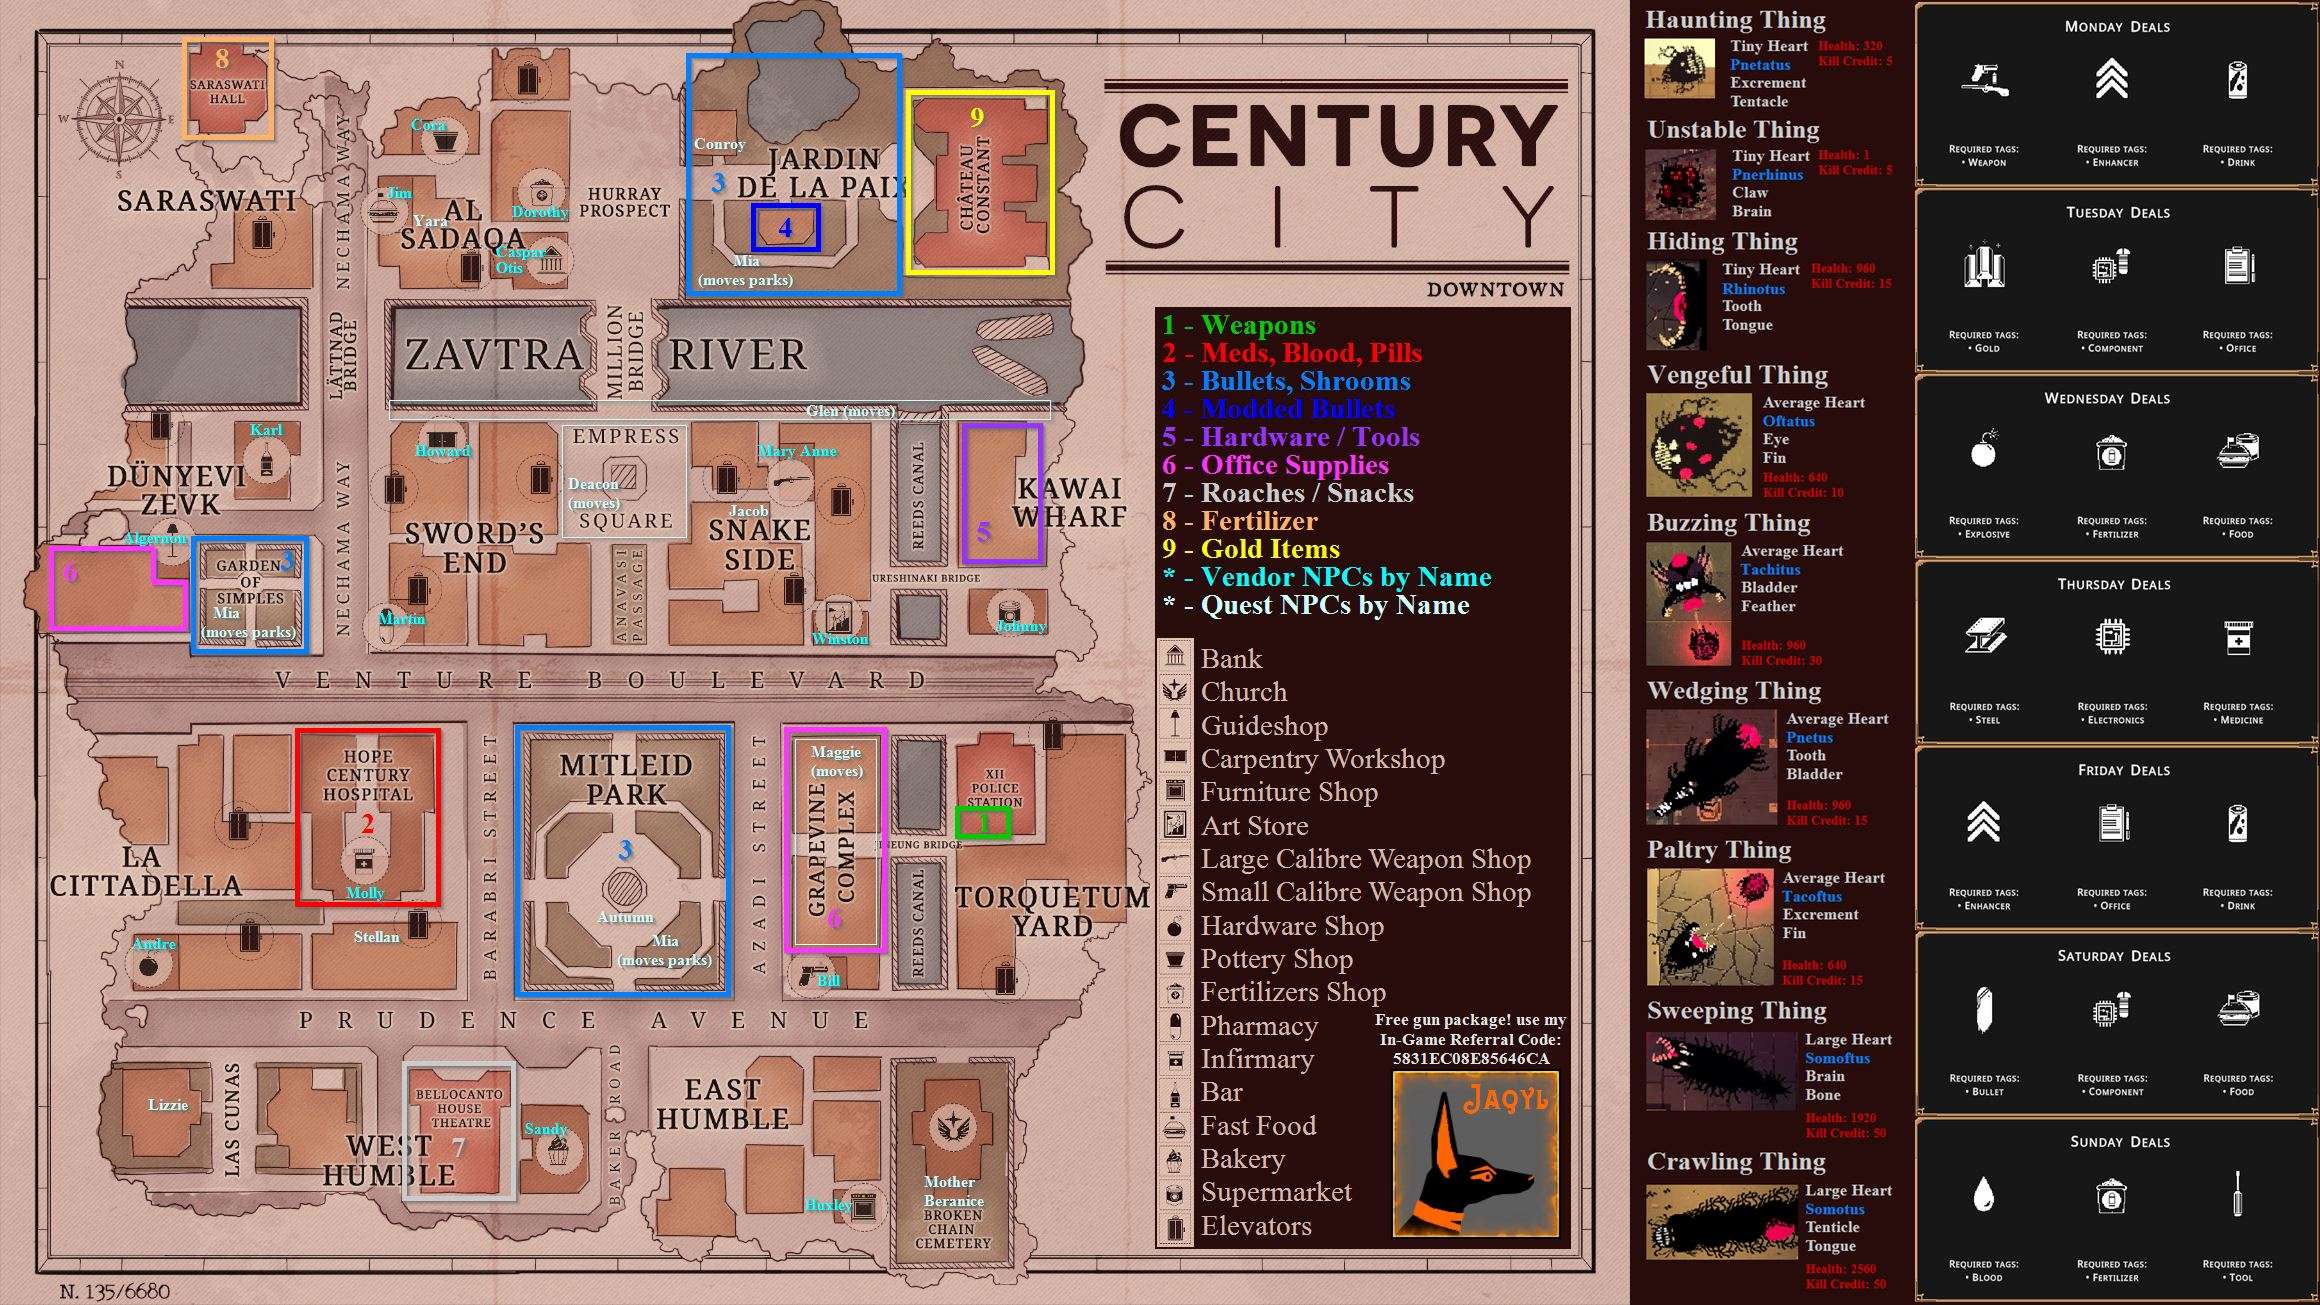
Loot AreasLoot by item type is both numbered and boxed using color-coding that matches the legend listed under ‘Century City’ on the right of the map.
Vendor & Quest NPCs
- Named and color-coded with Quest-only NPCs being a slightly lighter shade than Vendor + Quest NPCs.
- Quest-only NPCs Deacon, Maggie, and Glen vary their location within a small area. Their general area is indicated by a color-matching thin box.
- Quest-only NPC Mia moves to various positions within the three parks indicated by the third ‘Bullets, Shrooms’ boxes.
Monster GuideThe vertical Monster Info strip to the right of the map is organized by Heart size smallest to largest top-down, it includes the following…
- Reference image of each Thing.
- All possible monster drops. Edible buff mushrooms color-coded in blue.
- Monster starting Health.
- Credit Score gain per kill.
Daily DealsThe vertical Daily Deals Info strip on the far right details what item types the out-of-raid vendor Octave will buy from you each in-game day. You can check the current day at any time in or out of raid by opening your inventory(Default: Tab) and checking the middle left of your screen.
When looting, keep in mind you will frequently want to sleep after a raid so consider both the CURRENT DAY and the NEXT DAY item type listings when deciding what loot to keep for making money.
NPCs – Vendors & Quests
Vendor NPCs
All Vendor NPCs are also Quest NPCs, see the Quest NPCs section below for Task-specific information.
- If you see a Vendor NPC on the guide map and they aren’t there for you in-raid, you just haven’t unlocked them through quest progression yet. Finish active Tasks and sleep to cycle days to get new Tasks and unlock new NPCs.
- In-raid vendors only SELL items, they do not BUY items. See ‘Octave’ section below for selling.
- You must have the cash in your inventory to buy from an in-raid vendor.
- Cash can be withdrawn from Otis at the bank or any of the many ATMs spread around the map. You can NOT deposit cash at ATMs, only withdraw.
- Cash maxes out at 200,000 per stack. Ensure you have enough open inventory slots for the amount of cash you wish to withdraw.
- In-raid usable items purchased will go to your character inventory immediately. This includes weapons, food, medication, fertilizer, bullets, pills, etc.
- Furnishings purchased will be delivered to your door on the next day after purchase. Purchased, but not yet delivered, furnishings can be seen in the Basement with a note that they will be delivered tomorrow.
Quest NPCs
Quest NPCs do not sell any items and are only relevant if you have an active Task with them.
- Similar to the above note on Vendor NPCs, Quest NPCs will not be visible to you until you get your first Task from them.
- Once unlocked via their first task Quest NPCs will be visible in-raid even if you do not currently have a task with them. If you do not have an active Task interacting with a Quest NPC will just produce flavor dialog.
- Quest Items can be turned in as partial quantities. You do NOT have to have all items or the full quantity of any quest item to turn them in. Partial quest item turn in progress can be seen both at the Quest NPC and in your Journal.
- Task Rewards do NOT have to be taken all at once. You can take only some of the rewards from a quest and come back to the Quest NPC at a later time or even a later raid to retrieve the rest of your rewards. Until you have retrieved all the rewards from a Task it will remain in your Journal and may prevent you from progressing to other Tasks.
Octave – Out-of-raid Vendor
Octave, the out-of-raid vendor to the left of the Elevator on your floor, is the only vendor that will BUY items from you.
- Octave only buys three types of items per in-game weekday. See the Daily Deals strip on the right of the Infographic for full details.
- Items must have the EXACT item type listed in their tooltip to be sellable on the applicable day. Some items have multiple applicable types listed and can be sold on multiple days.
- Cash from selling to Octave is a physical inventory item and must be brought in-raid and deposited with Otis at the bank in the northern part of the map. You can NOT deposit cash at ATMs, only withdraw.
- Octave is also a Quest NPC! All of his Tasks require you to kill Things(monsters) or Others(players). Some of them have specific weapon type, caliber, and/or bullet requirements. Be sure to read the full requirements to get task credit.
Chasm – That noisy hole in your wall
Chasm is a Quest NPC who provides gameplay advice in the form of dialog. All his Tasks are to feed him increasing amounts of blood. His Task rewards alternate between a single additional inventory slot or a progressively increasing number of pickaxes to expand your apartment both sideways and upwards. After completing a Chasm task by feeding him enough blood he will close up and not offer another Task until you sleep, sometimes multiple days need to pass before he offers a new Task.
Monsters – Item Drops, Health, Kill Credit & More
All monsters in Hell Is Others are called ‘Things’
See the Monster Info strip in the Infographic for item drop, health, and kill credit details.
Thing Attack Patterns
Note: All Things do damage on physical contact with the exception of the Unstable Thing. This is particularly relevant for the larger Sweeping and Crawling things if you run into the rear trailing part of their body.
Haunting Thing
- Patrols. Follows you once spotted.
- Does damage on each physical contact. Minor damage.
Unstable Thing
- Stationary unless you get extremely close. If you do get close it will gravitate towards you and start its explosion animation if it contacts you.
- Explodes after a brief delay in a circular radius if physically touched or shot. Has 1 health so ANY bullet hit will trigger an explosion.
- Explosion radius is shown visibly for during the brief delay. Radius is affected by line of sight, going around a corner can sometimes be quicker than outdistancing the radius.
- Explosion does significant damage, but damage scales down slightly the further from the center you are when it hits.
Hiding Thing
- Stationary hidden position inside walls. There is no visual indicator on the walls Hiding Things position.
- Attacks in a chomp animation from a hidden position once you are within a certain range. This attack range isn’t all in hit distance. You can stand just outside its hit range and invoke continuous ttack animations. Mild damage.
- Static position, varied presence. – Positions are static across the map so they are learnable. Not all potential Hiding Thing positions will have a Hiding Thing each raid.
- Can apply a debuff on successful chomp that slows you down and causes you to make a loud squeaky/wet shoe step noise when moving.
- Critical damage dealt when you hit the bright red bulb in its throat. Direct, unobstructed hits required.
Vengeful Thing
- Patrols. Follows you once spotted.
- Explodes after a brief delay in a circular radius if physically touched or shot.
- Explosion radius is shown visibly for during the brief delay. Radius is affected by line of sight, going around a corner can sometimes be quicker than outdistancing the radius.
- Explosion does heavy damage, but damage scales down slightly the further from the center you are when it hits.
Buzzing Thing
- Patrols. Becomes stationary during projectile barrage. Does NOT follow you.
- Shoots rapid barrage of 6? 8? single projectiles in a row at you once spotted. Is stationary while shooting, but rotates to keep you targeted. Mild damage.
- Once rapid barrage is complete, Buzzing Thing continues its previous patrol unless you are in a position to be spotted by it again. Does NOT chase.
- While damage per projectile is mild, the number, speed, and rapid fire rate can result in total damage dealt adding up quickly.
- Critical damage dealt when you hit the bright red bulb on its rear or in its throat. Direct, unobstructed hits required.
Wedging Thing
- Patrols. Follows you once spotted.
- Lunges at you with a chomp attack when it closes to close range. Mild damage.
- Can apply a bleed debuff on successful chomp that continues to do minor damage to you until it fades. Bleed recovery time can be improved through furnishing bonuses.
- Critical damage dealt when you hit the bright red bulb on its rear. Direct, unobstructed hits required.
Paltry Thing
- Patrols. Follows you once spotted.
- Shoots slow barrage of 3 single projectiles in a row at you once spotted. Continues to move/chase while shooting. Mild damage.
- Critical damage dealt when you hit the bright red bulb in its throat. Direct, unobstructed hits required.
Sweeping Thing
- Patrols. Follows you once spotted.
- Shoots slow barrage of 3 projectiles per volley that spread in a cone or V pattern towards you once spotted. Continues to move/chase while shooting. Medium damage.
- Critical damage dealt when you hit the bright red bulb in its throat. Direct, unobstructed hits required.
Crawling Thing
- Patrols. Follows you once spotted.
- Does NOT shoot projectiles, but does significant damage on physical contact with any part of its body.
- Critical damage dealt when you hit the large bright red bulb on one of its sides. Direct, unobstructed hits required.
Thing +
Each Thing shown in the Infographic has a stronger + version. Compared to the normal Thing versions the + version Things…
- Have moderately more health.
- Deal slightly more damage.
- Provide a slightly higher Credit Score per kill.
- Look similar, but have distinct visual differences to distinguish them.
- Follow the same attack and movement patterns as their normal counterparts.
Monster Drops
See the Monster Info strip in the Infographic for full item drop list.
- Things always drop their Heart when killed, guaranteed. Heart size is static per type of Thing.
- Each Thing has a specific shroom it has a chance to drop. Shrooms are edible buff items with both positive and negative stat adjustments.
- Each Thing has a two specific bullet fertilizer items it has a chance to drop. The bullet fertilizer items from Things have both positive and negative bullet stat adjustments.
- The + version of Things have the same item drops as their normal version.
- Things give minor Credit Score bonuses per kill, see the Monster Info strip in the Infographic.
Loot – Weapons
Weapons
Durability – Guns and Melee Weapons will show a durability % on their tooltip. Gun durability reduces when shot. Melee Weapon durability reduces when successfully striking a target. Once durability reaches 0% the weapon will break and become unusable. Broken weapons can still be sold to Octave at a reduced value on a Monday.
Stats – Guns have 6 stats that very by type and model. These can be seen in the gun tooltip in inventory and in the weapon select menu in-raid.
- Damage – Damage modifier by percentage, applied to loaded bullet base damage.
- Range – Range modifier by percentage, applied to loaded bullet base range.
- Recoil – Severity of recoil. Lower numbers mean less recoil, higher numbers mean more recoil. Can be modified by loaded bullet stats.
- Rounds Per Minute – How quickly the gun spits out bullets. The higher the number, the faster the fire rate. Not modified by loaded bullet stats.
- Reload Time – The number of seconds it takes to reload when your magazine empties or you manually hit the reload button.
- Magazine Size – How many bullets the gun holds before it needs to be reloaded.
Class & Caliber – Weapons will list as either Small Caliber or Large Caliber. They will also list a weapon class such as Semi-Automatic Pistol, Revolver, SMG, Shotgun, Assault Rifle, Sniper, or Melee. Caliber and Class only matter for Kill Task completion requirements that may list one or both of these attributes to get credit for a Task Kill.
Rarity – Weapons come in three rarities, Base Level (green), Plus Level (blue), and Plus Plus Level (purple). Higher rarities of the same weapon may improve select gun stats such as Recoil, Reload Time, and Magazine Size. Higher rarity weapons will also sell to Octave for significantly more.
Throwables – Throwable weapons such as Grenades, Molotovs, and Flashbangs will travel further if you charge your throw by holding down left click for a brief time before releasing, up to a maximum range. Be careful not to accidentally drop a throwable at your feet by left clicking with no hold time … unless you’re into that.
Deployables – Deployable weapons such as the Land Mine, Proximity Mine, Claymore, and Bear Trap will be placed on the ground at your feet when you left click with them selected via weapon selection. There is a very brief pause after deployment before they are armed, make sure to move away immediately after placement. The Claymore’s trip laser will be pointed in the direction your character is facing when you click to deploy it. Deployable weapons CAN be triggered by you once armed and do the same damage to you as they would an enemy. Make sure to remember where you left them!
Loot – Food & Drink, Medicine, Enhancers & Blood
Food & Drink
Satiety – Food and Drink both cost ‘Satiety’ when consumed, the Satiety cost is listed in the item tooltip. Satiety is the small yellow bar under your health in the top left corner. Once your Satiety Bar is full you can no longer consume food or drink for their effect. If you try and consume a food or drink whose Satiety cost is more than you have left you will not gain their effect and will be forced into a puking animation that is also quite loud. Your Satiety Bar resets to zero after you sleep. Satiety max is 1000.
Example: If you try to eat Canned Meat whose Satiety cost is 113 when your Satiety Bar is already at 900/100 you will fill your Satiety Bar to full 1000/1000 but NOT receive the +225 Health listed on the Canned Meat.
- Food will heal you for the listed Health amount when eaten.
- Food will either be Savory or Sweet. Furnishing bonuses will affect one type or the other.
- Food with ‘Perishible’ listed in its tooltip will become rotten if you sleep to the next day unless stored in a refrigerator.
- Rotten food provides HALF the Health while still costing the same Satiety as its non-rotten counterpart.
- Drinks will regain the listed amount of stamina. Alcoholic drinks have a Health cost.
Medicine
Medicine will heal your Health or recover Stamina as listed WITHOUT a Satiety cost. Medkits and Bandages apply their heal immediately upon use. Injectors provide Health or Stamina recovery over time, applied in small bursts every 5 seconds during the 60 second duration. Deodorant will cover your smell for 60 seconds, making your heartbeat undetectable to Other players for the duration.
Enhancers – Pills & Shrooms
Enhancers offer modification of the four character stats which can be seen at any time by opening your inventory (Default: Tab) and checking their status on the middle right of the screen. Character stat modifications offered by Enhancers last until you die.
Toxicity – Enhancers cost Toxicity when consumed. Toxicity is the small purple bar under your Health and Satiety bars in the top left of your screen. Once your Toxicity Bar is full you can no longer consume food or drink for their effect. If you try and consume an Enhancer whose Toxicity cost is more than you have left you will not gain their effect and will be forced into a puking animation that is also quite loud. Your Toxicity Bar resets to zero after you die, it does NOT reset when you sleep. Toxicity max is 1000.
Enhancers come in two forms, Pills and Shrooms.
- Pills – Have a quick 0.75s use time and offer a positive buff to a single character stat with no negatives. Cost 75 Toxicity.
- Shrooms – Have a 2.0s use time and offer both positive and negative adjustments to 3 or 4 of the character stats. Each type of Shroom always offers the same stat adjustments. Cost 100 Toxicity. The Tree Stumps Mitleid Park and Jardin De La Paix are lootable containers that may contain Shrooms.
Character Stats – The five Character Stats are as follows …
- Sight – Determines the width of your sight cone when not looting or aiming a weapon(right click). Unmodified Sight is 0% and represents a fairly narrow cone of sight. This stat will not go above +200% at which point your Sight ‘cone’ is a full 180° in front of you.
- Smell – Determines how far away you can ‘smell’ the heartbeat when in the proximity of an Other(player). Max stat unknown.
- Vitality – Determines your maximum Health value. Unmodified Health maximum is 1000. Max stat unknown.
- Endurance – Determines your maximum Stamina value. Unmodified Stamina maximum is 1000. Max stat unknown.
- Search – Determines how quickly you open loot containers and bodies. Max stat unknown.
Blood
Blood is used to water the Bonsai Tree and any Bullet Plants in your apartment. It is also fed to Chasm for his progression quests which unlock additional inventory space or apartment expanding pickaxes.
Blood comes in three forms, Hearts, Vials/Bags, and Cockroaches.
Hearts – Dropped from Things and Others and are Perishable. Hearts will rot, halving their blood value, when you sleep unless you store them in a refrigerator. Small & Average Hearts will stack to a max total blood value of 400 per stack. Large Hearts will stack to two, for a max total blood value of 500 per stack. Human Hearts will stack to three, for a max total blood value of 600 per stack. There is a very rare Colossal Heart which only comes from the Chateau’s large fridge(top-right in Chateau kitchen) or the Theatre Chest(southern stage area).
Vials and Bags – Obtained from various loot containers and sometimes given as Task rewards. Vials and Bags are NOT Perishable incapable of rotting, even if not stored in a refrigerator.
Small, Medium, and Large Blood vials all stack to maximum blood value of 500 per stack. Blood Bags stack to two, for a maximum of 600 blood per stack. Washing your bloody shirt in a Sink or Washing Machine will return a unique non-splittable ‘Bottle of Blood’ with a blood value based on your Other kills and deaths since the last time you washed your shirt, max blood unknown.
Cockroaches – Only provide +4 blood per, but stack to a maximum of 100, for a max total blood value of 400 per stack. This tiny increment can sometimes be useful in conjunction with the wildly varying blood value of the ‘Bottle of Blood’ for reaching an exact value or at least wasting a little blood as possible.
Loot – Bullet Fertilizer & Quest / Task Items
Bullet Fertilizer
Bullet Fertilizer is added to Pots in your apartment to modify stats when growing your own bullets. After adding a single Wild Bullet to a pot, you can then add Fertilizer to the Pot up to its maximum blood capacity. The initial Wild Bullet costs 50 blood, the rest of the Pot blood capacity available for use with Fertilizers. The blood cost is listed as ‘Requires X Blood/Day to Farm’ on every fertilizer.
Fertilizers come in two forms Monster Parts and Essence.
Monster Parts – Green icon background. Can be obtained from some loot containers and drop from Things(monsters). Monster Parts offer bullet stat modifications that are both positive and negative, basically enhancing one stat at the expense of another stat. The modifications for each type of fertilizer are static.
See the Monster Strip on the Infographic for which two Monster Parts each type of Thing has a chance to drop.
Essence – Purple icon background. Can be obtained from some loot containers and sometimes given as rewards for completed Tasks(quest). Offers a significant enhancement to a single bullet stat with no negatives. Generally larger blood costs than Monster Part fertilizer.
Quest / Task Items
Quest / Task items only have two purposes.
- Being turned in to Quest NPC’s in-raid towards completing an active Task.
- Being carried out of raid to be sold to Octave on the appropriate weekday.
Additional Item Details
- Task Items have varying stack sizes from 1 to 25.
- Task Items Value is listed in their tooltip. The lower ‘Trade Value’ is the price Octave will actually pay for it based on your Credit Score modifier.
- Task Items are assigned up to three Types such as Tool, Electronics, Steel, Office, Component, Gold. These determine what days the item can be sold to Octave. See the ‘Daily Deals’ strip on the Infographic.
- When looting to sell, keep in mind you will frequently want to sleep after a raid so consider both the CURRENT DAY and the NEXT DAY item type listings when deciding what loot to keep for making money.
- Task Items have four rarities indicated by the background color of their icon. In increasing order these rarity colors are Grey, Green, Blue, Purple. Generally the higher the rarity the more valuable the item. Be aware that max stack size can sometimes mean multiple lower rarity items in a single stack can provide more value per inventory slot than some higher rarity items.
Free Weapons – Friend Referral Code
Friend Referral Code: 5831EC08E85646CA
If you are new to Hell Is Others, you can get a free package of weapons delivered to your door in-game by inputting my Friend Referral Code.
In-game hit Escape to open the Menu and go to Settings. Click on the Referral tab in the top right and then click ‘Redeem Code’. Paste in the code above and your free weapons package will be delivered to your door after you sleep and progress to the next in-game day.
Pro-Tip: The weapon package on your doorstep won’t disappear when you sleep or go into a raid! You don’t have to collect it all at once and can take weapons out of it one at a time as needed until it is empty.
Referral Weapon Box WILL disappear if you Prestige, but that is only after completing the main story line which takes awhile the first time.
Be the first to comment