
Chapter 2: Books Puzzle in The Order of the Wind
In the Order of the Wind’s restricted library, there are multiple books on multiple pedestals. Each book has a letter on its cover. A large stone slab stands in the center northern wall. If the heroes examine it, it reads “The wealth of knowledge is open to those who seek it here.”
Solution:
Notice the word “OPEN” is colored differently when examining the slab. To proceed, the players must arrange the books on the northern wall to spell “OPEN”, with OP to the left of the slab and EN to the right. The players can only hold one book at a time, so they will need to shuffle the books around a bit. But once the word is spelled out, the passage forward will open.
Chapter 3: Sidequest “Razing a Family” Minecart Solution
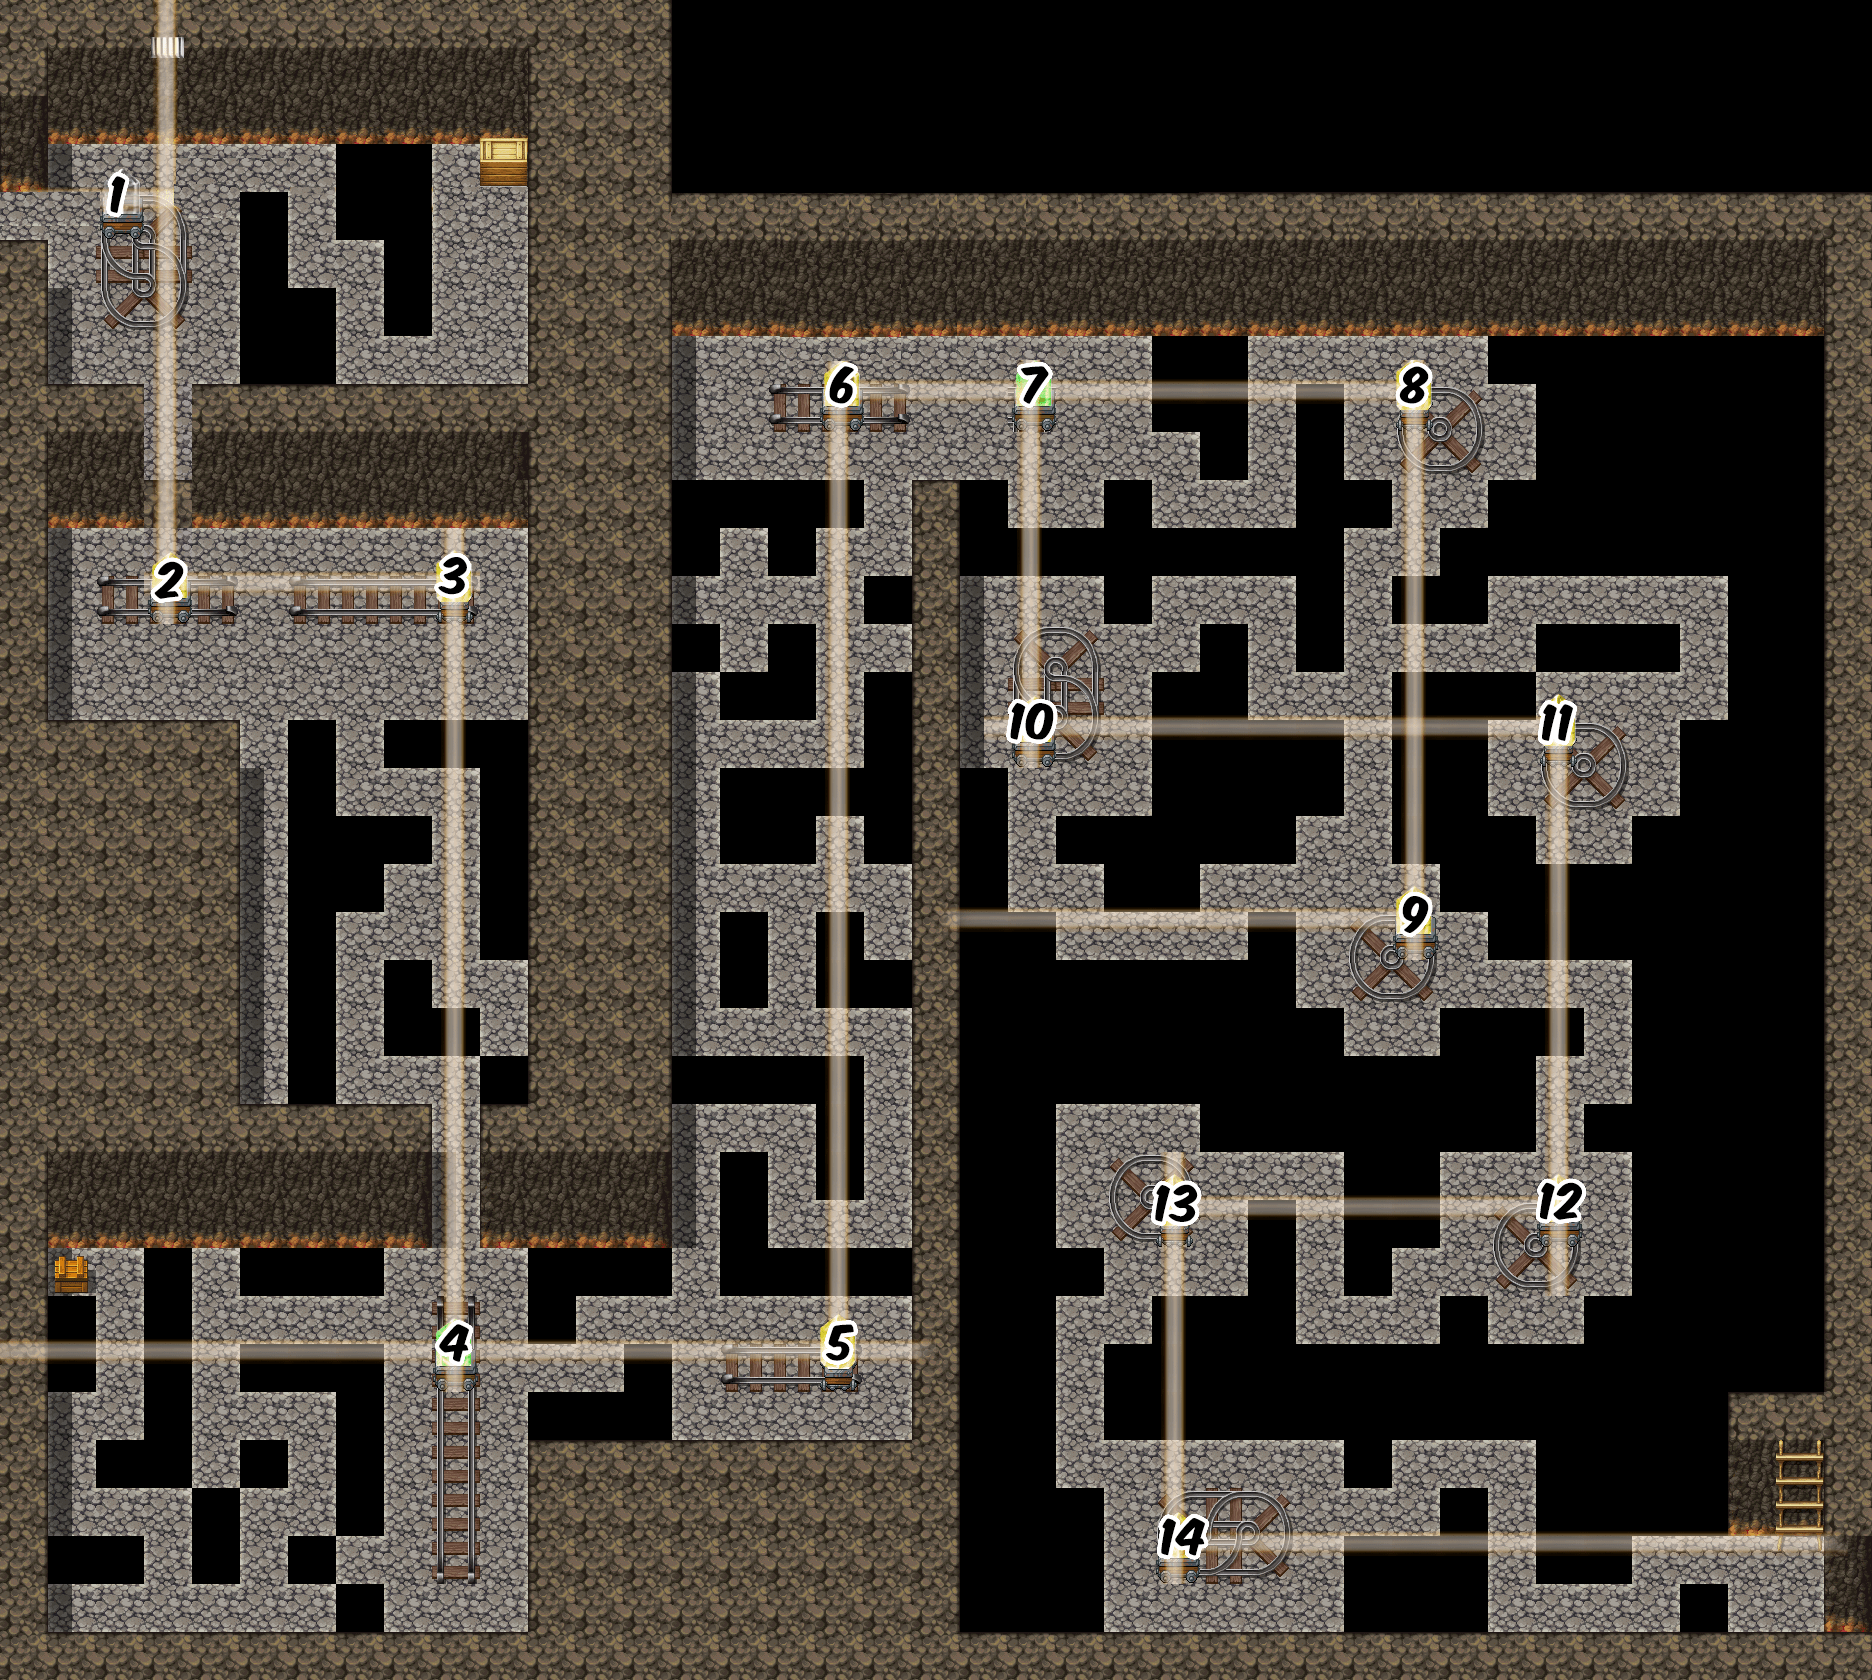
The sidequest Razing a Family features a minecart puzzle. There are two rooms. The first room is meant to teach the players the fundamentals, while the second room is meant to be more challenging. However, if you are having trouble with this, you can find the solutions below.
Room 1
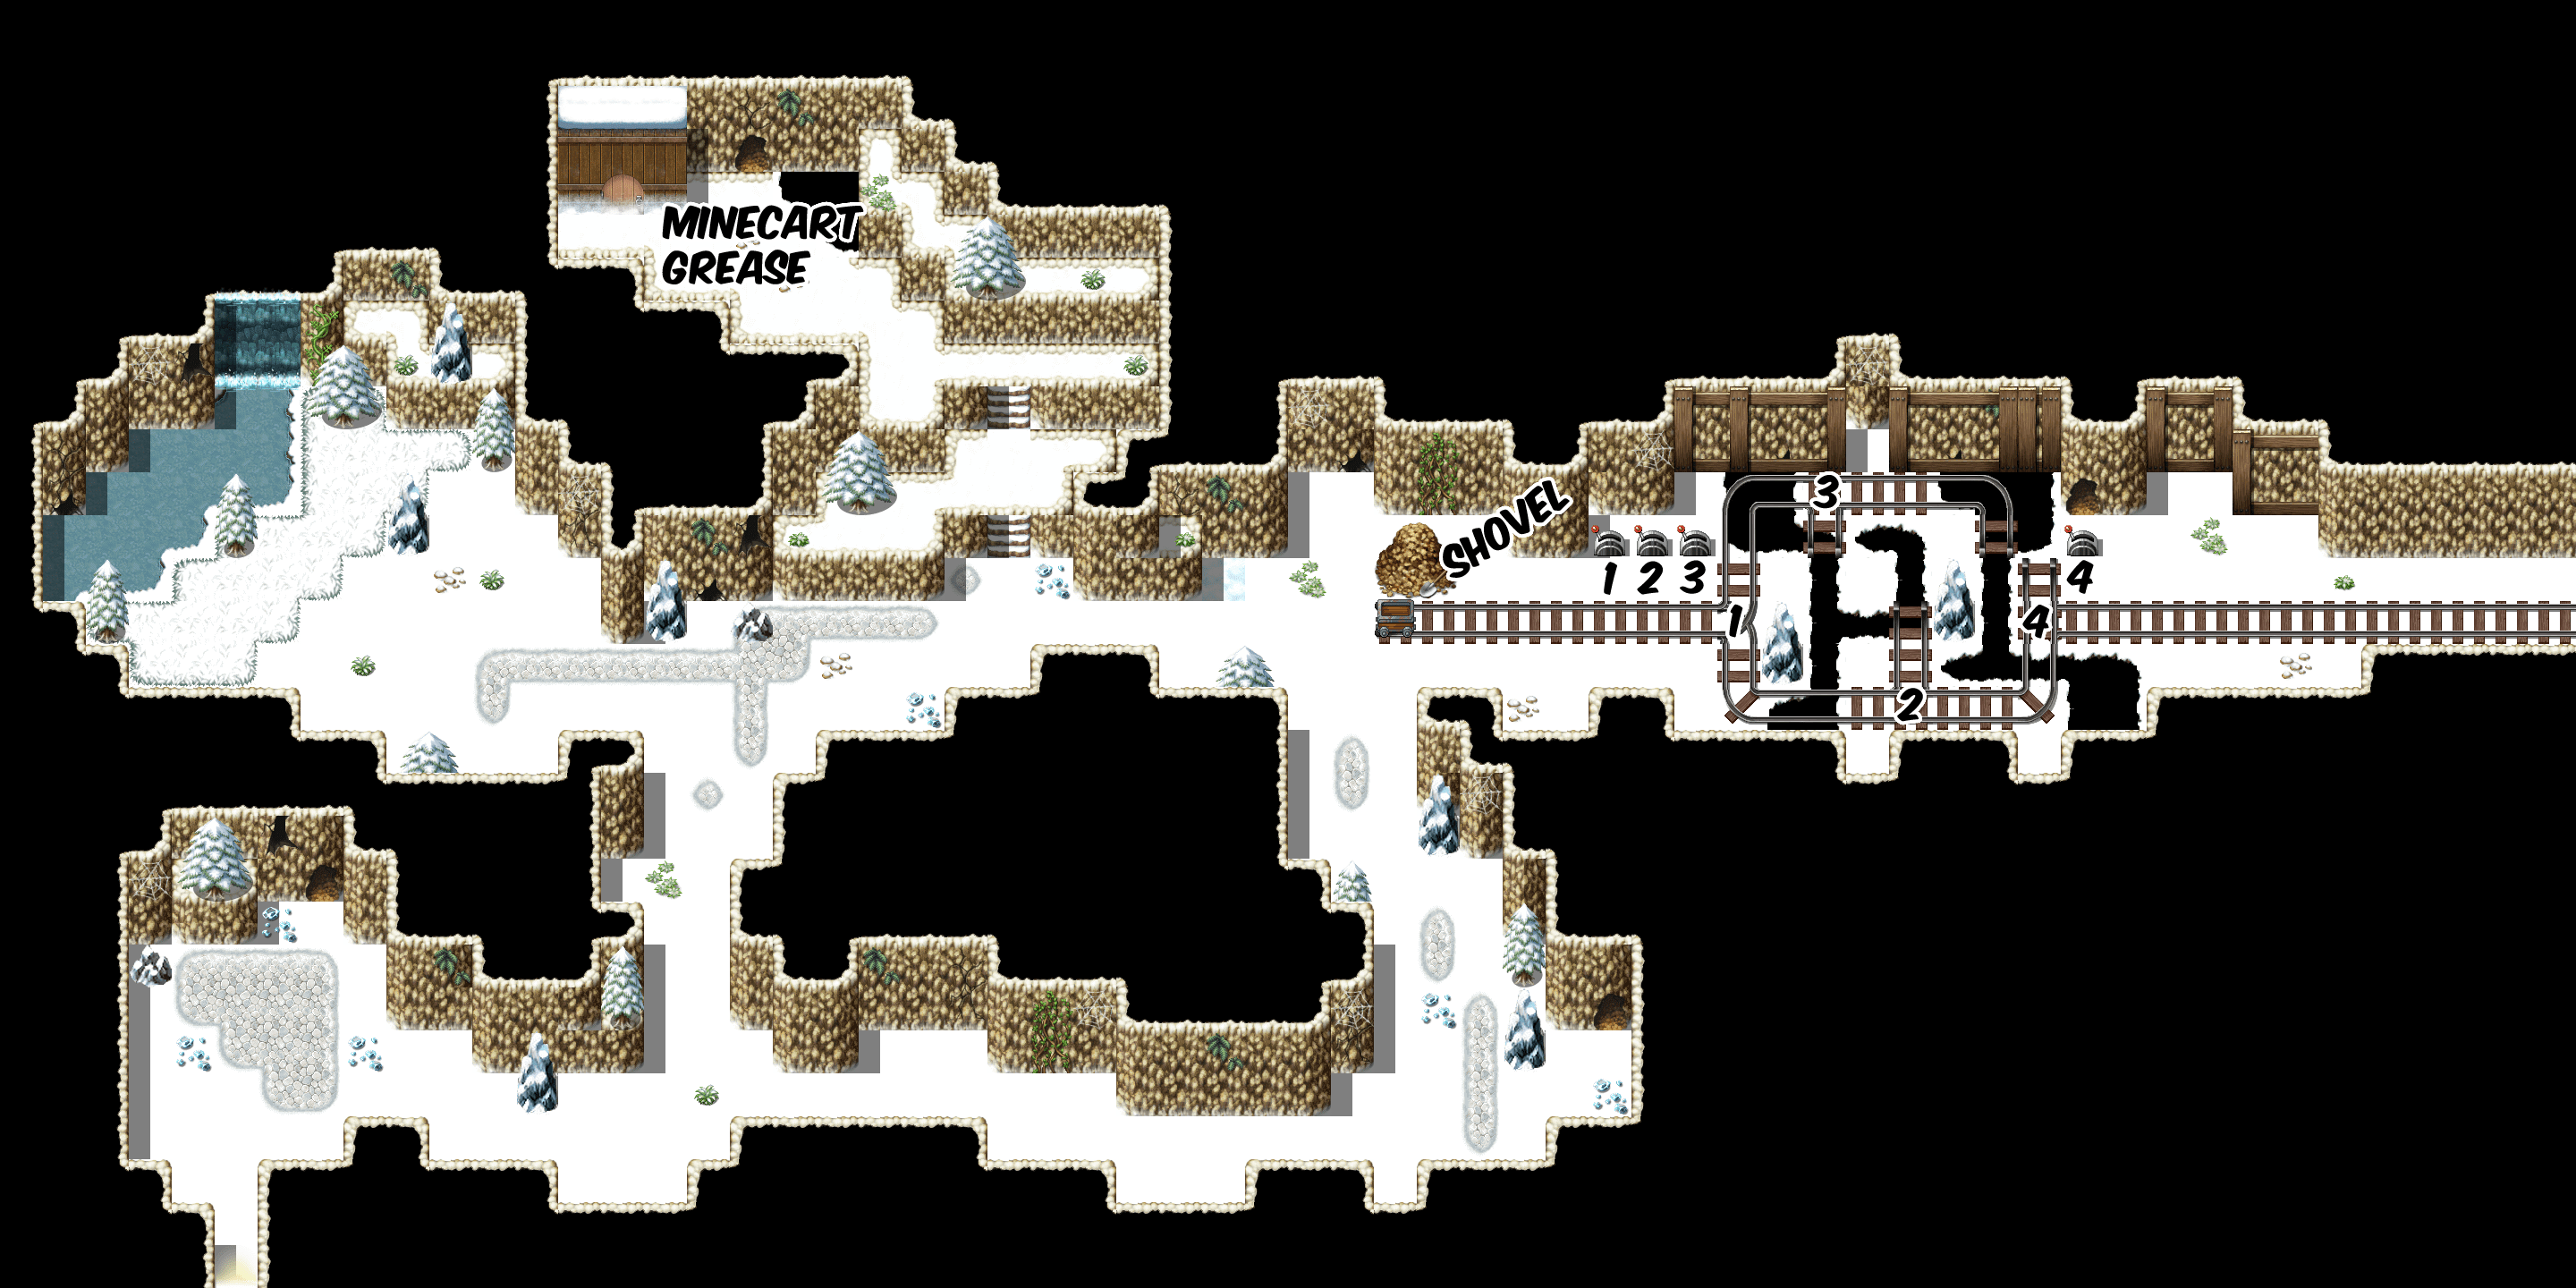
- Before the minecart can be pushed, the wheels must be greased. If you try to push it, you can move it a couple spaces but eventually it will become too hard and you will be told as such. Go north to the small shack to find the grease, then apply it to the minecart. It will now move much easier.
- There are 4 switches which change the direction of the tracks. 3 are accessible, while 1 is not.
- A shovel sits beside the minecart. Grab it. You can now use the shovel on the gravel pit to fill the minecart.
- If you fill the minecart with gravel and then push it, it will move to the end of the track as currently configured and dump its load.
- Switch the tracks and push the filled cart to the ends of each section to have it build a walk-able path to reach switch 4.
- Hit switch 4 and hop in the minecart. You will ride to the next screen.
- (Optional) Before you fill each section with rocks to build the bridge, you may want to hop in the empty cart and ride it first. You will be dumped into a hidden room below that you can easily get out of. But in this room is a rusted sword. Retrieving it starts an optional sidequest to reforge the blade.
Room 2
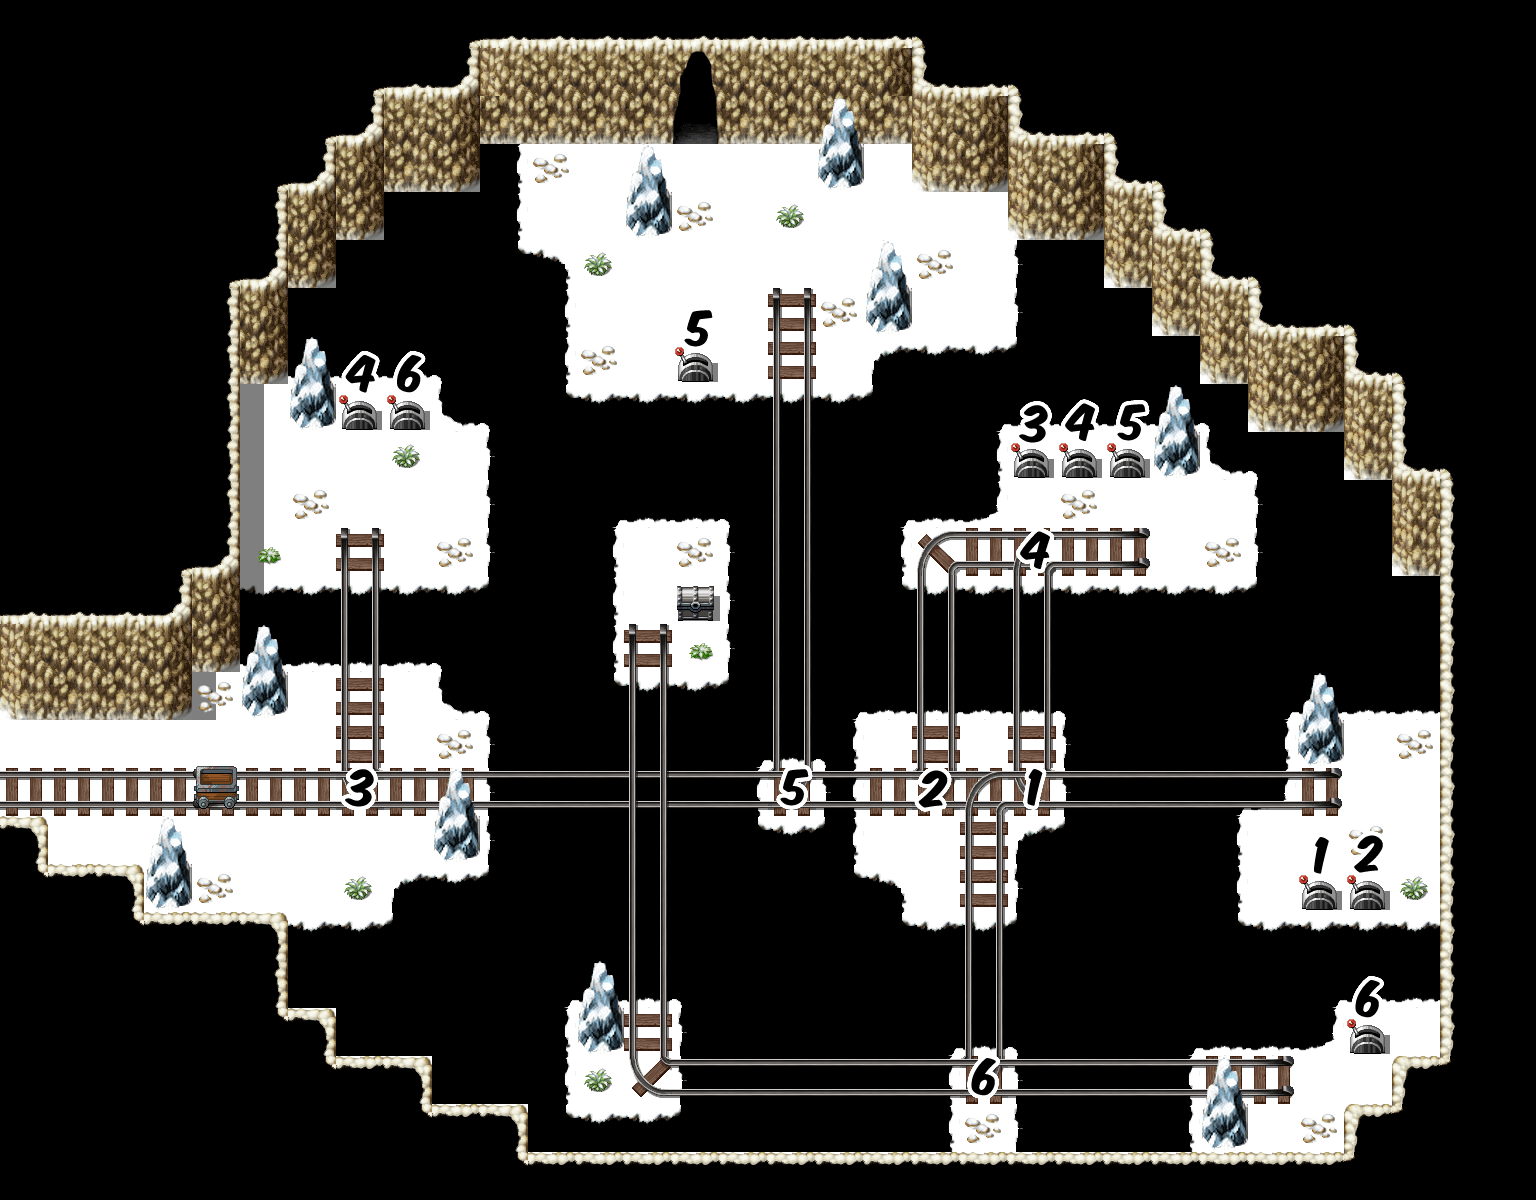
- You emerge into the 2nd room at the right side near two switches.
- (Optional) Hop back in immediately to reach the central chest. You can ride the cart back to the lower right to hit the switch to change segment 6. Ride it back to the chest, then back again. This will put you back where you started.
- Go ahead and hit switches 1 and 2.
- Ride the cart up to the upper switches (3, 4 and 5)
- Hit switches 3 and 5.
- Ride the cart to switches 4 and 6.
- Ride the cart back and you should emerge at the top of the map. Exit the cave to proceed.
Chapter 3: Conveyor Room Solution
In this room, the party is split into two groups. Madilyn and Winter will explore the western side, while Auryn and Davos will explore the eastern side. A series of switches must be thrown by both parties for both to progress.
Not all conveyors can be switched. The map highlights in color codes which switches control which conveyor belts.
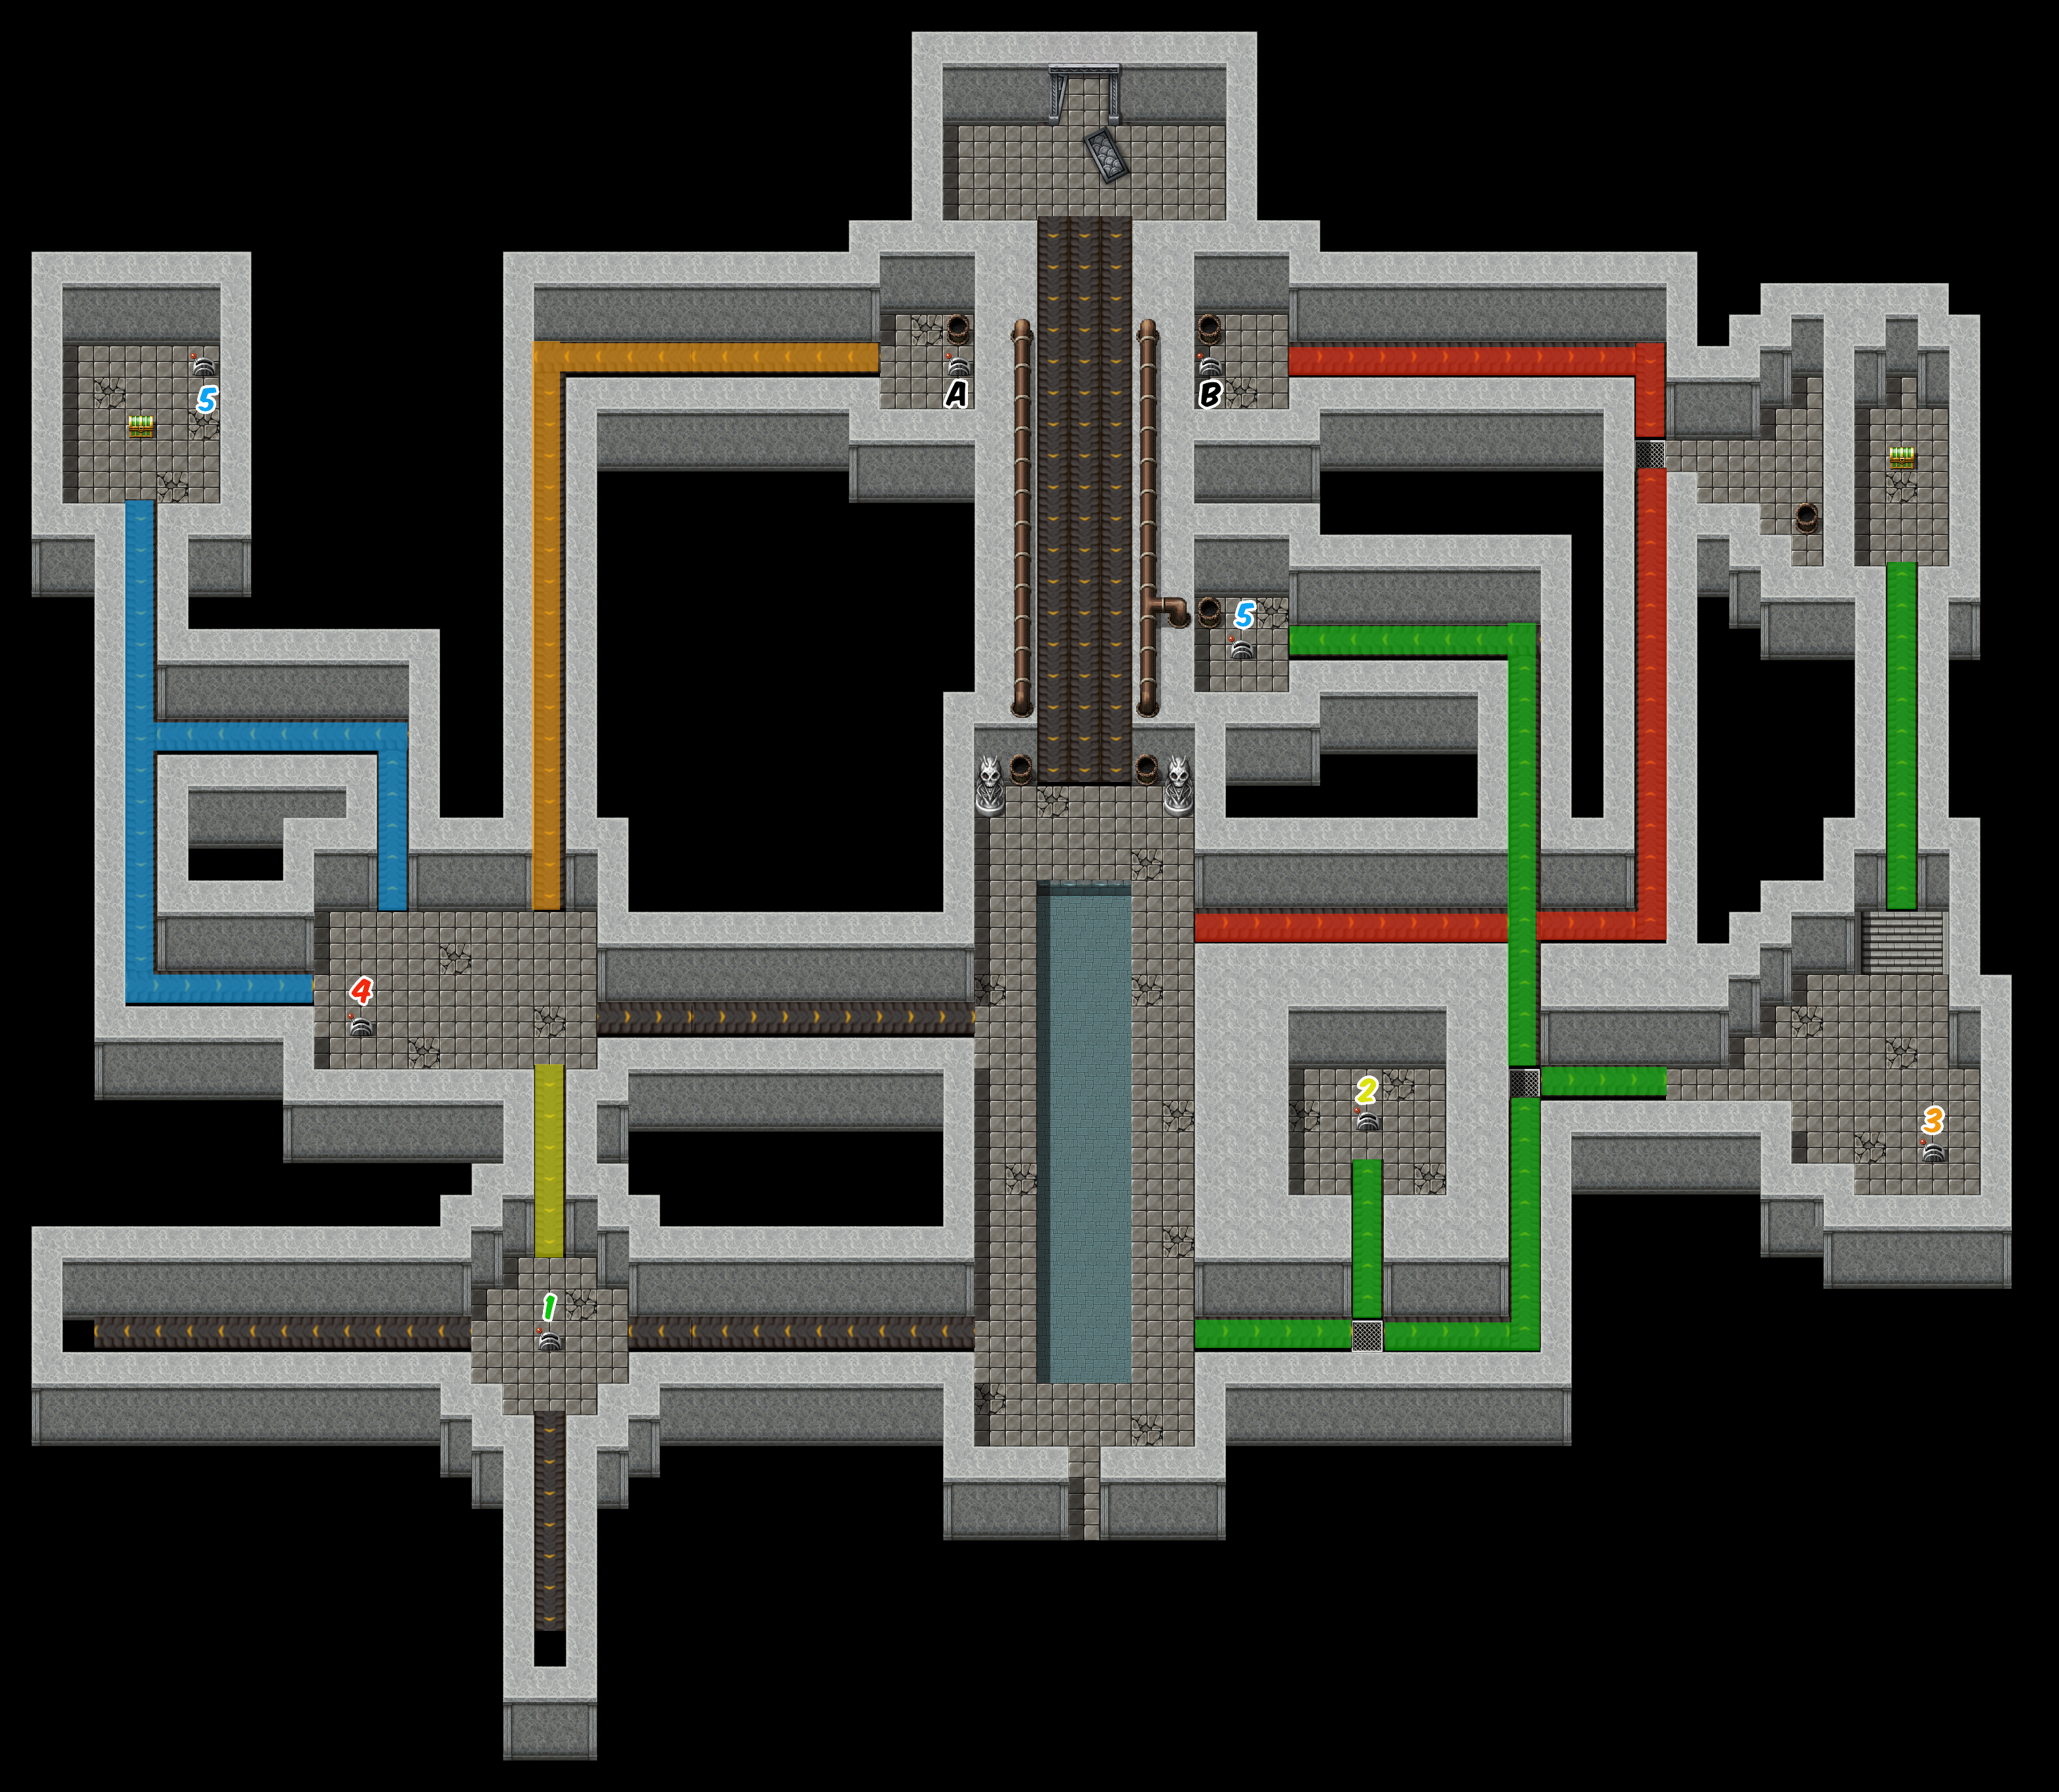
- First, have Auryn’s group ride the lower belt to switch 2. This can be hit now.
- Have Madilyn’s group ride their lower belt to switch 1. Hit it. This will allow Auryn to traverse backwards.
- Switch to Auryn’s group and go down, then right.
- Switch back to Madilyn’s group and hit the same switch (switch 1) again.
- Switch back to Auryn’s group and proceed to the right to switch 3. Hit switch 3.
- (Optional) Have Auryn’s group ride the conveyor north to get the chest. Switch back to Madilyn’s group to hit switch 1 again to allow him to backtrack.
- Madilyn will need to again hit switch 1 to allow Auryn to go left (if she didn’t already hit it for the chest) and then up.
- Have Auryn’s group navigate left, then up (as stated above) to switch 5. This switch is optional, and will allow Madilyn to access a chest in the upper left corner of the map. Whether or not you hit the switch, jump in the pipe to emerge back in the center.
- Continuing with Auryn’s group, ride the upper belt (highlighted in red) to the intersection. Switching back to Madilyn’s group, finally head north.
- (Optional) If Auryn hit switch 5, she can ride the belt to the optional chest and then hit the switch to return.
- Have Madilyn’s group hit switch 4.
- Back on Auryn’s group, they should be able to proceed on the belt north that will take them to switch B. Hit this switch and go through the pipe to emerge in the center once again.
- Finally, with Madilyn’s group head north on the orange highlighted belt to switch A. Hit it and take the pipe back to the center.
- With both switches A and B hit, the center conveyor will be reversed and the party will be able to proceed.
Chapter 4: Catacombs Solution
The players find themselves in a dark catacomb beneath Ivalace. So dark in fact that the only light is from a sewage grate. However, thanks to some conveniently placed crystals, the players can redirect the light in order to see the path forward. Some crystals can be moved to “scout” ahead, so the players know where is safe to step and where is not. Beware: if you step off the edge, you will be dropped back to the start of the room and take damage.
Room 1 serves as a teaching room of how this mechanic works, and room 2 serves as a more challenging room to implement what you’ve learned. Still, this can be a challenging area for some players. Rather than forcing you to reach for the graphing paper, feel free to use the maps below.
While you can use these maps to navigate blind straight to the end, here is an explanation of what is expected.
Room 1
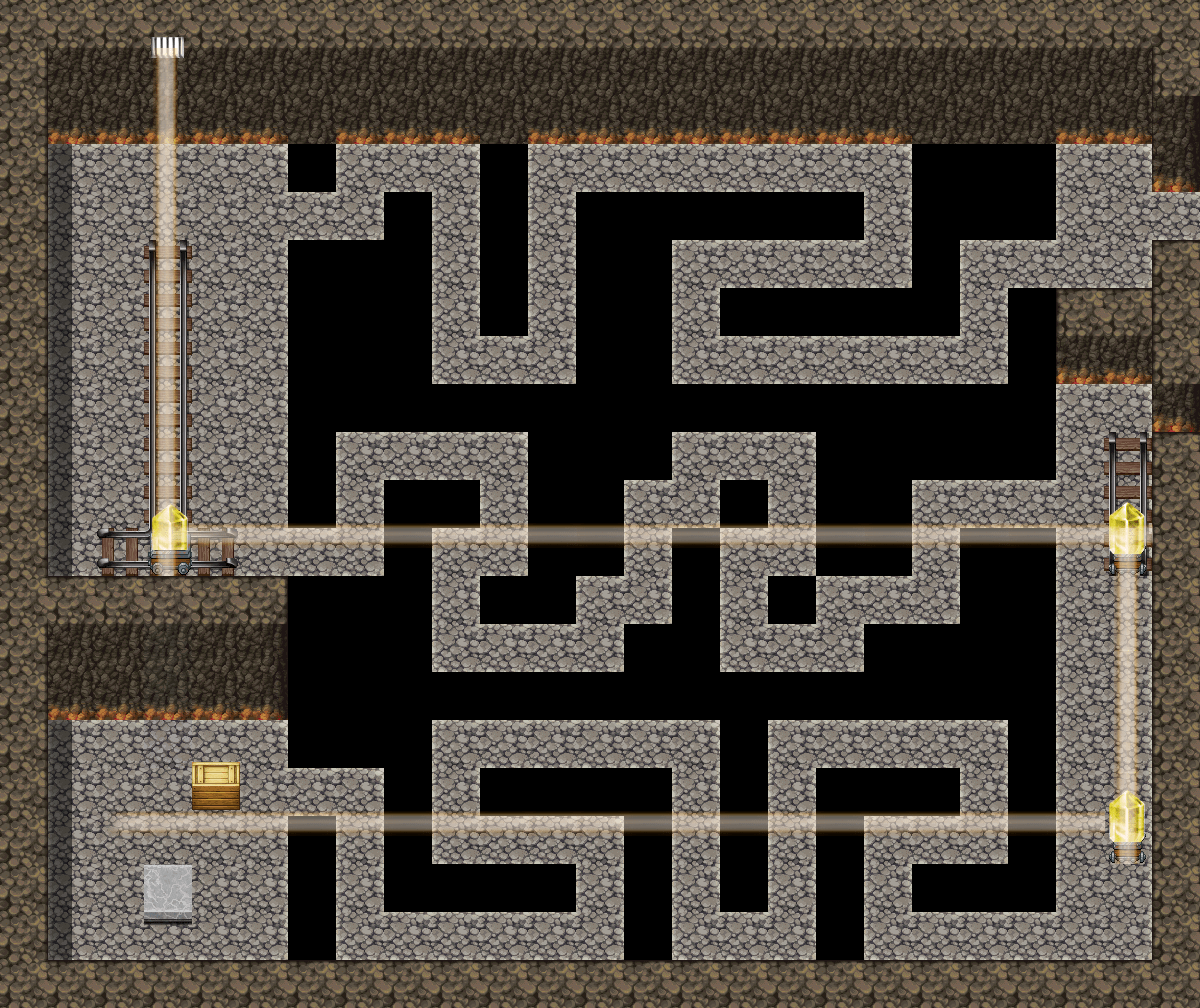
- Push the crystal one block right. This will intersect the light and allow you to see sufficiently to get to the next crystal.
- Push this crystal down to intersect the light beam. This will shoot light down and intersect another crystal, shooting light to the left.
- Navigate this passage and push the crate onto the pressure plate. This will open a passage directly north.
- Go up and you can now push the crystal upwards, allowing the path to the exit to be illuminated. You may want to move it up and down a couple times to take note of the path. Or simply use the map provided here for navigation.
Room 2
Room 2 poses a significantly greater challenge. As stated earlier, you can use this map to do a blind walk to the exit if you wish. Otherwise, here is what is expected of the player.
- Push crystal 1 into the light to see the path to the right. You may want to move it up or down a couple times to see the full path.
- Go right and push the block onto the pressure plate. This will open a path to the south.
- Move crystal 1 out of the way, allowing light to travel through the newly opened passage.
- Moving south, align crystal 2 to intersect the light, which will in turn hit crystal 3, sending light southward.
- The left side can be moved down freely to “scout” the path as you adjust crystal 3, but in the end you need to move it all the way to the right.
- Go south and you will see the light has intersected with a green crystal. Green crystals will split the light into 2 new paths, rather than 1.
- (Optional) You can move crystal 4 up and down to “scout” the path to the left. Doing so will allow you to navigate to a hidden chest.
- Align crystal 4 to intersect crystal 5.
- This area is a bit trickier, as there is no path to fully scout ahead. The player can slide crystal 5 around and progress a bit, map out what they can see, then move back to readjust the crystal. Ultimately, the crystal needs to be pushed all the way to the right.
- Moving up the path, ensure crystal 6 intersects with the light. This will send the light into crystal 7 and split it in two paths.
- Move forward to crystal 8 and adjust the position into the top left corner. This will send light downward.
- Travel south to crystal 9 and adjust it into the top right position. This will send light to the left and allow you to see to reach the next crystal. Be mindful of the edges.
- Move left to crystal 10 and intersect it with the light. Your next stop will be crystal 11. To intersect properly, crystal 10 needs to be in the bottom left corner, but you can side it up and down a bit to map out the path first.
- Moving to crystal 11, put it in the top left corner position. This will send light downward.
- Backtrack towards crystal 9 and move along the path to the right to crystal 12. Be mindful of the edge here and slide crystal 12 into the top right position. This sends light to the left.
- Carefully move to the left to reach crystal 13. Slide it into the bottom right position, which should send light downward.
- Travel south to the final crystal. Slide crystal 14 all the way to the left to intersect the light beam. You can move it freely up and down to scout the path ahead. Reach the ladder to escape the catacombs.
Chapter 4: Ivalace City Foundations Solution
Ivalace city foundations can be a challenging area. There are a lot of encounters, the map is large and it’s not always obvious where you need to go. Below is a map of the foundations, along with a guide to get you through.
Note: Your party is unequipped! (Because of course they are. They were in jail) Make sure you go into the menu to re-equip their gear you got from the previous scene.
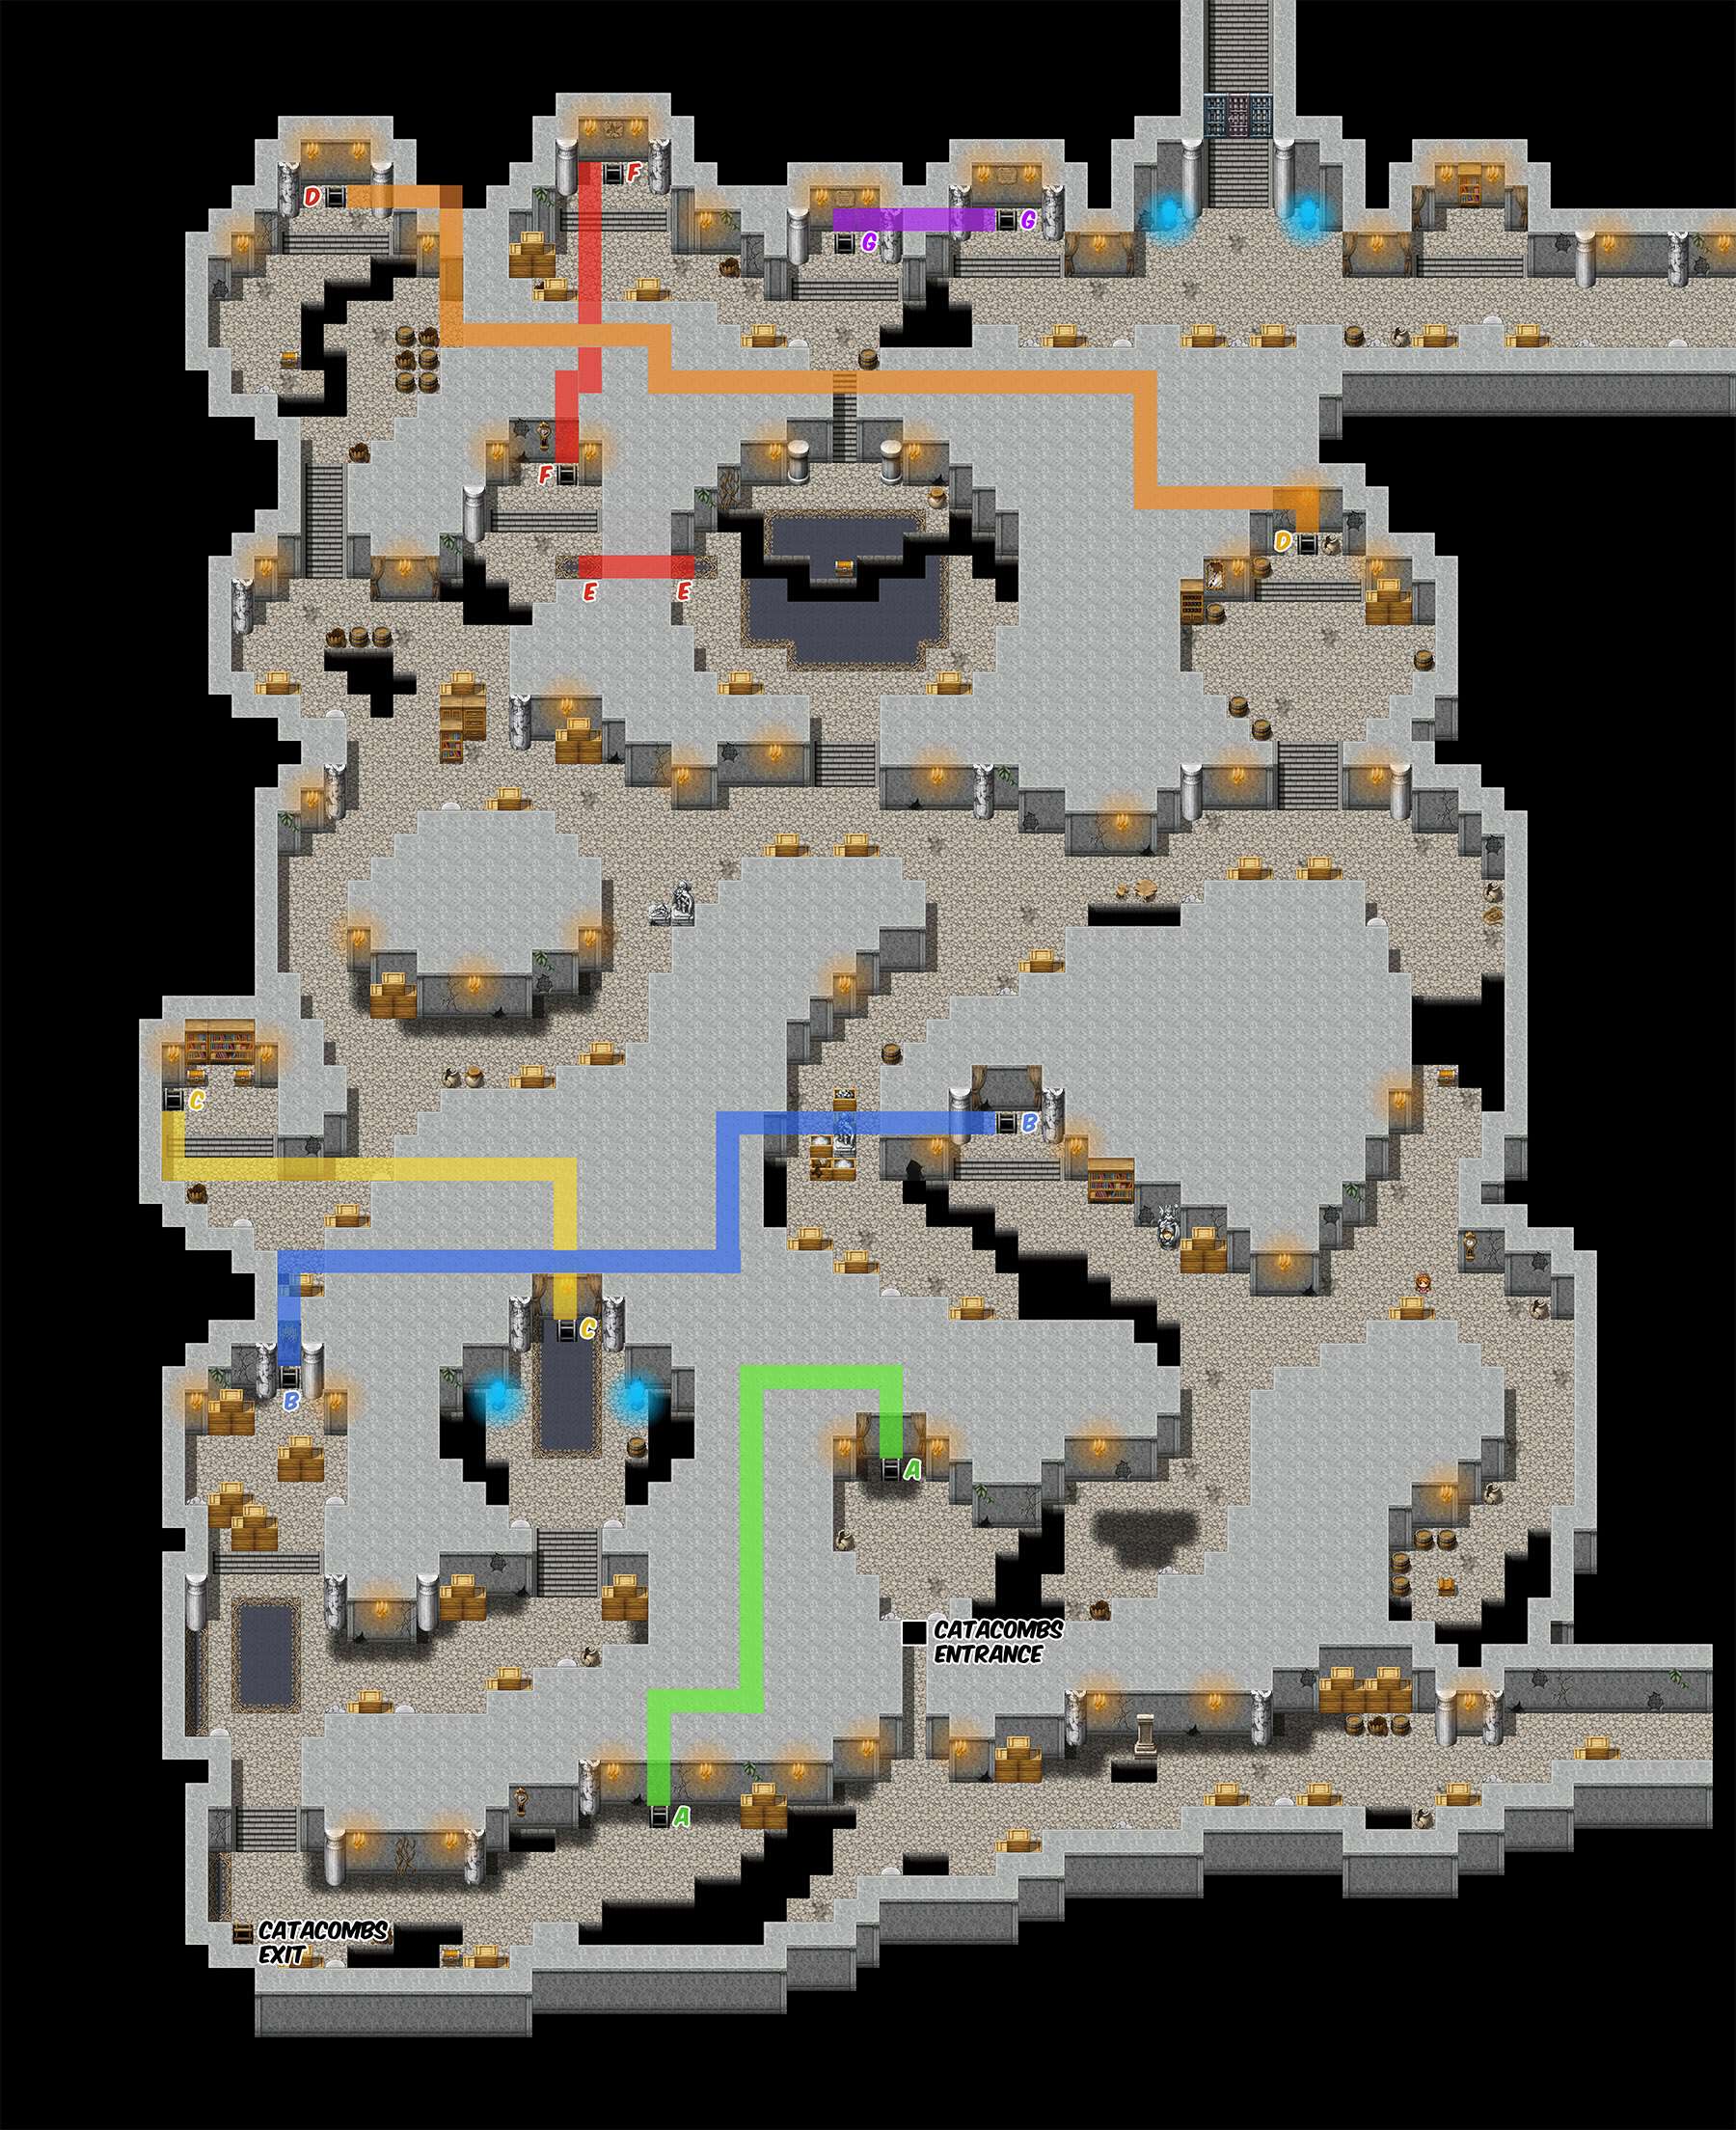
- The heroes will enter from the southeast corner. The only way forward is to the left and north. However, this will trigger a false floor and land them in the catacombs. (See this guide for the solution.) They will emerge at the point on the map marked “Catacombs Exit”
- From here, head north. Foundations has a series of ladders leading to underground paths. From this point there are two ways you can take.
- (Optional) Path B will take you to an area with a few items and a lost girl. You can choose to take the girl with you to help guide her out of the dungeon. Note success or failure doesn’t matter if the girl becomes knocked out. In combat she is mostly useless. Although she can be used to an effective degree to use items such as potions on party members, or molotov cocktails on enemies.
- If you took path B, backtrack. Take path C to the north.
- (Optional) To the northeast of here, you can take path D to reach a chest.
- The way forward is obscured by a false wall. However, light shines through it, as well as a carpet, giving the player a hint that the wall is passable. Navigate to section E and take the passage at path F to the north.
- From here, simply go right and take path G to the right.
- The exit is locked. To progress from here, head right to the next area.
Chapter 4: Antechamber Riddle Solution
The Antechamber of the Source contains a riddle in which the players are expected to examine 3 colored statues. The statues make statements. A tablet in the central northern area explains that one statue always tells the truth, one statue always lies and one can do either.
Based on this information, the players have to determine which colored statues are which. To paraphrase:
- The Paladin always tells the truth
- The Illusionist can tell a truth or a false
- The Assassin always lies
The statues individual statements are as follows:
- Green Statue: I Am The Illusionist
- Red Statue: Blue Speaks Truth
- Blue Statue: I Am The Paladin
Based on this information, you will need to sus out who is who. 3 colored switches are on the northern wall and are used to set who the player thinks is who. When you feel you have set the switches correctly, test it with the yellow switch on the far right. If you are correct, the path forward will open.
Solution
Blue is the Paladin, he has told the truth. Red is the Illusionist, but has chosen to tell the truth. This leave Green as the Assassin.
Explanation: If we assume blue is the paladin as they claim, red cannot be the assassin or else they would lie about blue. That only leaves the illusionist. It also means green has lied, making them the assassin.
If we assume blue is the assassin, red could possibly be the illusionist. But that only leaves green to be the paladin, and they claim to be the illusionist. So that combination is invalid.
Finally if we assume blue is the illusionist, red could possibly be the assassin and covering for blue’s lie. They can’t be paladin because blue would have lied. But once again, green claims illusionist. Nobody claims paladin. So this combination is also invalid.
Thanks for the guide! Really helpful especially on the early game where there are so many missable quest. I’m able to 100% completion on 1 run