
This is a quick guide on how to beat the level.
Terror Hotel Guide
About
This is a quick guide I made after beating the level twice to help out those in need. The maps don’t have an accurate scale and there are some hallways missing. But they show the general location of the key rooms.
This took less than 3 hours to make so if anyone wants to make a prettier guide with better maps go for it.
Maps
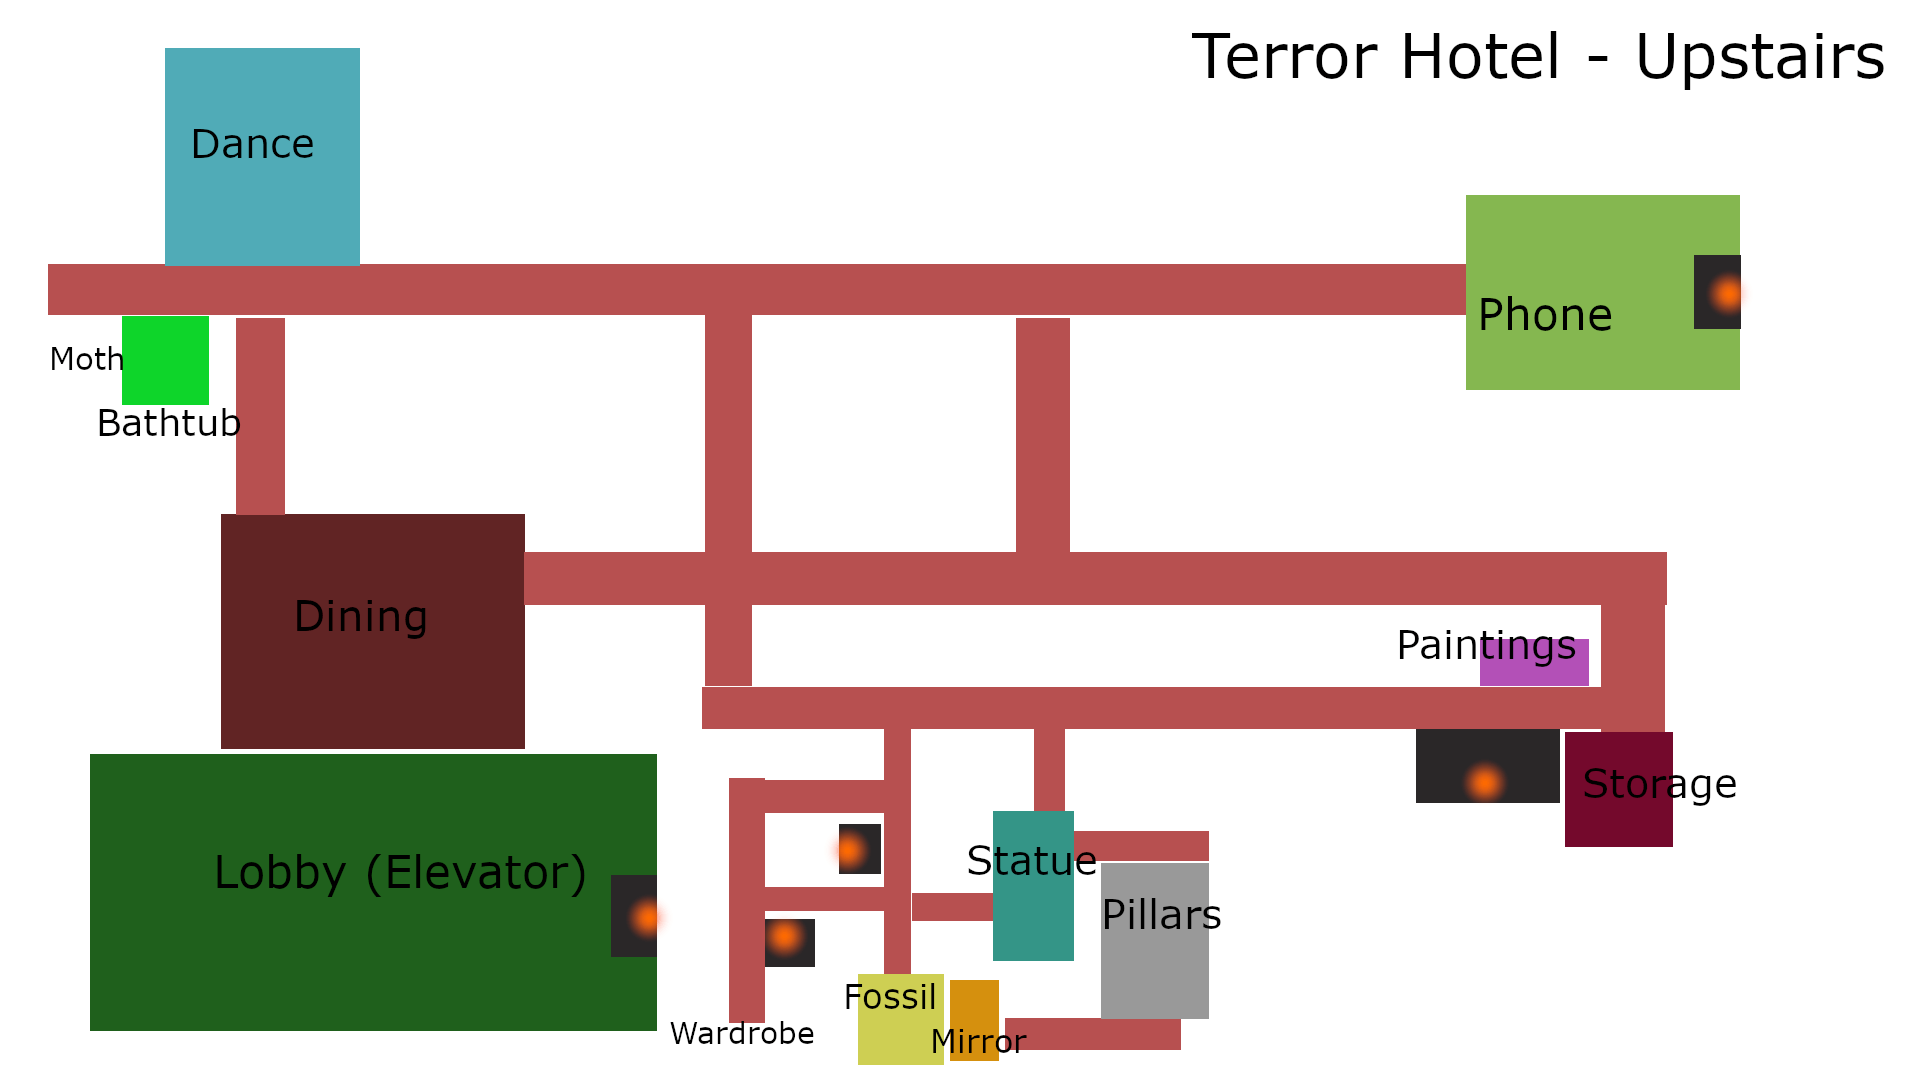
Upstairs area:
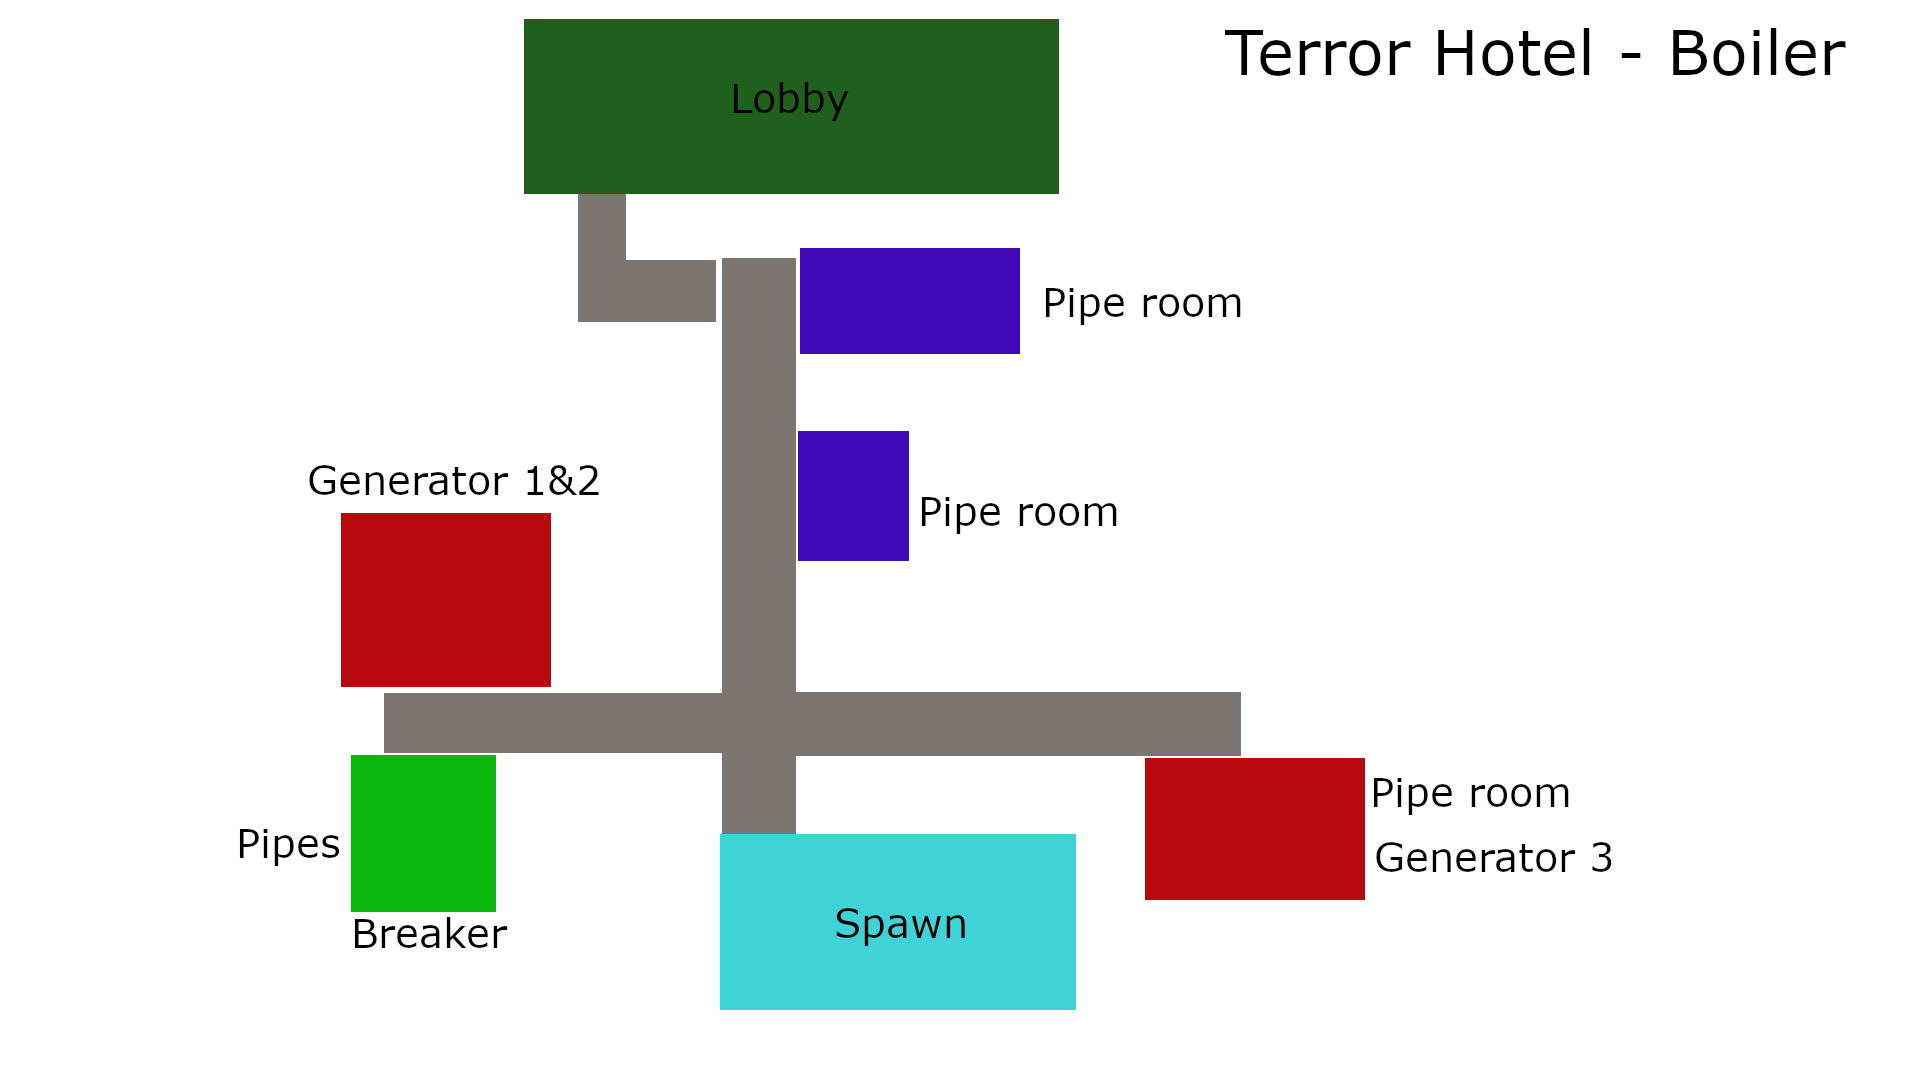
Boiler room area:
Tips
These are some tips on how to survive the level if you’re having trouble:
Use Moth jellys
There’s a lot of them on this level. The only thing you have to watch out for is to not accidentally go in the death moth’s vision while running.
Enemy spawns
From experience, the humanoid entities tend to spawn on the top hallway (the one near the Dance room), and the death moth tends to spawn in the Pillars / Fossil region. This may be randomised and may not account all entities so beware.
Hot zones
Some hallways/rooms are more popular with the entities. Even more so as time goes on.
I’m thinking of the Dining room, the top hallway (rooms 114, 113 …), the middle hallways (rooms 101, 102… and storeroom, paintings room, kitchen …). The lower halls too usually have at least 1 entity roaming about.
The Death moth usually hangs out in the little hallways, but I’ve seen it in the Fossil room and in the Pillars room so watch out, use your ears and when in doubt, use your motion detector.
Handling enemies
Avoid the Death moth as much as you can (even if they hang out in a puzzle room just leave it for later). It will move around at certain times to change it’s nest. If it spots you, break line of sight and get to the nearest room / wardrobe.
For the humanoid entities, you should break line of sight and hide in a room. Sometimes baiting a hit can help you break line of sight, but it risks you getting hit. If it’s an entity that spits acid it can deal you extra damage if you try baiting it so watch out.
Progression First Part
There are 2 main tasks you can work towards at the beginning.
Getting the Storage key – Getting the Boiler key
- Find paintings – Find weights
- Painting codes – Fossils
- Statue face – Mirror puzzle
Finding paintings/weights
You have to find specific paintings in the numbered rooms and take note as to which room has which painting. The paintings in the dark rooms can be hard to see so don’t forget to flash your light in them.
You can do this blindly and note all of the paintings with their room as you see them.
Or you can target the paintings by first visiting the Painting codes room (marked as “Paintings” on the map).
While you check out the rooms, you should try and find some of the weights. There are 3 in total, but only one of them will work in the end.
Some of them may be hidden in the storage room, in which case you’ll need to complete the other path first if you need them.
Painting codes
Marked as “Paintings” on the map
- For each painting in the room, you need to enter the room number they appear in (Should be 10X or 11X).
- If you are missing only one painting, you can bruteforce the last one in a few seconds.
- Once you enter the correct combination, you’ll be given the statue’s face.
Fossils
Marked as “Fossil” on the map
- Only one of the 3 fossils will give you the gem.
- You can remove one from it’s pedestal if you have the corresponding weight to put in it’s place (the room will lock itself otherwise).
- To check a fossil, you’ll need to carry it all the way up to the bathtub. During this time you won’t be able to use some items, running will drain more stamina, running while boosted on Moth jelly drains a little stamina.
- You can also drop the fossil at any point if you want.
I strongly recommend using Moth jelly during this transport mission. You won’t feel slow and it will be easier to outrun the entities.
Also, I recommend avoiding the dining area unless the other hallway is occupied by an entity. Some entities like to visit the area and if you get in a chase, you’ll drain a lot of stamina trying to get to a room (I’ve died a few times there).
Once you put the fossil in the bathtub and wait a little, it will either drop a gem, or nothing at all.
Statue face
Marked as “Statue” on the map
- The statue is hidden in this cluster of hallways, in one of the dead ends.
- After putting his face back, you’ll get the storage key.
Mirror puzzle
Marked as “Mirror” on the map
- You first need to place the gem in the projector.
- Then you need to turn each mirror in order to direct the beam through every one of them.
- To help direct the beam, you can right click to change your perspective and aim more precisely.
- The last mirror should point the beam to the ice statue in the centre of the room.
This should destroy the statue and give you the boiler key.
Progression Second Part (Storage Room Unlocked)
Once you unlock the storage room, there are several things you can do.
- Finding missing weights (See part one)
- Lighting fireplaces
- Dance room puzzle
Completing the Dance room puzzle will unlock
- Generator temperatures
- Phone combination
- Final fireplace
Lighting fireplaces
Dark gray spots with an orange dot on the map
- In the storage room, you can find a candle to light fireplaces up.
- There are 5 spots in total to light up, doing this will complete the first step of turning the generators back on.
Here are the spots if you have trouble finding them:
- In the room next to the storage room.
- In a room in the fossil hallway.
- In a room in the wardrobe hallway (It’s close to the fossil hallway).
- In the lobby.
- In the phone room (unlocked after doing the Dancing room puzzle).
When you’re done, there should be fire in the boiler room’s fireplace.
Dance room puzzle
Marked as “Dance” on the map
- In the storage room, you should find a vinyl you can play in the room.
- You should leave the room alone for a while until a piano appears in one of the corner (if it doesn’t appear, make sure you left the room long enough).
- When the piano appears, you need to play the three “!” keys on it in “the right order”.
Personally I didn’t get this puzzle (do I need to match the keys with the song playing? do I need to find a note or hint?), I just ended up bruteforcing it in the end (it’s not very hard with the limited combinations).
There are 6 possible combinations in total:
- 1 2 3
- 1 3 2
- 2 1 3
- 3 1 2
- 2 3 1
- 3 2 1
Once you enter the correct combination, you’ll get a notification that “something changed”. This means that the phone room was unlocked.
Generator temperatures
In room marked as “Phone” on the map
- On the table, you should see a note that tells you the correct temperatures of the 3 generators.
- They should all be numbers between 10 and 50 degrees.
- Keep them in mind or in a note, you’ll need them later.
Phone combination
In room marked as “Phone” on the map
If you hear the phone ring, you can pick it up and it will tell you a 4 number combination. If the phone is not ringing. You can either wait on it, or you can go and do some other things while you wait (the ringing noise reaches far and you’ve probably heard it before when exploring the level).
Just know that it does take a long time between each ringing (it felt like 2 minutes) so try to not miss it.
This combination will unlock the Moth room door (only door with a padlock on it). It’s in the same room as the one with the bathtub.
Progression Third Part (Boiler Rooms Unlocked + Moth Room Unlocked)
When reaching this part, the main goal is to get the generator working again to help us get through the moth room.
If you haven’t already, you should get the boiler key before proceeding to the next part.
Other than the fireplace puzzle, you need to fix the water pipes and to set the correct generator temperatures to activate them.
Fixing the water pipes
In rooms marked as “Pipe room” on the map
- First get to the breaker room (marked as “Breaker” on the boiler map).
- You’ll need to take 2 “I” pipes and 1 “L” pipe to their corresponding holes in each of the pipe rooms.
- When this is done, you will have the second step of the generators completed.
Setting the temperatures
In rooms marked as “Generator X” on the map
For this part, you’ll need to have found the correct temperatures in the Phone room. There should be a number and a panel on each of the generators. You just need to put the temperature corresponding to the generator number on each of the panels.
Activating the generators
In room marked as “Breaker” on the map
If you have lit all 5 fireplaces, fixed the water pipes, and set the generators to their correct temperatures. You can activate the switch in the breaker room to activate the generators.
If it doesn’t work, you should check your generators temperatures, maybe you’ve mixed them up.
The generators will generate smoke in the moth room allowing you to progress.
Progression Final Part (Generators Activated)
It’s the final stretch. Now we want to set the table for the entity that has the key (ref: note in lobby).
Getting the moth cocoon
In area marked as “Moth” on the map
- Now that the generators make smoke. The moths in the moth room won’t target you anymore. You just need to evade them as they are buzzing around randomly.
- Falling in the pits also kills you so watch your feets (sometimes walking in a big sack can push you aside).
- When you reach the other side, there will be a man holding a cocoon, you need to get the cocoon for the next part.
After that you will need to traverse the room again (or die and respawn next to the entrance of the room).
Setting the table
In room marked as “Dining” on the map
- You first need to brush off the entities chasing you (the dining room usually has one entity through it when you least want it). Then you can put the cocoon in one of the plates. After that you can ring the table.
- Now you should make some distance (wait in the lobby) and wait for the limping entity to make it’s way to the table (can take a bit of time if it’s far away). When it sits and eats, you should wait until he collapses on the floor to get his keys.
I had one time where I interrupted his meal by coming too close, and the keys were in his plate after he collapsed. The second time where I let him eat in peace, the keys were on the floor next to his body.
Exit
Now that you have the elevator key, you can just take the elevator in the lobby (it’s near the boiler entrance).
Useful! I have passed but a little confused because the ending. Is it a bad ending? Is there a good ending? Because my ending is “Lost inside the backrooms”
I think it’s the normal ending. It may change in the future if another level gets added.
This is also the text you see on the other endings where you don’t exit the backrooms.