
A basic guide to help users get started and collect all of the achievements!
Contents
Getting Started
Сrеdit gоеs to Nuguette !
Mermaid Colony is a exactly what it says on the tin – a colony builder but for mermaids! The primary goals of the game are to:
- Maintain your colony
- Keep the darkness at bay
- Unlock all of the spells up until the final spell, which will vanquish the darkness for good!
The Basics
Your colony will begin with four dwellings (which each house 2 mermaids), a temple, a throne, and a handful of random workshops with mermaids already manning some of those workshops.
Buildings cannot be built directly next to each other, aside from dwellings, which can be built in clusters of five to save space. You’ll have to build your colony buildings diagonally from each other, or even further apart.
Controls
- To move: WASD or right-click and drag
- To build: Right-click an empty space (it should show as “rock” when you hover over it) that is not in the darkness. Up to the top-right of the screen, a panel with options will appear. From that you can select “build” or one of the plant options. If you select a building under “Build”, a blueprint will appear with a list of the required resources. It will have a red box over it if you are lacking resources.
- To prioritise something for hauling: Right-click the item on the bar down the bottom, which will turn it green.
- To select a building: Right-click the building (or open the Buildings tab and click the building)
- To select a mermaid: Left-click directly on mermaid (or right-click the building/dwelling they’re assigned and click on their name, or open the Mermaids tab and click the job)
- To set a mermaid/building’s production: The worker holds the production and activity controls. Select the mermaid worker and you’ll see the buttons to manage production on the left, in the middle of their profile. Under the list of production items, you’ll see a “don’t repeat” box. If you click it, you can quickly set it to “repeat indefinitely”, but you can click the arrows to the side to set a specific number of repetitions.
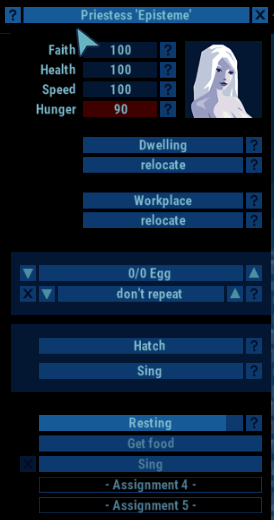
- Work Types: Our friend Episteme is pictured below, and she demonstrates both production and activities! To set the location of an activity like Sing, click the Sing button and then select where you’d like the mermaid to perform the action. The mermaid will go to that spot every time they perform the action until you change it.
Starter Mermaids
There’s lots of mermaids, but let’s begin with the basic babes that you’ll always start with:
- Haulers require a storehouse and will take resources where they need to be (like completed things out of workshops and raw material into workshops). Mermaids at workshops will not go get raw resources for crafting themselves, so haulers are vital.
- Builders don’t require any workplace and will, well.. build. They’ll bring resources from storehouses to the buildings and build them up. Be careful not to build too much at once or they’ll get overwhelmed and cycle through a bunch of buildings. They are also slow, so never leave it too late!
- Huntresses patrol your colony for monsters and hunt for food. They’re the only mermaids that don’t require a dwelling, their Hunter’s Lodge will provide a workplace and lodging. You can set the patrol and hunting areas by selecting the mermaid, picking the task and it’ll give you the option to select a new area. I usually make sure there’s a line of them with plenty of overlap on the edges of the colony with a couple within. It’ll take them a few hits to kill any monster, so it’s always good to have them a tad further out to make sure monsters don’t disrupt your other workers.
- Priestesses lay eggs, hatch new mermaids, and sing to keep other mermaids’ faith high. If you run out of priestesses, the game ends, so look after them! (Unless you’re trying not too…)
The Darkness
The primary element of the darkness are Spawns, blobby masses that produce darkness and spawn monsters. Darkness reduces faith and harms plant matter. After some time in light, they will die off. They also produce:
- Spores, which travel out in search of new places to create spawns. These settle into new spawns.
- Leeches, which chase and attack mermaids. These disperse once “enough” damage is done.
- Krakens, which target buildings. They disperse once a building has been completely reduced to ruins. I’ve noticed they tend to prefer lighthouses, so building those around may help keep your more important structures safe.
- Blobs, which slowly rise up and emit a great amount of darkness, which immediately saps nearby mermaid’s faith.
- Swarms, which move slowly and target any flora in their path.
All of these creatures will cause mermaids to flee and lose faith, dropping whatever item they are hauling at the time. This can be very costly! Huntresses and the Sea Dragon will attack the monsters and defend your colony.
For help pushing back the darkness, check the Spells section.
Faith
Integral to the game is Faith, which is produced by Mermaids. Each mermaid can have a maximum of 100 faith and it is reduced by a number of things, including darkness and not being looked after (no dwelling/workplace, hungry etc). Faith allows you to unlock and, in conjunction with gems, cast spells. About every 200 faith you’ll unlock a new spell. See Spells for more details.
Building and Maintaining a Colony (Workplace / Resource Guide)
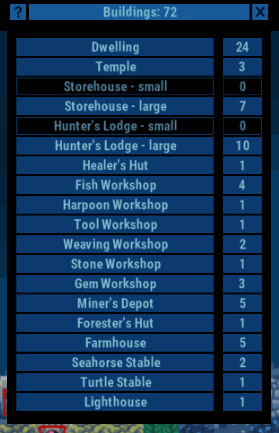
The game has pretty solid help systems, if you ever encounter an object, spell, building or mermaid you’re unfamiliar with, you can click the “?” key and the ever-reliable Episteme will tell you everything you need to know. That said, sometimes you’ll run out of resources or have your colony crippled by missing a critical workshop too late in the game. Here’s the full list of mermaids and buildings based on the end of my winning game:

From my experience, here’s some of the key buildings/productions you should focus on to ensure you don’t fall over. This is NOT including dwellings since they’re pretty self-explanatory.
Must be Continually Outputting
These buildings and resources are absolutely vital to your colony’s survival, and must be outputting near-continuously for your colony to thrive. Keep a close eye on these resources and if they start dipping, take action by building duplicate workshops/hatching more helpers.
- Storehouse (Hauler): Each hauler requires a storehouse to work, and two haulers can work in each small storehouse. Building three small storehouses will unlock the large ones, which fit four haulers, and you can then upgrade all of your small ones to large.
- Mining Depot (Miner): retrieves basic minerals – quartz, obsidian and limestone. Quartz is vital for the gem cutter, and should be the priority. Limestone is required for cut stone and obsidian for a variety of tools, so they’re used less frequently but still important to have.
- Gem Workshop (Gem Cutter): Gems are required for casting spells, building/repairing buildings, and hatching new mermaids. Absolutely vital, relies on the Mining Depot for a supply of quartz.
- Farmhouse (Farmer): plants and gathers mussels, seagrass and red algae.
- Mussels produce shells and meat (see Fish Workshop)
- Seagrass is a key crafting resource (see Weaving Workshop, Healer’s Hut, Tool Workshop etc) and attracts jellyfish (Healer’s Hut)
- Red algae is a food source and attracts shrimp (source of shells, see Fish Workshop)
- Fish Workshop (Fish Cleaner): produces meat, shells, teeth and bones from caught/harvested wildlife. Meat is an important food source, and shells are vital for building and repairs. Teeth and bones are used in tool and harpoon creation, so they’re not quite as important. Shells are produced when your fish cleaner works with Shrimp or Mussels, so make sure to plant plenty of those farms!
- Weaving Workshop (Weaver): Weavers produce baskets (tool for haulers and farmers, create as you need), ropes, nets (tool for Huntresses, but also vital for construction and repair. Maintain a healthy supply at all times), and pouches (tool for healers). Weavers need a bevy of seagrass for their work, so make sure you have farmers planting and gathering it.
Important, have no impact if left to produce indefinitely
These buildings are important but the starter resources should be prioritised in other areas. Keep an eye on these resources and build them when they’re required, as otherwise they could put a strain on your haulers and clog up the system.
- Stone Workshop (Stonecutter): Produces Stone Block from Limestone, which are used for building/repairing. Limestone is not used for anything else.
- Forester’s Hut (Forester): Foresters can plant and harvest kelp forests, which yield kelp and attract kelpfish. Kelp is important for building and repairing, but isn’t used for anything else.
Important, should be set to produce limited amounts
These buildings vie for important resources, and while their outputs are vital, producing too much will ruin your colony as key resources will run out. You can make more than needed, but keep in mind it’s not just the base cost of the resource – key items like seagrass will be stored in the building when you might need it for something else as well.
- Tool Workshop (Toolmaker): produces various tools required for various jobs. Check what you need, just keep in mind the toolmaker themselves will need a knife, so keep one on-hand if you haven’t made one yet. Requirements vary per tool but they often use seagrass.
- Harpoon Workshop (Harpoonmaker): Creates harpoons, which you need to hatch huntresses. Make them as you need them. Requires obsidian, bone and seagrass.
- Healer’s Hut (Healer): Produces medicine, which is important for healing critically low health mermaids, but uses seagrass and jellyfish – the jellyfish are bountiful if you have lots of seagrass farms, but the seagrass remains too important to waste on excess production. I like to keep a supply of around five medicine at all times.
- Turtle & Seahorse Stables (Turtle & Seahorse Breeders): These two workshops will unlock as you grow, and produce mounts for your mermaids; turtles for builders and haulers, and seahorses for your huntresses and healers. Producing extra will waste seagrass > ropes, but the breeders can’t produce another mount until the previous one has been taken, so there’s not too much harm in letting them run indefinitely.
Spells
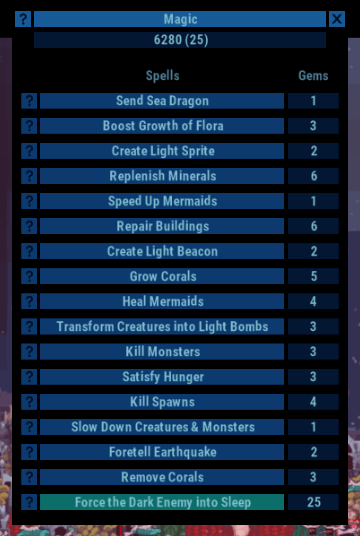
At each new faith level, you will be offered a choice of two random spells. I have ordered them in usefulness for my playstyle, but it may differ for yours!
- Send Sea Dragon (1): This will always be your first spell, and is thankfully quite useful! The Sea Dragon is a defender that needs no rest. It will feed on the wildlife around its assigned area in order to replenish health, so as long as it has that, you’re good to go! Scoot it around wherever you need it, although I tend to keep it on the edge of the colony towards the middle bottom.
- Create Light Beacon (2): This powerful spell creates a beacon of light that lingers for a little while. This in combination with Grow Corals and Kill Spawns is especially potent.
- Kill Spawns (4): Kills several spawns in the radius of the spell.
- Grow Corals (5): Grows corals in the spell radius. Coral are a source of light, but fragile and vulnerable to darkness.
- Replenish Materials (6): After a while, your miners will have depleted the accessible resources (in my case, quartz) and you’ll need more. This spell completely refreshes depleted mines.
- Speed up Mermaids (1): A cheap spell that makes everybody in the radius of the spell hustle! Useful, especially considering the slow game speed.
- Repair Buildings (6): Good for if you’re in a pinch after a quake, it fully repairs all buildings in the radius of the spell. It’s expensive, but great if you’re super low on nets or shells yet have a surplus of gems.
- Kill Monsters (3): I only use this if there’s an unattended monster or a pack of 3+ that the huntresses are struggling with. Instantly kills any monsters in the radius of the spell.
- Boost Growth of Flora (3): Boosts the growth of any plants/farms in the range of the spell. Use as required.
- Create Light Sprite (2): Creates a very short-lived being of light that attacks monsters.
- Heal Mermaids (4): Good for if you’re out of medicine or if several mermaids are injured, but otherwise not overly useful, especially if your healer has a seahorse and is speedy.
- Foretell Earthquake (2): A simple spell that produces a timer up the top of the screen that tells you how long until the next quake. Can help you plan your repairs!
- Satisfy Hunger: Good if you’re fighting a food shortage (or hauling mishap that’s led to a food shortage). Could also be used to kill Episteme by stopping food production and feeding everyone except her.
- Slow Down Creatures and Monsters (1): Give your Huntresses the upper hand!
- Transform Creatures into Light Bombs (3): I’ve actually never used this, if it’s handy leave feedback!
- Remove Corals (3): Another one I’ve never used. I don’t know why you’d want to remove sources of light, unless they’re in the way of your construction.
- Force the Dark Enemy into Sleep (25): The final spell! It is the final spell you unlock, and you’ll need 5800 faith (or 58 mermaids at full faith) to get it. Using this spell ends the game.
Pushing Back the Darkness
To push back the darkness with spells, make sure you have plenty of gems and then:
- Cast Create Light Beacon on the edge of the darkness, and then cast Kill Spawns deep in the darkness to get maximum potency.
- Maintain Create Light Beacon until most of the spawns in the area are gone, or there’s at least a nice clear space where corals will be safe.
- Cast Grow Corals in the clear area. Some will go right up against spawns, which will probably kill them, but that’s okay! I plant random farms around the corals to provide a buffer, which stops the corals from falling prey to darkness as quickly/gives you warning that it’s too dark.
- Maintain Create Light Beacon until the corals are stable, or continue moving down/into the darkness.
- Move your huntresses down to the new area to give them more reach into the darkness, thus preventing spores from moving back up, while keeping them in the light. Scoot the dragon down if required too, but make sure he still has food to eat! If you’re planing kelp, seagrass or red algae around the forest you should be fine
Achievements
Here’s how you can get ALL achievements for Mermaid Colony.
- 10, 20, 30, 40 and 50 Mermaids: Just keep building your colony steadily and you’ll get this! Once you reach a comfortable equilibrium with about 45 mermaids you can just make a bunch of huntresses to achieve it if you’re in a rush – you’ll need them to defend a big colony anyway. Ping!
- Full House: Build a dwelling DIRECTLY ADJACENT to the starting cluster of four dwellings. Ping!
- It Sure is Hot: Right-click a space next to a vent (like a little underwater volcano) and plant any farm. Ping!
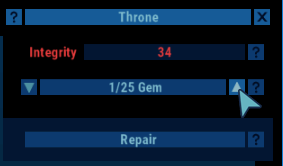
- Sitting on a Fortune: This is best done late game when you’re relying on spells and need lots of gems stored there anyway. Right-click the throne and use the arrows to the right of the screen to up the amount to 25. This is the amount required for the final spell anyway!
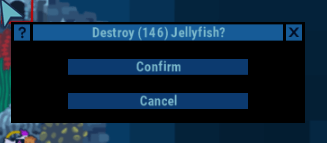
- Into the Trash: Simple! Right-click a storehouse, find a lesser-needed stack of items (I always have a surplus of jellyfish), click the X to the left and then click confirm. Ping!

- Win the Game: The final spell takes >5800 faith to unlock and costs 25 gems to cast.
- Ask a Ghost: This one can be a bit tricky and took a couple tries. The basic goal is to build a second temple (perhaps optional), hatch a second priestess (required to avoid a game over when Episteme dies) and kill Episteme, the priestess you start with. The below is my strategy, but you could potentially also stop food production and nourish the rest of the colony with Satisfy Hunger.
- Begin a new colony as normal, build up and ensure everyone is happy and fed. I have tried starving the entire colony before and it resulted in a game over due to the other priestess dying before Episteme.
- Build a new temple at the bottom edge of your colony. This will be Episteme’s new workplace.
- Once the temple is done, click Episteme and select the “relocate” under Workplace. She will swim down to the temple.
- Build a new dwelling for Episteme in order to ensure she doesn’t eat regularly and her health stays low. Place it as close to the darkness as possible.
- Once the dwelling is complete, click on Episteme. Under dwelling, click “relocate” and put her in the new dwelling.
- Wait for a kraken to destroy the dwelling and do NOT reassign her
- On Episteme’s profile, click the “Sing” button and move her out to be close to the darkness. Try to ensure she’s in a space all monsters have to go through in order to reach the village. You won’t get all of them, but try to maximise your chances.
- You also need to ensure there are no protectors nearby, but make sure the sea dragon is covering her temple to avoid a game crash.
- Over time, her health will slowly decline as she eats infrequently and can’t fully recover her health from each leech attack.
- Once she eventually dies, the game only triggered the achievement for me when I saved and re-entered, then brought up a help panel for one of the spells. Prior to that it didn’t trigger despite me bringing up health panels.
- Ping!
- Clean-up Crew: I was able to demolish ruins hiding in the spawn by casing the spell Create Light Beacon and sending my builders into the abyss with some Huntresses standing by to keep them safe. I missed one until the very end when I’d cleared most of the spawns though because they’re quite hard to see through the spawns.
Known Bugs
Some things to look out for/be aware of to avoid a wrench being thrown in your plans.
- Huntresses will lose their assignments and begin patrolling/hunting up the top of the map
- If a a temple is destroyed (e.g. by Kraken or quake), the game will crash. Click “Abort” on the error message and re-start the game, it will have auto-saved fairly recently so it shouldn’t be too big a deal..
- If a building slated for repair is destroyed, the worker will sometimes perpetually return to the site to “repair none
- Fish Workshops may display in the information panel as a different building while under construction, but the blueprint’s outline will be the same.
- Hunter’s Lodges will always accept two Huntresses even though only the large ones should do it.You cannot re-assign/assign Huntresses to the second slot until it is upgraded to large, though.
Be the first to comment