
In most other 4x games, every tile inside your city’s borders produces some number of resources for you, so right off the bat, you’ve got resources to work with.
Guide to Tile Improvement
Basics
You’ve got a limited supply of starting resources (iron, wood, stone and gold, food), but by themselves, the terrain tilesare just land. Aside from possibly providing a defensive bonus to your units, it doesn’t do anything for you unless you improve it or chop trees to get a quick infusion of wood.
Oh! And tree chopping! You can chop trees for 20 wood (10 if scrub), and if you don’t also clear the land, in 20 turns or so, the trees will grow back, giving you a renewable resource, and Lumber Mills come surprisingly late in the game, so you’ll be glad the trees grow back, because it gives you a resource you can farm to get you by until you can build some Lumber Mills.
In any case, since raw (undeveloped) terrain tiles are worthless to you from a Kingdom perspective, your workers are super important. If they’re not out there improving tiles, you’re not growing your economy.
In terms of the kinds of improvements you can make to your land, that’s largely driven by tech, but you will have a few options available from game start (mine, chop, farm, net). In any event, if you want to do more than that (and you do), you’ll need to research the appropriate techs to unlock those abilities.
If you’ve played Civ before, you get this. Most of the resource-related techs are very low level, so you can get them quickly, with the notable exceptions being lumber mills and Land Consolidation, which is the tech that unlocks luxuries (allowing you to build groves), which come a bit later on.
Note: a few luxuries are available at game start if they’re minable or fishable, but you’ll have to wait for the rest.At game start, the exact improvements you’ll be able to build will vary depending on what Nation you select, because each Nation has different starting techs, but regardless of which Nation you’re playing, your starting worker (and yes, you get one, right out the gate) will have at least a couple of things he can do.
Naturally, this invites players to experiment with different Nations to find the one(s) that are best suited to their playing styles, but again, a Nation is more than just a collection of top-levelbonuses. Remember, each Nationis constituted off our different noble families, and you only get to pick three during any one game, so even within your favorite Nation, there’s lots of room for experimentation, because different combinations of Noble Families will yield a Nation with very different capabilities and a totally different feel.
Note: The unspoken expectation of the game is that each of your first three cities will be given to a different Noble Family, and then once you’ve picked three, the fourth family simply vanishes.
You can certainly give all three of your starting cities to just oneor two families, but doing so invites penalties in the form of greater discontent, so unless there’s a compelling reason to do so, I’d recommend against it.
The good news is that even if you do that, once you pick your third Noble Family and all three have a city, you’ll reverse the discontent penalty and things will get more or less back to normal.
Terrain Types & Improvements
Broadly speaking, every tile on the map can either be defined as urban or rural.
Cities may only be founded on urban tiles. Urban improvements may only be built on, or immediately adjacent to urban tiles with a few exceptions I’ll cover in just a bit.
Workers can, as you research the appropriate techs, build a variety of both rural and urban improvements.
Rural improvements provide the basic resources you’ll need to grow your empire: iron, wood, stone, foodand gold.
Some rural improvements (special tiles) also provide other bonuses (to growth, and sometimes, they’ll provide you with a fraction of an order – some pastures, for example, will give you 0.5 orders per turn, while wheat and fish provide a bonus to growth as well as providing food. Remember, food and growth are two different things!).
The number of urban tiles you have matters because each urban tile can support 1 citizen. Beyond a certain point, if you haven’t been adding new urban tiles, your cities will start to suffer from discontent (at a rate of 0.5 discontent for each citizen you haven’t provided an urban tile for). Urban development is one of the tools you’ll use to control happiness.
Urban improvements consume resources produced by rural improvements (carrying a per turn upkeep in one of the materials mentioned above) and provide the resources you’ll ultimately need to win the game (culture, research, orders, Civics, and sometimes money).
At first glance, tile improvement in OW looks complicated, but it’s really not. It can be its own little mini gamethough, as you discover patterns that work for you.
Principles of Tile Improvement
There are two of these:
First, likes attract likes. So, if you have a cluster of mines or quarries built together, each will gain a small boost to output based on adjacency to a tile of the same type (in other words, a cluster of mines is more productive than a lone mine, sitting all by itself on a hill).
This then, is at least partly determined by what specials you have around your cities. If you have an ore special, then it will be a good producer for you, but you may want to build mines all around it, both to make the special tile even more productive, and to boost the productivity of all the mines in the cluster.
Unfortunately, completely encircling a special tile with the same type of improvement can take up a lot of tile real estate, and you often don’t have many city border tiles to work with at gamestart. The best and most efficient alternative then, is to improve tiles in “triangles” so that if you built a triad of mines, each one gets an adjacency bonus from the other two, dramatically boosting your total output without taking up a huge amount ofspace.
Second, some tile improvements are enhanced by companion tile improvements. For example, if you build a granary, it will enhance the output of every farm adjacent to it, which means you’ll get the most out of your granary by building one, and thensurrounding it completely with farms.
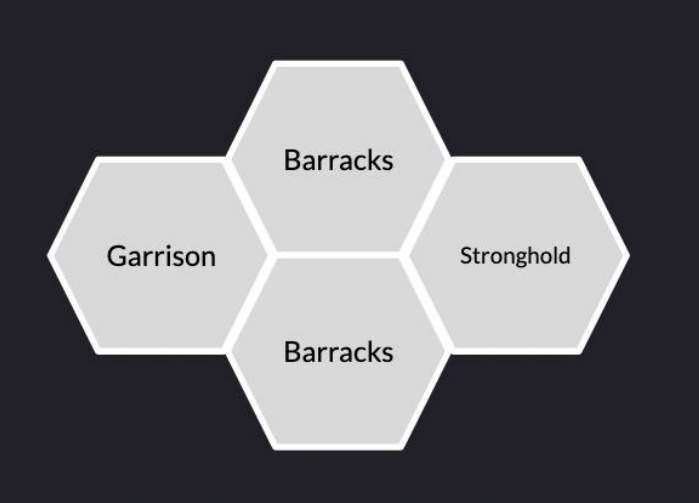
In a similar vein, barracks and ranges are better when built around garrisons/strongholds/citadels, so again, build those improvements, and then as much as possible, surround them with barracks and ranges and they’ll be more effective.
This is a “diamond” of improvements, which is a triangle, plus an extra at the bottom. In this case, we’re looking at an ideal placement of two barracks, a Garrison and a Stronghold.
Note, however, that you may also want to factor in the addition of a Stronghold. In that case, this is the ideal configuration.
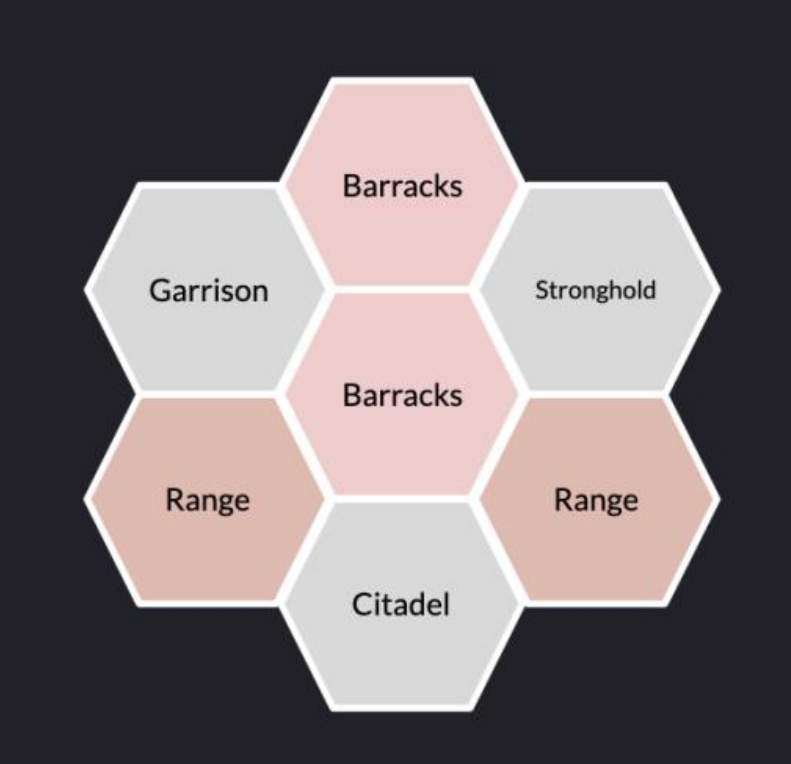
Sometimes, the available terrain won’t cooperate with you and you won’t be able to do this, but when you can, this configuration will maximize your training output, and the triangle (or diamond) is useful for any type of improvements (clusters of mines, quarries, etc.).
The Odeon, theaters and amphitheaters are more effective if you have hamlets built immediately adjacent to them, so same idea (and note that the Amphitheater improvement reduces discontent in any city you build one in, so you’ll probably want one in most of your cities eventually because they help keep your people happy).
Note too that some buildings can only be built next to other buildings. A Ministry has to be built next to a Courthouse, and a Palace has to be built next to a Ministry, for example.
Don’t worry. You don’t have to remember all of that. If you want to build something, just put your worker on a tile and hover over your options. You’ll get a display on the map screen of where the improvement in question can currently be built and each improvement has its conditions listed next to it (i.e., “must be built adjacent to two urban tiles”).
For the most part, urban tiles have to be adjacent to each otherand often, adjacent to at least two other urban tiles.
If you’re building on the coast, the restrictions are relaxed and you only need 1 other urban tile adjacent, provided that the adjacent tile is both coastal and urban!
Monasteries, Shrines, Hamlets and Wondersare exceptions to the adjacency rule. These buildings can be built anywhere, which gives you the freedom and flexibility to jump over existing tile improvements, leverage “suburb” tiles (urban tiles generated when you explore an ancient run), and grow your city in new ways or in new directions. The advantage of religious buildings are that they bolster your relationship with the religion associated with the building in question. The advantage of Hamlets is a bit simpler:
Money. Hamlets mature over time, generating even more money, so the more quickly you build them, the faster they upgrade, and the more you get paid. You want to get paid, so you want hamlets ASAP.
You want religious buildings ASAP too, workers can only build pagan Shrines. If you want Monasteries, Temples and Cathedrals, you’ll need to build Disciples.
Again, this seems like a lot to absorb, but really, it’s not, and the tile improvement suggestions that the computer will give you aren’t awful. You can easily win the game simply by taking cues from the computer regarding what to put where, but once you get a few games under your belt, you’ll almost certainly start ignoring the computer’s suggestions in favor of pursuing your own highly optimized tile improvement strategies. Anyway, just remember those two things: Likes attract likes and some buildings work better when they’re next to each other, and you’ll be off and running where tile improvement is concerned.
The most important thing to realize about tile improvement is that moving the worker to a tile takes oneor more orders.
If there are trees on the tile, it will take another order to cut them down. Then another 2 orders to clear the land. Then another order to actually start building the improvement in question.
Then, of course, the improvement won’t just pop up magically the next turn. It will take a few years for the worker to complete the task you have set him to, and every turn he’s working, he will automatically deduct an order from your orders count during those turns.
You can see this if you pay attention to the tile improvement screen when you’re about to issue an order to a worker. It says, -1 order per turn for x number of years. So just be aware of that. Improving the terrain around your cities is vital, but it will chew up your orders, which will give you less of them to work with until that job is done.
The other thing to point out here is optimized orders management. Let’s say, for example, you move your worker to a tile with trees on it and you want to build a farm, but you find that you can’t do that when you get there because you don’t have three orders left (one to cut the trees, two to clear the land and one more to actually start building the farm). What if you only have three orders left?
Well, in that case, you can manually issue the orders to cut the trees and clear the land, using up all of your orders for the turn so that next turn, you’ll only have to spend 1 order to actually start building the farm.
It’s a small thing, but it can make a big difference in your game because you’re spending your orders efficiently. Speaking of that, this is as good a spot as any to talk about good orders management.
Orders are probably the most precious resource in the game. You’ll probably never get to the point where you feel like you’vegot enough to do absolutely everything you want to do.
Now, it’s true that if you have unused orders, the game will sell those (for 10 gold each) and give you some money for next turn.
That’s good, but honestly, there are much better ways to spend those orders. If you’re consistently finding that you’ve got lots of unused ordersfrom one turn to the next, then you don’t have enough workers in the field.
Think about it
An unused order will net you ten gold. Using an order to chop a tree will net you 20 wood, which you can sell for… well, it varies from one game to the next, but I promise you that you’ll get more than ten gold by selling the wood.
So don’t just live with unused orders. Build an extra worker or two, and when you find yourself in a turn where your other workers are busy doing stuff and you’ve moved all the troops you need to, and you don’t have anything to do re: diplomacy that requires an order, go chop some trees. They’ll grow back, and you’ll get more for your order than you otherwise would.
Final note before we leave this section
Your workers are responsible for the care and maintenance of your tile improvements. When something gets pillaged (and it invariably will), you’ll see a counter appear over the tile improvement in question.
If you do nothing, the improvement is destroyed when the counter hits zero. To keep that from happening, you’ll need to march a worker to that tile and make repairs.
Other Jobs For Workers
In addition to improving the tiles around your cities, there are a couple of other good uses for workers.
First and foremost, if you have a given city that’s not connected to your capital, that city will get a point of Discontent every turn.
You can fix that by road-connecting the city to your capital butnote that you don’t necessarily have to build the road from one city to another. You can build the road to a river that is connected to your other cities, and then to your capitol. Rivers = roadsfor most purposes, in OW.
Of course, for the purposes of moving troops, you may want to build a road from one city to the next. Rivers can sometimes take meandering routes, after all, and you can build your road so that it provides a straight shot. There’s value in that as it enables you to move your troops around more easily and order-efficiently, so a strong argument can be made for a good network of military roads that have nothing to do with connecting cities to your capitol.
In fact, one very good use of workers would be to use them to build roads to landsyou plan to conquer. Doing so will speed your army on its way when you’re ready, and if you need to reinforce your battle group, your reinforcements will arrive more quickly too.
On top of that, if you’re planning to take cities from a rival AI, you’ll almost certainly want to connect them to your trade network, in which case, you’ll need the road anyway.
Finally, workers can (with appropriate tech) build forts. Forts provide a hefty 50% defensive bonus.
In addition to that, units on a Fort tile can heal, giving you a handy means of “outside your borders” healing.
If you spend an order, you can also tell your troops to fortify, which gives them a 5% defensive bonus per turn, to a max of 25%, so building a fort, combined with the fortify command = one tough defensive hombre.It gets even better if you’ve promoted that unit to Herbalist, because the second Herbalist promotion allows the unit to regain 1 hit point per turn, and both the Guard and Combat promotions further enhance defense, so… you get the idea.
Now, imagine a narrow mountain pass (there are lots of those in OW), and your enemy’s only options are to come through the pass or spend 10 turns going around.
Now station an archer (or even better, an onager) just behind your fortified tank, andit would practically take an Act of God to get through the pass.
All that to say that workers have lots of “stuff” to do butbe aware that not all workers are created equally.
The workers from some families have a special power. Traderfamily workers, for example, can build multiple road tiles per turn. Move worker. Build road. Move worker again. Build road again.
And if you use force march on said worker, you can build road tiles until you run yourself out of orders if you want or need to. One Trader Family worker is usually all you need to road connect your entire Kingdom. They’re amazing. Bear in mind too that while you’re building roads, if you build through a tile containing scrub, you can chop it without using an order, gaining 10 free wood. Do that every chance you get!You can also have workers accompany your army on campaign, so they can quickly repair any pillaged tiles once the city is captured (especially helpful if you’re playing Assyria), and workers can “prep thebattlefield” chopping trees and possibly clear cutting the land to deny an enemy army cover.
One thing to be aware of though is that workers are loyal to the family that built them. This is expressed by the fact that if you move, say, an Artisan worker into some other family’s borders and have him improve a tile, it will take 1 year longer to build that improvement.
It will also take 1 year longer to improve a tile on a hill, and if the worker is wounded, anything he does other than road building will also take 1 year longer (and all of those conditions stack!).
Finally, note that if you build roads to Nations you are at peace with, or have an alliance with, you’ll increase your gold per turn as friendly cities are added to your trade network.
Wonders
Wonders deserve their own short section here, given that workers are responsible for building them.
There are a total of sixteen wonders in the game, but in any given game, only 13 will be present (selected randomly). Wonders are powerful, but time and resource intensive projects that offer compelling advantages to the Nations that build them (or capture them later).
The interesting thing here is that since not all wonders appear in every game, it’s impossible to build a reliable strategy around any particular wonder. They can serve to augment a strategy, but you’ll have to make peace with the idea that you can’t guarantee you’ll be able to build the Pyramids (or whatever your favorite wonder is), every single game.
Also note that wonders are tied to cultural levels in addition to specific techs, so if you’ve got your eye on a mid to late game wonder, cultural improvements really matter because if you can be the first Nation to achieve a given culture level, and you’ve got the appropriate tech…Here’s the complete list of Wonders that can appear in any given game, sorted by when they are available, culturally:
Weak Culture Wonders
The Great Ziggurat
- Where to Build It: Must be built in a Holy City.
- Cost: 100 Civics and 600 Stone
Output
- +4 Culture per turn.
- +20 Civics per turn.
- -20% to all improvement costs.
You can’t survive in the game without building your economy, so it’s something that you’ll wind up doing for the entire game. This wonder makes it easier, cheaper and more efficient.In addition to that, it providesa healthy Civics boost and having a nice, stable, per turn source of Civics is always a good thing. A solid wonder for any Nation, but it does dovetail especially well with Egypt’s natural abilities.
The Hanging Gardens
- Where to Build It: Must be built adjacent to a river.
- Cost: 100 Civics, 400 Stone, 200 Wood.
Output
- +4 Culture per turn.
- +20% Growth to All Cities.
The wood makes this a relatively expensive early game wonder unless you’re in an area with plenty of forests to chop. Even so, a 20% growth boost to all your cities is huge, and this one has tremendous synergy with Babylon’s native abilities, though anyone looking to jump start their expansion effort would be interested, for sure.
The Oracle
- Where to Build It: Must be built on a hill.
- Cost: 100 Civics, 200 Food, 400 Stone.
Output
- +4 Culture per turn.
- +10 gold per turn, per Religion.
- +1 Tech Card Hand Size.
Free Agent Network In All Holy Cities (that exist when the Oracle is completed).
An exceedingly well-priced, powerful wonder. The additional tech card each time you select a tech to research is handy and genuinely powerful if you have a Scholar leader as it can help you get to the exact tech you want to research next. The money is okay, but the real power lies in the free Agent Networks.
Granted, you’ve still got to research Portcullis to actually deploy an agent, but that’s money you don’t have to spend, and orders you don’t have to use to get scouts to those cities, and the research boost can be significant when you get to that point.
The Pyramids
- Where to Build It: Must be built on an arid or sand tile.
- Cost: 100 Civics and 600 Stone.
Output
- +4 Culture per Turn
- +1 Order per turn
- -50% Start Law Cost.
This is a solid wonder no matter how you slice it.
Nobody ever complained about having too many Civics or too many Orders and this Wonder gives you more of both, because Civics you don’t have to spend adopting laws are Civics you still have on hand for other things (like assigning Governors, buffing your Religion, etc.). Basically, this Wonder just makes playing the game easier. Get it if you can.
Developing Culture Wonders
The Apadana
- Where to Build It: Must be built adjacent to a City Center.
- Cost: 200 Civics and 900 Stone.
Output
- +6 Culture per turn.
- +20 Civics per turn.
- -50% Maintenance in all cities.
Snagging this and the Great Ziggurat together will put your Realm on steroids. Everything about your Kingdom will be more efficient and positivelyhumming. The reduction in maintenance will give you plenty of cash to buy pretty much anything you need and the Civics boost is always useful.
Even alone, the Apadana is no slouch in the Wonders department as money is the most versatile form of currency you have, and the more you have available, the more you’ll find your options expanding.
The Ishtar Gate
- Where to Build It: Must be build adjacent to a City Center.
- Cost: 200 Civics, 300 Iron, 600 Stone.
Output
- +6 Culture per Turn.
- +1 Growth per Turn, per Culture Level.
- All Cities you Own gain +100 Culture on completion.
Pricey, but exceedingly powerful for a number of reasons. First, it instantly gives you a whole boatload of new places you can rush buy from. Second, it’s almost certain to give you a chain of cultural events as your newest cities all move from Weak to Developing, and third, it gives you a nice growth boost in the city you build it in. This one’s a keeper.
The Lighthouse
- Where to Build It: Coastal Water.
- Cost: 200 Civics, 300 Iron, 600 Stone.
Output
- +6 Culture per Turn
- +5 Gold per Turn, per Specialist (in the city the Lighthouse is built in).
- All cities you own see +100% output of Nets.
This wonder can be insanely powerful if you’re playing with a Hunters family, and even if you’re not, with lots of Nettiles, it can still be a superb addition. It’s also one of two wonders that can help you get off of an island pre Navigation, or help to build an intercoastal waterway and get you around a troublesome mountain, so handy for a number of reasons.
The Necropolis
- Where to Build It: Must be built on a Hill.
- Cost: 200 Civics and 900 Stone.
Output
- +2 Culture per turn, per Specialist (in the city you build it in).
- All cities that have a Temple see an additional -2 Discontent.
If you’re going to lean into Religion in your current game, then you want this wonder. It makes one of the key religious buildings vastly more powerful. Consider this one to be a Religious Supercharge option.
Strong Culture Wonders
The Acropolis
- Where to Build It: Must be built on a Hill.
- Cost: 300 Civics and 1200 Stone.
Output
- +8 Culture per Turn.
- +2 Civics per turn, per Religion in the city it is built in.
- All cities you control gain +0.5 Orders per Forum.
Forums are an often underappreciated city Project. This makes them genuinely powerful. If you have eight cities in your realm, building Forums everywhere can give you an additional 4 Orders for nominal cost, and the more religions you allow to spread to the city where the Acropolis is built, the more Civics you’ll have to play with too (which makes this an excellent pairing with the Tolerance law).
Expensive, but anything that gives you more Orders hasto be counted as powerful.
The Colossus
- Where to Build It: Coastal Water.
- Cost: 300 Civics, 800 Iron, 400 Stone.
Output
- +8 Culture per Turn.
- +1 Level for all New Units (from this city).
(All Cities) +2 Civics per Turn per Connected City.
One of my favorite wonders, this one is useful in all kinds of direct and indirect ways. Like the Lighthouse, you can use it to get around nettlesome corners where your Intercoastal Waterway system is concerned, and the civics boon can be enormous. If you build this in a city you’ve already specialized as a troop training center, you can easily engineer a situation where your starting units get at least 2 free promotions, right out the gate, and it’s not hard to push past that (2 barracks and 2 ranges, each with Elder Officers is +200xp. A Strict Governor is another +100, and a free level on top of that! Then of course, there are event driven “extras” that might give you another +50xp for certain types of units…
The Mausoleum
- Where to Build It: Must be built on a Hill.
- Cost: 300 Civics, 1200 Stone.
Output
- +8 Culture per Turn.
- New Units start with Guard I (in the city this is built in).
All Cities gain +40% Culture.
If you’re playing a Culture heavy game, you need this wonder. It will help your cities develop and mature more quickly which will see you adding a steady stream of VP’s to your count, and even if you’re not fond of defensive combat promotions, getting this wonder will simultaneously increase the survivability of your troops and deny a powerful tool to all of your rivals.
The Musaeum
- Where to Build It: Must be adjacent to a City Center.
- Cost: 300 Civics, 800 Iron, 400 Wood.
Output
- +8 Culture per Turn.
- +50% Science Output.
All cities you control gain +1 Civic per turn, per Elder Specialist
The main draw here is obviously the hefty boost to science output and as a Strong culture wonder, it stands to reason that any city that could even qualify to build this wonder would probably have decent science.Given that science drives the game, this one should be high on just about everybody’s wish list.
Legendary Culture Wonders
The Circus Maximus
- Where to Build It: Must be built adjacent to a City Center.
- Cost: 400 Civics, 600 Food, 1200 Stone.
Output
- +10 Culture per Turn.
- +10 XP per Turn for Idle Mounted Units.
- +40 Training per Turn.
All cities that build new Mounted Units see those units start with SwiftIf Swift, fast-leveling Cataphracts don’t get your heart racing, nothing will. This is a great capstone wonder. Expensive, sure, but by the time you can build this, you can almost certainly afford the hit.
The Hagia Sophia
- Where to Build It: Anywhere in any Holy City.
- Cost: 400 Civics and 1800 Stone.
Output
- +10 Culture per Turn.
- +40 Civics per Turn.
All Cities see a -2 Discontent reduction.
That last line says it all, doesn’t it? If you’re looking for a way to slam the door on your Discontent problems, this will likely do it, or at the very least can play a pivotalrole in getting you there.
The Pantheon
- Where to Build It: Anywhere in any Holy City.
- Cost: 400 Civics and 1800 Stone.
Output.
- +10 Culture per Turn.
- +40 Training per Turn.
All cities with your State Religion gain +2 Civics per turn, per Culture Level.
This one feels a little underwhelming to me compared to the rest but I still wouldn’t say no to it if I had the resources (though admittedly I’d grab any of the others before this one).
The Via Recta Souk
- Where to Build It: Must be built adjacent to a City Center.
- Cost: 400 Civics, 1200 Stone, 600 Wood.
Output
- +2 Growth.
- +10 Culture per Turn.
All Cities you own gain an additional -1 Discontent per turn, per City Luxury.
This one’s power is directly tied to the kind of map you play on. If you play with sparse resources, you may not have any luxuries to spare to send to cities, but if you do, this can be…huge. Game altering.
How Many Workers Is Enough?
Given a limited number of orders, the more workers you have, the less likely you are to be able to keep them all busy. At a bare minimum, I would recommend one worker per city, but at that rate, you’ll probably end a number of turns with unspent orders, which means you don’t have enough workers yet. Let that be your guide. Build workers in between other stuff until you consistently don’t have the orders to support them all. That’s when you know you have “enough.” And as you grow, if you find yourself once again with unspent orders, the answer is to add more workers until that goes away.
This will vary from game to game and player to player, so there’s no one “right” answer here. Ultimately, it will wind up being something more than one worker per city in most cases, but exactly how much more isimpossible to define clearly.
Strategy Notes on Workers
Here’s the sweet spot I’ve found that works for me: One worker per city, but in my three family seats (which is almost always your first three cities), I want a second worker – one for rural tiles and one for urban. Then, as the game develops, those three “extra” workers can become floaters, building far-flung road networks, helping jumpstart tile improvement at a new city, etc.


Be the first to comment