
General Questions
Which Items Do I Need to Start The Build?
Poison Holy Relic Necromancer needs Geofri’s Crest, a sword with a base 1.60 Attacks per second AND and open Suffix to craft on, as well as two Transfigured Gems – Summon Holy Relic of Conviction and Lancing Steel of Spraying. In a perfect world you’d also get Darkness Enthroned and a couple of Ghastly Eye Jewels, but on an absolute baseline level you can do without.
You also want the Trigger a Socketed Spell when you Use a Skill, with a 8 second Cooldown/Spells Triggered this way have 150% more Cost Suffix craft, which you can now find in The Refinery in Act 9.
Why Specifically A 1.60 APS Weapon Base?
Pretty simple – the faster you attack, the better the build will feel. With a base of 1.6 attacks per second, you can eventually reach about 2 attacks per second with a crafted weapon.
We will always hit attack speed breakpoints because of how Lancing Steel of Spraying works, however, the faster we attack, the more Life Gain on Hit we get, and the smoother and snappier the build feels. It will never be reflected in PoB, but we promise you will love having a 2.0 APS weapon in the endgame, rather than a 1.4 APS weapon.
What Content Can the Build Do?
Everything, within reason. It’s worse at Sanctum than Poison SRS, but as good or better at everything else. You can even somewhat competently clear Legions with this build.
PoB
Where Do I Find My Minions’ Chance to Poison?
Unfortunately, the game does not tell you that information, so we need to rely on good ol’ Path of Building. If you don’t have it, go grab it from the provided link. First thing you need to do is import your character. To do that, follow these steps:
- Click on “Import/Export Build.

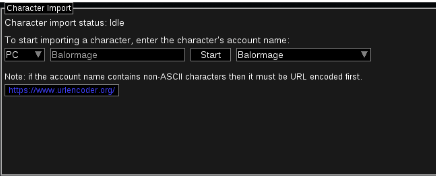
- Under “Character Import”, type in your Account Name, then hit “Start”.
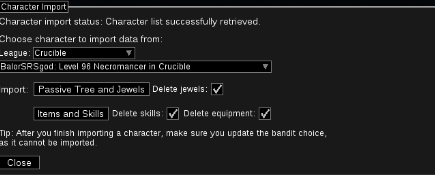
- Choose the appropriate league and character, tick all the checkboxes and your character is imported into PoB.
Now to find out your minions’ chance to poison, follow these steps:
- Click on the Calcs tab on the top left side of the screen.

- Under “View Skill Details” in “Socket Group”, select your Summon Holy Relic of Conviction and click “Show Minion Stats”.

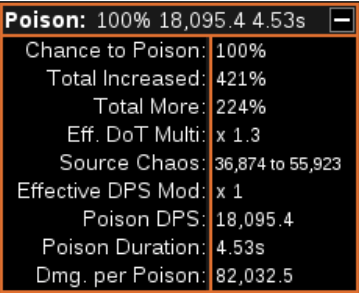
- Look for the “Poison” box and make sure it says 100%. If you hover over the number besides “Chance to Poison” (above “Total increased”), you can see all your sources of poison chance.
How Do I Get 100% Chance to Poison?
I am glad you asked – let’s break out the calculator and throw some math at you.
At the start, you can get away with just Chance to Poison support in your main links and maybe one or two Ghastly Eye Jewels inside the passive tree, but eventually, you want to get rid of the support and replace it with something more powerful. That means we need to make up 100% poison chance in other ways.
You will use 2 Ghastly Eye Jewel in your Darkness Enthroned that have an appropriate amount of Minions have (10-15)% chance to Poison Enemies on Hit. Since everyone has a different belt, you can reference this table with all the breakpoints.
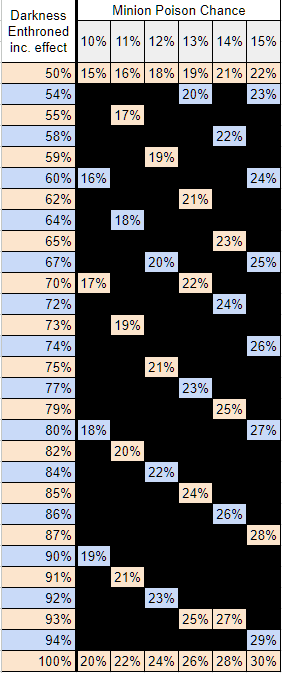
If your increased effect modifier doesn’t show up in the first column, please just refer to the one before. (Example: You have a belt with 69% increased effect of Abyss jewels, your breakpoints and effects are the same as the 67% increased effect, due to PoE rounding down).
Depending on what that number adds up to (the maximum is 60% – two 15% jewels in a 100% increased effect belt), you then need to make up the rest in jewels on the passive tree. Since there are literally hundreds of possible combinations here, I definitely implore you to have a look at the table and make it up as you go.
Why Is My DPS in Path of Building So Low?
Unfortunately, PoB has no way of accurately representing Holy Relic’s true DPS. You have to play this one a bit “by ear”, meaning – see how the build feels. If you feel like you lack damage, consider upgrading.
I like to quote something I recently read in a post: Vibes > DPS numbers.
Build Set-up
Poison Holy Relic is a slightly more complex build, starting with:
What’s Up With The “Breakpoints” I’m Hearing About?
Summon Holy Relic of Conviction gives the Relic minions increased cooldown recovery rate (CDR) per 1% Quality on the gem. Without throwing ALL the math at you, there are five breakpoints of CDR that allow the Relic’s nova to be triggered more often. These are:
2% (largely irrelevant), 14% (likely the first one you’ll hit), 30%, 52%, 82% and 128%. The last one, while obtainable with A LOT of investment, is also something we wouldn’t recommend trying to reach.
Do I Need to Hit Certain Attacks Per Second (APS)?
Normally, to have a benefit from the CDR granted by the skill gem’s quality, you’d need to hit 5 APS for the 52% breakpoint, 6 APS for the 82% and 7.58 APS for the 128%.
HOWEVER – since we use Lancing Steel of Spraying as our attack to trigger the Holy Relics novas and hit enemies with tons of projectiles, we can forgo the APS requirements.
Gem Links
4-link 1: Lancing Steel of Spraying – Returning Projectiles – Life Gain on Hit – Withering Touch/Lifetap (The last link depends on whether or not you have already solved your mana issues)
4-link 2: Malevolence – Generosity | Determination | Tempest Shield (DO NOT link Determination to Generosity!)
4-link 3: Raise Spectre – Minion Life – Meat Shield – Animate Guardian
3-link 1, set up in the Trigger weapon: Desecrate | Bone Offering | Convocation (optional)
3-link 2: Shield Charge OR Whirling Blades OR Leap Slam – Faster Attacks | Frostblink OR Flame Dash
6-link: Your 6-link won’t be as cut and dry as with Poison SRS, as it depends on what type of chest you have, as well as the amulet you wear. Please refer to the PoB and/or written guide for more information. (-means linked, | means not linked).
Rare 6-Link
In a rare, your set-up will look like this: Summon Holy Relic of Conviction – Unbound Ailments – Chance to Poison/Vile Toxins/Enhance (level 3) (once you have 100% poison chance without the support gem) – Void Manipulation – Minion Damage – (Awakened) Added Chaos Damage
Dialla’s Malefaction
Before we get into the gem set-up for a Dialla’s Malefaction, there is another question we need to answer. Please note that the Dialla’s set-up requires you to have capped your poison chance without the Chance to Poison support.
How Do I Colour My Dialla’s?
Dialla’s Malefaction has one very important line: Gems can be Socketed in this Item ignoring Socket Colour. That means that the colour of the gem does not need to match the colour of the socket, and Dialla’s gives different bonuses per socket. There are two of interest for us:
- Gems Socketed in Red Sockets have +2 to Level
- Gems Socketed in Green Sockets have +30% to Quality
Depending on your amulet choice, there’s three colouring options:
3 Green – 3 Red: Summon Holy Relic of Conviction – Empower (Level 3) – Enhance (Level 3) each in Red – Void Manipulation – Unbound Ailments – Minion Damage each in Green.
4 Green – 2 Red: Empower (Level 3) – Enhance (Level 3) each in Red – Summon Holy Relic of Conviction – Void Manipulation – Unbound Ailments – Minion Damage each in Green
5 Green – 1 Red: Empower (Level 3) in Red – Summon Holy Relic of Conviction – Void Manipulation – Unbound Ailments – Minion Damage – Vile Toxins/(Awakened) Added Chaos Damage each in Green
There are further options, but the most important part is to get your Summon Holy Relic of Conviction to the quality breakpoint you want it at. Which eventually will be 82% quality.
Which Support Gem Should I Drop in a 5-Link?
Minion Damage.
Is Determination Still Worth It After the Nerf?
We’re still unsure and would need a good argument about what to replace it with.
(Personally, I think Determination is still worth it, but requires a little more investment on the tree. At the time of writing this, I have 20k Armour with no flask up.)
Which Movement Skill Should I Use?
This comes down to personal preference. We use two types of movement skills in this build: for moving through the map quickly it’s either Shield Charge, Whirling Blades or Leap Slam and for moving over gaps and terrain it’s either Frostblink or Flame Dash.
Why Does My Movement Skill Feel a Bit “Stuttery”?
Make sure you have enabled Always Attack Without Moving on your movement skills. Left-click on the skill and then make sure this box at the top of the skill list is activated.

Which Spectres Do We Use?
In 3.25, we are getting back corpses from the Affliction League! That means our spectre options have increased massively. Corpses can now spawn as rewards in Ritual. Also, if you don’t need the Minion Block Chance from Decay Ward (see below), you can always anoint Death Attunement for an extra Spectre.
These are our options:
- (Perfect) Hulking Miscreation: Grants 100% increased Damage and 30% Attack and Cast Speed to Constructs – which Summon Holy Relic of Conviction count as. The Perfect version also grants nearby allies 20% of Physical Damage as Extra Lightning Damage. HOWEVER, unlike SRS, the Holy Relics do not benefit from the Attack and Cast Speed granted by this Spectre, since they only cast their Nova when WE hit an enemy. This makes this spectre a bit less appealing.
- Perfect Forest Tiger: Grants Haste
- Perfect Warlord: Grants Endurance Charges and Vitality
- Perfect Eldritch Eye/Perfect Frozen Cannibal/Perfect Fiery Cannibal: Grant Purity of Lightning/Ice/Fire respectively to use as an extra defensive measure against certain bosses
These Are All Very Expensive! Are There Cheaper Options?
Sure thing! Please do not more than 10 chaos for these:
- Perfect Forest Warrior: Grants nearby allies Onslaught. Has Culling Strike (which is relevant until you put a Kingmaker on your Animate Guardian).
- Perfect Pain Artist: Casts Zealotry, which grants our minions more spell damage.
Also, there are regular spectre options that do not require any of the corpses:
- Carnage Chieftain: Large ape creatures from Act 2 (Riverways/Old Fields). Grant Frenzy Charges, but for consistent uptime, you want 2.
Or you can use one of each of these:
- Pale Seraphim: Beyond monster. reduces Action Speed on Enemies and makes them take increased damage.
- Arena Master: Monster from Drox-influenced maps.Grants 20% increased Damage, Attack, Cast and Movement Speed.
If you are in SSF, you have to hunt down Pale Seraphim and Arena Master yourself, which can be incredibly annoying, as their corpses disappear. If you are in a trade environment, go ask in /global 6666 or in Balor’s global chat, /global 22567.
How Do I Summon My Corpse Spectres?
Most importantly: Take out bone offering from the trigger weapon!
Then, right-click on the corpse in your inventory. It will appear on the ground in your hideout. Then you can use Raise Spectre as usual.
What to Do When My Corpse Spectres Die/Get Unsummoned?
If they die, they’re gone.
If they get unsummoned, they will leave their corpses on the ground, so BE CAREFUL to not destroy them with Bone Offering. Ideally, never take the gem out while you’re in a Map.
Which Items Go on My Animate Guardian (Affectionately Called “Bob”)?
There are two irreplaceable core item to Bob:
- Boots: Windscream (for an additional curse)
- Gloves: Any cheap rare gloves with a Curse Enemies with Despair on Hit corrupted implicit modifier. Can later be replaced by Southbound with the same corruption.
The other three gear slots have multiple options:
| Helmet | Chest | Weapon |
| Mask of the Stitched Demon (expensive, an incredibly defensive option for Bob, makes him nearly unkillable when combined with one of the defensive chests) | Gruthkul’s Pelt (cheaper than the other two options, provides tankiness for Bob, but less so than Doppelgänger Guise) | Dying Breath (cheap, provides increased damage) |
| Leer Cast (cheap, gives 50% increased damage), possibly with a % life regen corruption | Garb of the Ephemeral (expensive, provides tankiness for you, extra options on Synthesis Implicits) | Kingmaker (expensive, provides Fortify and Culling Strike) |
| Crown of the Tyrant (expensive, specifically with a WHITE socket for tons of extra flat chaos damage) | Doppelgänger Guise (moderate price, provides tankiness for Bob) | |
| Zahndethus’ Cassock (very cheap, provides Bob with a ton of Chaos Resistance and creates Consecrated Ground on block) |
You could also give Bob the Asenath’s Gentle Touch gloves and apply Despair yourself with a rare pair of gloves that have the implicit or a Despair on Hit ring.
How Do I Assemble My Animate Guardian?
Go into a combat zone (for example Blood Aqueducts in Act 9), throw all items on the ground from your inventory, hover over the gear pieces and press the button for Animate Guardian over each piece. Make sure your loot filter doesn’t hide any of the items. I recommend turning it off temporarily while summoning the Guardian.
DO NOT try to throw gear on the ground in your hideout or in town – a prompt will show up asking if you wish to delete the item, as gear cannot be on the ground in non-combat zones.
How Do I Keep My Animate Guardian (And Holy Relics) Alive?
Take the Minion Defence Mastery for Minions Leech 1% of Damage as Life. Use Bone Barrier as your fourth Ascendancy node.
Only start using Animate Guardian at an appropriate Gem level – 19 should usually be fine, and make sure it’s linked to both Minion Life and Meat Shield. Use one of the defensive chests mentioned above.
Forgo a third spectre and anoint Decay Ward, a cheap to anoint notable that grants your minions increased block chance and Life Recovery on Block, which synergises well with Bone Offering.
Which Pantheon Powers Do I Use?
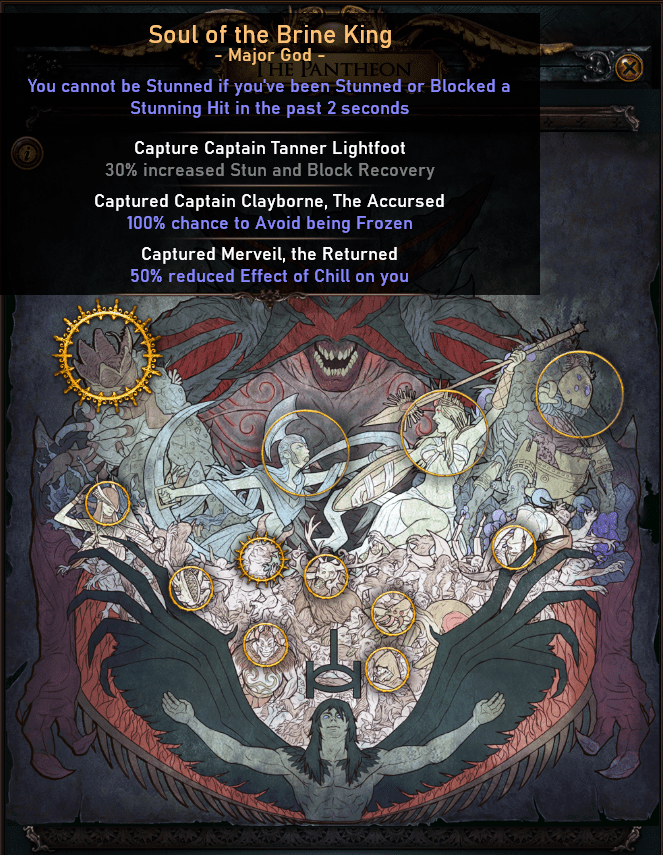
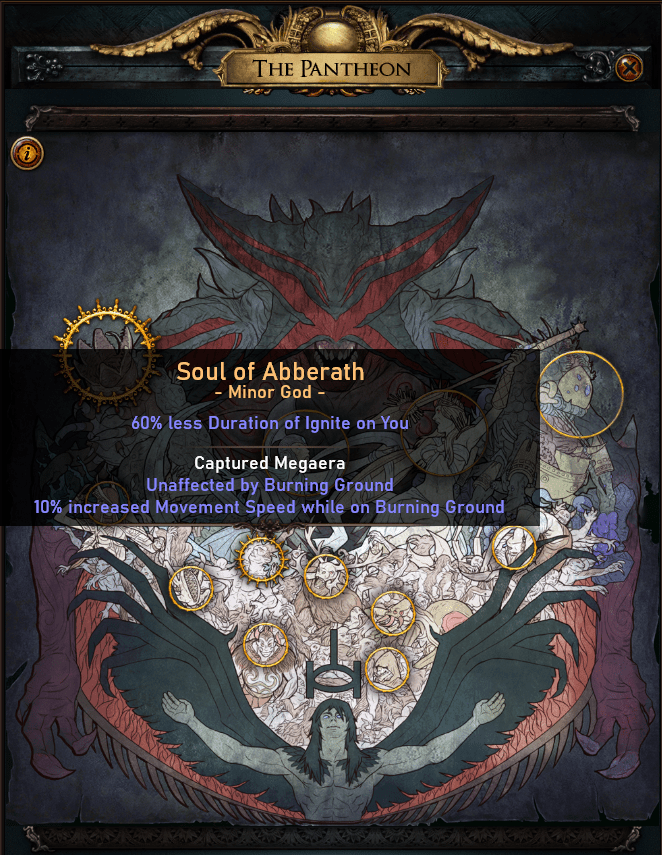
Brine King and Abberath.
Is the Build Ailment Immune?
The build is ailment immune in all but name with the right setup.
We get Freeze avoidance and reduced Chill effect from the aforementioned Brine King Pantheon. If your Animate Guardian wears Garb of the Ephemeral, you become immune to Chill and Freeze (well, ackshually your Movement and Action Speed cannot be reduced below base value, but – same difference) and you cannot take Critical Strikes from enemies, which also neutralises Brittle. That’s the cold ailments taken care of.
For Fire ailments, we reduce the duration of Ignites on us by 60% thanks to the Abberath Pantheon, and will also be unaffected by Burning Ground from it. Scorch lowers our Elemental Resistances by up to 30% for 4 seconds – this one is completely negligible.
As for Lightning ailments, Tempest Shield grants us Shock immunity. Sap makes you deal up to 20% less damage for 4 seconds – again, this is negligible.
And for Corrupting Blood, we can use the corresponding Protection Mastery until we can get immunity on a jewel corruption.
Why Do We take Mind Over Matter?
We don’t. What we do is use a Timeless Jewel in the socket below Mind Over Matter, which will then transform the Keystone into a different one.
The Timeless Jewel we want for our purpose is Elegant Hubris with Commissioned # coins to commemorate Caspiro which will transform the Mind Over Matter Keystone into the Supreme Ostentation Keystone. This Keystone allows us to forgo any attribute requirements on gear, at the downside of not gaining any inherent stat bonuses from our Attributes.
Now, the number on a Timeless Jewel is called the seed. The seed determines what happens to the small and notable passives on the skill tree. Our absolutely ideal best in slot Timeless Jewel would give us the Slum Lord notable on both Arcanist’s Dominion and Fire Walker. However, a jewel like that will be VERY expensive. You can settle for one of the other notables in the area that will cost you 3 Passive Points to reach.
Please refer to the Timeless Jewel search within Path of Building to find a proper seed. If you need help on how to use it, there are some proper guides for it on YouTube.
How Do We Sustain Mana?
If you are first starting out, as you can see in the Gem Links section above, you have the option of using Lifetap in your 4-link with Lancing Steel of Spraying.
Once you reach a certain level of gearing, you will use the Non-Channelling Skills have -7 to Total Mana Cost craft on both of your rings. This craft requires an open prefix and can be unveiled from Rings or Amulets with the “Elreon’s” veiled modifier. If you do not have the mod unveiled yet, you can simply buy a veiled ring/amulet from trade and should get it with relative ease.
Also, you want to use a Viridian Jewel with Gain 2 Mana per Enemy Hit with Attacks.
Which Map Mods (Below T17s) Should I Avoid?
This build is pretty much immune to any map mod. For Players cannot regenerate Life, Mana or Energy Shield you can bring a Mana Flask if you want, but usually it shouldn’t be necessary, especially once you have the jewel for mana on hit that we mentioned in the previous question.
For Tier 17 maps, please use your own best judgement.
Fantastic Abyss Jewels and How to Craft Them
This build relies on very good Ghastly Eye Jewels to unlock its full potential. If you are up to a foray into crafting, this section is for you! Do not spend exorbitant amounts of Divines on ready-made jewels. Make them yourself and get something to settle on for the time being!
To start, we need a base jewel with item level 60 or above, as that is the minimum item level required to roll Minions have (10-15)% chance to Poison Enemies on Hit. Start spamming Orbs of Alteration and Orbs of Augmentation until you hit it, which is about a 1:65 chance using this method. If you hit one of the following prefixes with an open suffix, you can use an Orb of Augmentation to look for the poison chance:
- +# to maximum Life
- Minions deal # to # additional Chaos Damage
- Minions deal # to # additional Physical Damage
Once you have the poison chance at a value you are happy with, you can use a Regal Orb to make it rare. At this step, you are looking for one of the following useful mods:
- Any of the prefixes listed above that you do not have yet
- +x to Maximum Energy Shield (Prefix)
- +x to Armour (Prefix)
- Minions have X% chance to Hinder Enemies on Hit with Spells (Suffix)
If you hit any of the modifiers mentioned, you can (and probably should) use an Exalted Orb to get a fourth mod. If not – back to the beginning.
Since it’s very likely you will need all of your Abyss jewels to require Minions have (10-15)% chance to Poison Enemies on Hit, there aren’t really many other options for affixes on your jewels.
Upgrades
Which Item Slot Should I Upgrade First? Is There a Priority?
Balor likes to say “Buy what you can afford WHEN you can afford it.” I will list the upgrades to the build from the “Early Maps” in no particular order:
- Dialla’s Malefaction
- Amanamu’s Gaze
- Aegis Aurora (if you hit 20,000+ Armour!) or The Surrender
- Either Replica Dragonfang’s Flight (with +3 to Holy Relic of course) OR Ashes of the Stars (neither amulet is per se BETTER than the other – they are different options to achieving the same end result)
- A 12 passive Minion Damage cluster with Added Small Passive Skills have 35% increased Effect and +x% to Chaos Resistance, +x to Maximum Life and a suffix of your choosing. This is an “I don’t know what to do with my money” upgrade.
But Which Amulet Should I Use? and Is There a Cheaper Option?
Of course there is a cheaper option, and it is our trusted friend The Jinxed Juju. This is a fantastic amulet, since it provides Chaos Resistance, Aura effect and extra tankiness with its ”10% of Damage from Hits is taken from your Spectres’ Life before you“ unique modifier. Also, Option 2 for Dialla’s Malefaction lets you reach the 82% quality breakpoint without the need for Ashes of the Stars. From there you COULD upgrade into Replica Dragonfang’s Flight. However, last we checked, they were very expensive.
WhatCan I Use as a Shield Option?
Before Aegis Aurora or The Surrender, you can use a Shaper-influenced shield with Recover (3–5)% of Life when you Block.




Be the first to comment