
Beginners Guide
General Tips
Buy a long gun: In the first shop, I’d highly recommend buying a long gun. You can go only with pistol, but 99% of the time it is not worth the hassle.
Sell Ammo Boxes: You can extend this to almost all consumables, but ammo boxes are usually the least useful and give a ton of scrap. I’d advise keeping a bandage though.
Bad armor > No armor: You can go the first stages naked, but I think you should have at least something in every slot by stage 3. Even if the armor pieces are not really good, the base defense is already better than nothing, and by stage 3 you shouldn’t really be counting pennies.
Use consumables: in later stages you probably will have some spare scrap, and consumables can really help you during fights. Adrenaline, Bloodwort and Frenzy Dust are always good, but I’d also get some Bandages, Greenleaf and Spiceroot, as these are the debuffs that are most likely to end your run.
Avoid Melee: Saying this in a soul’s like almost sounds like a treachery, but believe me, this game is meant to be played in long range, and, for us, mere mortals, going melee in a mode with so few healing and permadeath is 100% the worst call you can make. I’m not saying that a good punch in the face of an enemy that jumped near you is not good, just that using melee in a proactive manner, instead of a reactive one, is really a dangerous decision to be making.
Never Stop Moving: So, every second that passes and you are not in the labyrinth your enemies are getting stronger, so, be sure that you are never spending any time doing nothing. You should 100% of the time be doing one of those: Killing enemies, getting items/scrap or going to the next phase. If you can manage to do more than one of these at the same time it is even better.
Adapt your gear: Some bosses really can be cheesed in a way or another, so keep track of these, and if you have the proper gear, use it. One of my favorites is the sentry mod in stationary bosses, those turrets don’t mess around. There are a ton of other bosses that also can be cheesed, so be aware and adapt your gear depending on the occasion.
Hunting for gear: So, one thing that I never heard anyone talking about is a method to get specific gear in the pylons. This is really not reliable, but for runs that go really far, this can be a great way to improve your build. Basically, the pylons can never offer something that you already own, so if you’re trying to get a specific item, just buy the other items that go in the same slot. This works better with armor, weapons and mods, rings and amulets have a pool too big to really be worth.
Destroy Breakables: If you’re having problems with getting too much scrap, this is probably the reason. A lot of people don’t realize how much scrap you can get from breakables, you can get easily 2k in a decent scrap map (see more in map breakdown). Sometimes you can even get up to 5k with good gear and some time loss. So, if you are not breaking everything in front of you, start doing so. Also, you can roll over to break objects, and don’t be afraid to spend some ammo in this as well, just break everything in the fastest way possible. (pro tip:, equip weapons with slashing motions like swords, these are the best to break objects)
Prioritize Buying Hearts: if your first stage was in a good scrap map, then you 100% should be buying one heart. I’d recommend getting at least 7 before ever spending scrap in random books.
Dodge just by walking: This is not only restrained to survival mode, but it’s even more important here. In this game, your rolls are a limited resource, be it due to your stamina or due to the fact that you have a vulnerable window between 2 consecutive rolls. So, knowing this, when you are fighting multiple enemies, something that is likely to happen even more in survival, as you will be sprinting through maps, you really need to spare your rolls to the most important and hard to dodge attacks.
360º blindsense: I don’t know exactly what to call this, but it’s super important. Just as the point above, something that is also a limited resource (even if it doesn’t seem so) is your camera. Even with the maximum FOV, you will not be able to be looking in every direction at the same time, so, every time you are turning your camera to see your surroundings, you are not shooting at an enemy. To mitigate this, you should familiarize yourself with the game sounds (this game’s sound design is amazing, almost everything has a specific audio clue) and, after some training, you should be able to dodge enemy’s attacks without even looking.
Maps Breakdown
This is basically a guide to what you should prioritize doing in every map. Basically there are 4 things that you should.
Earth-Outside: you can get a decent amount of scrap if you go into the buildings and break everything, but I would recommend just focusing on passing as fast as possible while killing every enemy in your sight, because the buildings just take too much time to explore.
Earth-Sewer/subway/root forest: All of these are really similar. They don’t have many breakables, and the chests are really easy to stop, so I’d recommend just sprinting through the phases as well.
Rhom-Outside: Rhom has some great enemy density, so it’s a great opportunity to increase your level. Some of the tables in the houses feature breakable bowls that can drop a lot of scrap, but they are kinda hard to break, if you have a high RPS gun use it to break them.
Rhom-Futuristic Temple: It’s easy to get lost on those, so I’d say that your main goal is to avoid backtracking. Apart from that, this dungeon feats some of the strongest enemies, so be careful. Also, there are some breakables in the walls, use your gun to farm scrap with these.
Rhom-Ruins: Some may find these hard, but if you don’t rush and avoid stacking a lot of skulls, this should be a really easy level. The elites are really easy to kill, so you can farm a good amount of books. The items and chests are also not very hidden, so you can get those without losing much time.
Rhom-Ravines: This is a really dangerous level, as the enemies run and hide, and have a great range. Watch out for the enemies, aim your shots well to kill the enemies before they stack and don’t rush, otherwise you’ll get overwhelmed easily. Also be cautious with the cliffs, there’s nothing worse than losing a run due to a fall.
Corsus-Outside: This is probably the most open area in the game, so long range builds will shine the most here. There are also a lot of crates to collect tons of scrap, and a huge amount of easy elites to collect some books. Just be cautious to not waste so much time in the tribe houses.
Corsus-Underground Cavern: This is the single map with the most potential to get scrap. Just avoid getting lost or losing much hp to the enemies. Also, sometimes you’ll be able to see items through walls that seem to be really close, but you can easily get lost or do a lot of backtracking trying to get it, so be wary.
Corsus-Insect Temple: This is one of the best maps overall, it’s easy to navigate through (just pay attention to the map if you’re getting lost) it has a lot of breakables, a ton of easy elites, and the enemies overall are really weak. These levels are also filled with chests and items. If i’d say that there is one level worth exploring every corner is this one.
Yaesha-Outside: This is similar to earth, but a little harder. The enemies can deal a ton of damage, but with a bit of practice you’ll be able to pass through this level without taking much damage. There are also some breakables and some chests here, although some are kinda hidden, so be watchful.
Yaesha-Tree Houses: One of the maps with most loot and breakables, but you will need to do a lot of backtracking to get it all, remember what objects are breakables and remember that usually there is not 2 chests too close and you should be able to farm this level without losing too much time.
Yaesha-Temple: This is a really good map overall, it has some good enemy density without being too hard, a decent amount of breakables, a ton of chests and items, and the navigation is not so hard.
Yaesha-Cavern: The caverns are really straightforward, and have some good amount of loot, the enemies are also pretty weak.
Reisum-Outside: Reisum is by far the hardest dimension, so staying alive is always your main priority. In the village houses there are a lot of breakables and some chests, but be aware that you can easily waste a lot of time going through every house, being mindful of that, this can be a good map to farm a ton.
Reisum-Caverns: The main problem in the caverns is the huge amount of rats that keep spawning out of nowhere, but if you can deal with them, there are usually a ton of items and chests in these dungeons. Also, the layout is almost always a loop with a little path leading to the entrance and another path to the exit, so be careful to not loop around the map.
Reisum-islands: The islands are probably the hardest dungeon of all, it is packed with a ton of enemies that stagger you a lot, a huge enemy density, a lot of strong elites and even some holes to insta kill you. Your main goal here should be staying alive. Try to avoid getting much aggro, don’t rush and be sure to kill every enemy before advancing, cause if you need to kite the enemies and suddenly a kamikaze rat appears on your back you’ll get very sad, trust me.
Scrap Management
Early game (0-2 boss kills) – This is the easiest part of the run, so your goal is to capitalize and create the biggest advantage possible. You can waste a bit of time getting extra scrap in maps that can generate a lot of it, or rush your maximum in other maps. Your goal here is to get a decent piece of gear in every slot and at least 4 dragon hearts, preferably 5. This is also a good time to get gear that doesn’t necessarily fit your build, as you still can change it completely.
Mid game (3-5 boss kills) – Now you should be with a decent build, so you don’t need so much scrap, just buy items that already have good synergy with your current items. Buy some more dragon Hearts, I usually find 7 a pretty safe number. Don’t waste much time now to get scrap, as it is not worth it.
Late game (6+ boss kilss) – In this stage you probably got a solid build, so you’ll probably spend scrap with tomes, consumables or by hunting items (see general tips). Your main goal here is to delay as most as possible the enemies overleveling you. This is usually the time that you’ll need to unequip any gear that helps you go faster through phases or farming more to equip your combat gear.
Long Guns Tier List
Click to enlarge…
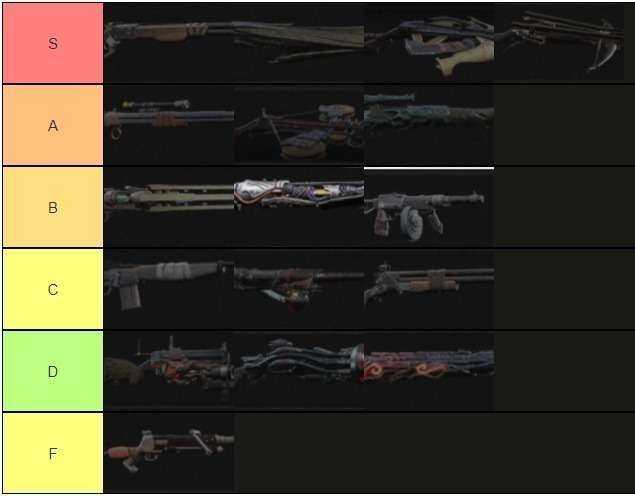
S
- Hunting Rifle – My favorite starting weapon, it can one shot most enemies with a body shot in the early game, so you can just run through the maps killing everything. Also has an amazing DPS and doesn’t require any synergy to be amazing.
- Particle Accelerator – One of the best boss weapons, has amazing damage, being able to one shot most of enemies until the mid game, one of the fastest reload speeds of the game, and the second best burst damage mod of the game. The added scope is just the icing on the cake. (The mod count as an explosion to vulcan’s detonator)
- Devastator – really good crossbow with amazing damage and one of the best single target mods of the game. Bleed damage also has a ton of synergies with rings and amulets. Can be good on one-shot builds and mod damage builds, gain a lot of points due to the versatility.
- RIcochet Rifle – the best 1 round weapon to be your first buy. The ricochet is really amazing and you have a small damage tradeoff compared to the sniper rifle and crossbow. It can even out damage them when the projectile bounces in the wall back to the target. The lack of struggle in the early game with multiple targets and less ammo consumption is what puts this in the S tier.
A
- Sniper Rifle – Really good damage, scope, range… This has everything that a sniper should. If you can get your hands on some reload speed this is even greater. You can struggle in the first levels with ammo or with tons of foes, but most of the time you can just kite back or kill them before they even get to you.
- Crossbow – Basically the same as Sniper Rifle, but with a little less damage, range, weakspot damage and no scope. What do you get in exchange? Less noise and a faster shooting animation. Not worth the tradeoff to me, but isn’t a big deal, still a great weapon.
- Ruin – I don’t really like this weapons, but avoiding death in a hardcore gamemode is pretty sweet.
B
- Eye of the storm – Is a hunting rifle with a little bit more damage and magazine size, but with less RPS and a bad mod attached. In the early game this is great, but as soon as you get good mods you should unequip this.
- Beam Rifle – the best automatic long gun for dps. Yet, in a fast game that you need to keep dodging, weapons that need you to keep shooting for a long time leaves less time to move around, dodge, use mods… you get it. This is still great in the early game, and this shines with radiant armor if you can get it.
- Chicago Typewriter – This is Beam Rifle’s little brother, it’s really similar, but a little worse in almost every aspect. At least you get more precision as you shoot.
C
- Assault Rifle – This is Chigo Typewriter’s little brother. Again, really similar, but worse. A 32 ammo magazine in an automatic weapon will just force you to be reloading in the middle of fights all the time. You can easily go with this for the first phases, but I’d highly recommend replacing it as soon as possible.
- Alternator – This is like Assault Rifle, but a little better in every aspect, except that this comes with a mediocre mod attached. As you will only be able to get this on the 3d boss or further down the run, you’ll probably never want to equip this weapon unless you have a really good fire/burn build.
- Coach Gun – decent damage, but with low range and 2 rounds on magazine. In a souls like game the close range options need to deal much more damage than the long ones to be relevant. This is not the case.
D
- Spore Bloom – I really like to compare this weapons with devastator, both are 1 round weapons with a mod that deal’s elemental damage over time. This weapon somehow managed to be worse in almost every aspect. It has almost no range, its shots have less damage, the mod deals less damage, the enemies can walk away from the mod… the only upside of this is that it hits in AOE, so maybe for ad-clear this can be decent. Still, after stage 3 you should have far better choices.
- Repulsor – Don’t get me wrong, this weapon is not horrible, it’s way better than spore bloom and fusion rifle, and the reason i put it here is just because of its price. This is NEVER worth 1500 scrap. If you search on the internet, you’ll find some build of people melting bosses on apocalypse with this weapon, but don’t be fooled, in those videos they are just stacking tons of damage multipliers that are basically unrealistic to be happening in your normal playthrough. Said that, let me just clarify why this weapon is really not so good: Low range, Mediocre damage, high reload time, short magazine, and a strange mod that is almost never worth using. Don’t buy Repulsor.
- Fusion Rifle – Imagine that Eye of the Storm and Assault Rifle had a son together, this would be Fusion Rifle. It’s a bad weapon with a bad mod attached, it’s mod doesn’t even make any sense. On one hand, you’ll want to use it to deal damage, but on the other hand when you use it you lose RPS, so you want to keep it at maximum. I tried both labyrinth and radiant builds with this weapon, and it didn’t excel at either.
F
- Shotgun – I guess you can figure out why this weapon is over here after seeing the rest of the list. Just in case that you still want to read it: mediocre to bad damage, short magazine and literally the WORST range, accuracy and RPS. Choosing this weapon is like choosing to play on harder mode.
Hand Guns Tier List
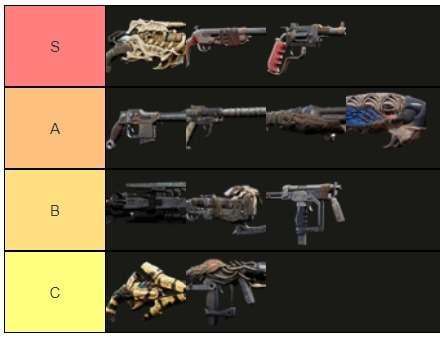
Quick Note: As a rule of thumb, your handgun will never out damage your long gun, so, you will not always want to choose the highest damage handgun; I usually have 3 aspects that i like to have on my handgun. The first is being able to compensate for my long gun weakness. If I have a shotgun, then I may opt for a high range handgun. If I’m with a crossbow, maybe a fast short-ranged handgun to be able to deal with crowds, you get it.
The second point is if it has a way to improve my damage while I’m using my long gun. This will always come from mods, a lot of times i’ll just use my handgun to generate mod power and use the mod. So, weapons with good unique mods, or with good mod power generation will shine in this aspect. The last thing that I’m looking in my handgun is it’s capability to substitute my long gun during fights, be it whether if I need to use my handgun to stack a mod, or either if it’s because my long gun ammo runned out, I don’t want to lose too much power if i suddenly need to change to my handgun.
S
- Curse of the jungle god – If there is one thing that puts a smile on my face is seeing ravager on stage 3. This weapon just goes well with any build, it has good damage, good magazine, good range and the mod is just AMAZING. It can deal massive damage to stationary bosses, can deal with crows of enemies, and you can even just put the tentacles and leave, clearing the level faster without losing xp.
- Hunting Pistol – This is the bread and butter handgun for any one round magazine build. Everything that buffs your long gun will work as a charm with this as well. It also has the added bonus to synergize really well with Provisioner Ring for ranged damage builds and Burden of the Follower for any mod build. This is also by far the handgun with most range.
- Magnum Revolver– This is probably the only handgun that can carry you through the first 3 levels without much struggle. I swear, if you have Magnum Revolver you don’t need any long weapons in the early game. I’d still not recommend this, but it’s just to show how good this is. It’s really similar with than hunting rifle, and they are both good for the same reason.
A
- Repeater Pistol – This is your starter weapon, and, most of the time, i’d say that you really don’t need to change it. It’s a really good kinda “joker” weapon that most of the time will not be the best weapon for the job, but will be at least on the top5. It has decent range, decent damage and a pretty good RPS. A 15 ammo magazine isn’t amazing, but for a handgun, it’ll do the trick.
- Machine Pistol – This is almost like a blunderbuss disguised as a pistol. It can deploy 24 bullets in about a second, it’s great for charging your mods and to suddenly pull out a burst if you don’t have time to reload your long gun. Bonus points if you have radiant armor, as this just instantly full stack it. The only falloff is if you need to use this as a dps at any moment, cause you’ll find yourself reloading more than shooting.
- Sawed Off – This is a great panic button for when you’re getting overwhelmed with foes, just pull this out and you get 3 huge damage low-ranged shots. If you’re struggling too much with enemies getting close to you, this can really help. Also can generate mod surprisingly quickly, but you need to get close to do so.
- Pride of Iskal – This weapon is not particularly great, it has decent damage, a weird AOE shot, and good range, but what really shines in this weapon is its mod. In survival mode, Healing is much more scarce, so having another reliable way of doing so is always great. Yet, in the late game you’d rather prefer buying more hearts than being stuck with this weapon. 1500 is also a rip off.
B
- Defiler – This is a pretty mediocre weapon, range is decent, damage is kinda low, magazine is definitively too short, and the RPS is just too low. Yet, this has and pretty neat mod. If you have a good mod enhancing accessories, but no good mods to pair it with, this can be really handy. It can also just be used to spam stored mod in the start of a boss fight, but you’ll probably have something better.
- Twin Shot – Hunting pistol crossbow edition. It also has 2 shots (although they’re fired together). Because of this it just synergizes less with every one shot build accessory. Take this while you’re waiting for Hunting Pistol to show up in a pillar if you want this type of weapon.
- Submachine Gun– This is a pretty popular weapon for the beginners, but growing used to the game I just find that the Repeater Pistol can do almost everything better than this. The accuracy drop is a really big downside, and the lack of range also. This will do a pretty good against lots of close enemies, but there are other weapons that do so as well with less drawbacks.
C
- Hive Canon – There are some bosses that can do cheese with this weapon, but most of the time this is just nerfed magnum revolver with a bad mod attached. It has a small AOE on the shoots though, if you find it useful, go for it, i guess.
- Spitfire – This weapon’s numbers are just a bit too low. It’s heavily dependent on the mod to be good, and even then it has a really short range and not enough single target damage to compensate. If you’ll face a horde of really small enemies this may be a good pick, otherwise, no.
Armor Tier List
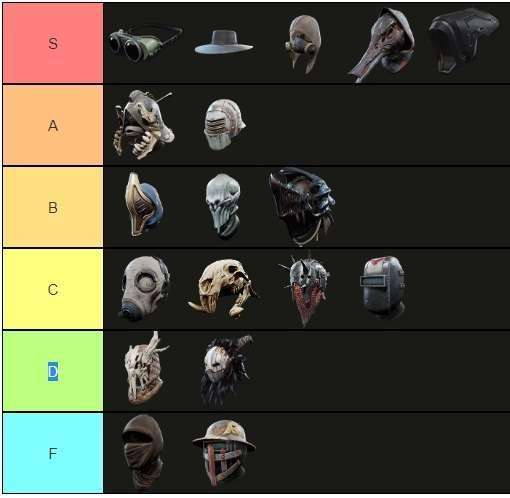
S
- Adventurer – Getting extra scrap on the early is huge, this helps a ton. Dump it after stage 4-5 though.
- Cultist – There are a lot of mods that pair well with mod duration, and the passive mod generation also is great to reload your handgun mod without you needing to use it.
- Hunter – Ranged and weakspot damage are almost always welcome.
- Slayer – It’s not unusual to find weapons with short magazines, and some of the best weapons of the game are one round guns, so the reload speed and damage buff fit’s like a glove.
- Labyrinth – Best armor to boost mod power, there are a ton of good damaging mods, and this boost it immensely. 10% refund on use is also pretty decent.
A
- Osseos – Good overall damage buff, the only downside is that it needs weapons with decent RPS to this proc well.
- Leto’s – The single most broken armor in the game. If you got all the pieces and a way to get rid of the belly-flop you already have an amazing build. Putting just one piece can also be good, just the huge defense stats of one piece can make you pretty tanky already.
B
- Radiant – The best armor for dps with automatic guns. It really is dependent on getting multiple pieces, and crit chance through gear/tomes. Another downside is the lack of mobility, the complete set gives you the heavy roll, and the weapons that you pair with this armor also don’t leave much time for you to keep moving and dodging.
- Void – Really solid option, enhance every type of damage, so it can be used decently in almost any build. Losing the damage buff when you take any damage is sad though. The aiming movespeed is also barely noticeable.
- Carapace – Really good defensive bonus, but also heavily dependent on having multiple pieces equipped. Also, most of the time you’d rather get an offensive buff than a defensive one.
C
- Bandit – In older times this would compete with slayer set, but after the nerfs this is just a worse option. If you have two one round guns then this can be a decent placeholder.
- Warlord – This can be one of the best armor in the game, but you really need to get all the pieces and get a reliable way to avoid dying.
- Scavenger -The auto pickup is cool, i really like to get one piece just cause of this. Realistically, this has little to no use besides that.
- Drifter – Just like the scavenger, the stack buff is bad, but the 1 piece stamina boost can help you to sprint through maps in the early game.
D
- Twisted – Another set that you’ll only want to pick a single piece, being at full health in survival is not reliable at all, so, if you really want the little life regen, get one piece, but 90% of the time you can just ignore this
- Elder – Using dragon hearts to gain damage instead of healing… and the buff isn’t even that great. The 25% chance of not consuming the heart seems stronger than what it really is.
F
- Akari – If you’re constantly dodging, and have a perfect timing to be constantly activating the buff, then get this. If you are, however, like most of the people, you’ll be avoiding many more hits just by walking or killing the enemies before they attack. The perfect evade window is also pretty unreliable for most players, and the buffs aren’t even that great.
- Scrapper – You really should try to avoid getting enemies near you, so an armor set that only works when they are, is just… bad.
Mods Tier List
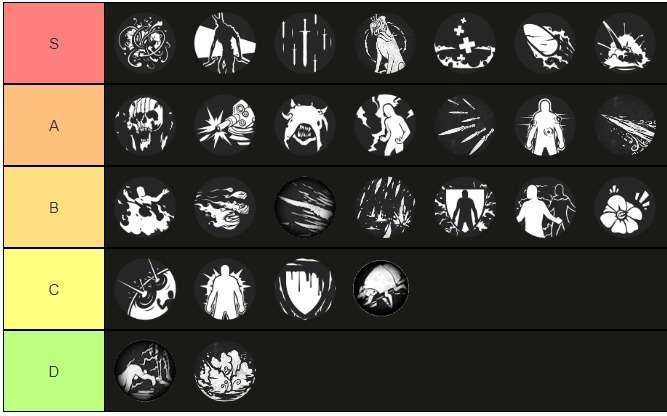
*I’ll only put here mods that are not weapon binded, as I prefer to rate those together with the weapon.
S
- Swarm – This is just amazing for everything. It kills every mob in its way and deals huge damage to bosses. This also can crit, so even with a build not focused on mod power this can deal massive damage.
- Hunter’s Mark – The extra crit chance can rival with most damage buffing mods, but the outline on enemies is the cherry on top that makes this the best.
- Song of Swords – +20% to all damage is good in any game that you can think of.
- Very Good Boy – What can be better than a usain bolt cutie that will munch down enemies much before you even get to them.
- Mender’s Aura – This is like 2 extra dragon hearts, and they are even refillable. The one thing that a lot of people see as a downside is that it’s not instant, but i actually quite like this, cause i can use this before taking the damage, and then, if i take a hit, i instantly start healing.
- Hot Shot – This is really similar to Song of Swords, but with 5% less damage, and only works on one weapon. The burning is not really good, but this mod is good enough without it anyways
- Explosive Shot – This has one of the highest damages, Hits in AOE, can hold 3 charges and count as an explosion for Vulcan’s Detonator.
A
- Beckon – A really solid option both to boss damage and to clearing phases.
- Iron Sentinel – Amazing for damage on bosses, also, the summoner trait can be purchased on the store, so you can pump some extra damage to this on the late game.
- Seed Caller – It’s like Beckon, but melee. Works great on most occasions, but it can’t reach some enemies.
- Storm Caller – Really good to clear maps rapidly, you gain movespeed and deal damage to everything in your way.
- Fan of Knives – Good bleed damage, has the versatility to hit multiple enemies or only one, can hold multiple charges… Solid option overall. Bleed damage also synergize well with tons of trinkets.
- Flicker Cloak – If you have decent mod power generation this can be a reliable way to keep getting some extra life and avoiding stagger. You can dump this as you get better at dodging though.
- Cold Spear – This can be the best damage buff (or debuff I guess), but really depends on high crit chances. If you have it, then go for this, otherwise, other buffs can be better.
B
- Wildfire Shot – Burning damage is not exactly the best, but it’s still pretty decent, if you can get charcoal necklace this is an amazing option.
- Breath of the Desert – Overall decent option to deal some burst damage. Also recharges pretty fast.
- Unstable Quill – Can deal some massive damage, but really needs scaling to work well.
- Blizzard – Really big recharge, but can deal a good AOE damage.
- Howler’s Immunity – Solid defensive buff, but most of the time you’ll want more offensive mods
- Blink Token – good for mobility and has a decent damage, but the poor control and the need to get near bosses to damage them with this makes a mediocre choice.
- Rattle Weed – can be a good defensive mod, but is really unreliable.
C
- Veil of the Black Tear – Can be really amazing in some cases, but most of the time you don’t want something that locks you into one place
- Mantle of Thorns – only reduce melee damage, and the thorns require you being hit to activate, something that you should avoid.
- Corrosive Aura – can be a good damage debuff, but it requires you to get near enemies to proc, again, something that you should avoid.
- Seeker – the damage is just too low to be good.
D
- Rift Walker – I really don’t know how you’re supposed to use this mod. This is just a fancy roll to me.
- Frozen Mist – barely no damage and a mediocre debuff, not worth your mod slot.
Amulets Tier List
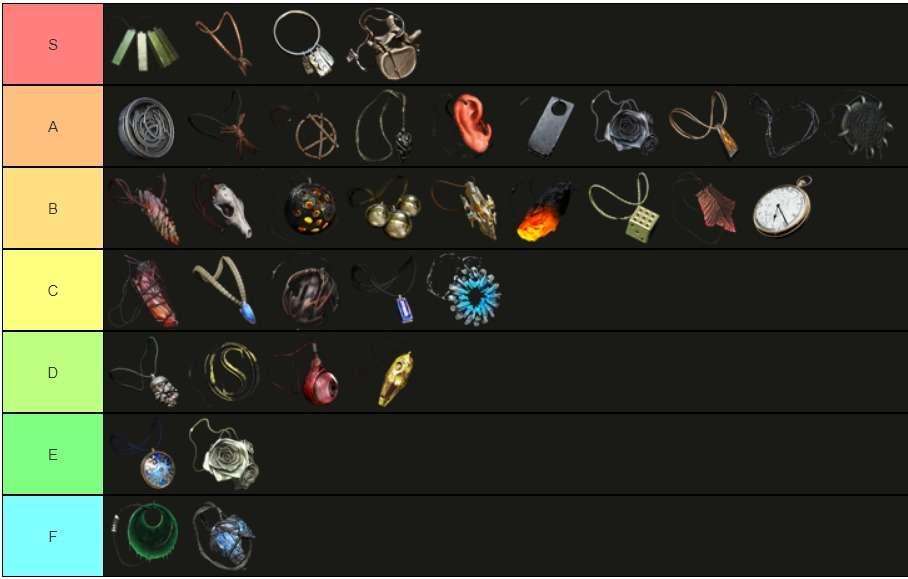
S
- Talisman of Perseverance – Xp can scale very rapidly, this just helps so much gathering levels ahead. Stay with this as long as you can, but when you start to struggle, change this for a combat oriented one.
- Gunslinger Charm – There isn’t a single weapon in the game that doesn’t benefit from this.
- Galenic Charm – There are a lot of good damaging mods, this goes well with any of them.
- Shattered Vertebrae – 10% ranged damage is already really good, the crit shenanigan is also cool.
A
- Talisman of Animosity – weakspot is pretty common, and the damage bonus after killing with weakspot will proc very frequently.
- Twisted Idol – HUGE defense bonus, the encumbrance reduction also allows you to go for leto’s armor without getting so heavy.
- Soul Anchor – Minions are really good in survival, and this gives a massive buff when they’re active.
- Onyx Pendulum – Amazing damage bonus, but you need to keep changing weapons. Also don’t work well with short magazine guns.
- Hangman’s Memento – Similar to Talisman of Animosity, but a little less reliable.
- Polished Whetstone – This is a huge buff, but you need to have a way of inflicting bleed, otherwise is useless.
- Black Rose -if you have a good armor to pair with this, this can be amazing, but you will eventually want to change this.
- Brutal Mark – Solid buff overall. Better with high RPS weapons, since you will probably never oneshot any enemy.
- Razorwire Necklace – Similar to Polished Whetstone, better for mod damage builds, but the buff to bleeding enemies is worse.
- Amulet of Epicaricacy – This is easy to proc, and mod generation buffs are scarce. Still, damage buffs are usually better.
B
- Nightmare Spiral – I’d say this is really a personal choice, some really like this, some hate this. I like the effect, just don’t know if it really is worth the amulet slot. Quick note that you can unequip this to use dragon hearts.
- Daredevil’s Charm – In the early game this is amazing, but i wouldn’t recommend not equipping armor pieces just to keep the buff. If you’re some god gamer that doesn’t take any hits, go for it, but if you are like 99,9% of the players, be wary.
- Vulcan’s Detonator – This is a better galenic charm that only works with explosions. If you have explosion mods, go for this.
- Mender’s Charm – Increased healing can be very good, but if you don’t have any heal besides dragon hearts, I’d dump this.
- Rock of Anguish – Some amazing buffs, but you need to be at low health to work. I wouldn’t recommend being at low health
- Charcoal Necklace – Huge buff to burning, but there are few good burning options.
- Scavenger’s Bauble – If you’re playing well, you’ll already be getting more than enough scrap, and it doesn’t scale so well.
- Terror Margin – This is the best lifesteal source of the game, if you managed to get a really tanky build, this can make it viable
- Pocket Watch – Helps you get through phases faster.
C
- Heart of Darkness – Good buff, but a huge drawback that persists for a long time. You also can unequip this before using the heart.
- Leto’s Amulet – As the name says, really good with leto’s. Pretty bad otherwise.
- Rusted Amulet – Huge stamina buff, but this will probably make you overencumbered, which is bad.
- Cleansing Jewel – Can be good to spare consumables, but most of the time you won’t want to use your hearts for this.
- Blessed Necklace – 30% damage reduction is good, but for only 10 seconds is not worth it.
D
- Vengeance Idol – Similar to rock of anguish, but only proc below 50%. You really want to avoid being below 50%.
- Stalker’s Brand – Being more stealthy is decent, but nothing really worth getting.
- Butcher’s Fetish – The average player cannot perform charged melee attacks consistently without getting into danger.
- Radioactive Ember – Radiant damage is really rare, and has almost no synergies.
E
- Storm Amulet – If radiant damage is rare, shock is even more. And has even less synergies
- White Rose – A lot of people see this as a tradeoff of one weapon mod for +25% damage. The reality is that you’re also sacrificing your amulet slot. If you combine a good amulet with a good mod you can get around 35-50% more damage in total.
F
- Abrasive Amulet – Corrosion is good, but has almost no way of applying it. I already talked about melee charged attacks in Butcher’s Fetish.
- Driftstone – Just horrible. You’ll almost never apply frostbite, and doubling it does almost nothing.




Be the first to comment