Make Your Jayber Useful in Boss Raid
By Ordinary Guy.
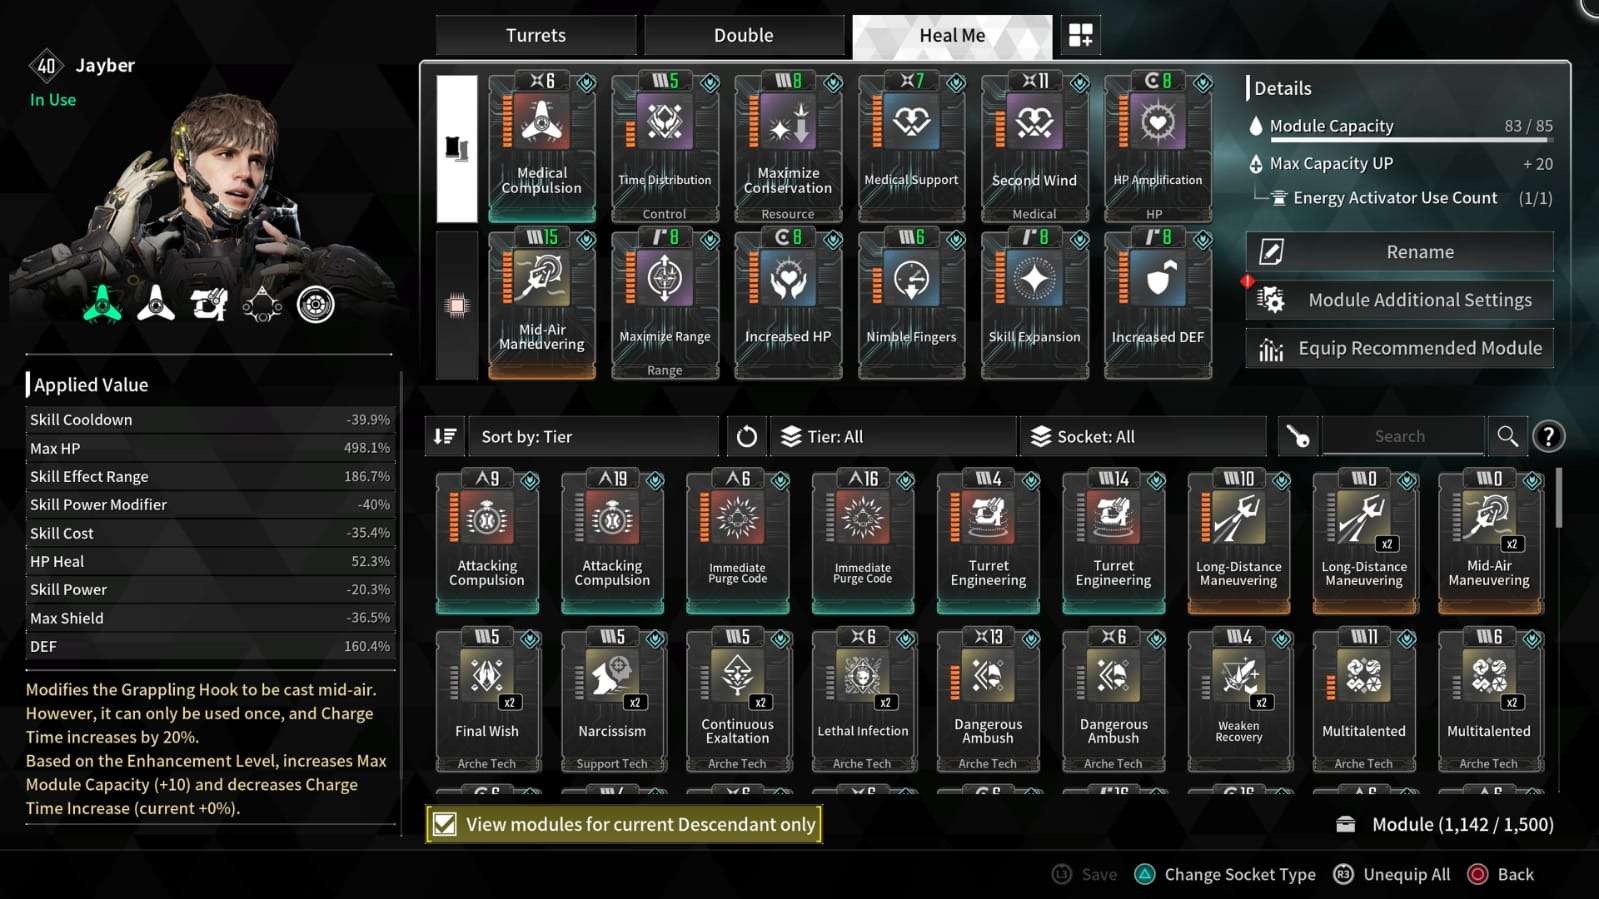
Keep in mind, this build focuses on healing and tanking but still do decent damage paired with the right Enduring Legacy build.
First off, the most important is his Red Mod Medical Compulsion. This module changes your 1 skill (Assault Turret) into 2 skill (Medical Turret). So, you’re gonna have 2 Medical Turrets which heals you and nearby allies within range in a set duration.
I had three HP modules equipped on him:
- Increased HP for max health of +218.5%
- HP Amplification for max health of +227.2%, although you will have your shield decreased by -36.5% that’s not important at all as you will have a lot of health
- Time Distribution for additional +52.4% max health
Two skill cooldown modules:
- Nimble Fingers for -25.6% skill cooldown
- Time Distribution for – 14.3% skill cooldown
One Skill Cost reduction module:
- Maximize Conservation for -35.4% skill cost, but with a Skill Power Modifier decreased by -20%. Ignore the skill power decrease modifier as you won’t be using any skills that does damage
Two Skill Effect Range modules:
- Skill Expansion for a range of +92.3% skill effect
- Maximize Range for an additional range of +94.4% skill effect. Again, this mod have a Skill Power Modifier decreased by -20% but just ignore them
One DEF module is enough as we have high HP:
- Increased DEF for +160.4% defense
Two Healing modules:
- Medical Support for an HP Heal of +30.8%
- Second Wind for an additional +21.5% HP Heal with Skill Power Modifier decreased by -20.3%
This sums up your healing skills up to 52.3% per tick. The red module, Medical Compulsion has a 1.5 seconds tick with a duration of 13.9 seconds un-enhanced and 11.6 seconds turret zone.
No Skill duration as we will be using our 3 skill, Multi-purpose Gun to increase the turrets’ duration at the same time, heals recovers their health. Turrets’ health and defense are proportional to Jayber’s max health and defense so it is important to have a very high health and defense.
Click to enlarge…

As for Reactor, I use Materialized Phase Reactor for a Non-Attribute and Dimension Skill Boost ratio. Doesn’t matter if it’s purple or yellow but it’s ideal to have Skill Cooldown and Skill Duration Up both in yellow as a substats.
Two Annihilation Components Set for additional +5.7% Skill Duration:
- Sensor for DEF with MP Recovery out of Combat.
- Memory for Max HP with MP Recovery in Combat.
The other two doesn’t matter but try to get as much HP and DEF as you can the same with the Annihilation set.
My Jayber has a total of 18,882.01 HP – 35,440.44 DEF – 151.33 Shield and 24,994.5 Firearm ATK. The Firearm ATK increases if you have both turrets summoned by +20% due to his passive skill, Turret Sync.
In accordance to this health, my health recovery per tick is at 906. With both turrets summoned, my HP heal is at 1,812 per tick.
As you can see in the video, I can even survive even inside Hard Mode Dead Bride’s Snow Dome. It barely made a dent on my health.
Now, If you want to do more damage, then replace Second Wind to Shot Focus for an additional +15% Firearm ATK and Skill Expansion to Passionate Sponsor for an additional of +7.5% Firearm ATK each time you buff/recover an ally for 10 seconds.


Be the first to comment