
Training Center BR Class 323
Overview
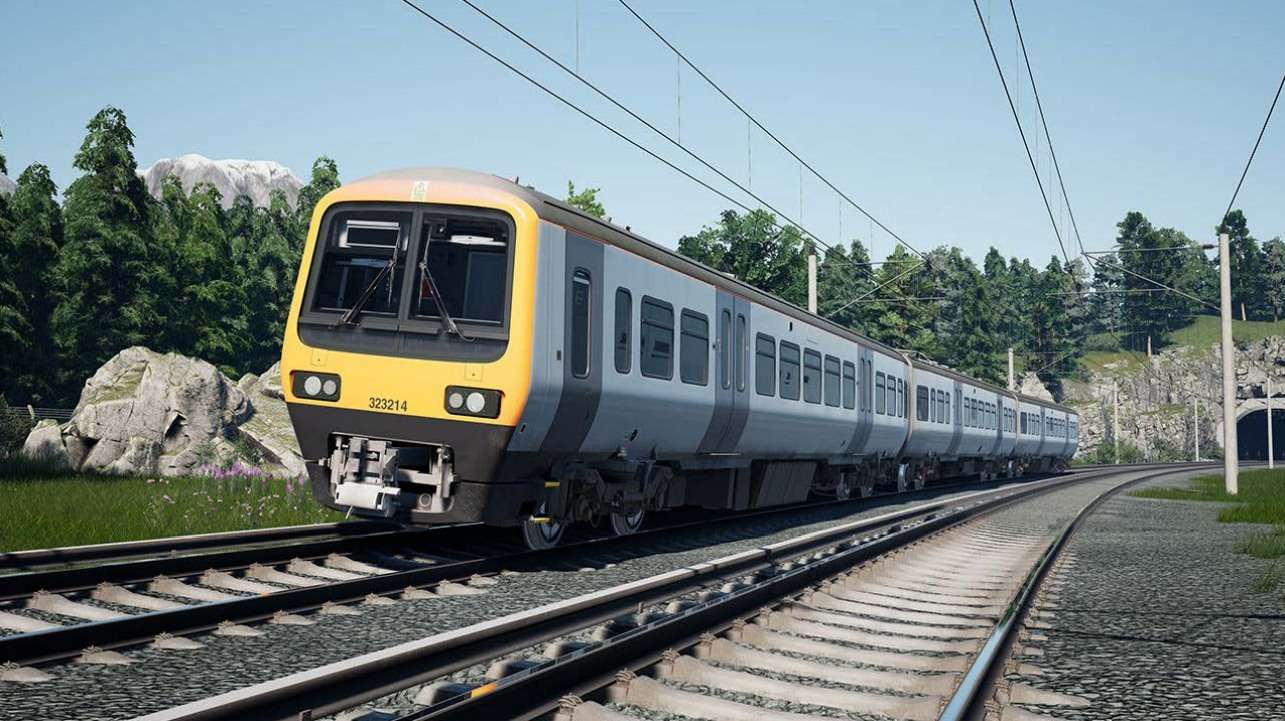
The Class 323 was built in the early 1990s to exclusively serve lines in the Midlands and the North of England. Designed by Hunslet in Birmingham, and constructed in Leeds, the Class 323 shares much of its characteristics with the Networker fleet, despite there being no relation. In fact, the unit has earned itself the unofficial nickname of “Hyper Networker” as its traction equipment operates in a very similar fashion, creating distinctive motor phasing sounds.
Split across 2 main regions in England, the Class 323 is often seen working West Midlands services around Birmingham, including on the Cross-City Line, as well as in Northern territory out of Manchester, serving the likes of the Glossop Line. Both of these are available in Train Sim World – so if you like the Class 323, you can pick up its local routes!
- Manufacturer: Hunslet Transportation Projects
- Build Location: Leeds, England
- Build Date: 1992-1995
- Number Built: 43 sets
- Power Type (AC): 25kV AC OHLE
- Coaches: 3 cars (2x DMS & 1x PTS)
- Capacity: 275 seats
- Length: 70.19 Metres (230 ft 3 in)
- Weight: 119.8 Metric Tons
- Top Speed: (145 km/h)
Training Center BR Class 323 Cab – 1/4
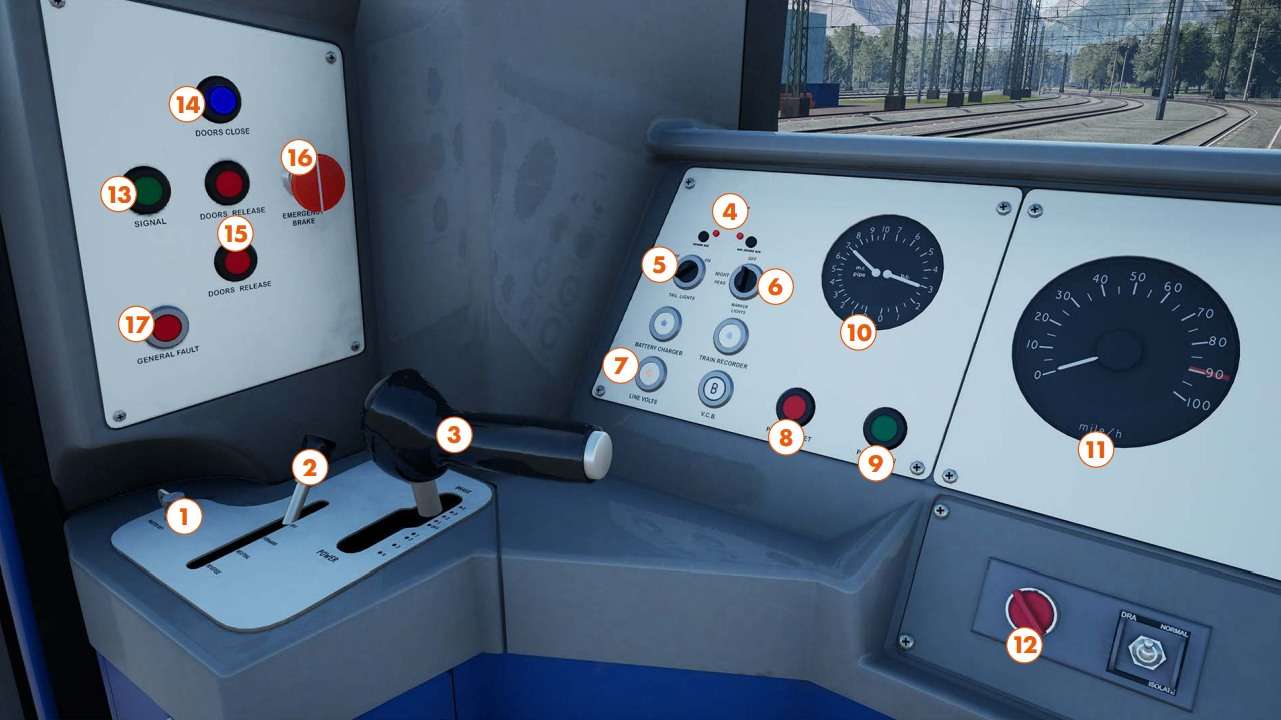
- 1 – Master Key
- 2 – Reverser
- 3 – Power Brake Handle
- 4 – Headlight Indicators
- 5 – Tail Lights Switch
- 6 – Headlights/Marker Lights Switch
- 7 – Line Volts Indicator
- 8 – Pan Up/Reset Button
- 9 – Pan Down Button
- 10 – Brake Gauge
- 11 – Speedometer Gauge
- 12 – Driver’s Reminder Appliance Switch
- 13 – Signal Buzzer Button
- 14 – Left Doors Close Button
- 15 – Left Doors Release Buttons
- 16 – Emergency Brake Plunger
- 17 – General Fault Indicator
Training Center BR Class 323 Cab – 2/4

- 18 – AWS Sunflower
- 19 – Safety Systems Isolated Indicator
- 20 – Pass Comm Alarm Override Button
- 21 – AWS Reset Button
- 22 – Hazard Warning Lights Button
- 23 – Sander Button
- 24 – Right Doors Release Buttons
- 25 – Door Interlock Indicator
- 26 – Right Doors Close Button
- 27 – TPWS Brake Demand Indicator
- 28 – TPWS Train Stop Override Button
- 29 – Left Side Blind (Off Screen)
- 30 – Cab Air Con Switch
- 31 – Cab Lights Switch
- 32 – Wiper Control Switch
- 33 – Cab Heater Switch
- 34 – Cab Fan Switch
- 35 – Couple Button
- 36 – Uncouple Button
- 37 – Two-Tone Horn Lever
- 38 – GSM-R Screen
- 39 – GSM-R Brightness Buttons
- 40 – GSM-R Volume Buttons
- 41 – GSM-R Confirm Button
- 42 – GSM-R Cancel Button
- 43 – GSM-R On/Off Button
- 44 – GSM-R Contact Signaller Button
Training Center BR Class 323 Cab – 3/4

- 45 – Coach Lighting On Button
- 46 – Coach Lighting Off Button
- 47 – Aux On Button
- 48 – Aux Off Button
- 49 – Door Key
- 50 – Regen Brake Switch
- 51 – Clipboard Light Button
- 52 – Left Cab Window
- 53 – Left Cab Door
- 54 – Right Side Blind (Off Screen)
- 55 – AWS Isolation
- 56 – Emergency Bypass Isolation
- 57 – Pass Comm Isolation
- 58 – Traction Interlock Isolation
- 59 – Vigilance Isolation
- 60 – DSD Isolation
- 61 – Right Doors Close Button
- 62 – Right Doors Release Buttons
- 63 – Signal Buzzer Button
- 64 – TPWS Temporary Isolation Switch
- 65 – Right Cab Door
- 66 – Right Cab Window
Training Center BR Class 323 Cab – 4/4
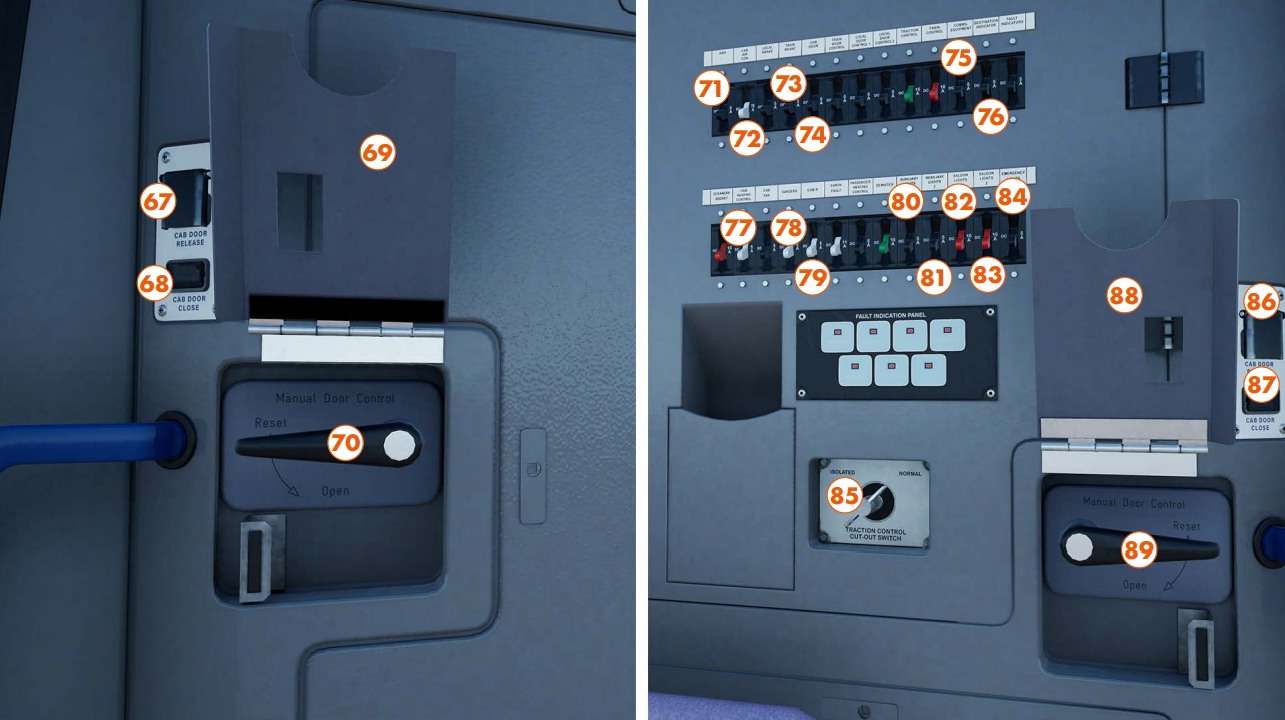
- 67 – Right Cab Door Release Button
- 68 – Right Cab Door Close Button
- 69 – Handle Cover
- 70 – Right Door Release Handle
- 71 – AWS TPWS Fuse
- 72 – Cab Fan Fuse
- 73 – Train Brake Fuse
- 74 – Cab Door Fuse
- 75 – Radio Fuse
- 76 – Destination Display Fuse
- 77 – Cab Heater Fuse
- 78 – Sand Fuse
- 79 – GSM-R Fuse
- 80 – Auxiliary Lights 1 Fuse
- 81 – Auxiliary Lights 2 Fuse
- 82 – Saloon Lights 1 Fuse
- 83 – Saloon Lights 1 Fuse
- 84 – Emergency Lights Fuse
- 85 – Traction Cut-Out Switch
- 86 – Left Cab Door Release Button
- 87 – Left Cab Door Close Button
- 88 – Handle Cover
- 89 – Left Door Release Handle
Training Center BR Class 323 Cab – Coach B
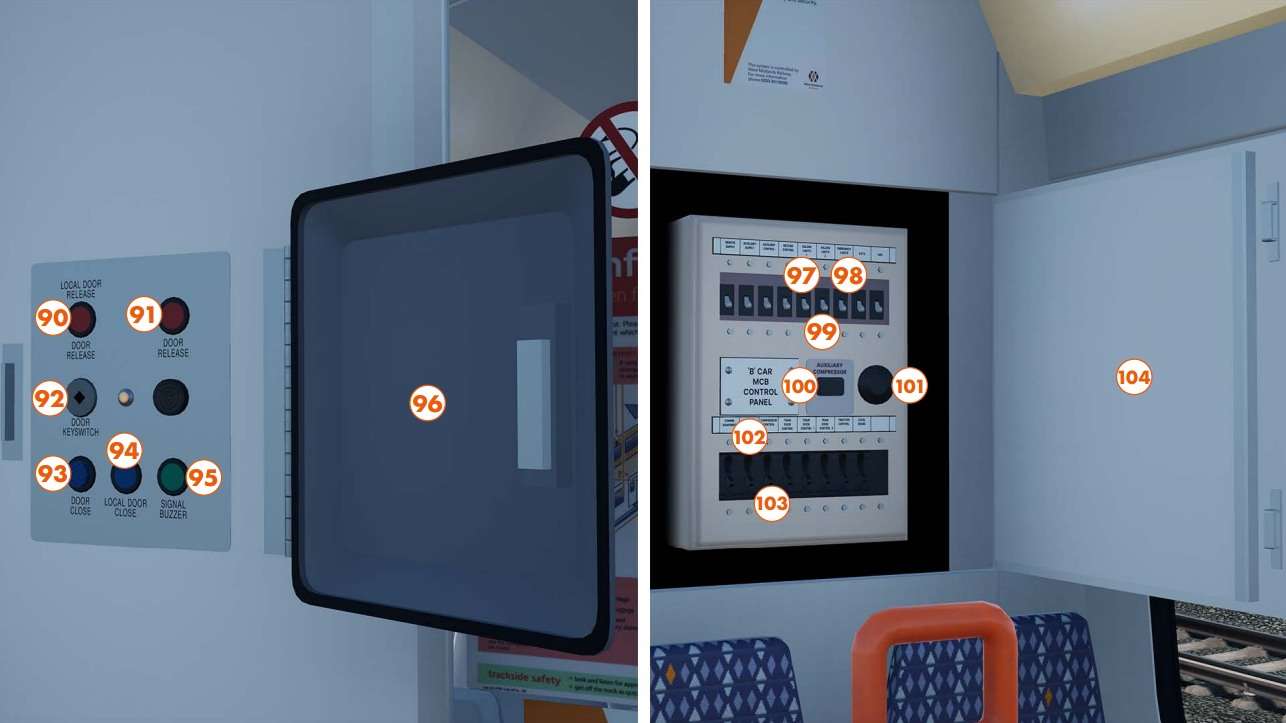
- 90 – Local Door Release Button
- 91 – Door Release Button
- 92 – Door Key
- 93 – Door Close Button
- 94 – Local Door Close Button
- 95 – Signal Buzzer Button
- 96 – Guard Operating Panel Door
- 97 – Saloon Lights 1 Fuse
- 98 – Saloon Lights 2 Fuse
- 99 – Emergency Lights Fuse
- 100 – Auxiliery Compressor Button
- 101 – Pantograph Isolation
- 102 – Fault Indicators Fuse
- 103 – Remote Supply Fuse
- 104 – Cabinet Door
Procedures & Unique Features
Coupling
- As with a lot of multiple units, there are 2 components to the coupler on the Class 323, a physical and an electrical connection, and doing both is required to fully couple a pair of units.
- Once you have fully drawn upto the train you wish to couple to and made physical contact, you must also press the Couple Button in the cab for a few seconds to make the electrical connection valid.
- The same is true for uncoupling, the Uncouple Button must be pressed until you hear the electrical blocks disconnect, then take low power away from the train to physically uncouple.
Emergency Brake Reset
- If you use the Emergency Brake either via the Plunger or Power Brake Handle, or by missing an alarm, let the train come to a complete stop, reset any controls or plungers and cancel any alarms before attempting to retake power.
- If you encounter a TPWS brake demand, the red brake demand indicator will flash, move the Power Brake Handle into a brake step and press the AWS button to acknowledge this.
- You must then wait 60 seconds after the train has stopped for the brakes to release.
- If the brakes do not release, you can move the Reverser into Off and back into the intended direction.
Other Bits & Bobs
- The BR Class 323 is equipped with a GSM-R display in timetable services this has the ability to display the current service’s headcode – you can see this if you own Cross-City or Glossop Line.
- The guard’s panel controls are interactive, however the best use of this, should you wish to try it, is in the On Guard scenario within Glossop Line.
- Using the controls in Coach B, you can isolate a train by forcibly lowering its pantograph, open the Cabinet Door in Coach B and turn the Pantograph Isolation Key, this unit can now be dragged “dead” by another unit.




Be the first to comment