Railpool BR 193 Vectron
Overview
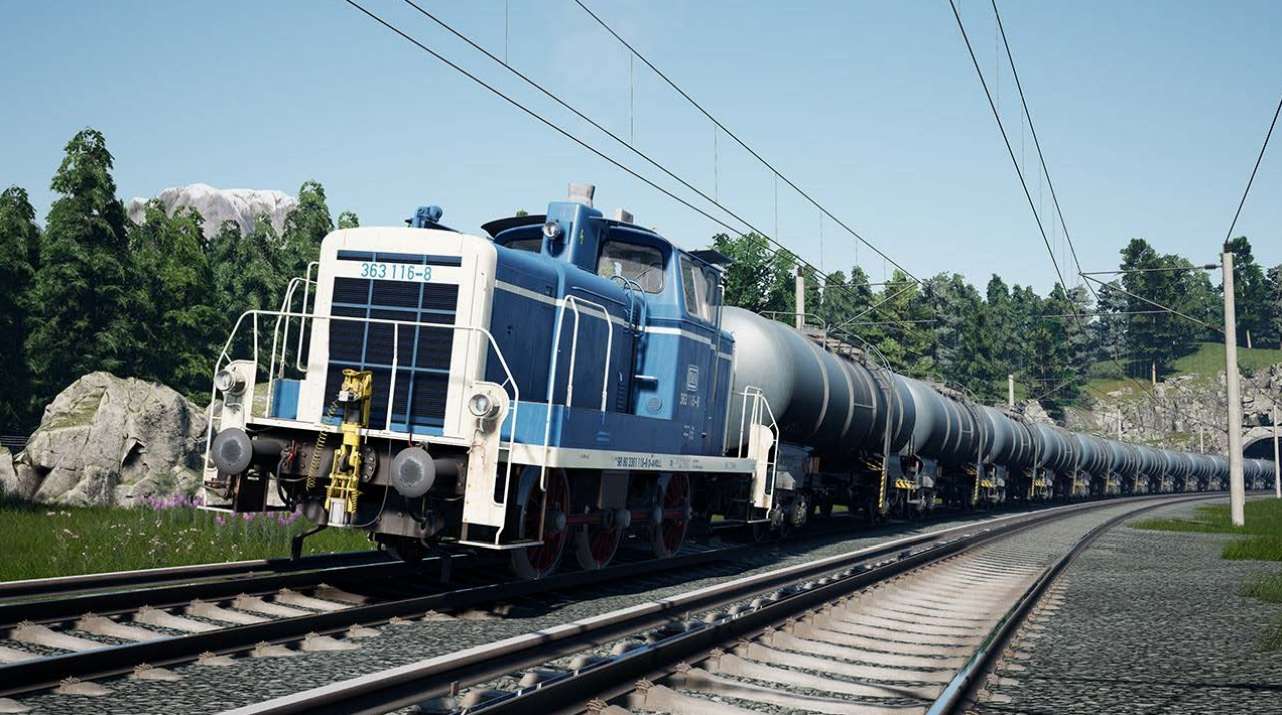
Perhaps the most iconic and recognisable modern locomotive in recent European history, the Siemens Vectron is a beloved locomotive family by crew and enthusiasts alike, and has made itself known in many countries thanks to the number of companies which operate them. Developed from the already successful Eurosprinter and Eurodual locomotives, the Vectron is an all-new and adaptable platform which can be offered in electric, dual-mode and multi-system configurations.
For companies in Germany, many of their Vectrons are classified as the BR 193, including the fleet owned and leased out by Railpool, who’s growing fleet enabled them to quickly offer additional motive power where it is needed, regardless of the borders the cargo may need to cross. Whether weaving through the complex network of Dresden, or bolting its way between borders on Vorarlberg, the BR 193 is capable, powerful and a very much loved computer on rails.
- Manufacturer: Siemens Mobility
- Build Location: Munich, Germany
- Build Date: 2010-Present
- Number Built: 30+ and growing (Railpool)
- Total Ordered: Over 1500+ locos
- Power Type: 15 kV and 25 kV, AC and DC
- Variant: Multi-System
- Power Output: 8600 horsepower
- Length: 18.9 Metres (62 ft)
- Weight: 90 Metric Tons
- Top Speed: 200km/h (125mph)
Railpool BR 193 Vectron Cab – 1/3
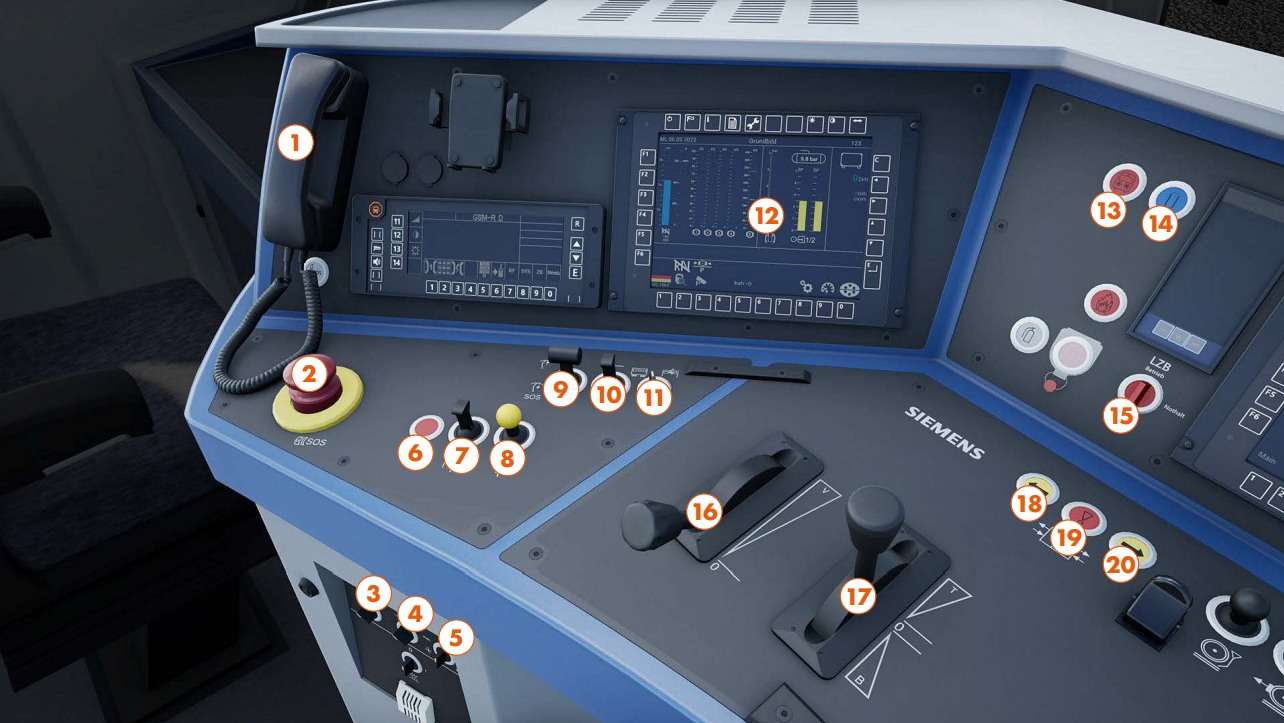
- 1 – Contact Signaller Phone
- 2 – Emergency Brake Button
- 3 – Air-Con Speed Switch
- 4 – Air-Con Temperature Switch
- 5 – Air-Con Mode Switch
- 6 – LZB/PZB Override Switch
- 7 – LZB/PZB Release Switch
- 8 – LZB/PZB Acknowledge Switch
- 9 – Pantograph Switch
- 10 – Main Circuit Breaker Switch
- 11 – Train Line Switch
- 12 – Technical and Diagnostic Display (TDD)
- 13 – Hazard Lights Button
- 14 – LZB Instrument Dimmer Button
- 15 – LZB Emergency Stop Switch
- 16 – AFB Handle (Confirm Set Speed on top)
- 17 – Throttle Handle (Train length on top)
- 18 – Left Doors Open button
- 19 – Doors Close Button
- 20 – Right Doors Open Button
Railpool BR 193 Vectron Cab – 2/3
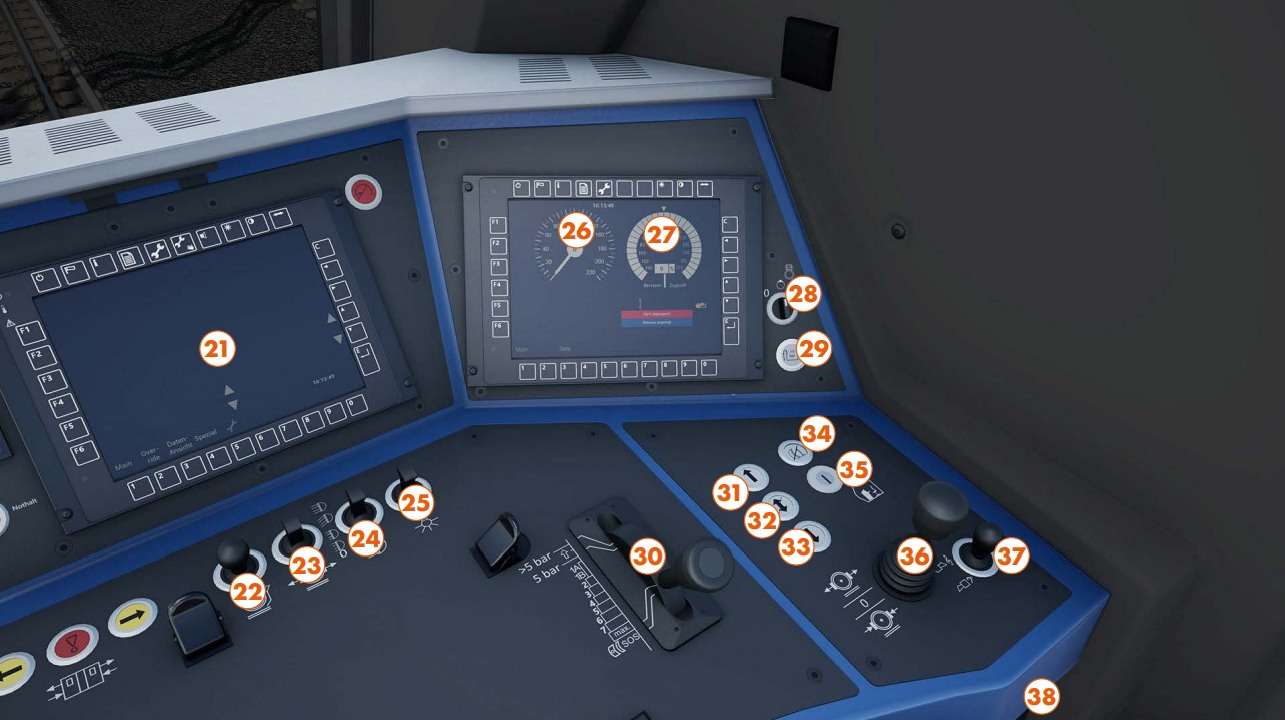
- 21 – Central Multi-Function Display*
- 22 – Sand Switch
- 23 – Brake Release Switch
- 24 – Headlights Switch
- 25 – Cab/Reading Light Switch
- 26 – Control Command Display (Speedometer)
- 27 – CCD (Tractive Effort)
- 28 – Air Compressor Switch
- 29 – Brake Pipe Overcharge Button
- 30 – Train Brake Handle
- 31 – Forward Button
- 32 – Neutral Button
- 33 – Reverse Button
- 34 – Train Brake Cut-Out Button
- 35 – Master Key
- 36 – Direct Brake Handle
- 37 – Horn Lever
- 38 – Wiper Switch
The default display configuration for Railpool Vectrons shows the CCD screen on the right-hand side of the cab, if you want to change what the screens display, you can do this with the arrow softkeys on the top row which look like this <–>
Railpool BR 193 Vectron Cab – 3/3
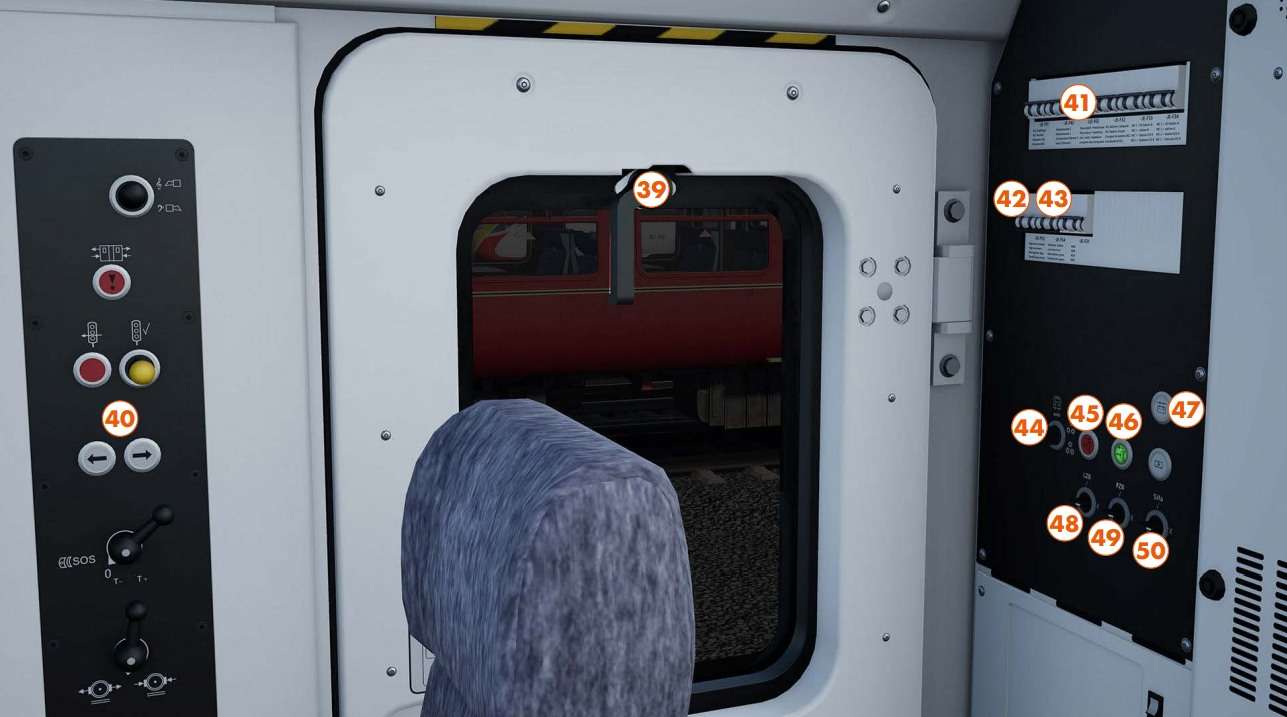
- 39 – Cab Window
- 40 – Shunting Controls
- 41 – Reading Light Breaker Switch
- 42 – Horn High Breaker Switch
- 43 – Horn Low Breaker Switch
- 44 – Signal Light Override Switch
- 45 – Parking Brake Apply Button
- 46 – Parking Brake Release Button
- 47 – Battery Button
- 48 – LZB Isolation Switch
- 49 – PZB Isolation Switch
- 50 – SIFA Isolation Switch
Procedures & Unique Features
How to enable AFB
- Make sure that the master key is turned, reverser is in Forward or Reverse, brakes are cut in and the Master Controller is in “Off”.
- Press Softkey 9 on the TDD (speedometer indicator) or Cruise Control Toggle keybind.
How to recover from a Sifa penalty brake application
- Acknowledge the Sifa warning (Alerter reset keybind).
- Momentarily move the Train Brake to the “Quick Release” position.
How to set and confirm an AFB target speed
- Ensure that AFB is enabled and the Throttle is not in the dynamic brake range and the Train Brake is in.
Running
- Move the AFB lever to the desired speed.
- Press the AFB Confirm Speed button on the AFB lever to make AFB react to the new target speed.
- If the train is stationary, apply at least 10 kN of tractive effort to make the hold brake release.
How to change Pantograph and Network
- Open the MCB.
- Move the Pantograph rocker switch to “Lower”.
- In the TDD, press Softkey 1.
- Cycle through the list to the desired network with the up and down arrow Softkeys.
- Confirm the network with the E-softkey.
- Raise the pantograph.
- When allowed, close the MCB.
How to change Brakemode
- Make sure that the locomotive is stationary.
- In the TDD, press Softkey 8.
- Cycle through the menu with the up and down arrow Softkeys until “Bremsart” is highlighted.
- Set the desired brake mode by pressing Softkey 1, 2 or 3.
- If all the coaches allow brake mode “R” (passenger train) set the brakemode to “R”. If not, but the train weight is less than 800 tonnes, set the brakemode to “P” otherwise set the brakemode to “G”.
How to change PZB Mode
- Make sure that the locomotive is stationary, PZB is not in restrictive mode and the penalty brake is not applied.
- In the TDD, press Softkey 8.
- Cycle through the menu with the up and down arrow Softkeys until “PZB Modus” is highlighted.
- Set the desired PZB Mode by pressing Softkey 1, 2 or 3.
- If the total BrH (braked weight percentage) is less than or equal to 65, set the PZB Mode to “U”, if the BrH exceeds 65 but is less than 111, set the PZB Mode to “M”, otherwise set the PZB Mode to “O”.
- In Timetable Mode, the correct PZB Mode for your train should be automatically selected.


Be the first to comment