
Contents
- All Tasks Locations (Crimson)
- First Recon
- Cache Retrieval
- Meds Wanted Medical Supplies
- Little Bird Down
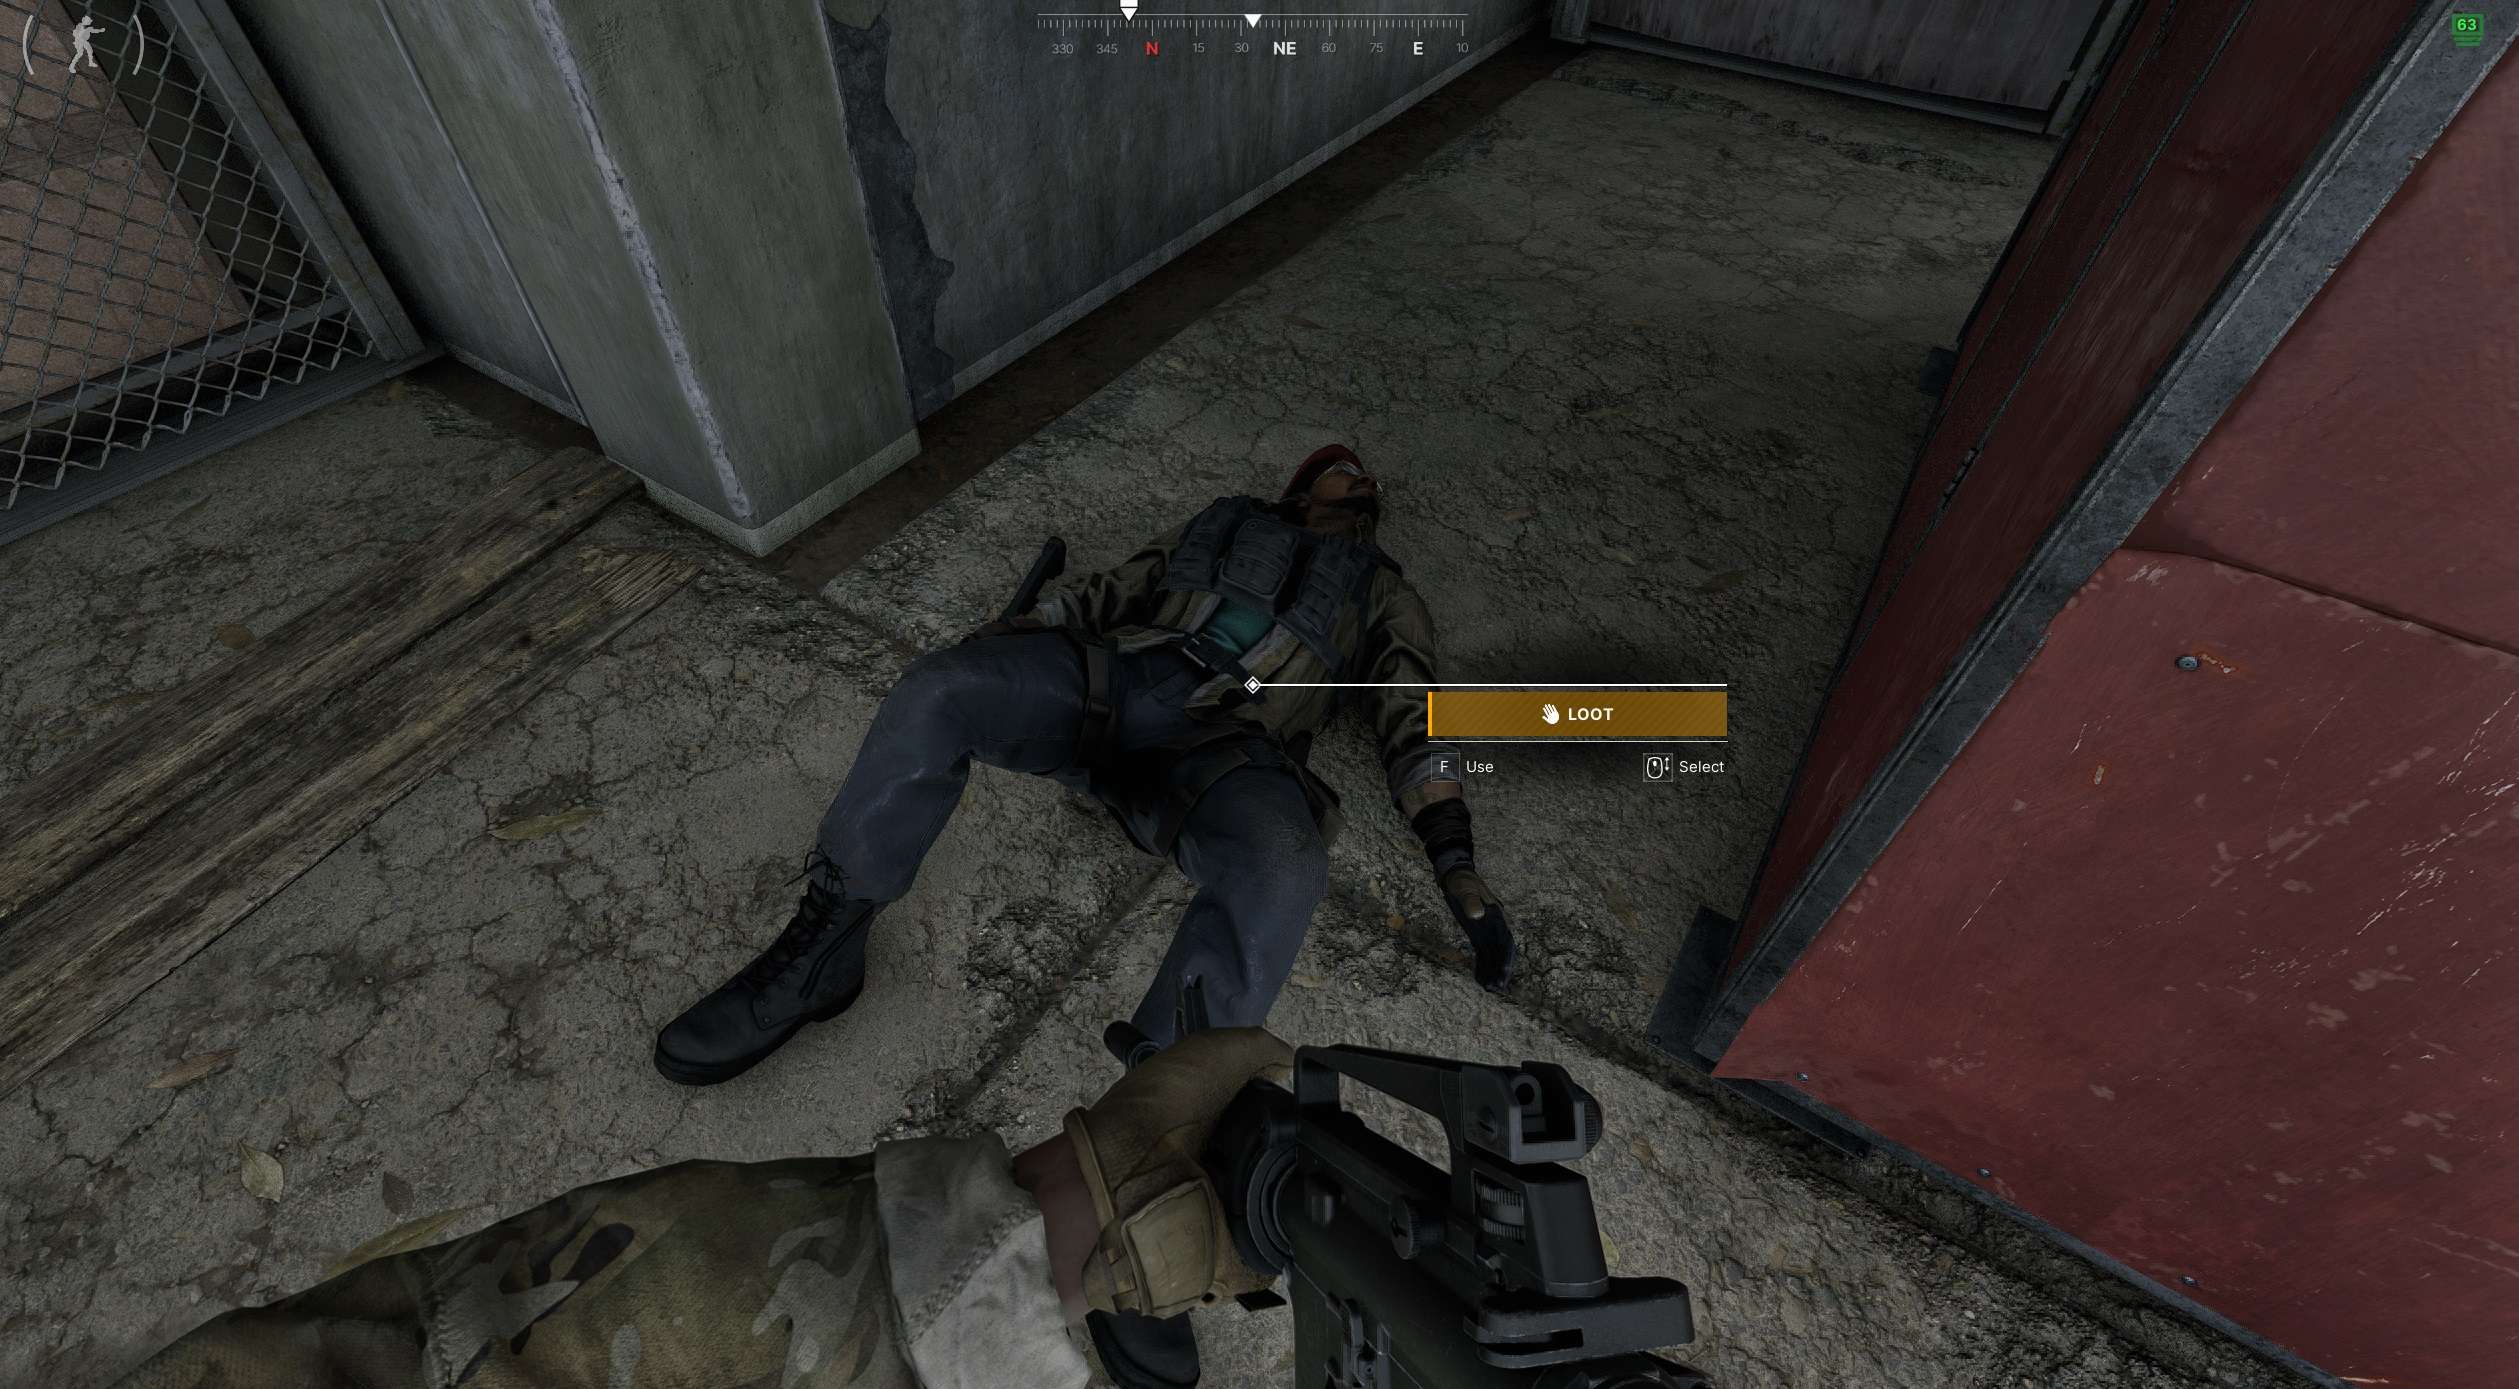
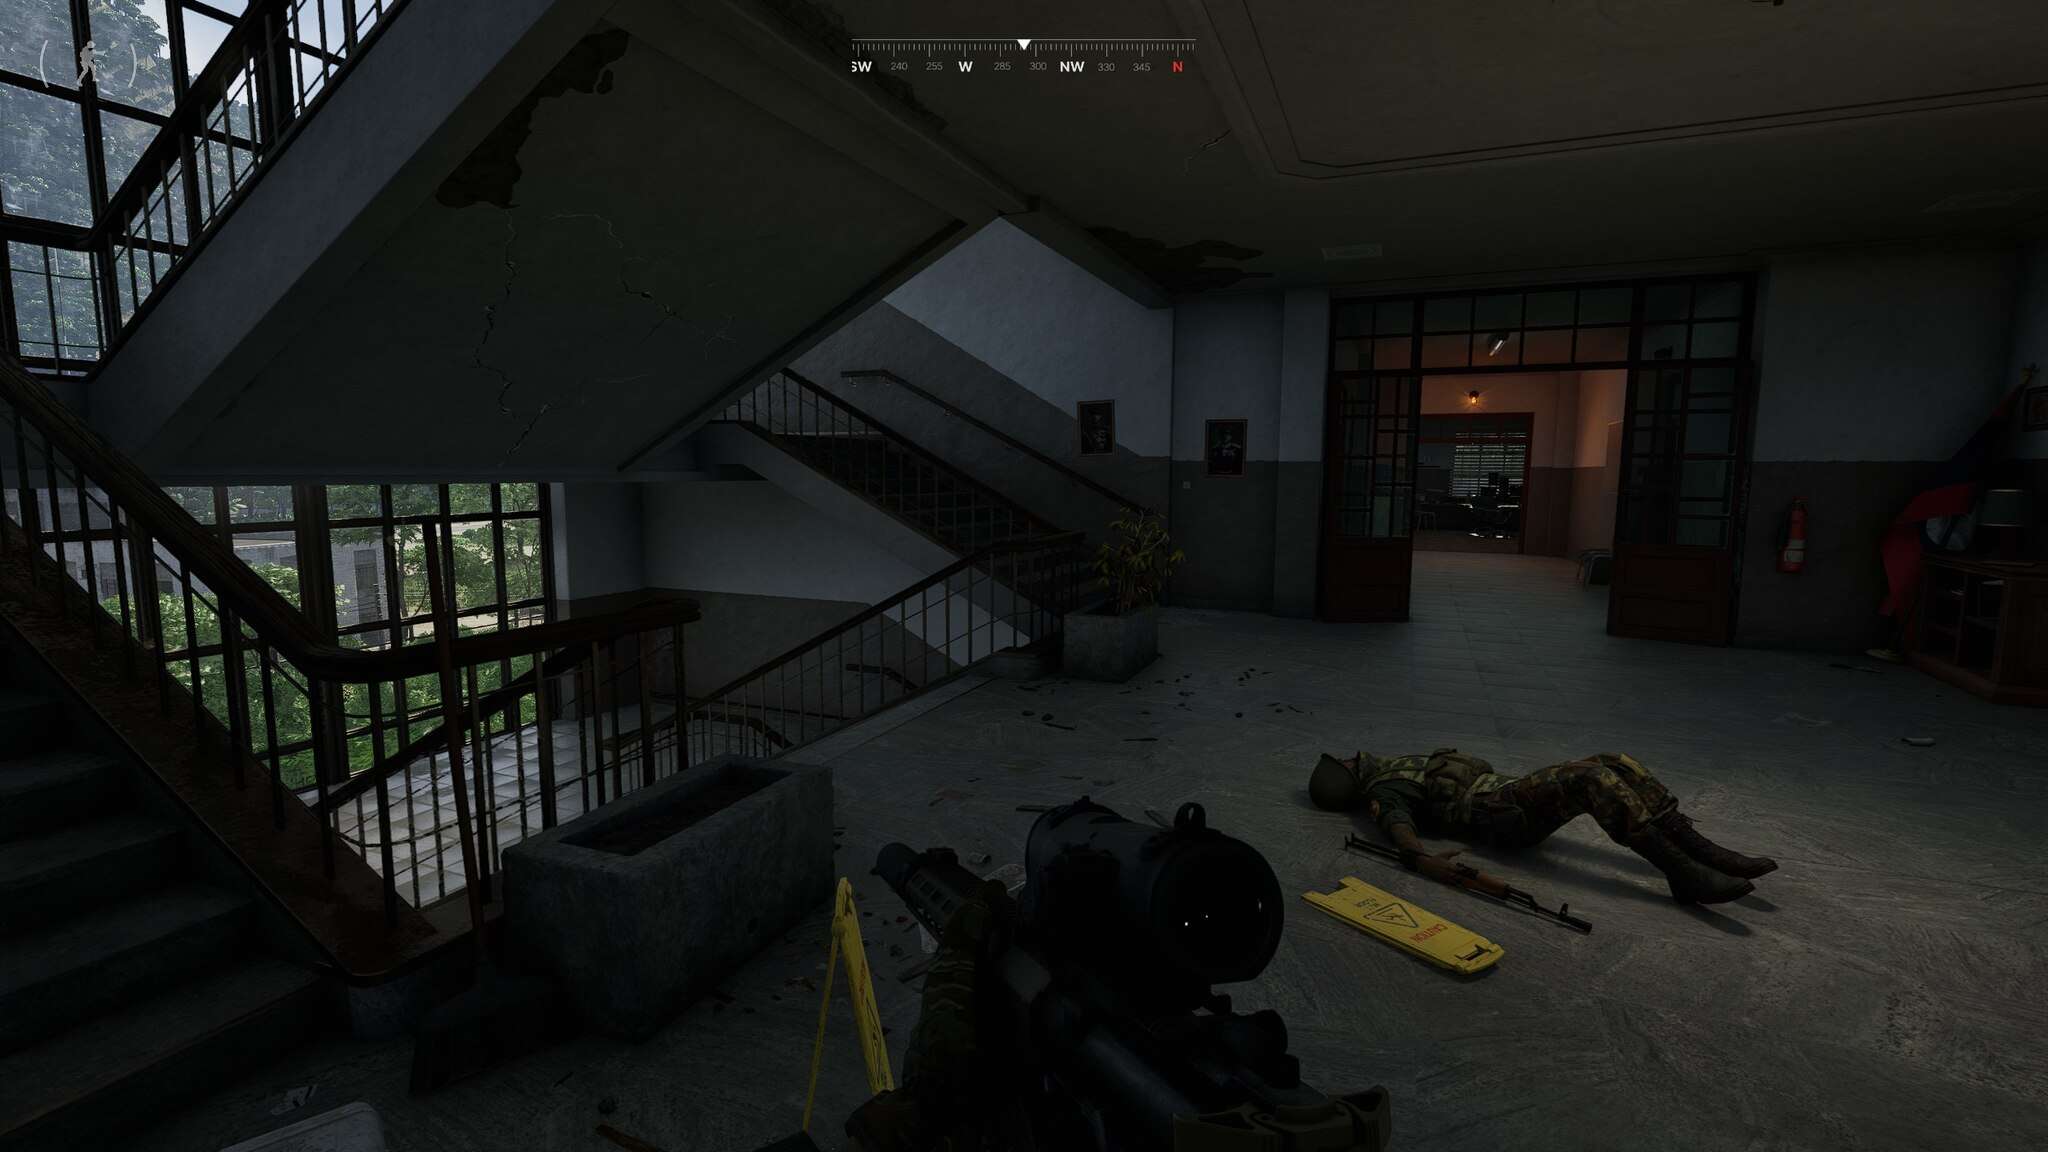
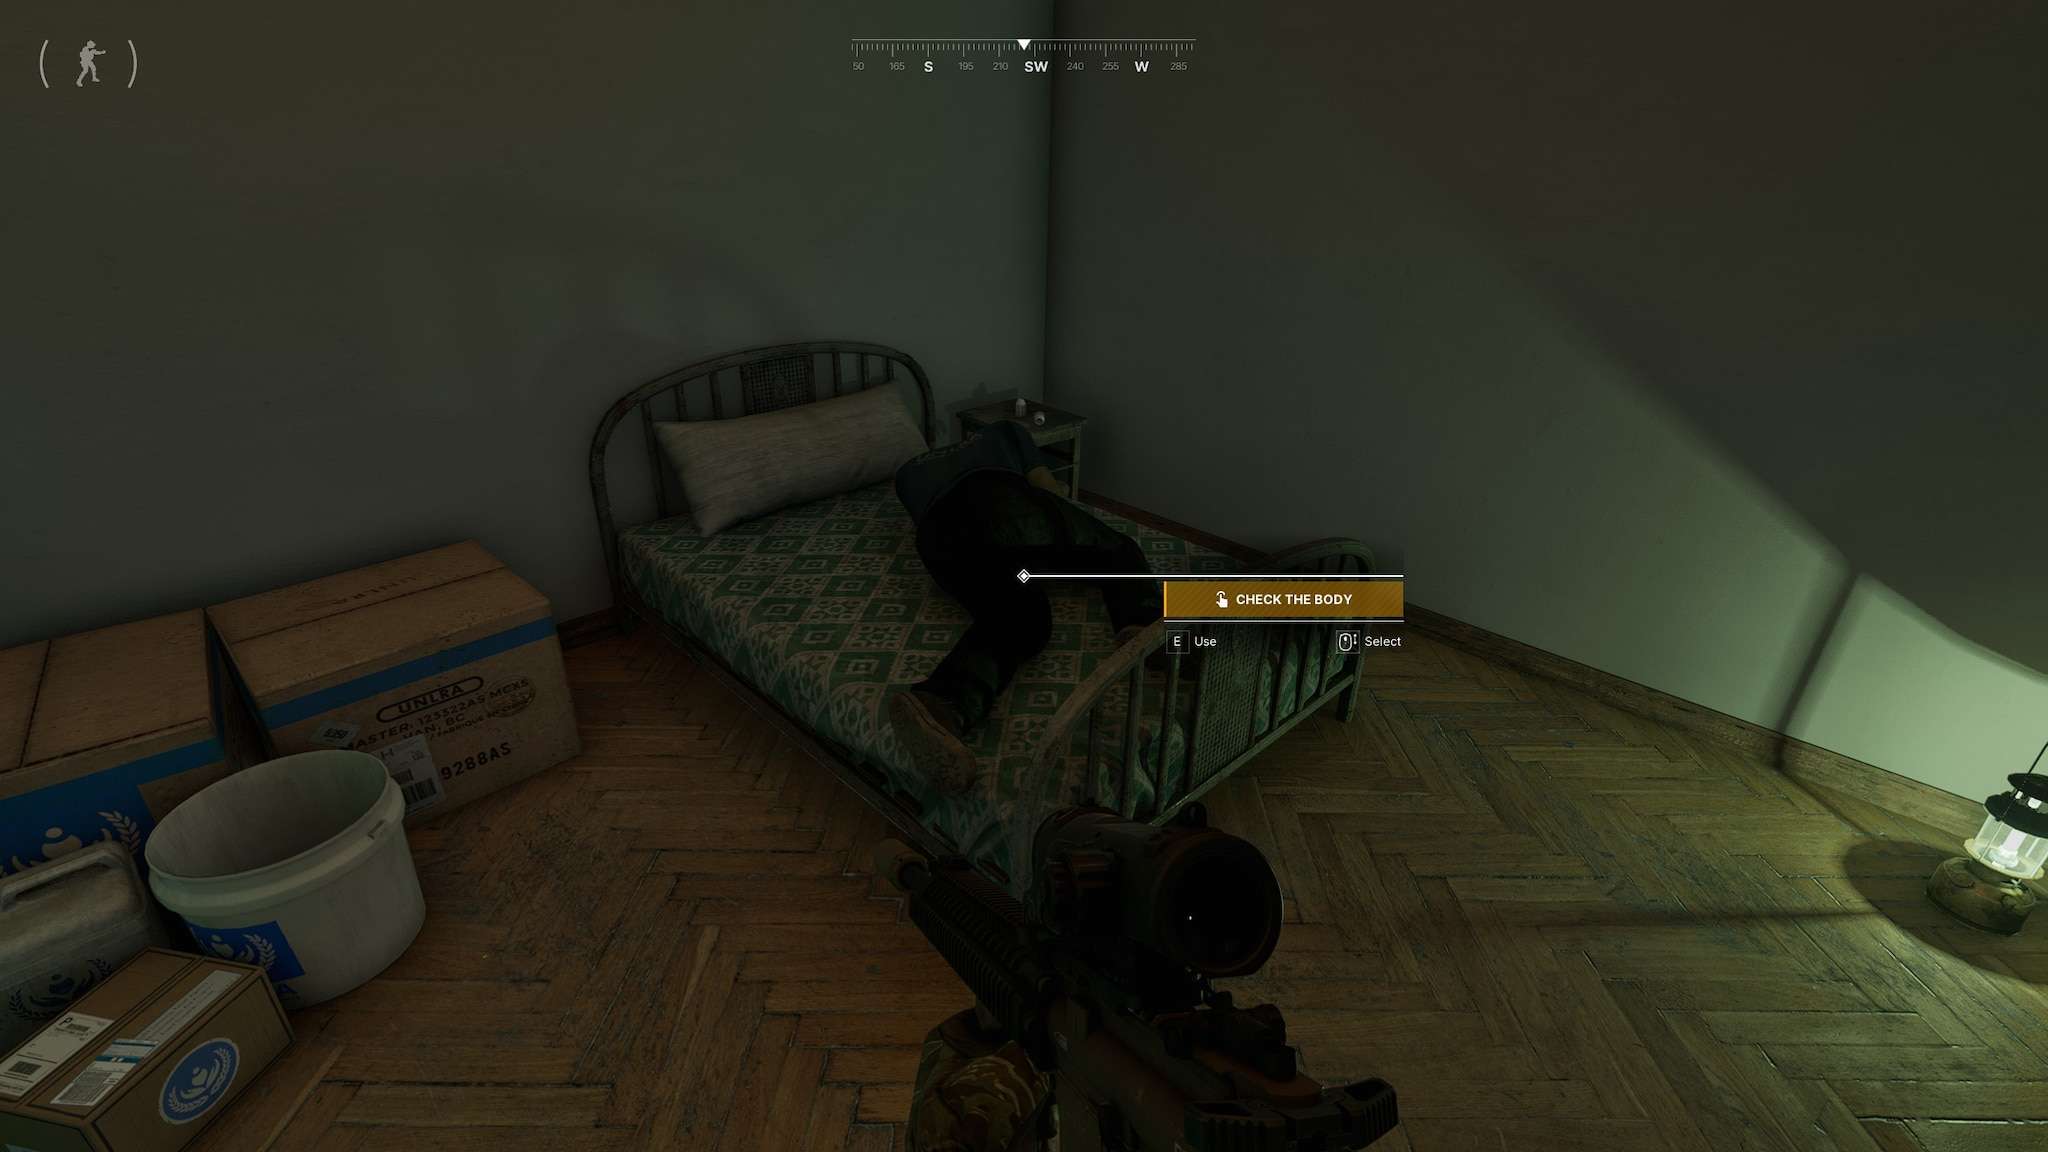
- Leave No Man Behind Body
- Lost and Found Kanoa Sinarath
- Medical Detective
- Rats Nest Hideout
- Secret Compassion
- Native Negotiations
- Helping Hand
- Tools of the Trade
- Radio Silence
- Left Behind & Last Farewell Body
- First Hit Criminal Leader
- Reclamation + Covert Research
- All Tasks Locations (Same for All)
- On The Range
- New Neighbours Intel
- The Shadow Over Ban Pa I
- The Negotiator
- Guns & Ammo
- True Grit
- It’s In The Water I
- Uninvited Guests
- Save The Rebellion
- Shortcut
- Warm Welcome
- At The Mounds Of Madness I
- At The Mounds Of Madness II
- The Shadow Over Ban Pa II
- Shooting Gallery
- The Brave
- Up To Snuff
- Final Liberation
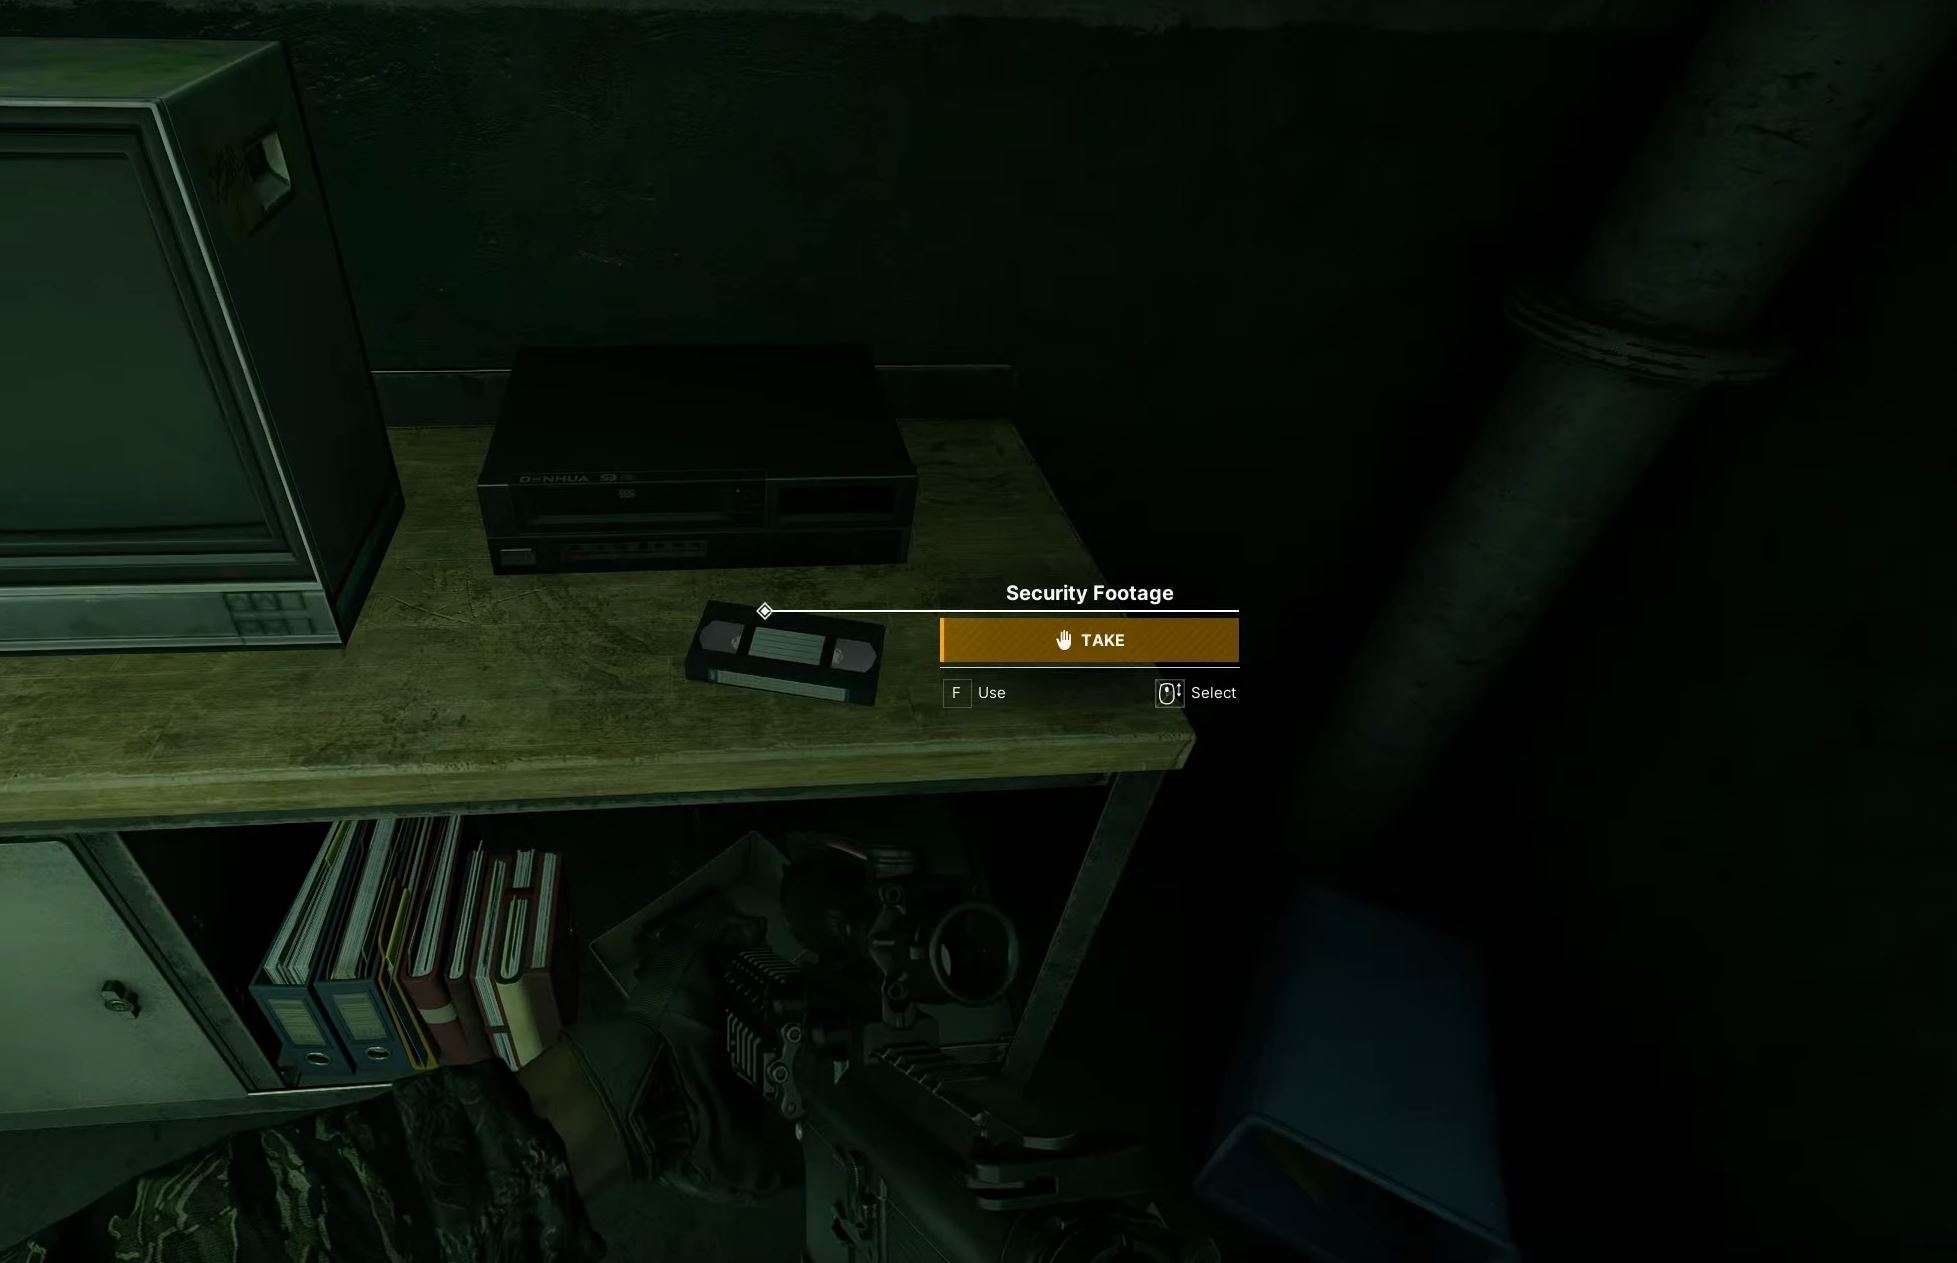
- Check Out Computers
- It’s In The Water II
- Out Of The Blue
- Duty to The Country
- Rebel Scum
- One Shot One Kill
- Carnivore
- The Most Dangerous Game
- Night Ocean
- A Single Drop
- Living In Burrows
- Manifest Destiny
- Final Checkout
- What Comes Up
- Too Close Too Sun
- Business Or Pleasure
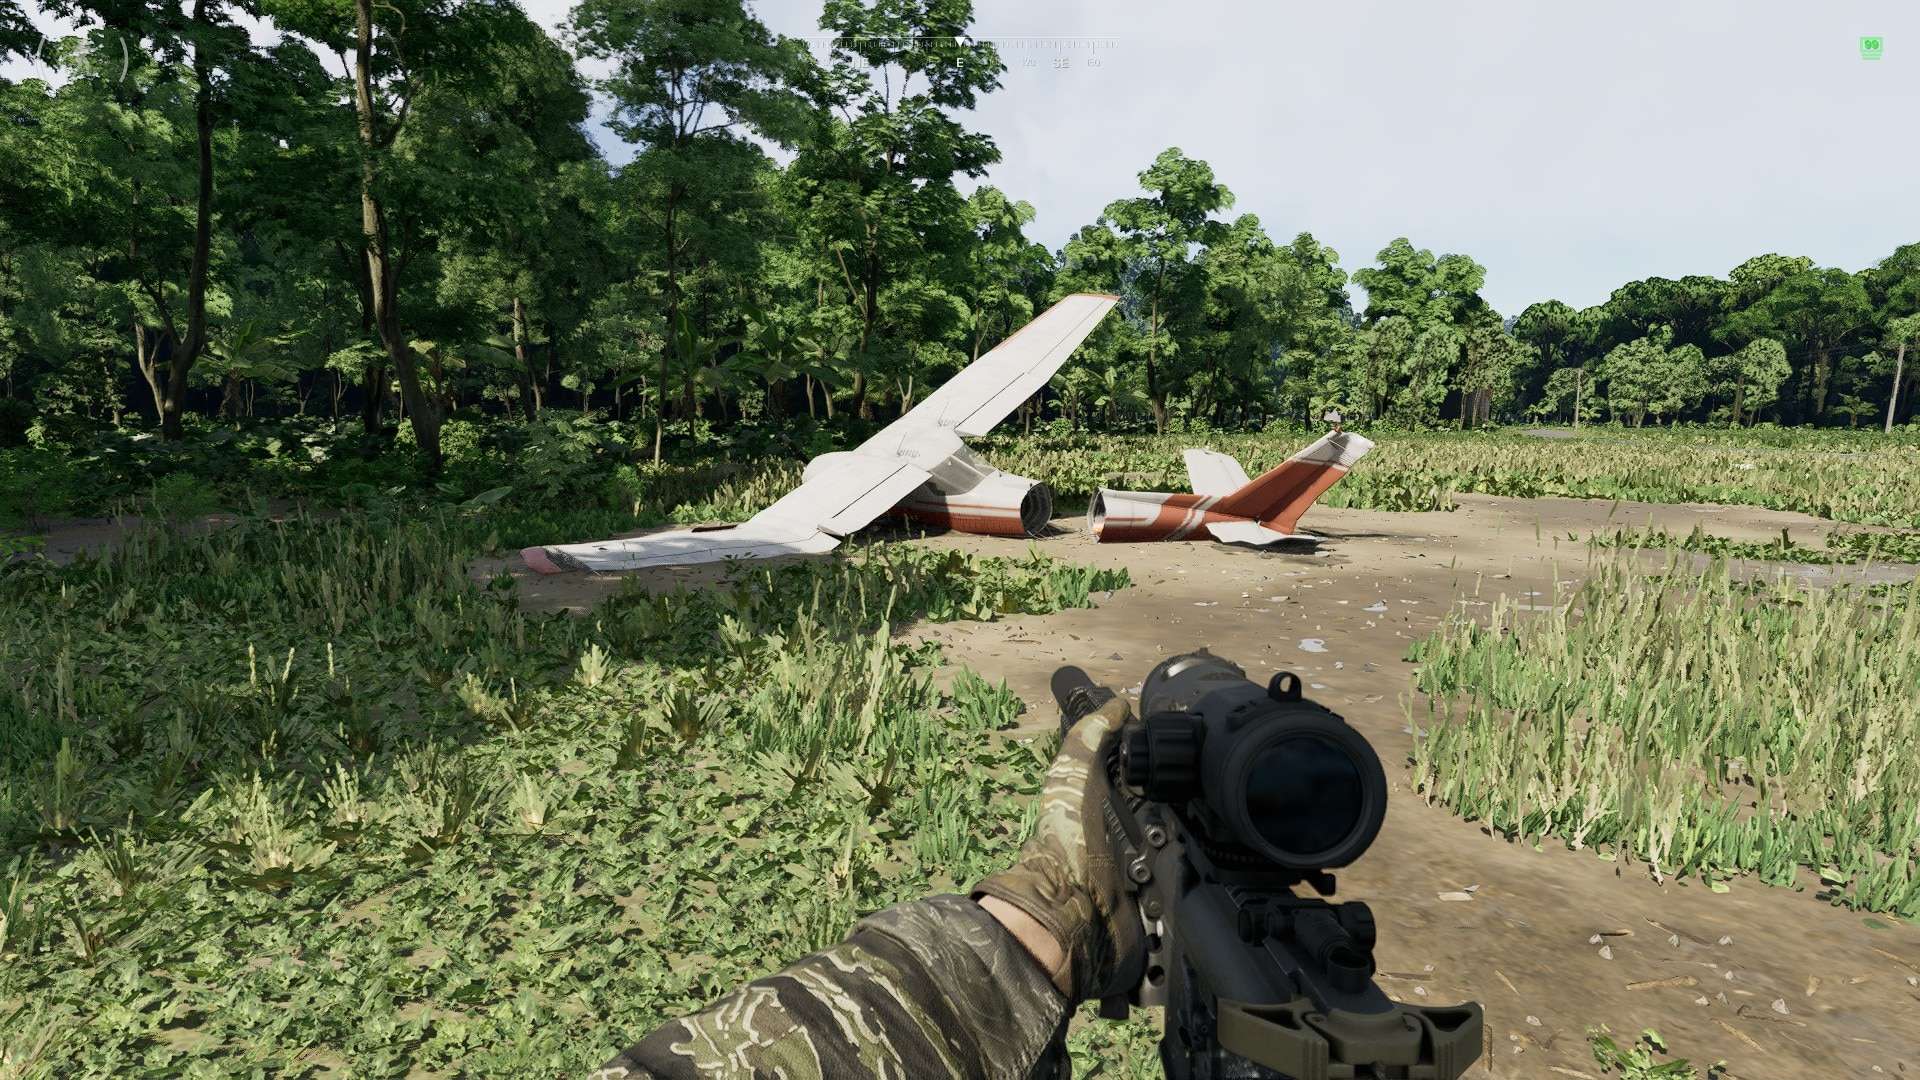
- Last Flight
- I Went, I Saw, I Conquered I
- I Went, I Saw, I Conquered II
- When A Tree Falls
- Fuel Shortage
- I Went, I Saw, I Conquered III
- Invaders From Afar
- Timber
- EOD
- Forth Narith Stroll
- Missing Colleague I
- Evacuation Question
- Missing Colleague II
- Neighbourly Help
- Line In The Sand
- Deep Waters
- Hazardous Treasures
- Wing Clipping
- Deepest, Darkest Fantasies
- Reconnaissance In Force
- Jets’N’Marks
- Hacker
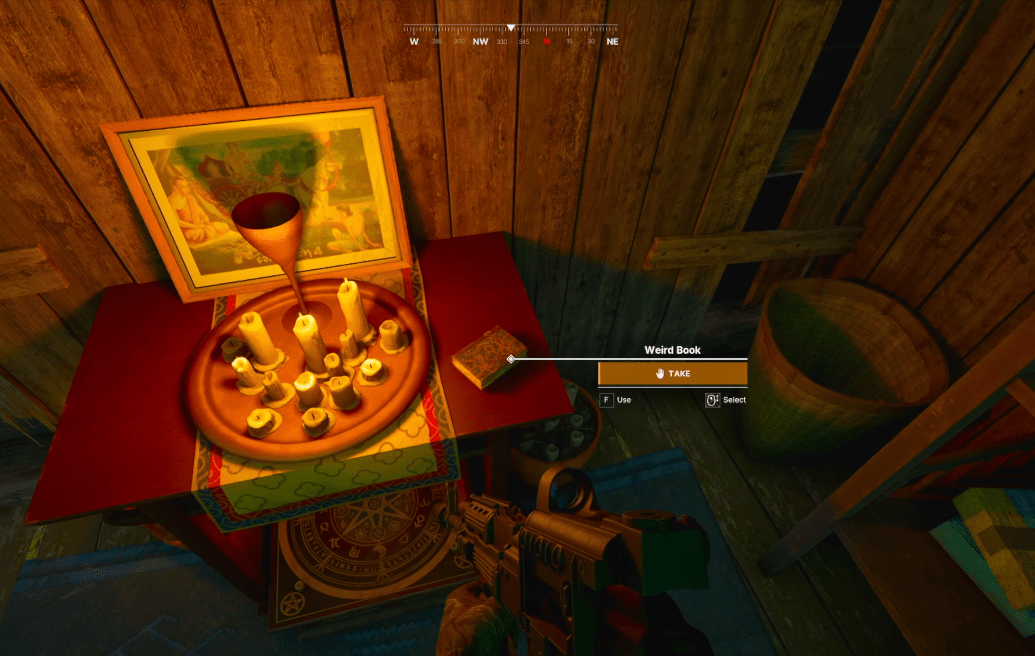
- Family Heirloom
- State of Weapon Shipment
- A Small Favor
- Deal of the Century
- Lost Lover
- The More The Merrier
- Skycrawlers
- Skycrawlers II
- Delayed Package
- Deep Depravity
- Prisoner 23
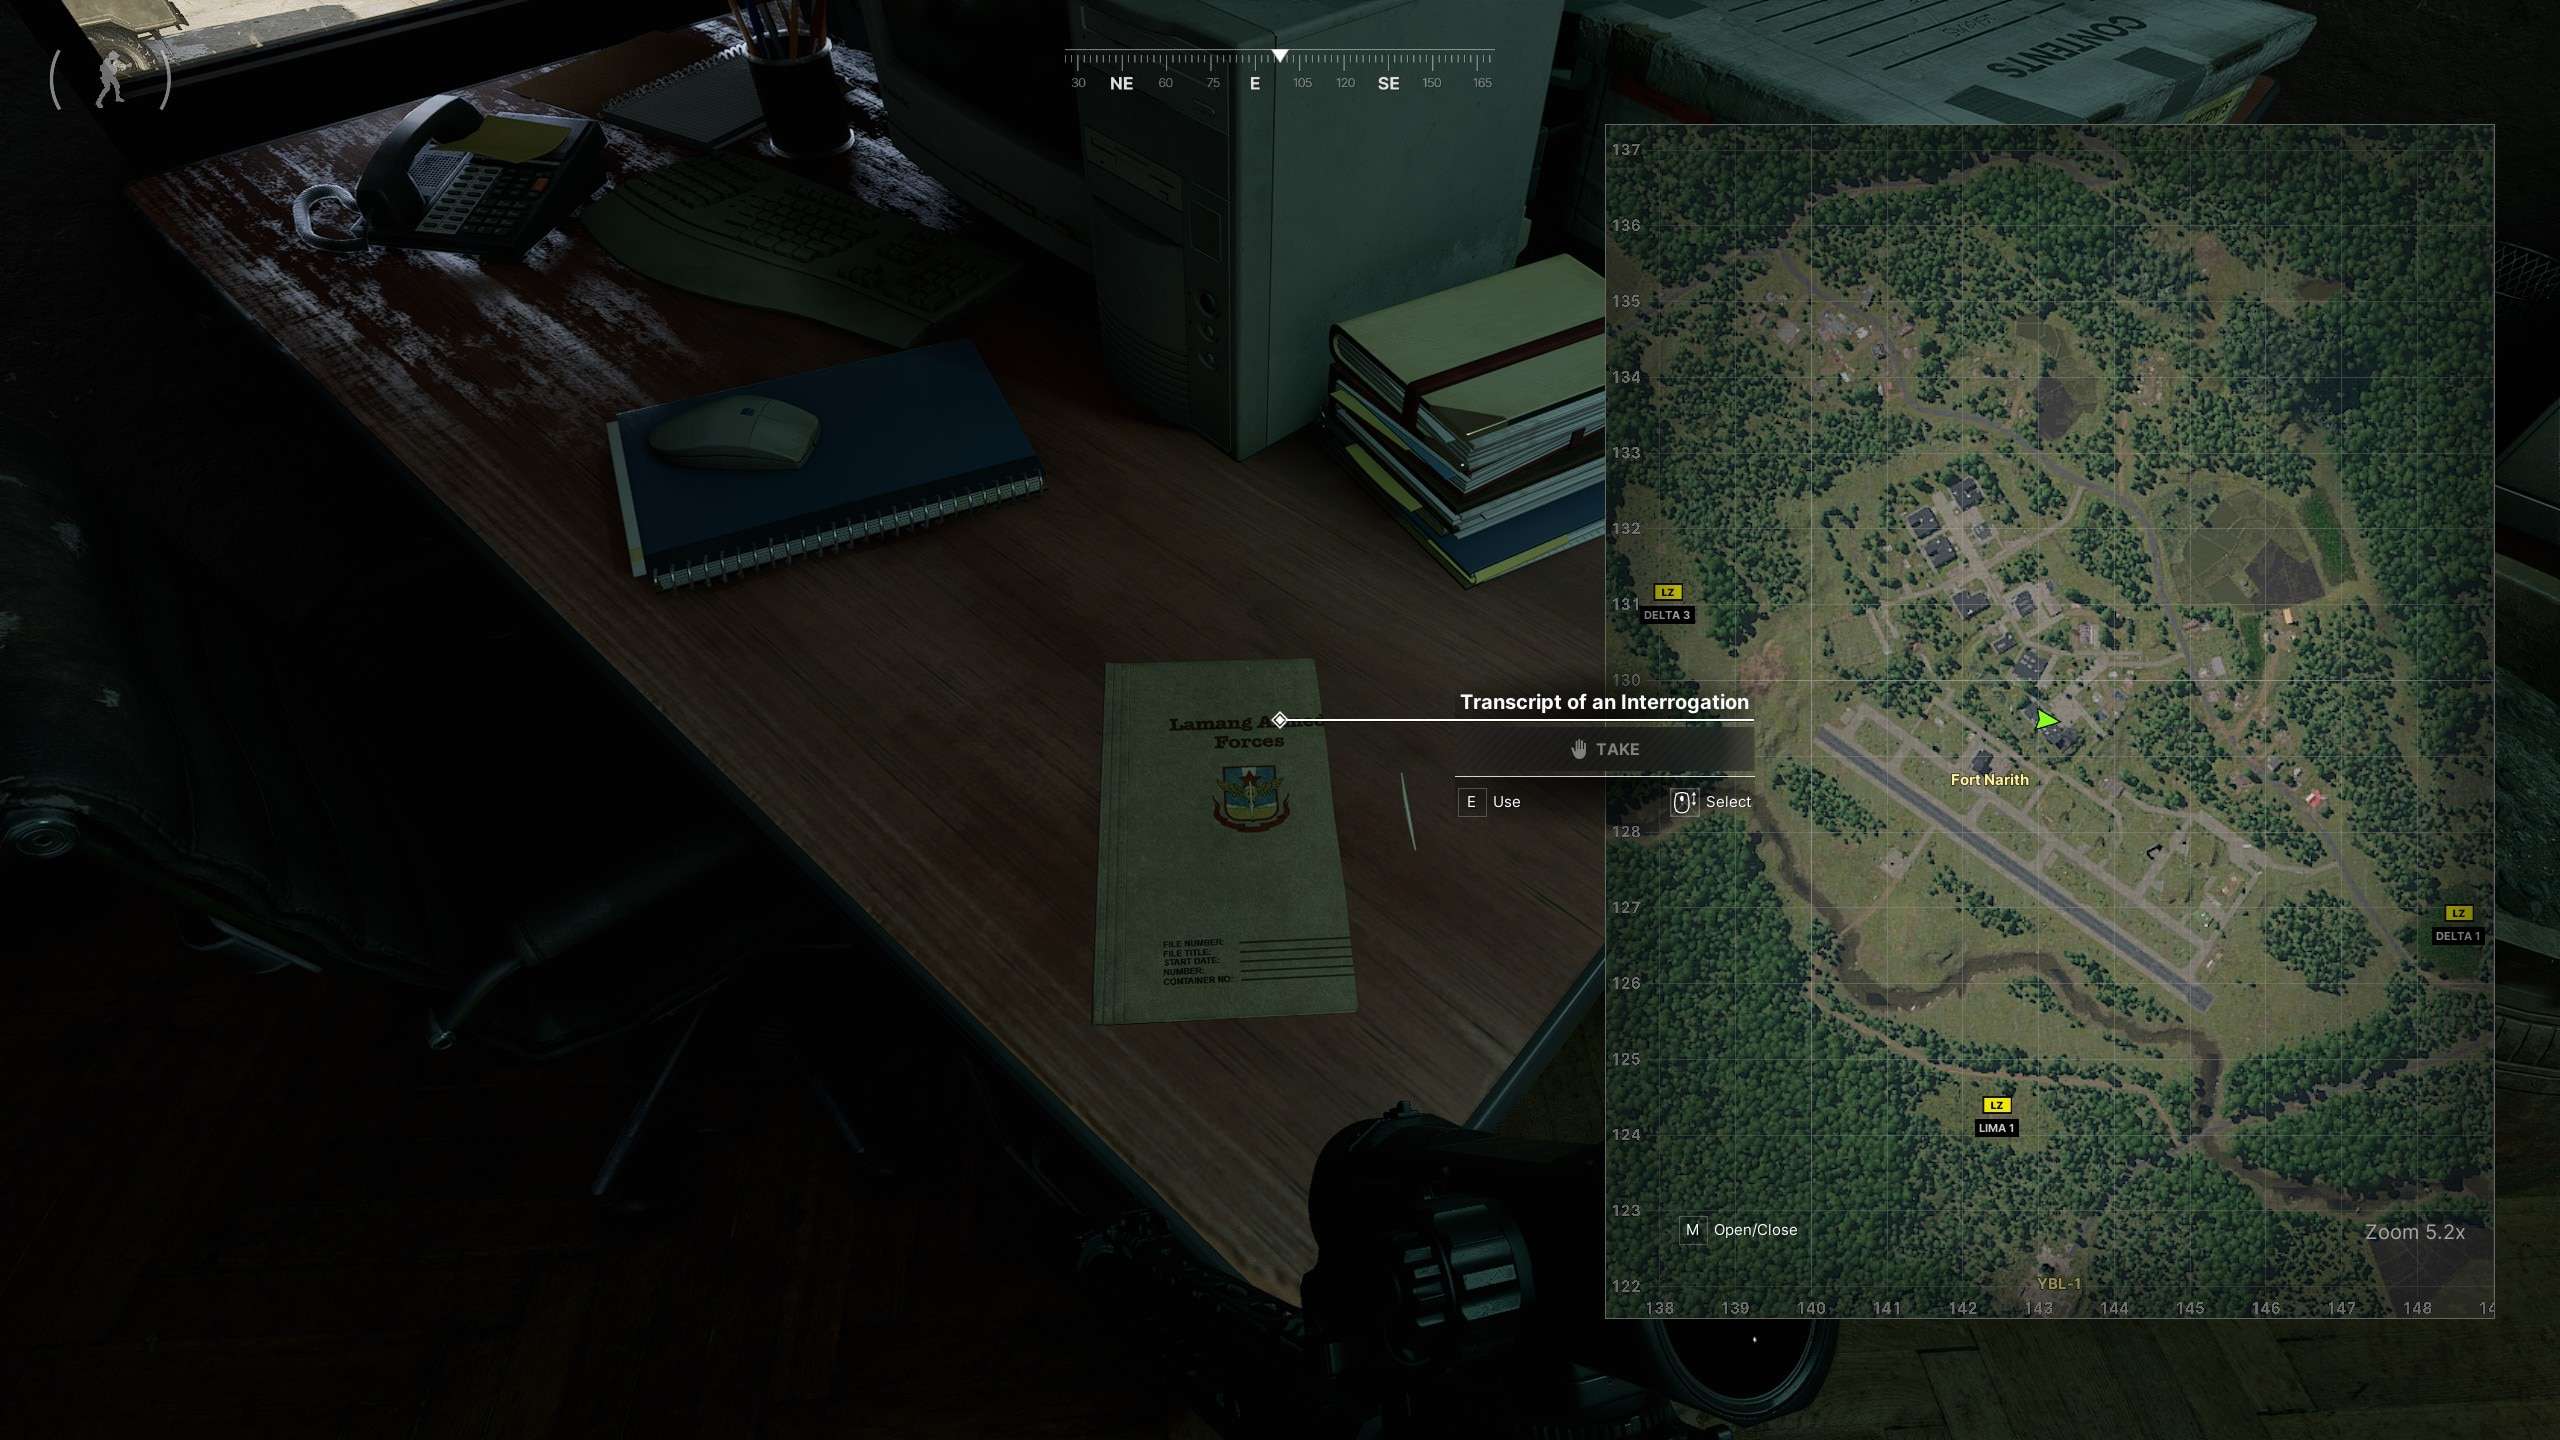
- Lamang Connection
- Fresh Meat
- Downsizing
- Evacuation Question
- In The Right Hands
- Seeker of Change
- Hacker II
- Name Your Poison
- Uncanny Files
- Who’s in Charge
- Fresh Meat II
- Dragonslayer
- Fresh Meat III
- UNLRA
- Aye Aye, Captain
- Baked
- Lost Girl
- Crime Doesn’t Pay
- Priceless Possessions
- The Value of Sharing
- Wanted Man
- Wanted Man II
- Lost Girl II
- Unnameable
- What Remains
- Incognito
- Test Results
- Crumb Collector + Buyer of Untold Truths
- How to Play Tips (Beginner, Intermediate & Advanced)
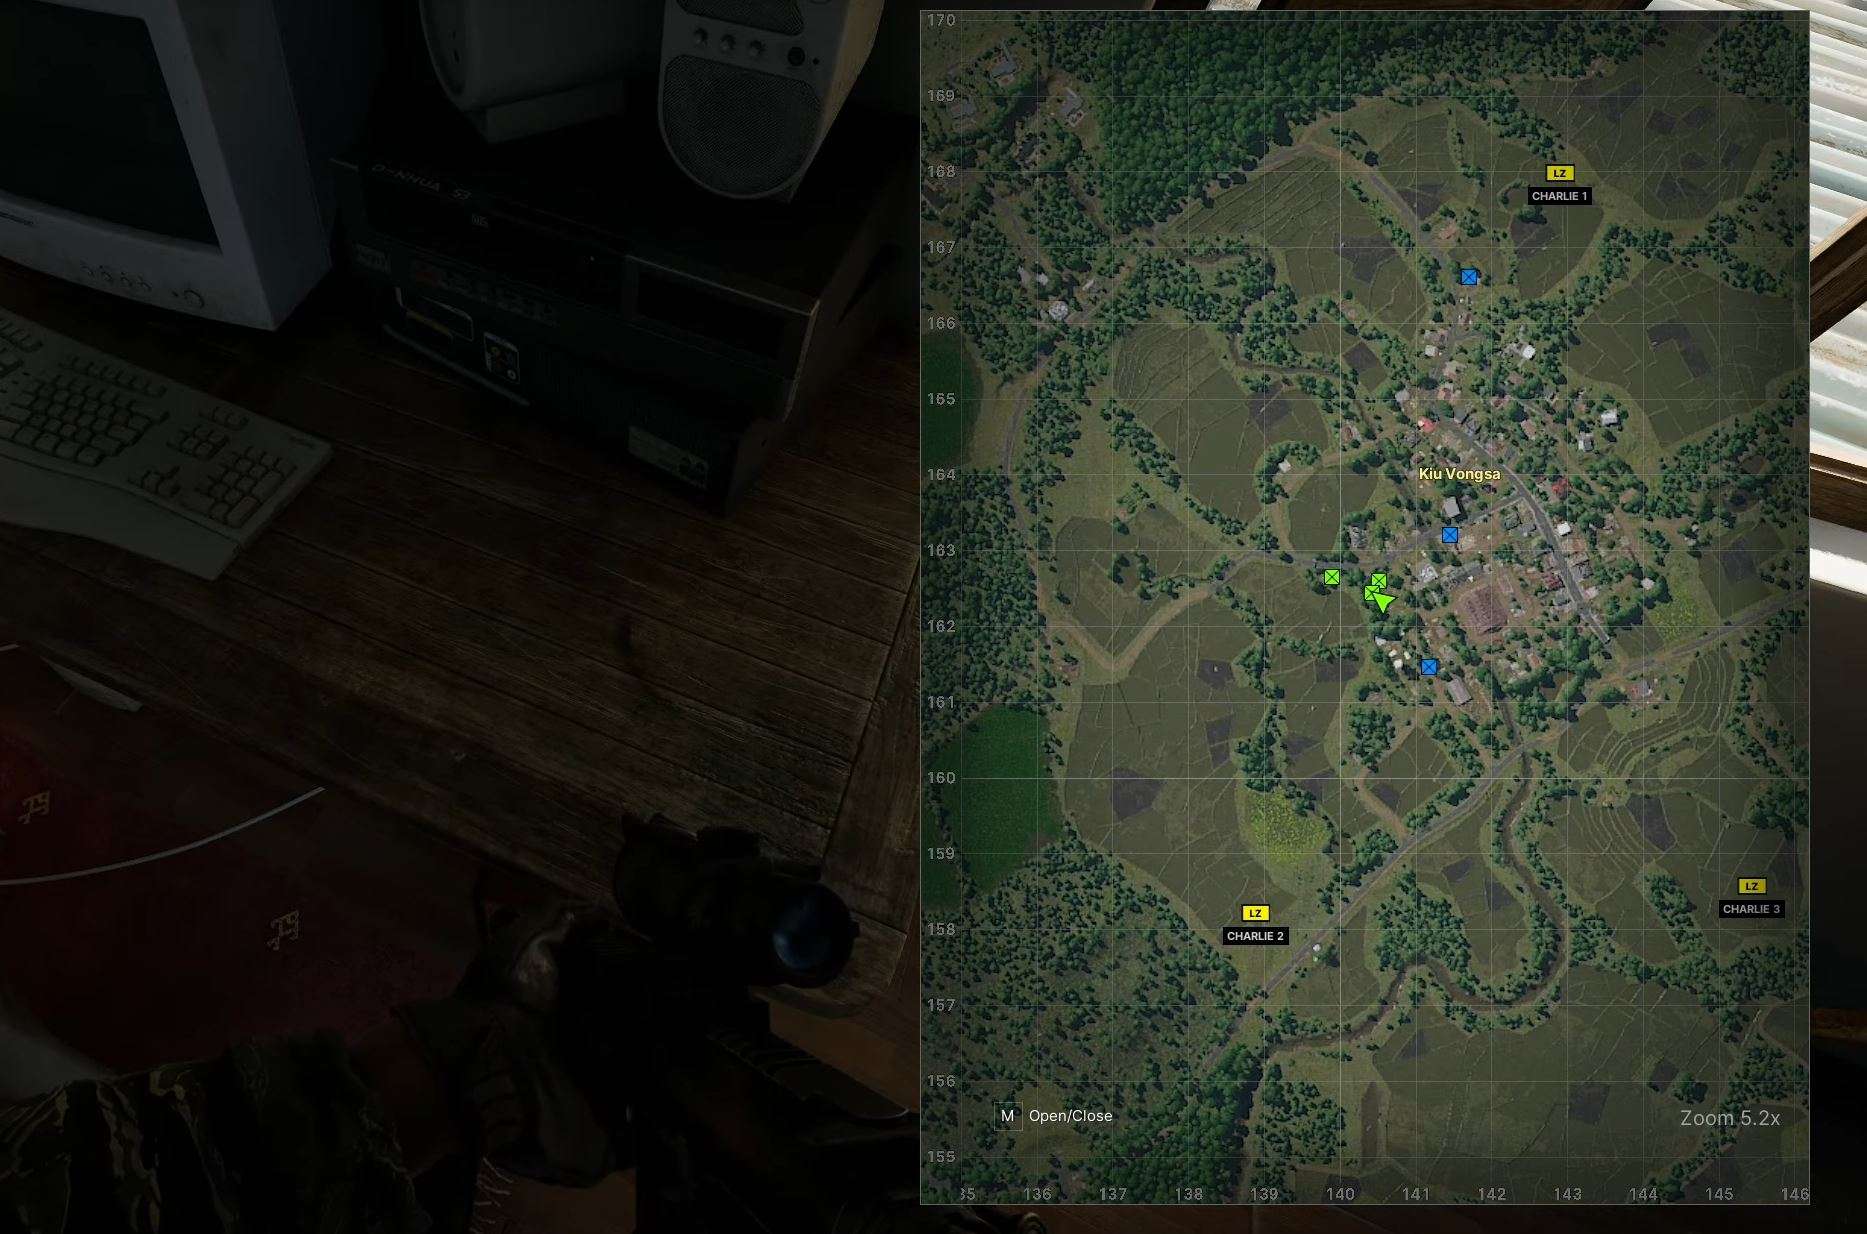
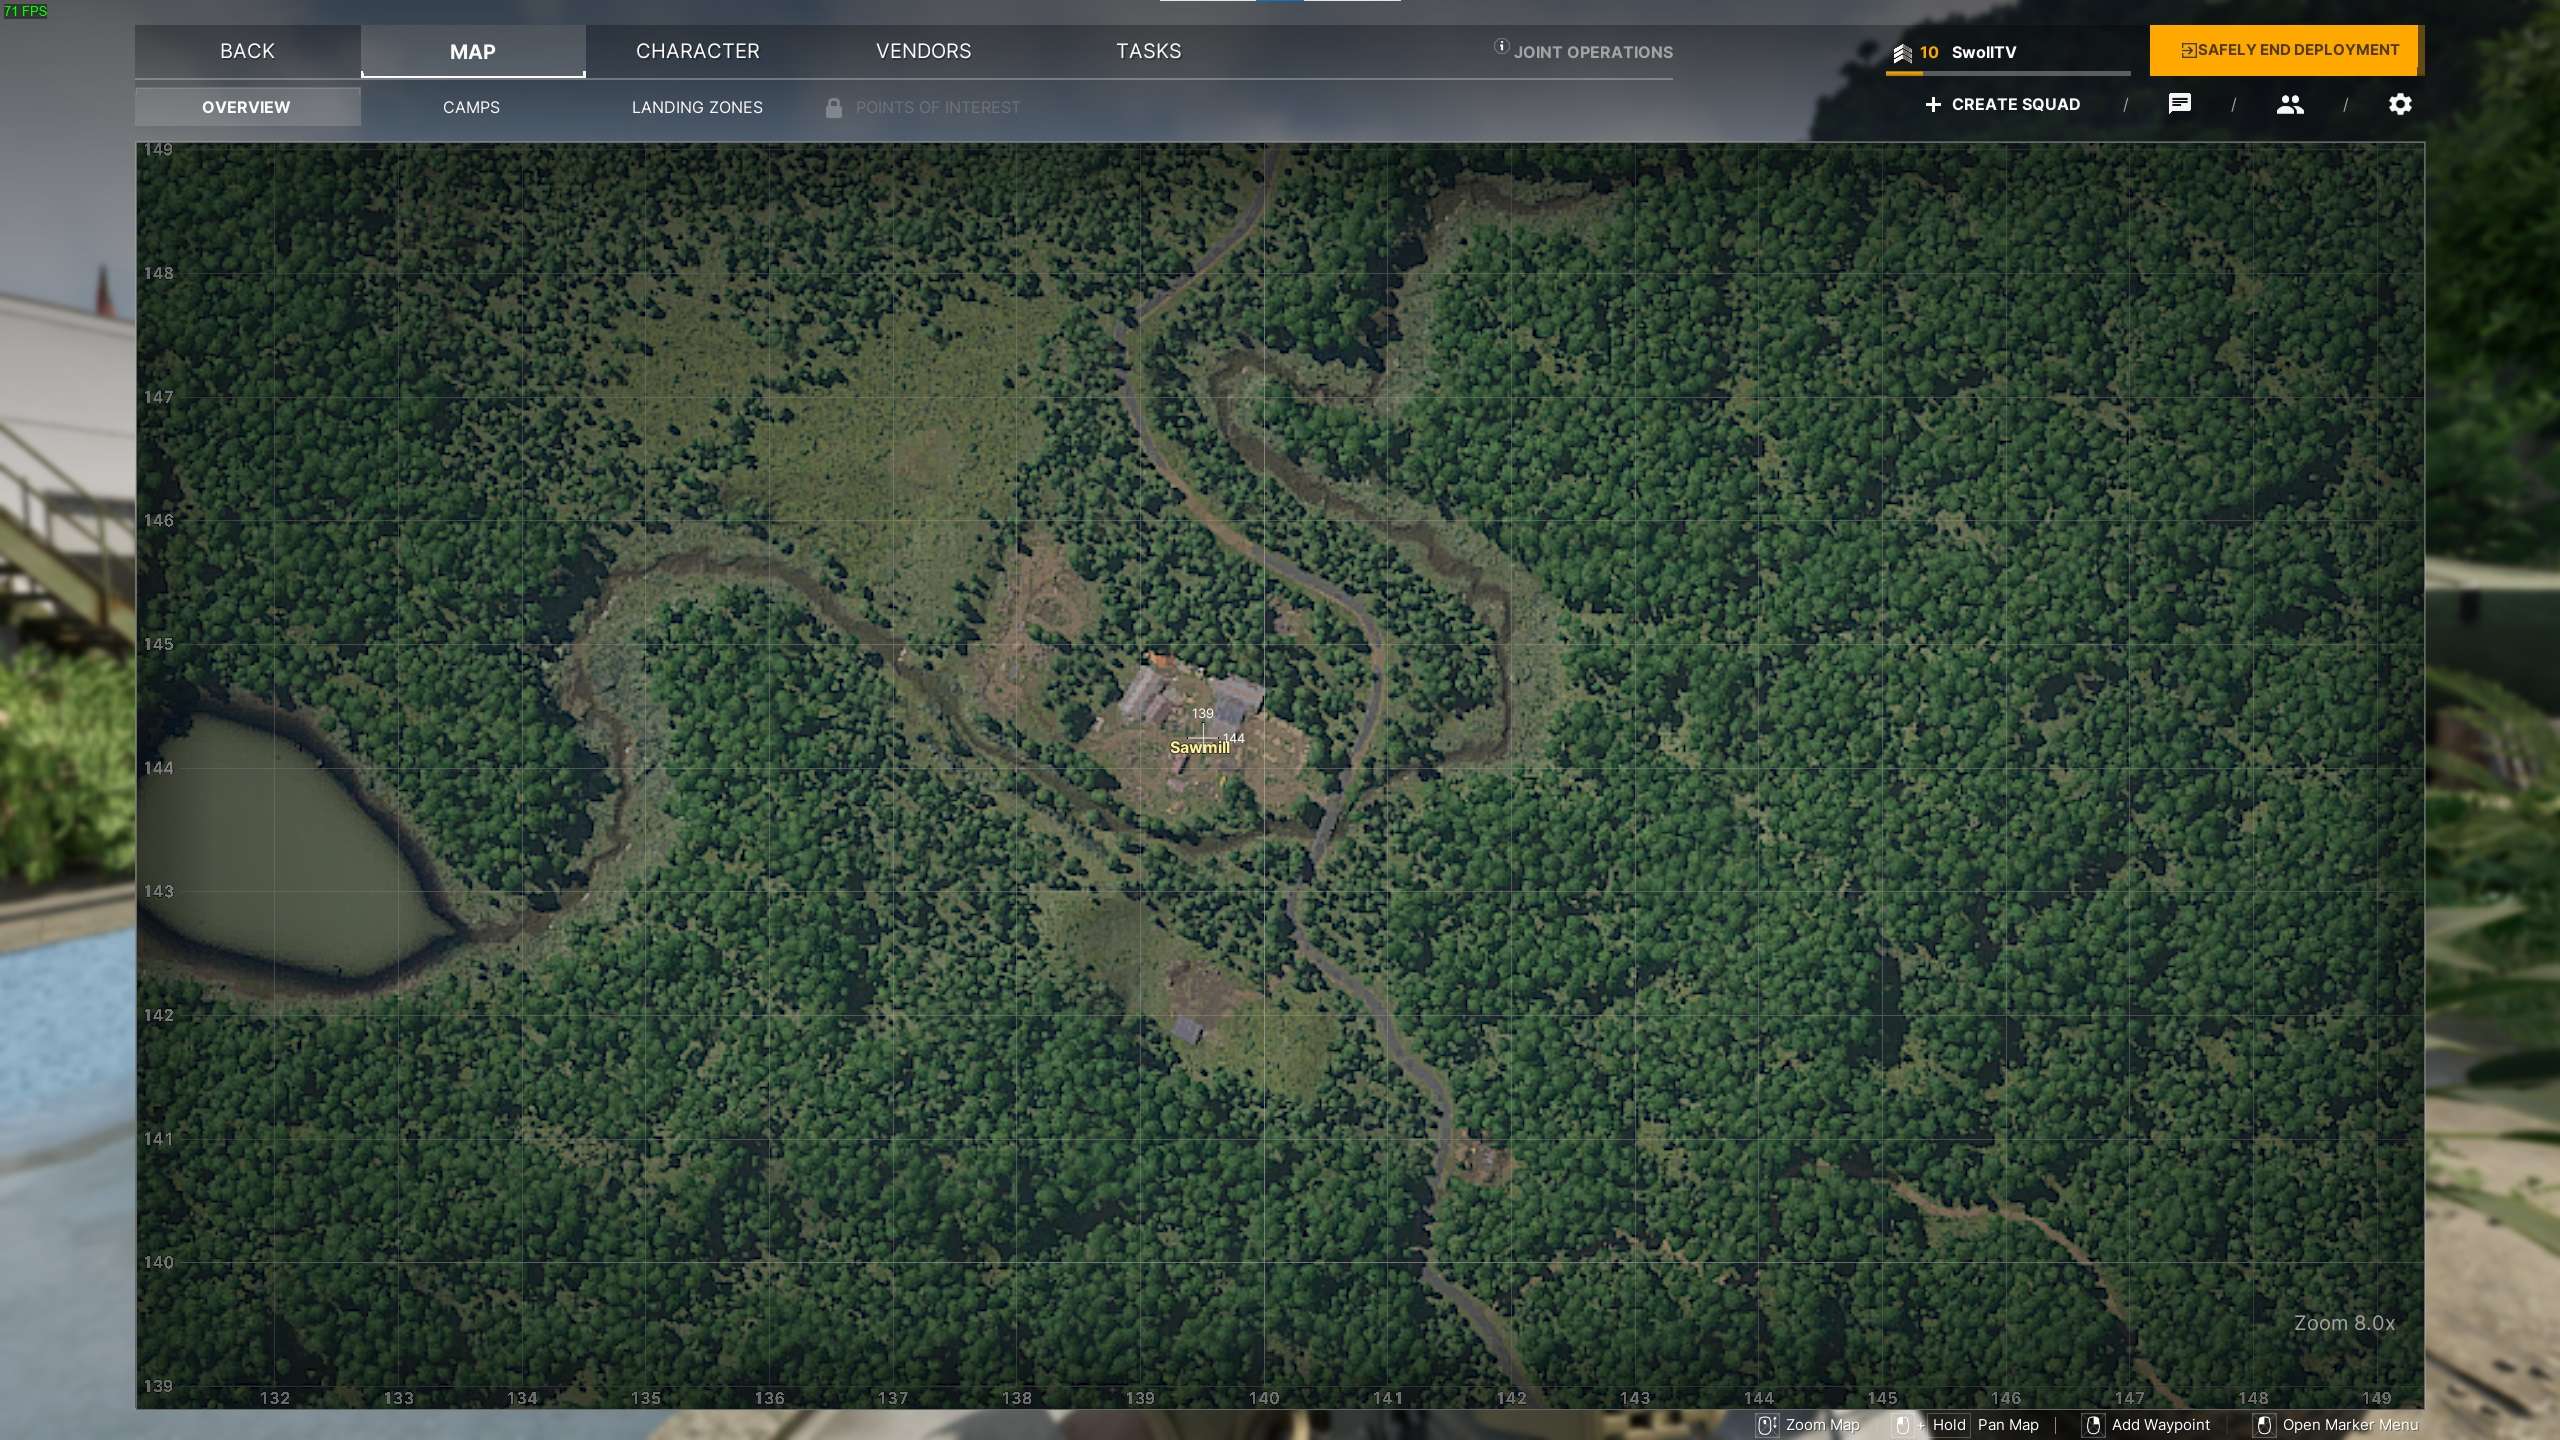
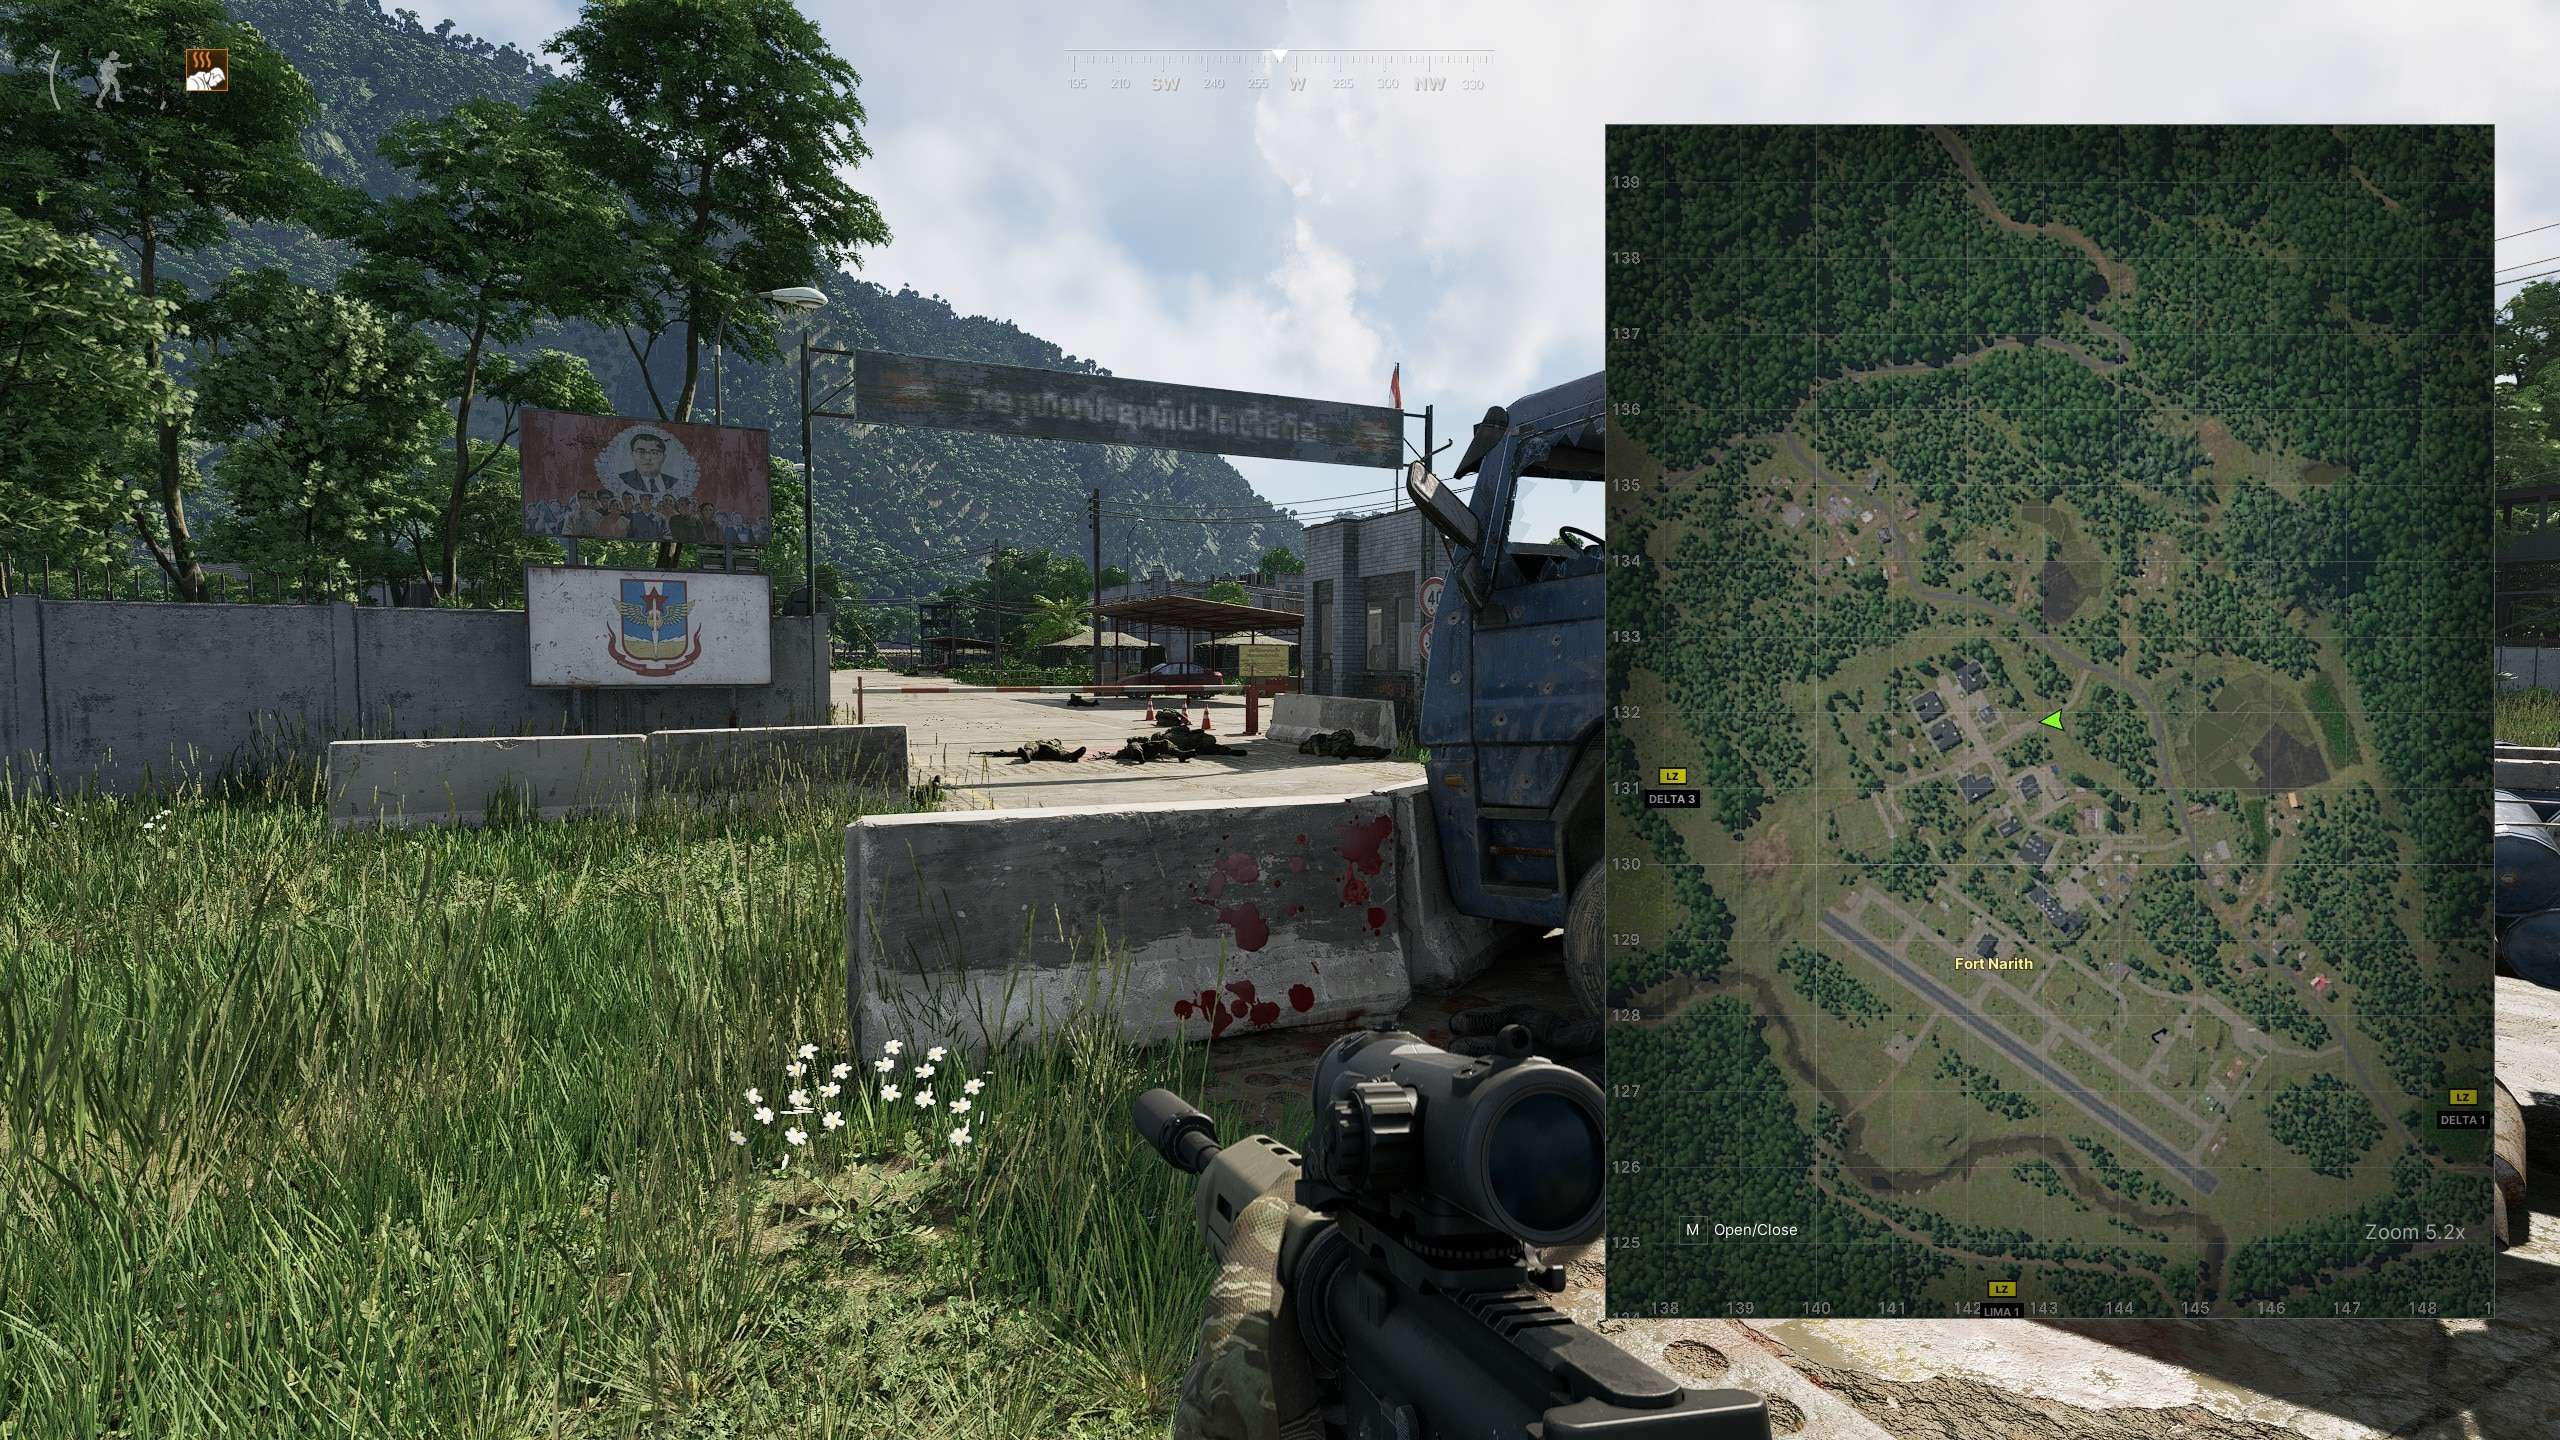
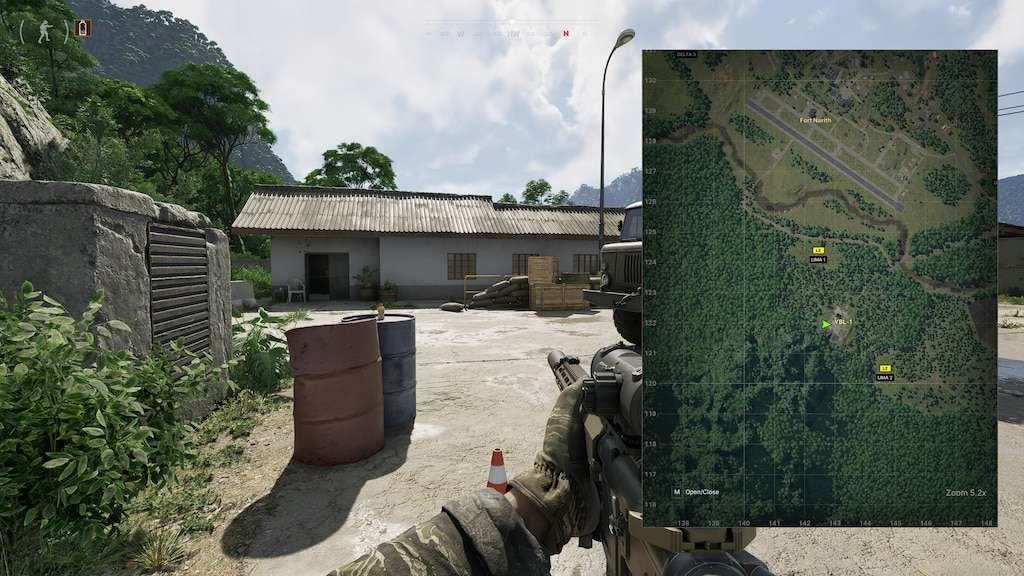
All Tasks Locations (Crimson)
By Swoll.
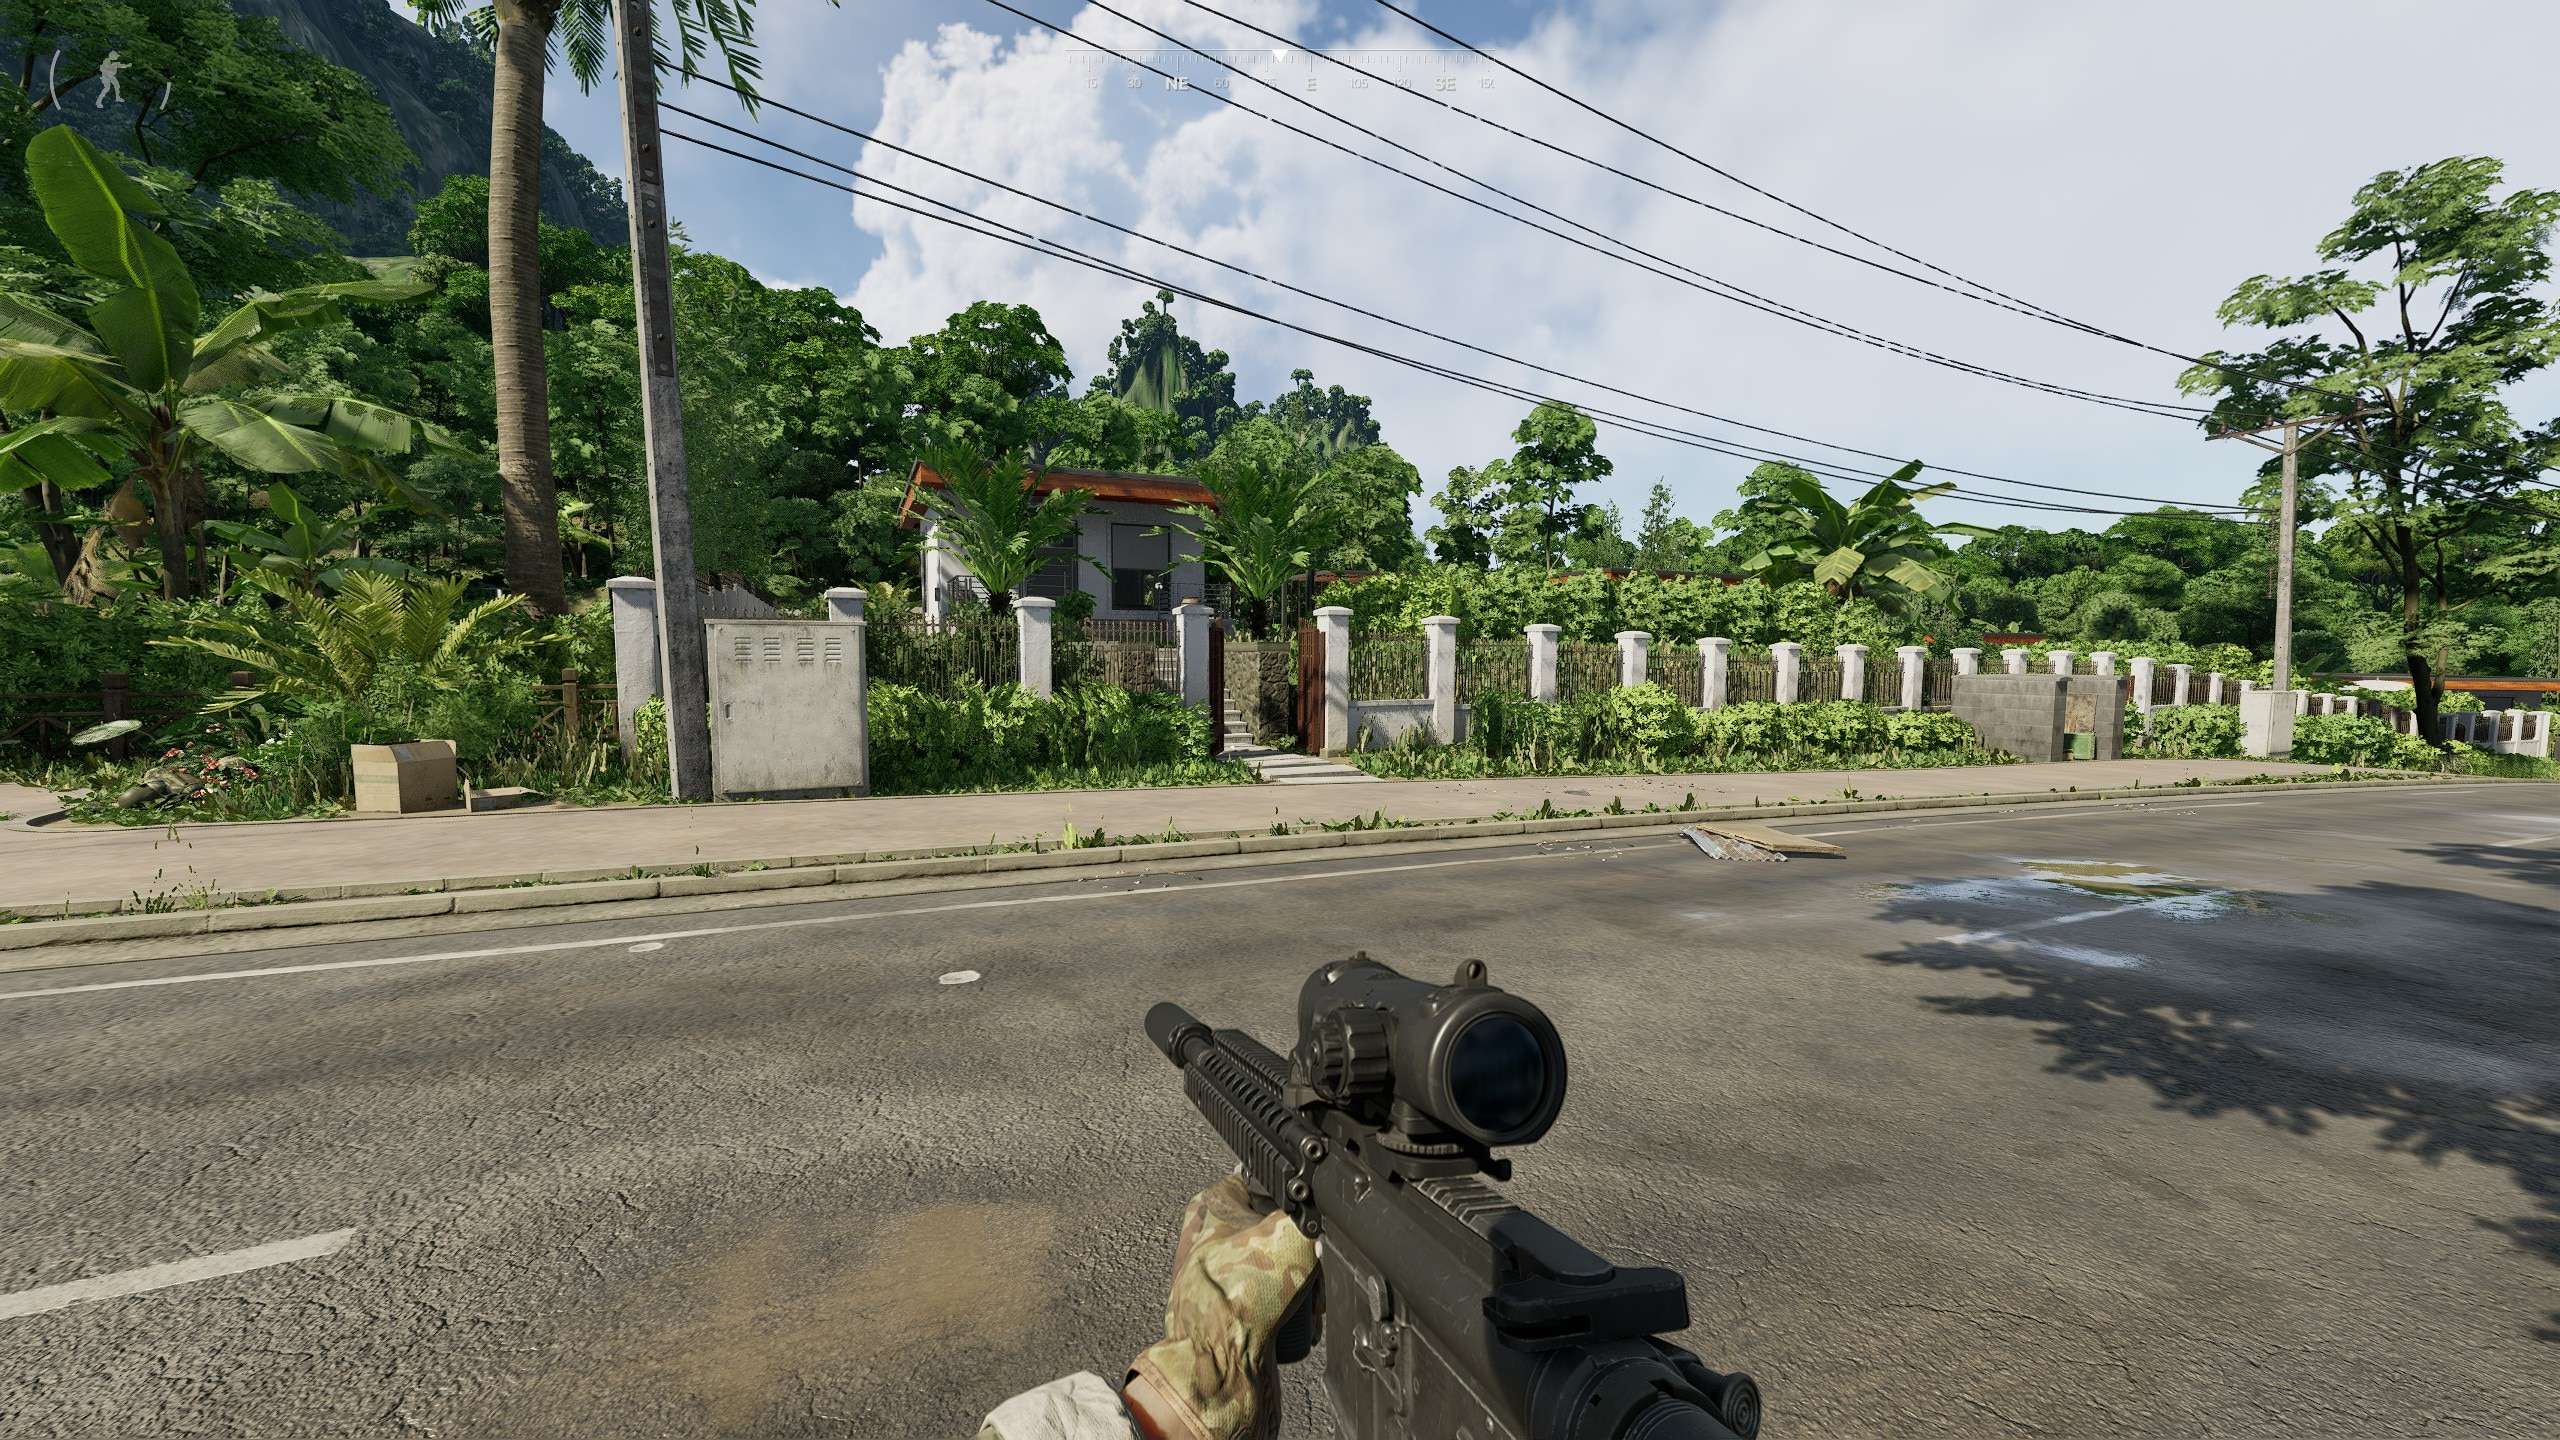
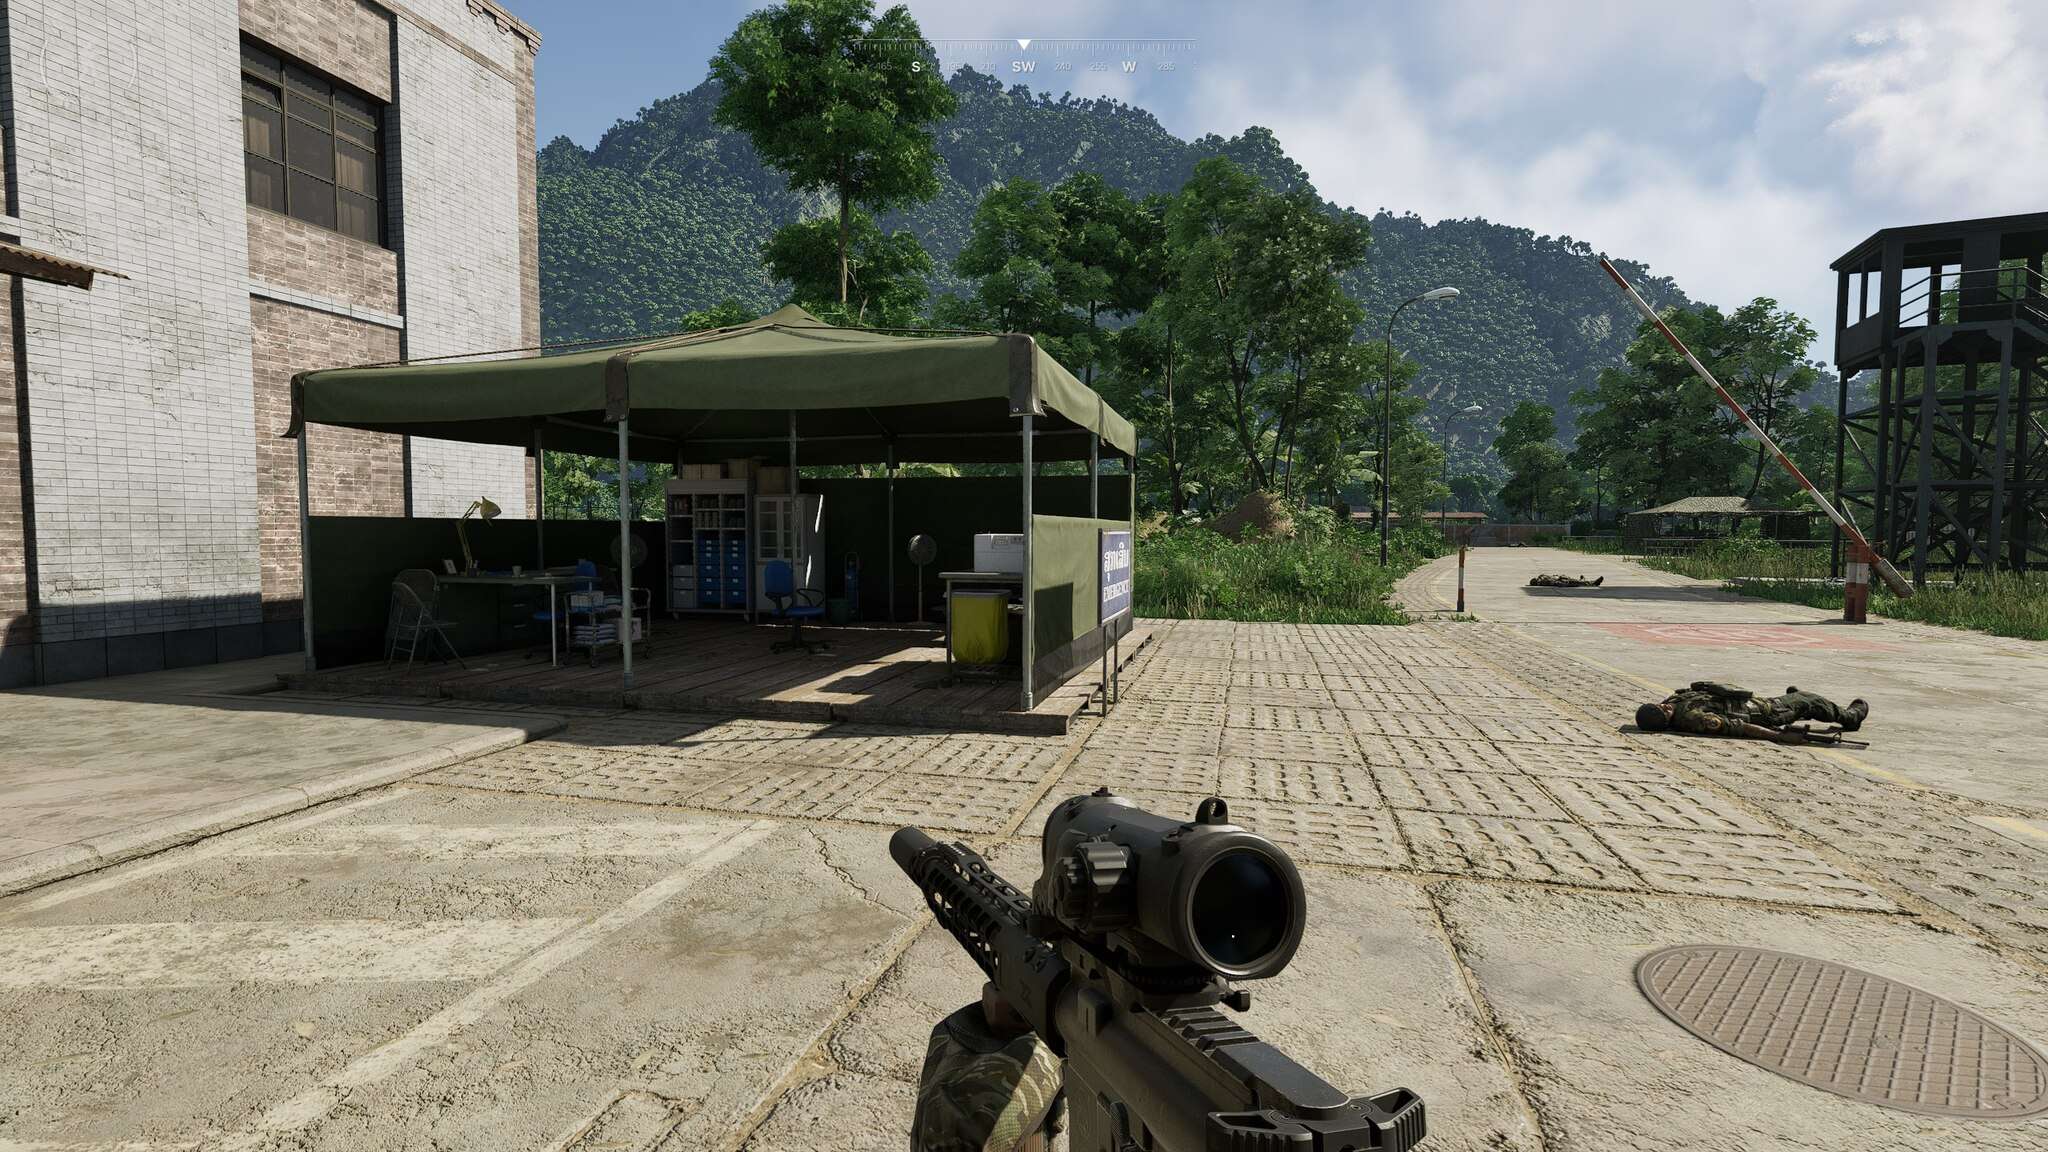
All the key drops are random and can be looted from bots that spawn in the same area. And check this out, the towns for all factions – Kiu Vongsa, Pha Lang, and Nam Thaven – are basically identical, just rotated around. Oh, and after completing mission 16, the locations are fixed for everyone.
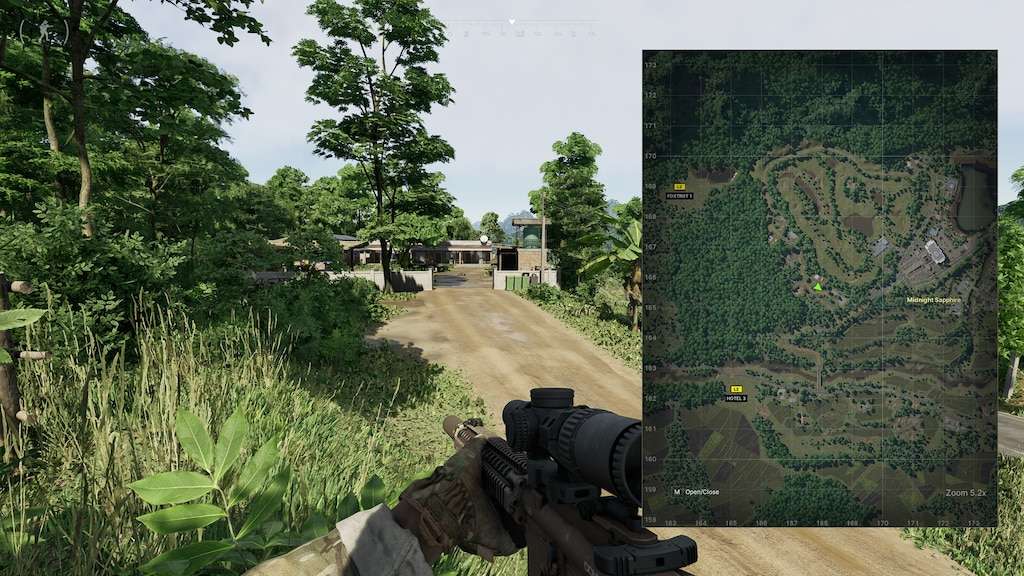
First Recon
#1: First Recon
- First Recon Demolished Building Location – 141 165
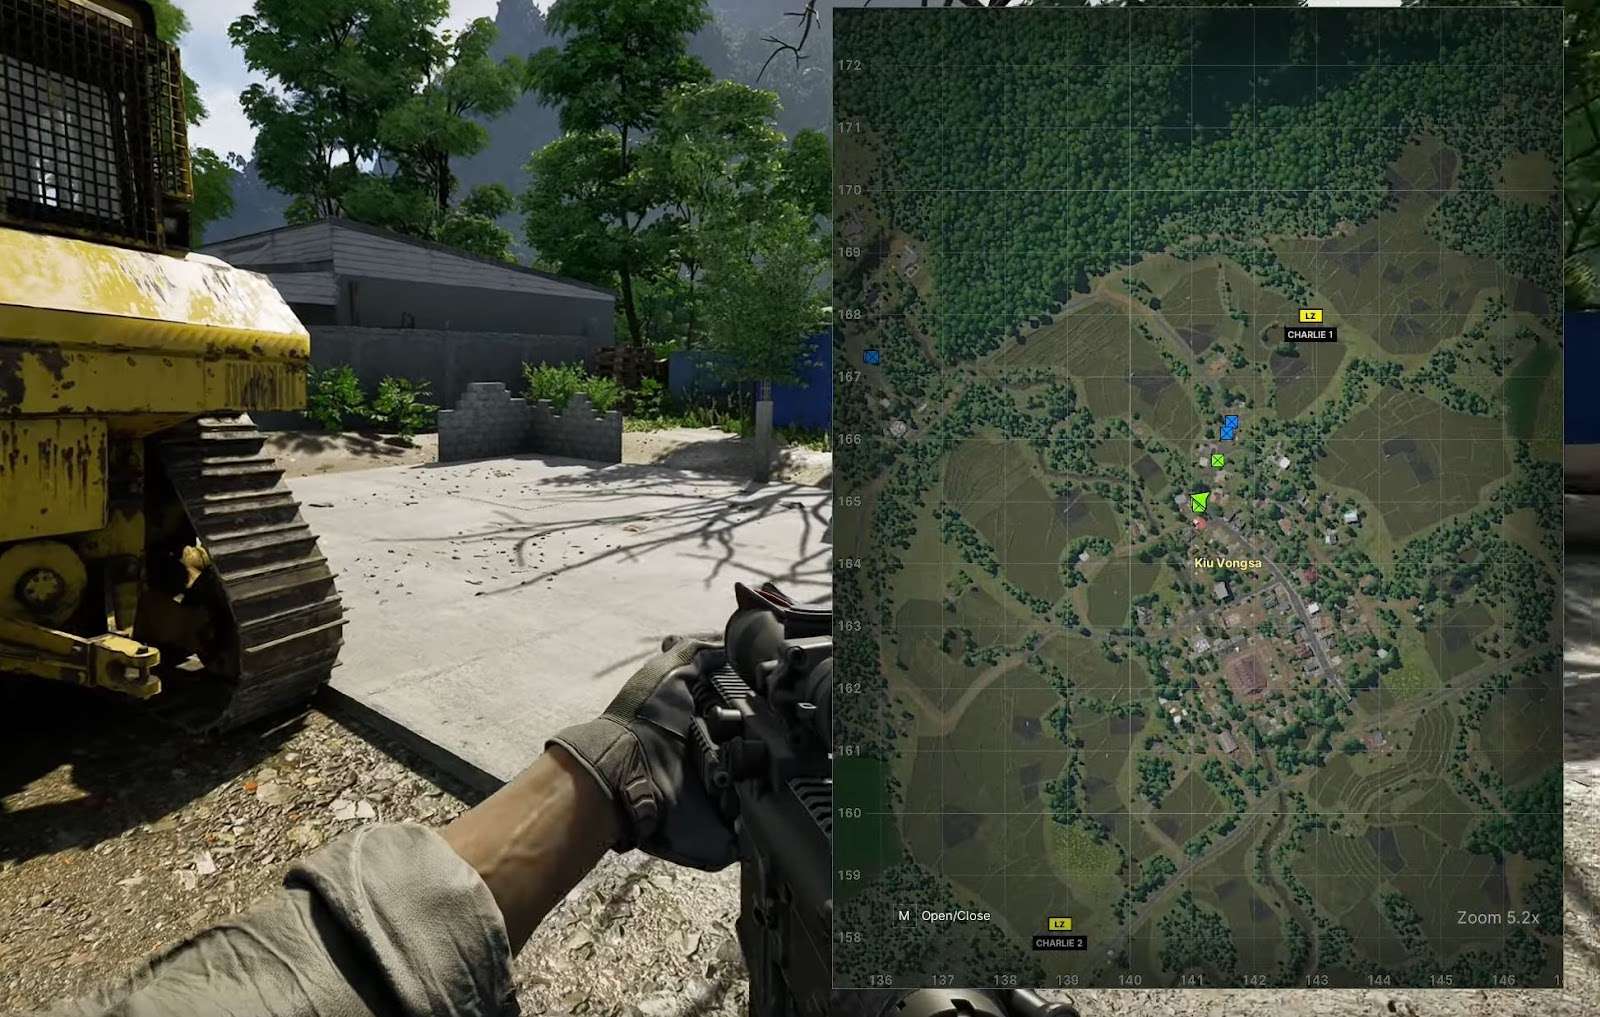
- First Recon Convenience Store Location – 141 162

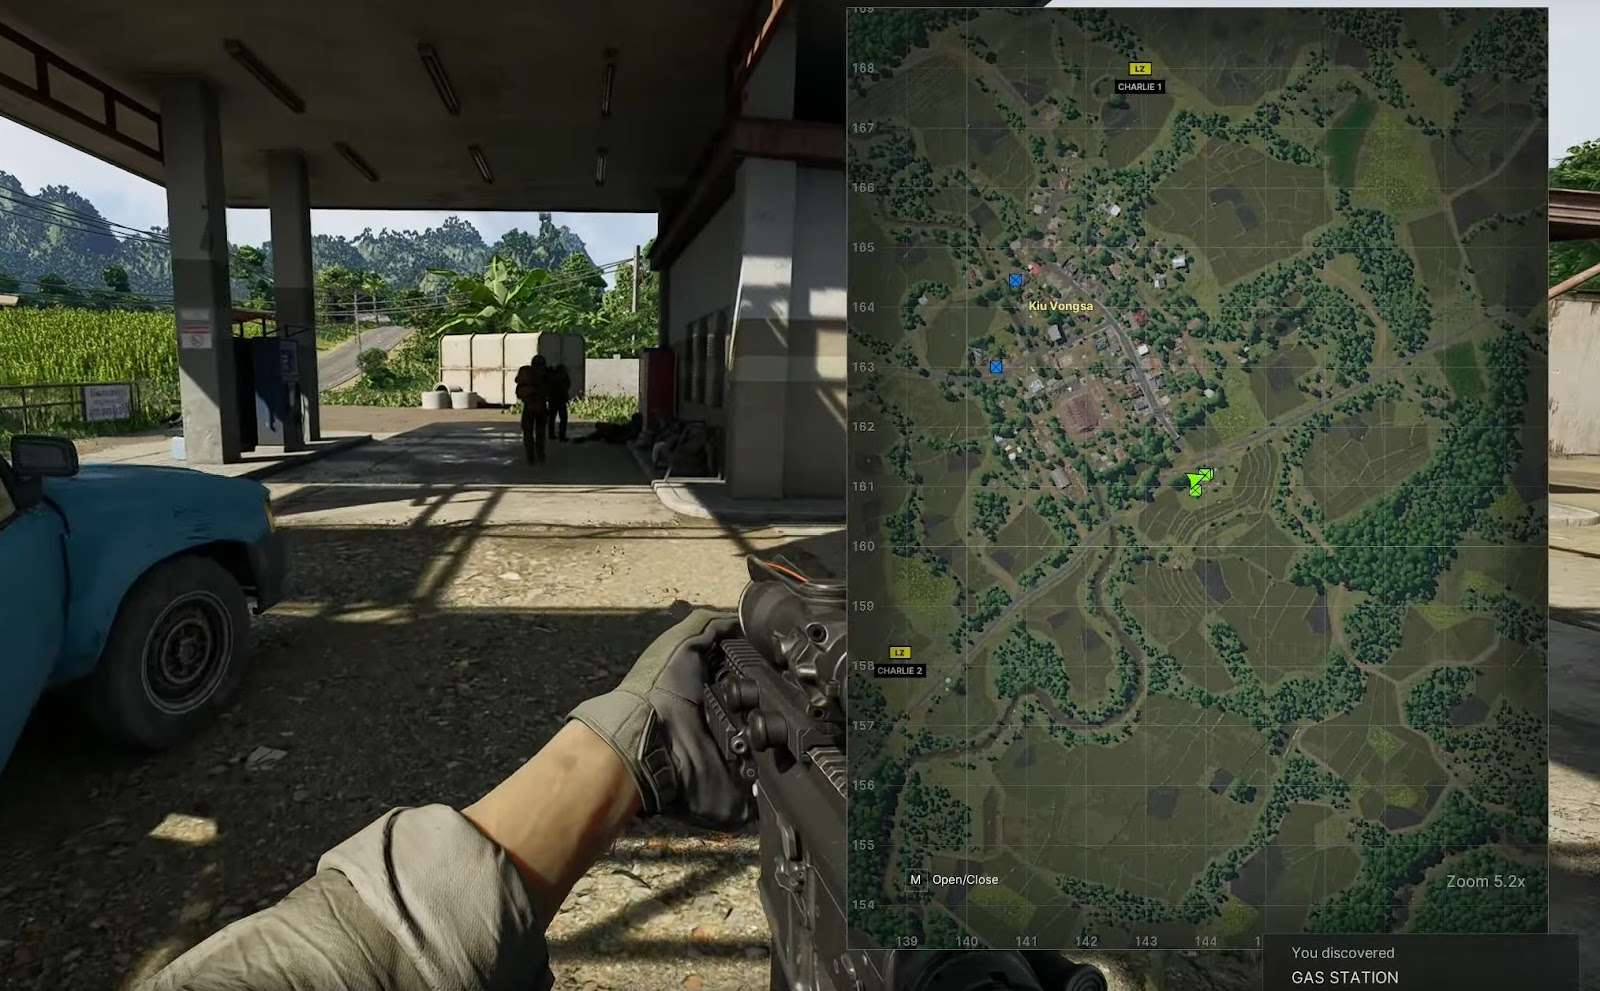
- First Recon Gas Station Location – 144 161
Cache Retrieval
#2: Cache Retrieval
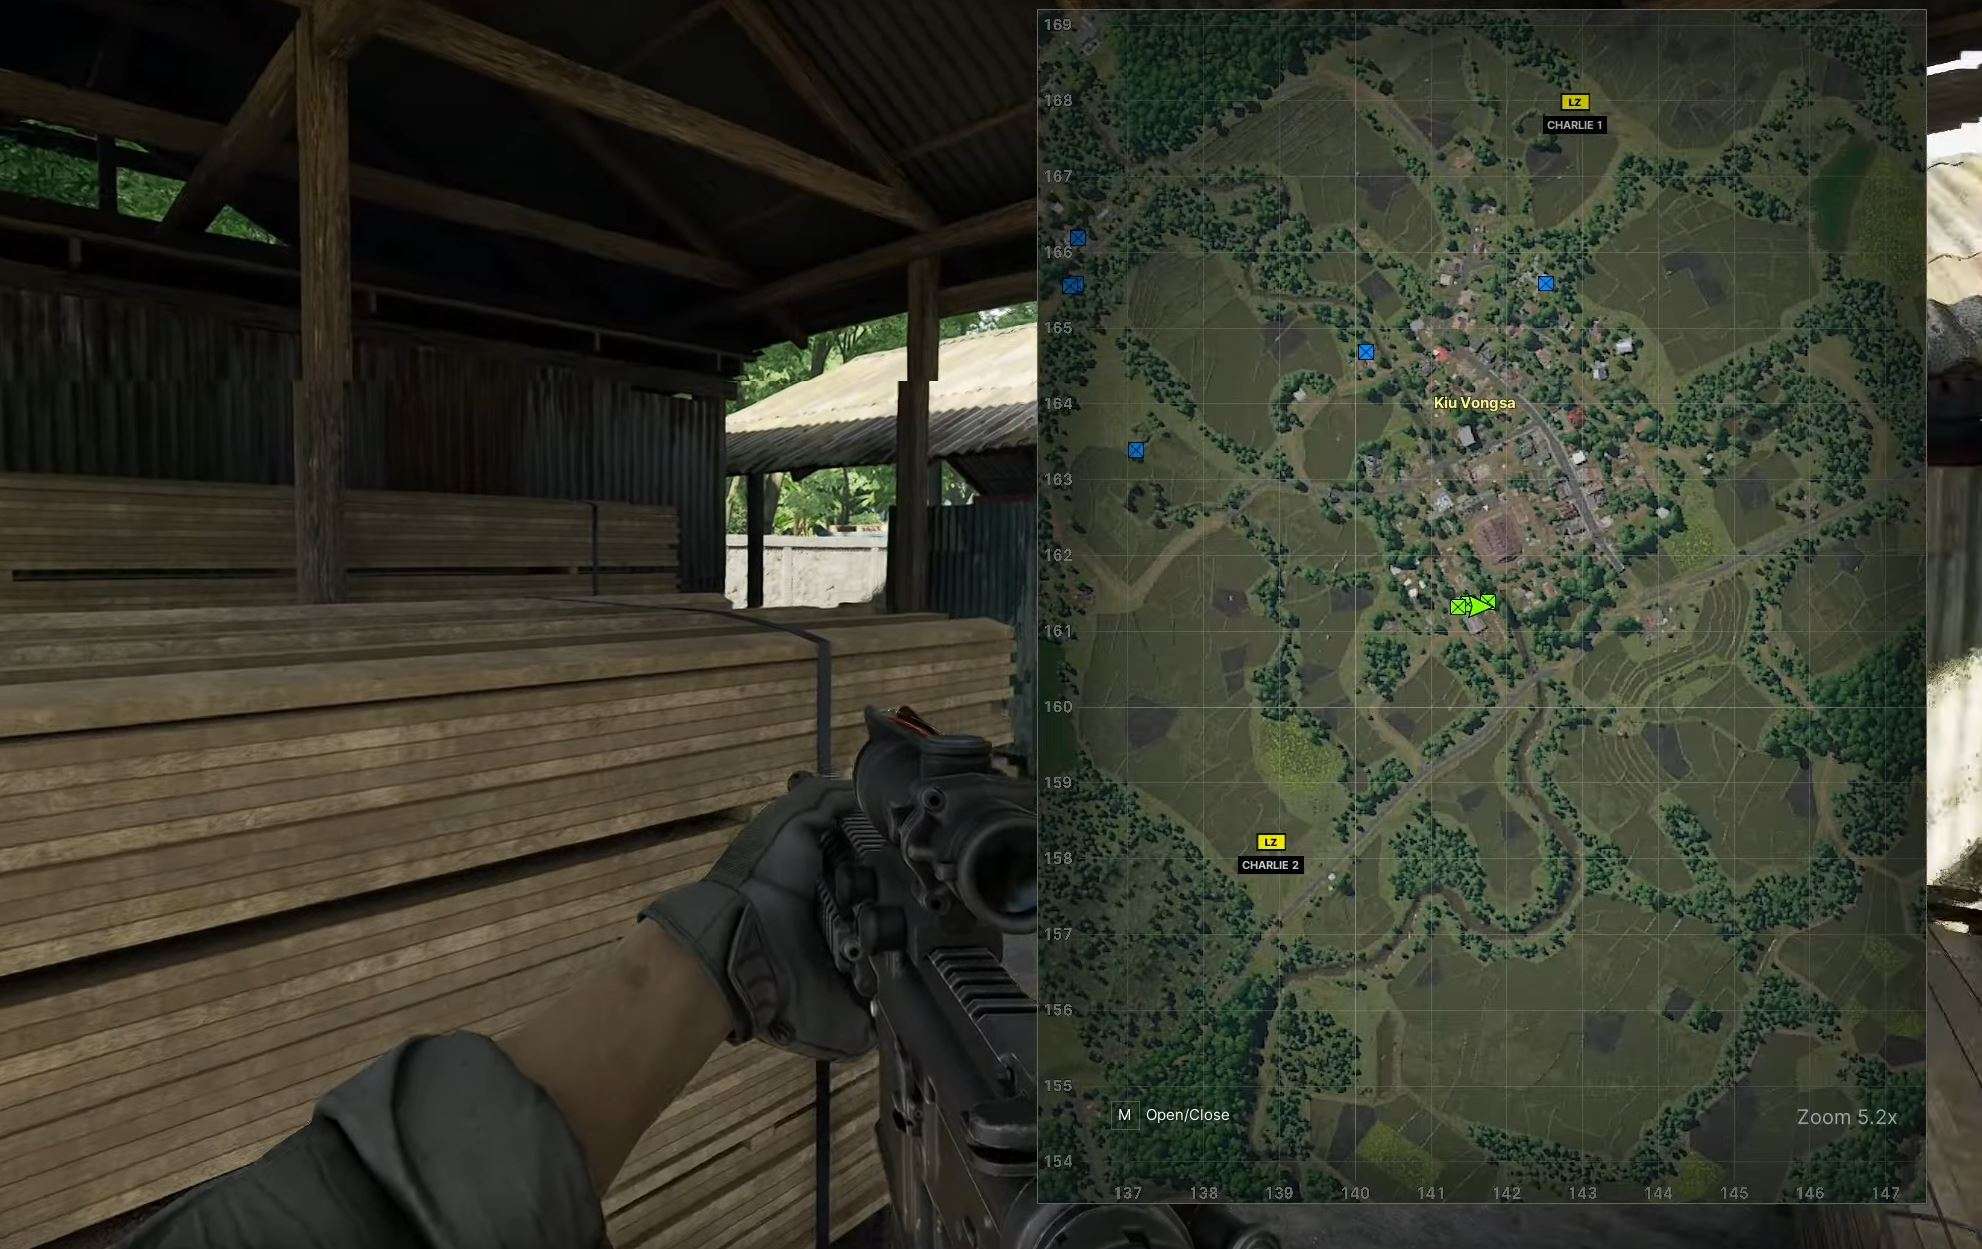
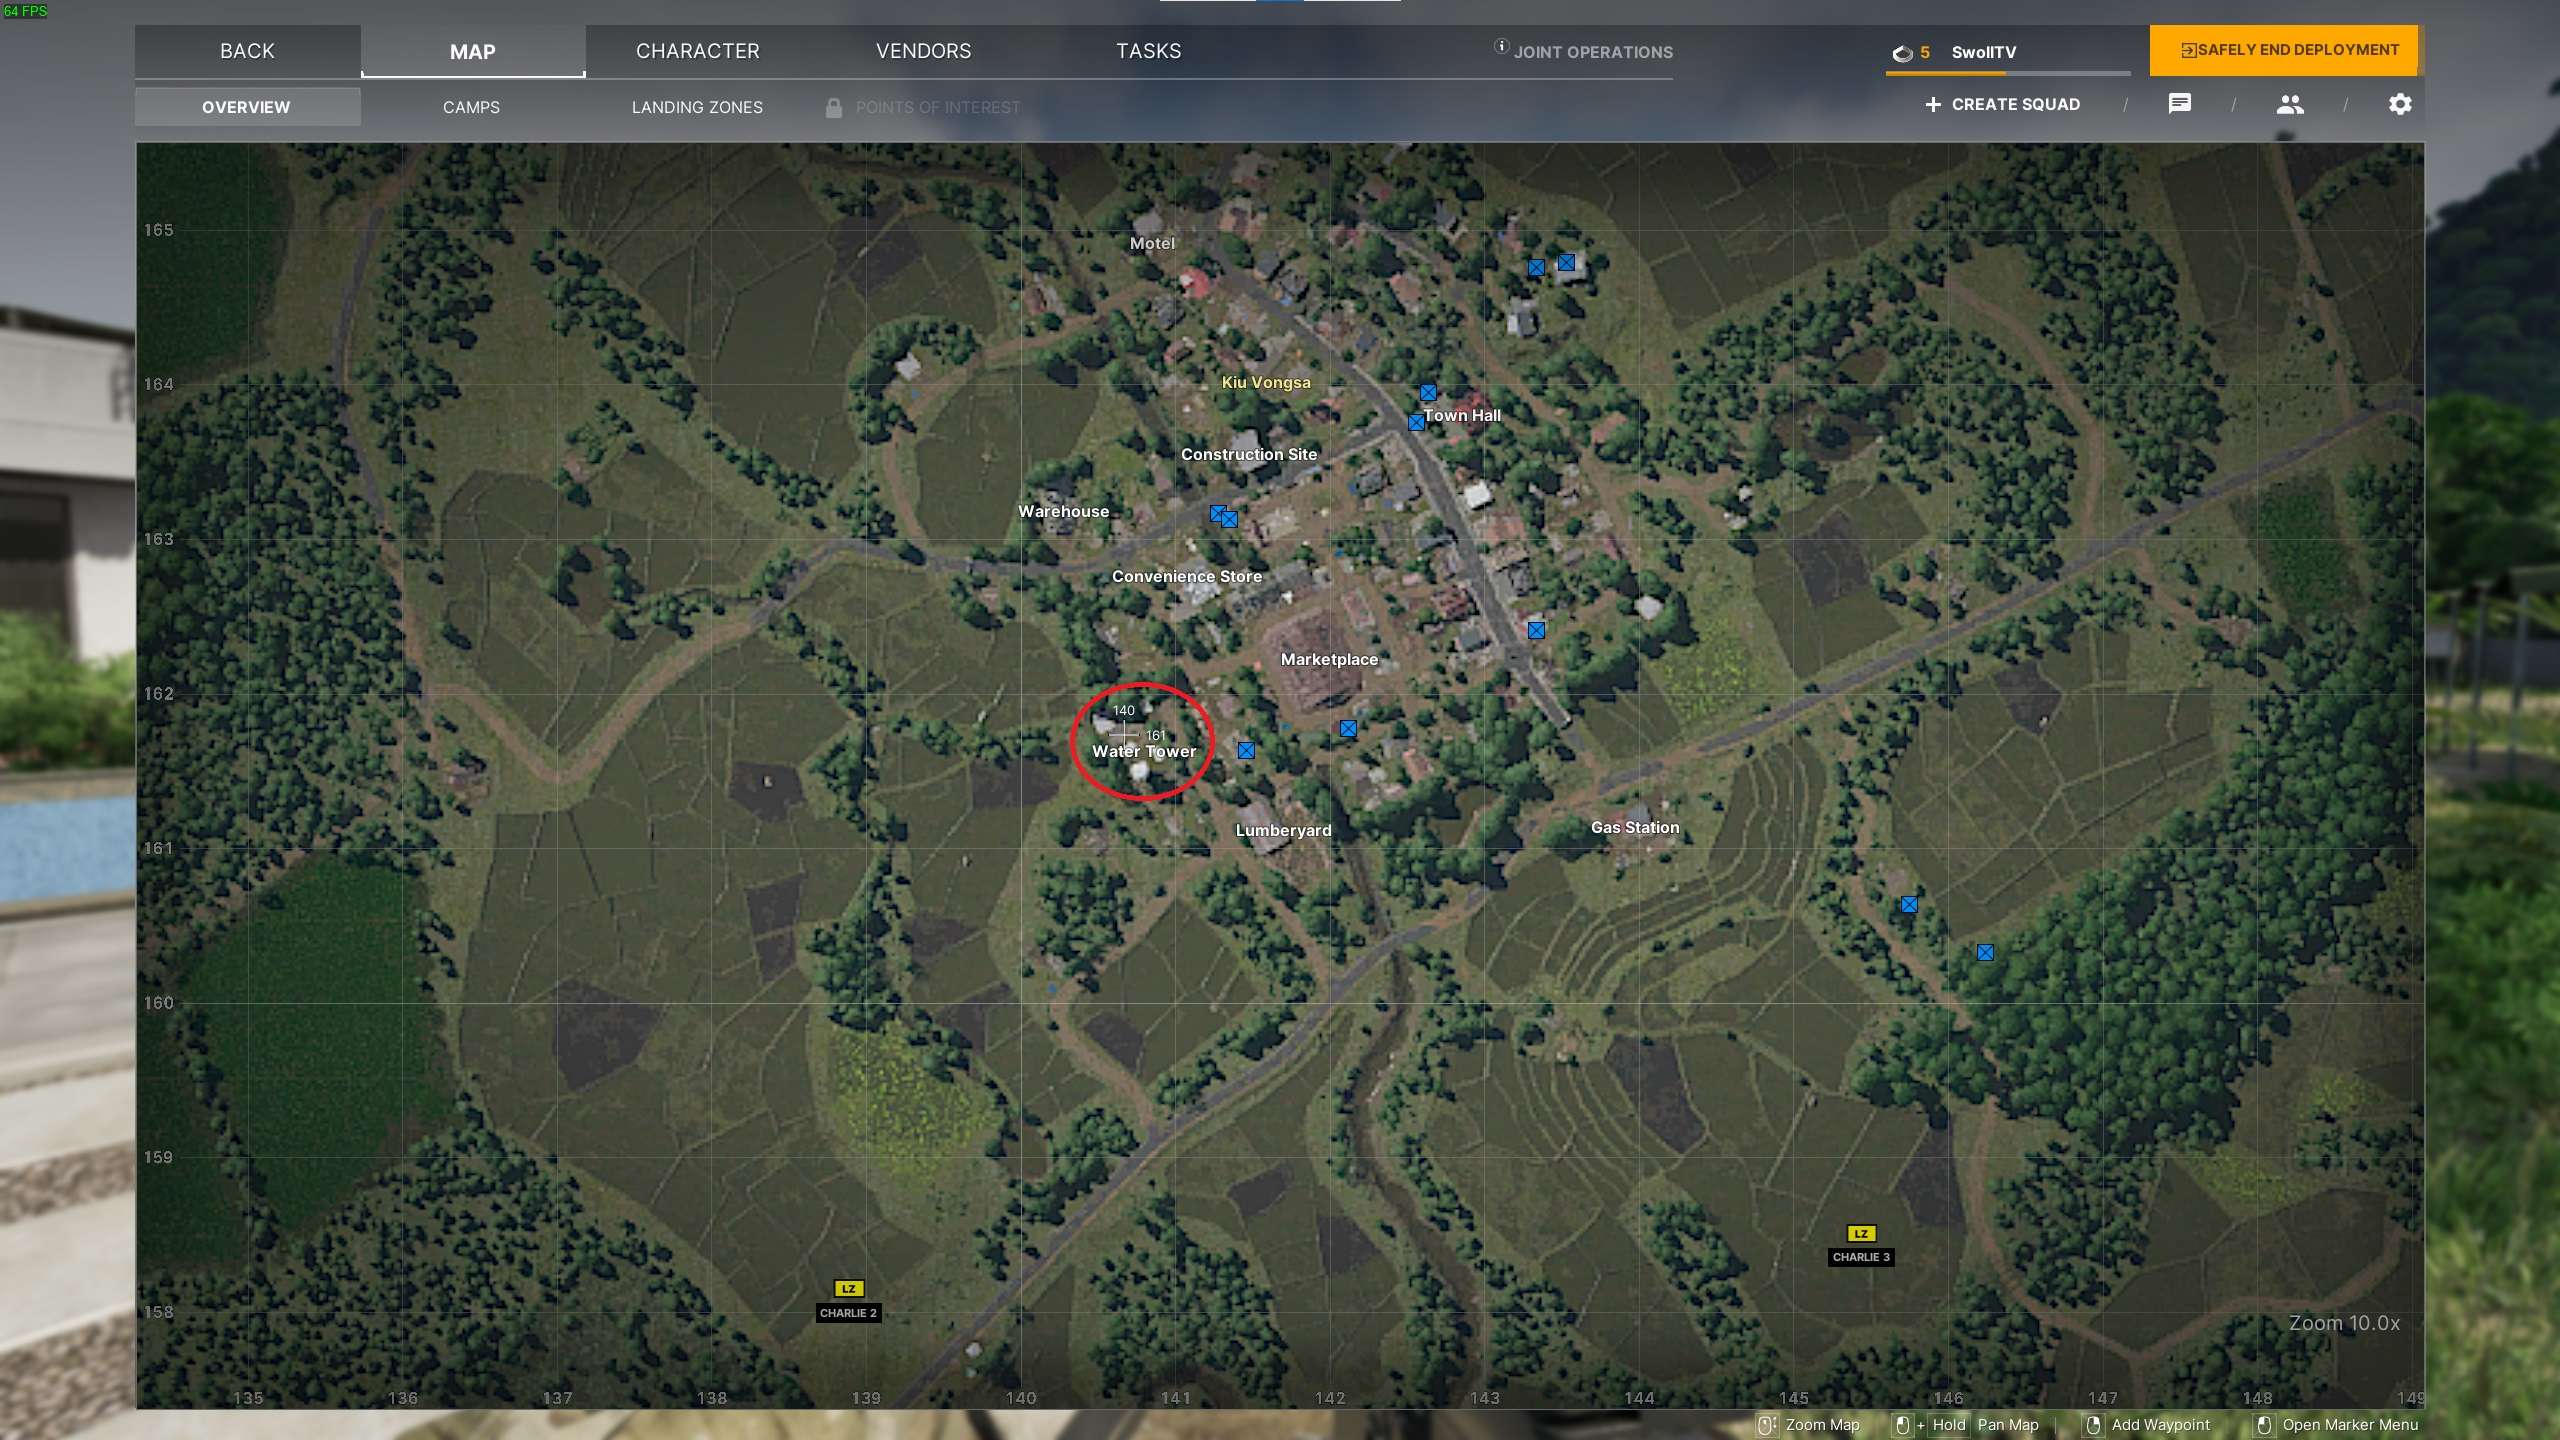
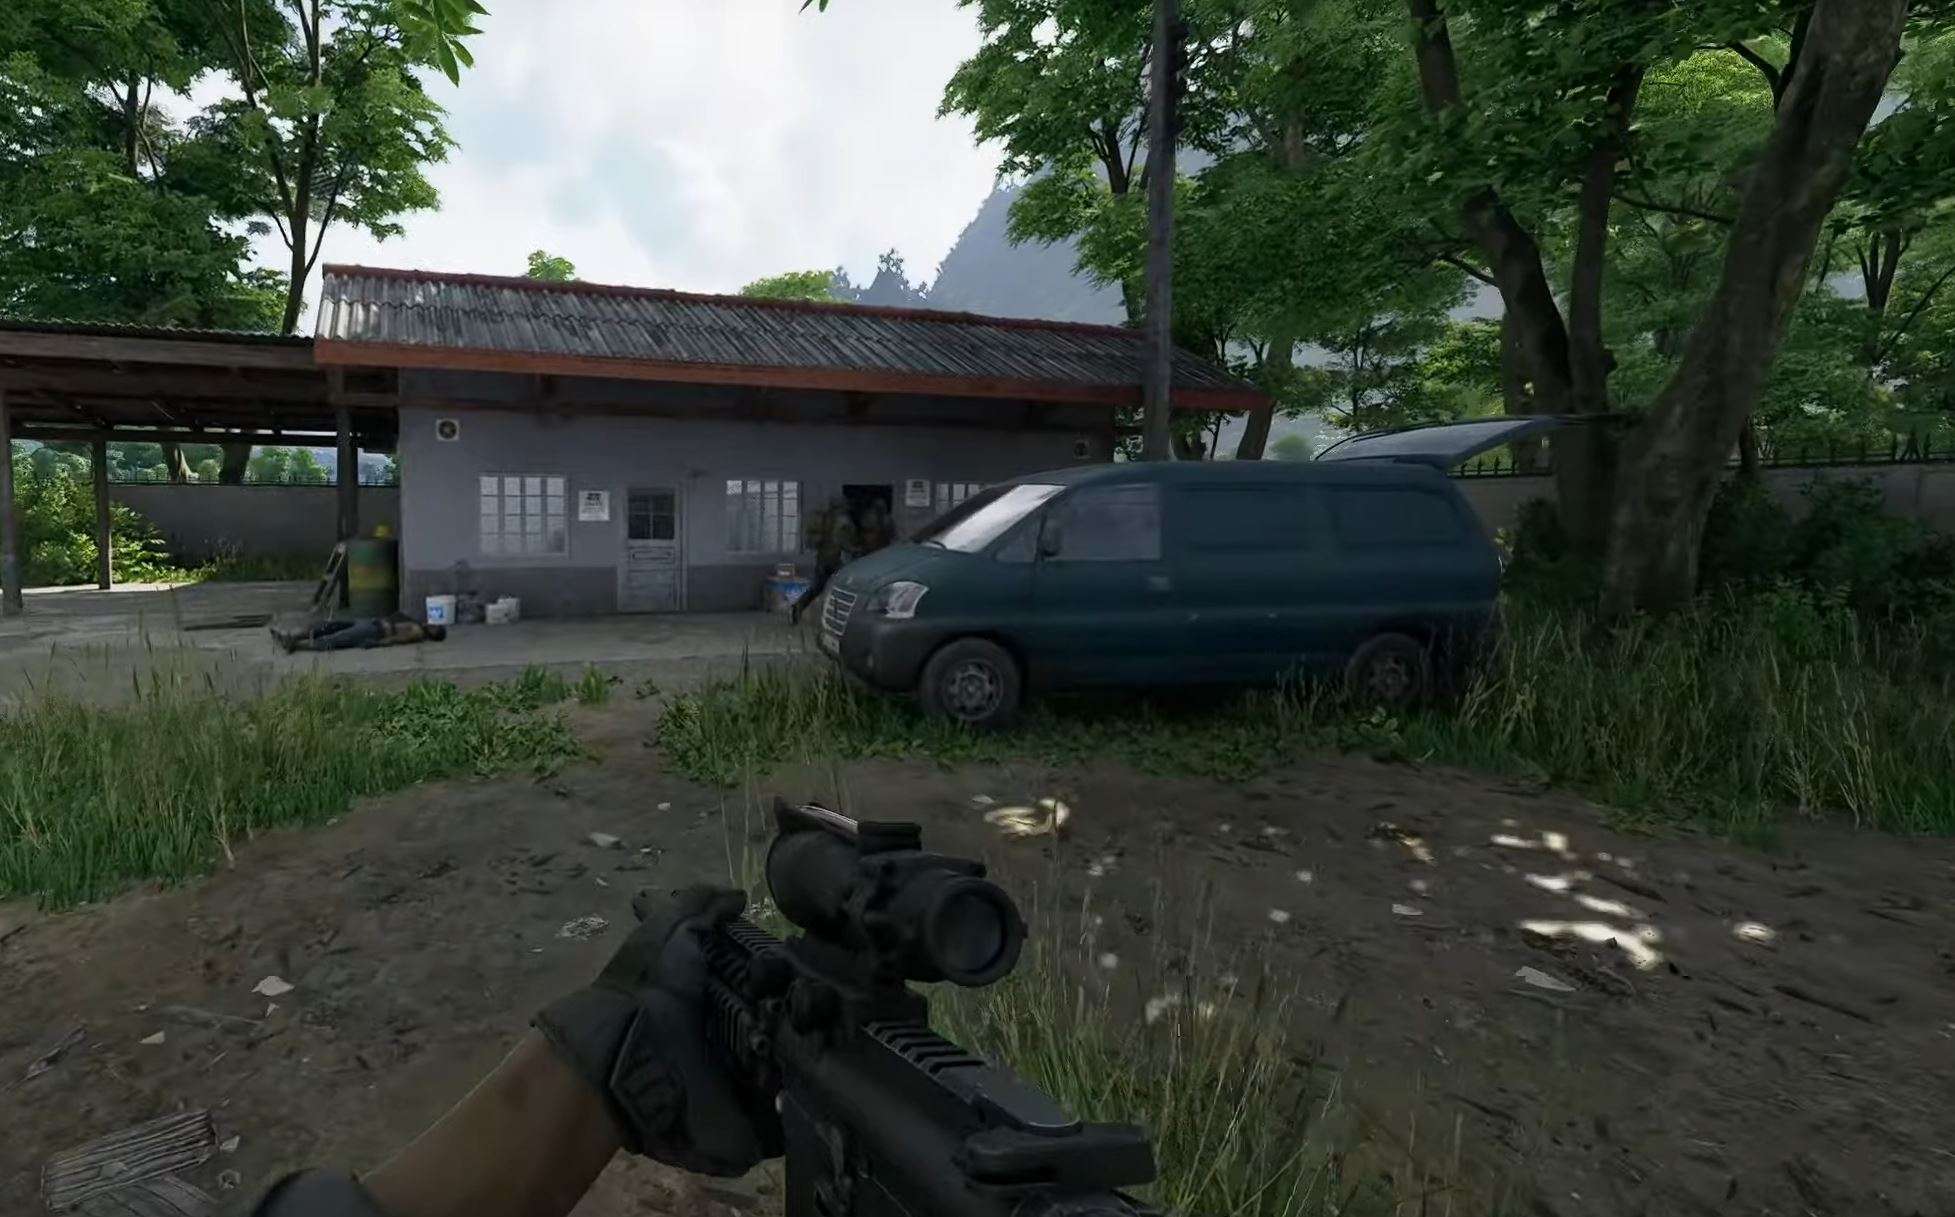
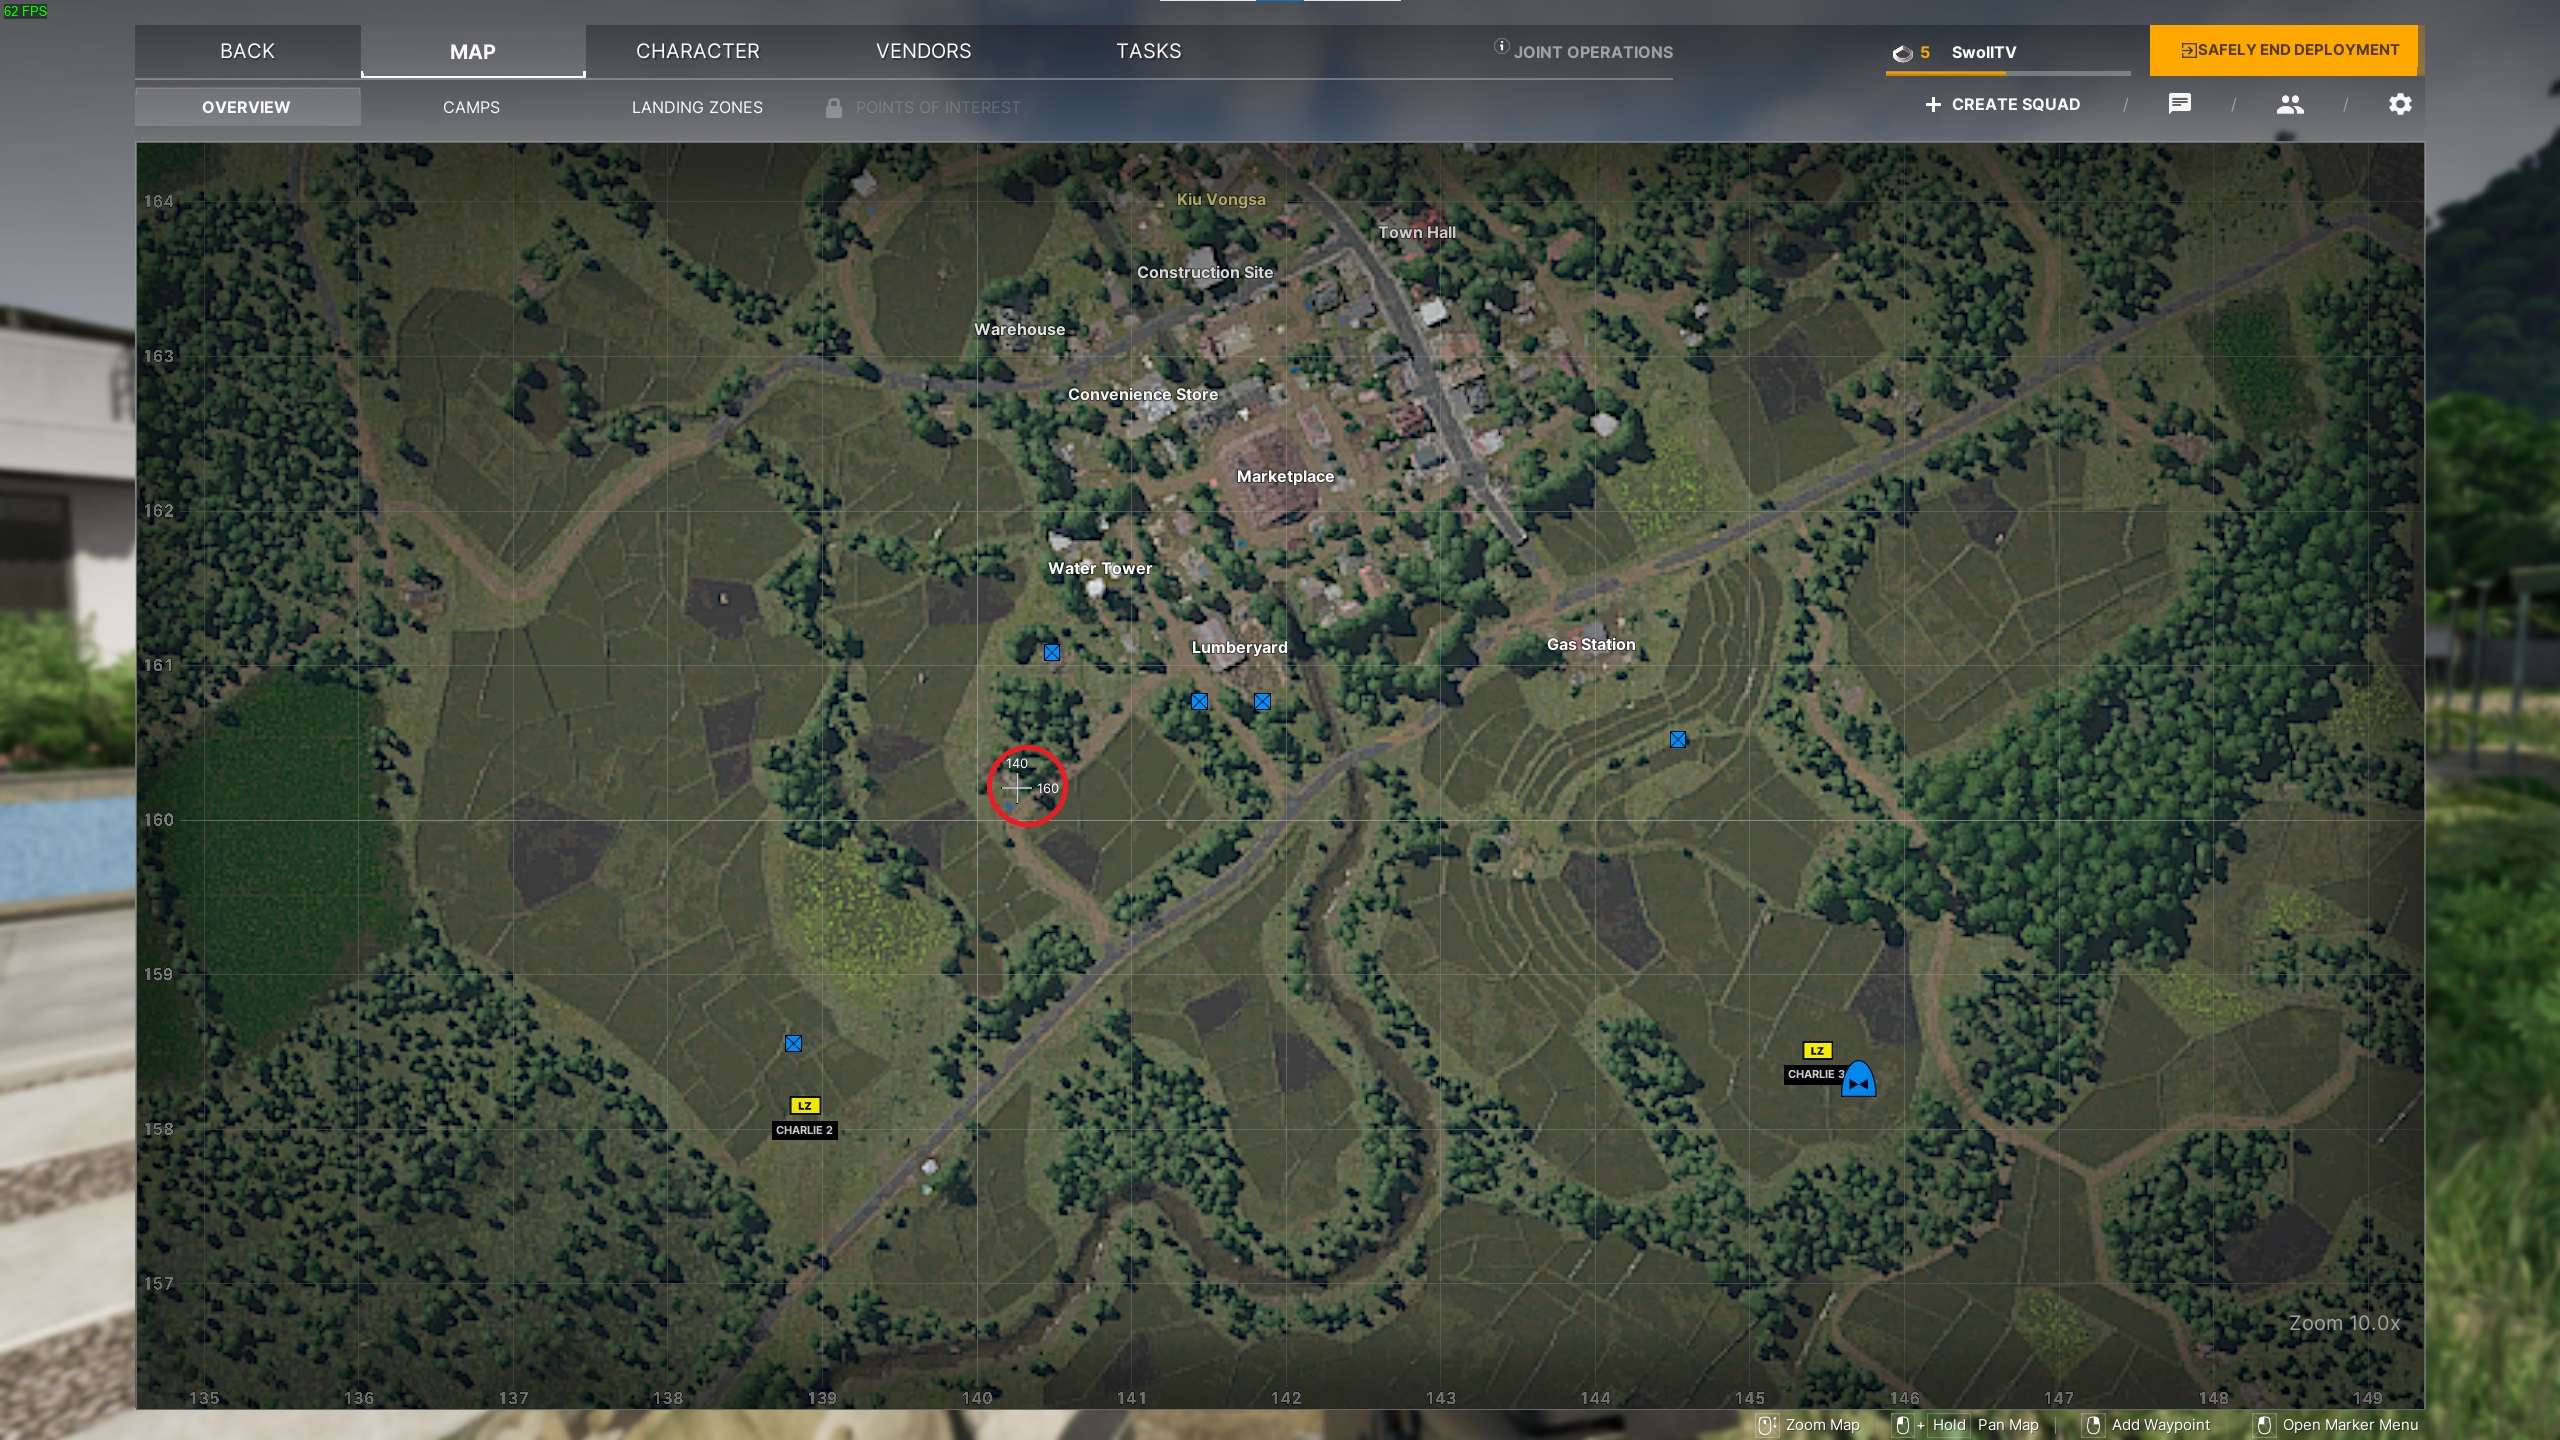
- Cache Retrieval Warehouse Location – 140 163
- Cache Retrieval Lumber Yard Location – 141 161
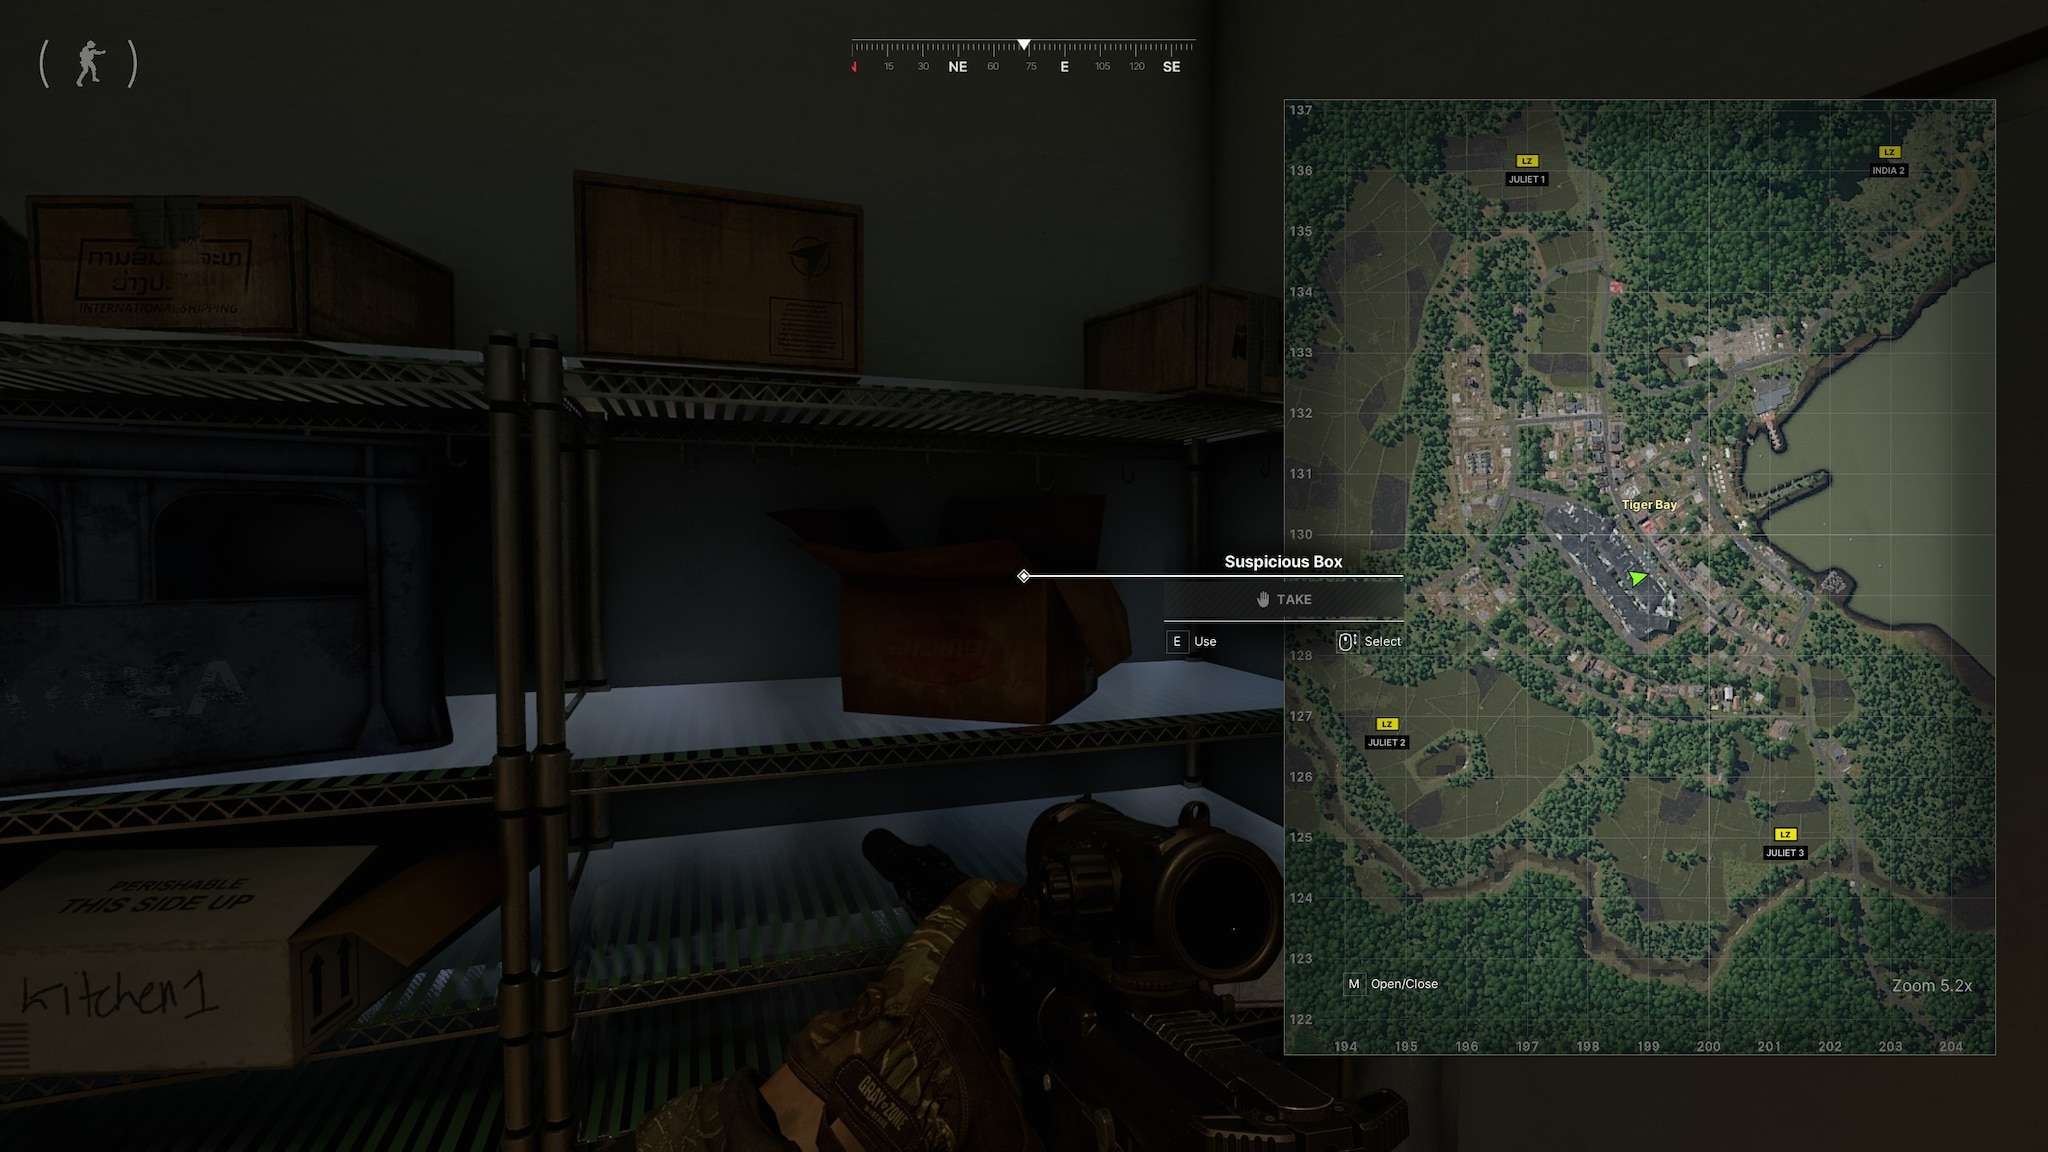
Meds Wanted Medical Supplies
#3: Meds Wanted Medical Supplies
- Meds Wanted Medical Supplies – 140 161

Little Bird Down
#4: Little Bird Down
- Little Bird Down Crashed Heli Location – 145 159
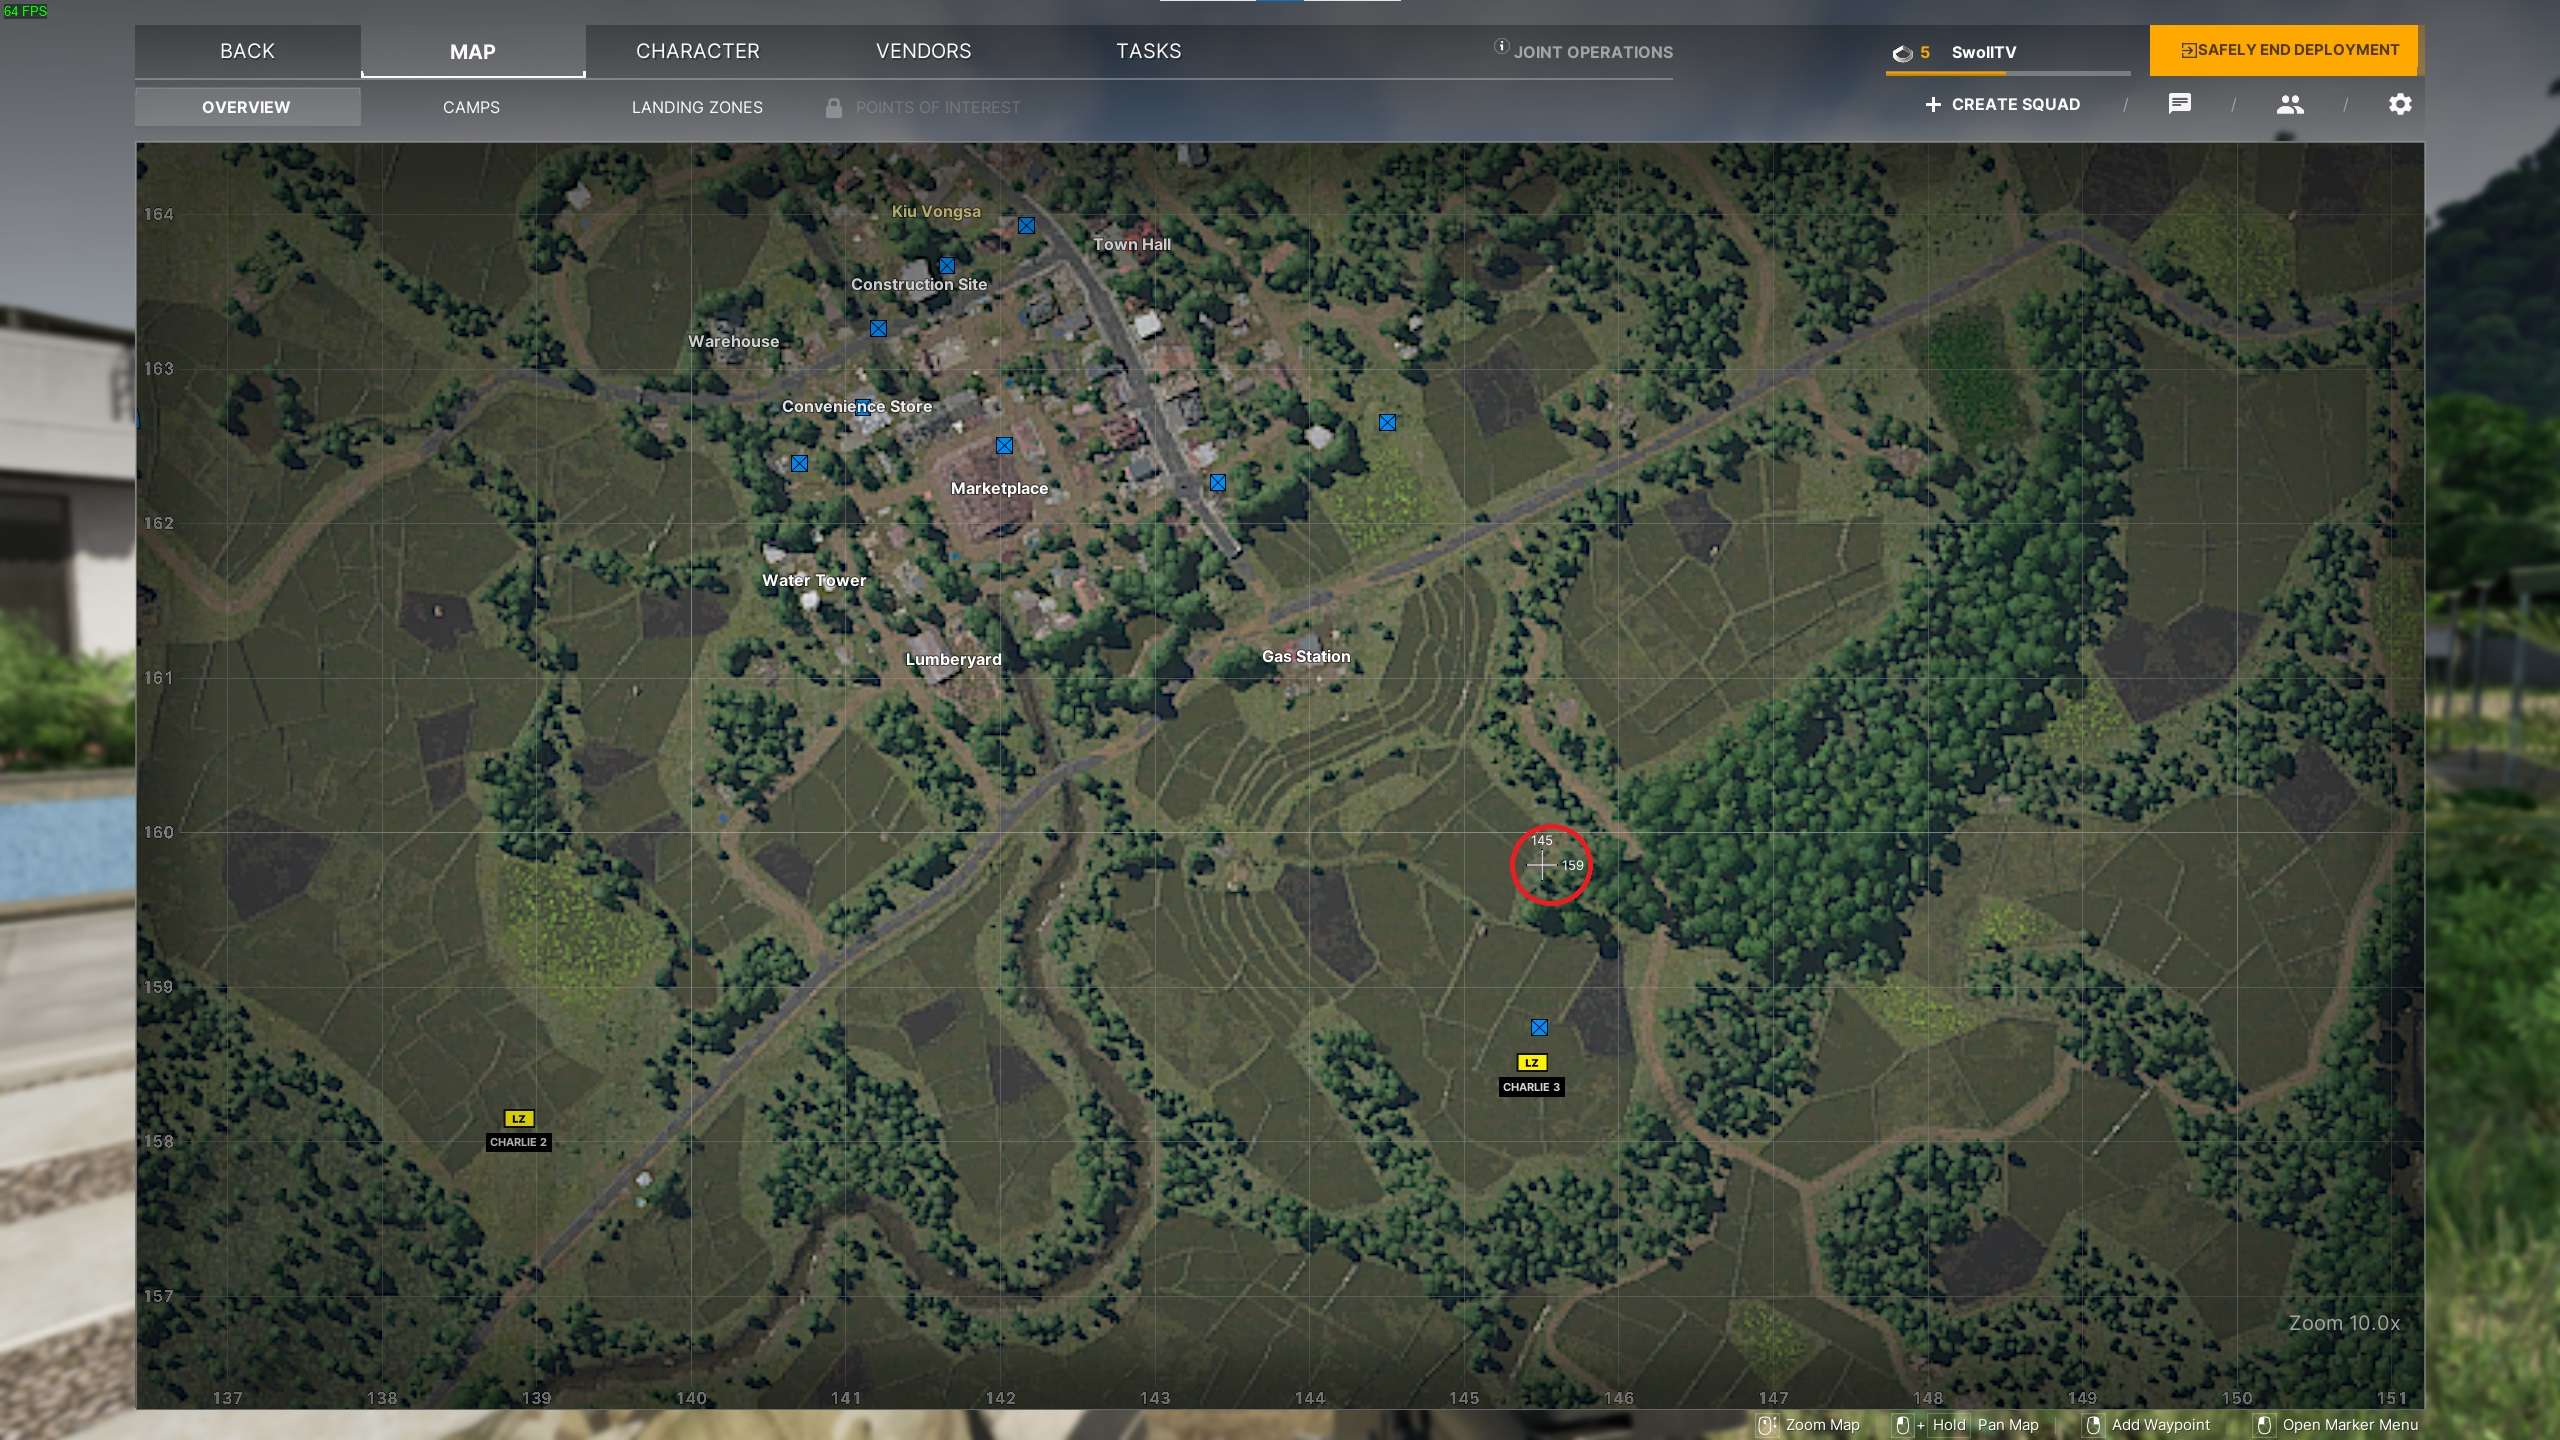
- Little Bird Down Crew Location – 145 160
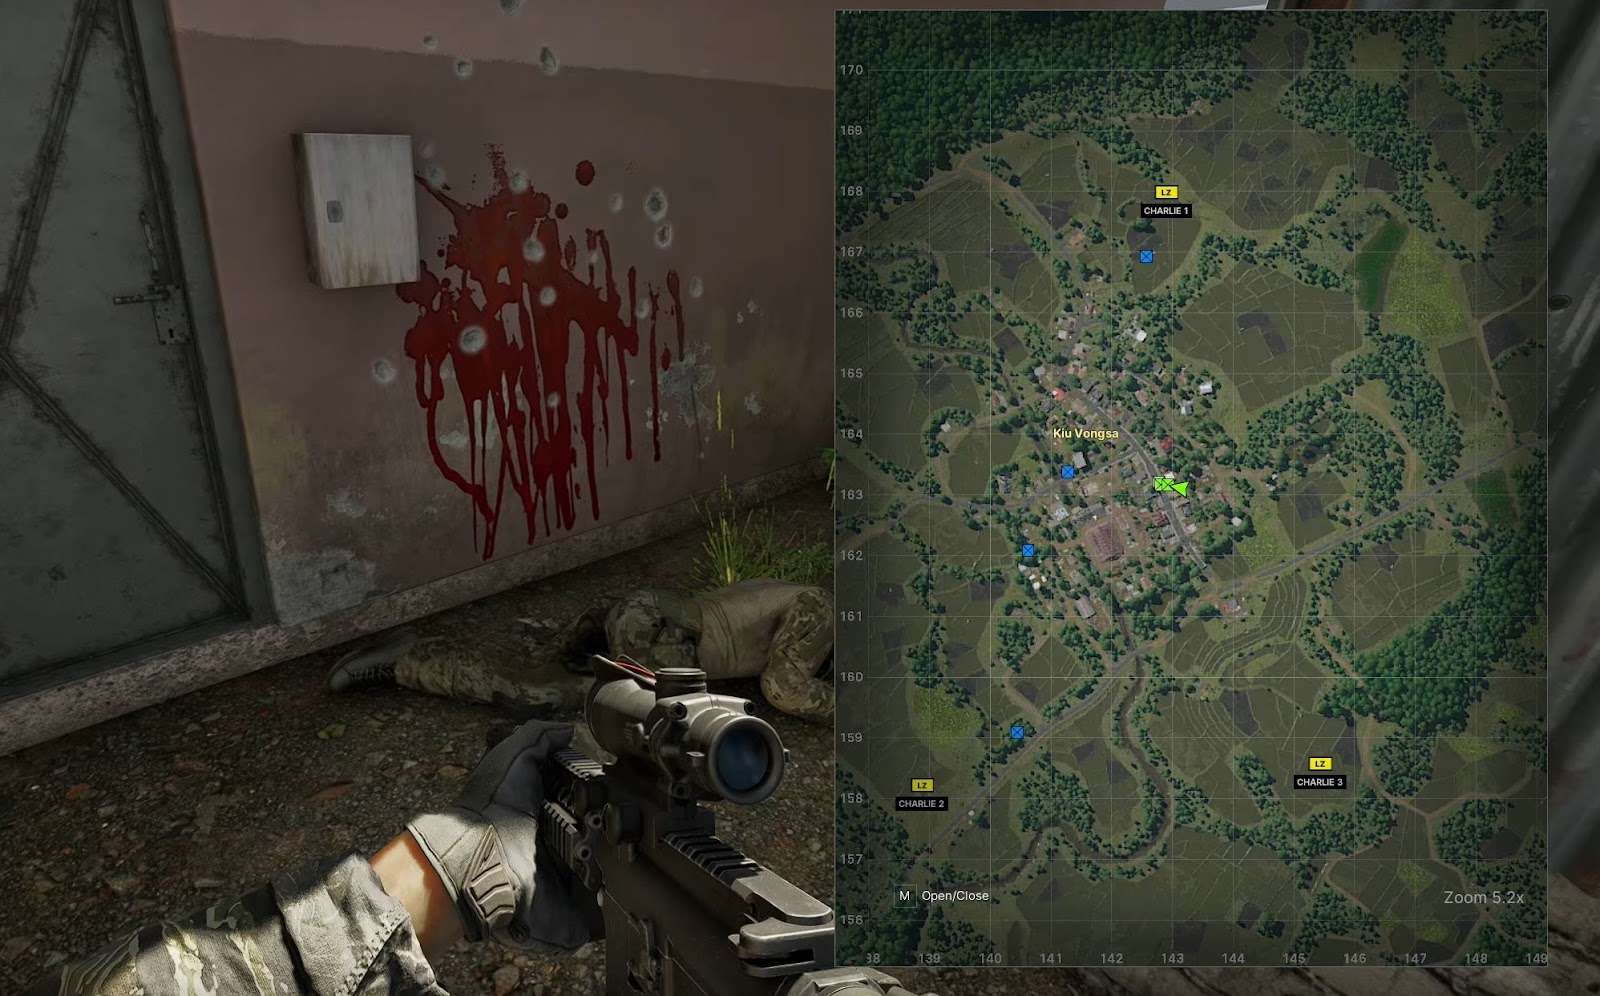
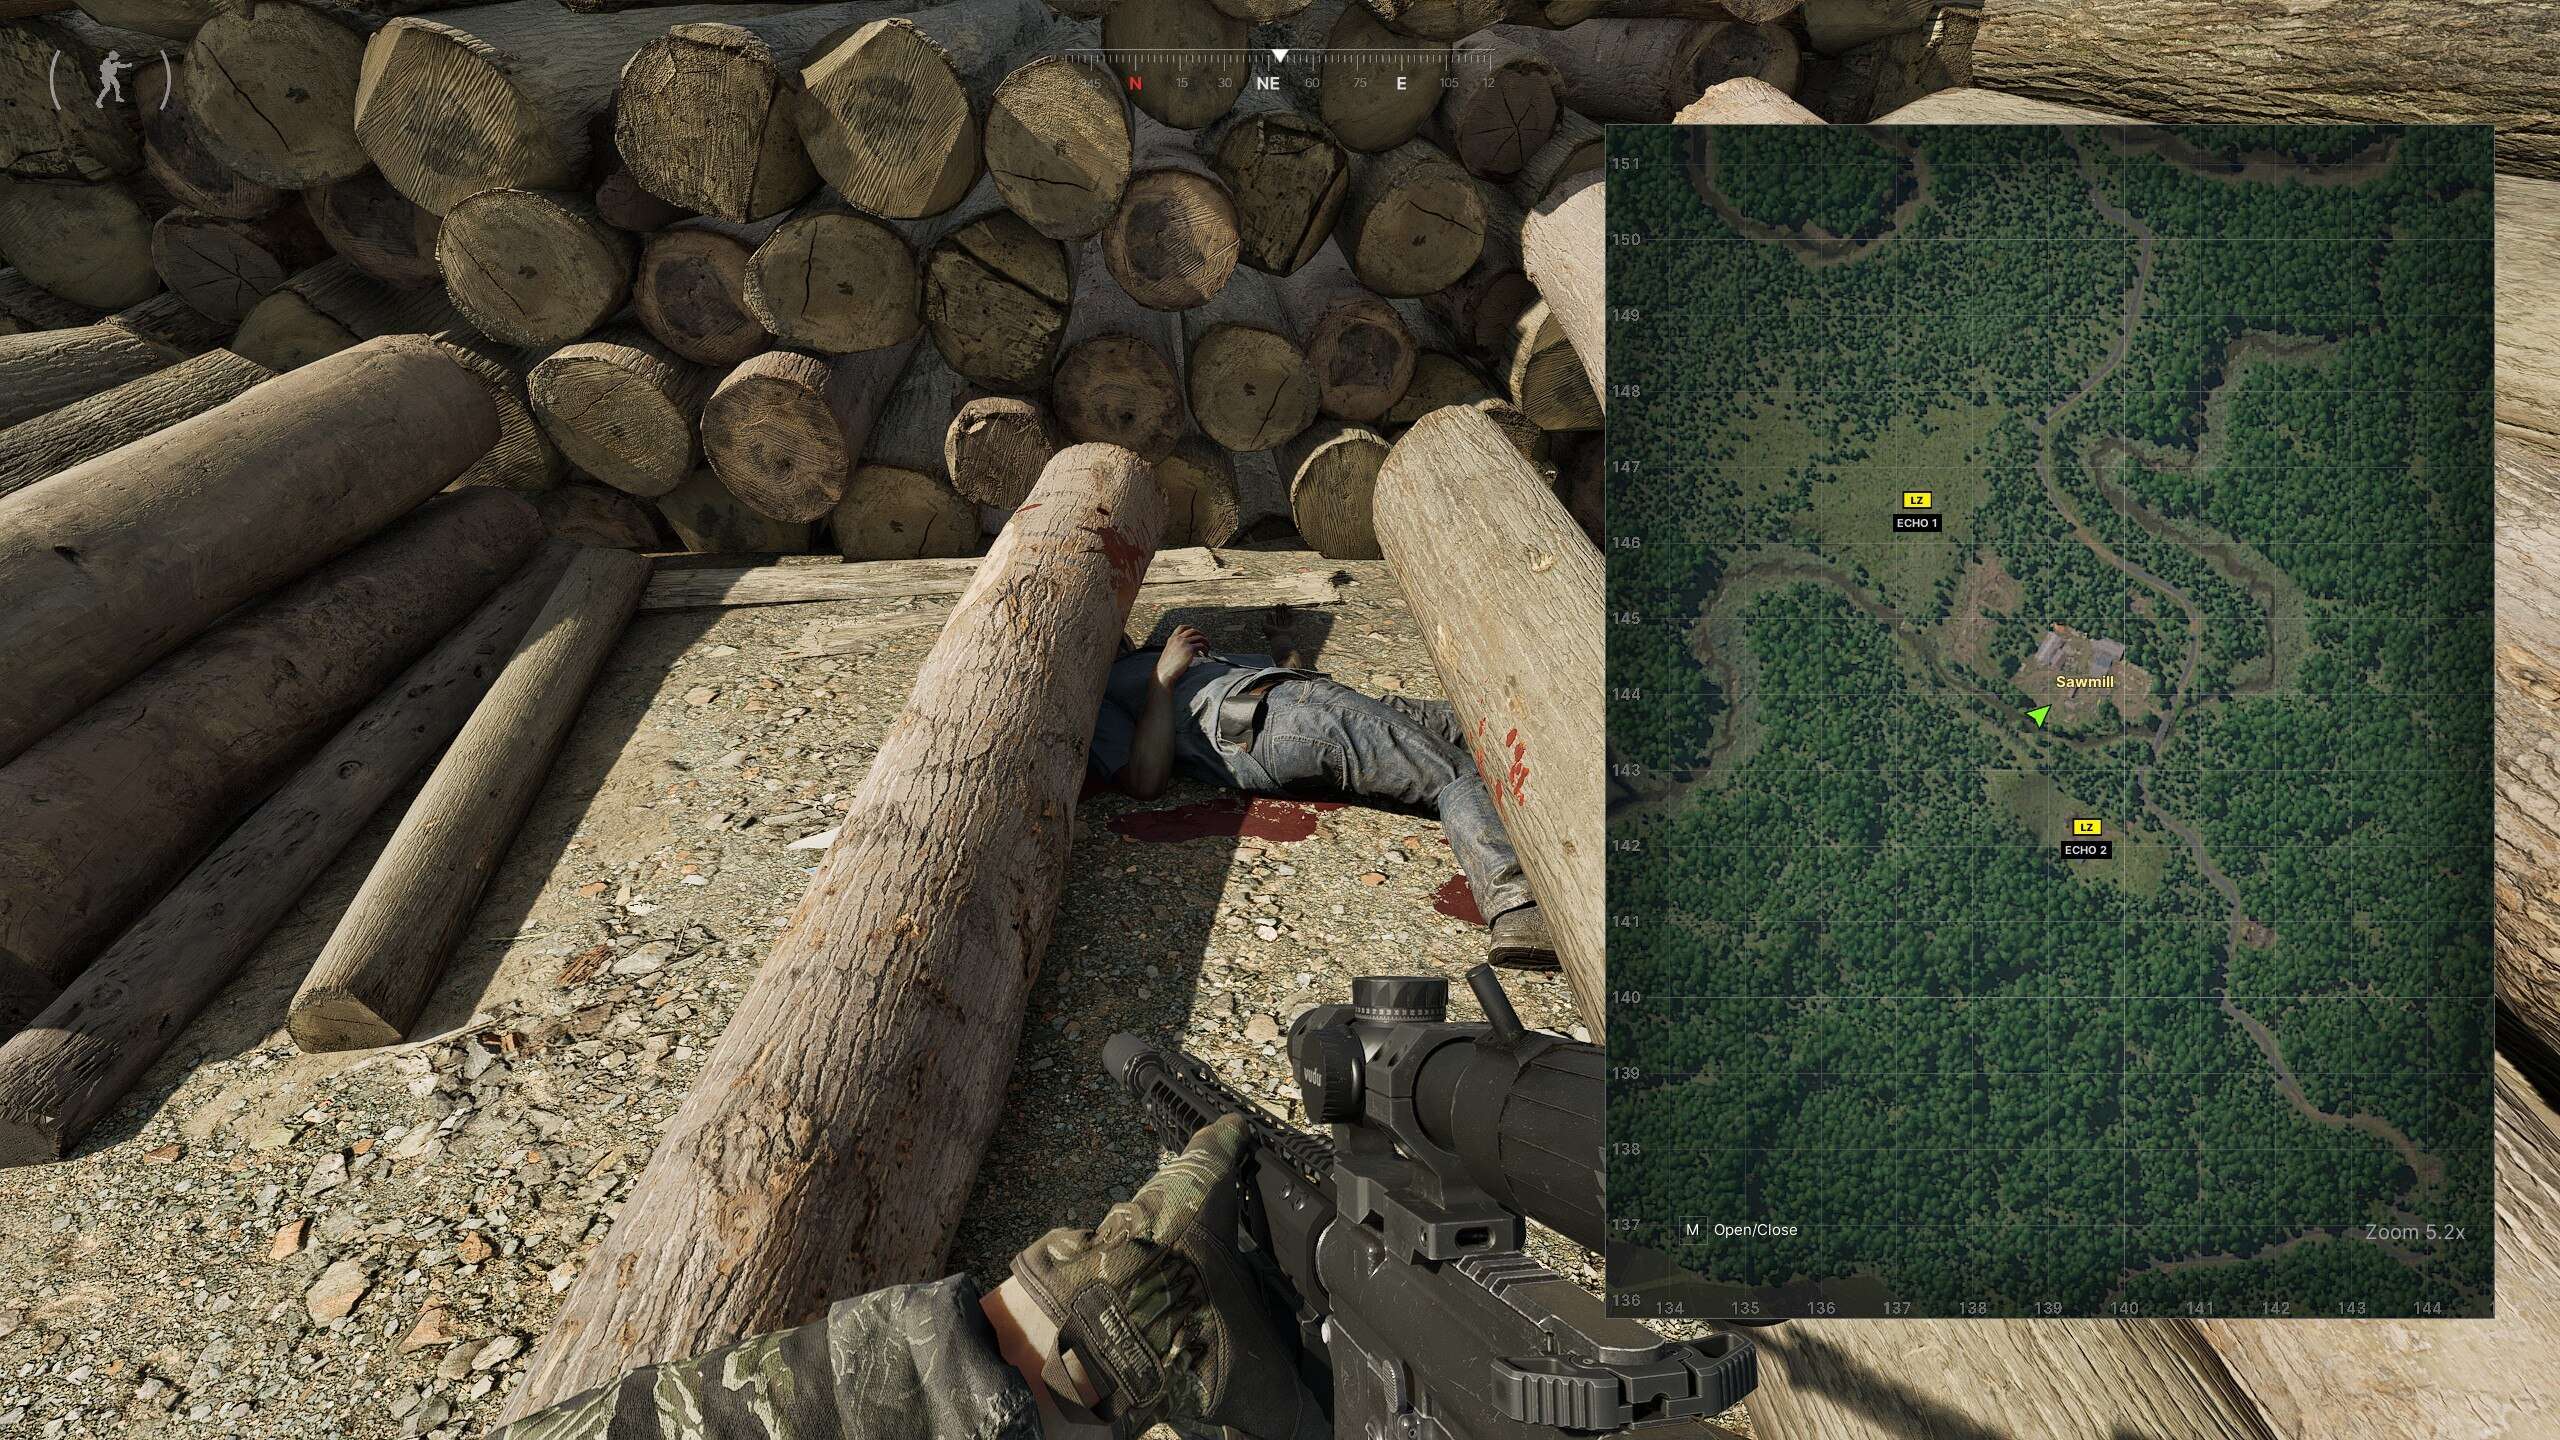
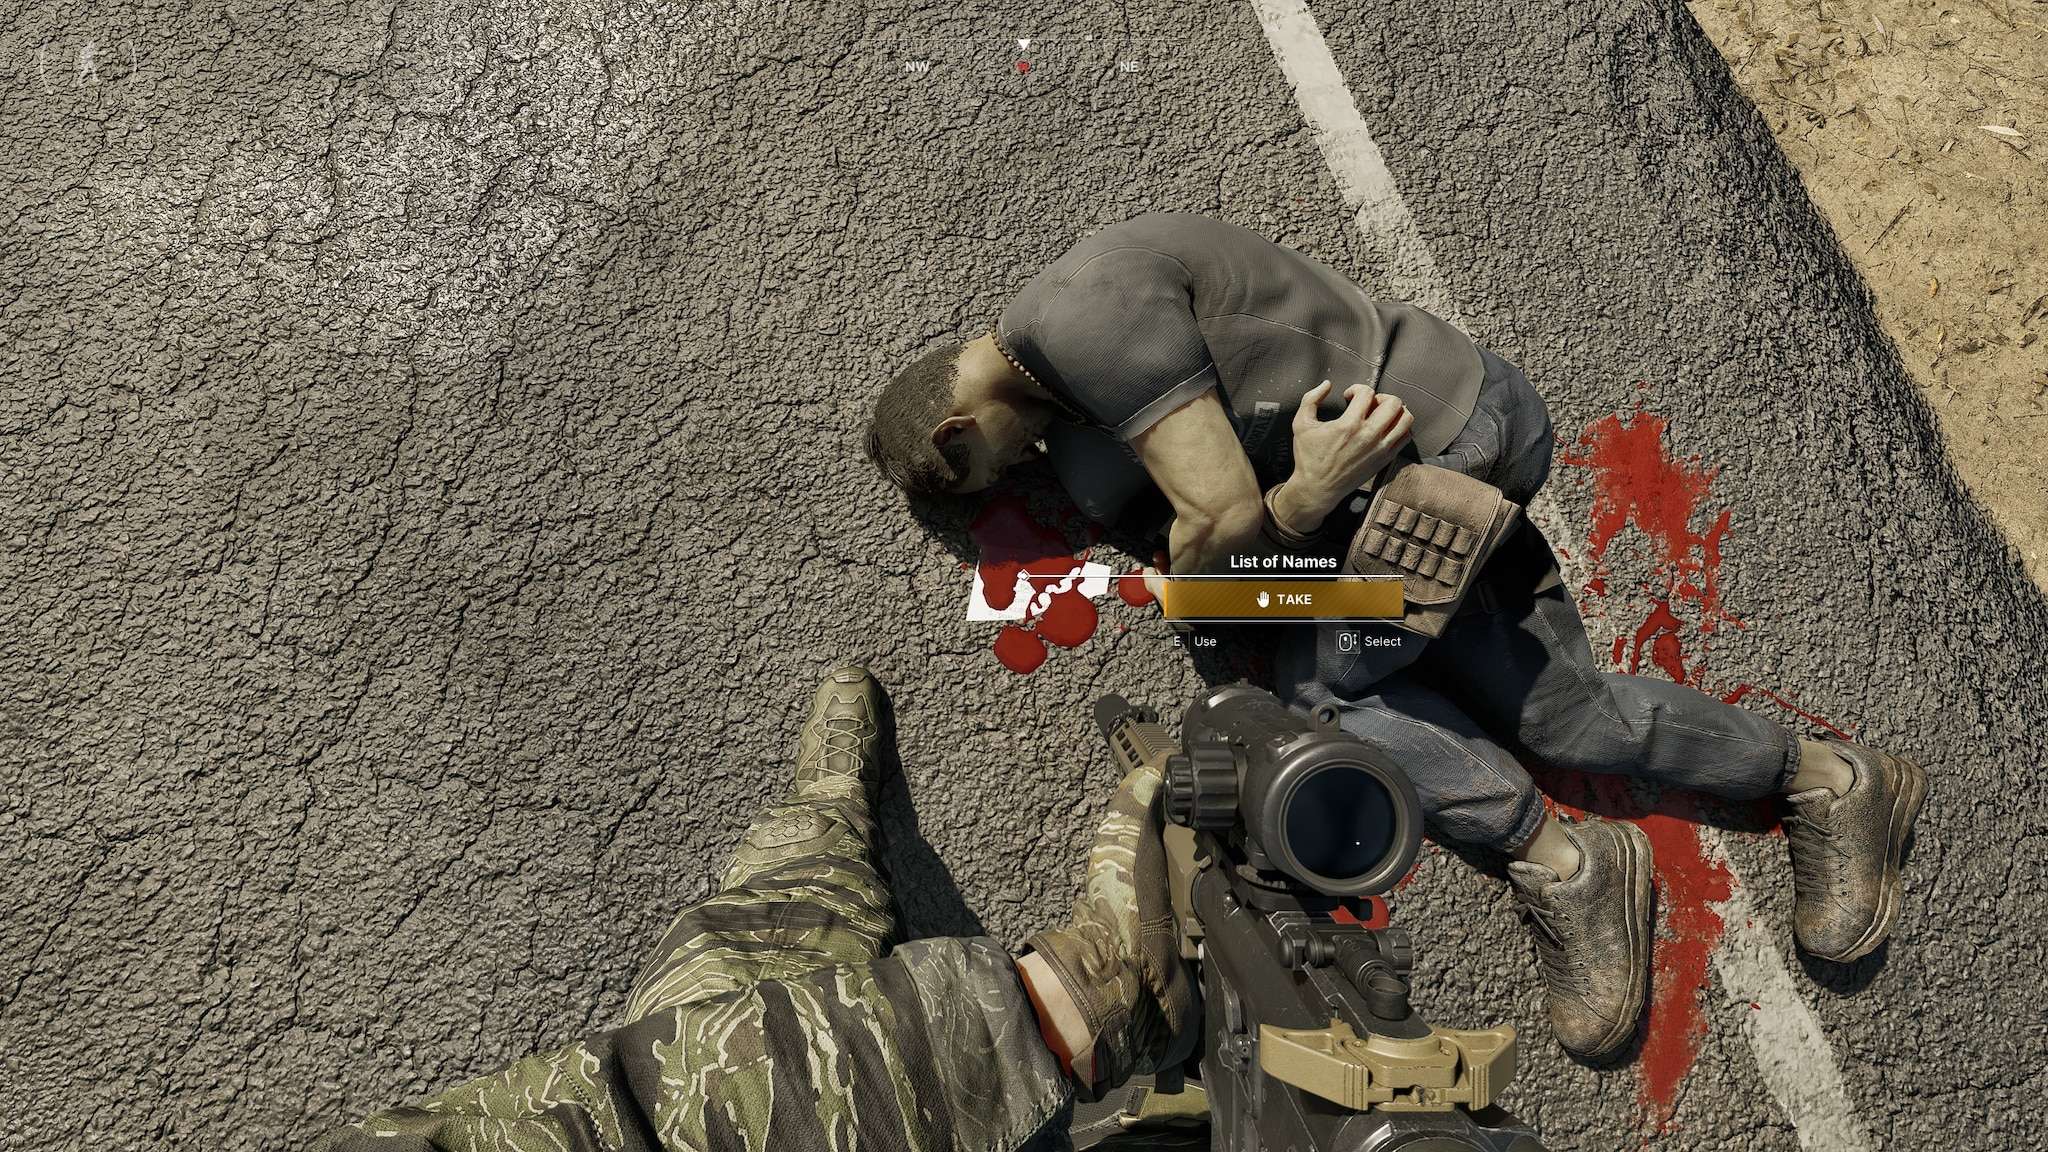
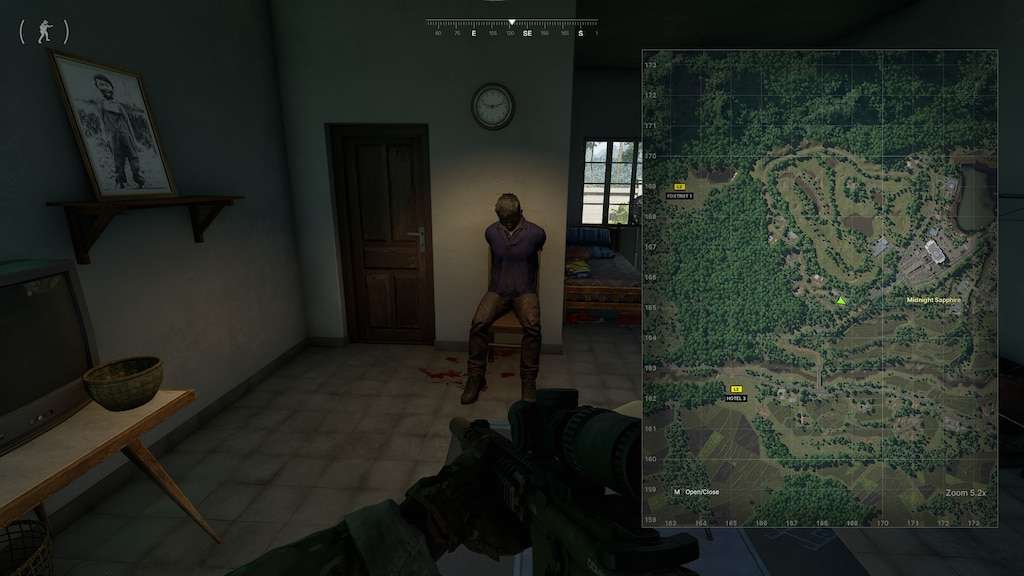
Leave No Man Behind Body
#5: Leave No Man Behind Body
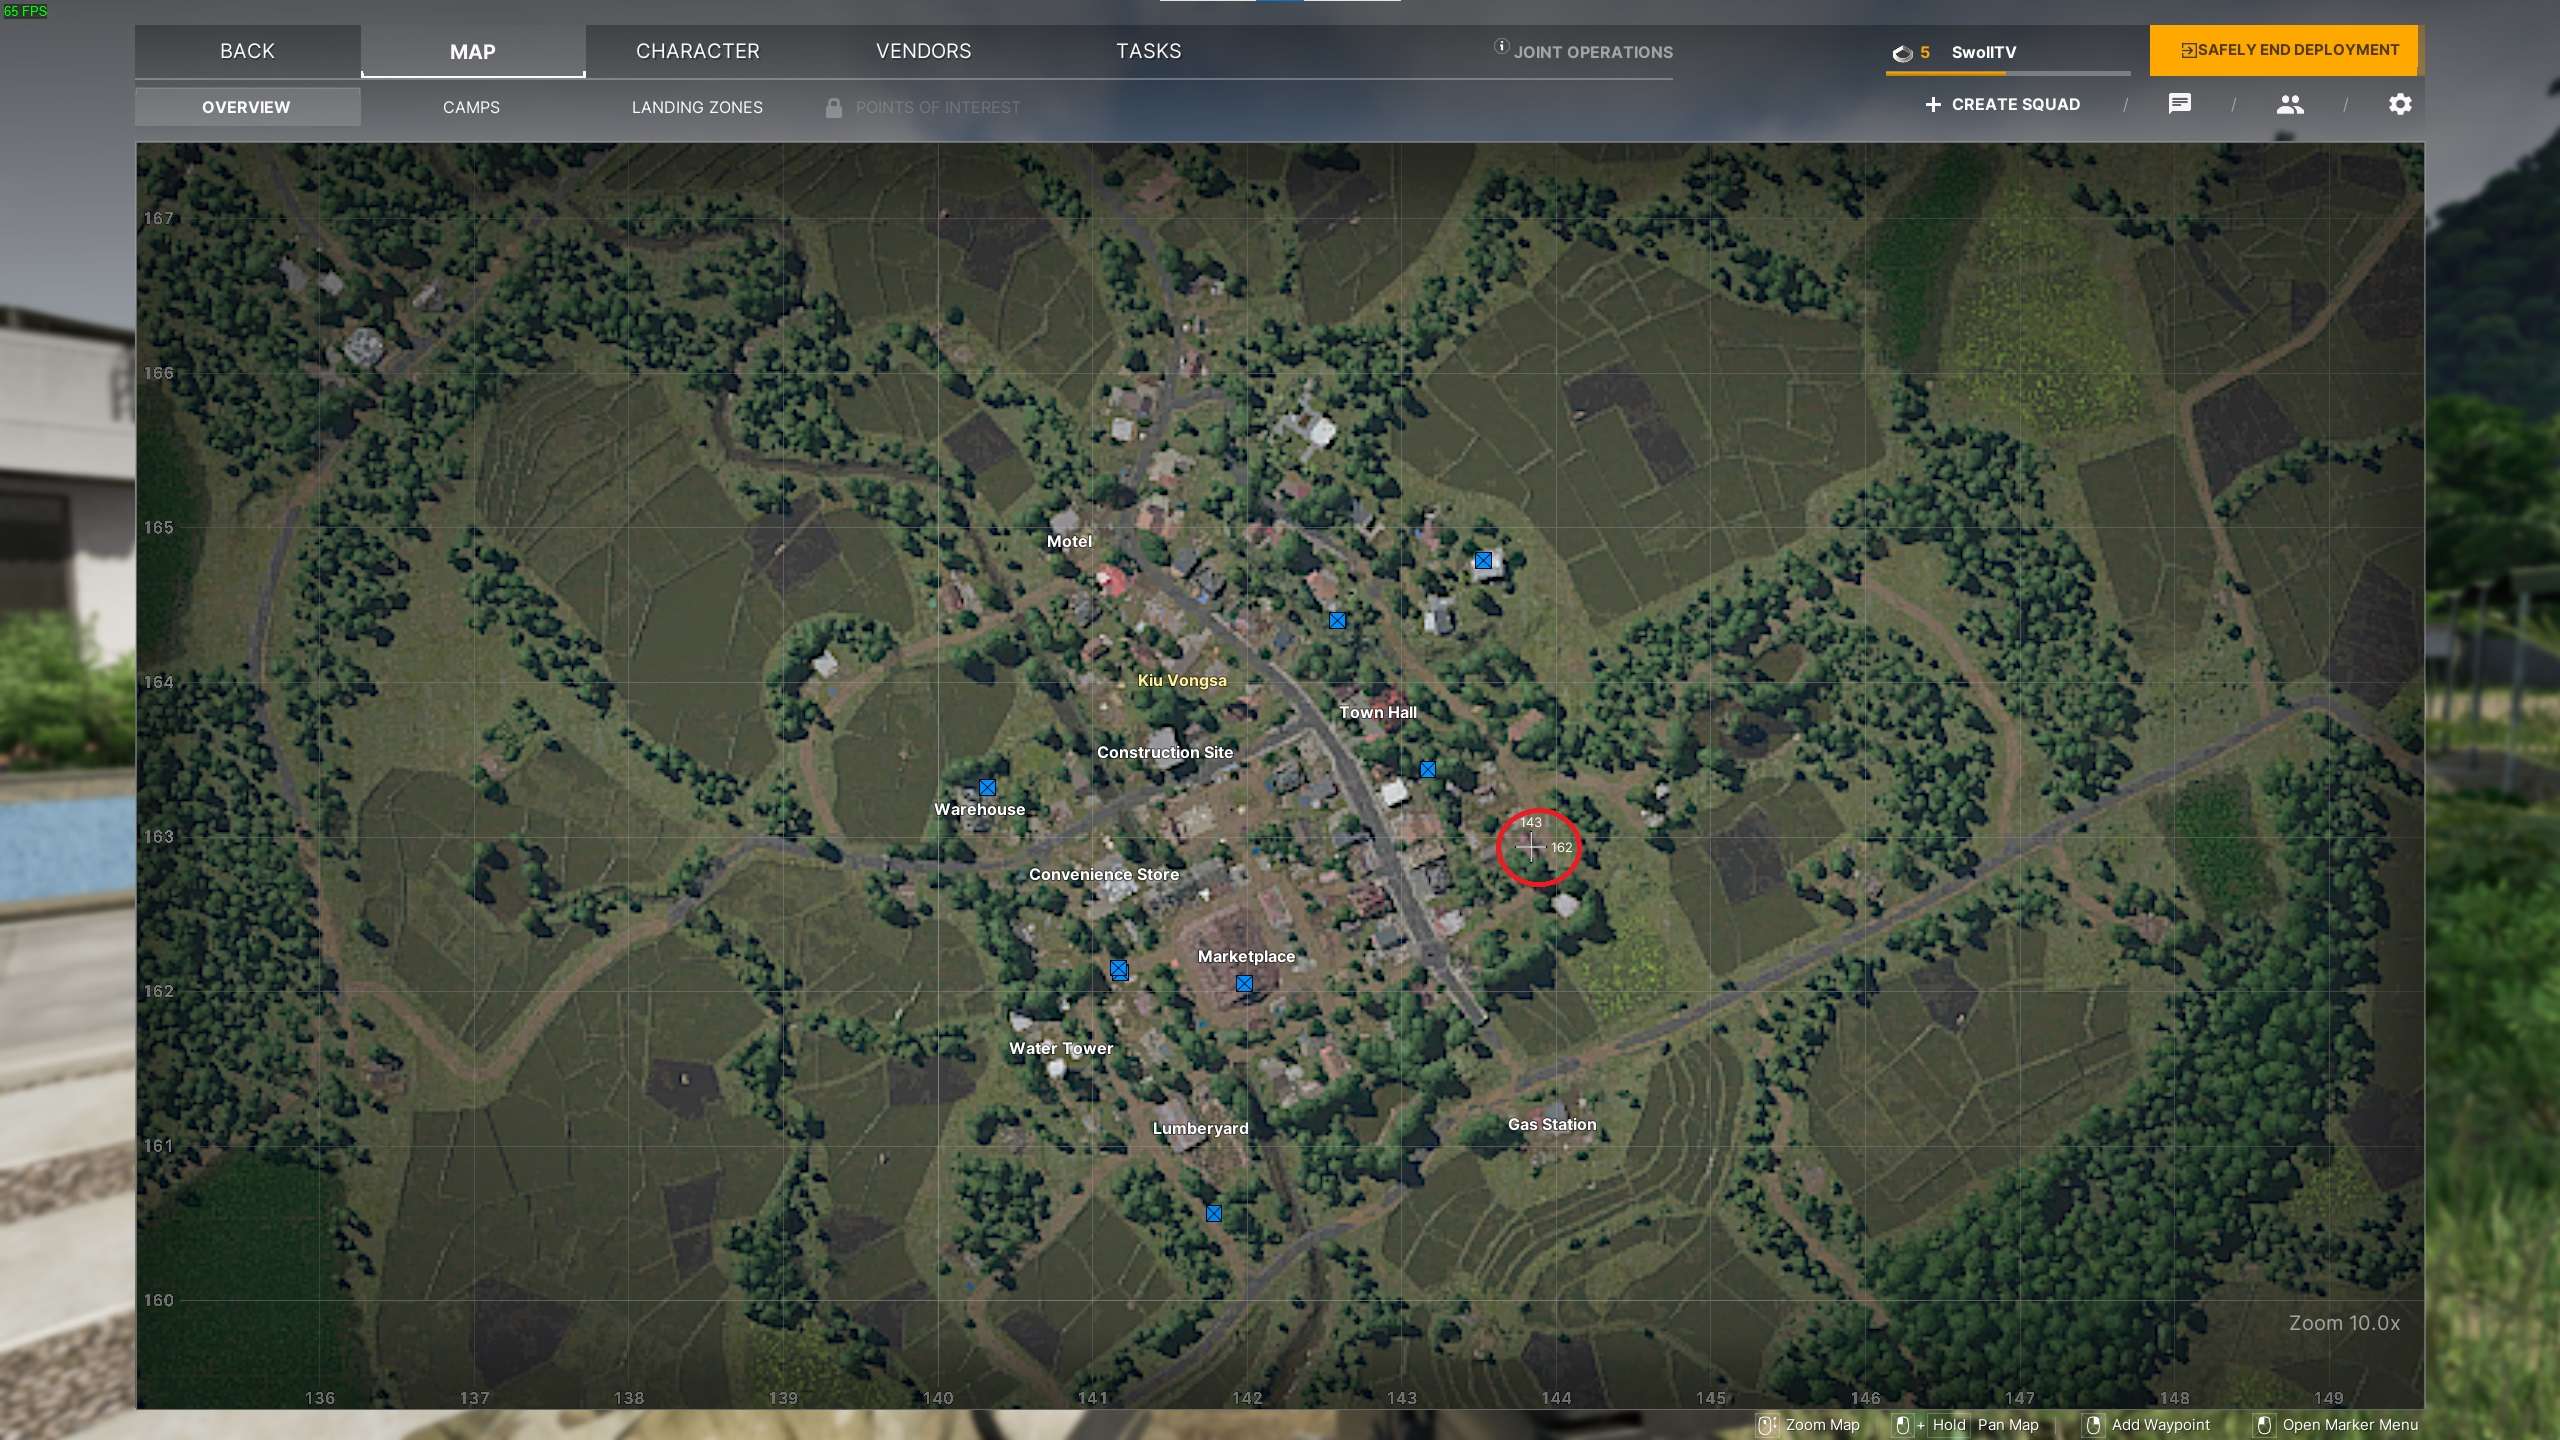
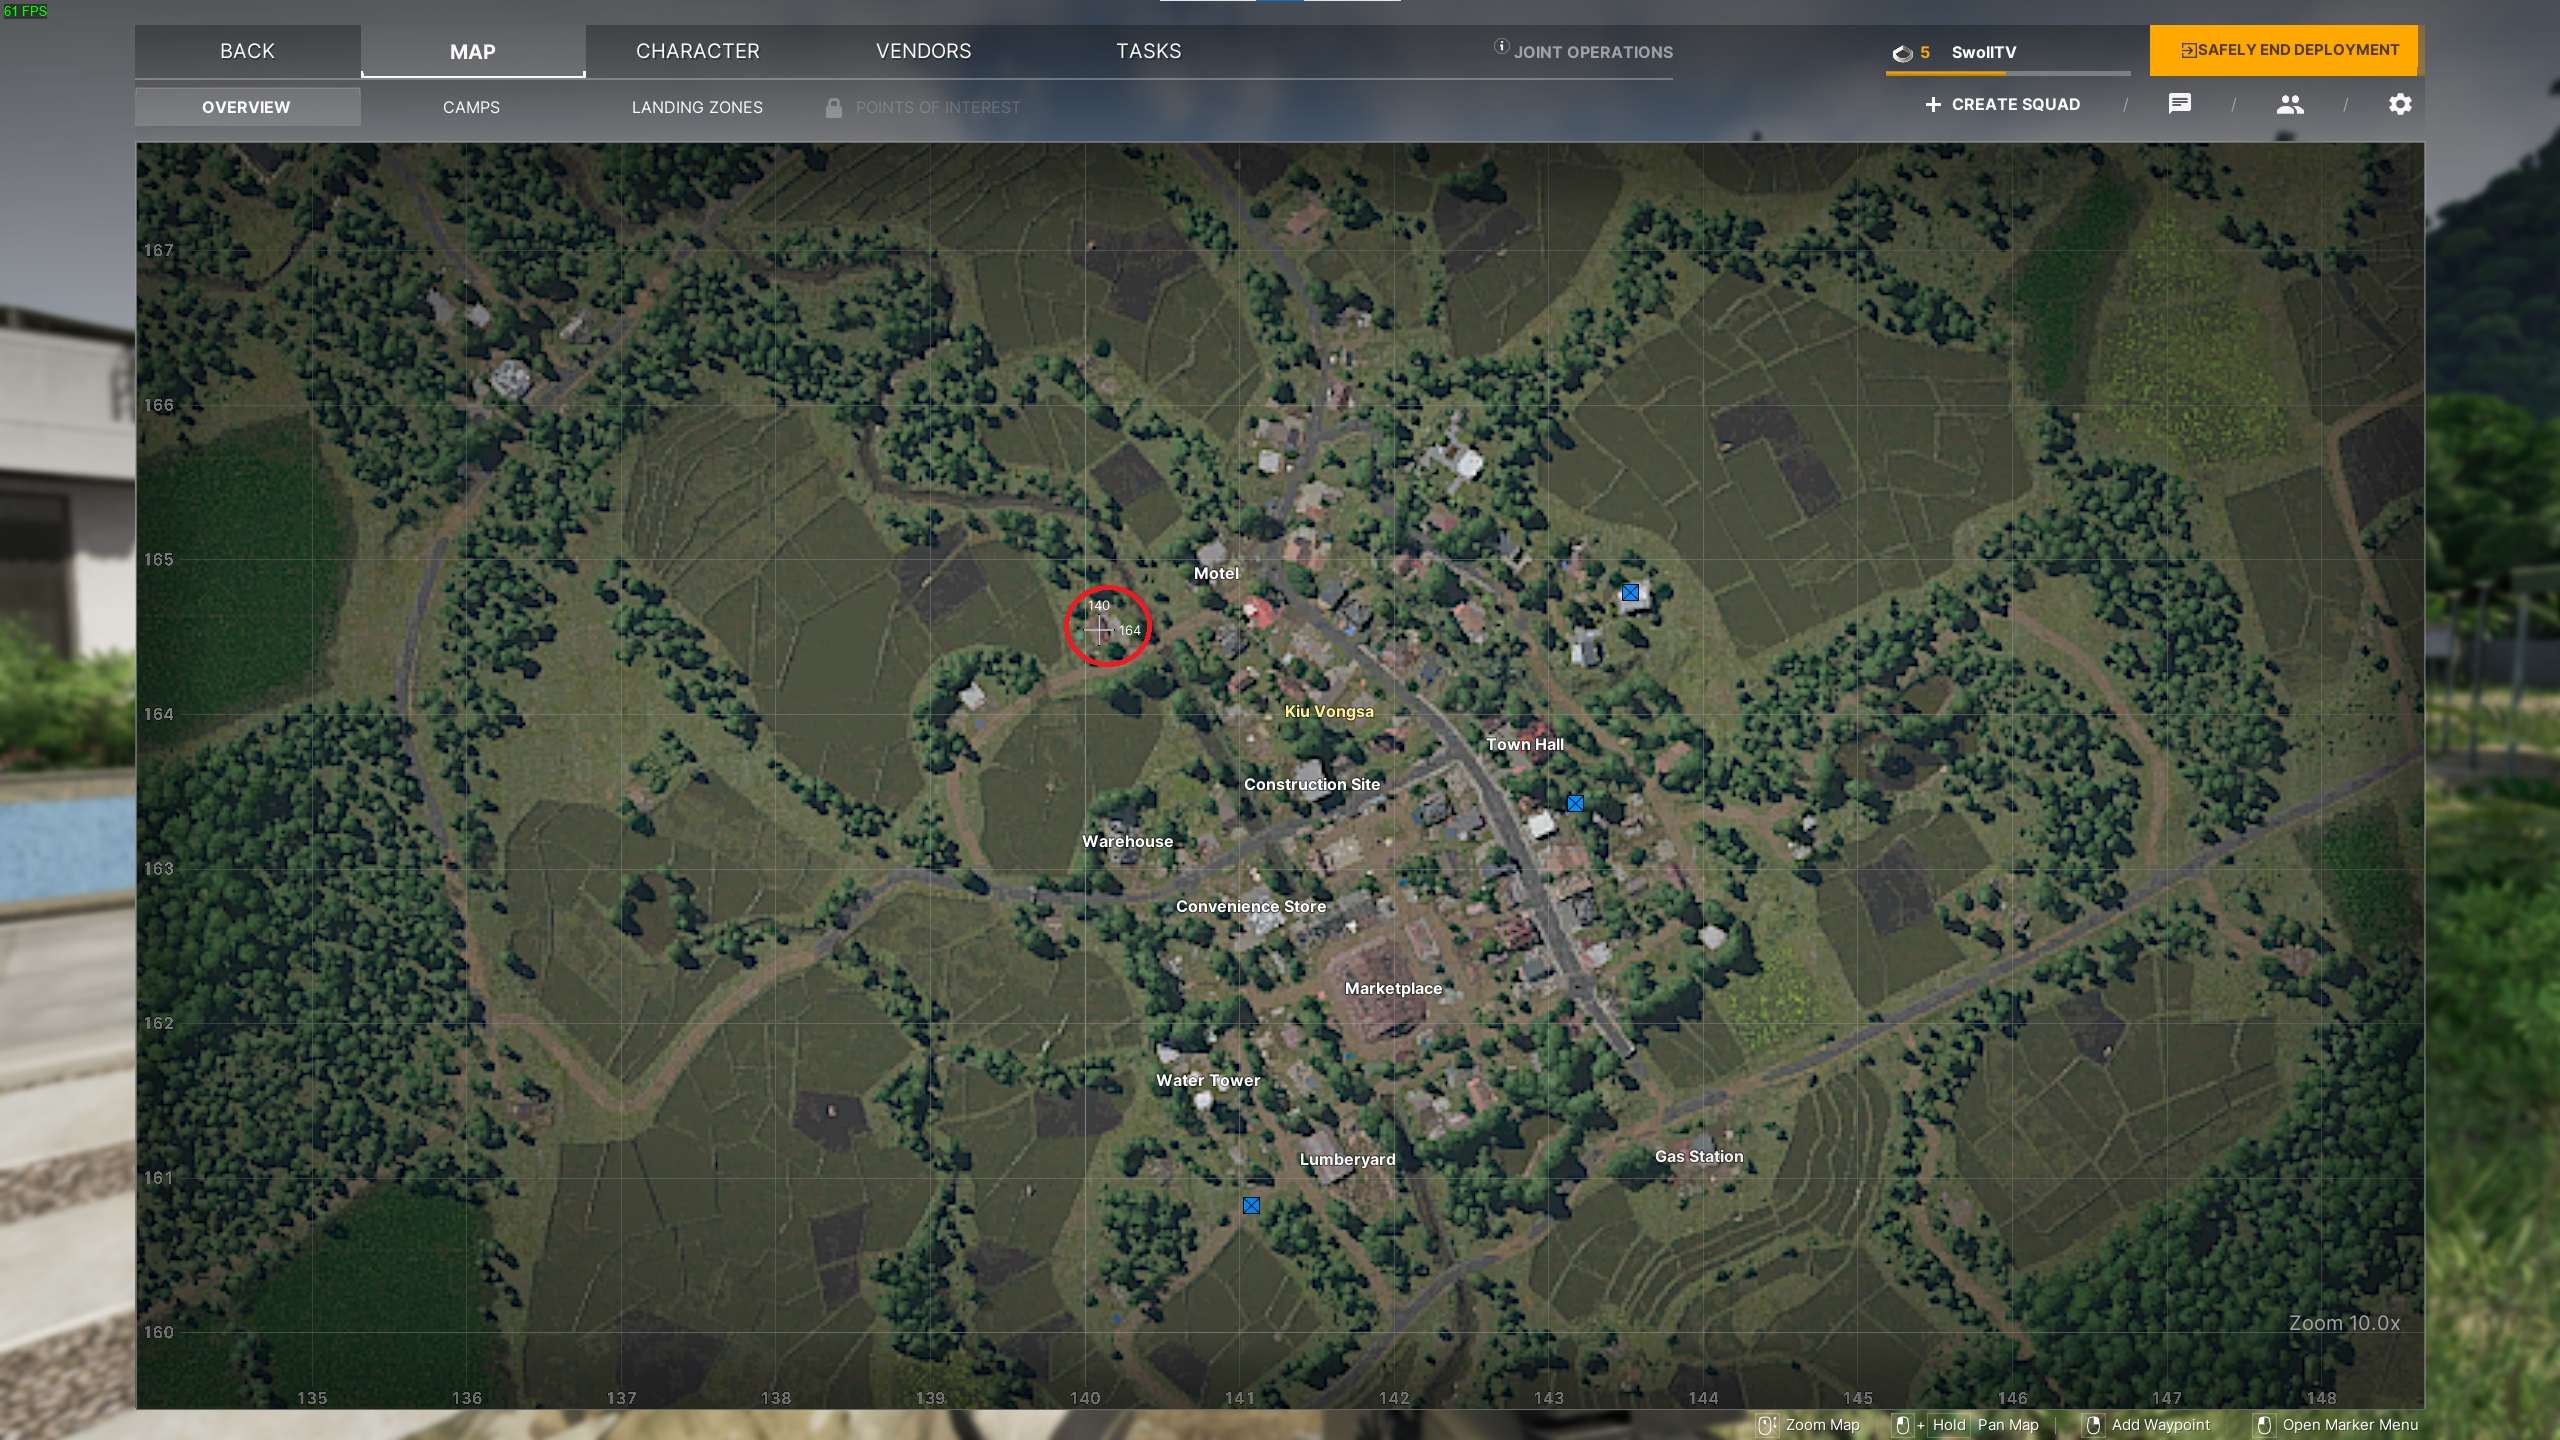
- Leave No Man Behind Body Location – 143 163
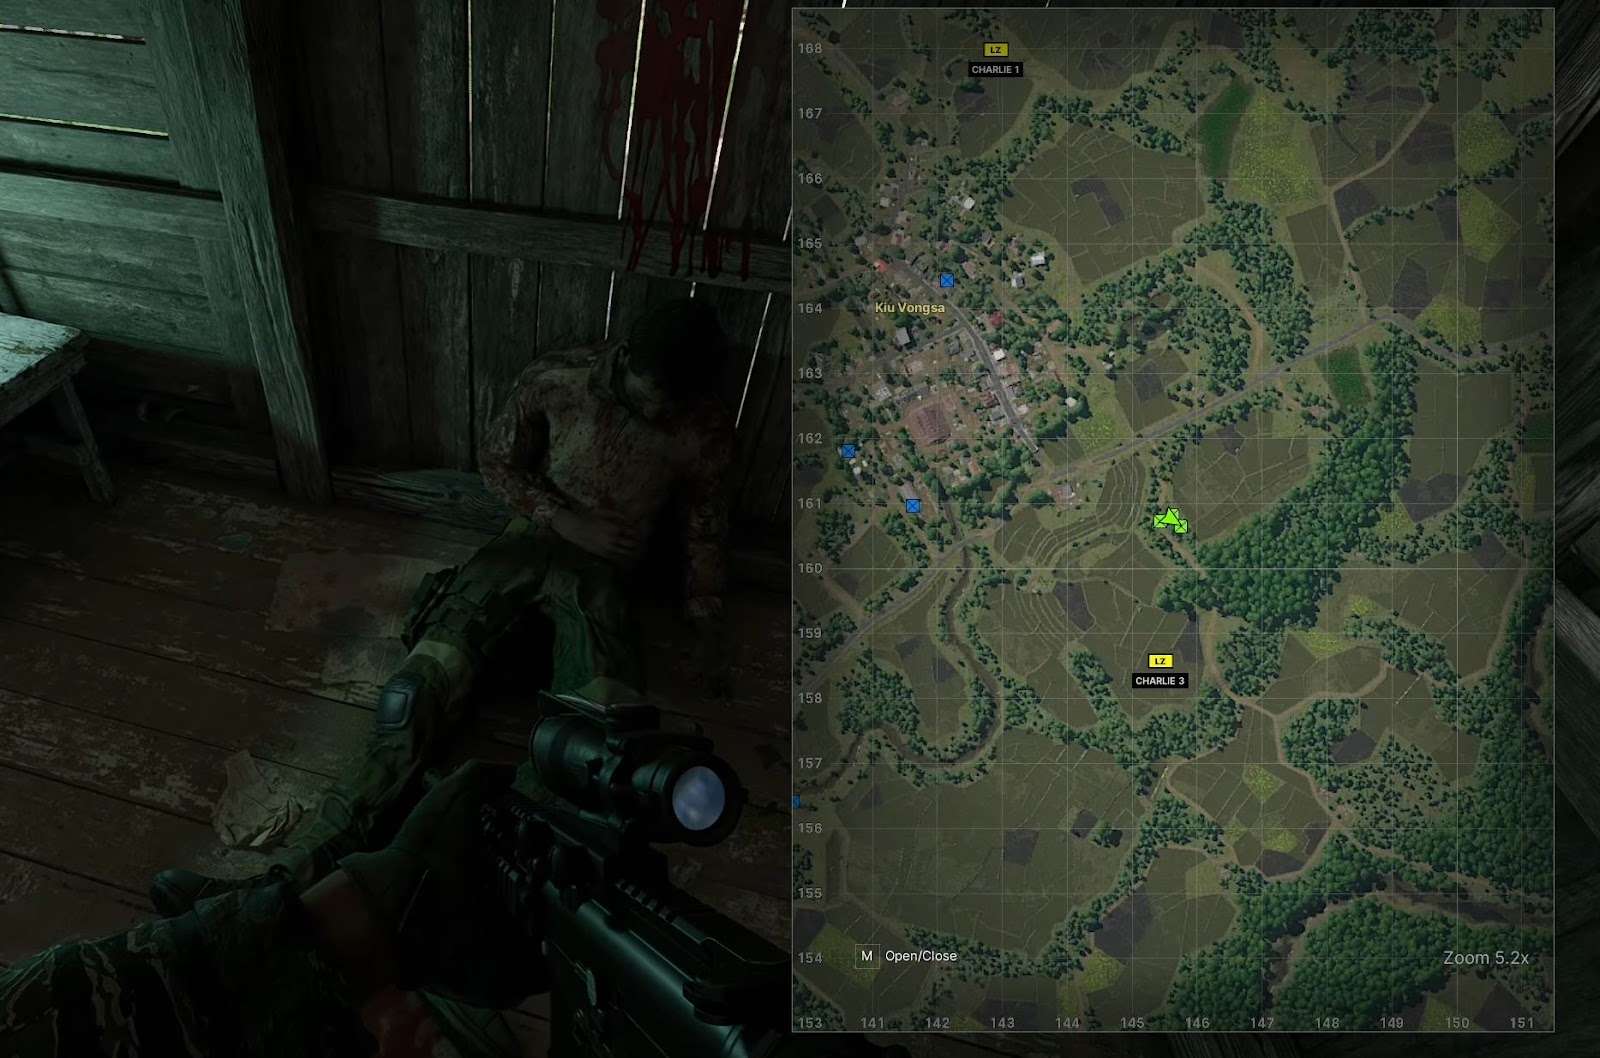
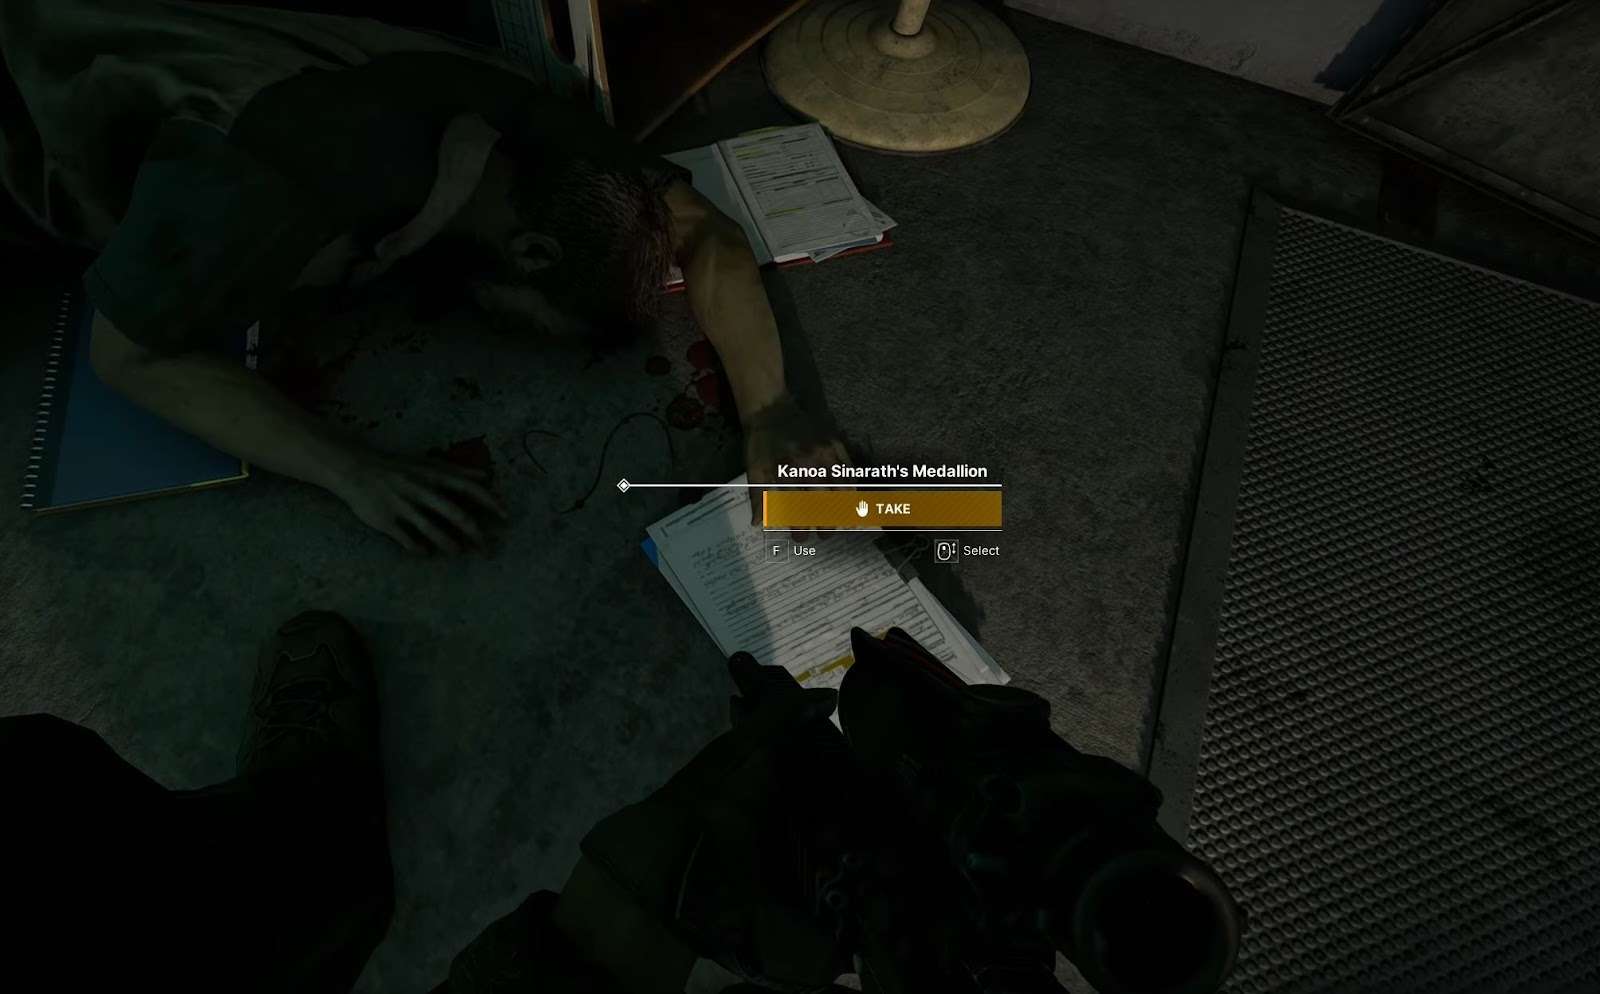
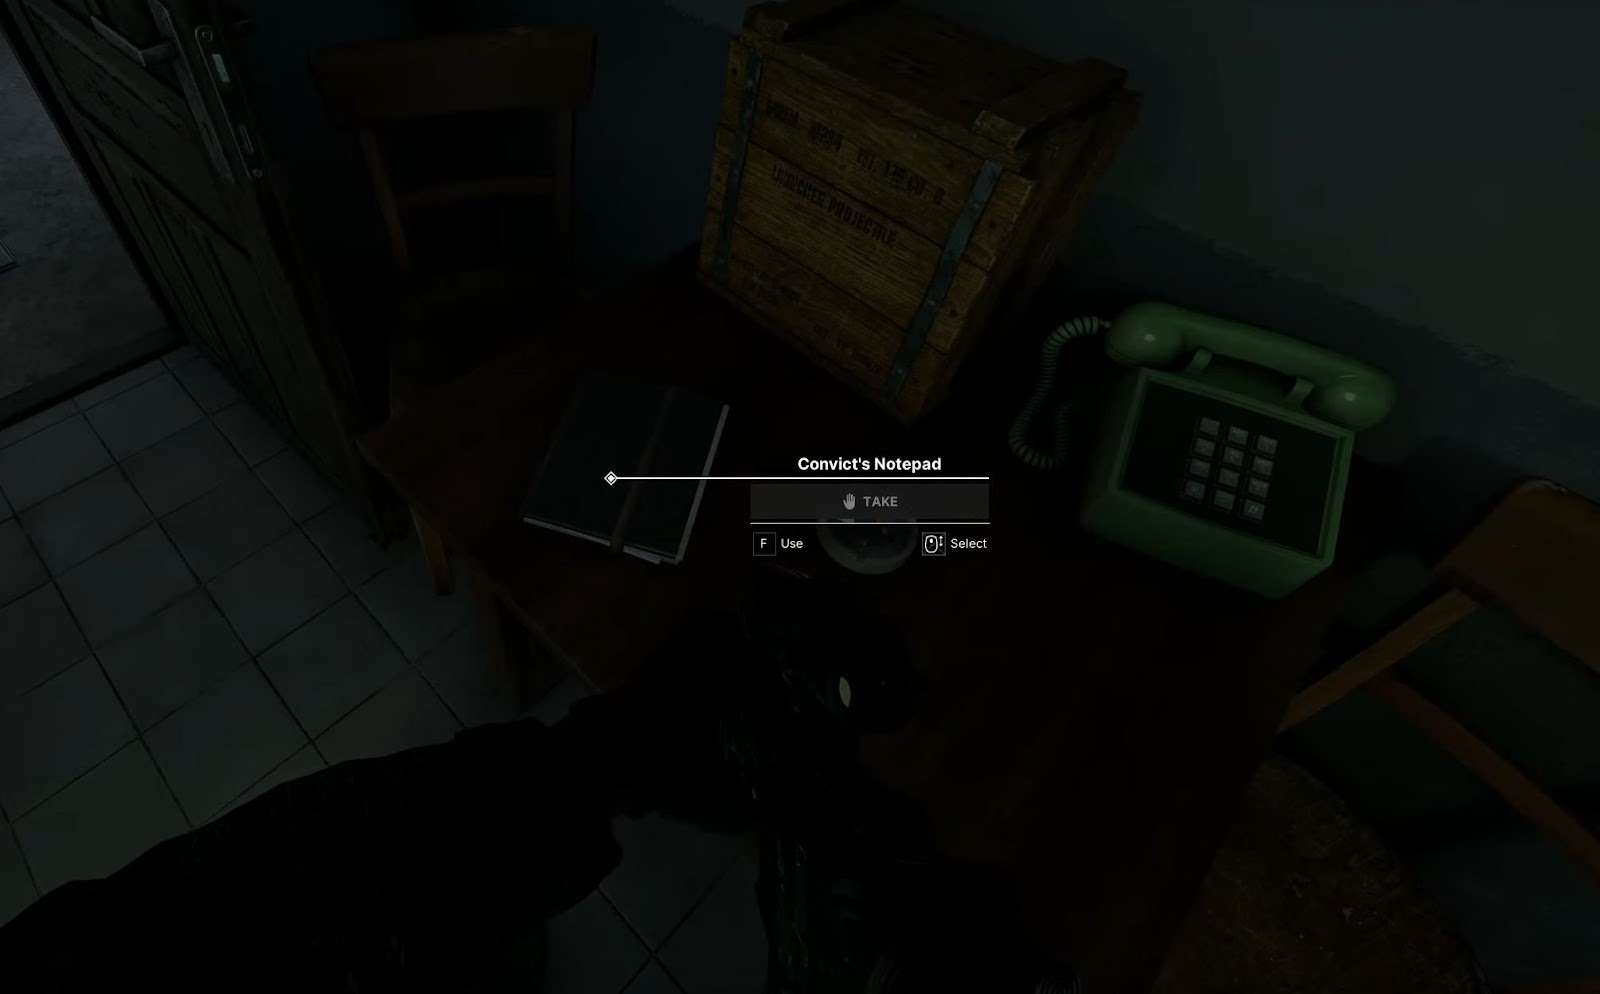
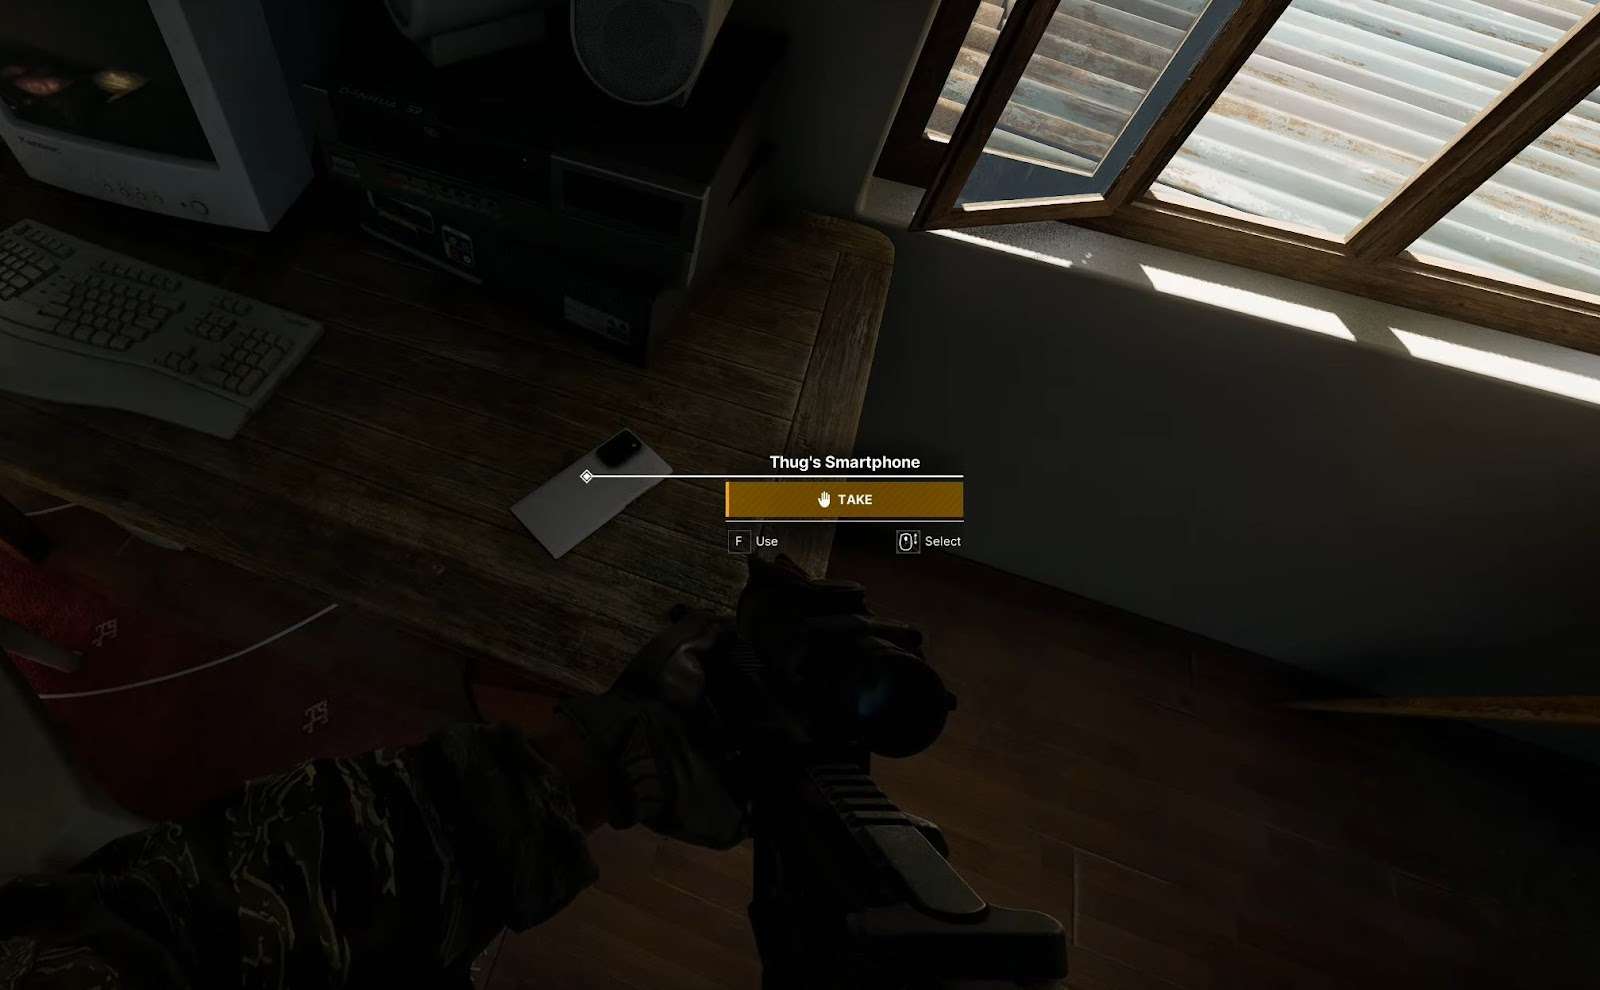
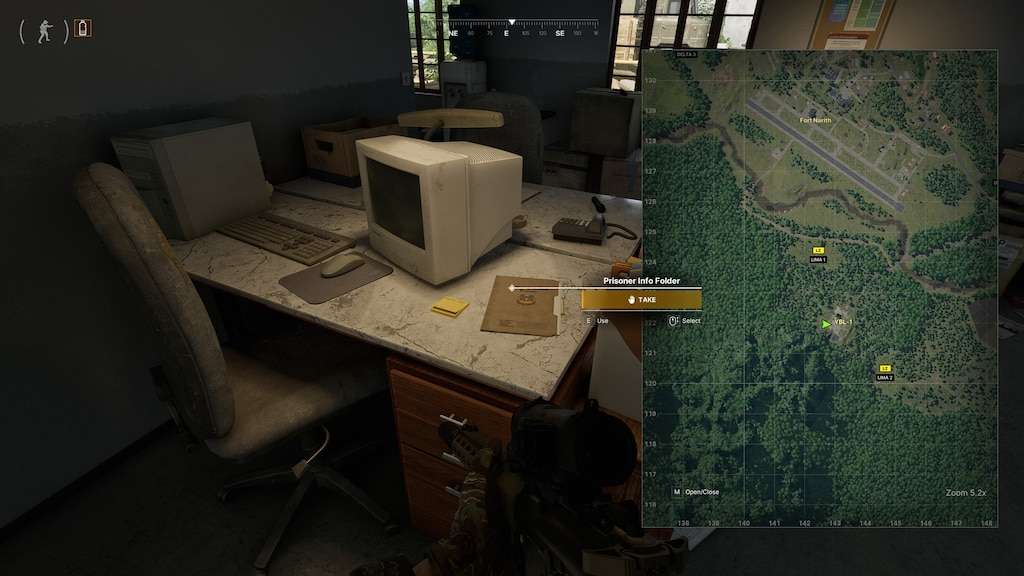
Lost and Found Kanoa Sinarath
#6: Lost and Found Kanoa Sinarath
- Lost and Found Kanoa Sinarath Location – 141 161

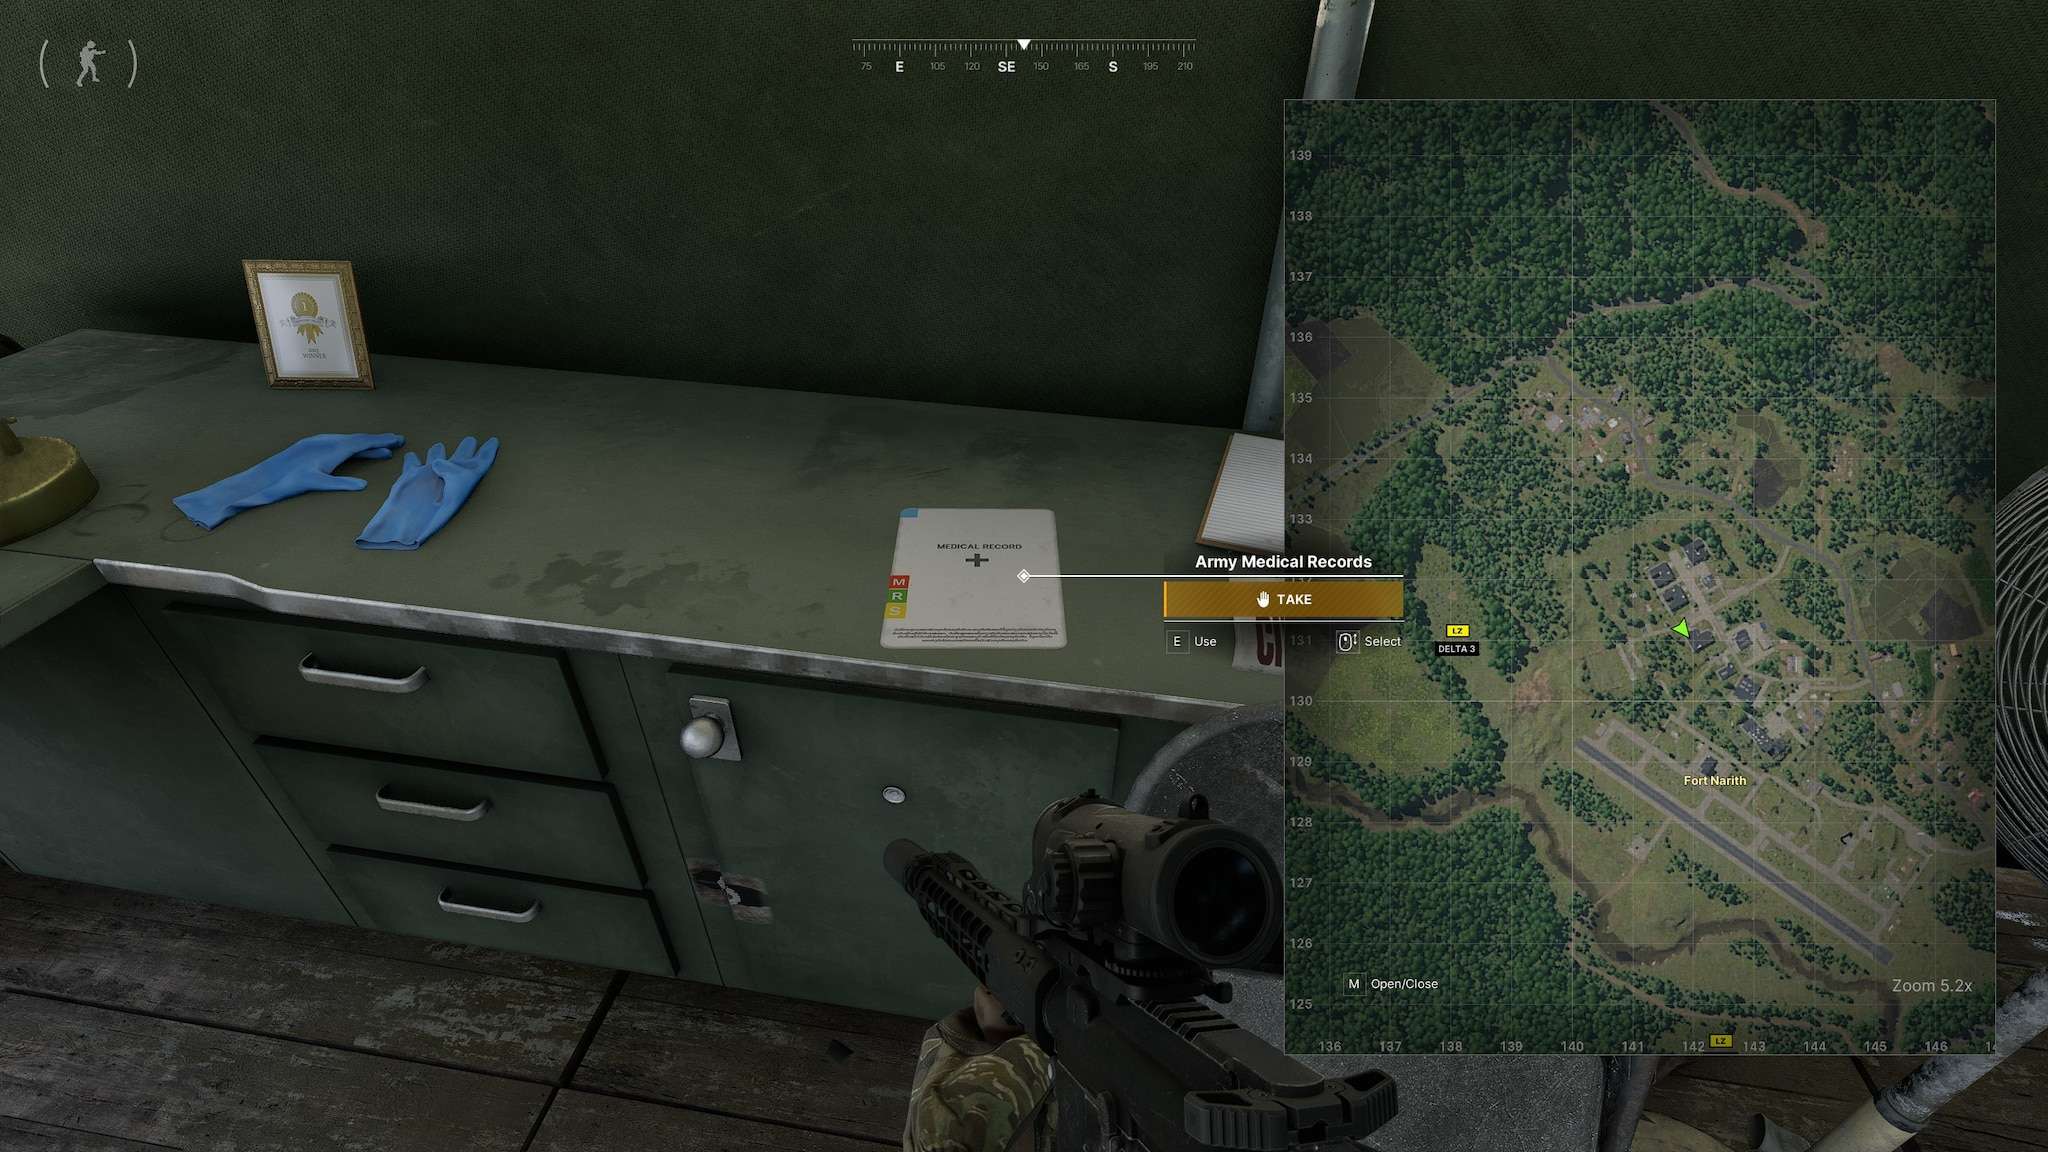
Medical Detective
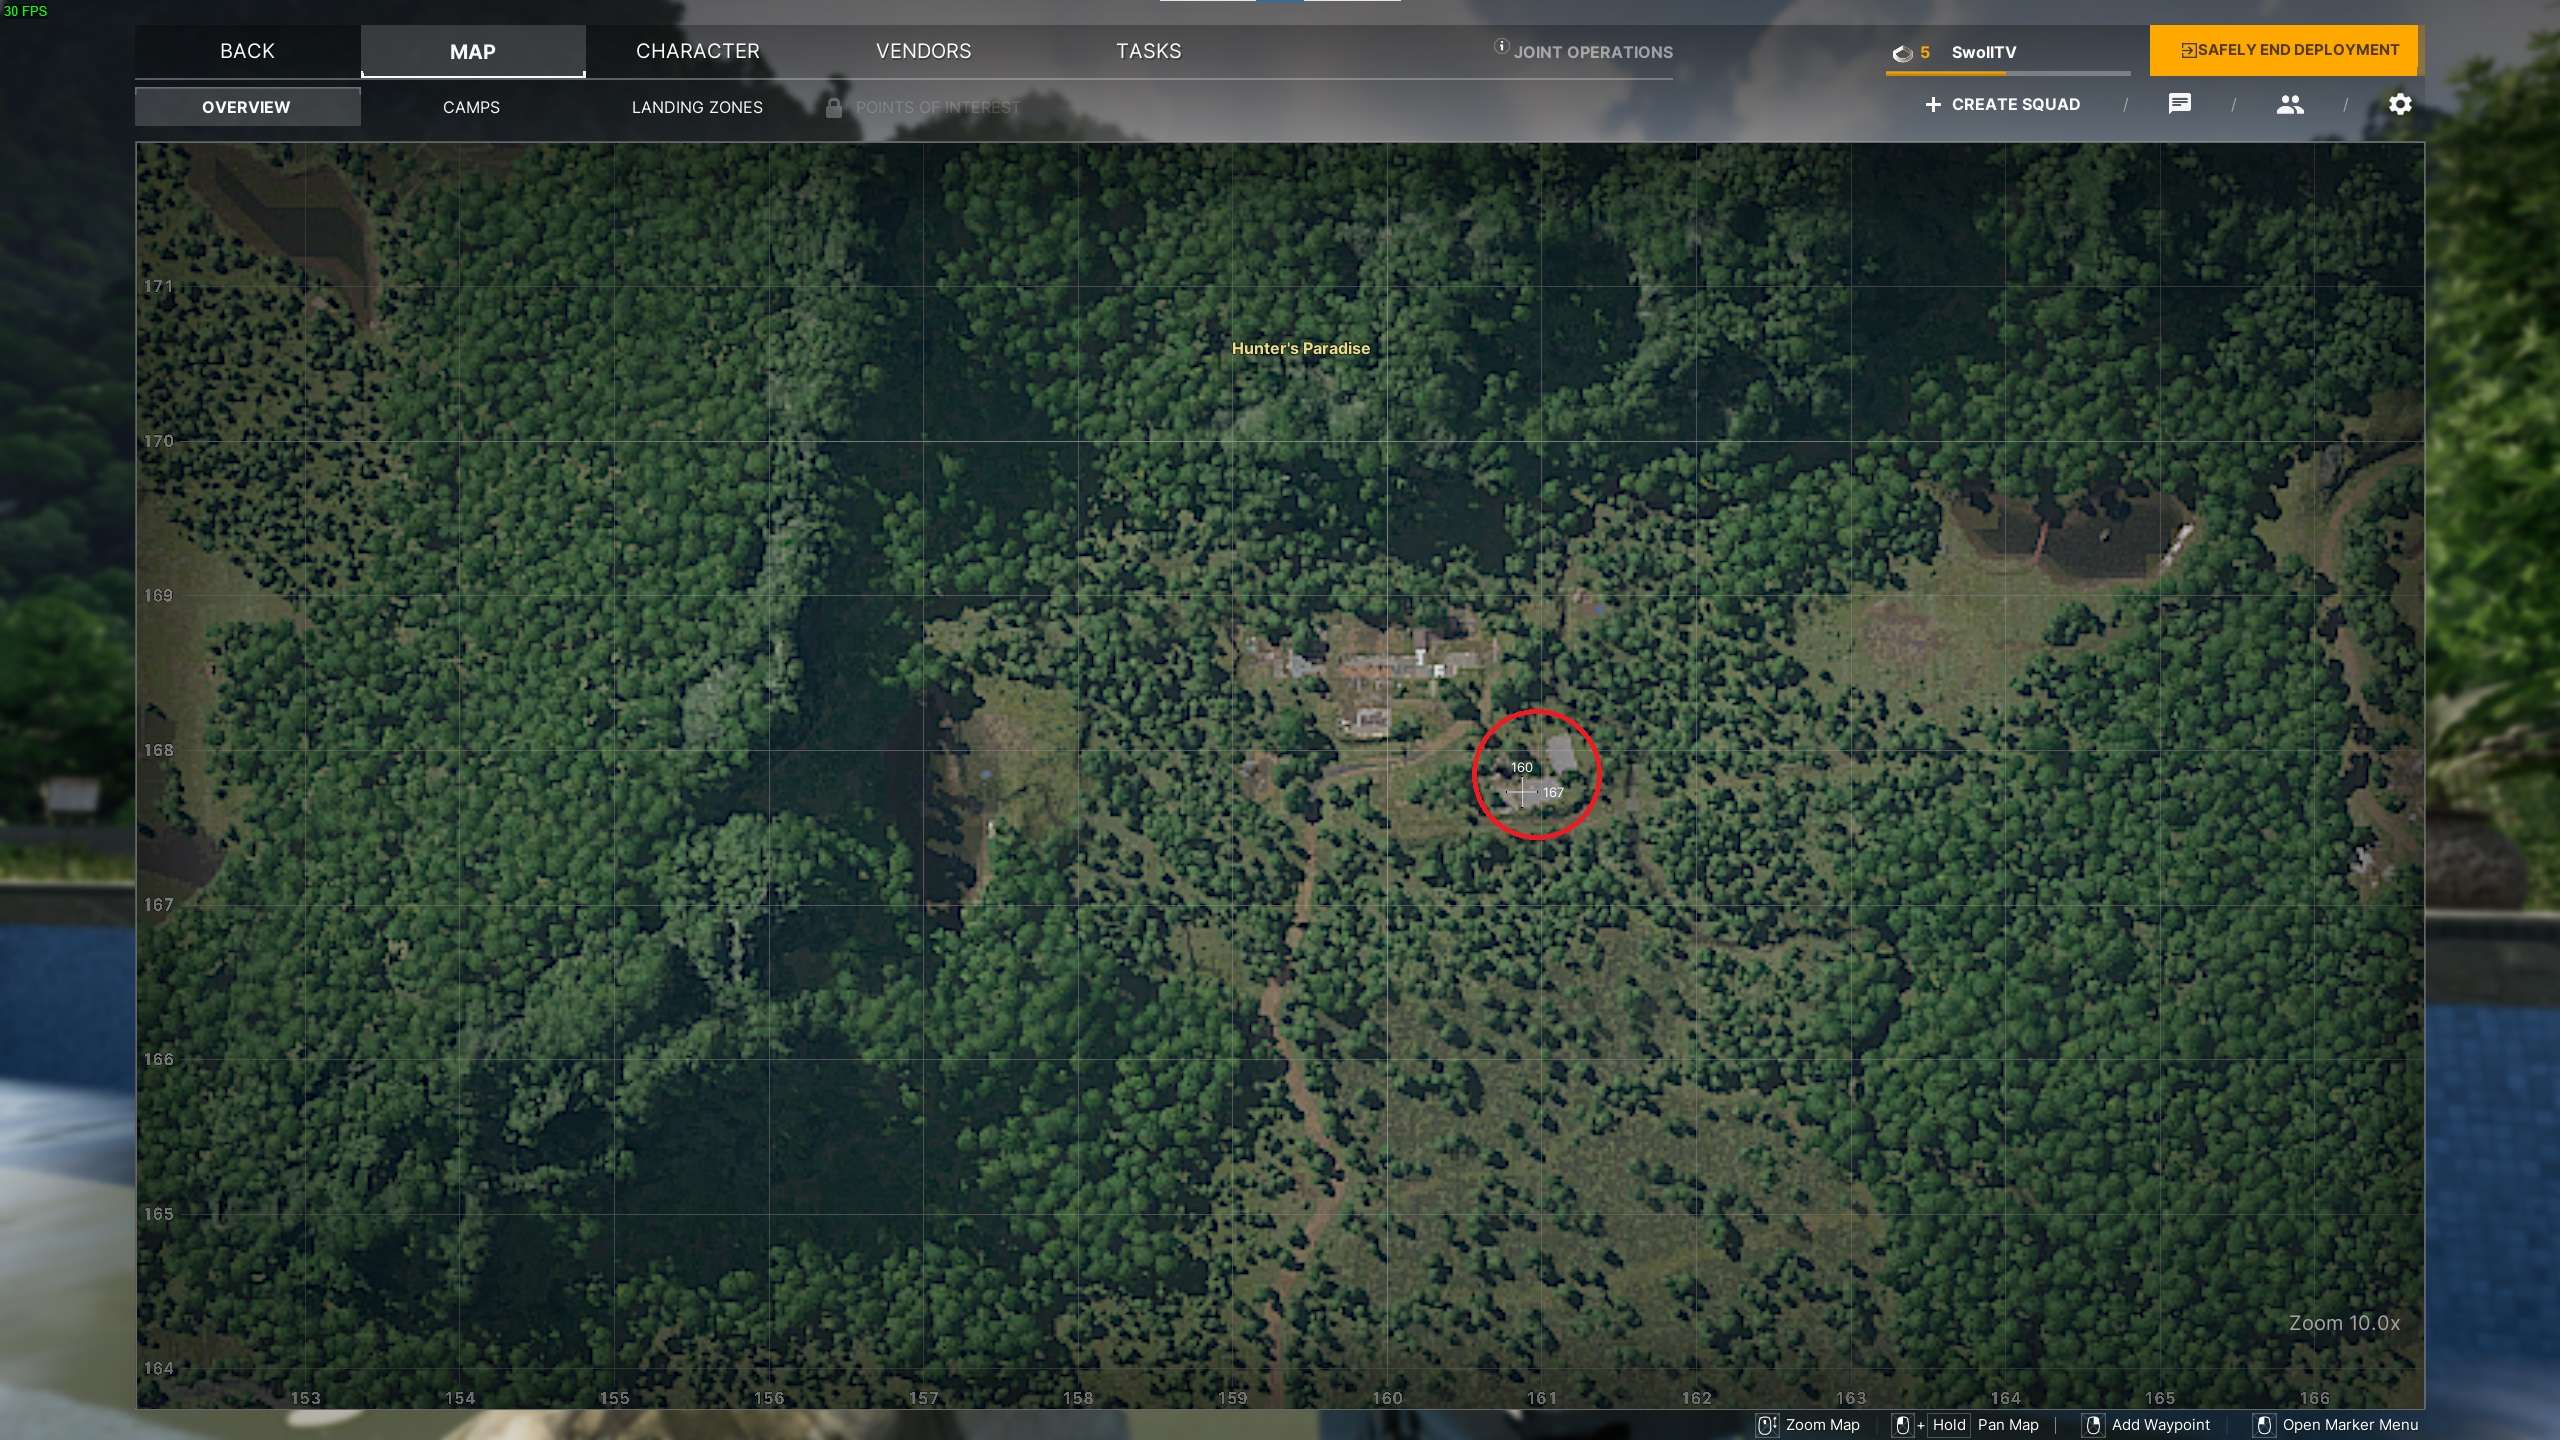
#7: Medical Detective
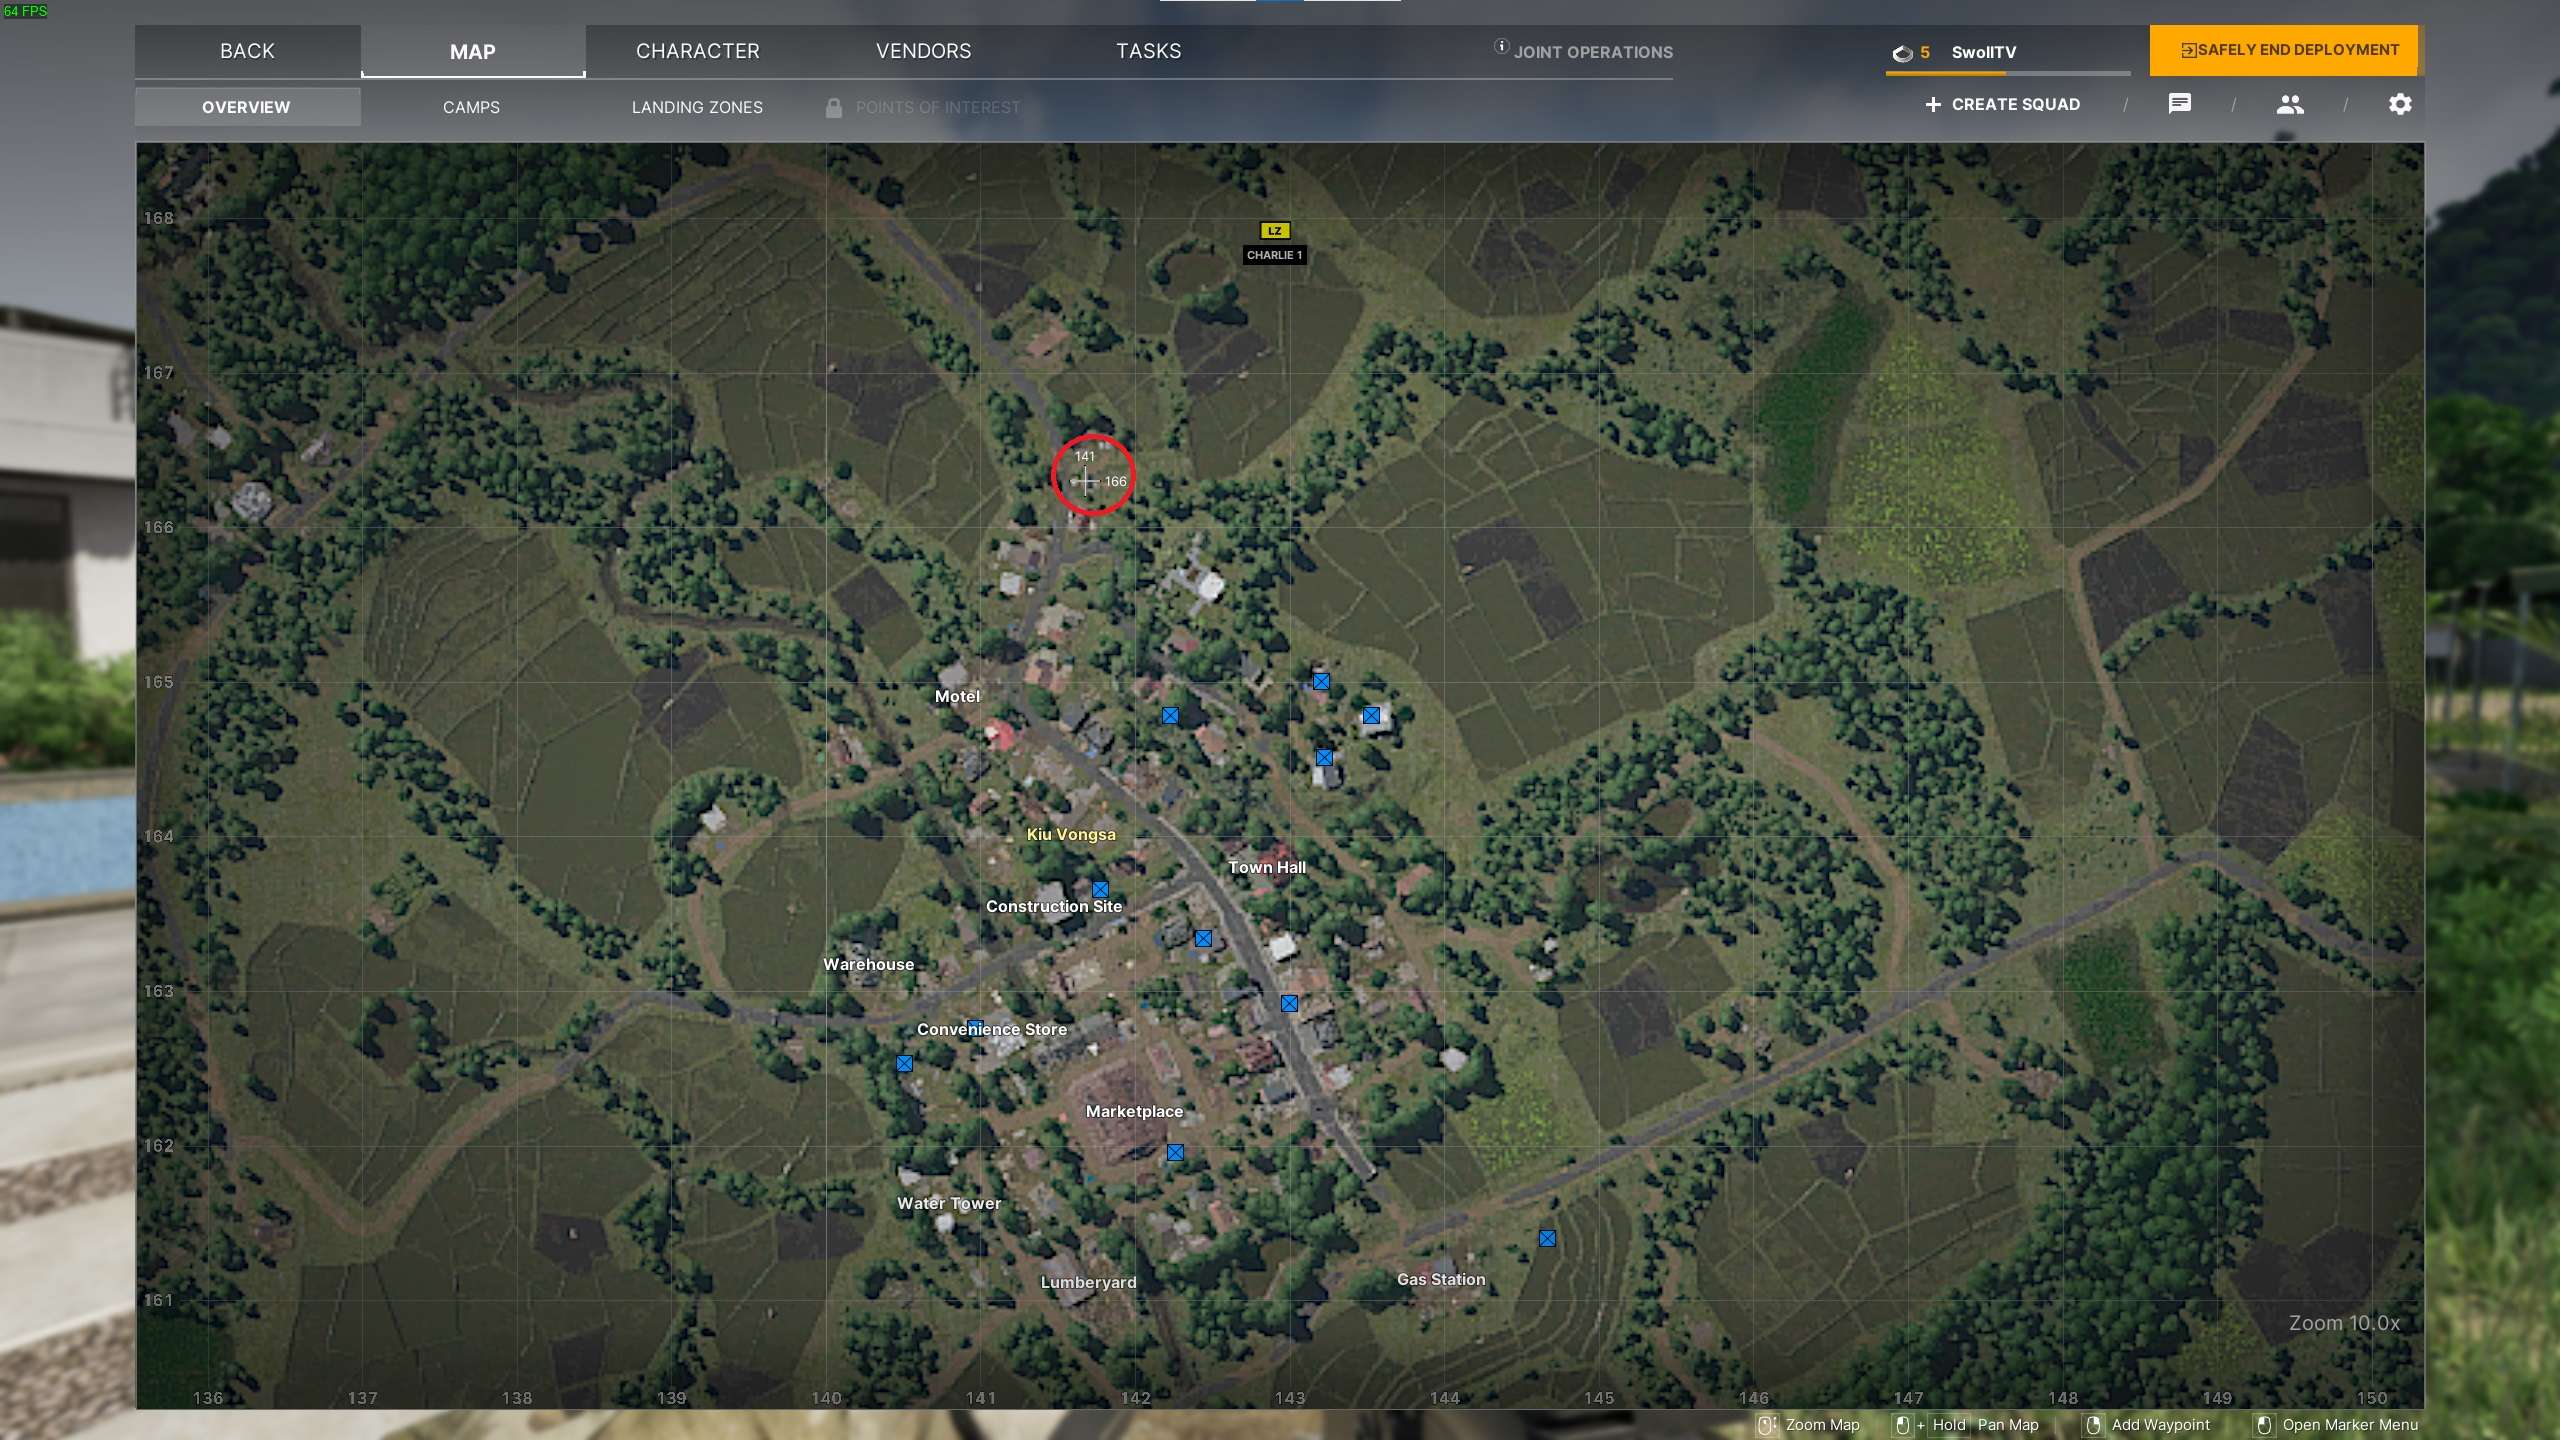
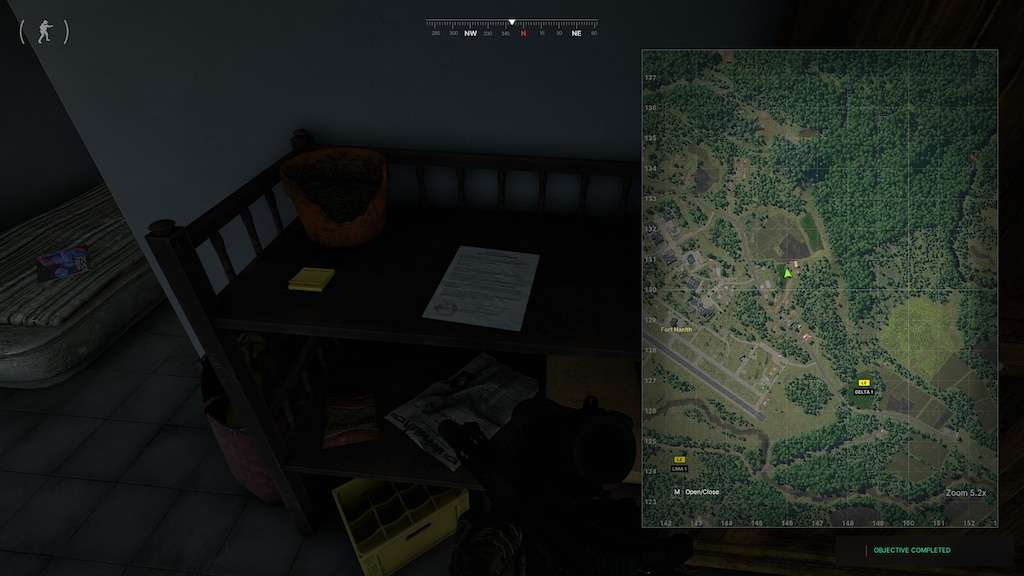
- Medical Detective Location – 141 166
Note: To get this task done, make sure you’ve got your hands on the KV, NT, or PL Doc Key. You’re gonna need one of those to unlock whatever it is you’re up to.
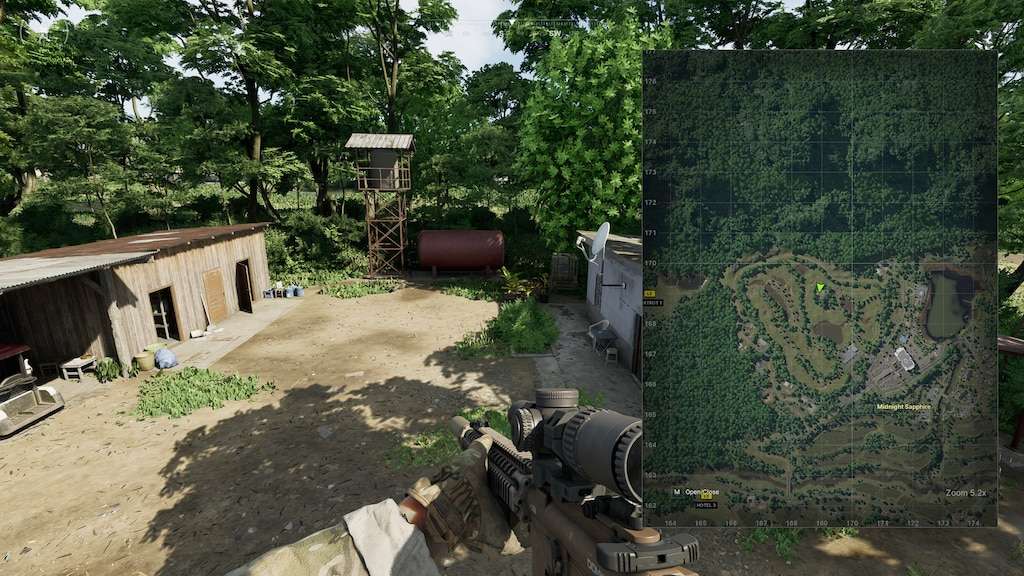
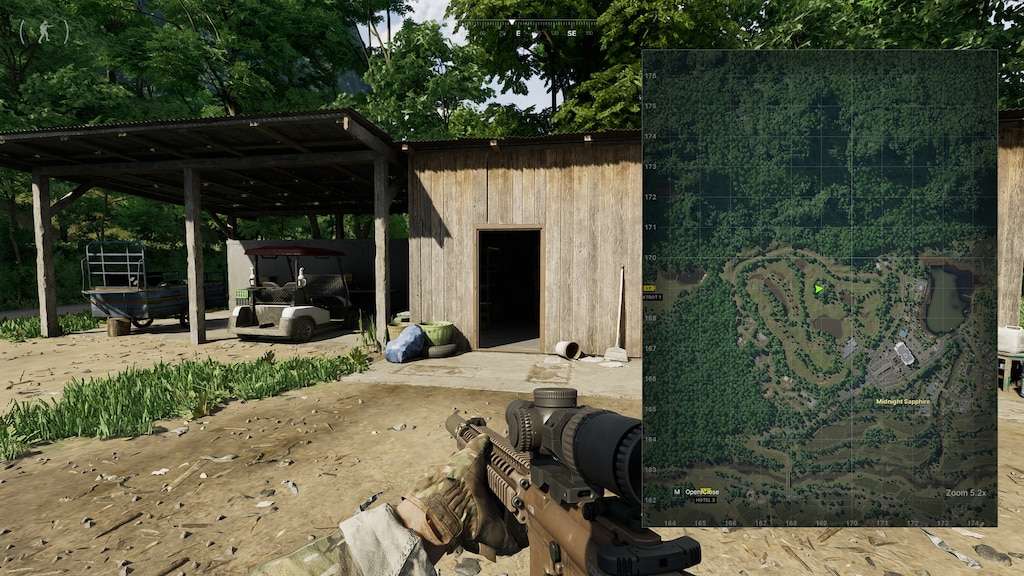
Rats Nest Hideout
#8: Rats Nest Hideout
- Rats Nest Hideout Location SouthEast – 143 162
- Rats Nest Hideout Location SouthWest – 140 162
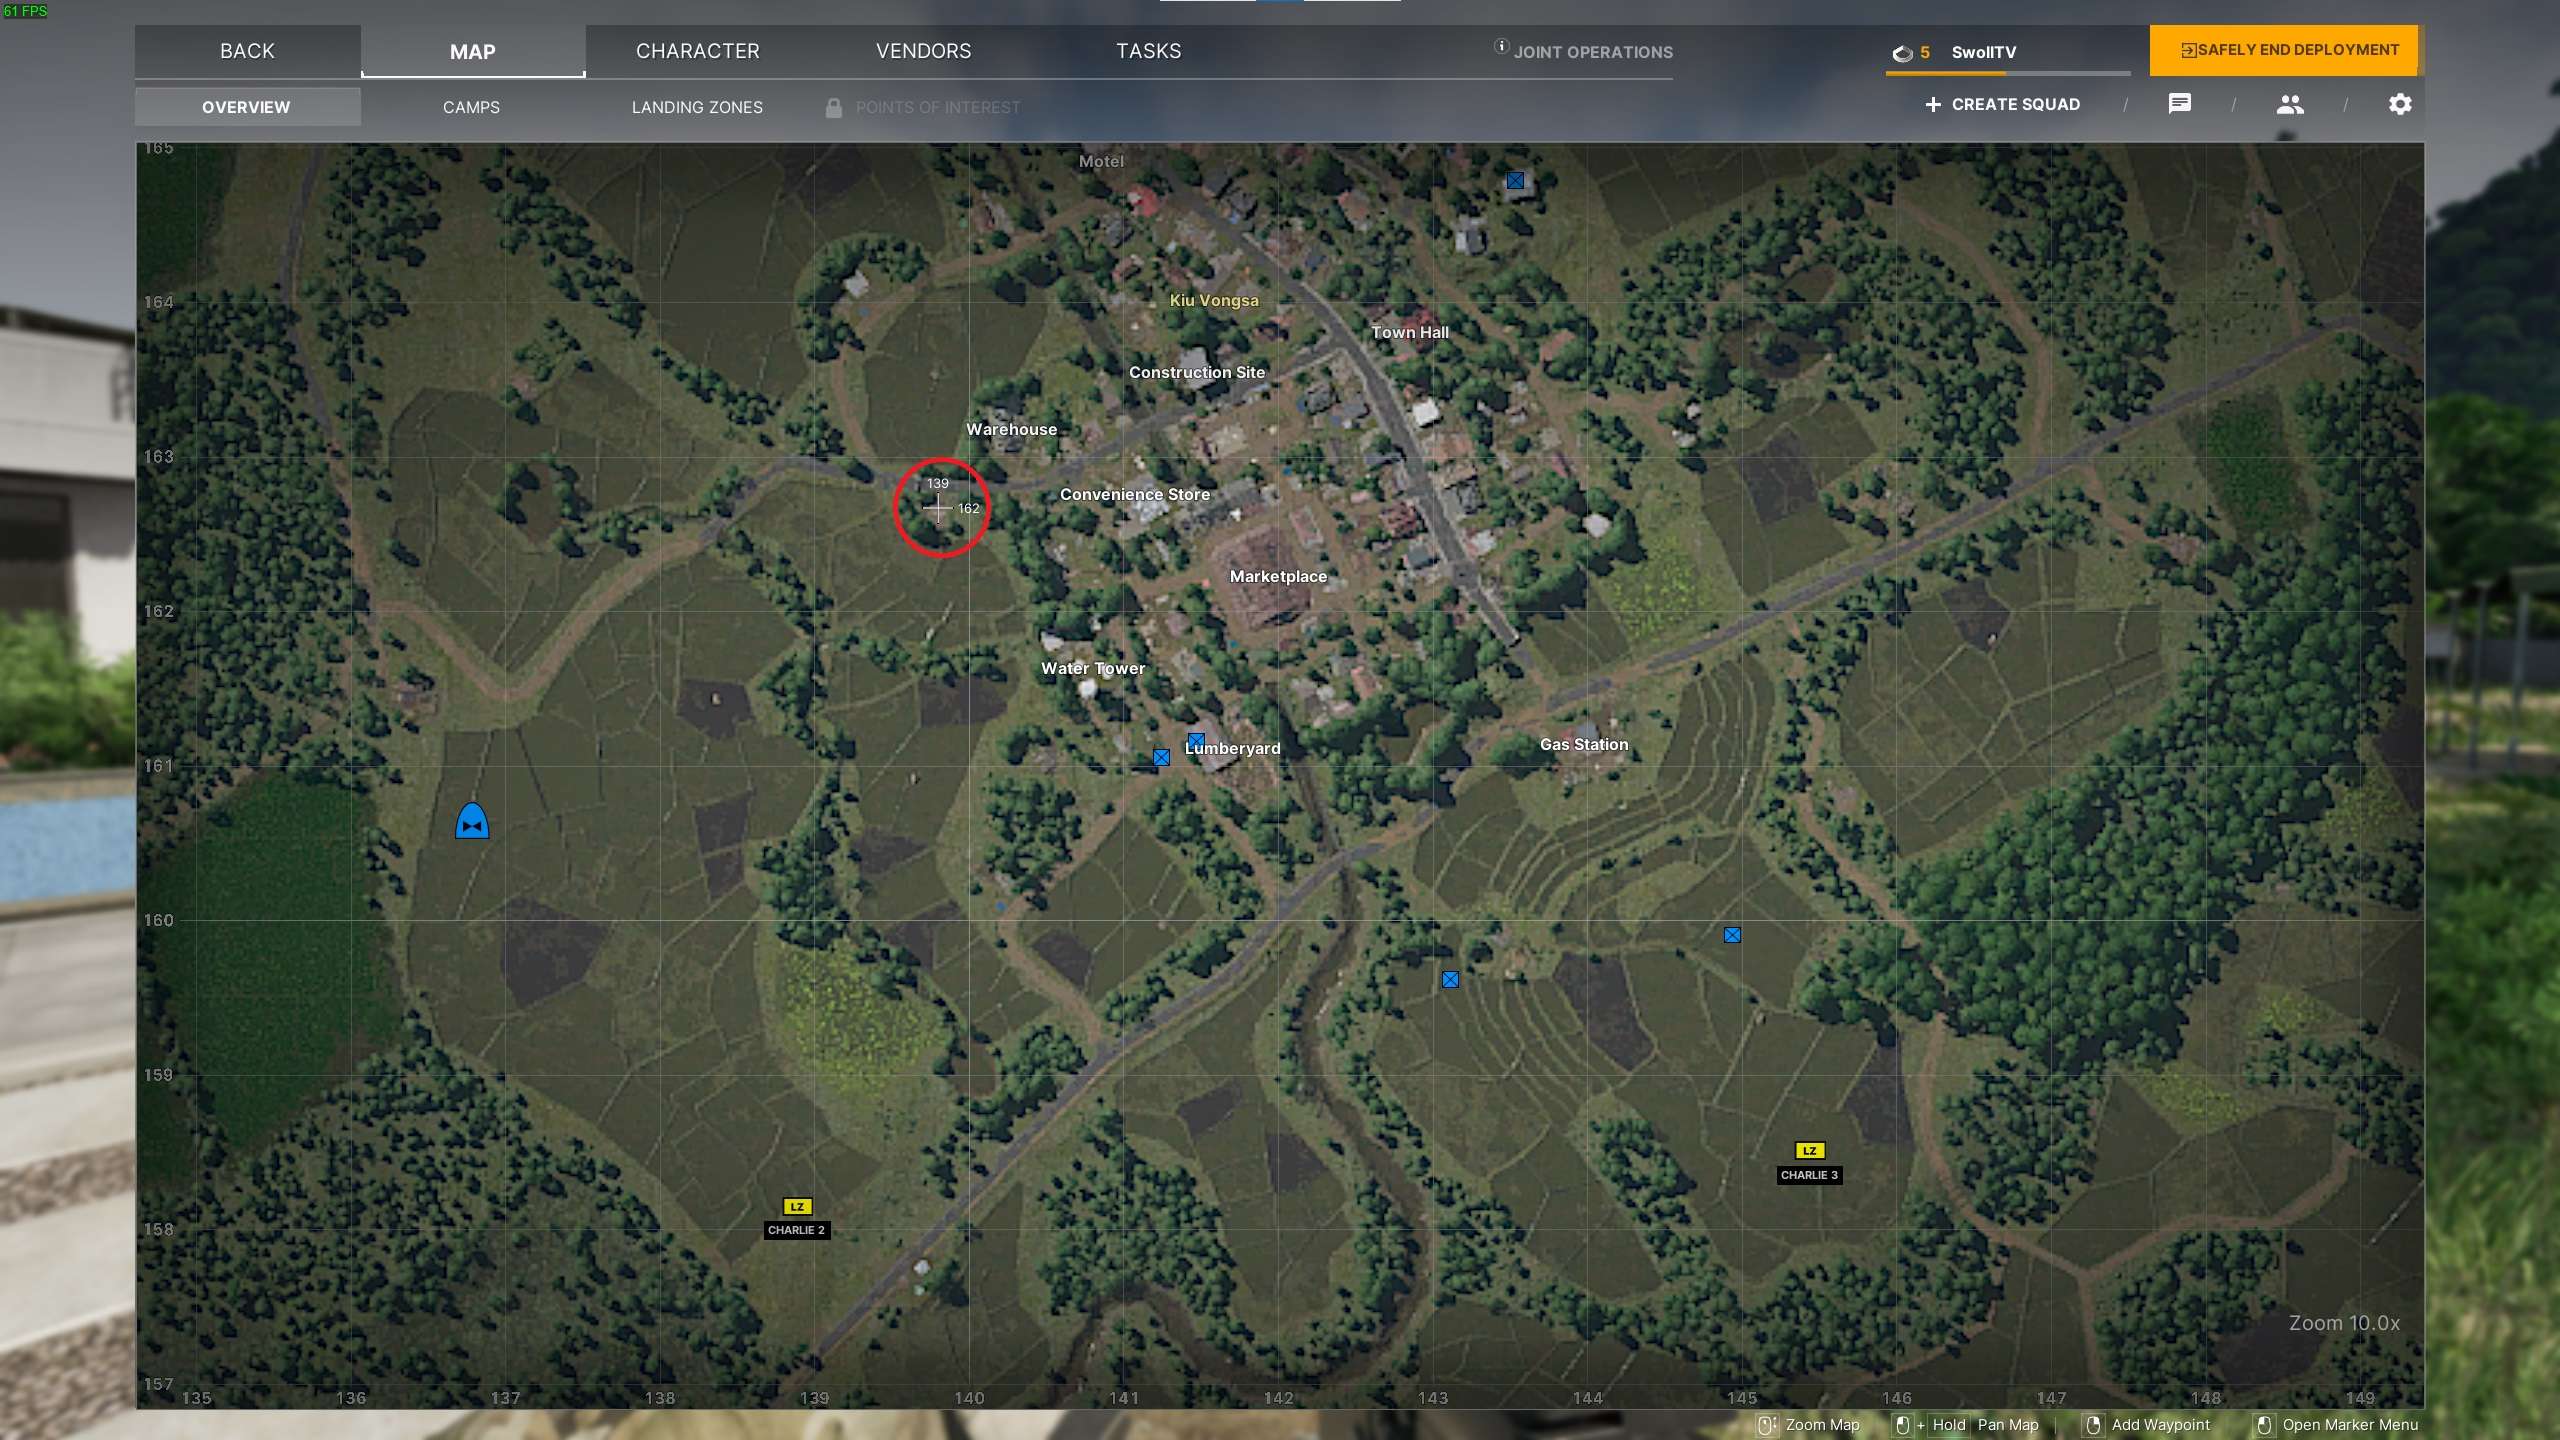
Secret Compassion
#9: Secret Compassion
- Secret Compassion Location East – 145 162
- Secret Compassion Location SouthWest – 140 160
- Secret Compassion Location West – 139 162

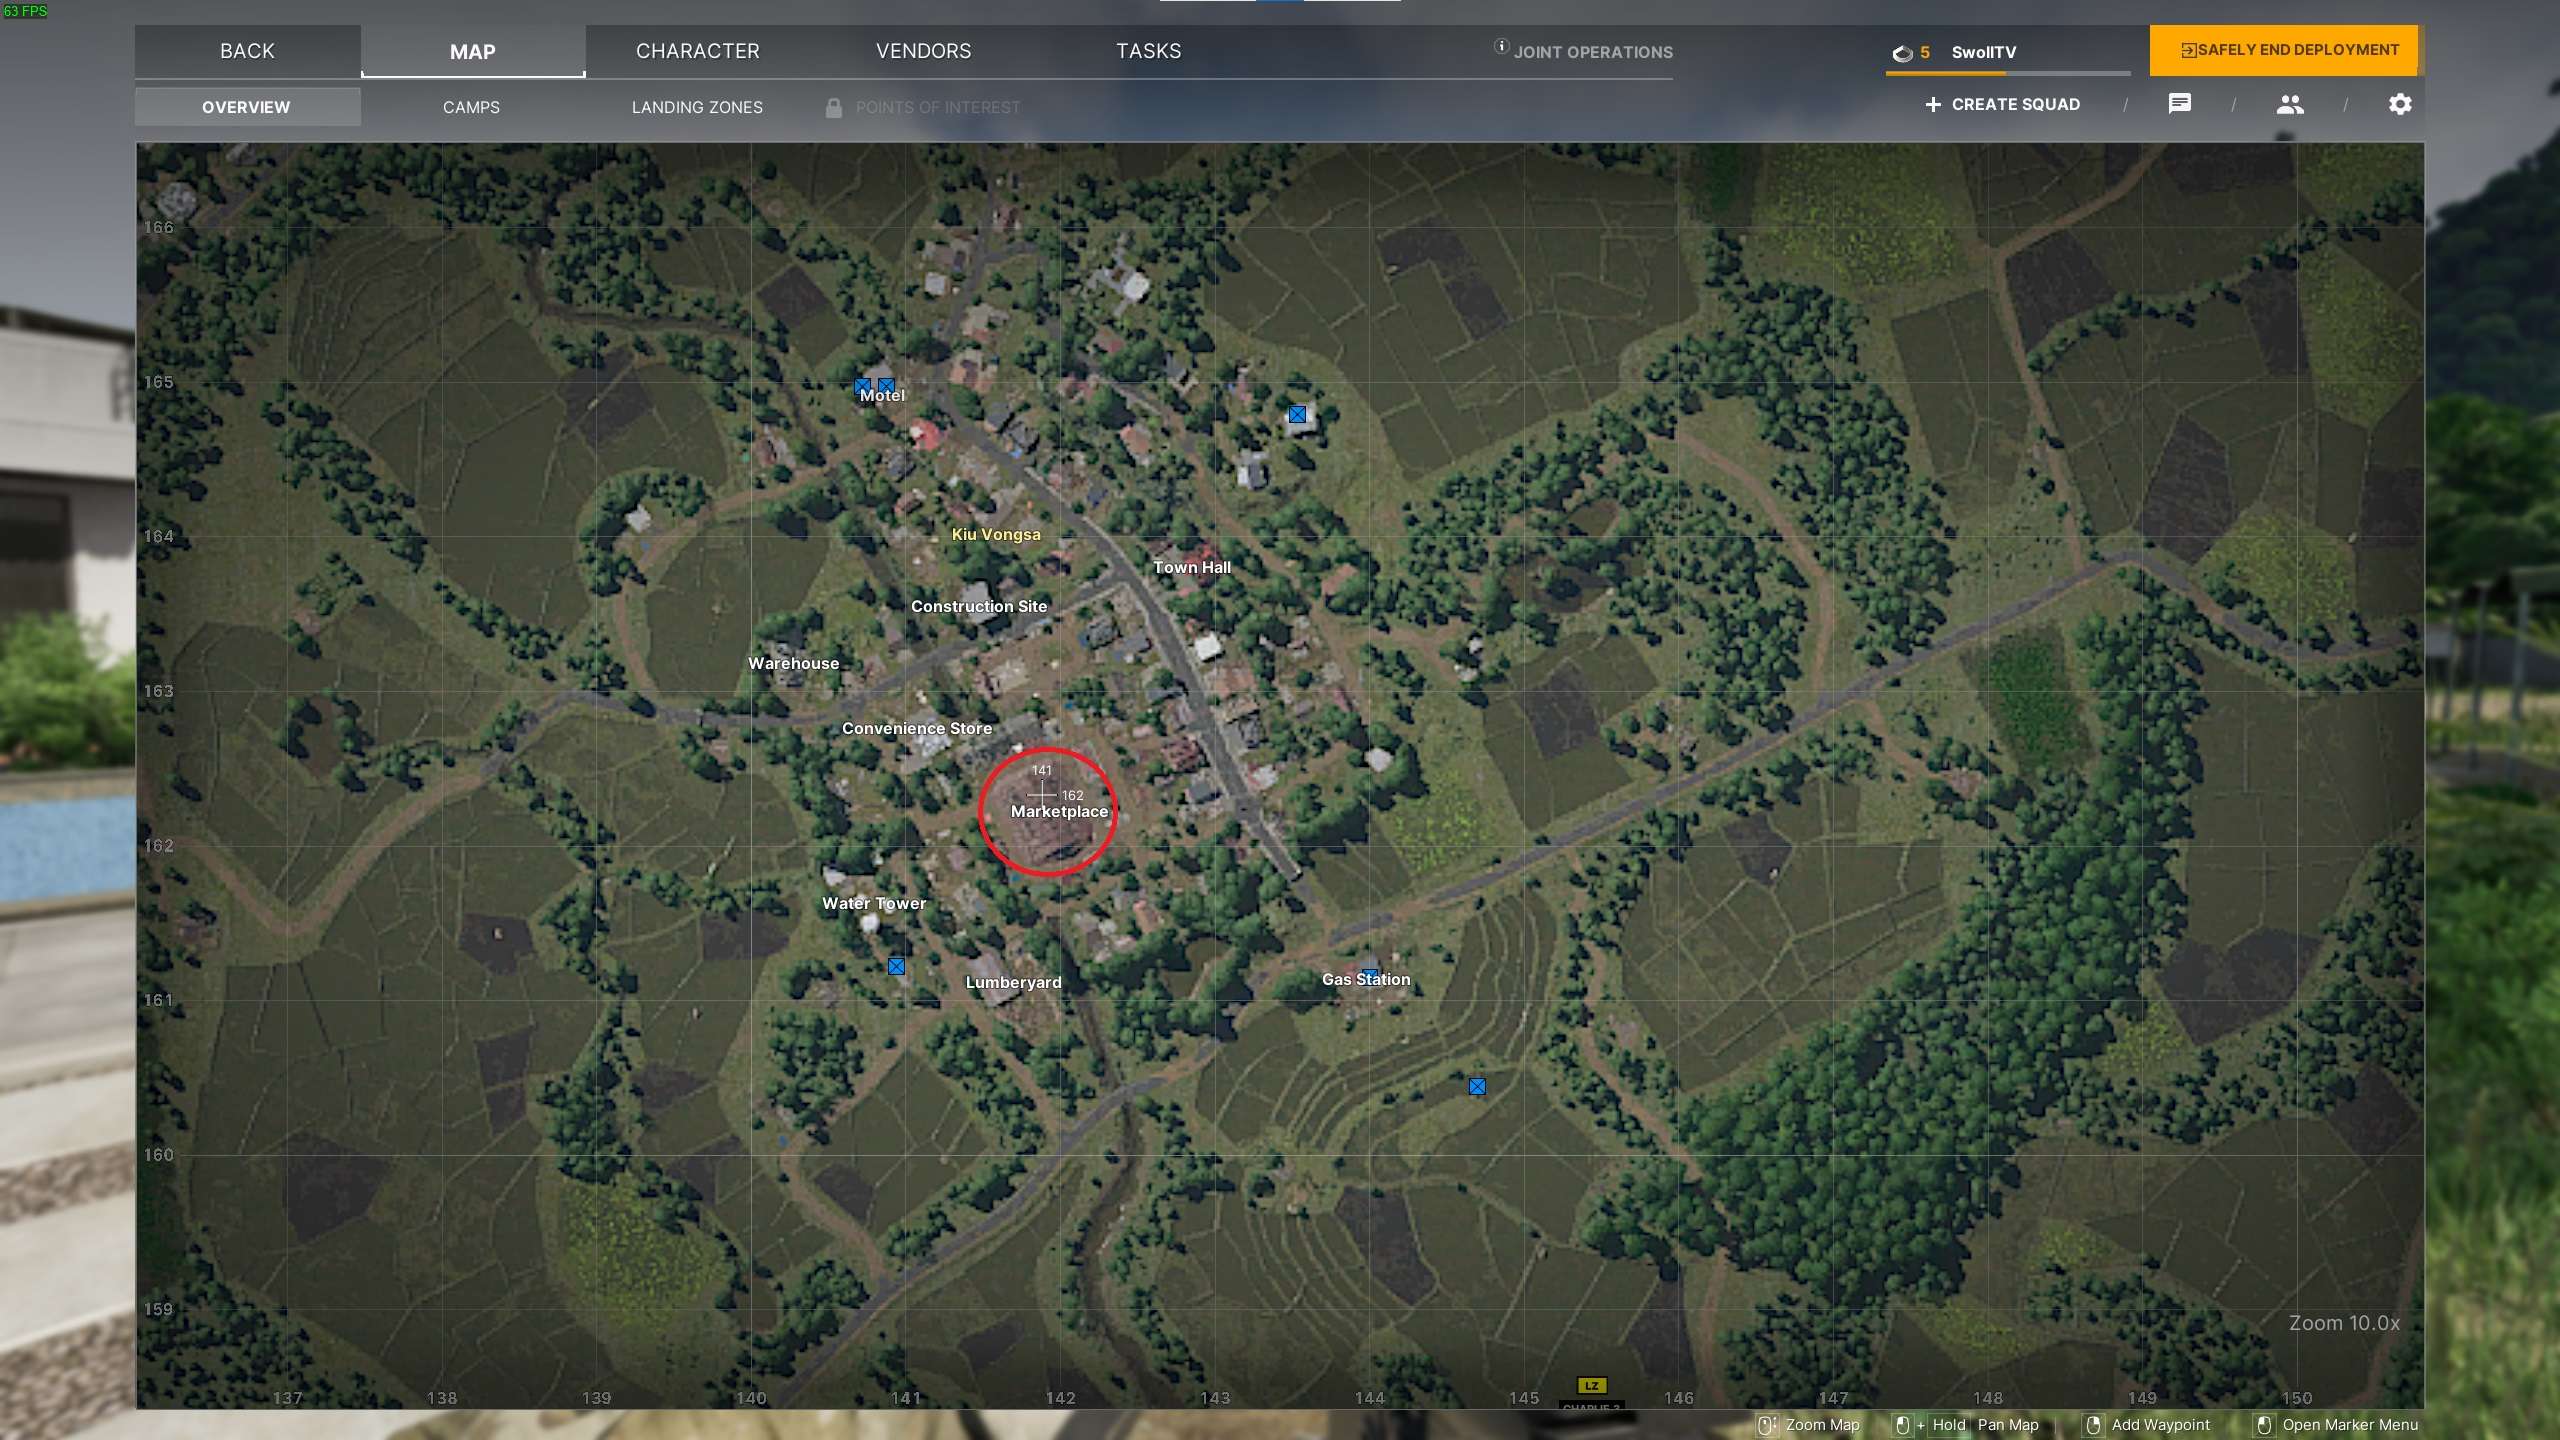
Native Negotiations
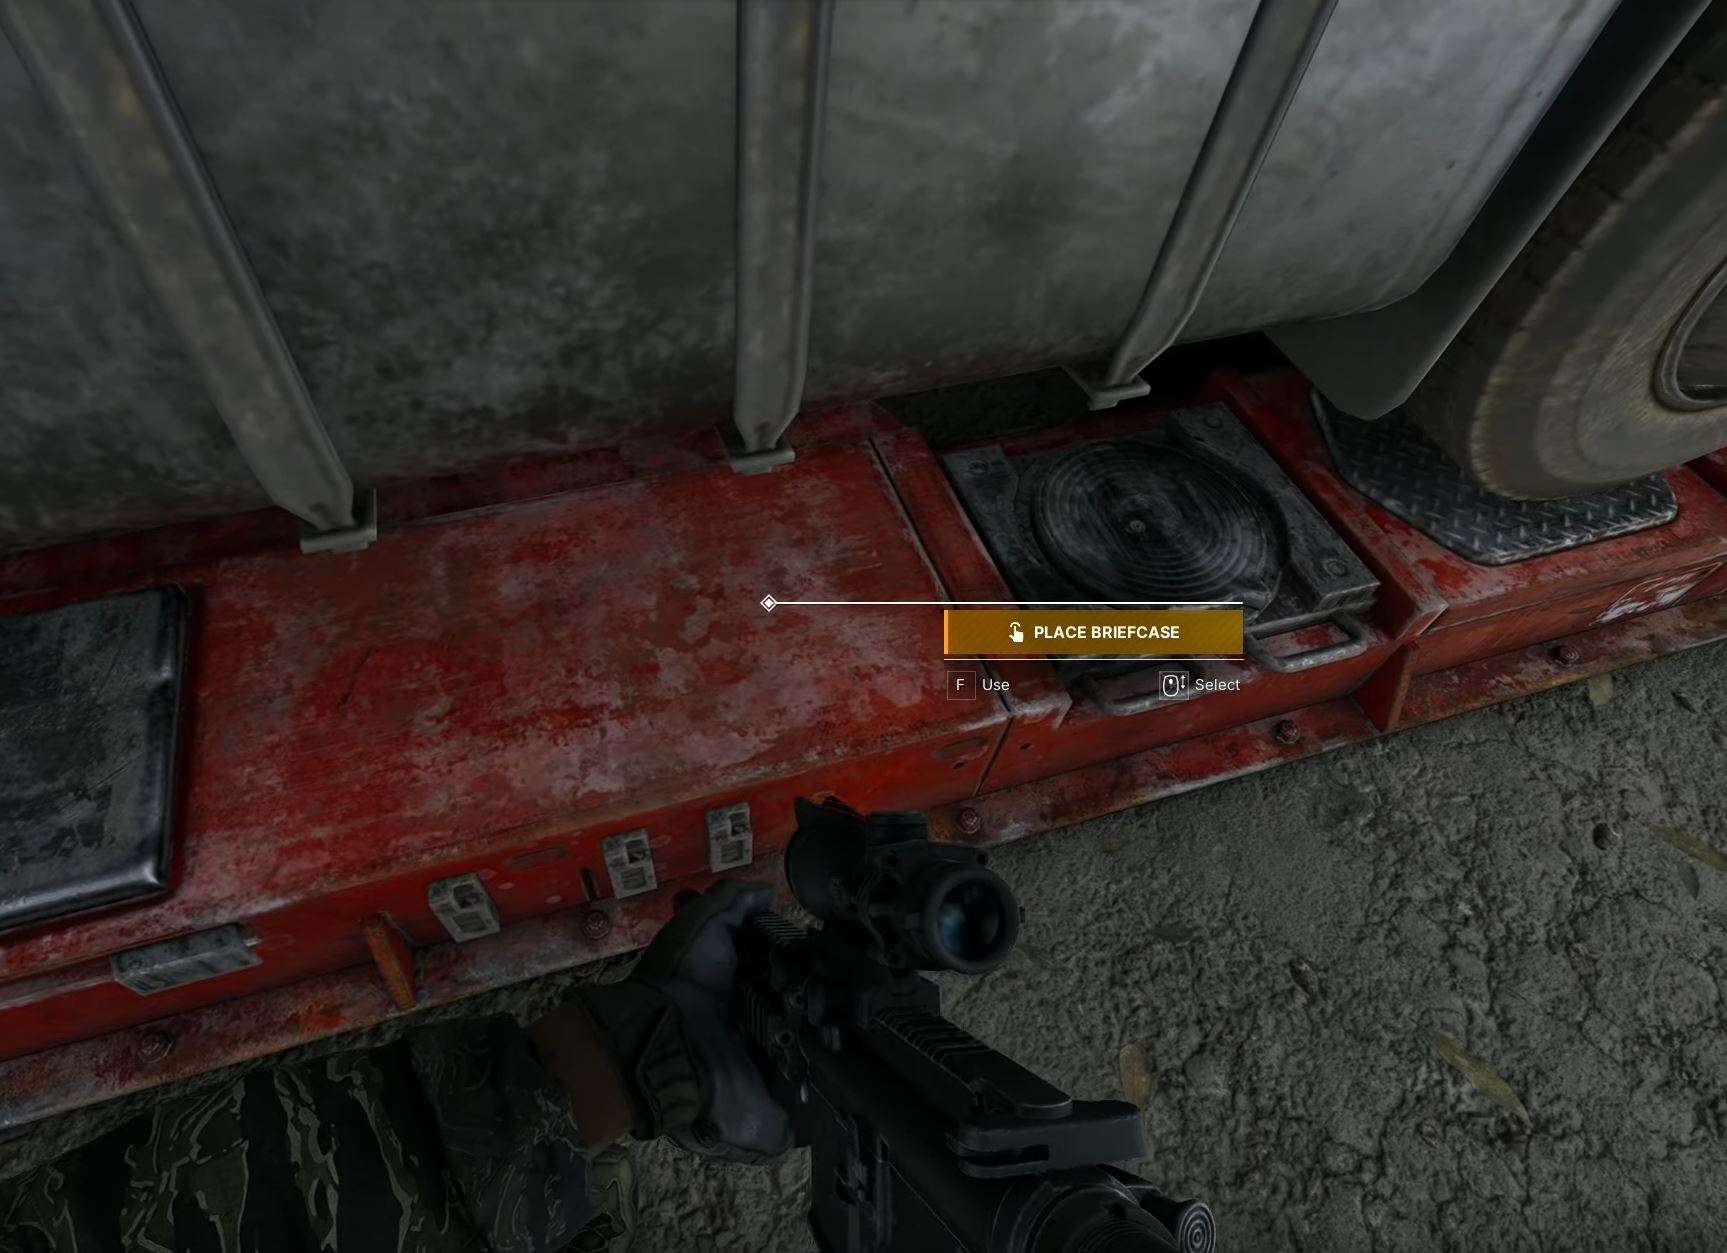
#10: Native Negotiations
- Native Negotiations Briefcase Pickup – At The Command Tent In The Base Camp
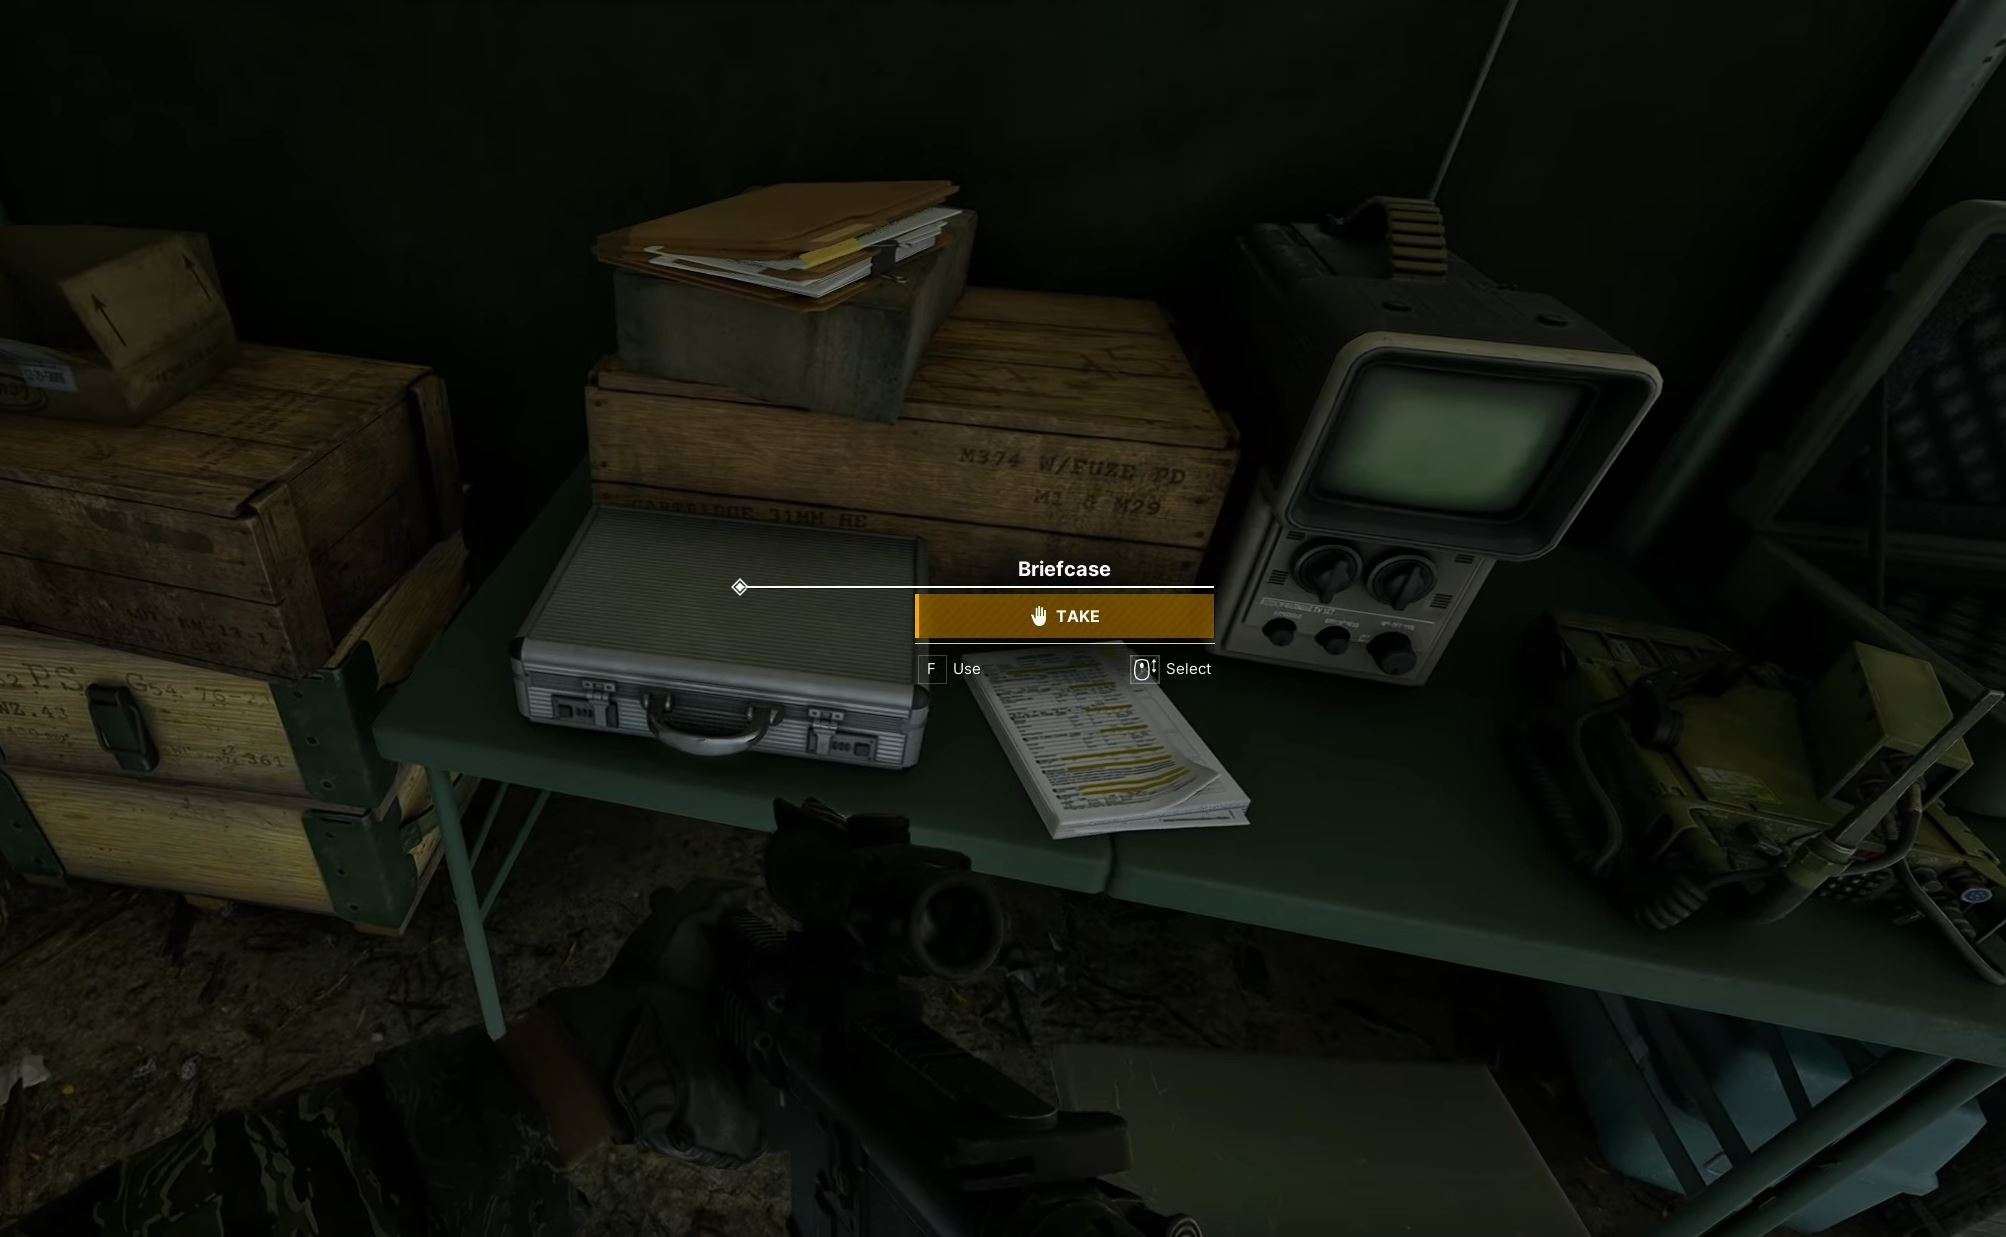
- Native Negotiations Briefcase Drop – 141 164

Helping Hand
#11: Helping Hand
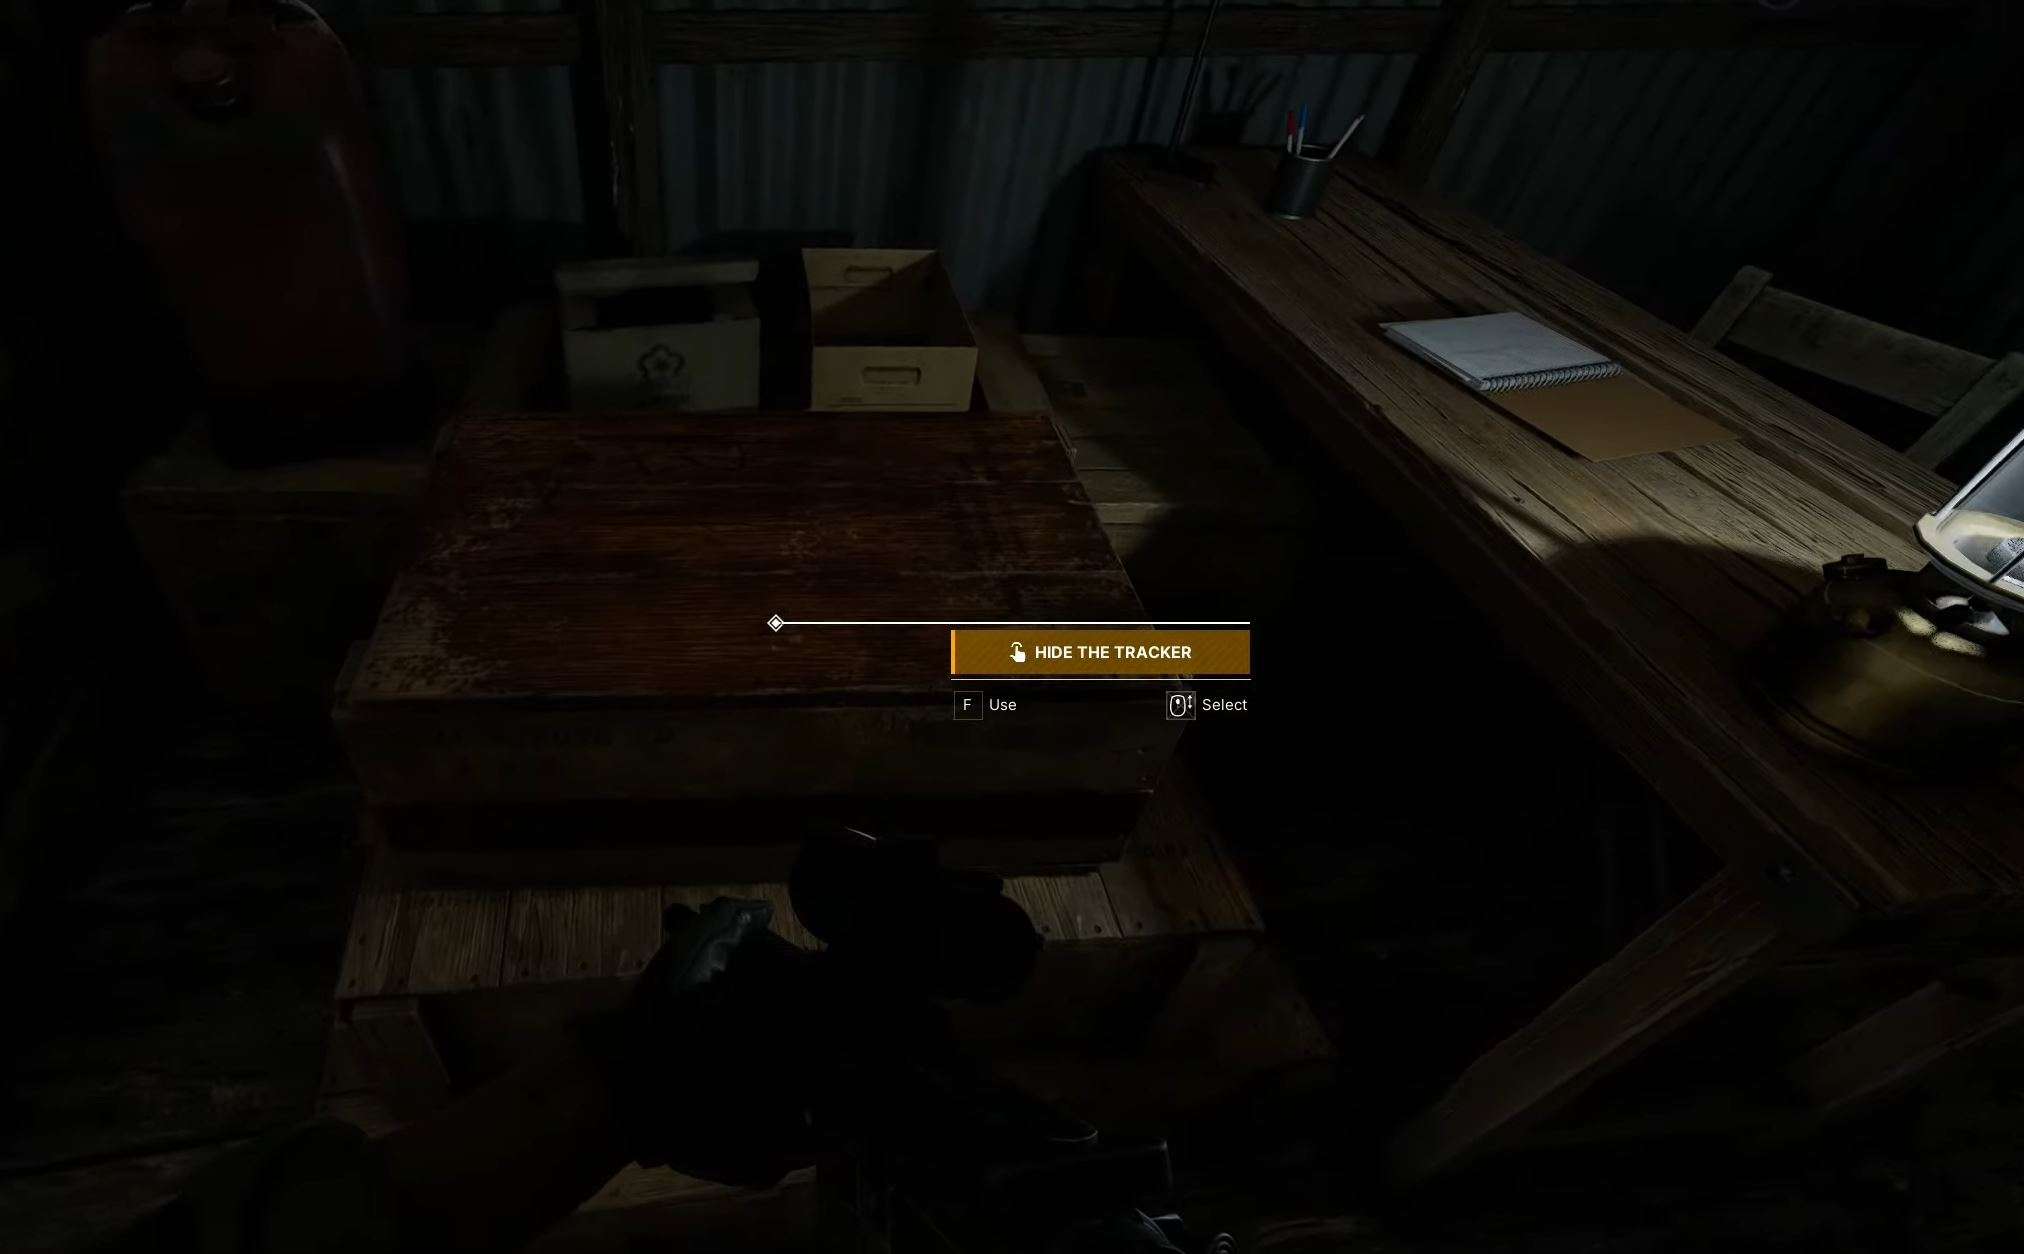
- Helping Hand Location – 141 164
Note: Now you’ll be needing the KV, NT, or PL Attic Key to tackle this task. Make sure you’ve got the right one before you dive in.

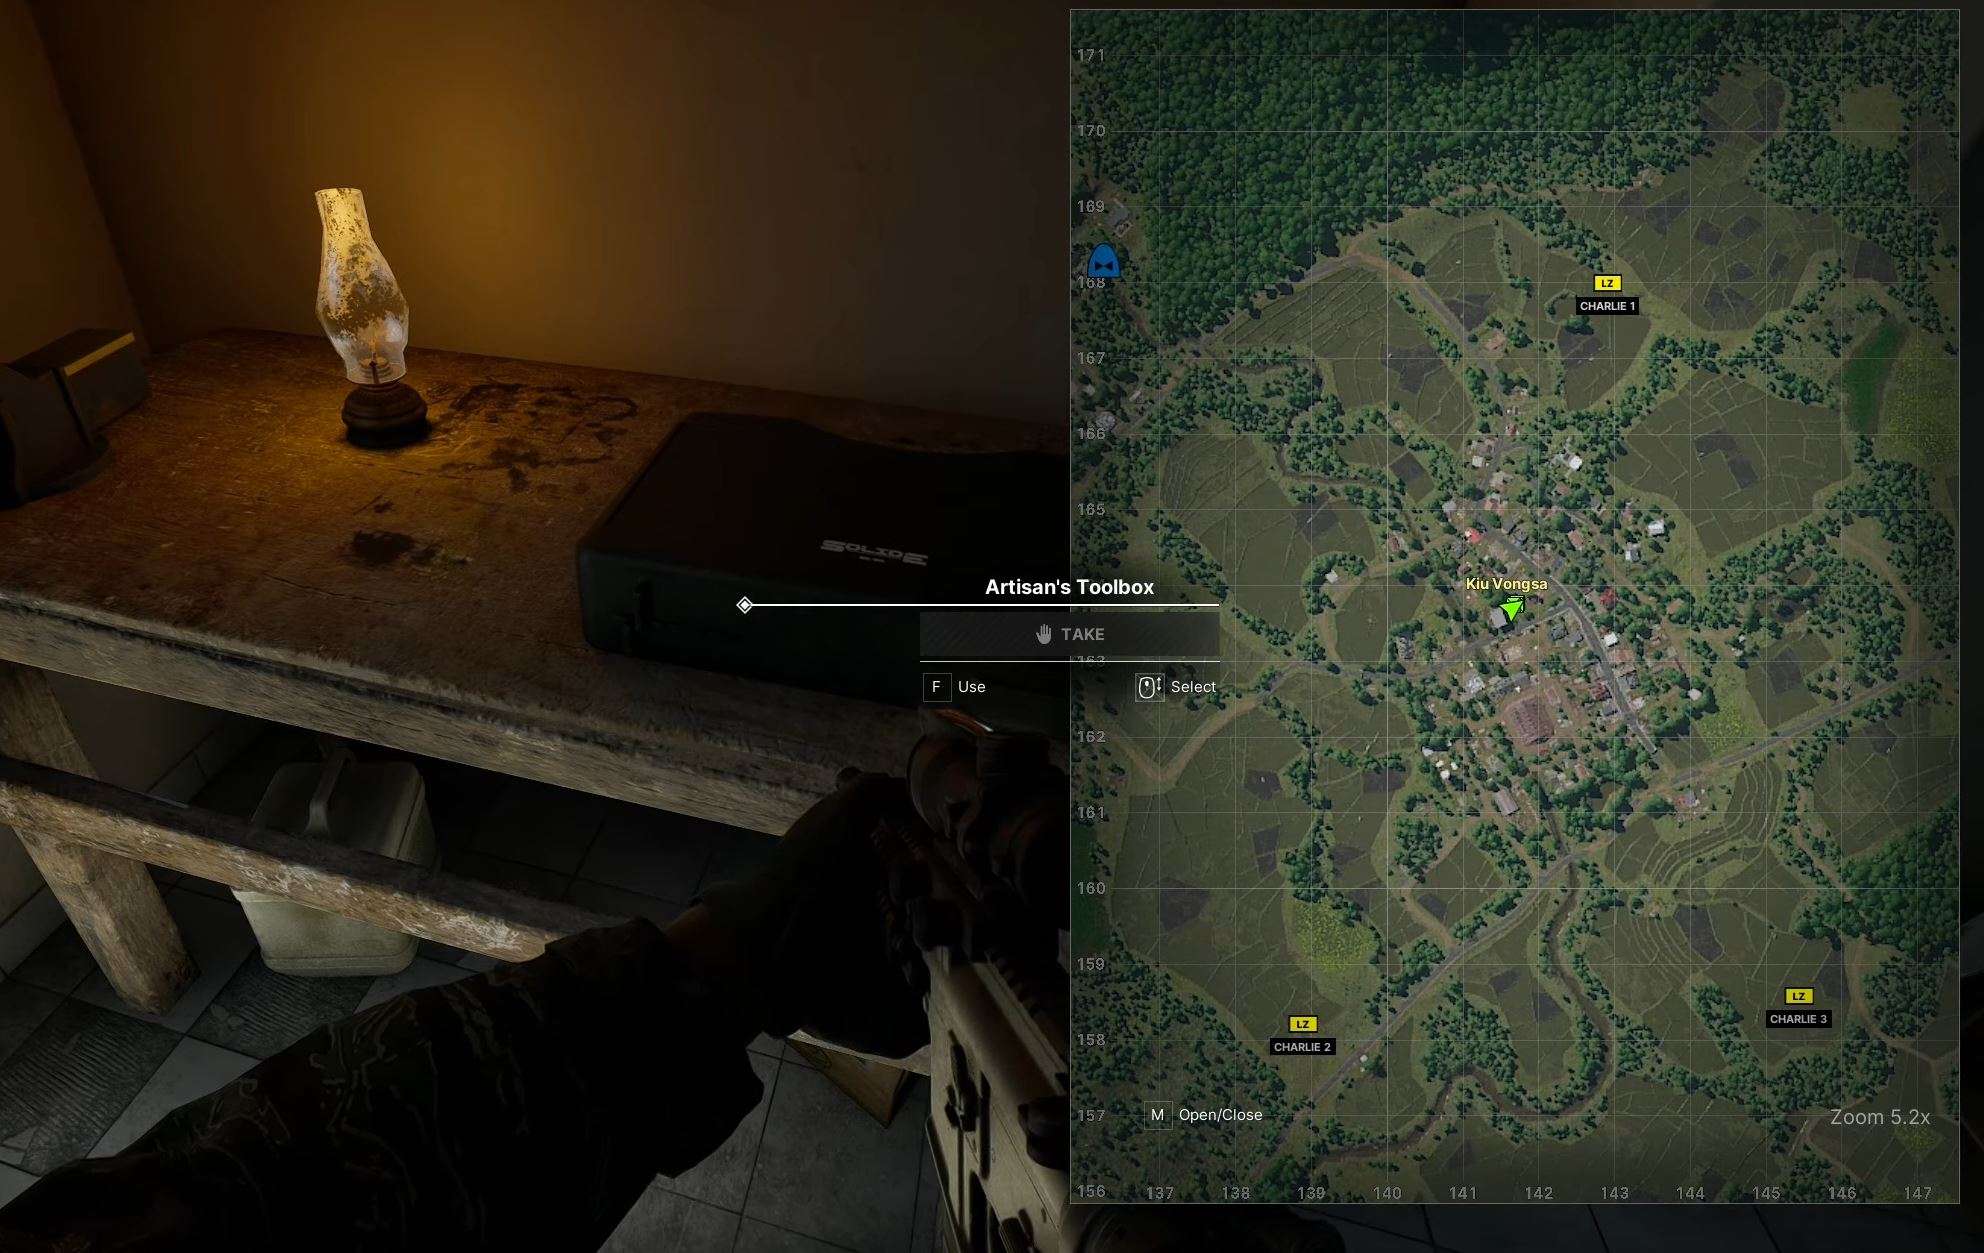
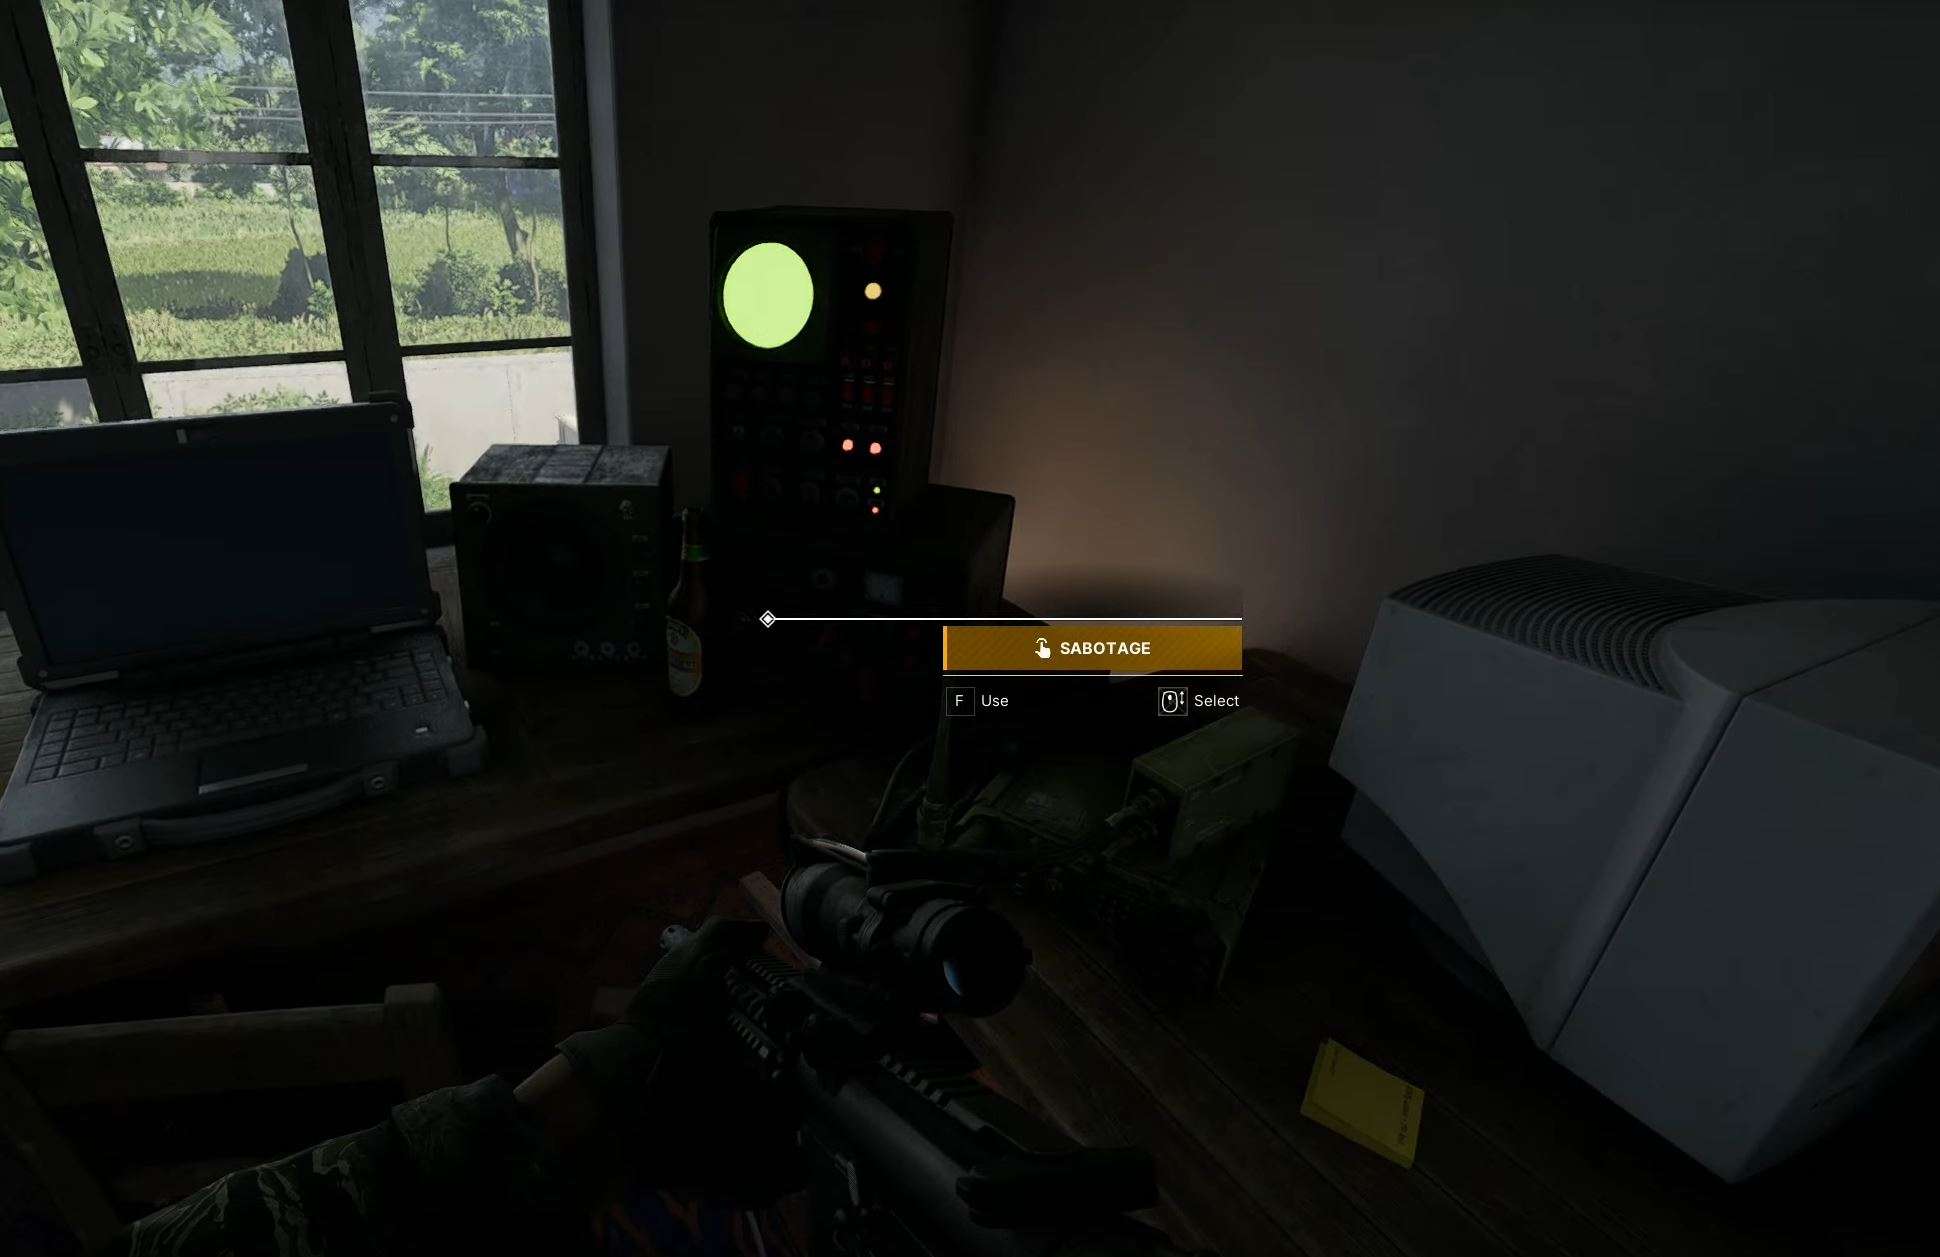
Tools of the Trade
#12: Tools of the Trade
- Tools of the Trade Location – 141 163
Radio Silence
#13: Radio Silence
- Radio Silence Location – 140 164
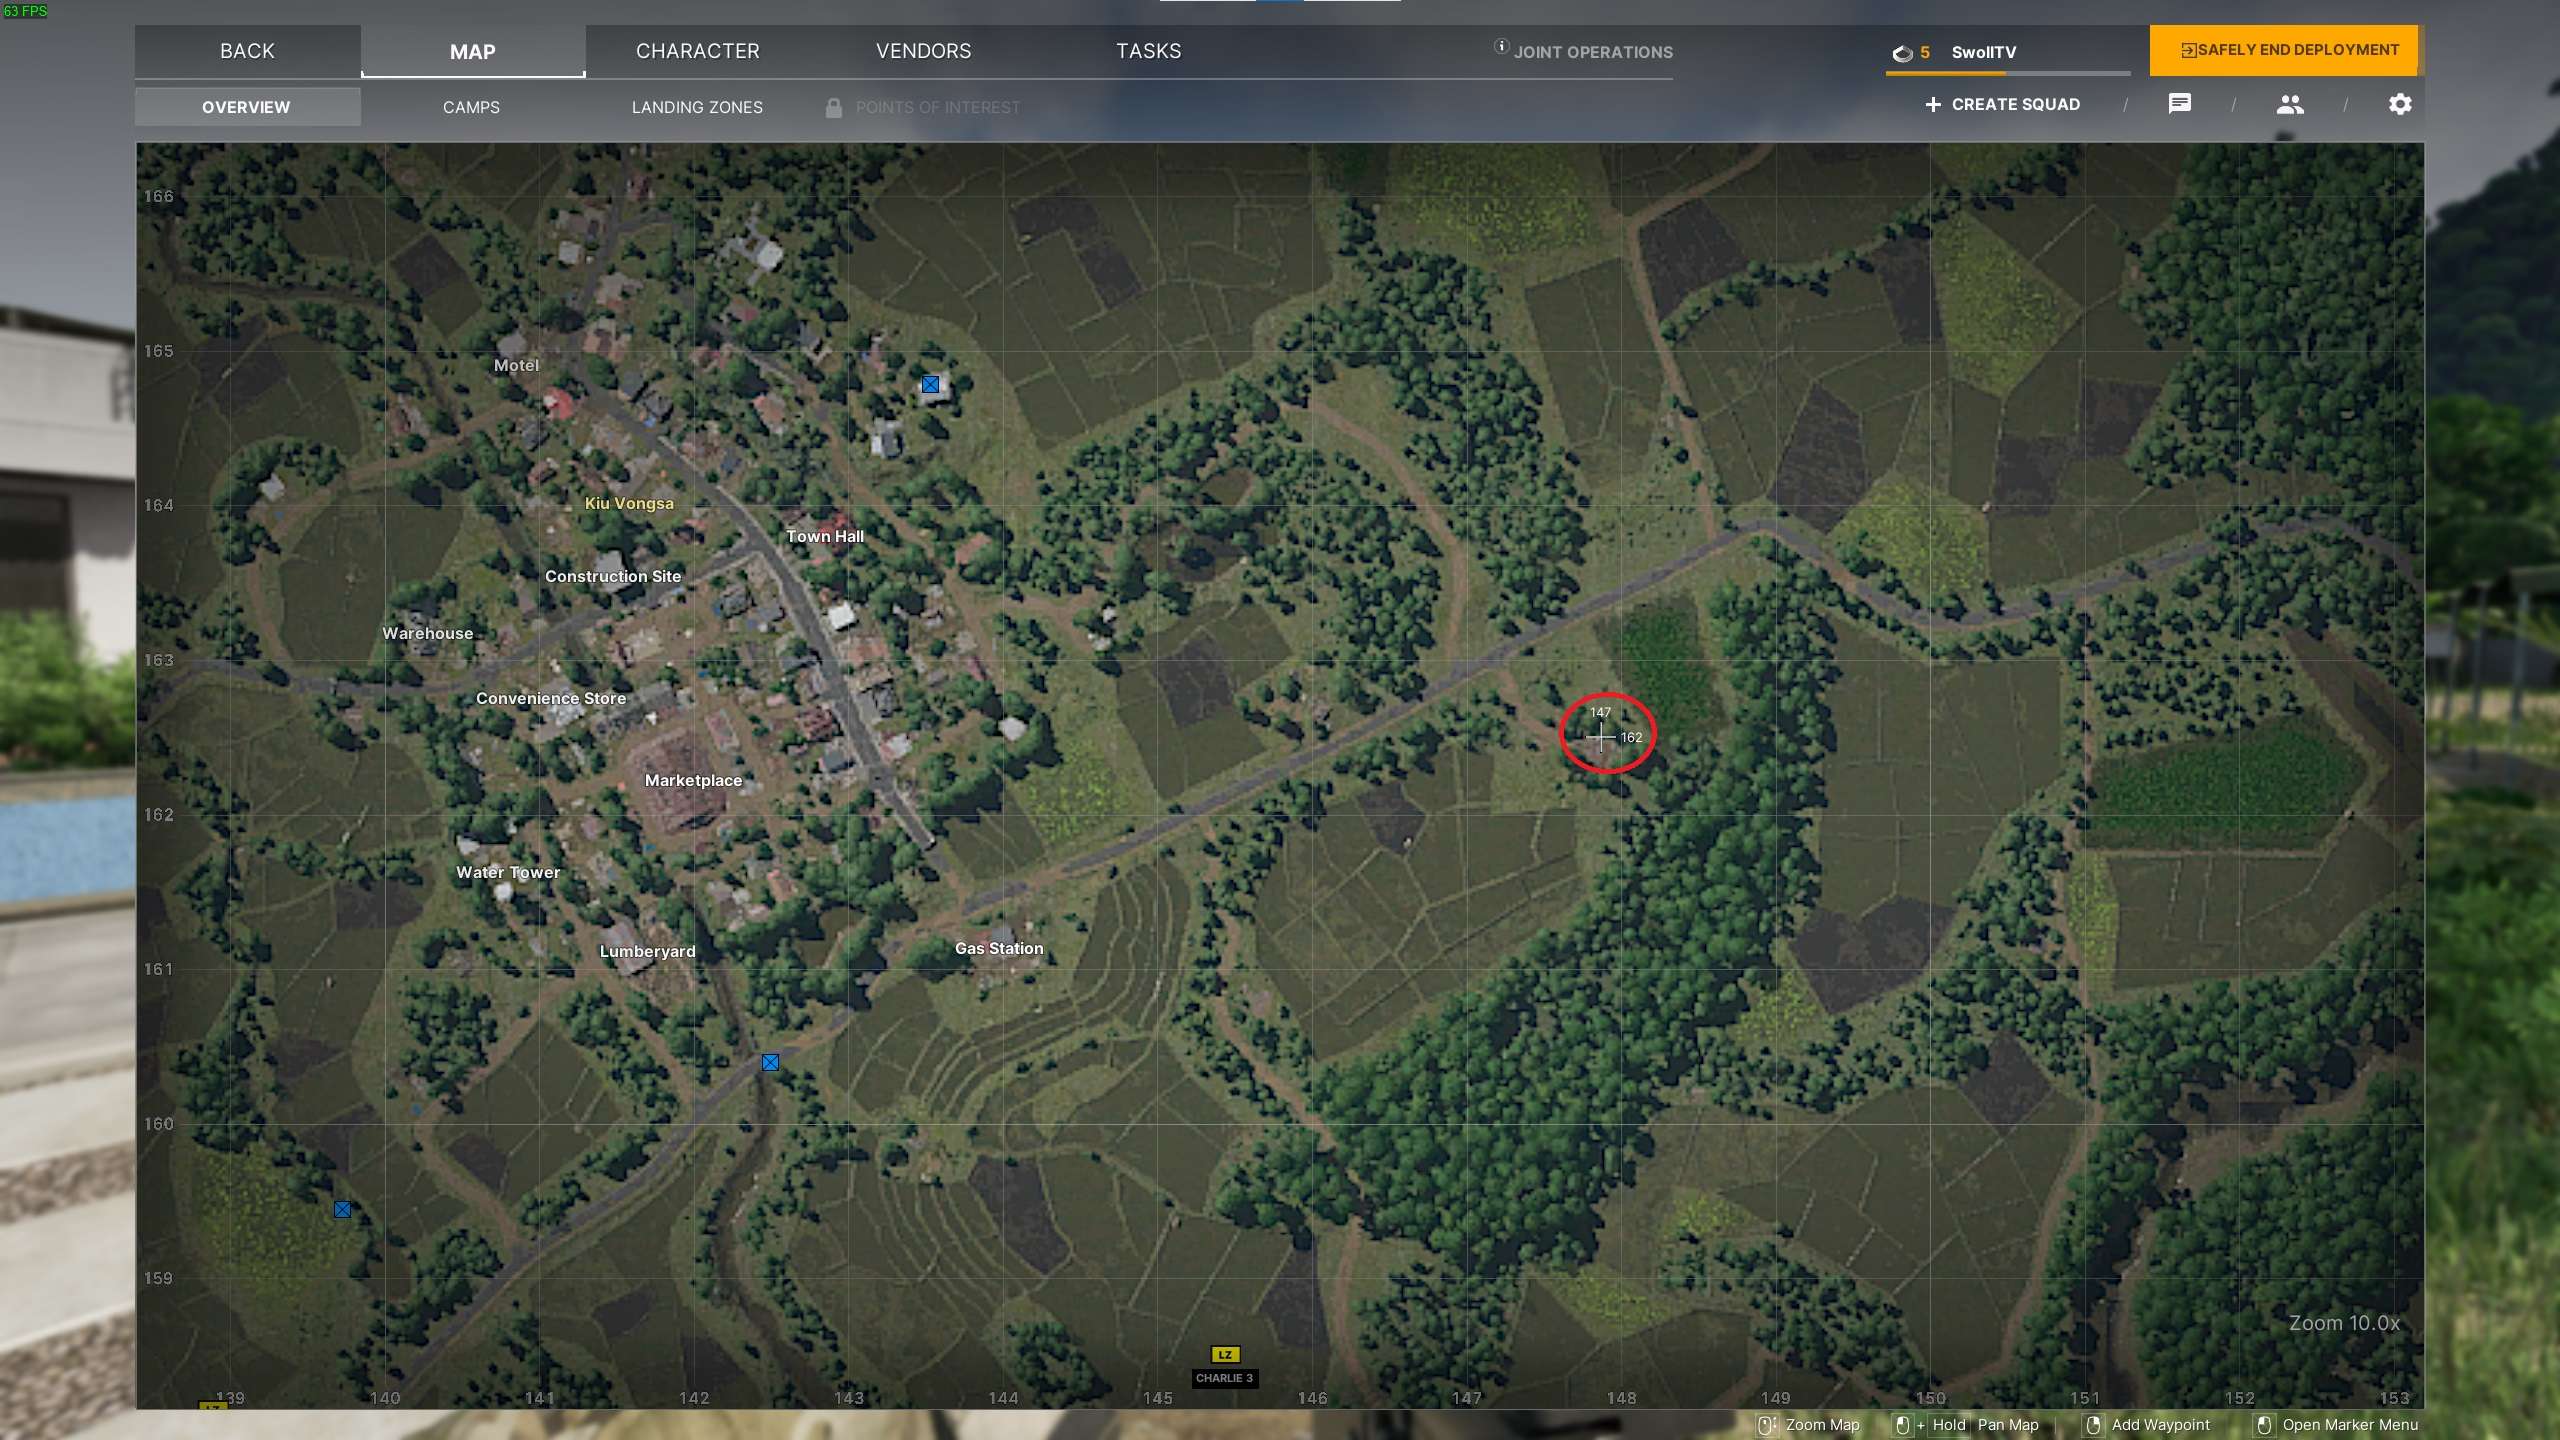
Left Behind & Last Farewell Body
#14: Left Behind & Last Farewell Body
- Left Behind & Last Farewell Body Location – 147 162

First Hit Criminal Leader
#15: First Hit Criminal Leader
- First Hit Criminal Leader Location – 141 162
Note: You have to hit the boss and kill him to perform this task.
The boss have a red beret.
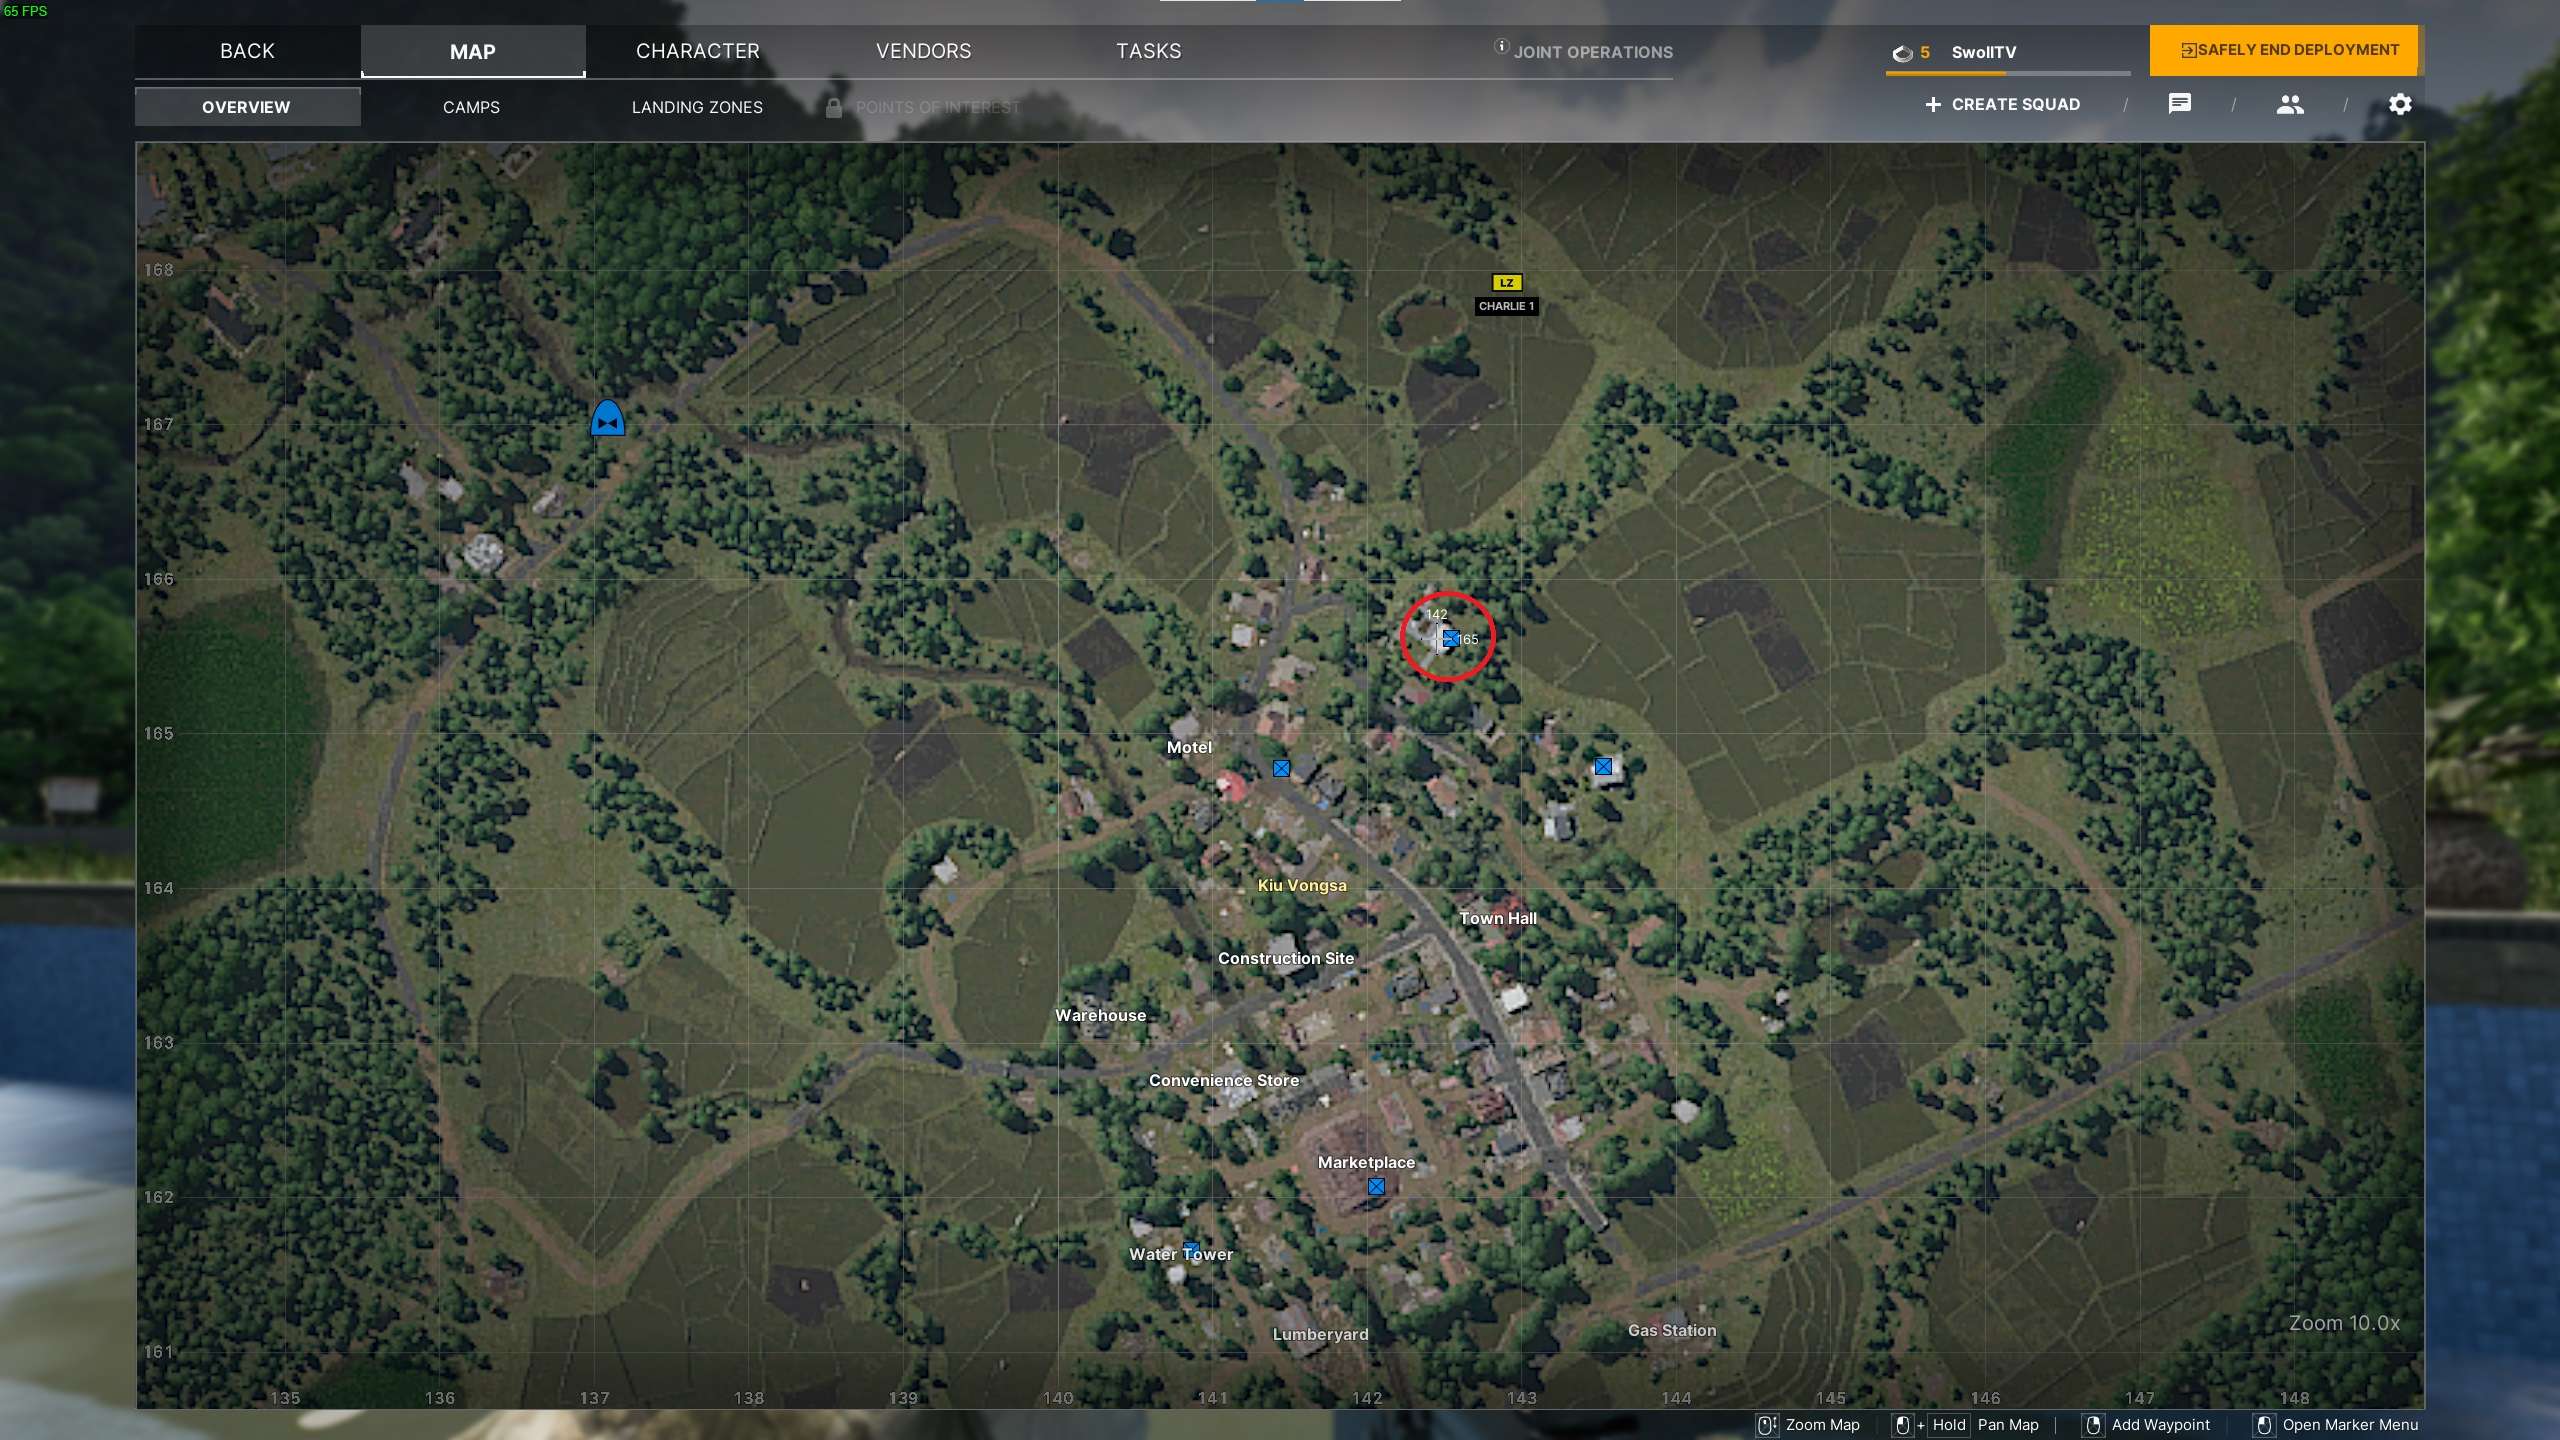
Reclamation + Covert Research
#16: Reclamation + Covert Research
- Reclamation + Covert Research Location – 142 165
Note: You have to choose between Lab Rat or Handshake to perform this task.

All Tasks Locations (Same for All)
Tasks are at the same location for all from now!
- Below this section, the tasks are exactly the same for every faction!
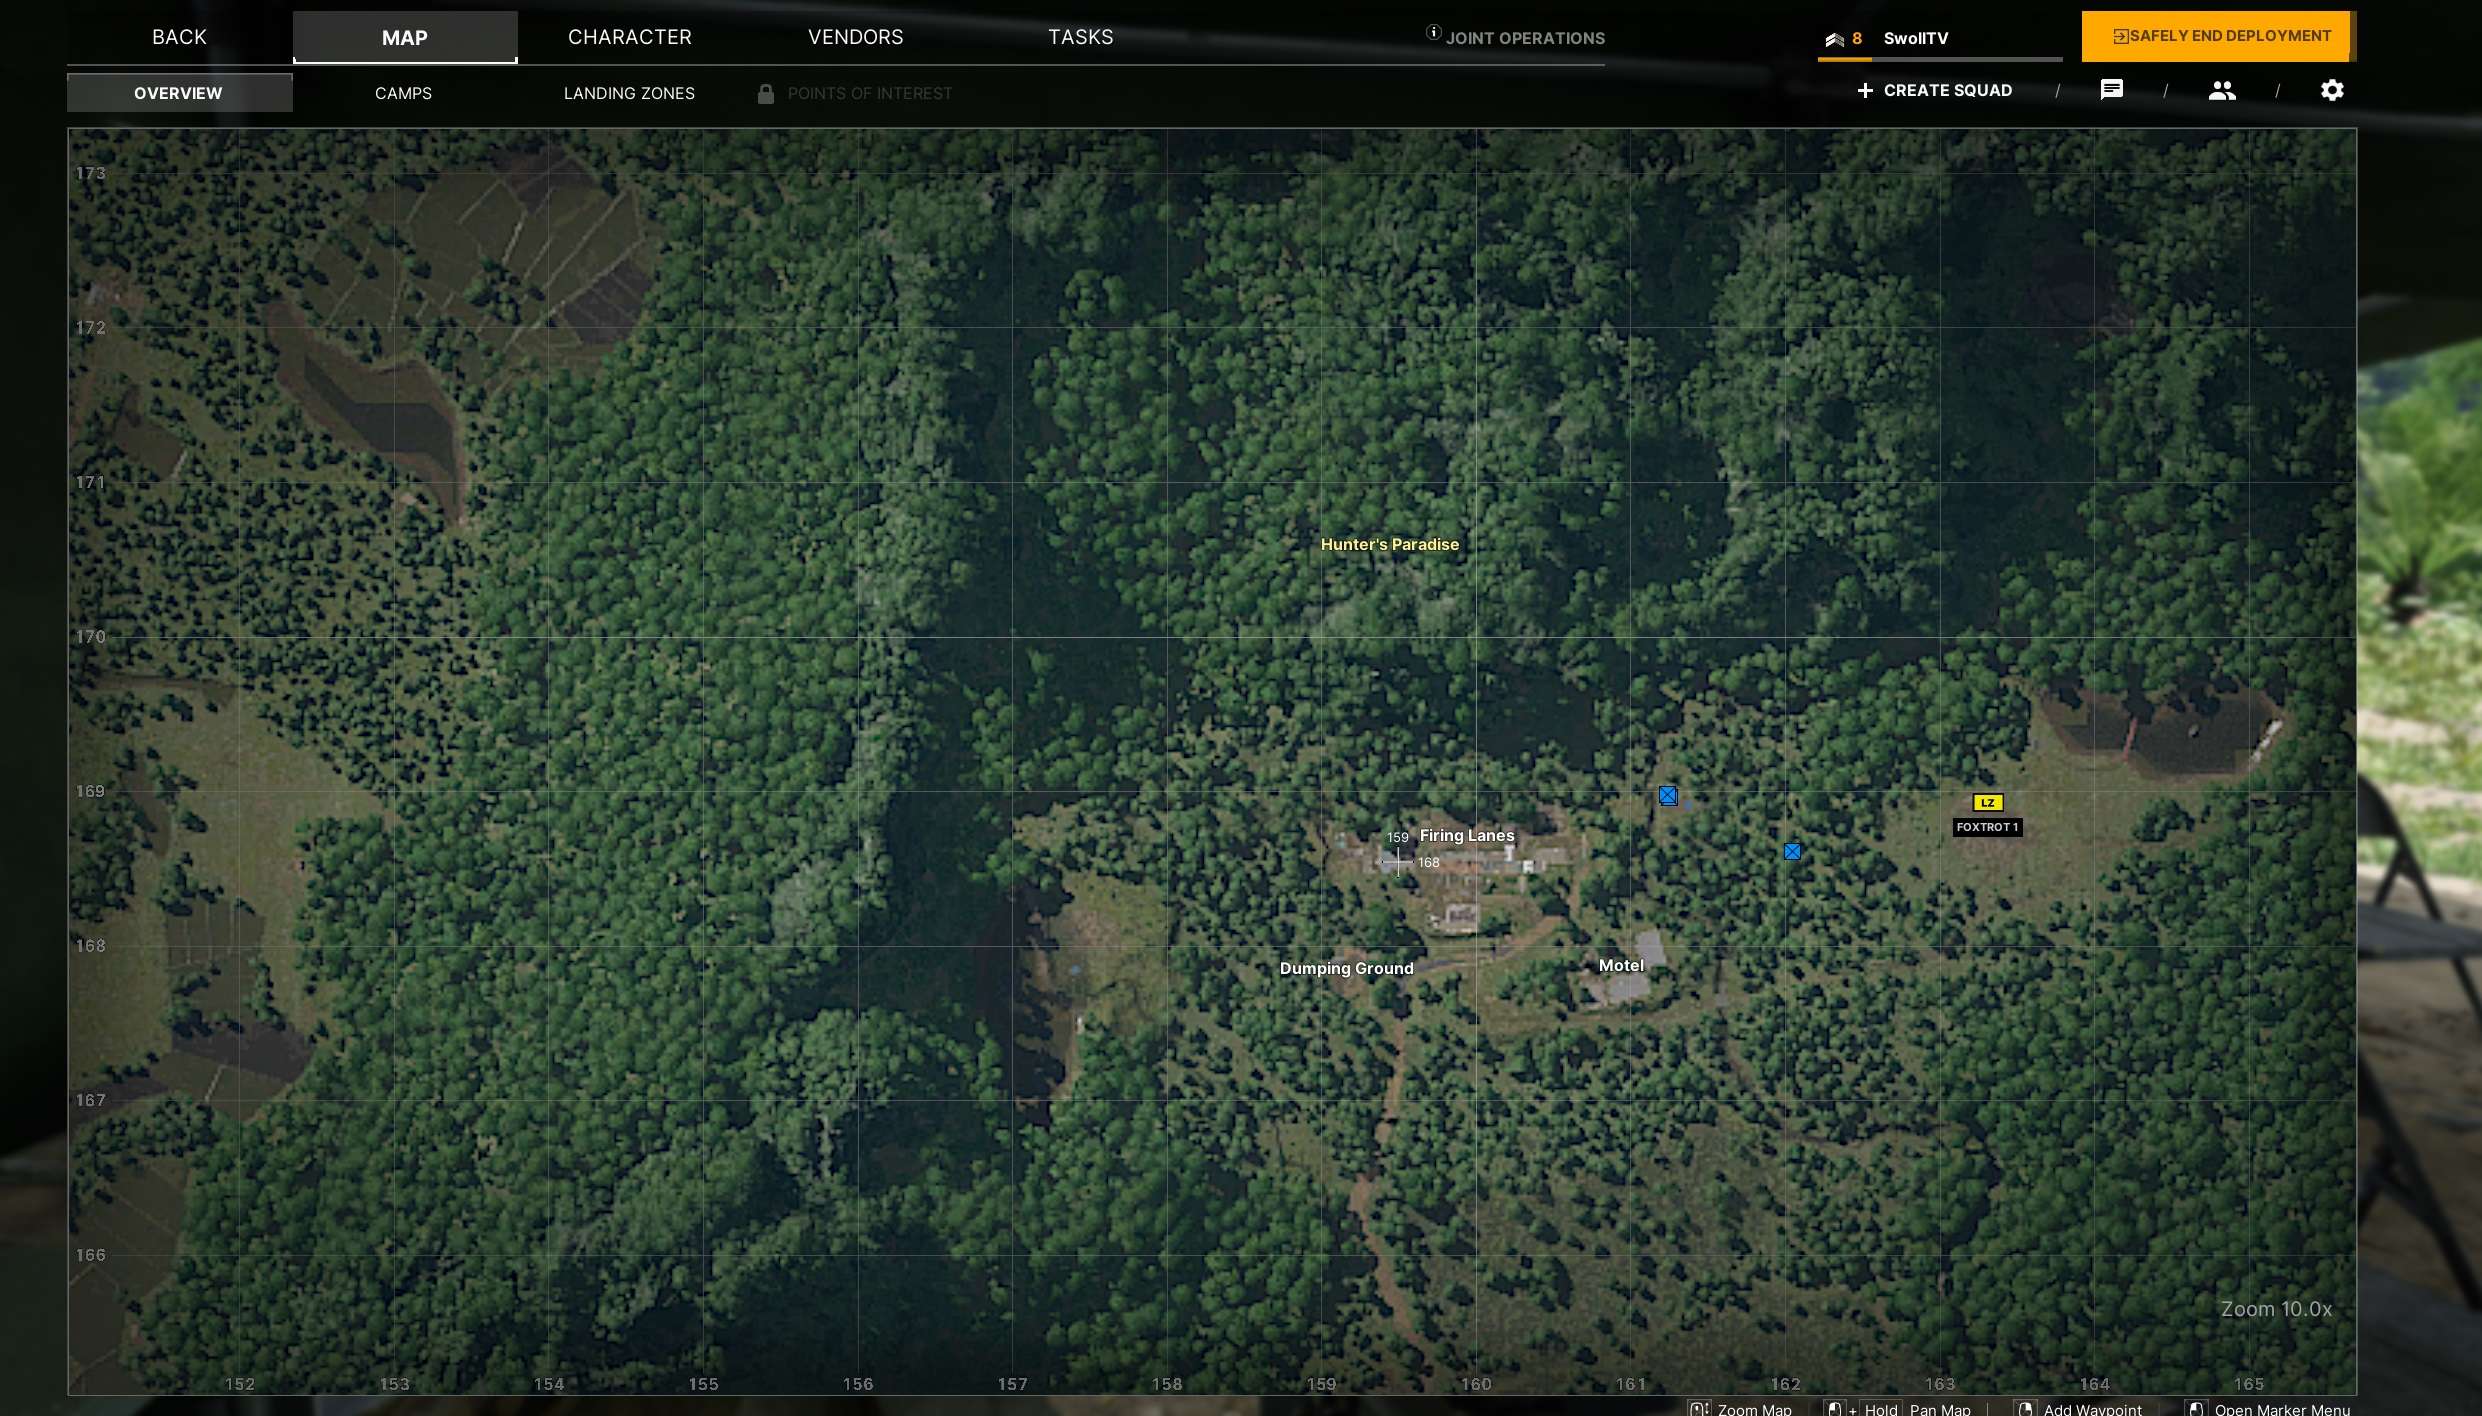
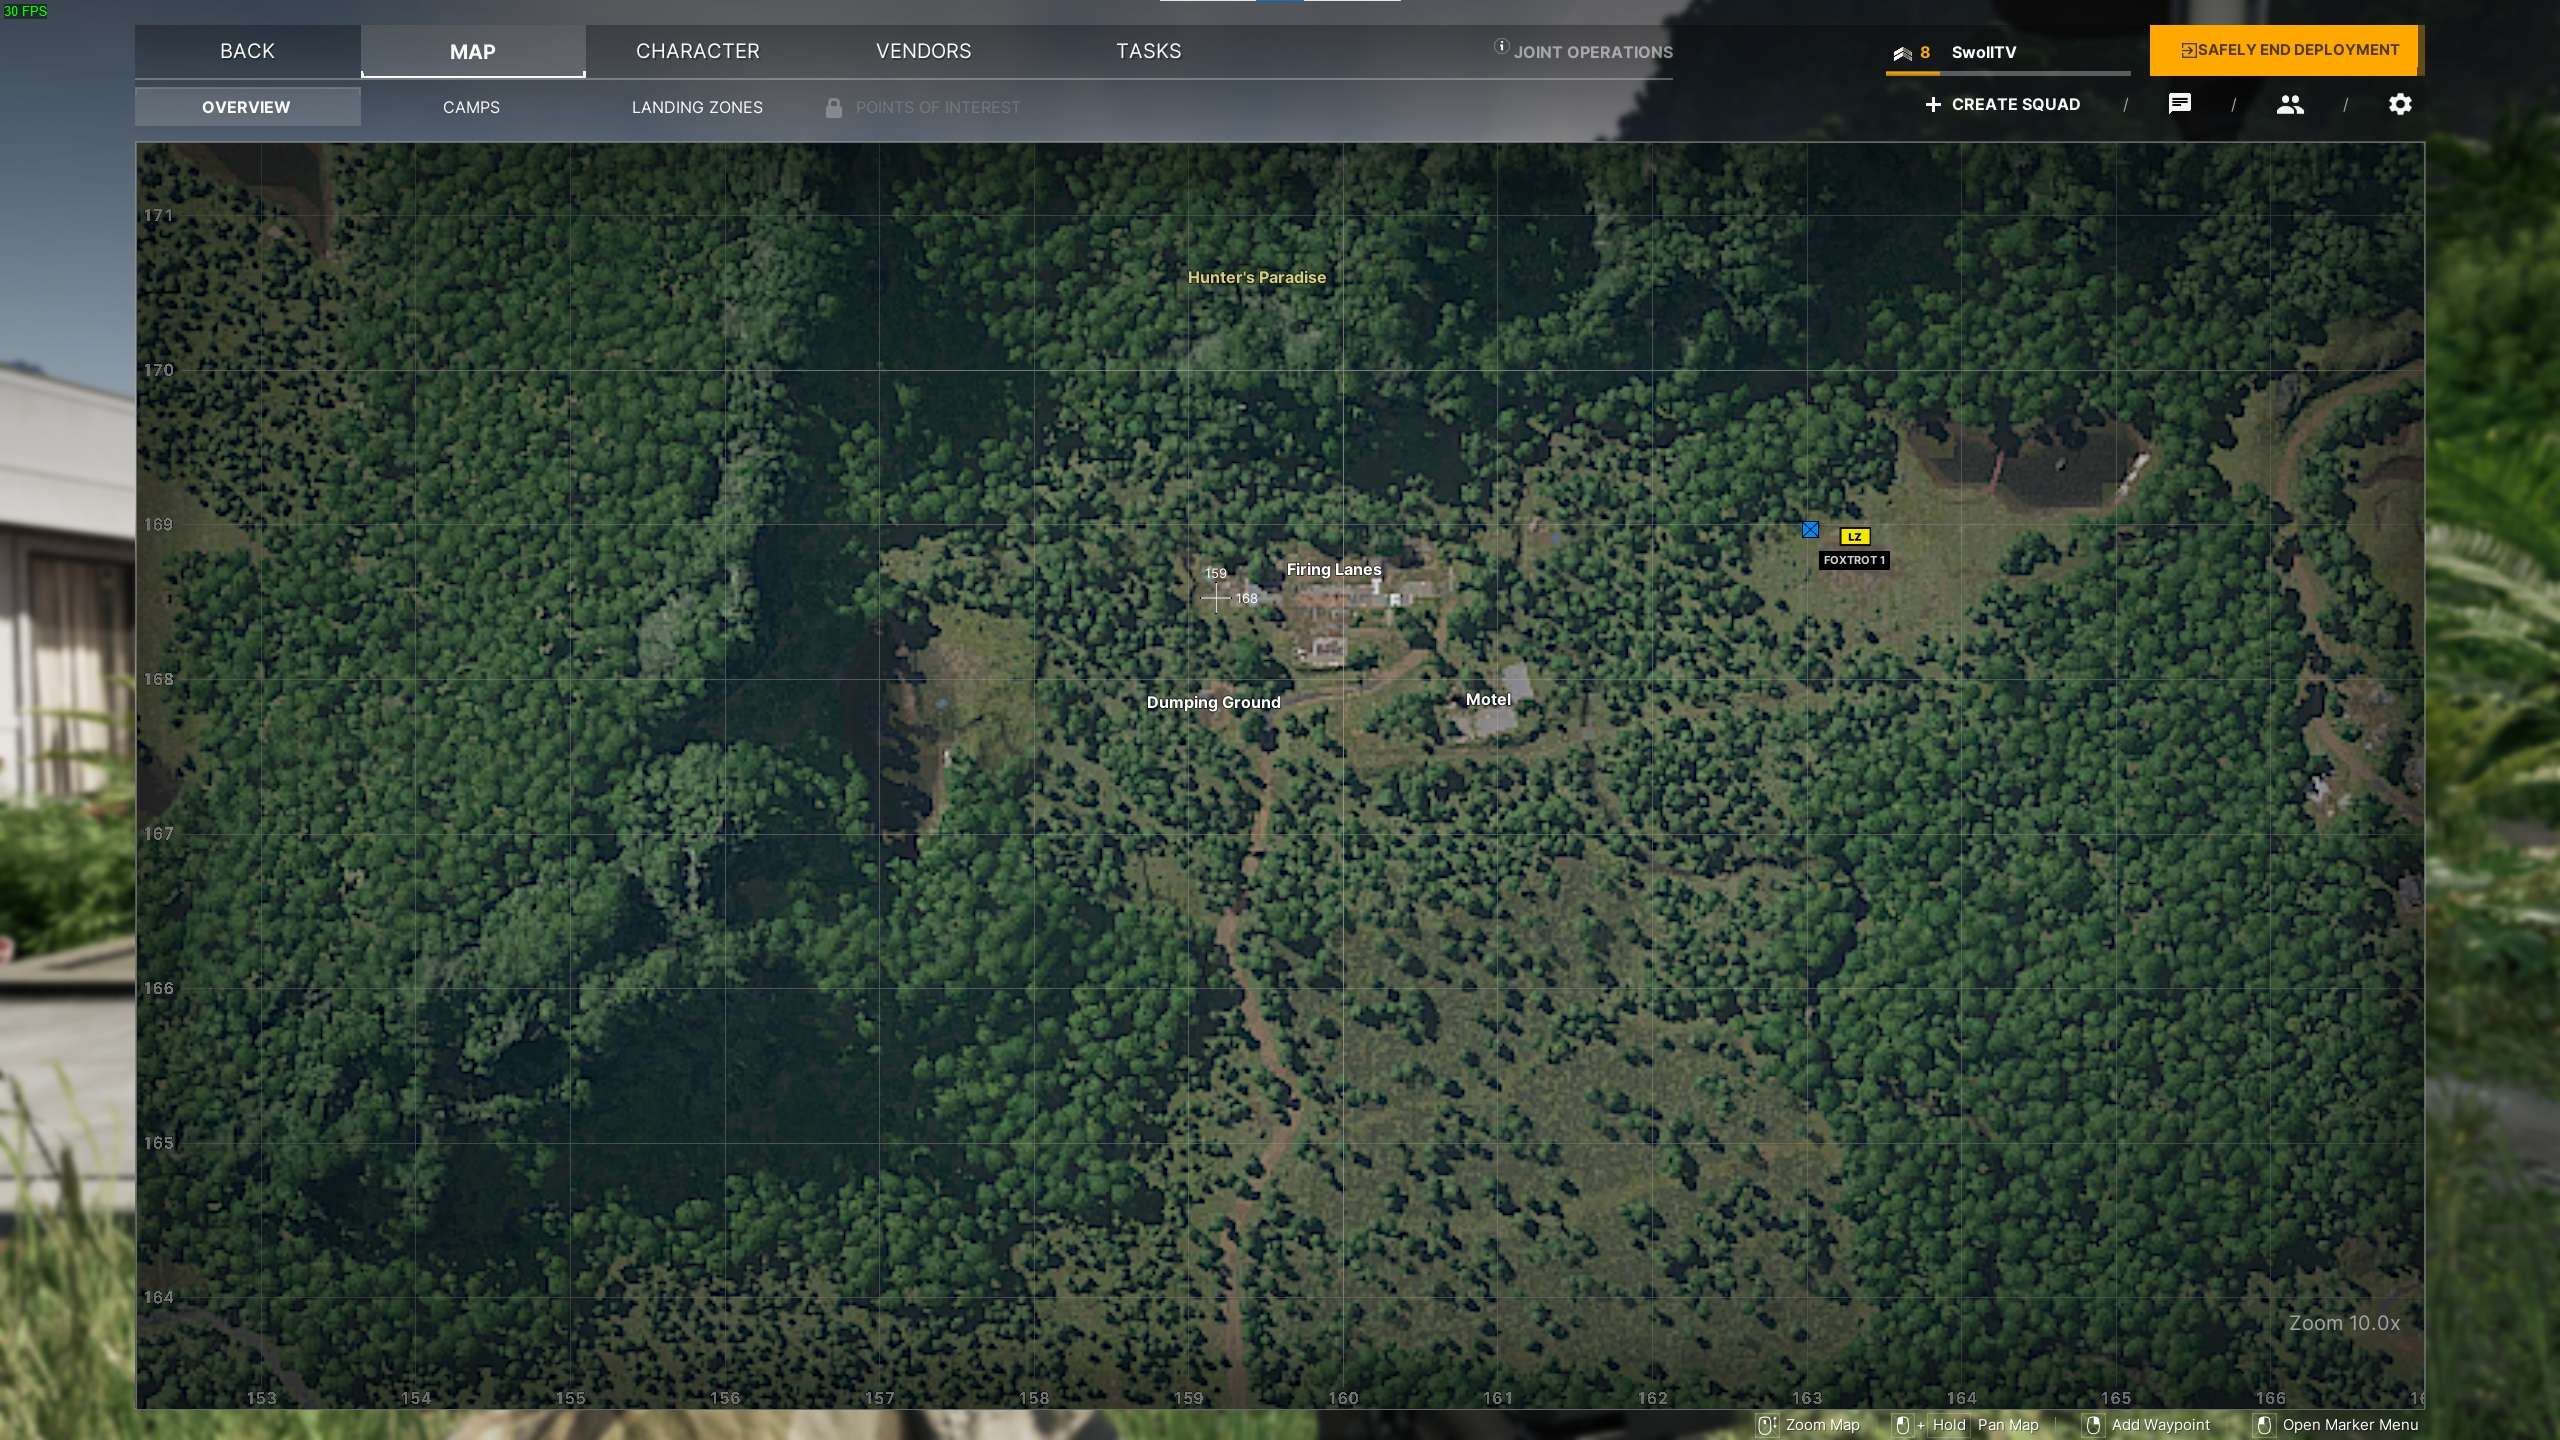
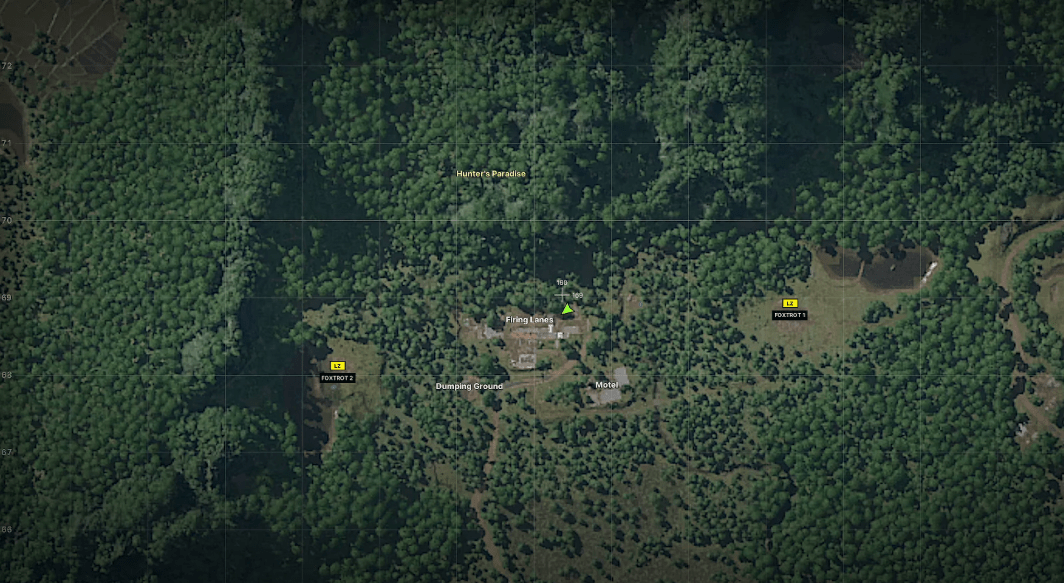
On The Range
#17: On The Range
- On The Range Shooting Lanes Location – 159 168
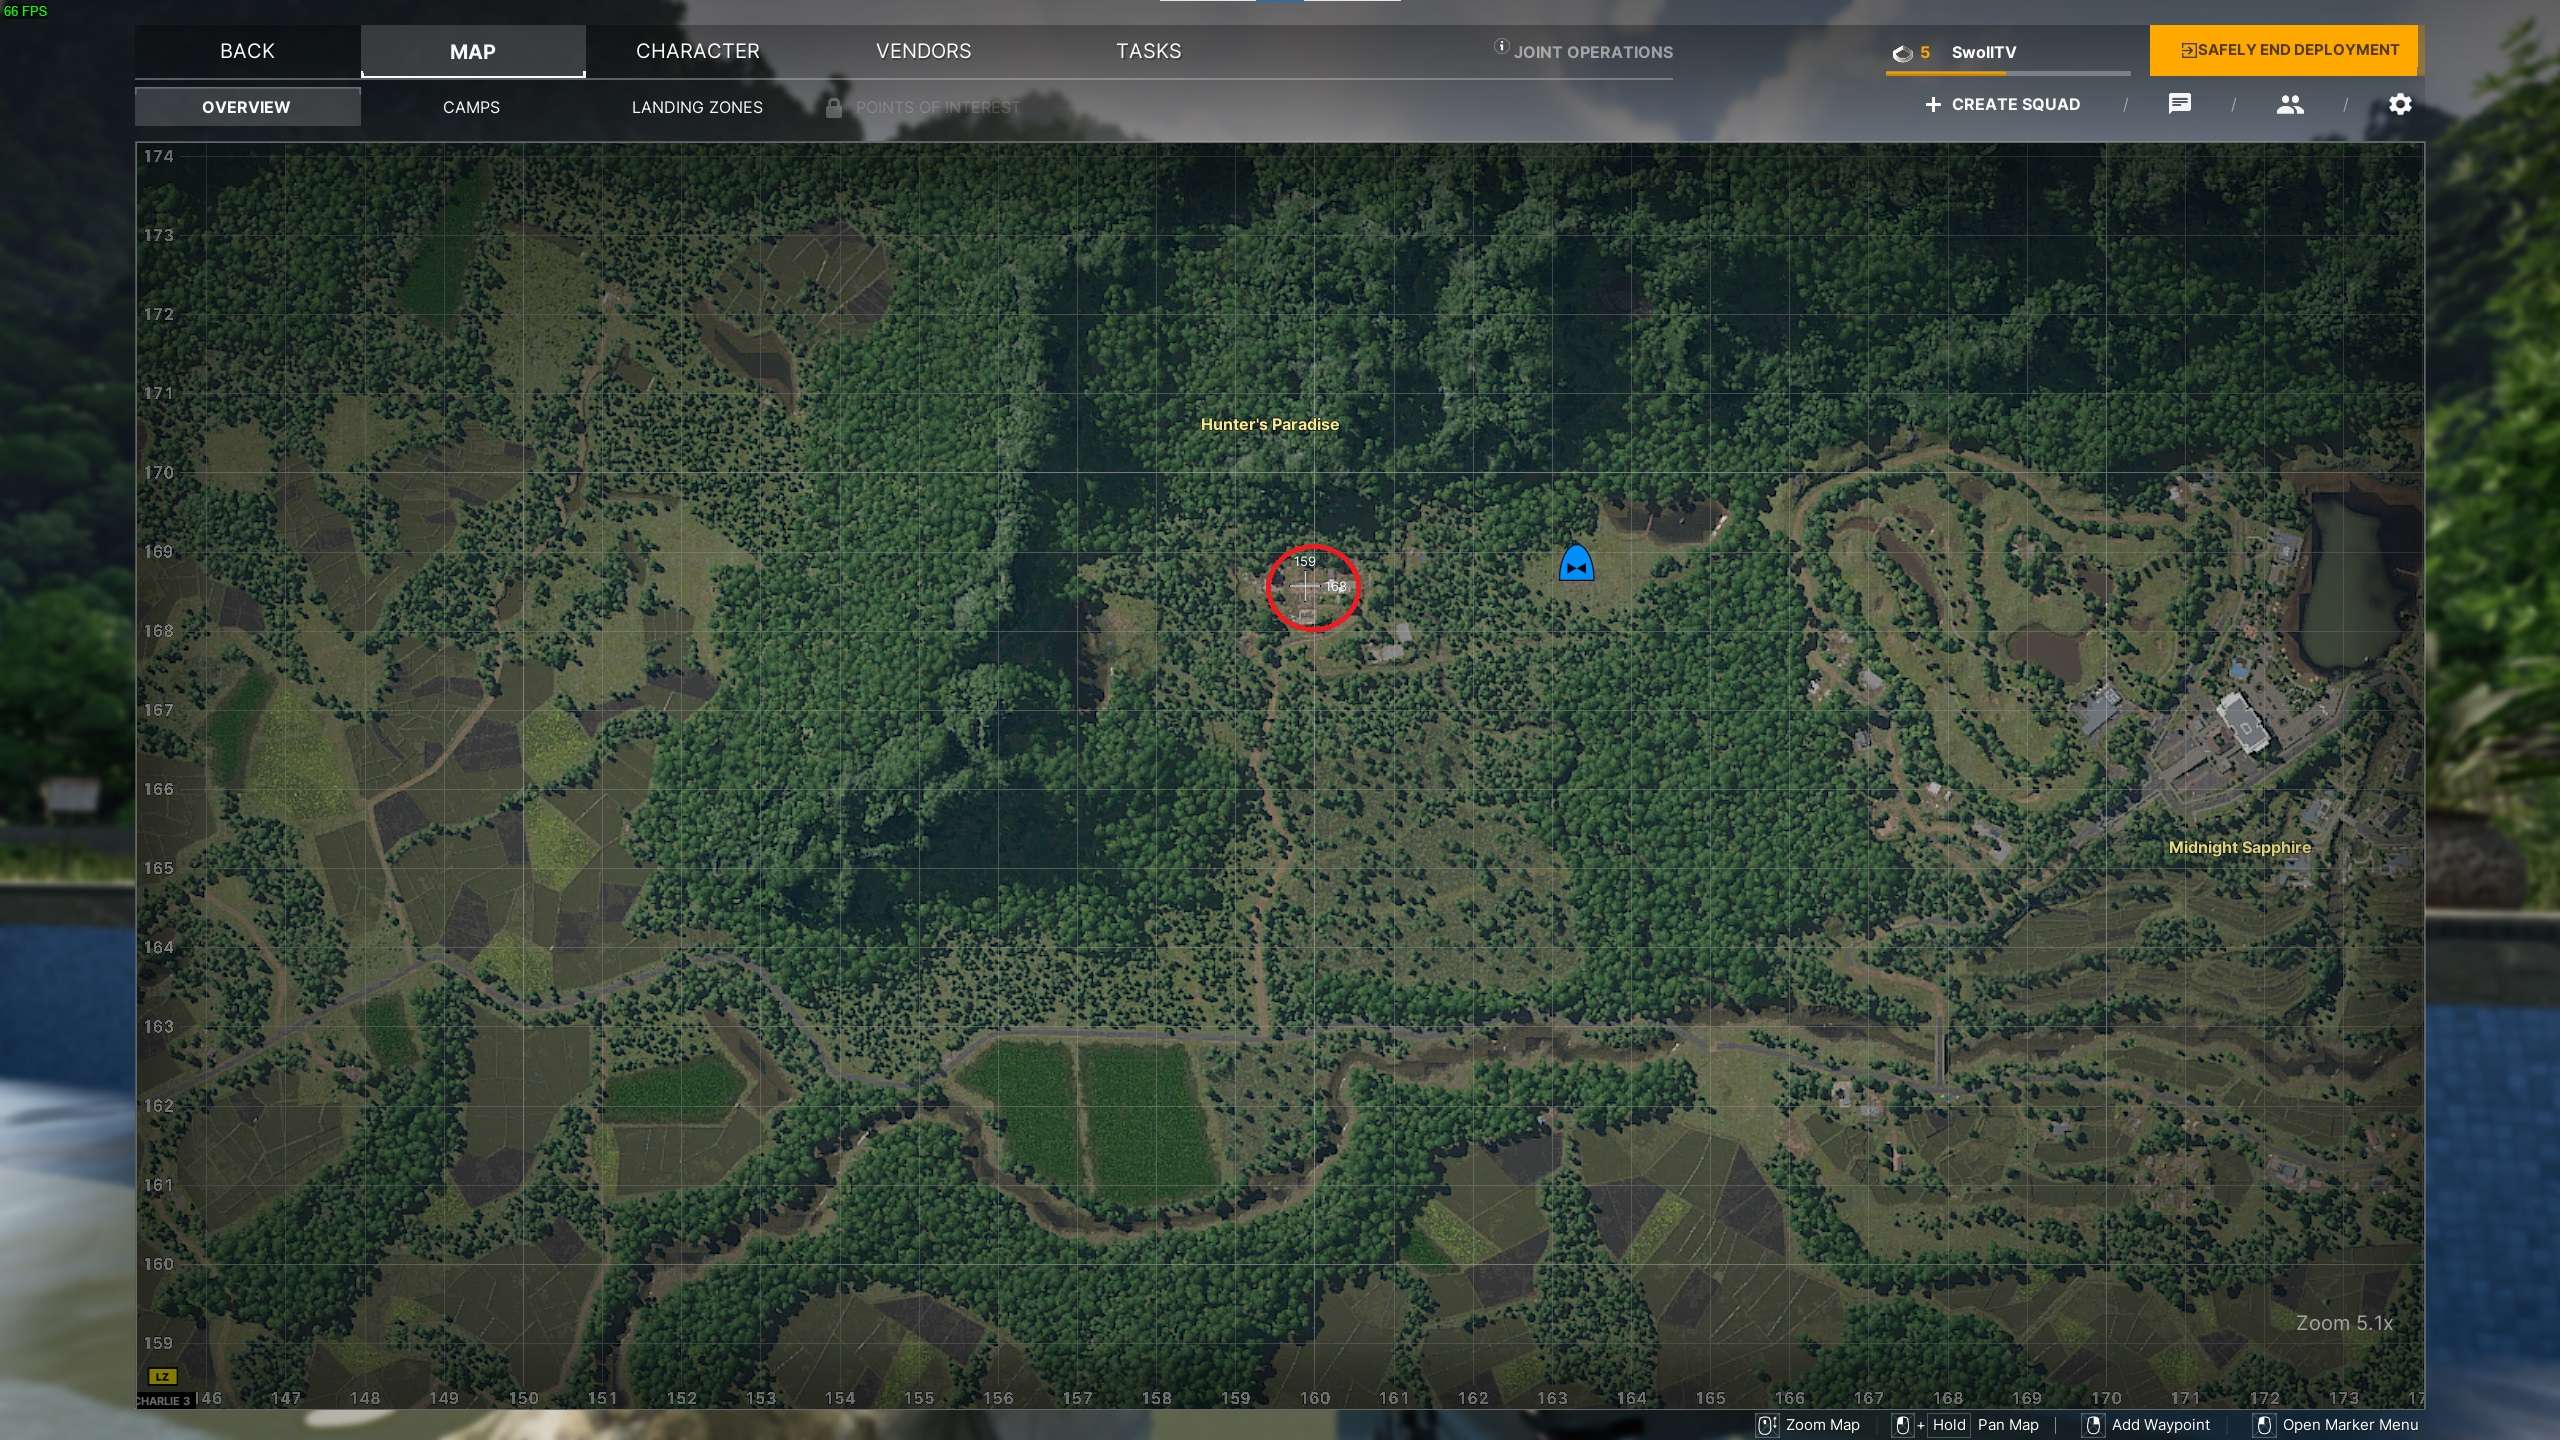
- On The Range Dumping Ground Location – 159 167
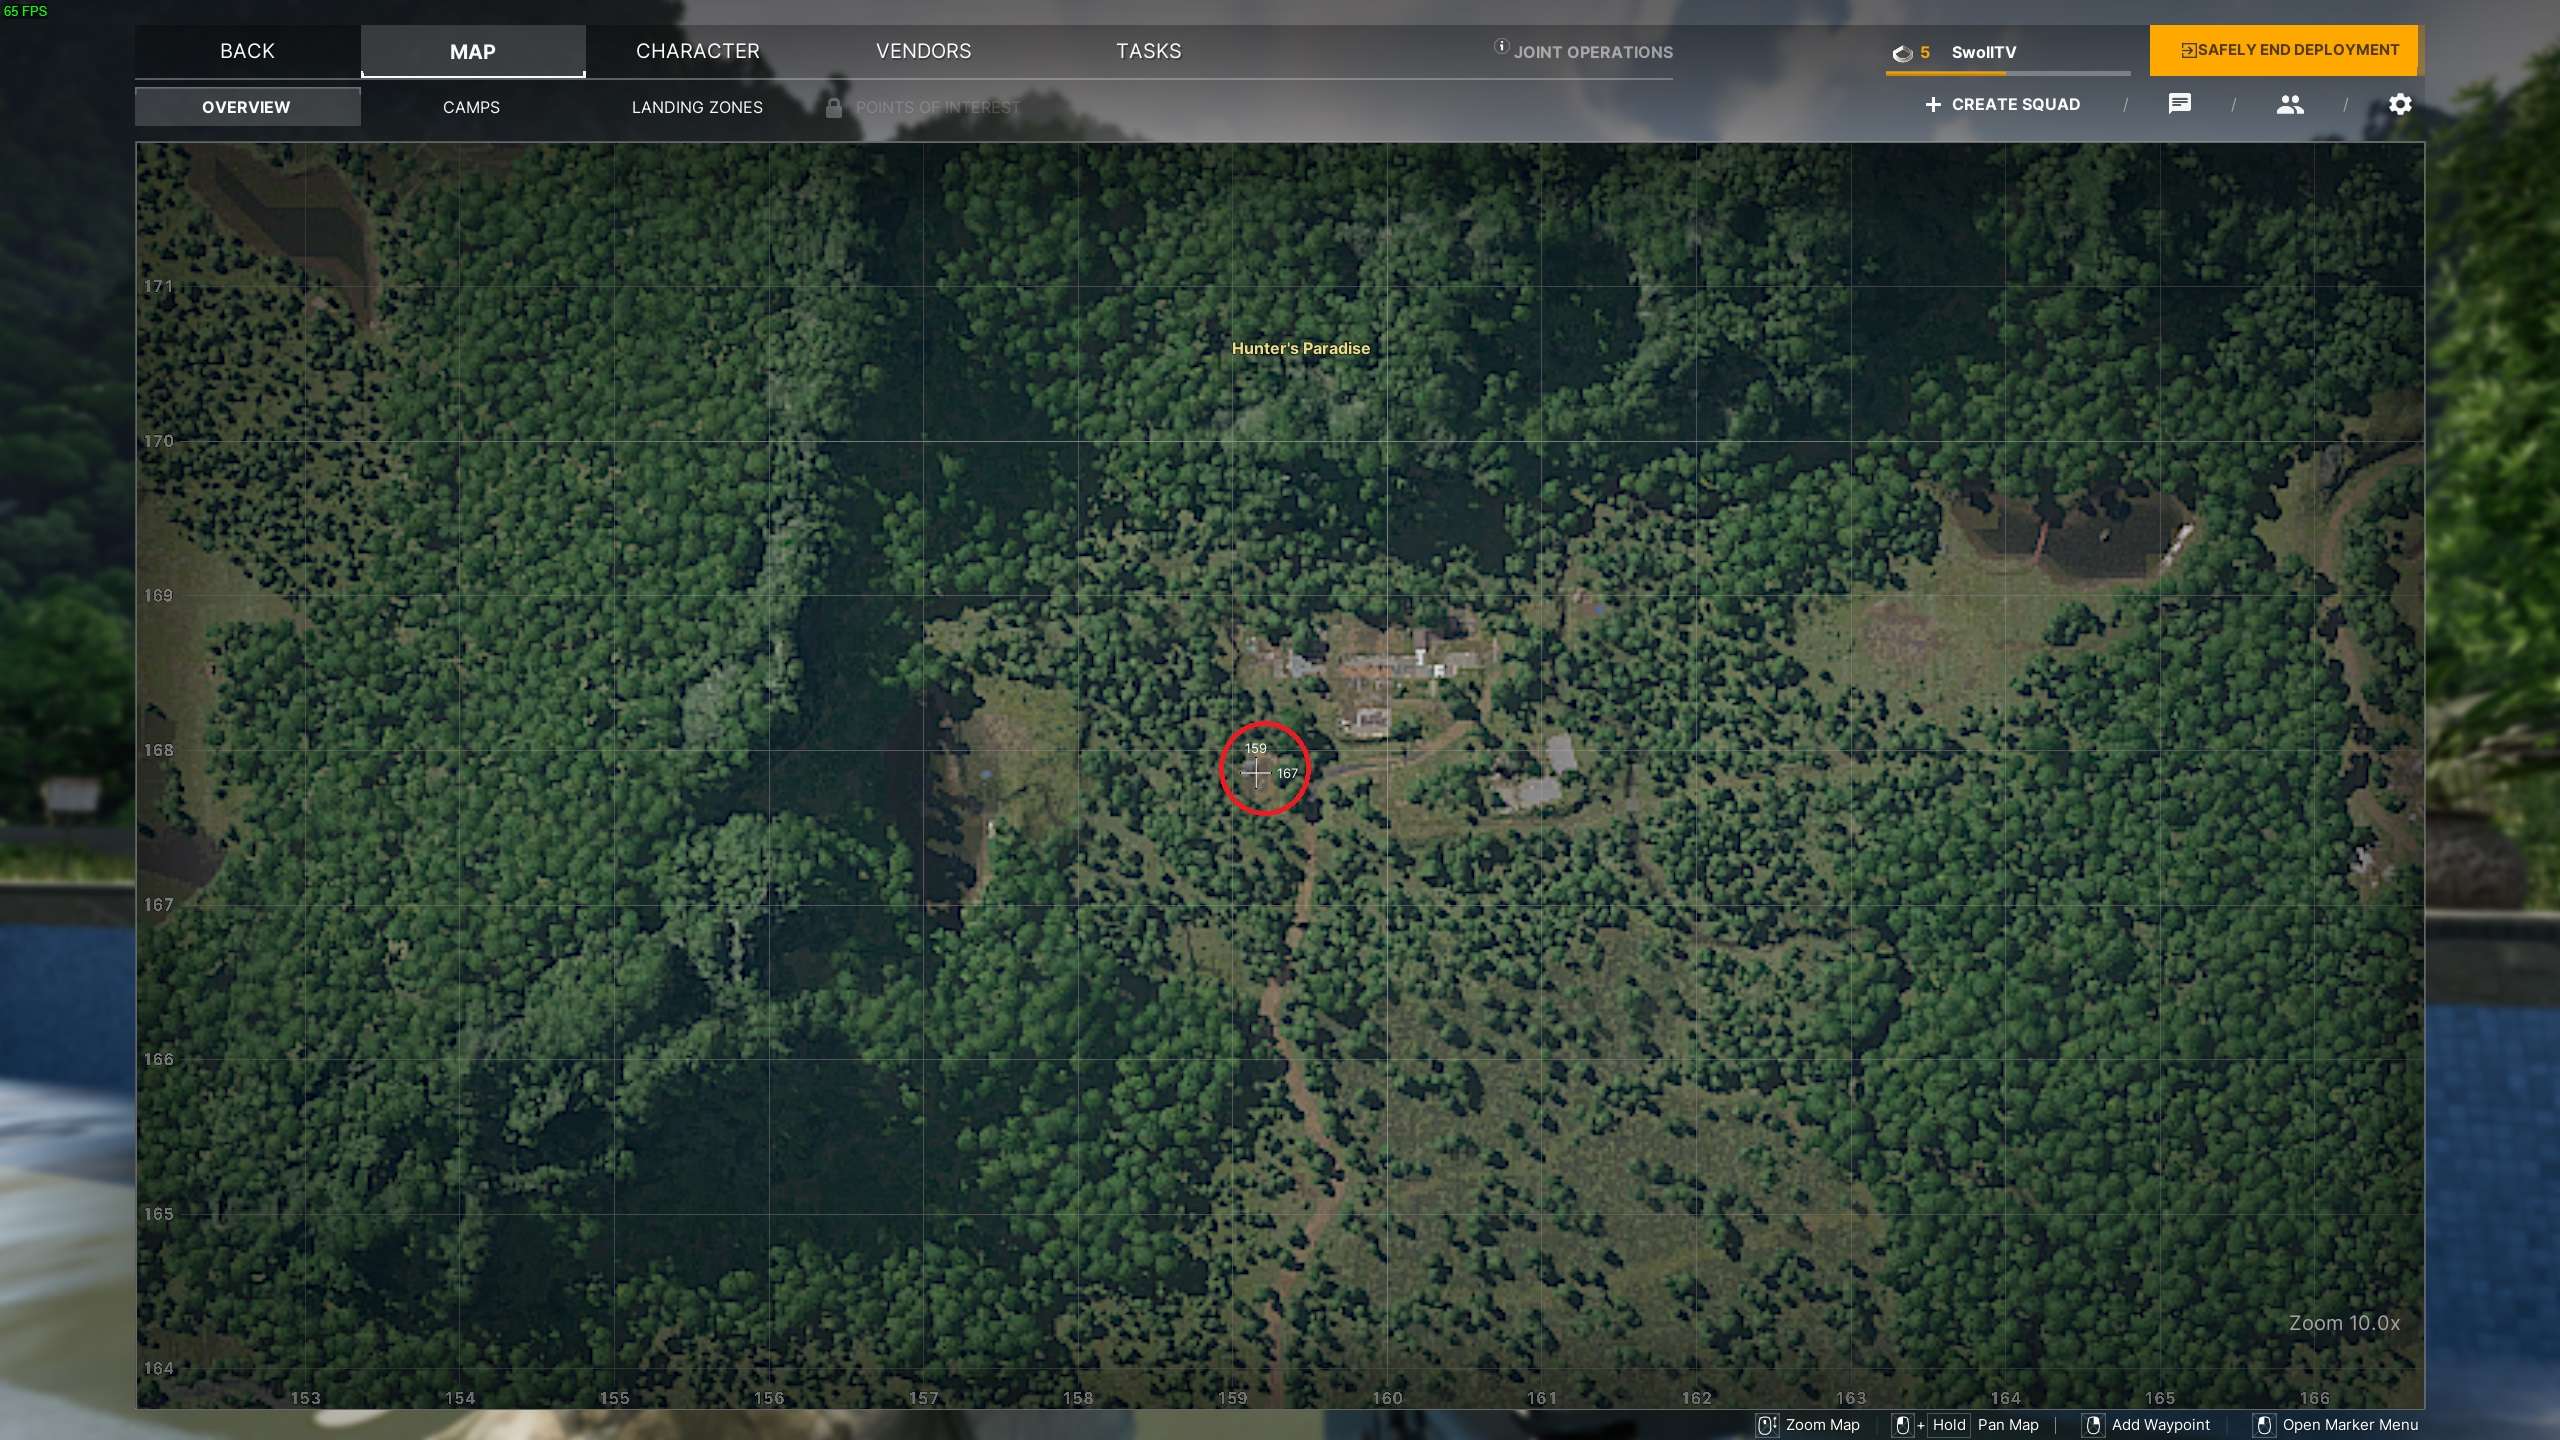
- On The Range Motel Location Location – 160 167
New Neighbours Intel
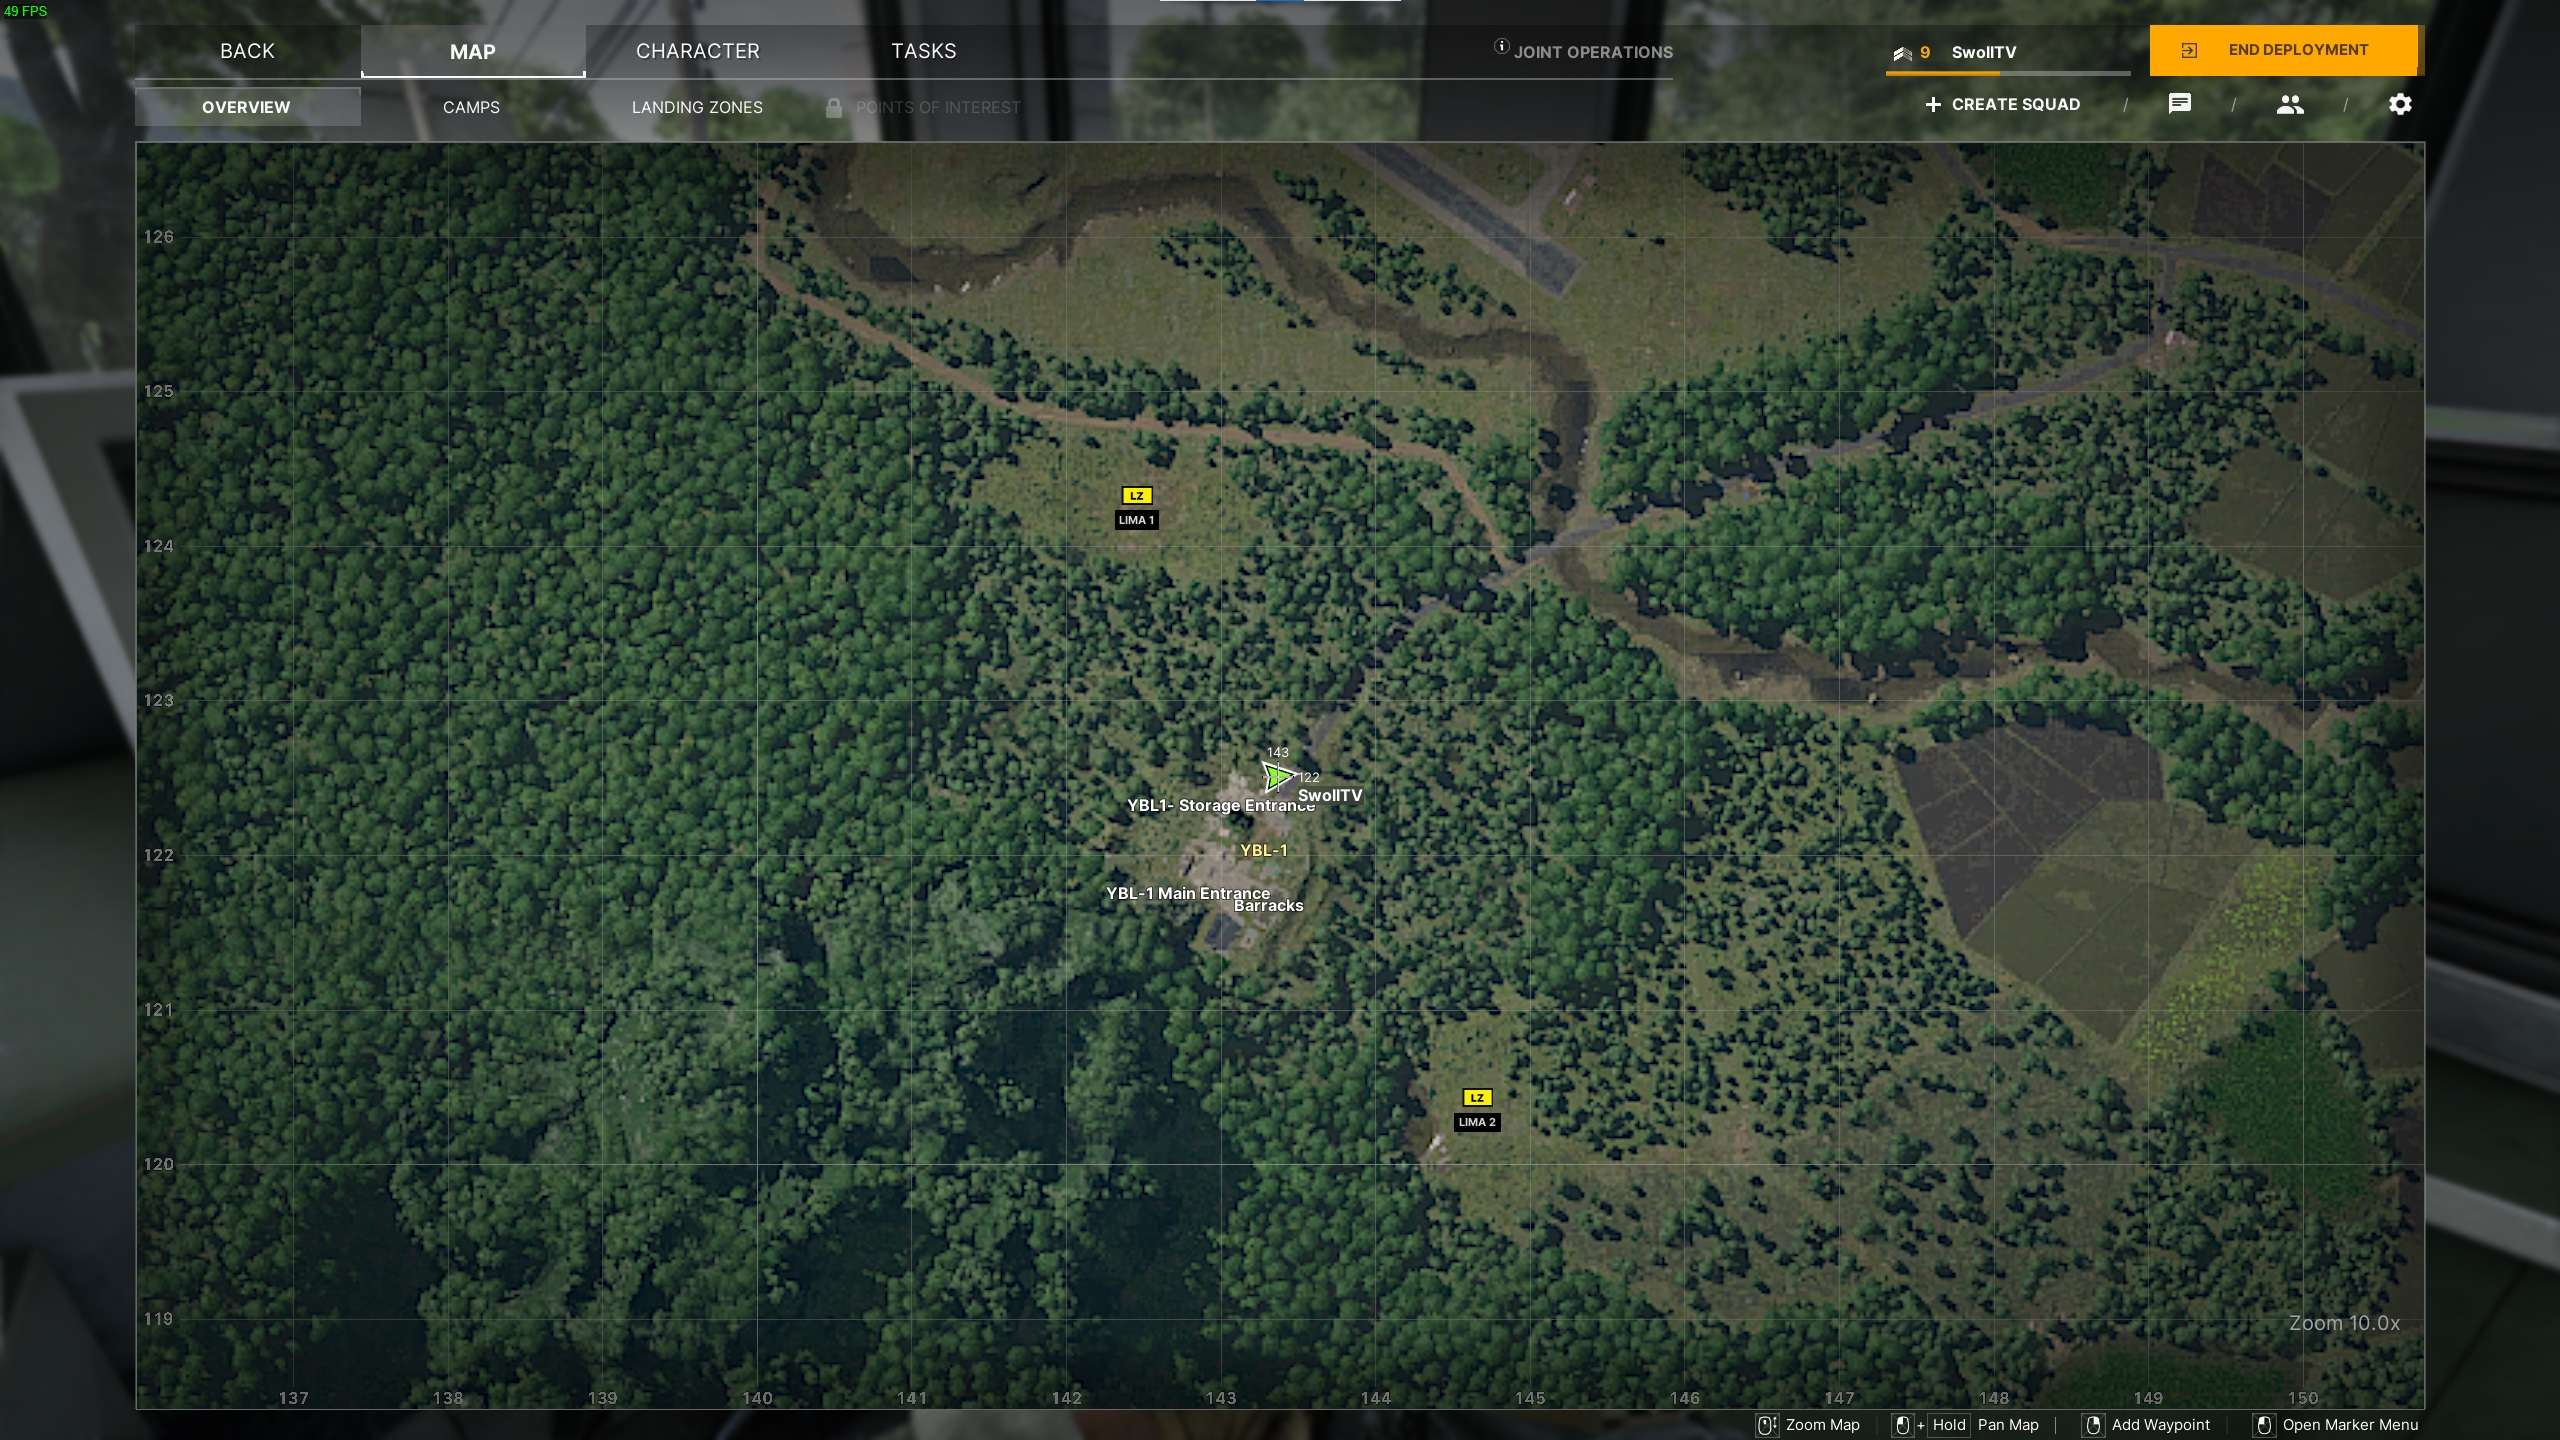
#18: New Neighbours Intel
- New Neighbours Intel Location – 142 121
Note: In the bunker at -1.

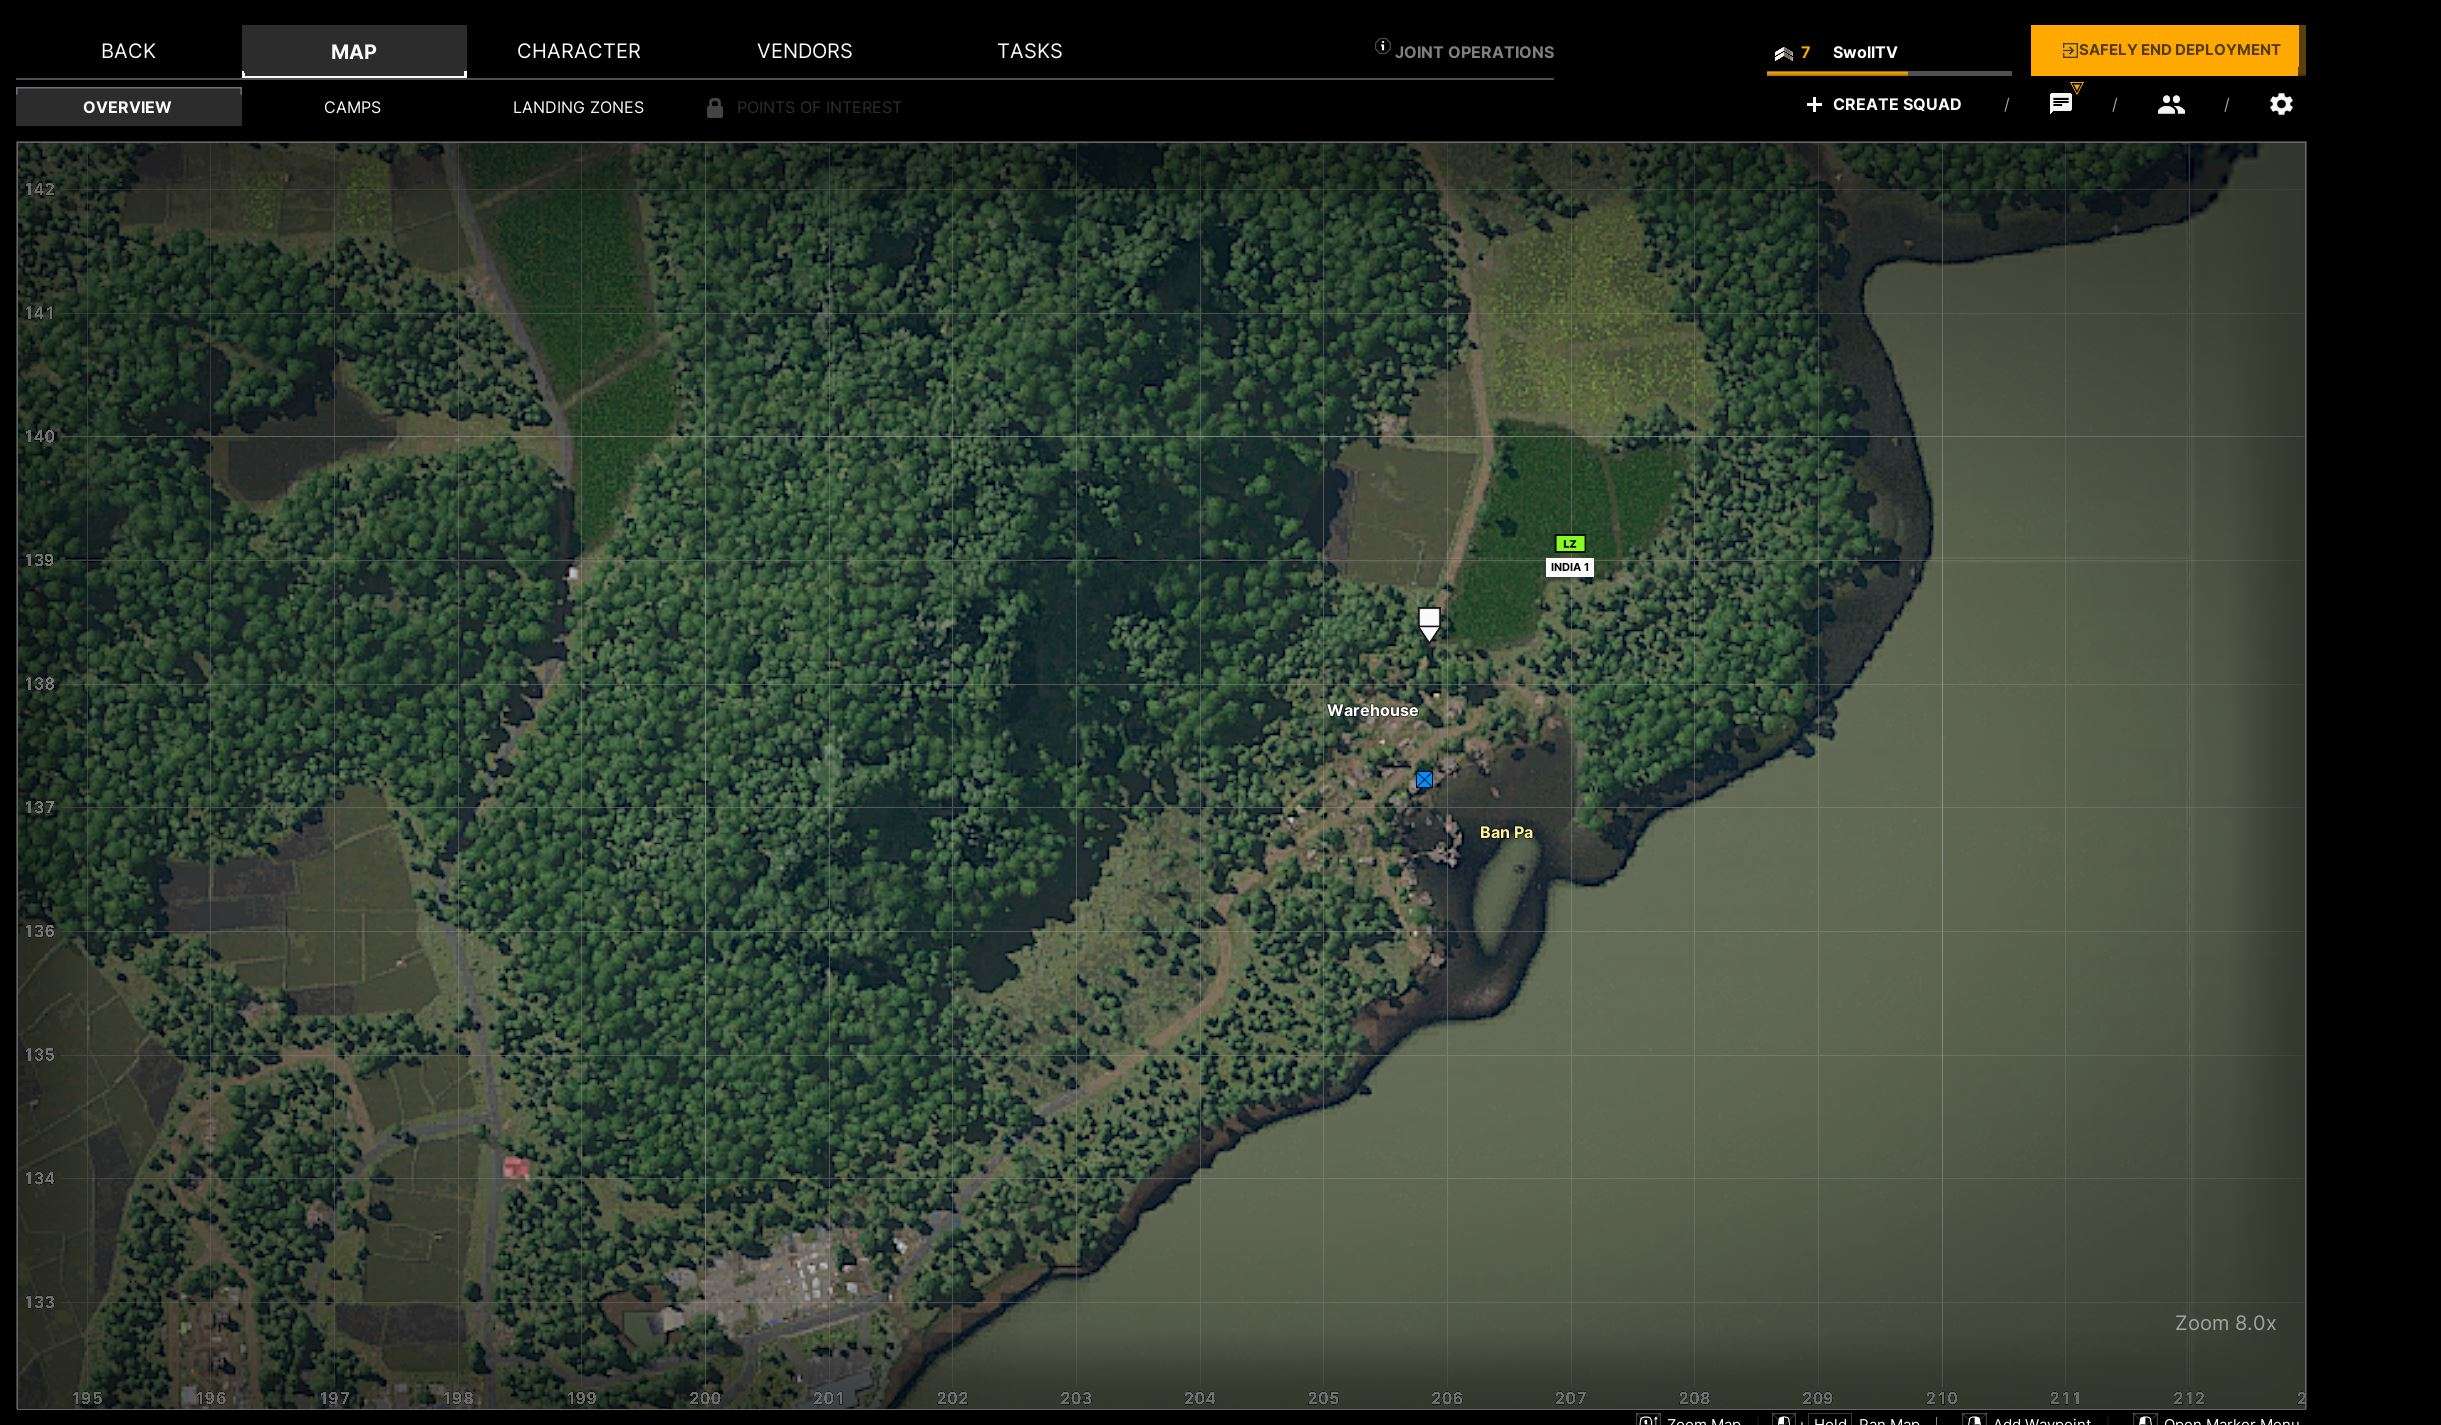
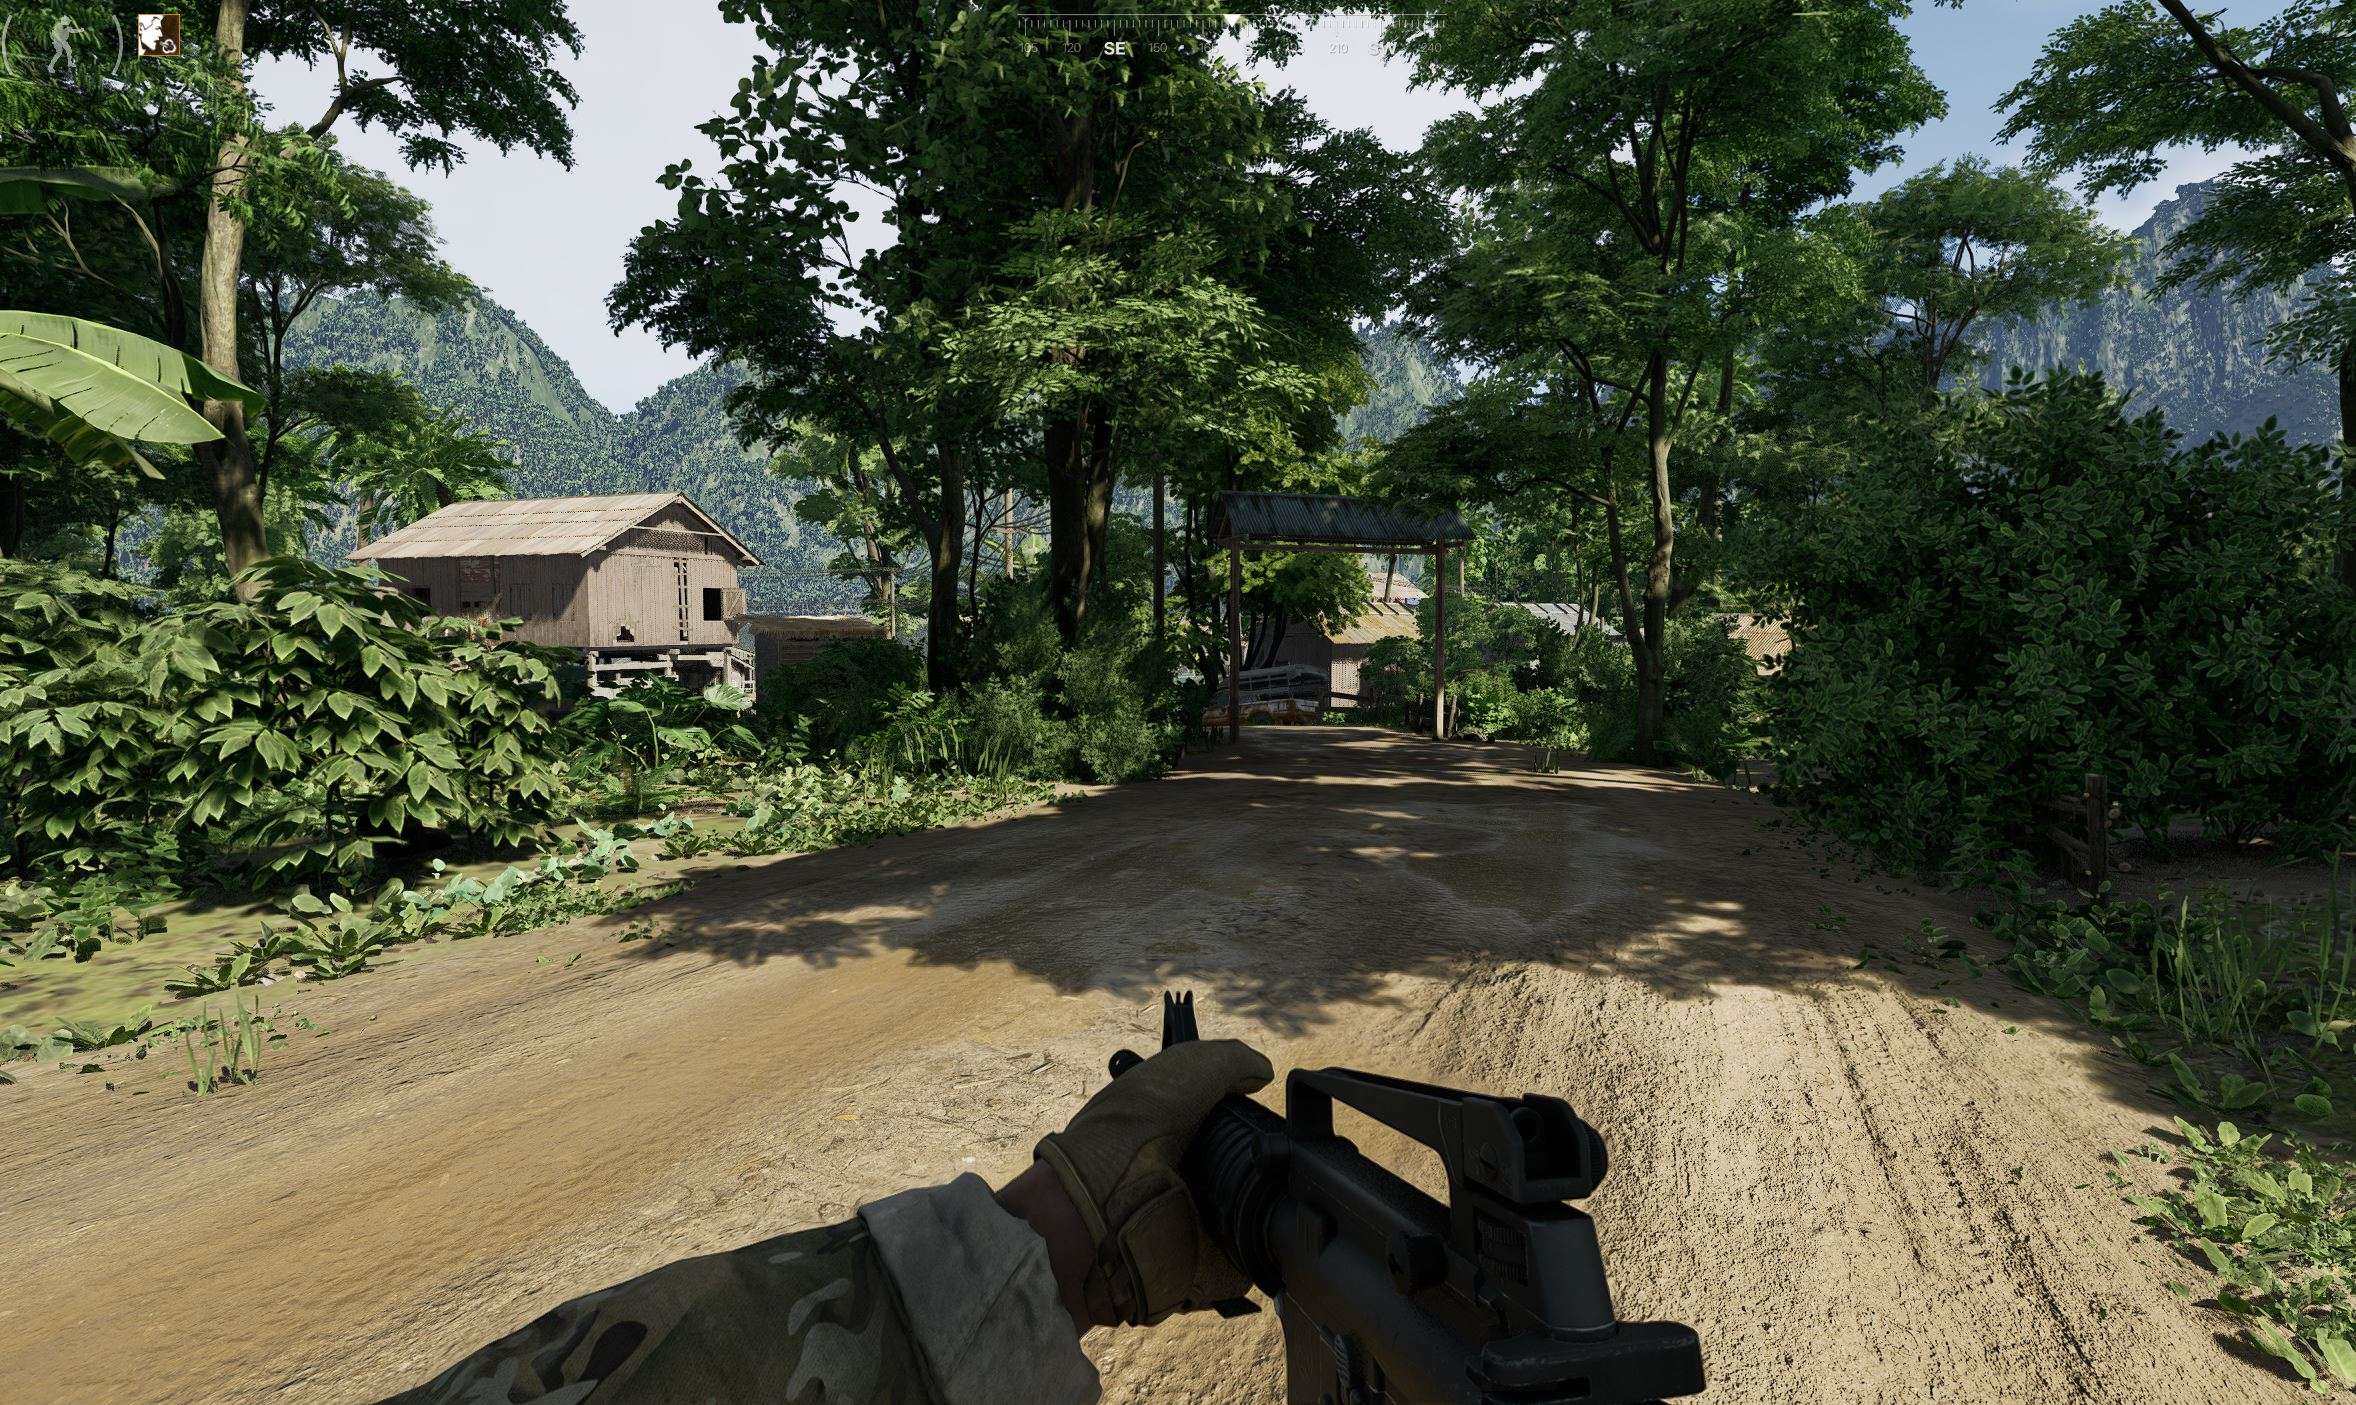
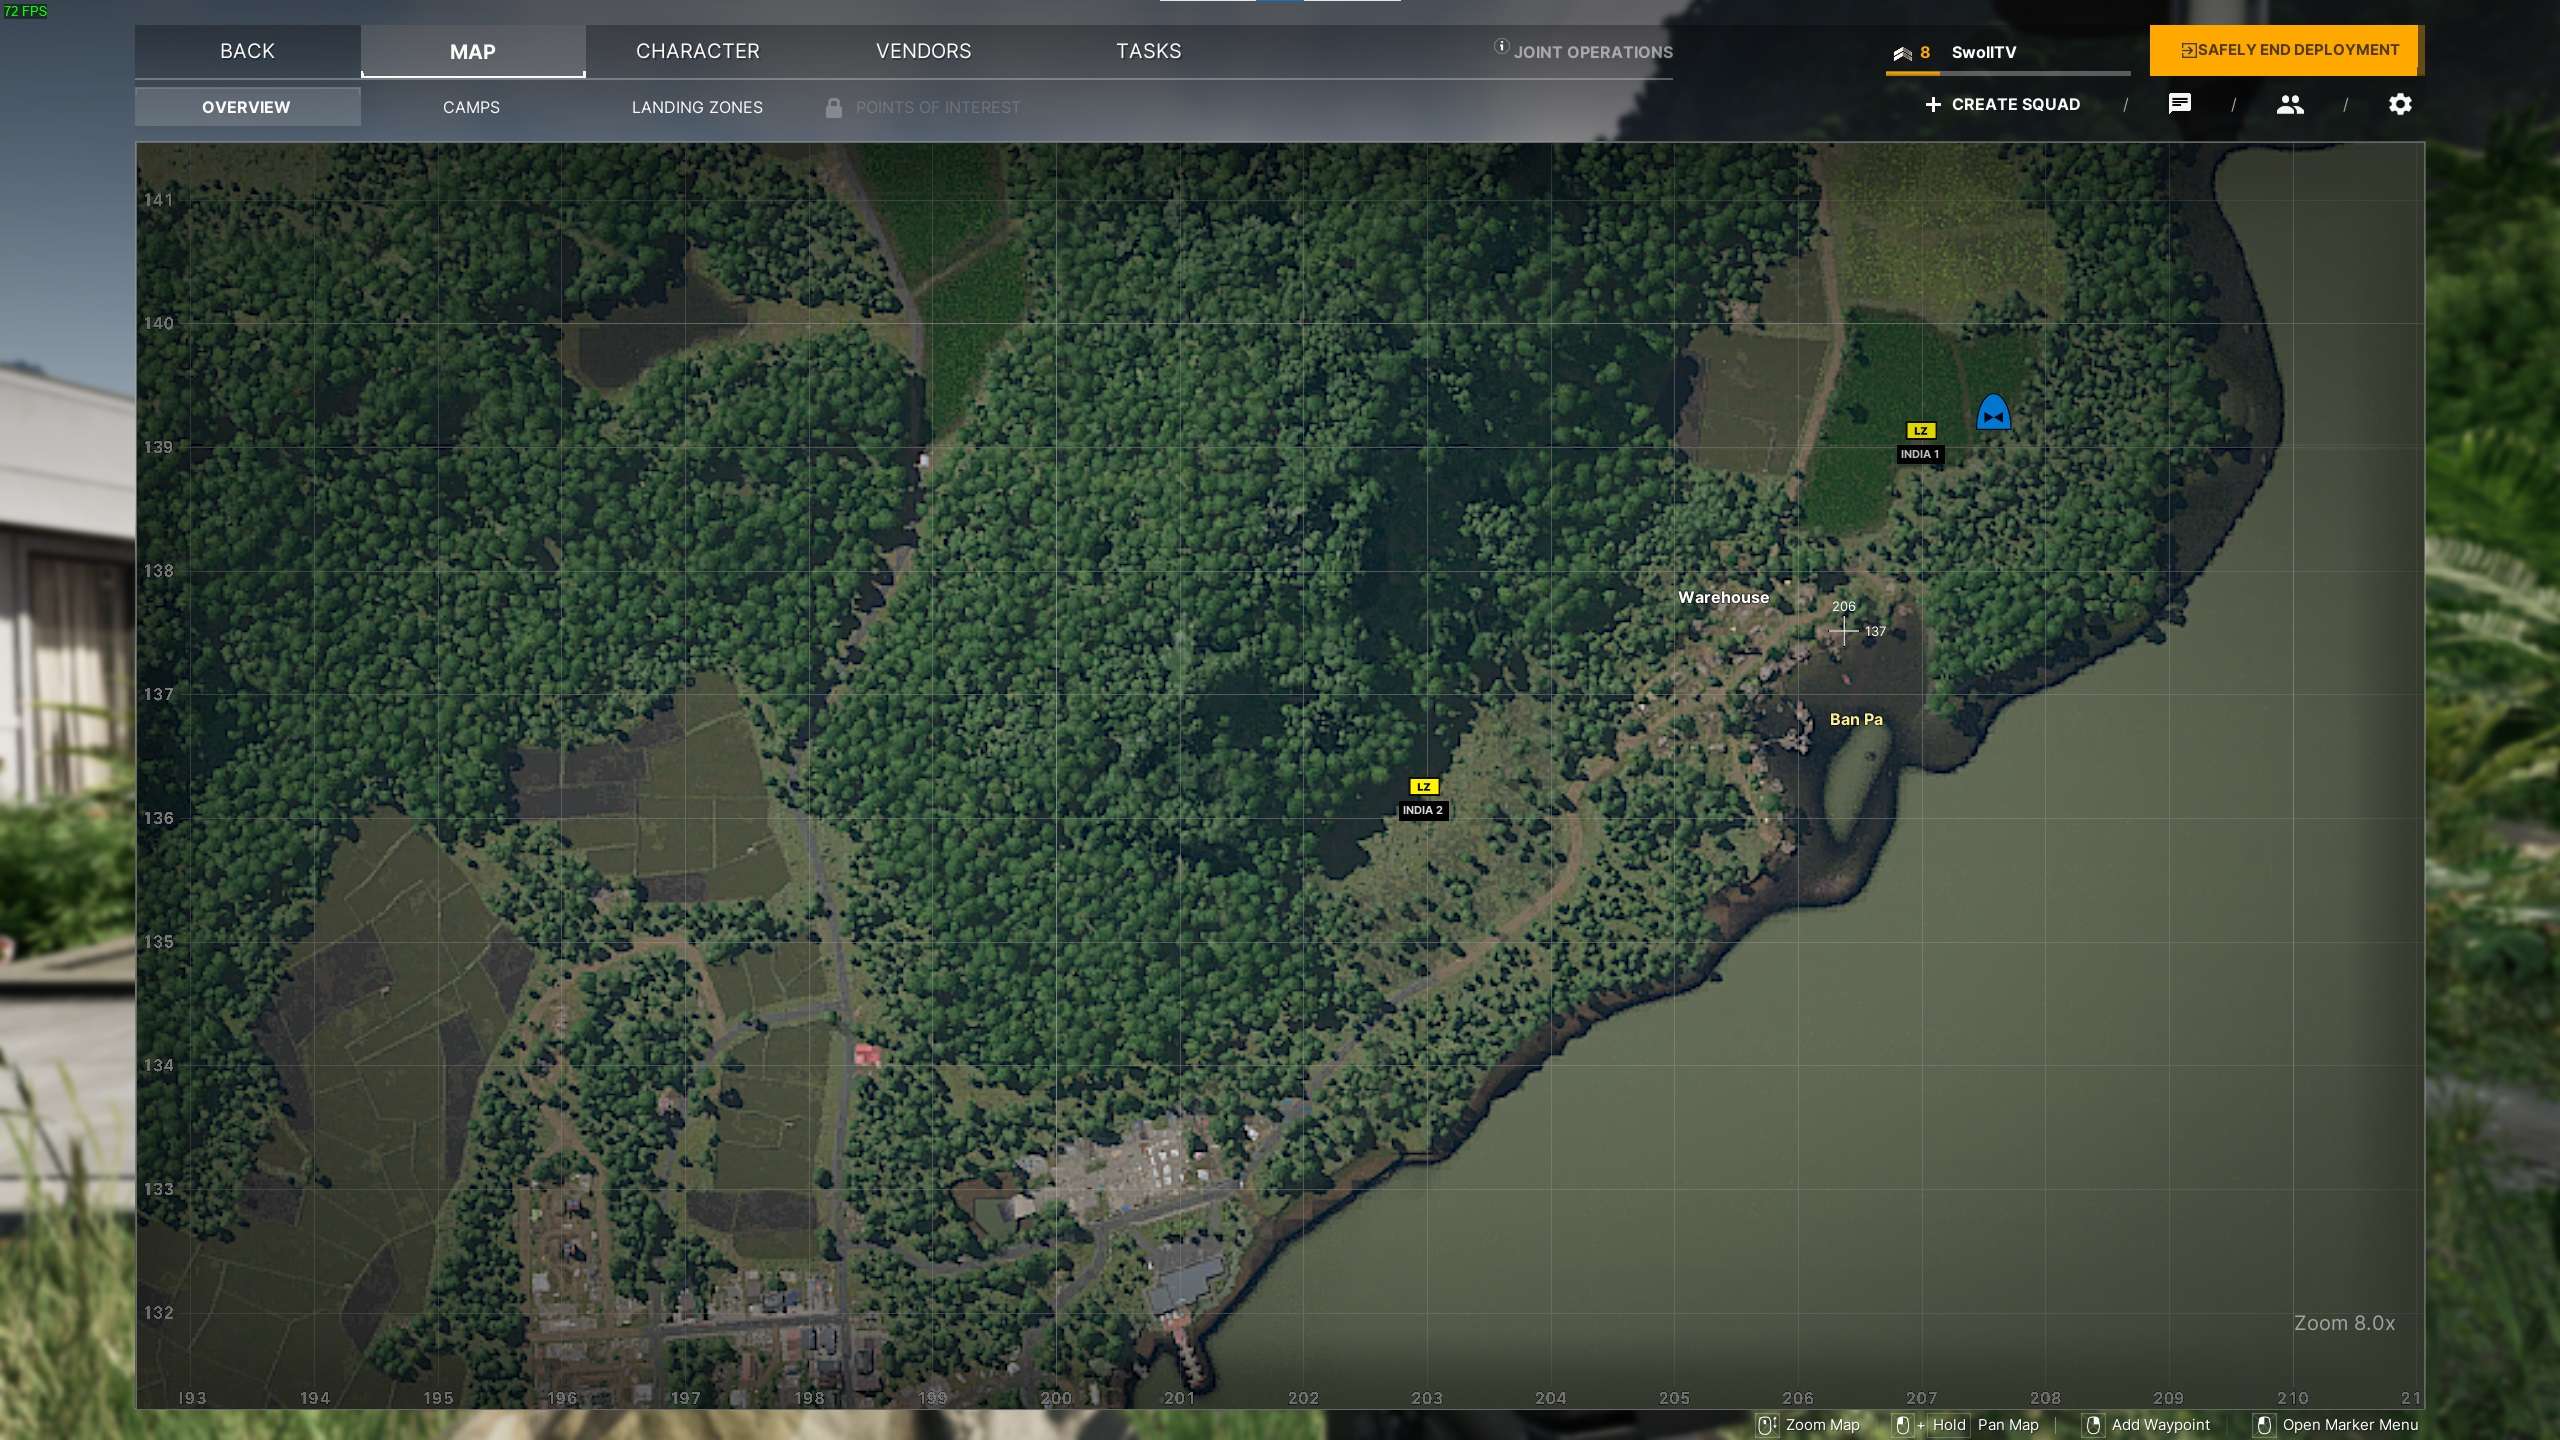
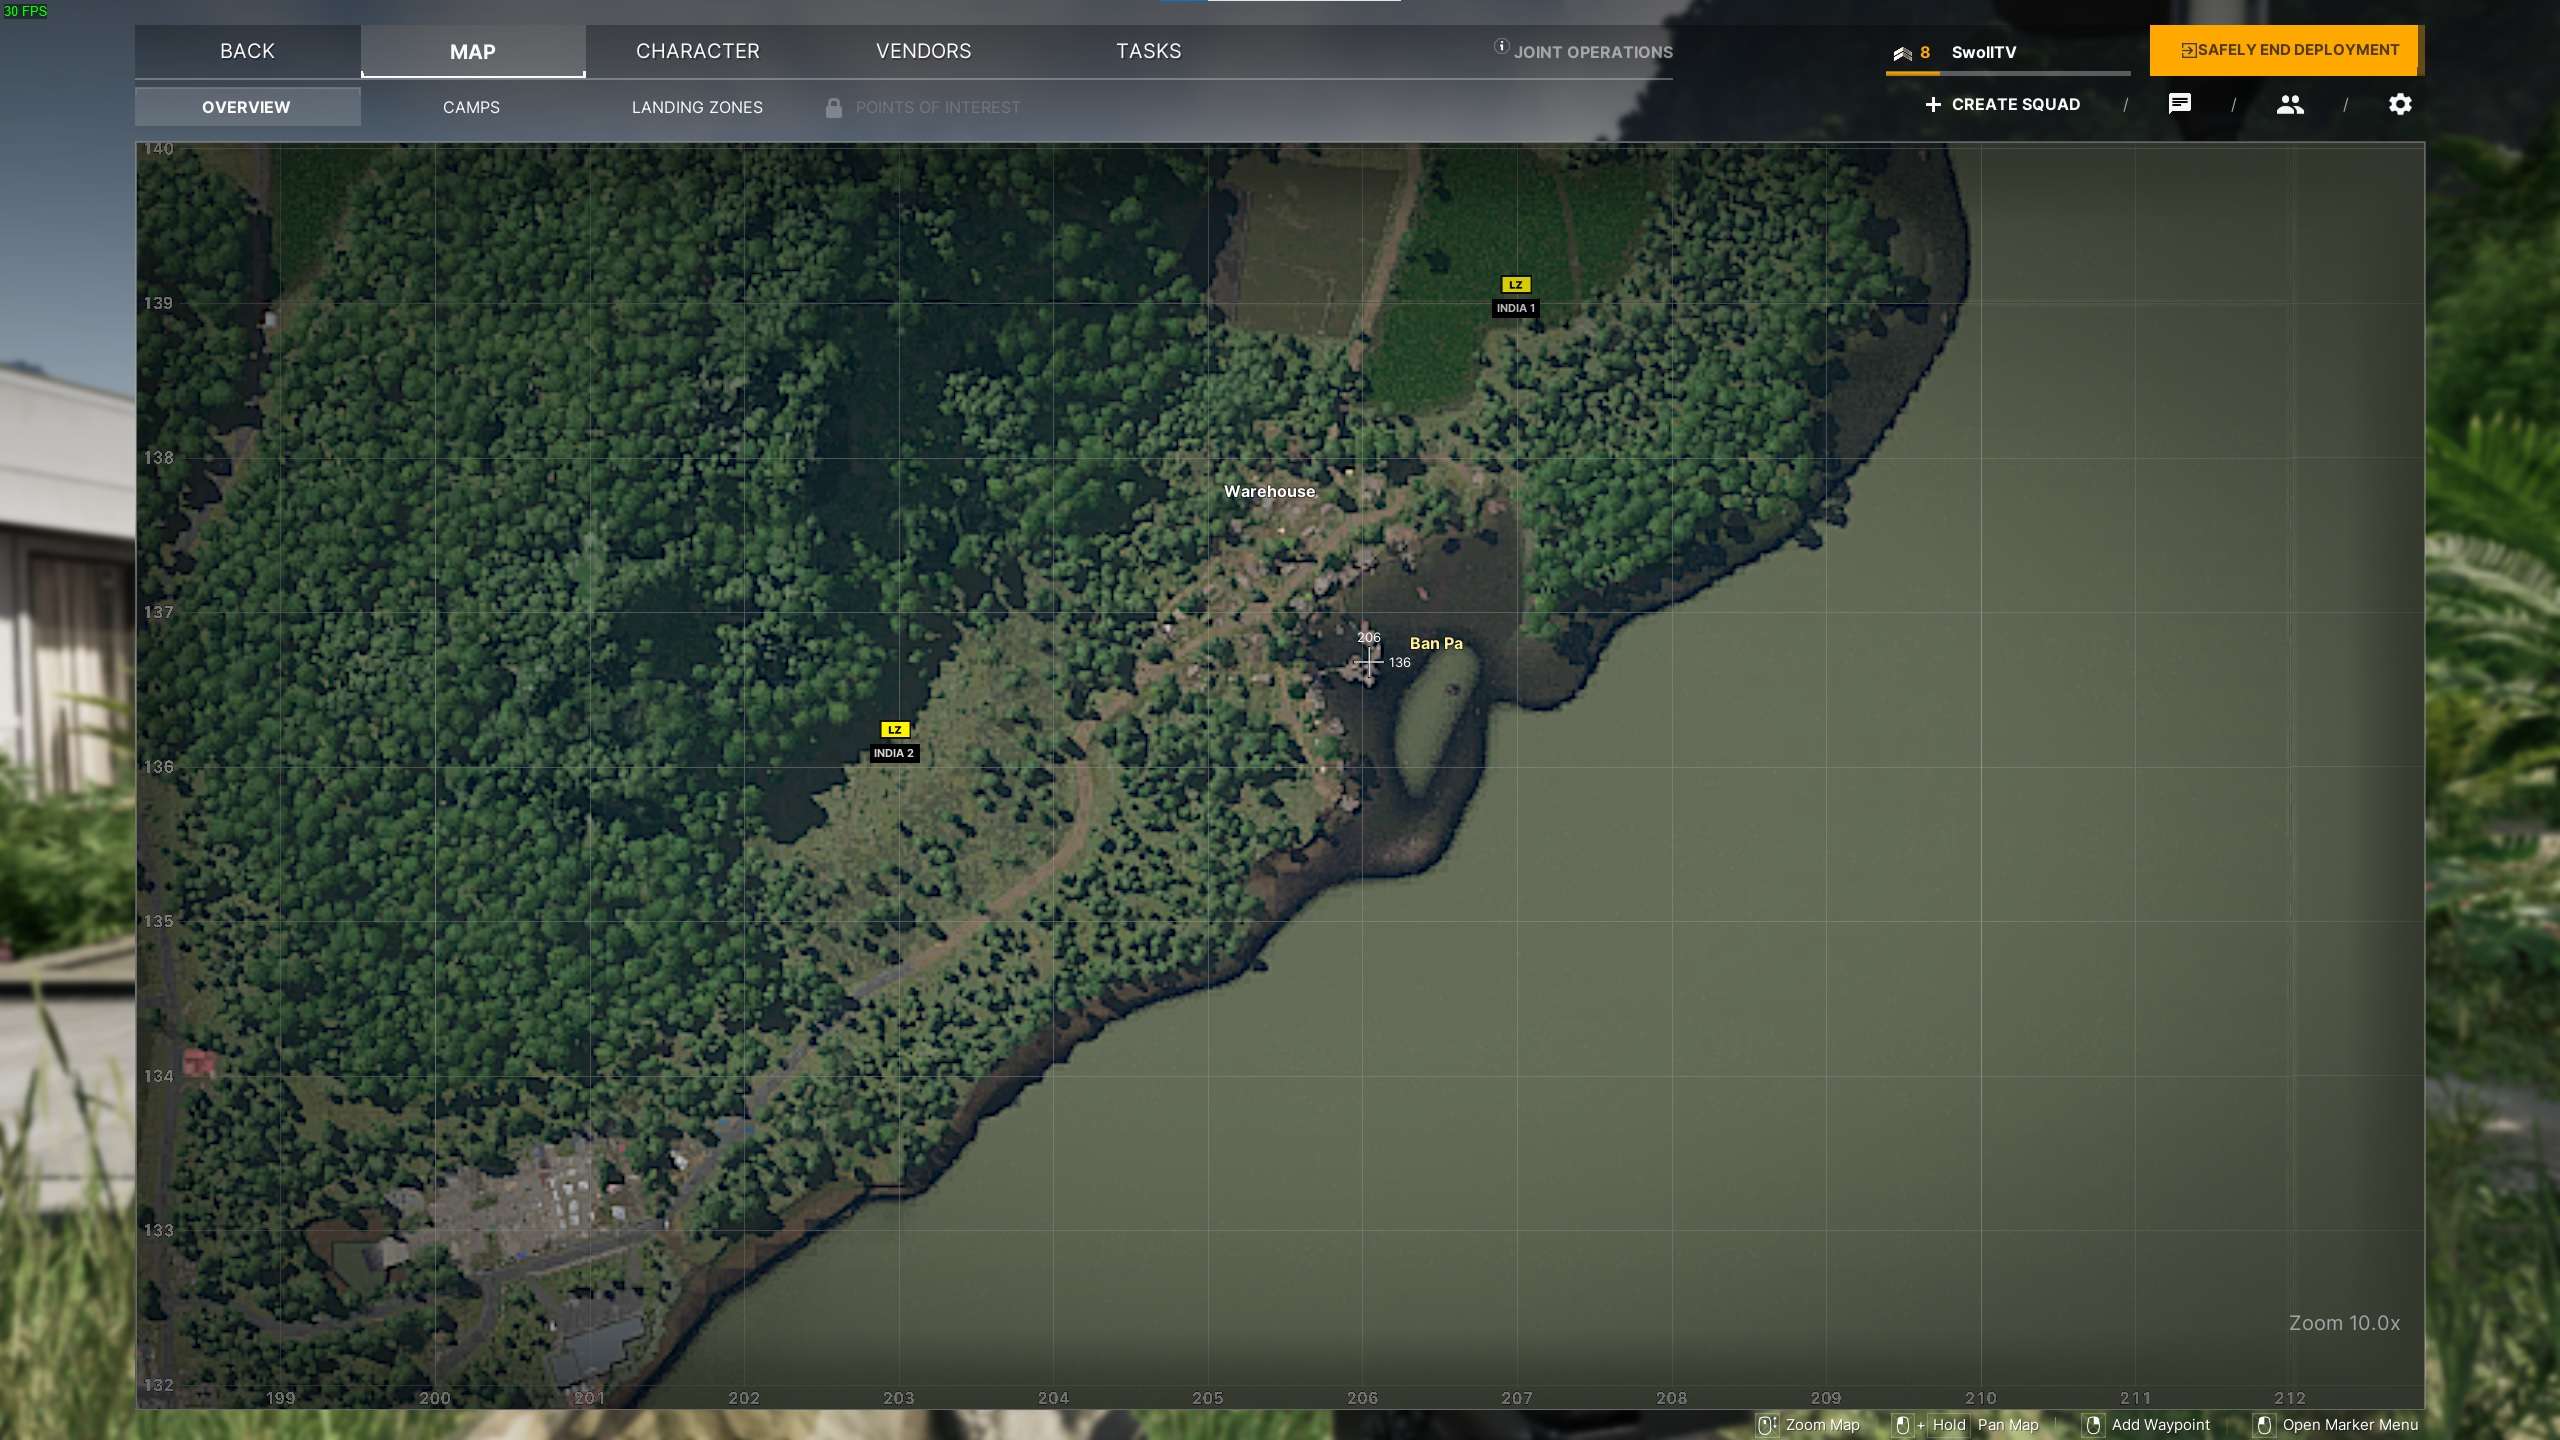
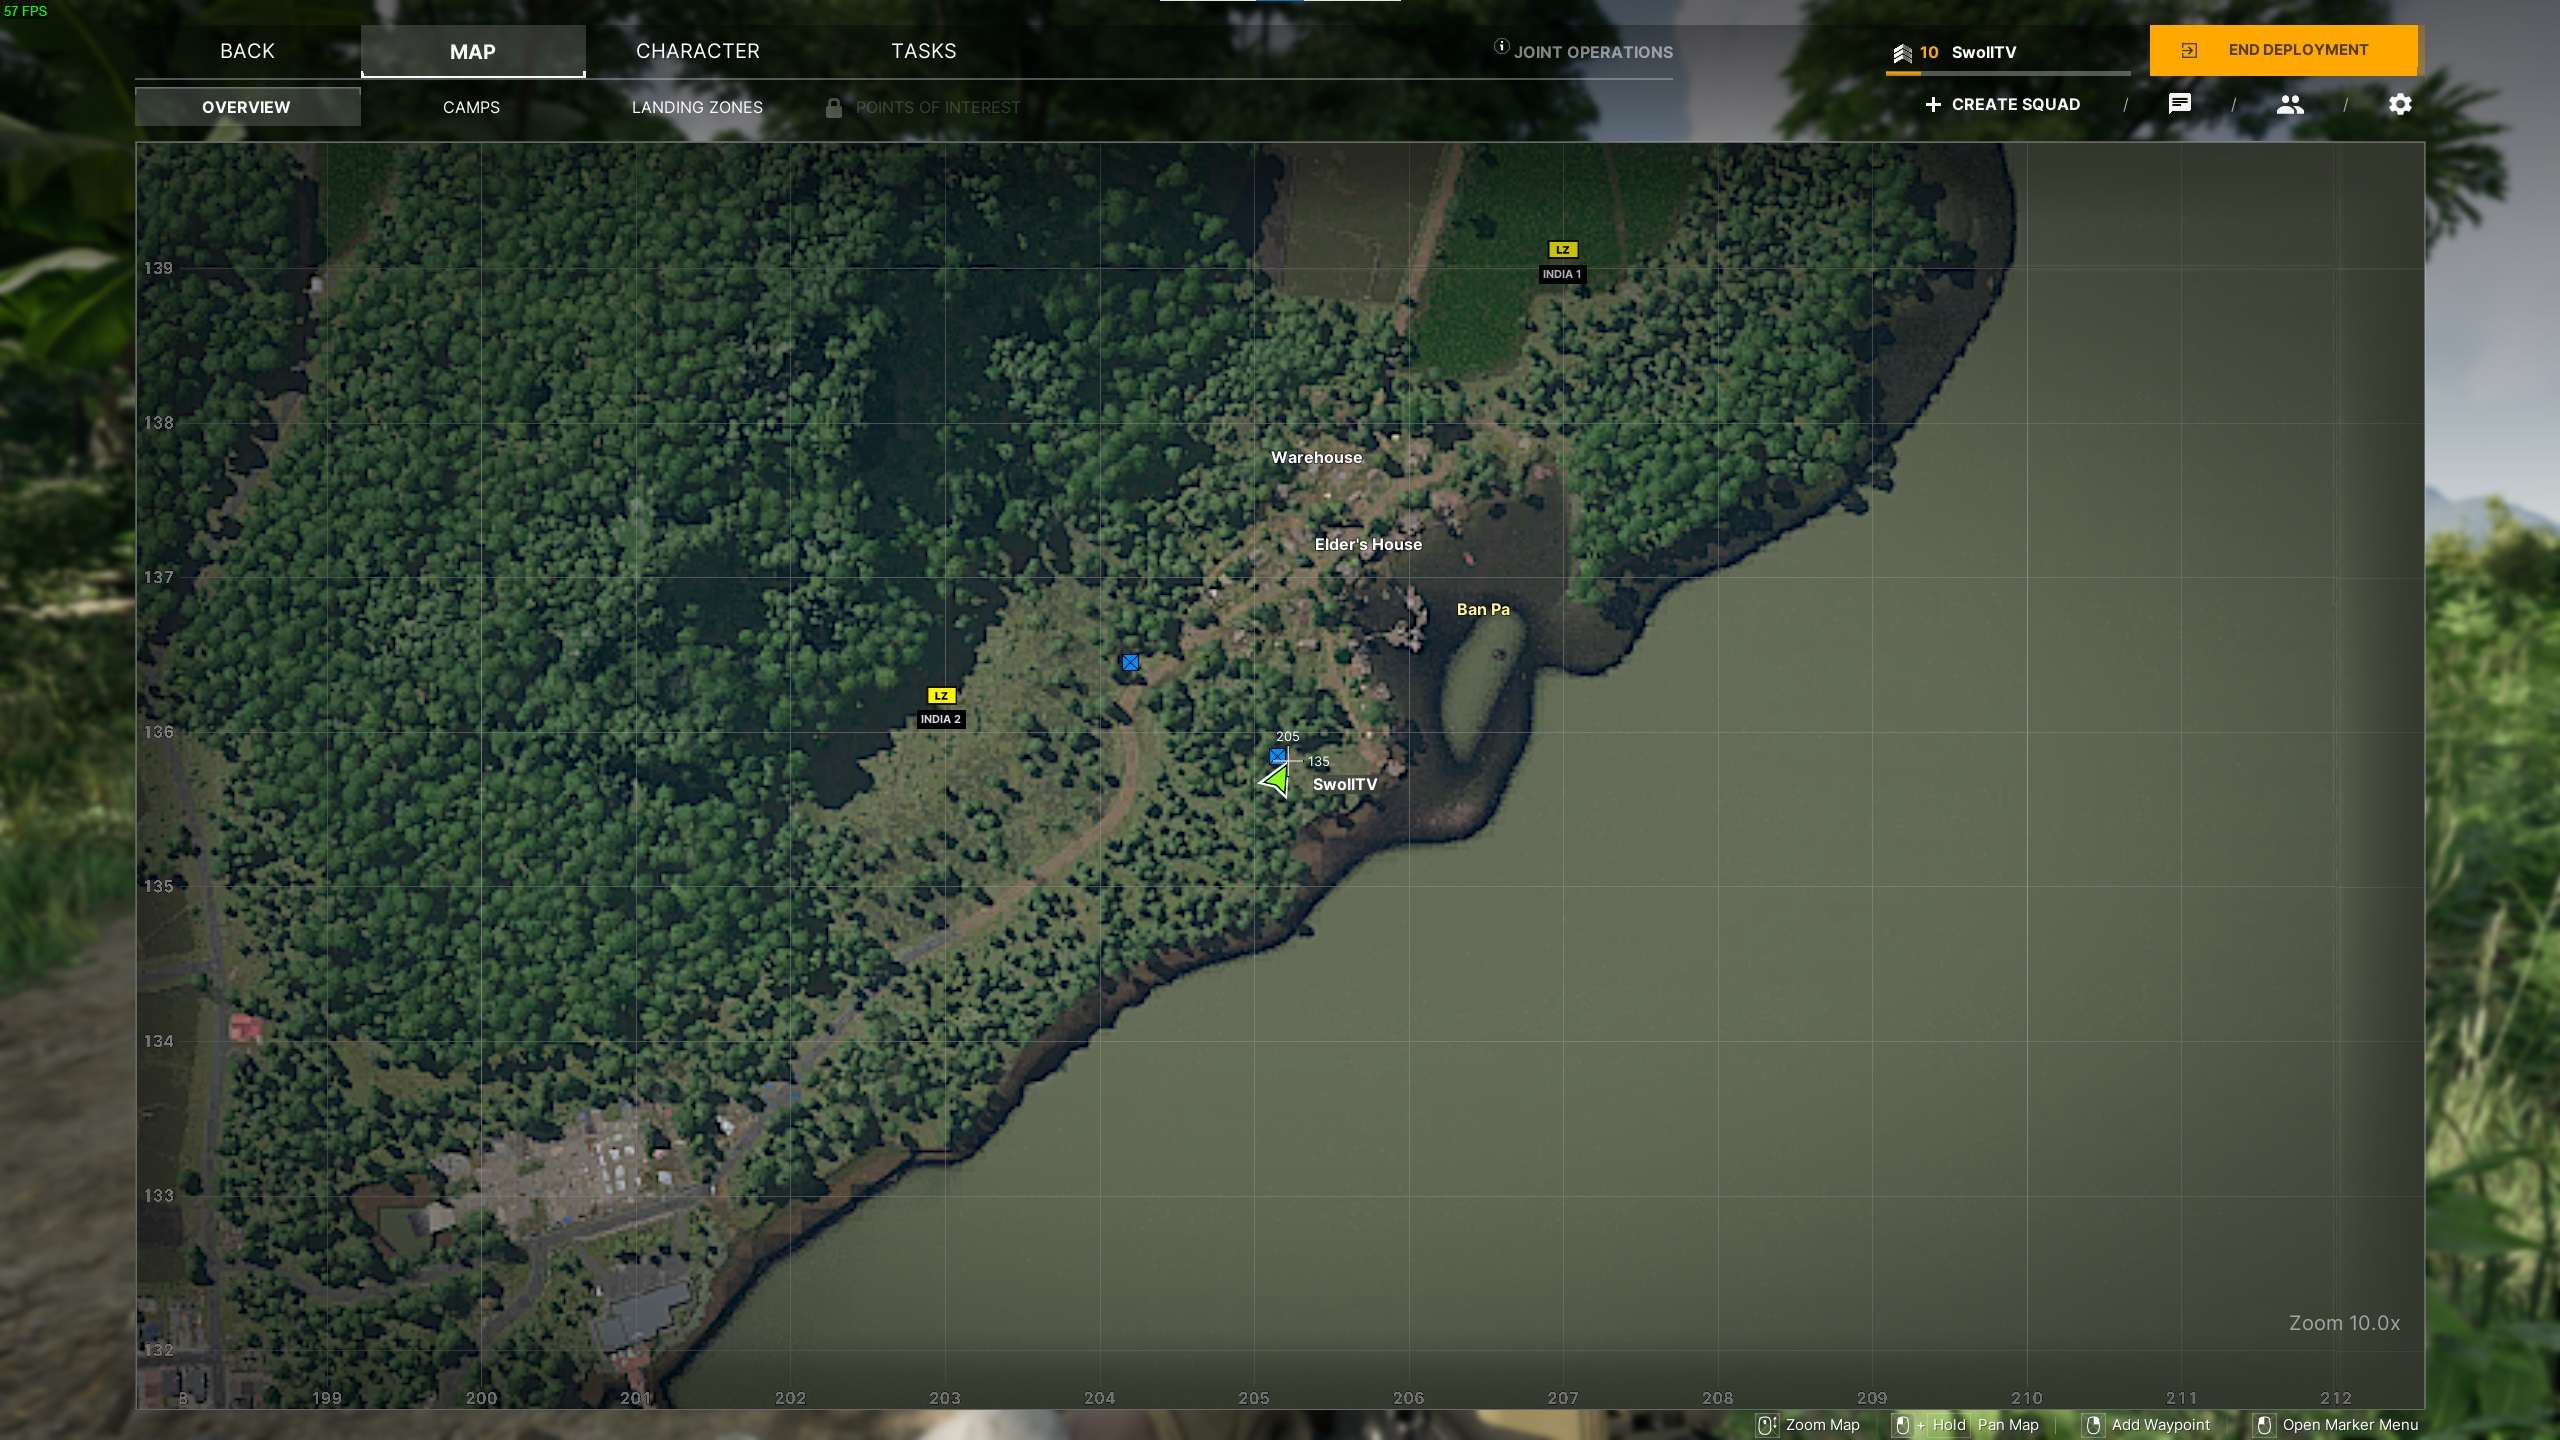
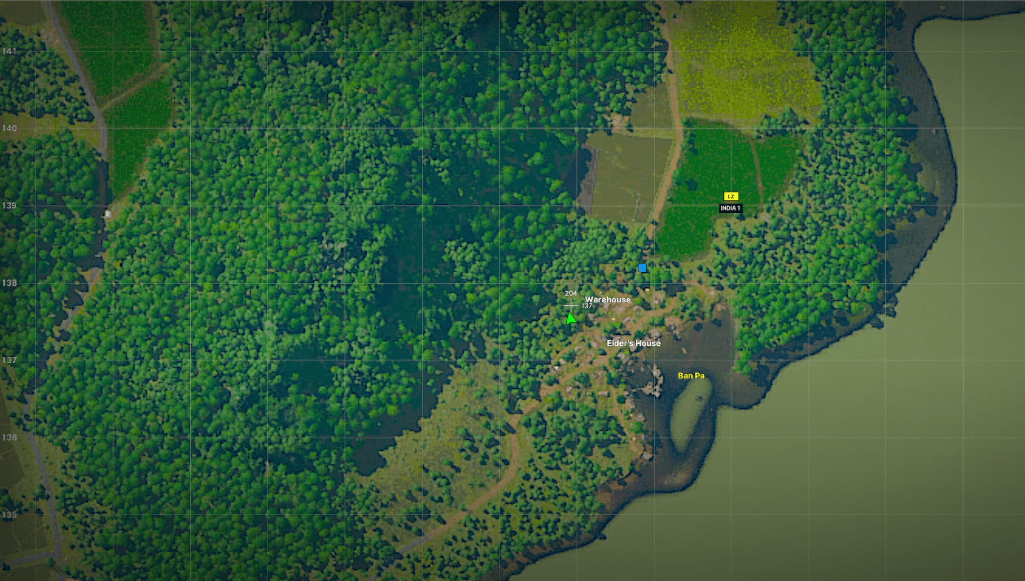
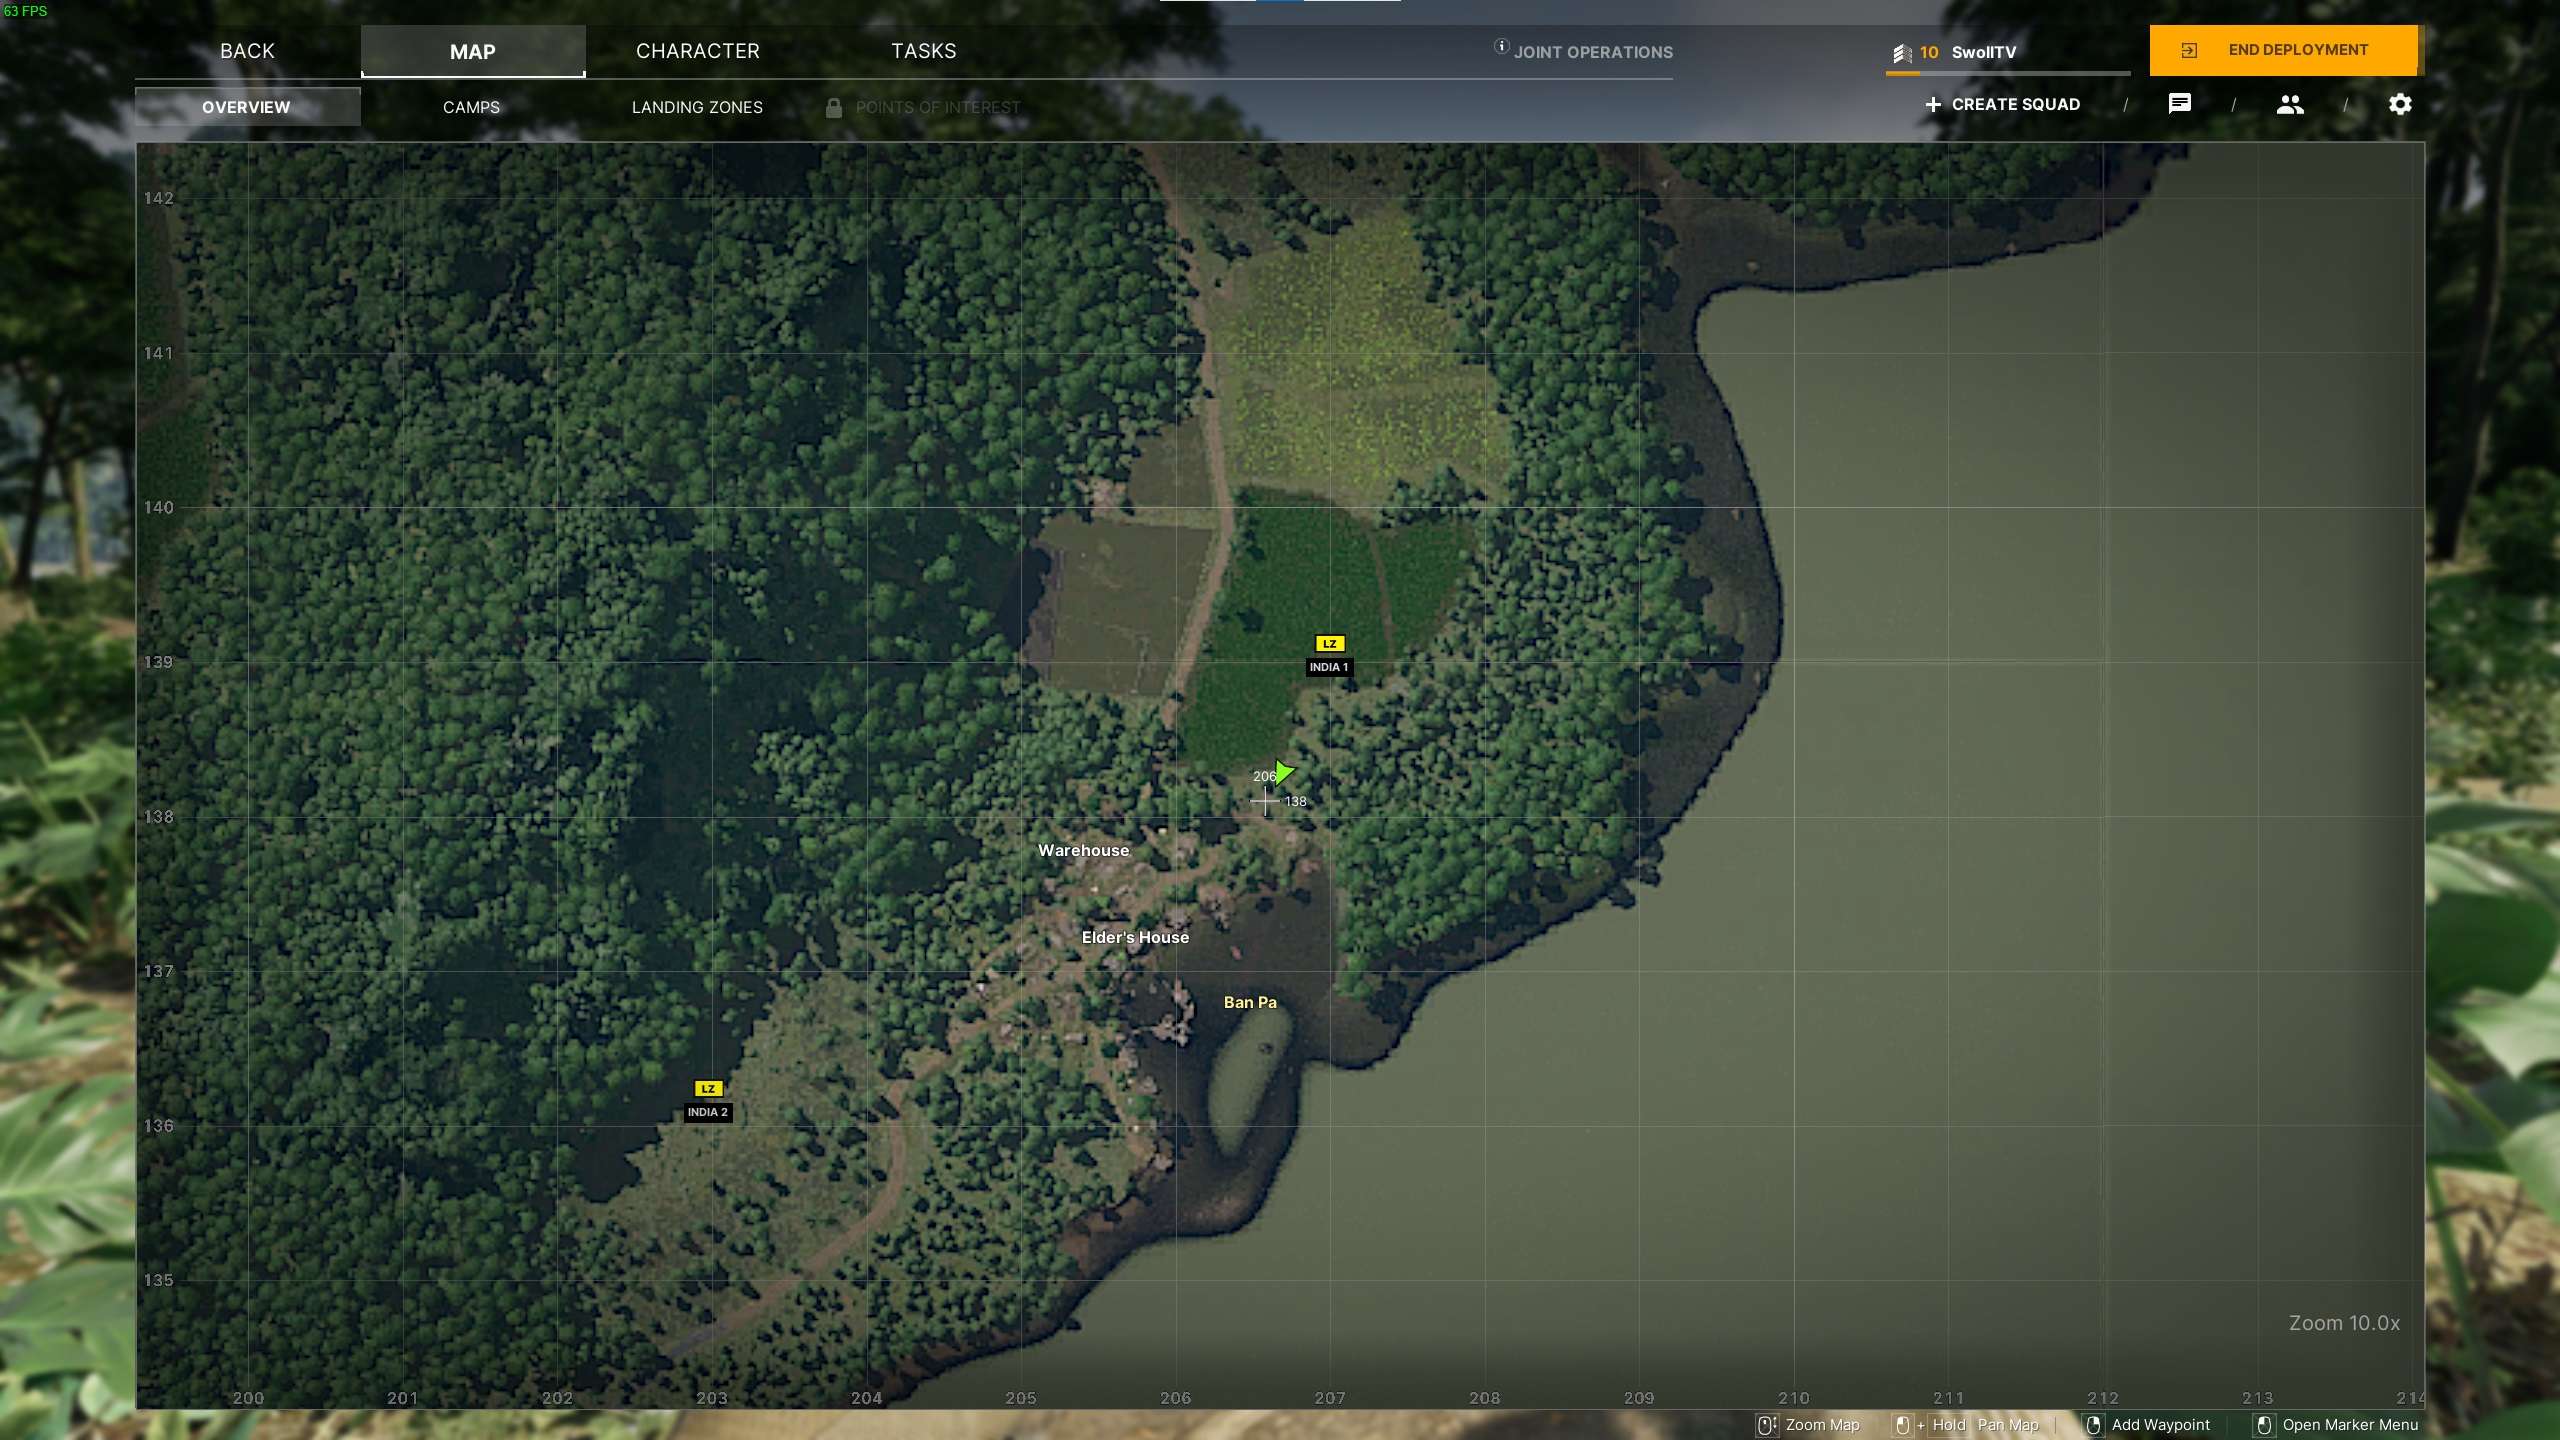
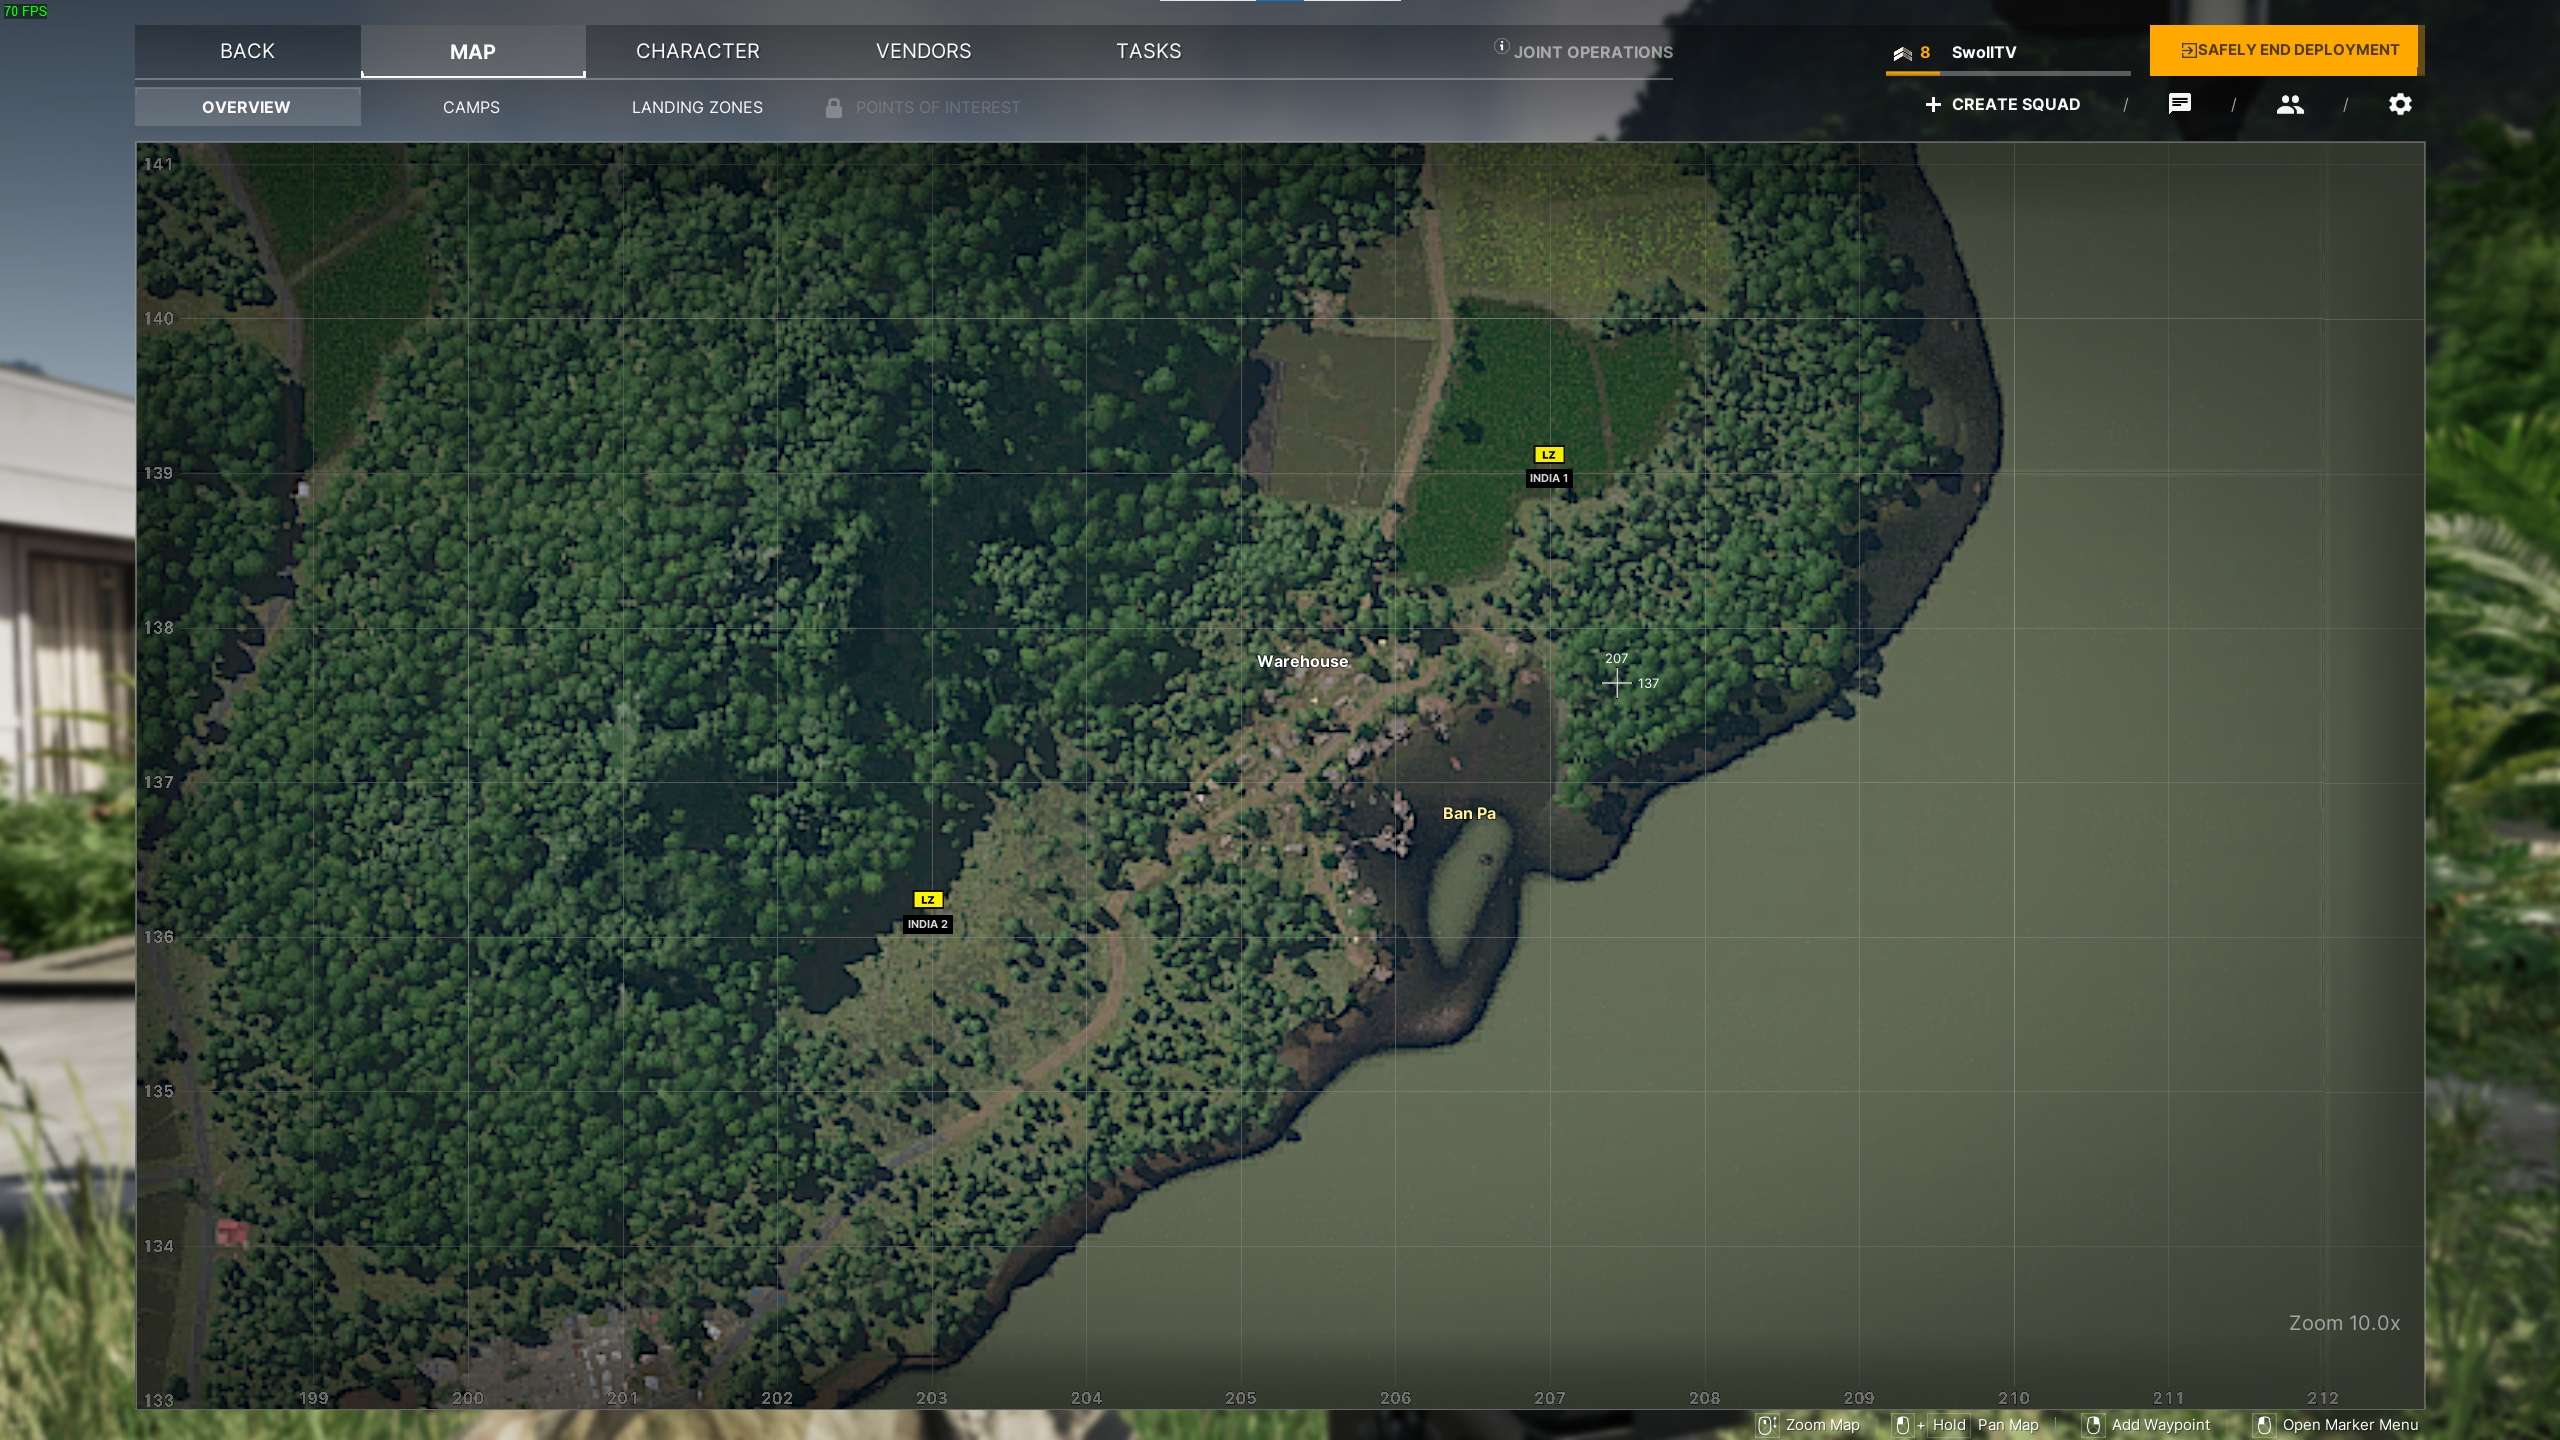
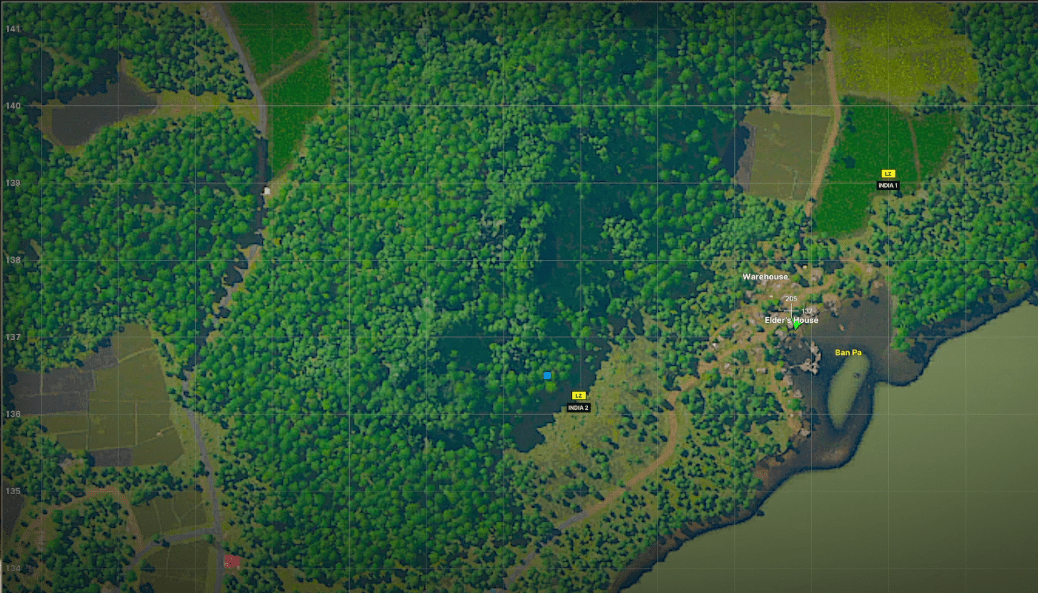
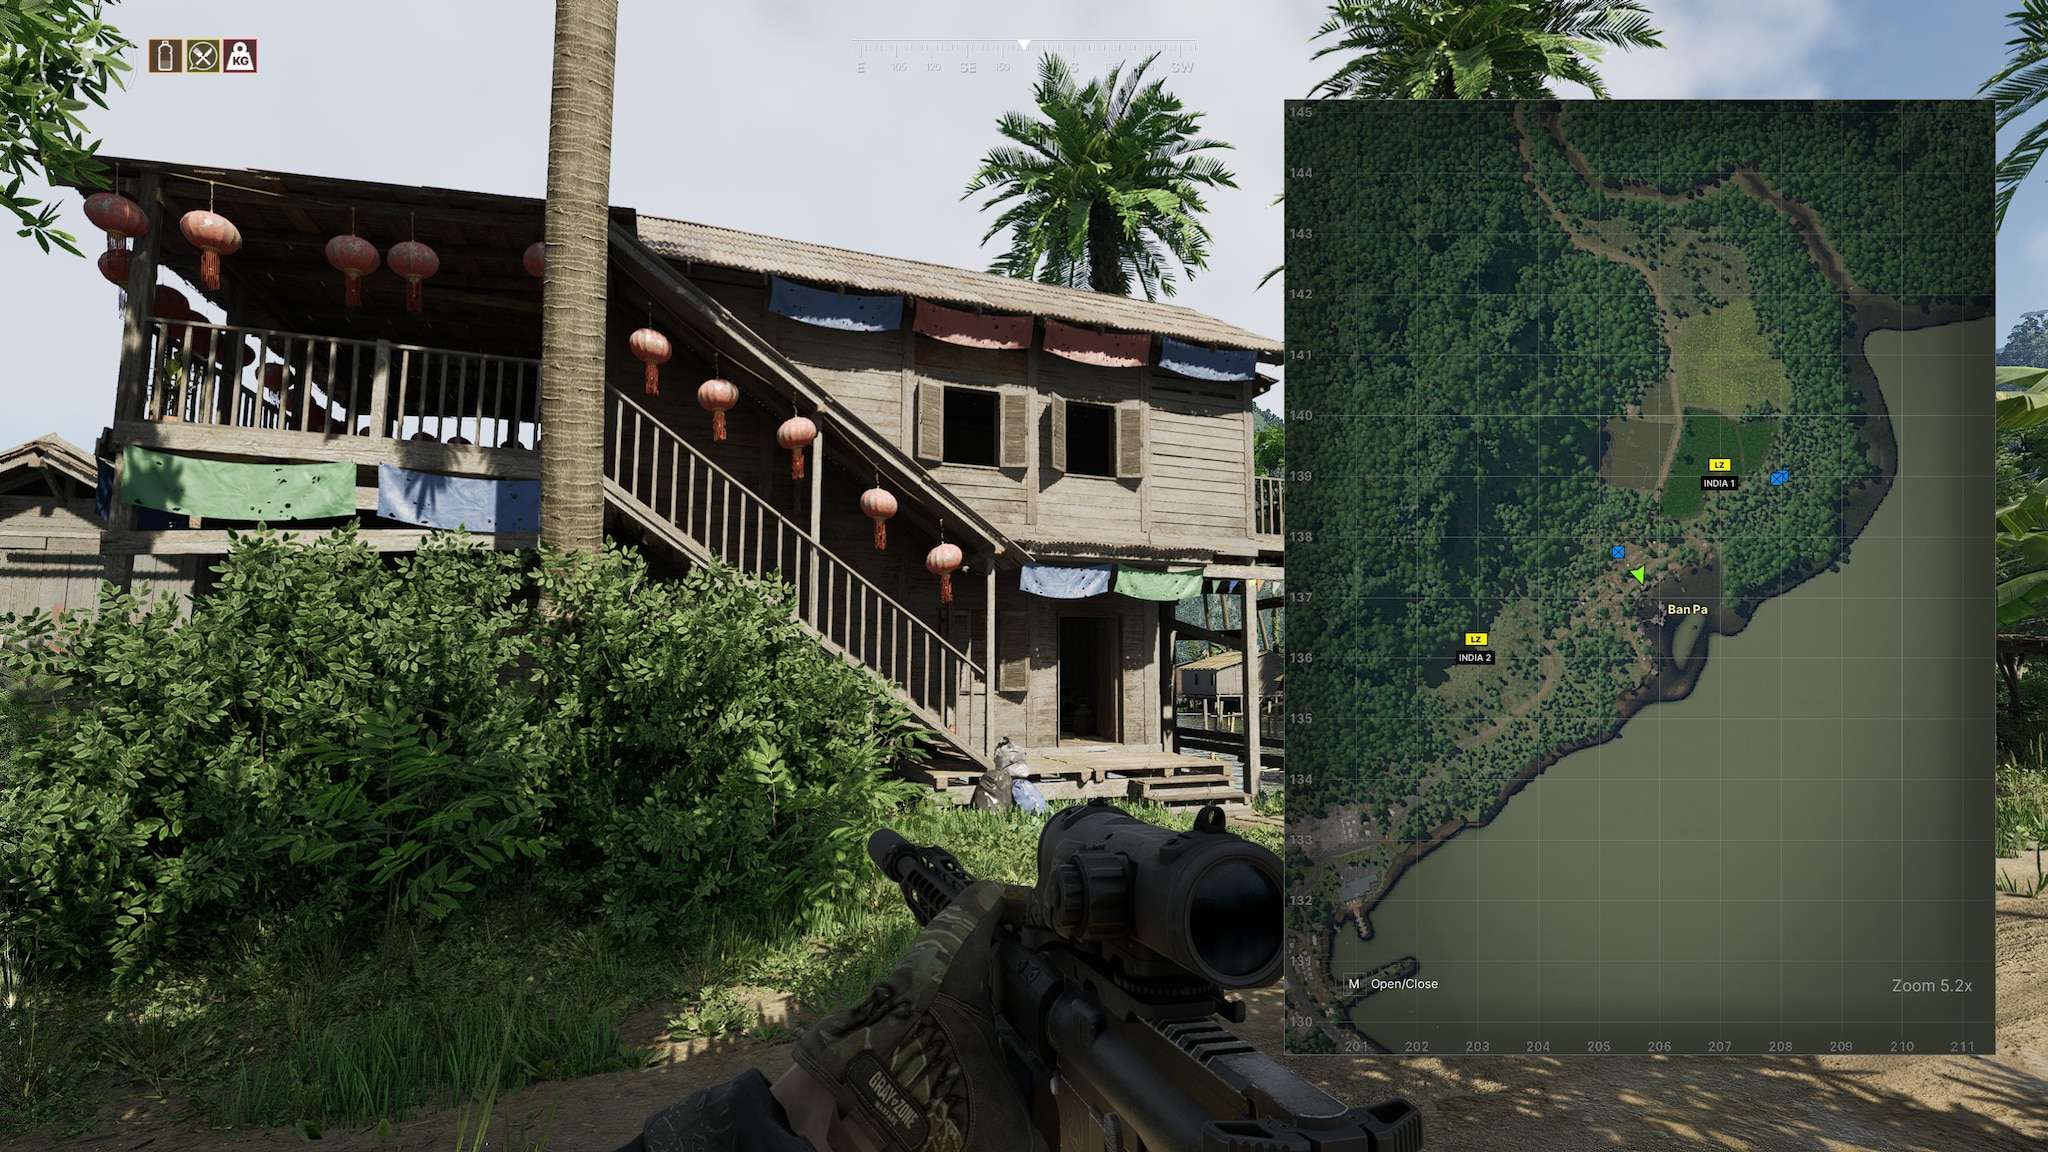
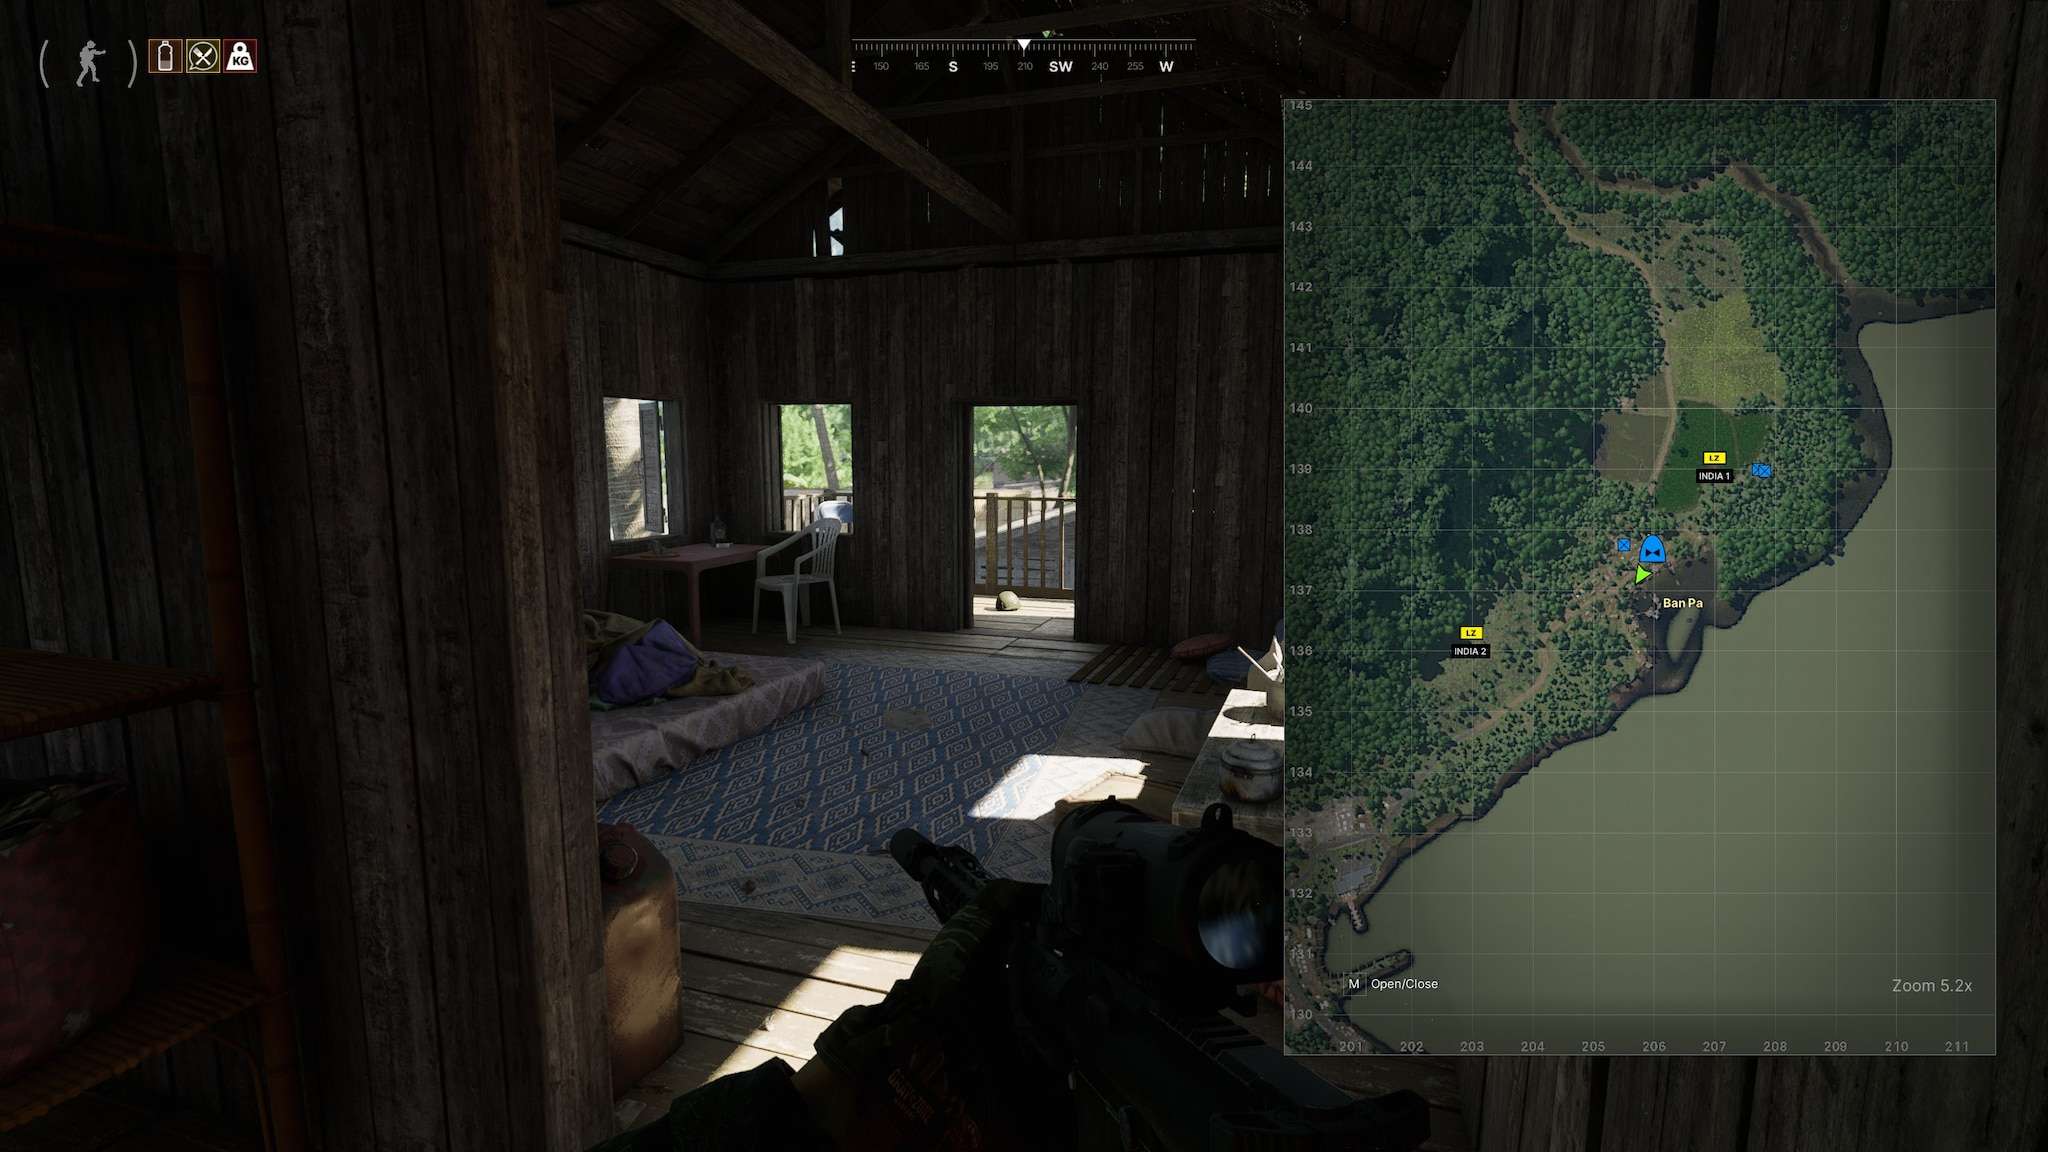
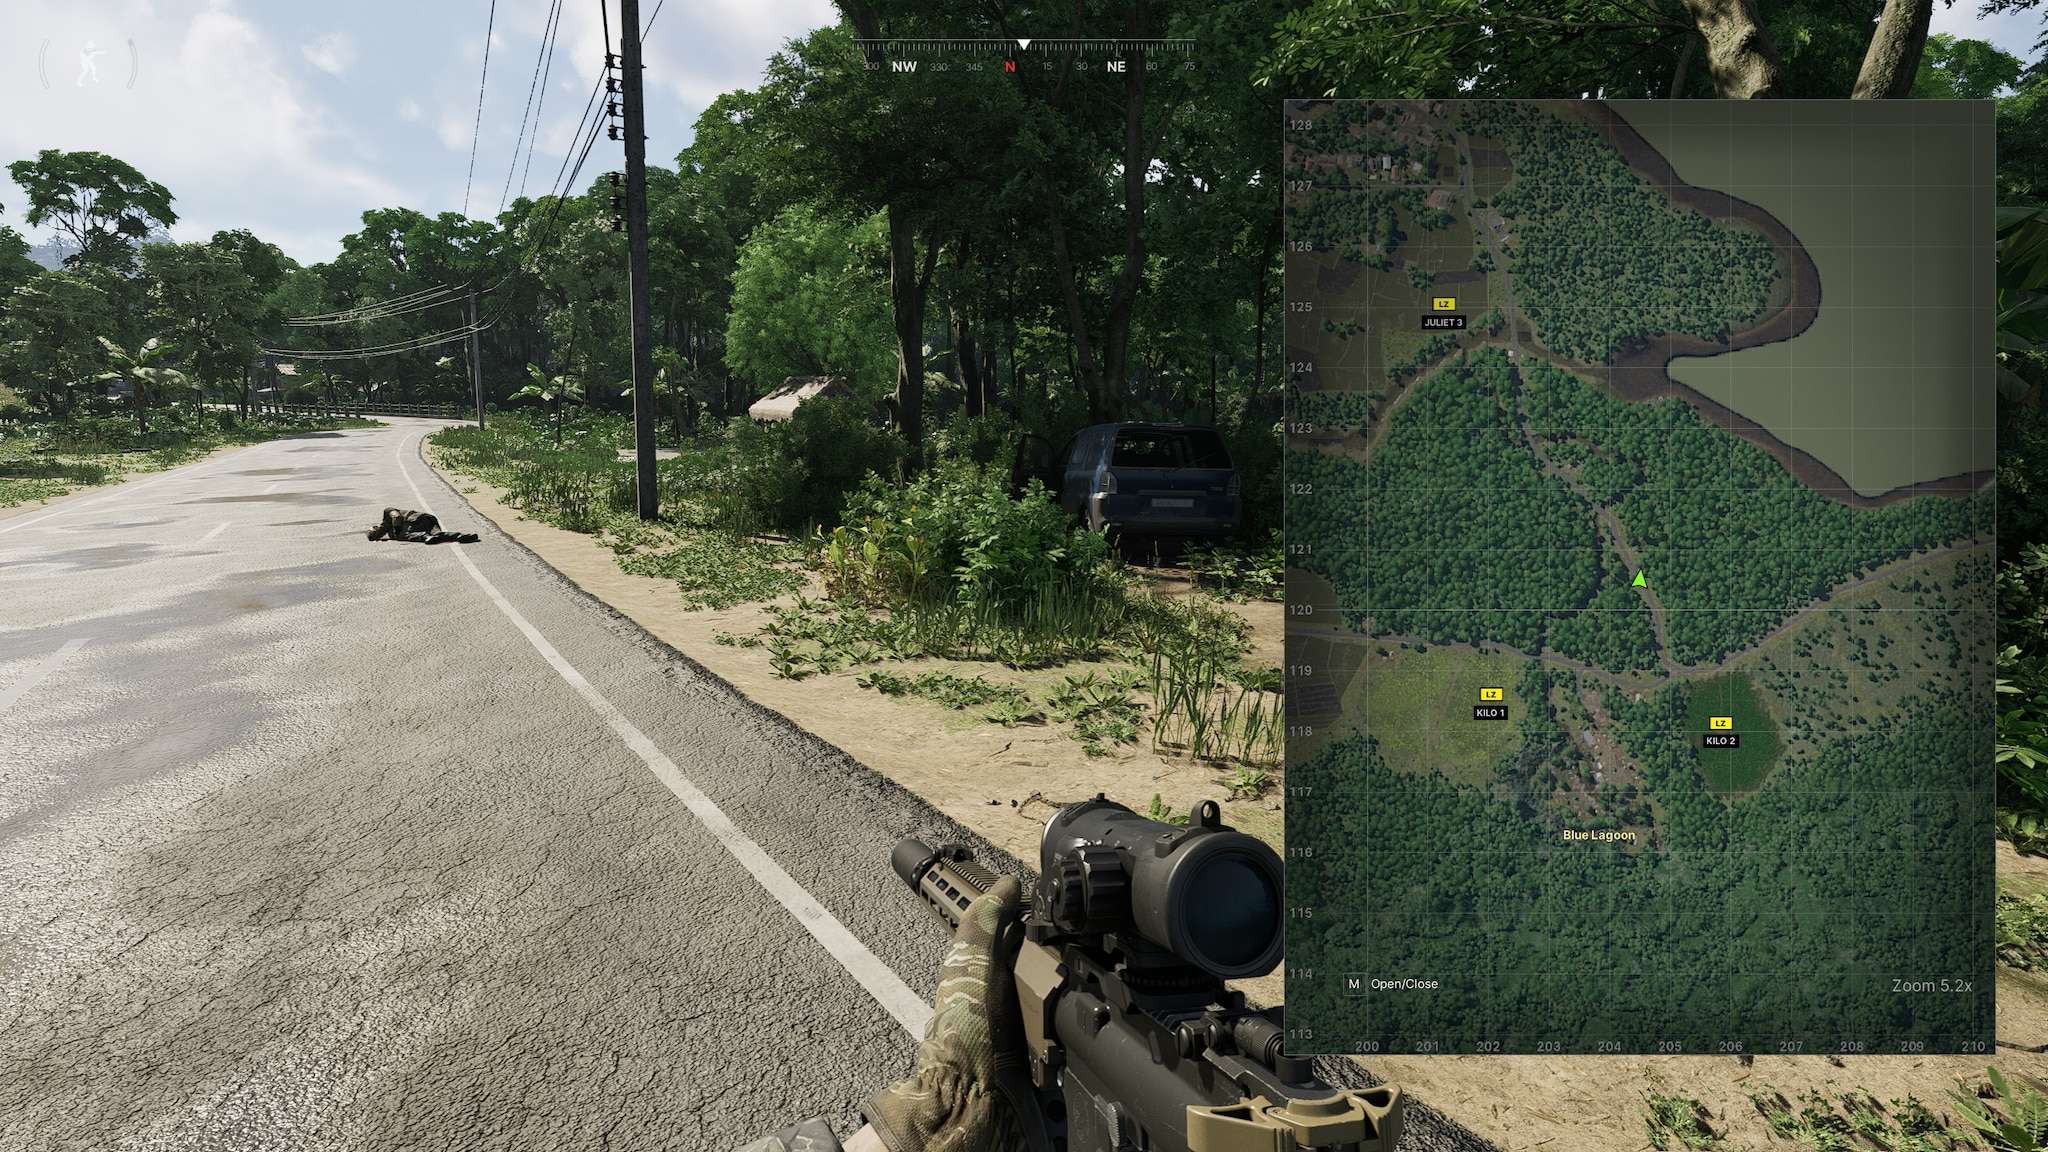
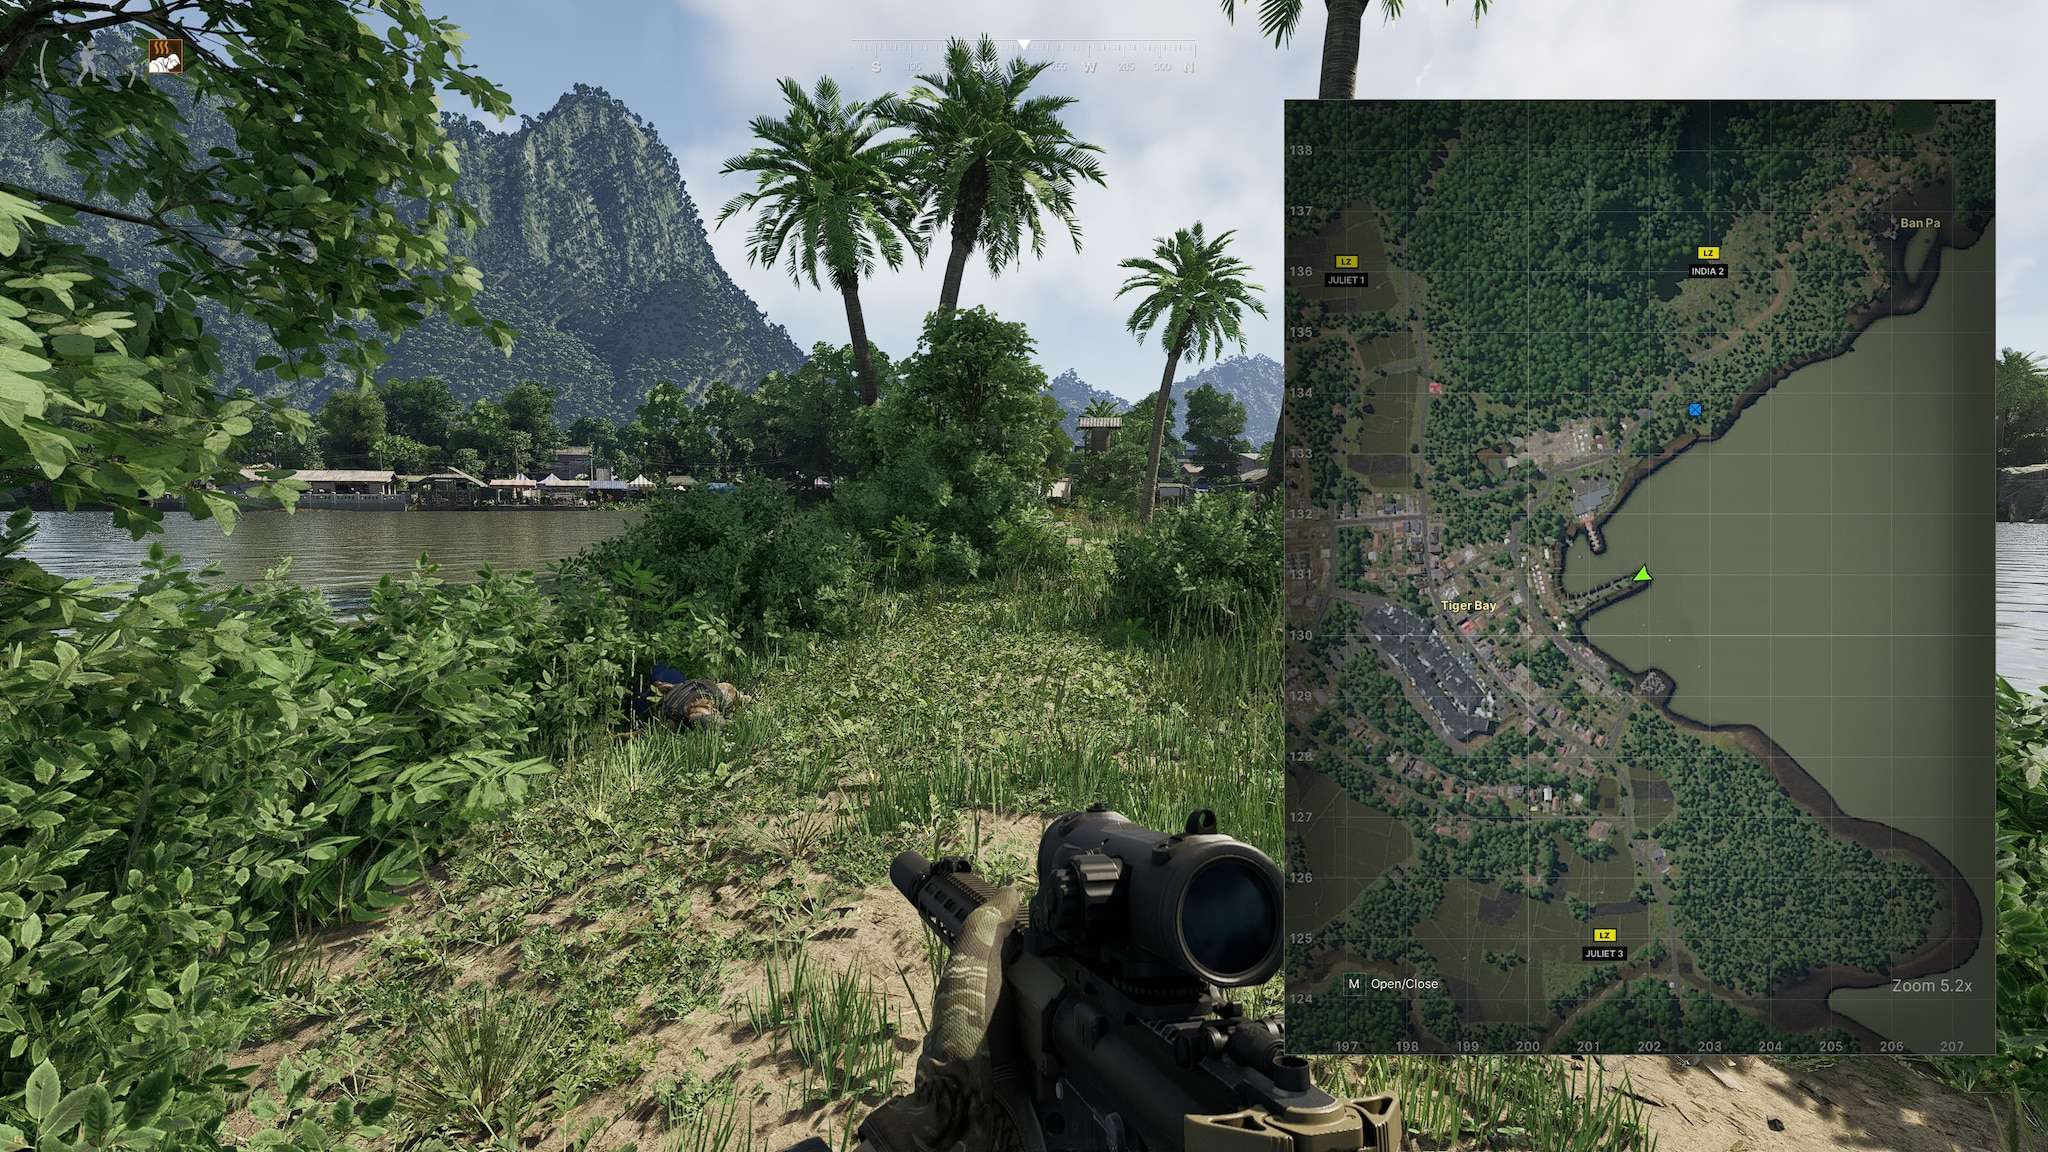
The Shadow Over Ban Pa I
#19: The Shadow Over Ban Pa
- The Shadow Over Ban Pa / Southern – 204 136
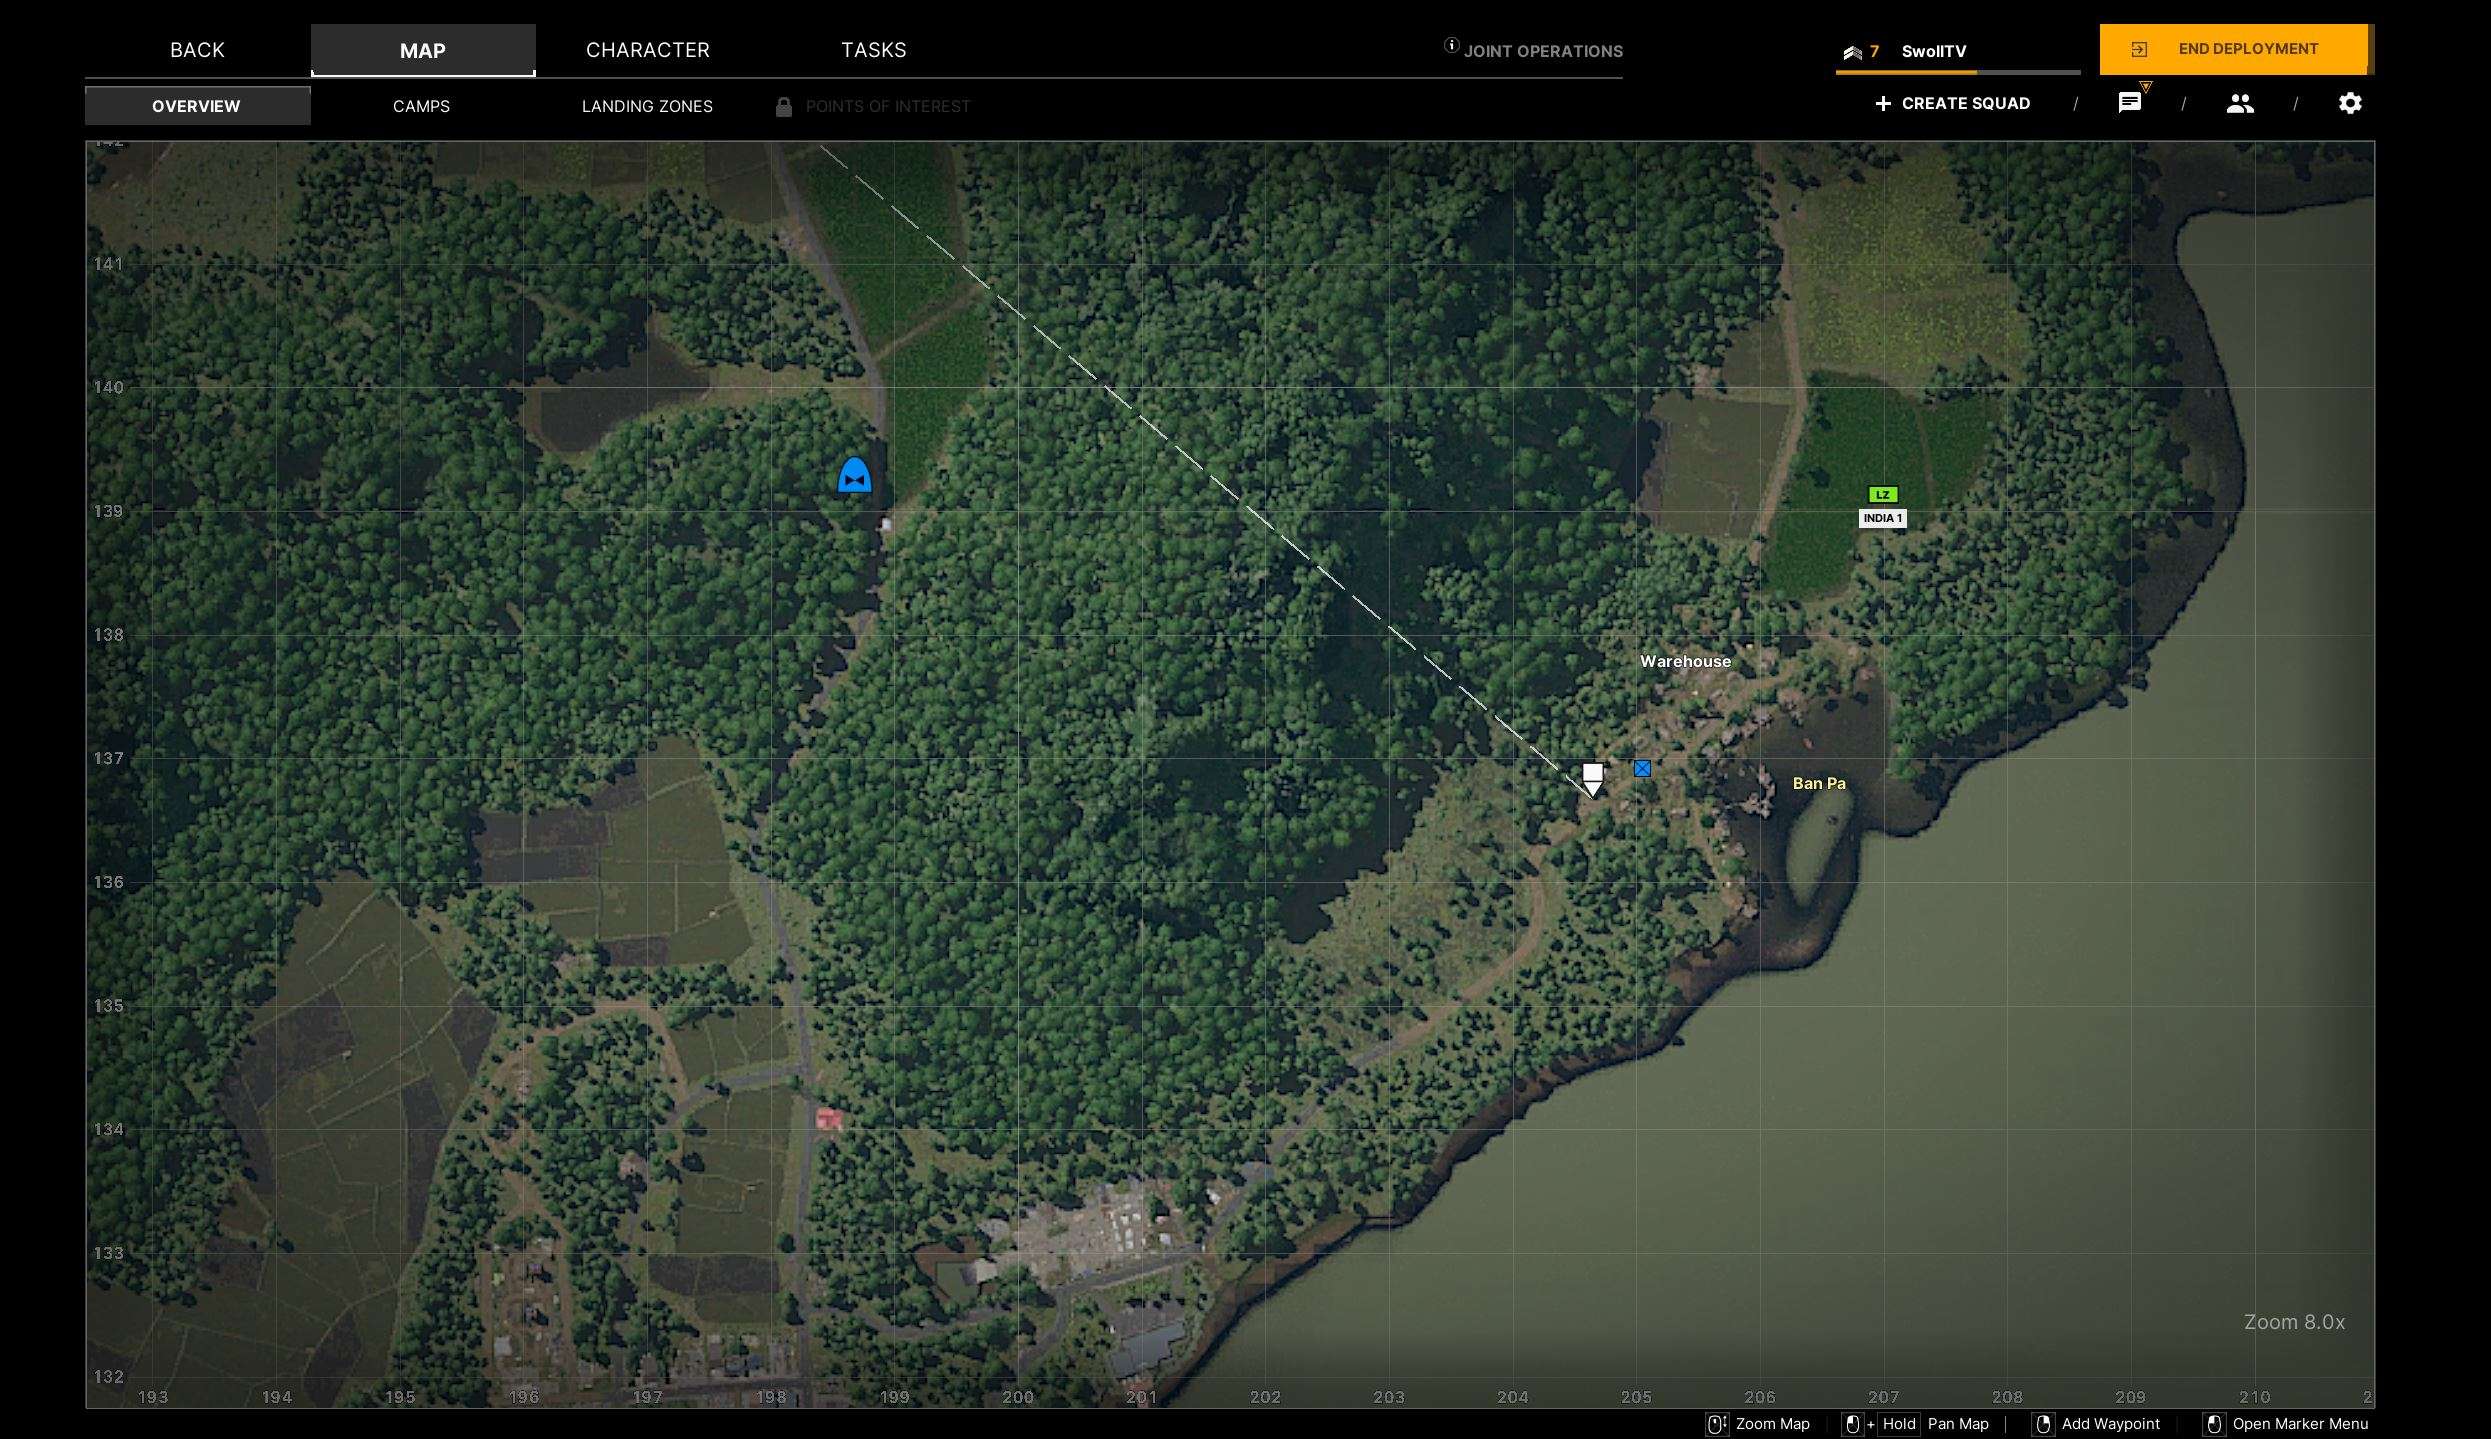
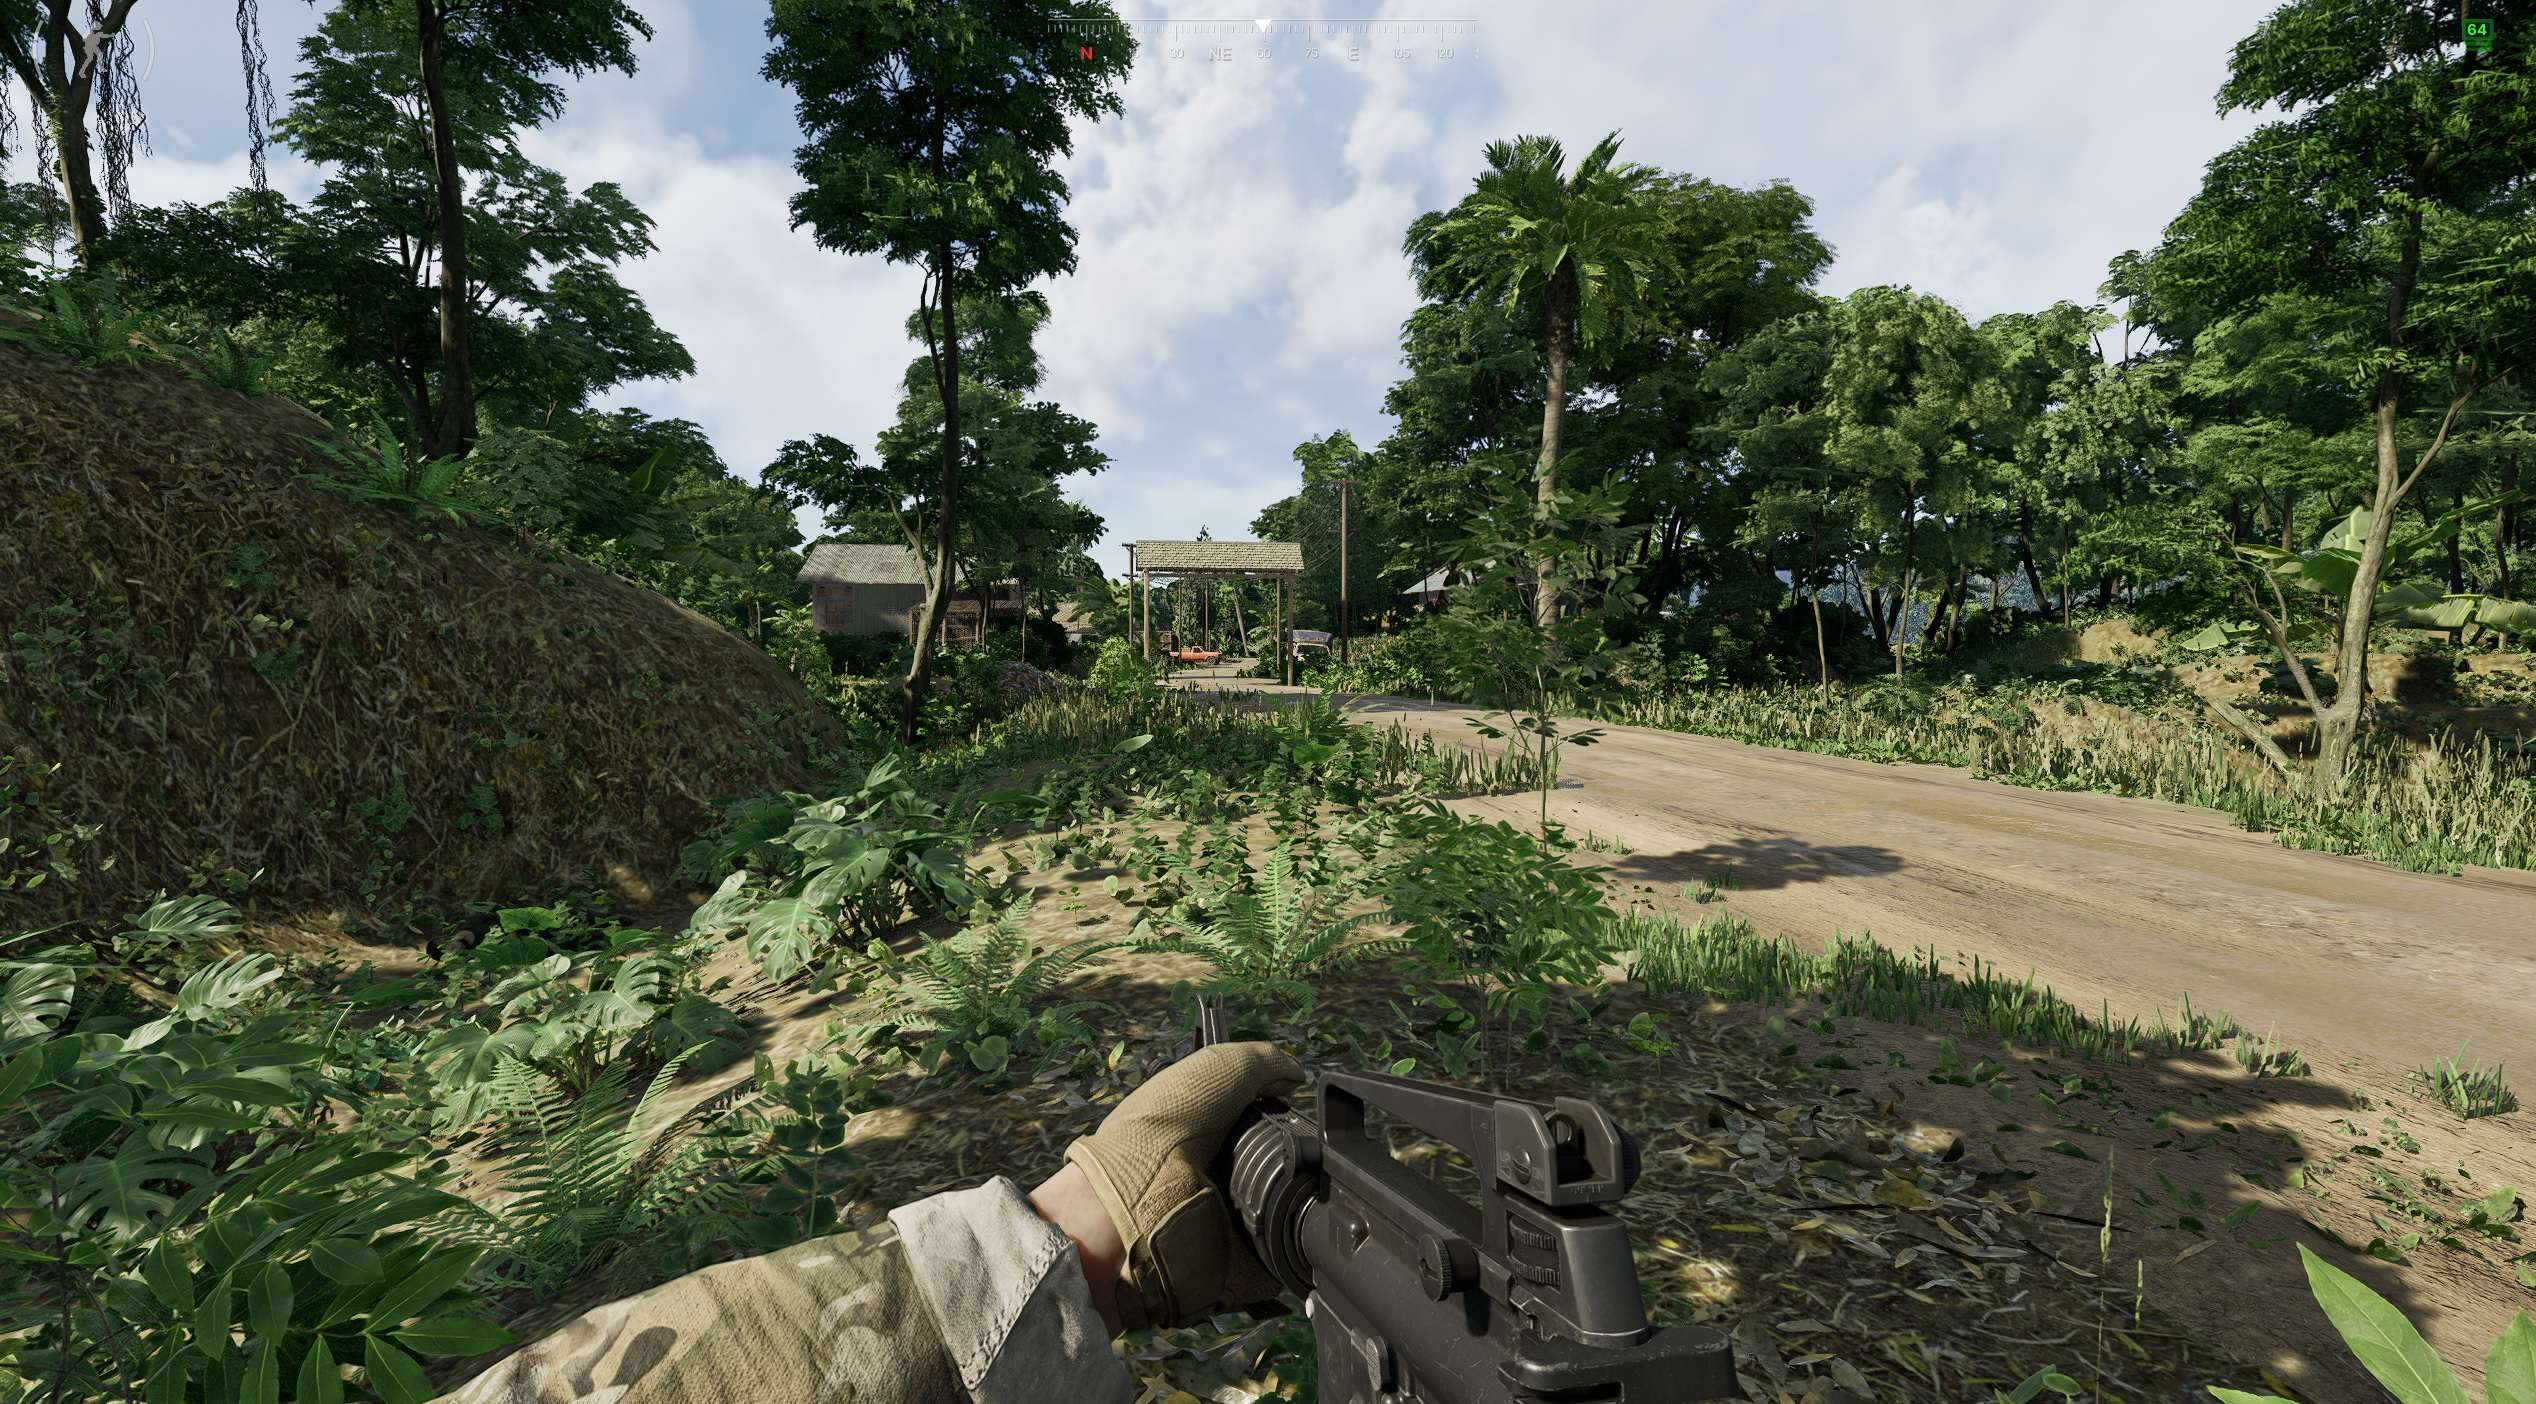
- The Shadow Over Ban Pa / Northern – 205 138
The Negotiator
#20: The Negotiator
- The Negotiator – 142 121
Note: In the bunker at -2, you need YBL Office 02 Key to perform this task.

Guns & Ammo
#21: Guns & Ammo
- Guns & Ammo – 159 168
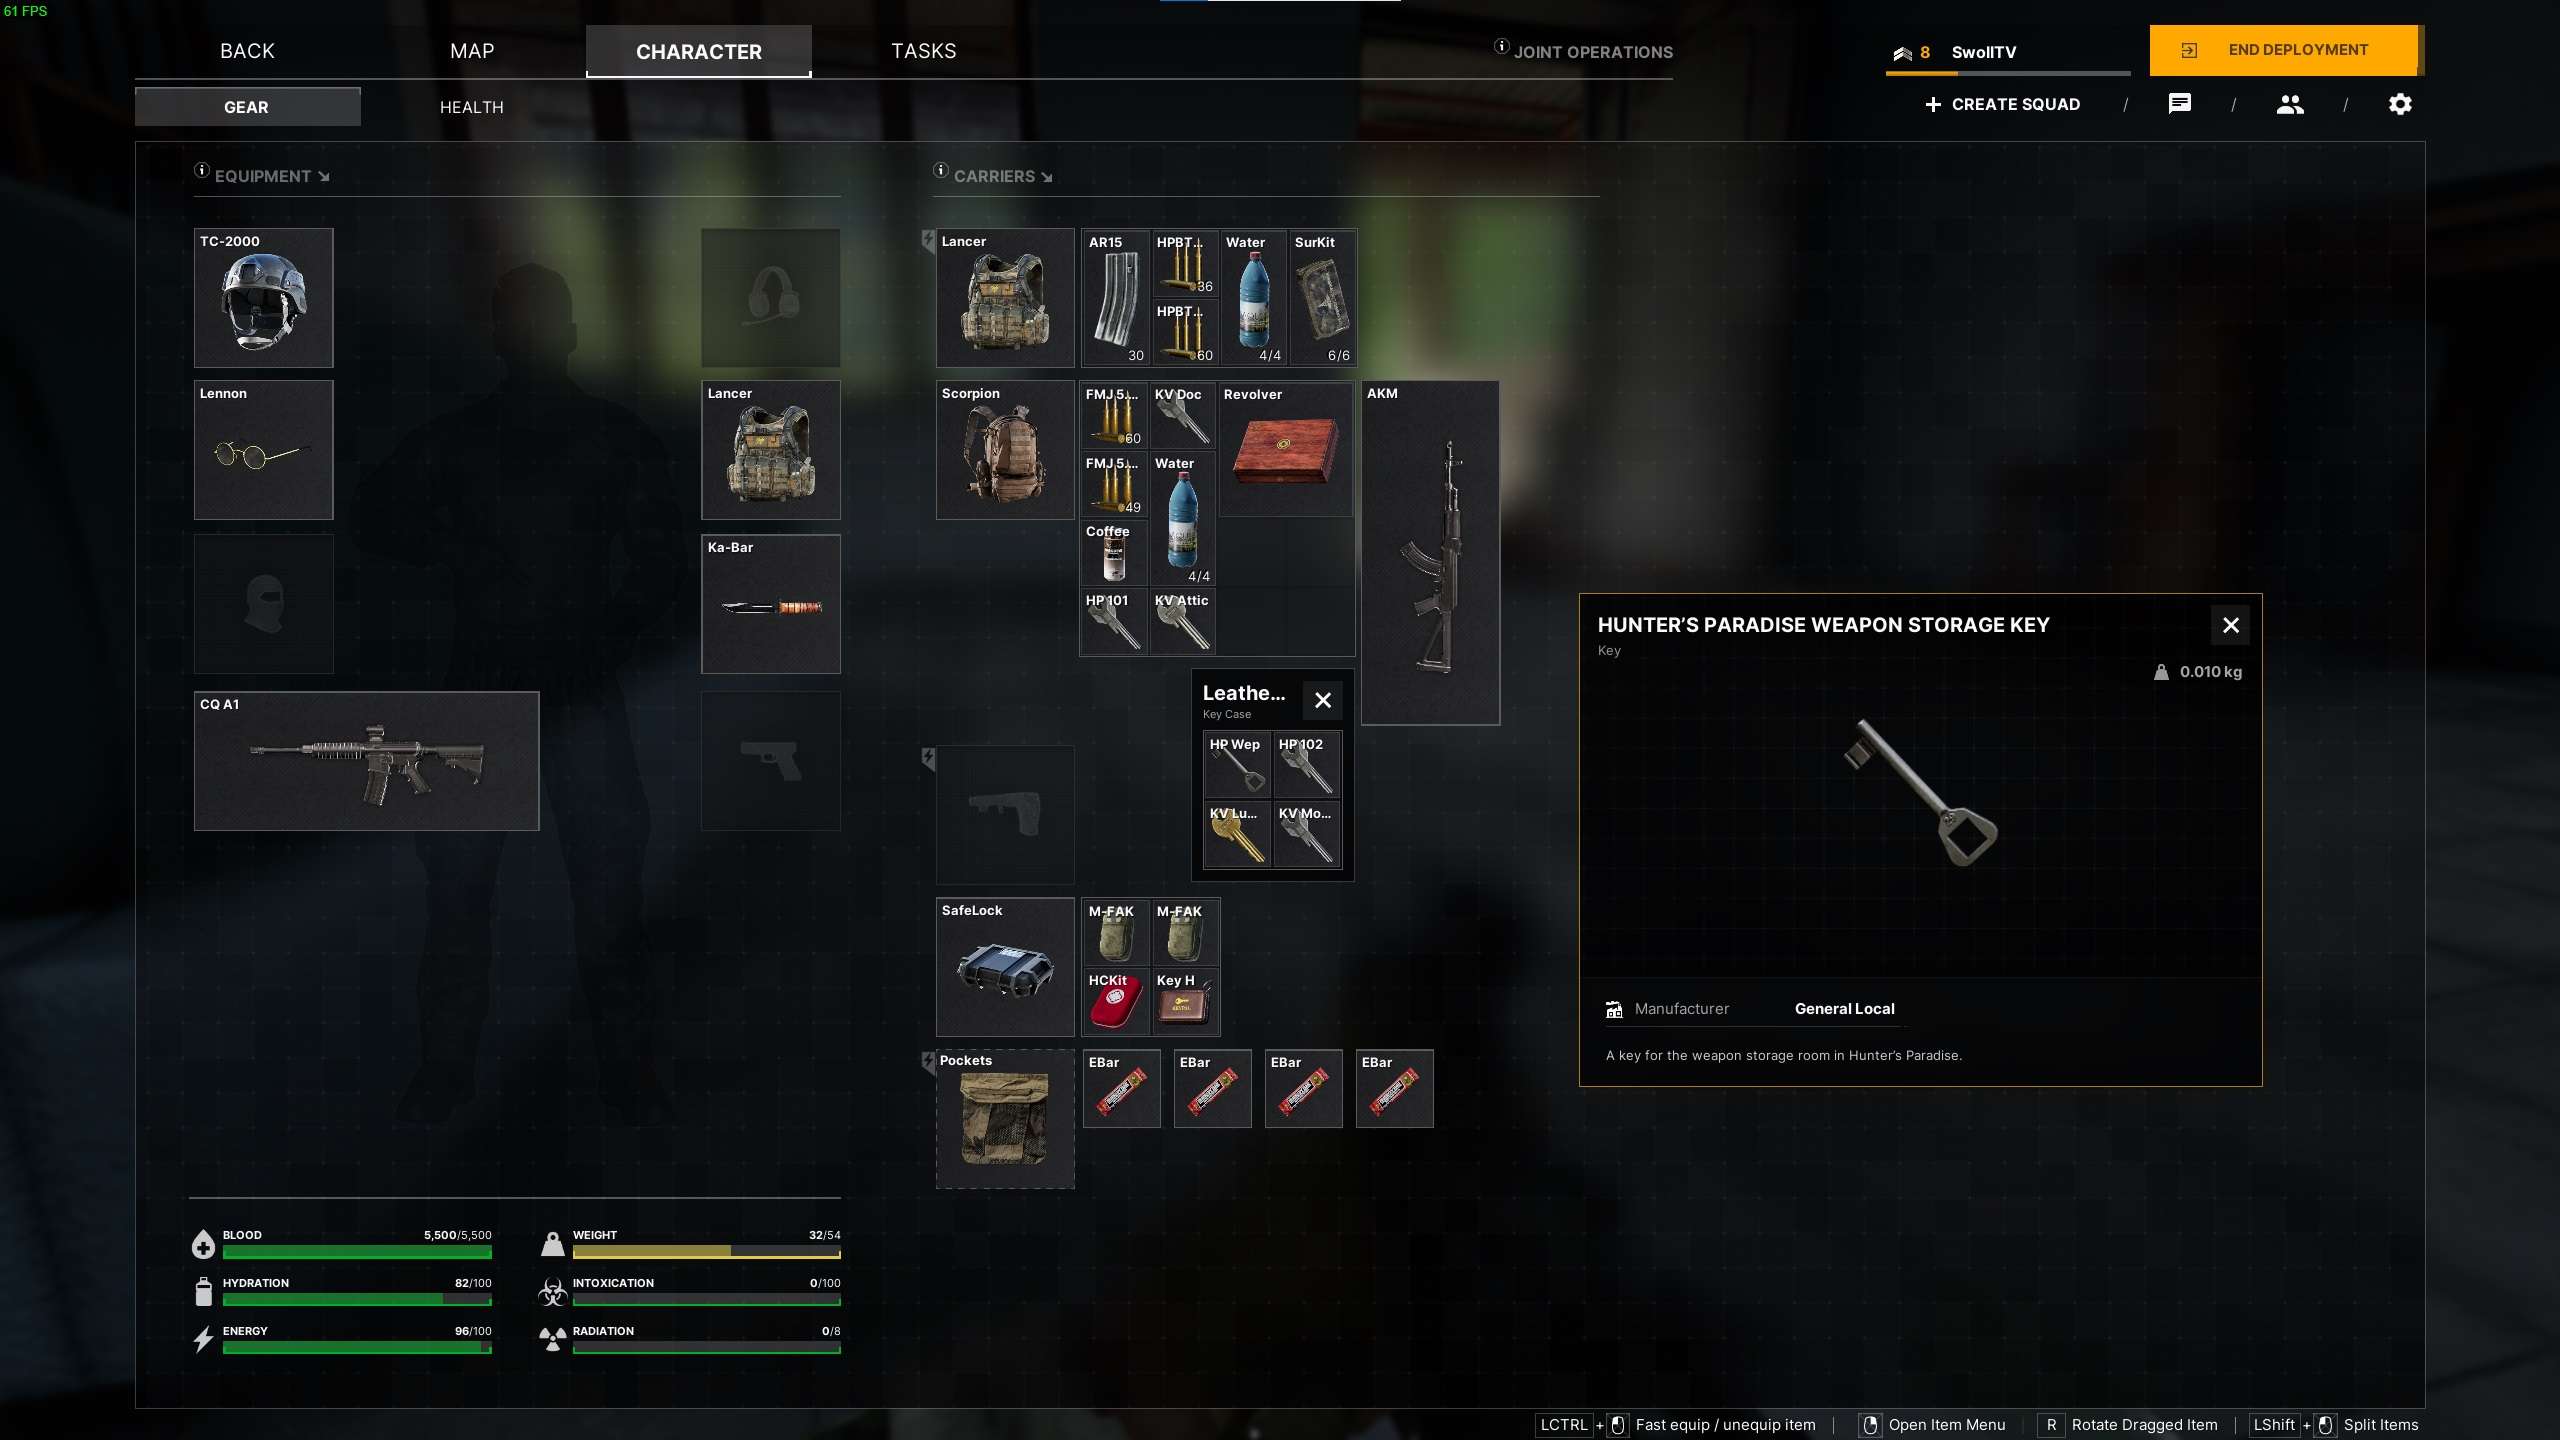
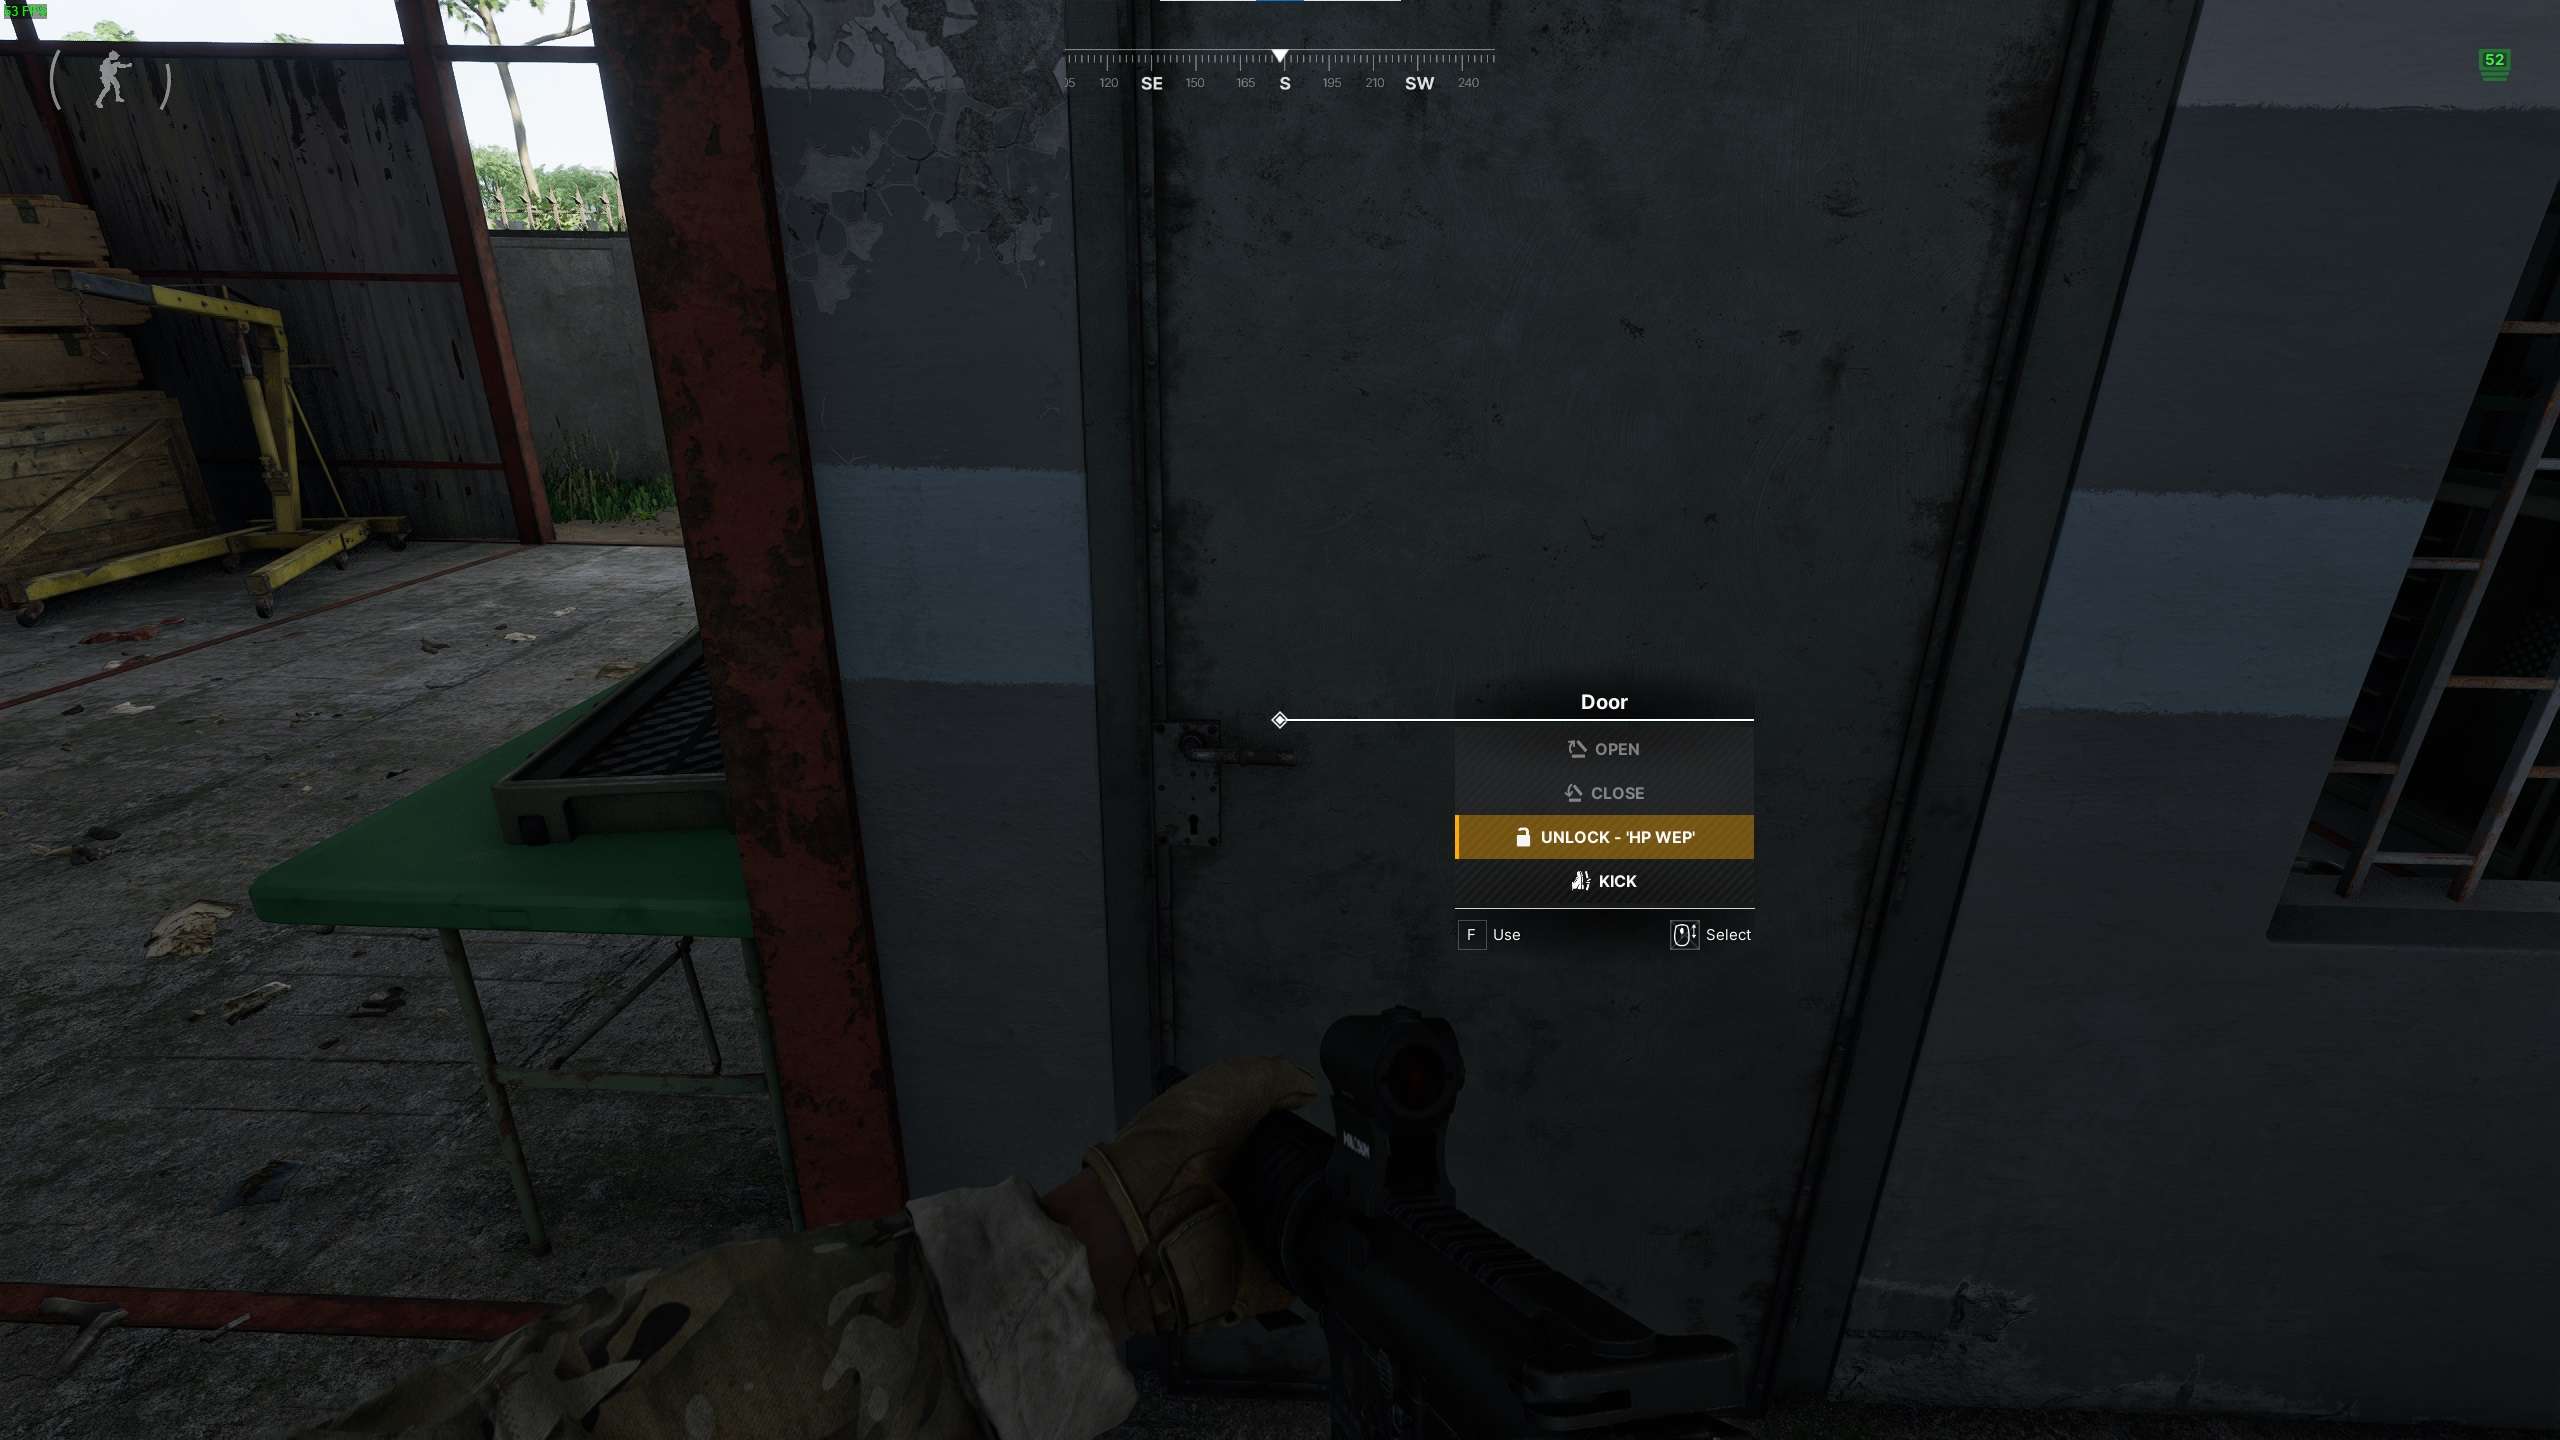
Note: You need HP Wep Key to perform this task.
True Grit
#22: True Grit
- True Grit – 160 167
Note: You need Motel 102 Key to perform this task.

It’s In The Water I
#23: It’s In The Water
- Collect avian tissue samples – 205 136

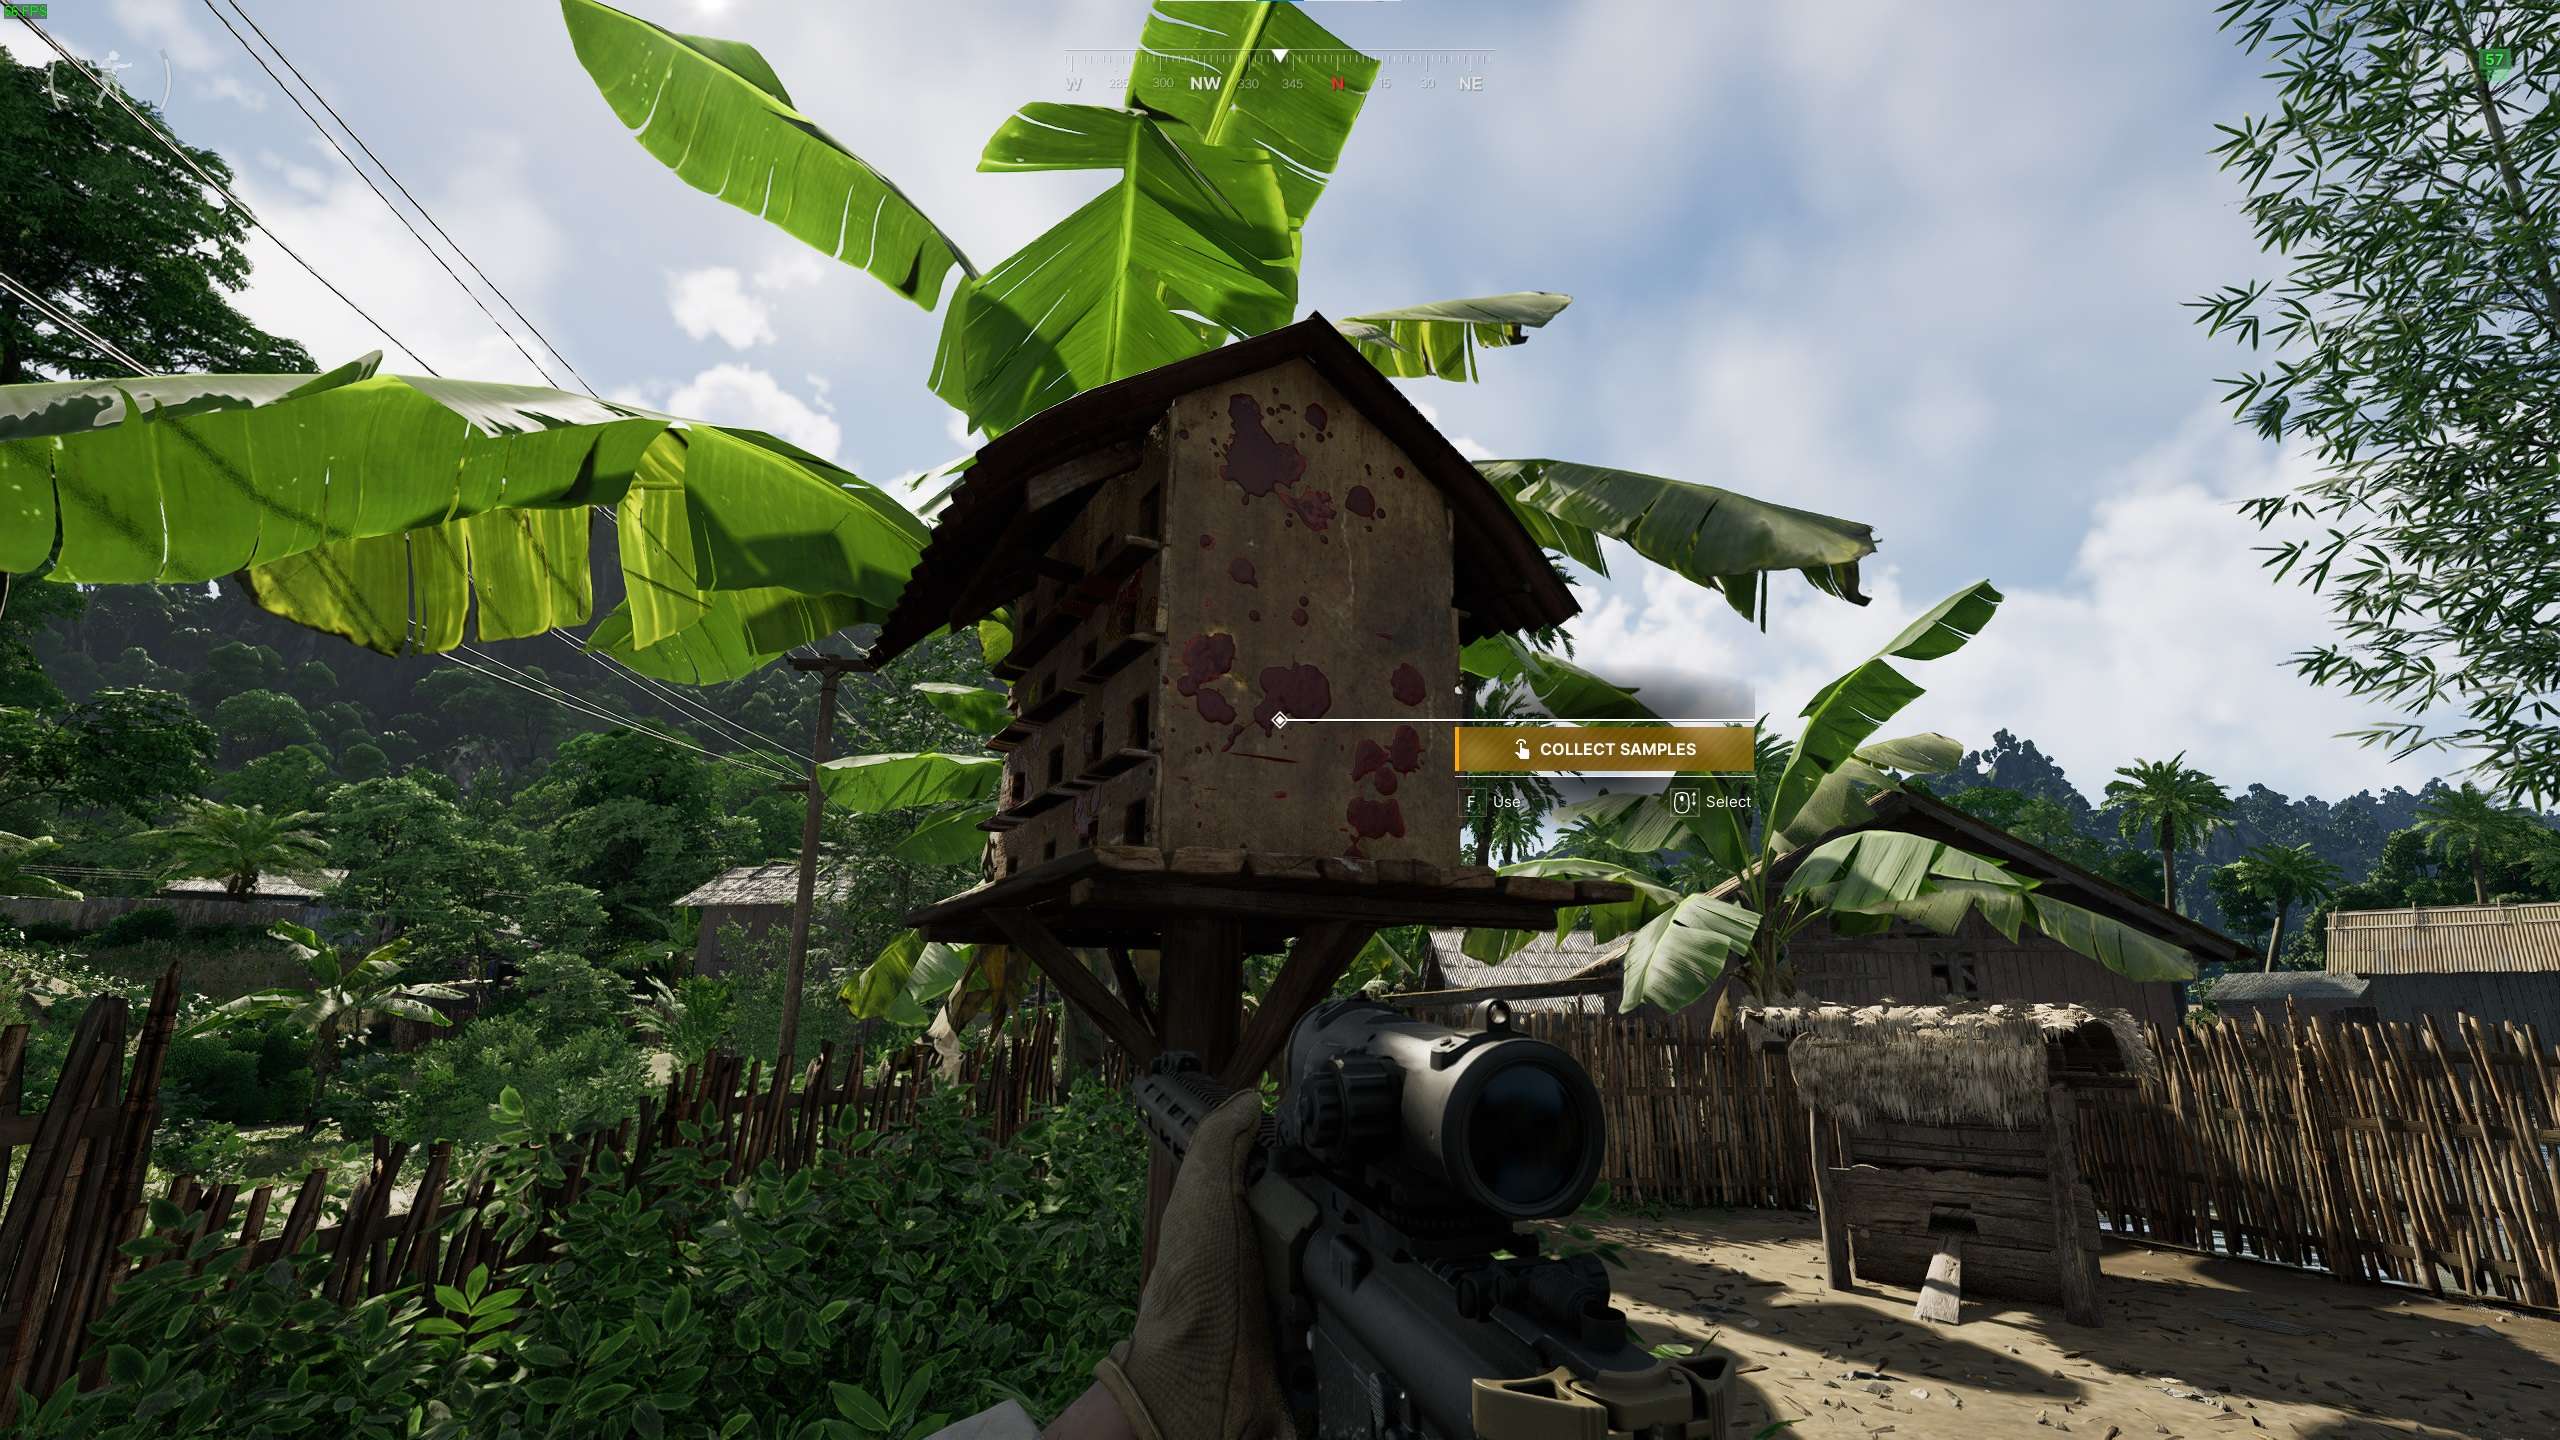
- Collect water samples from a well – 205 137
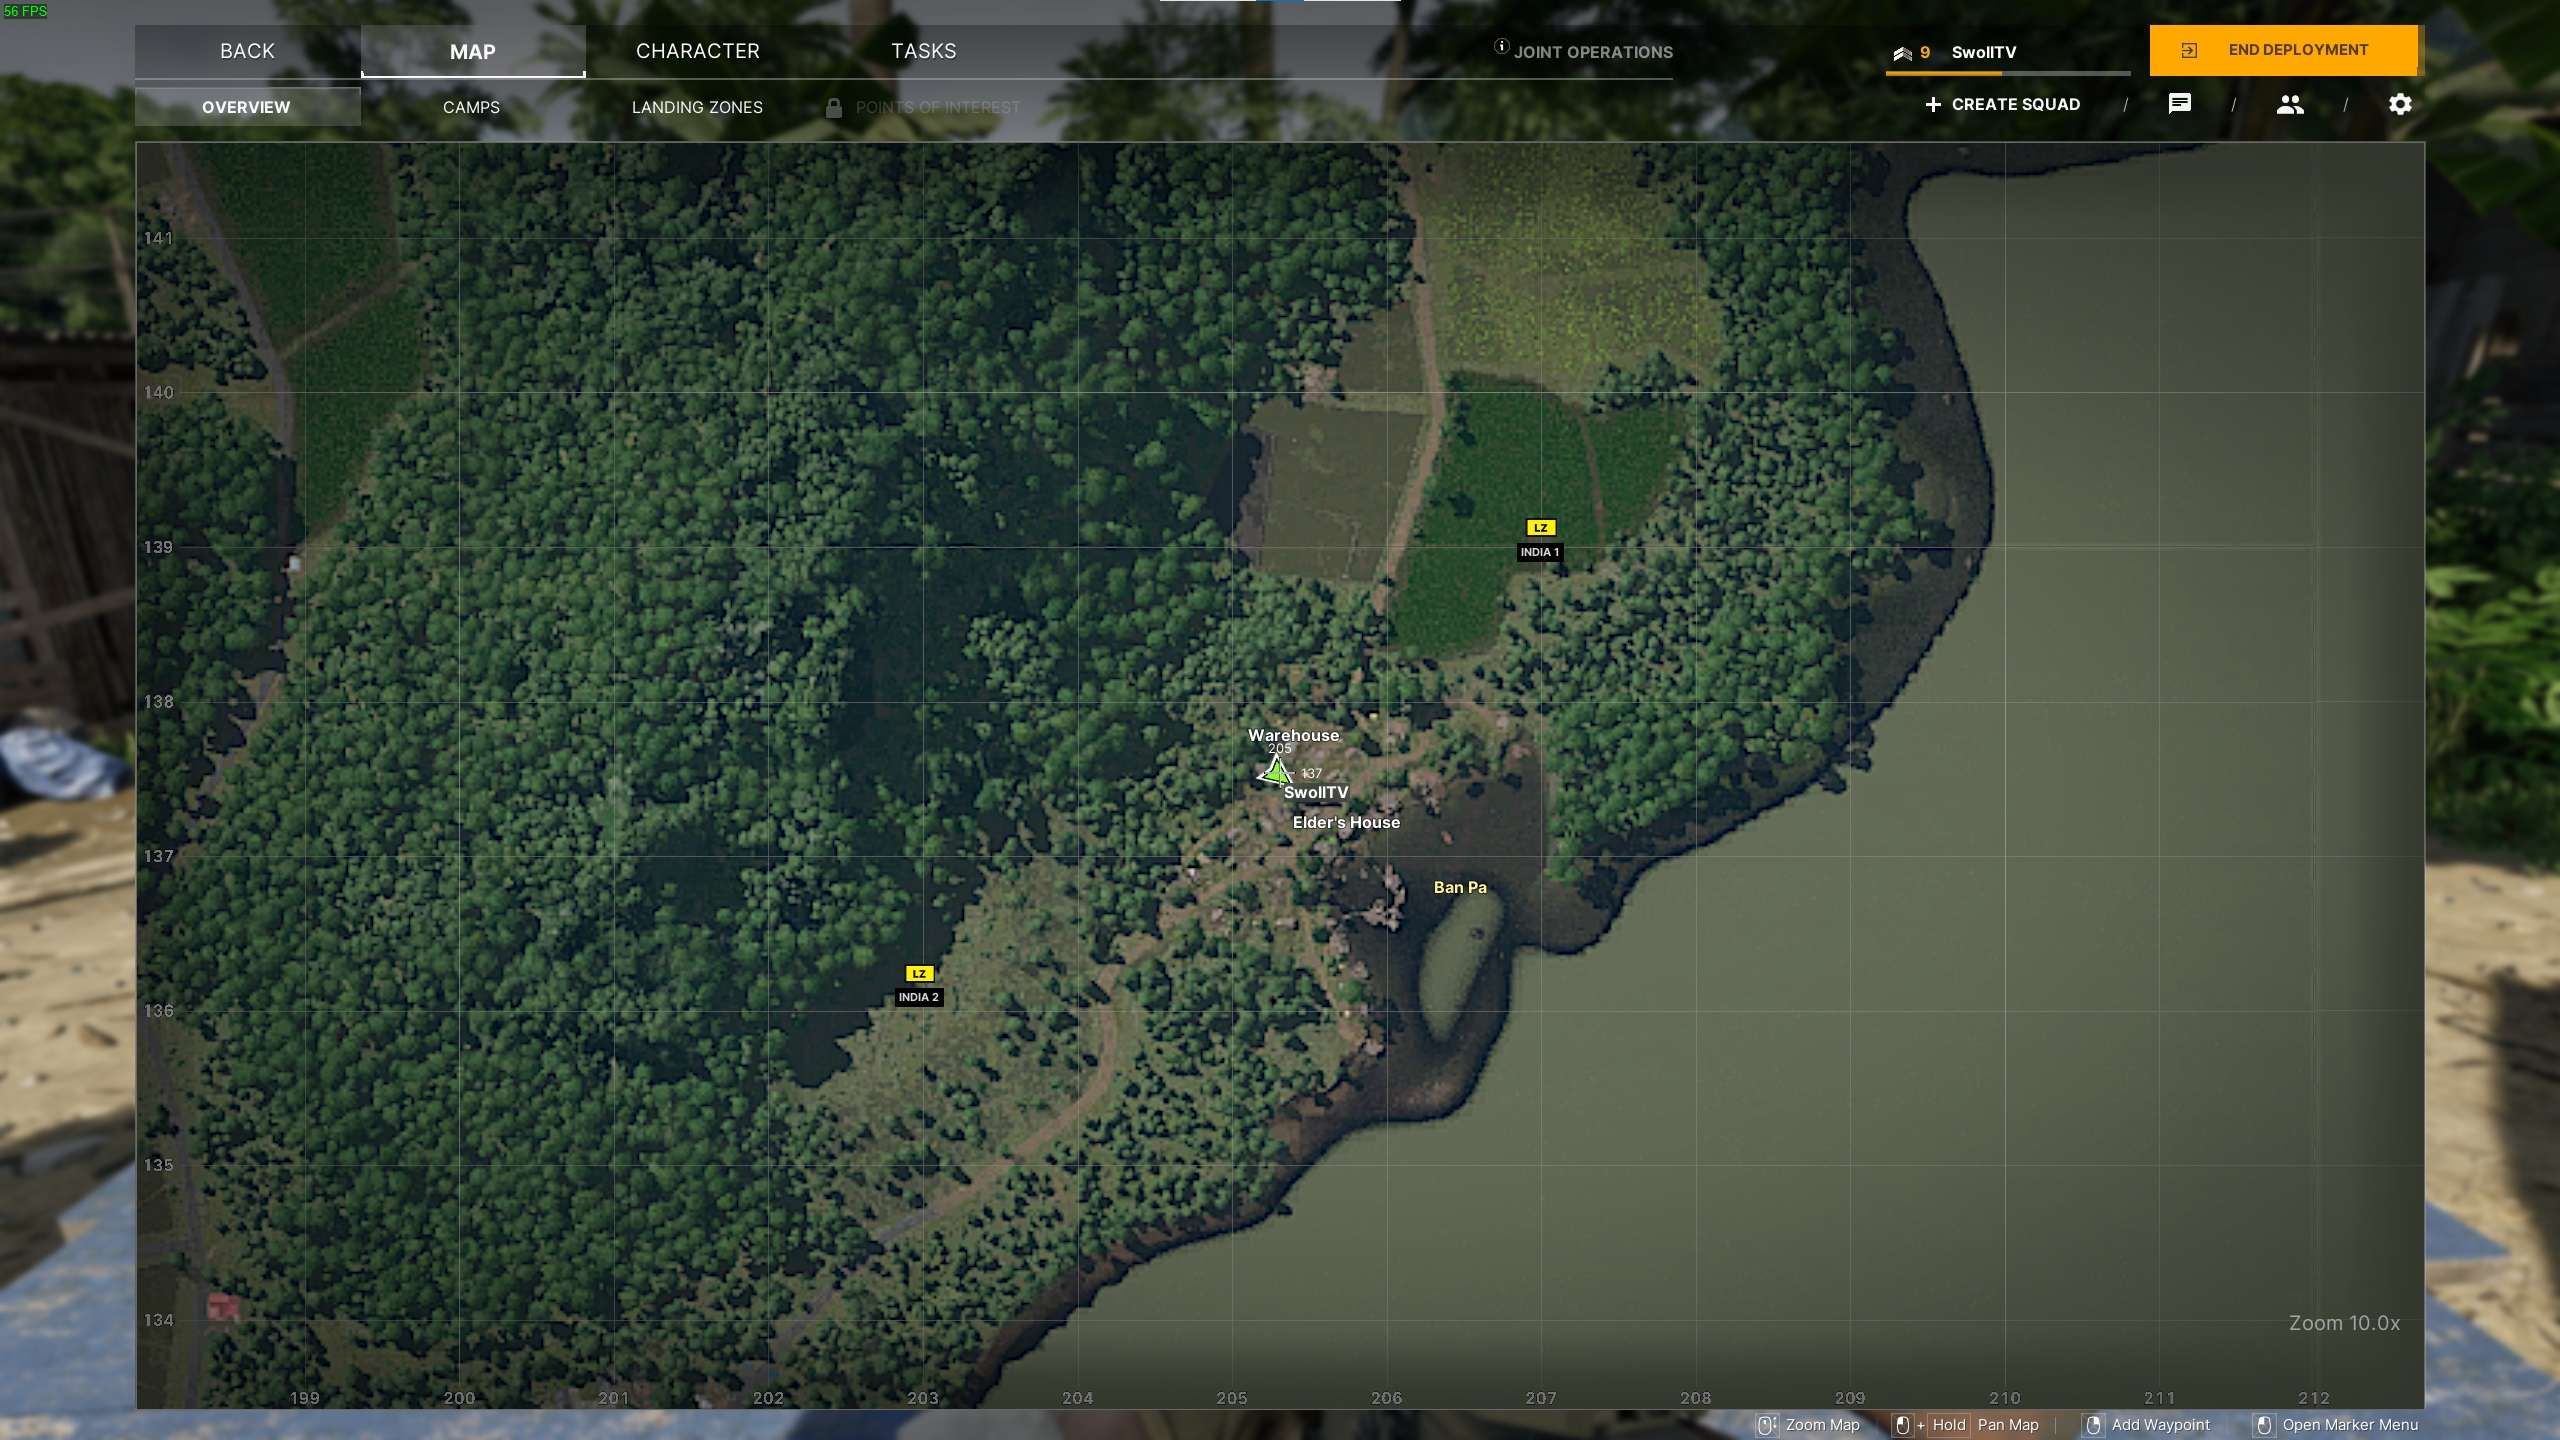
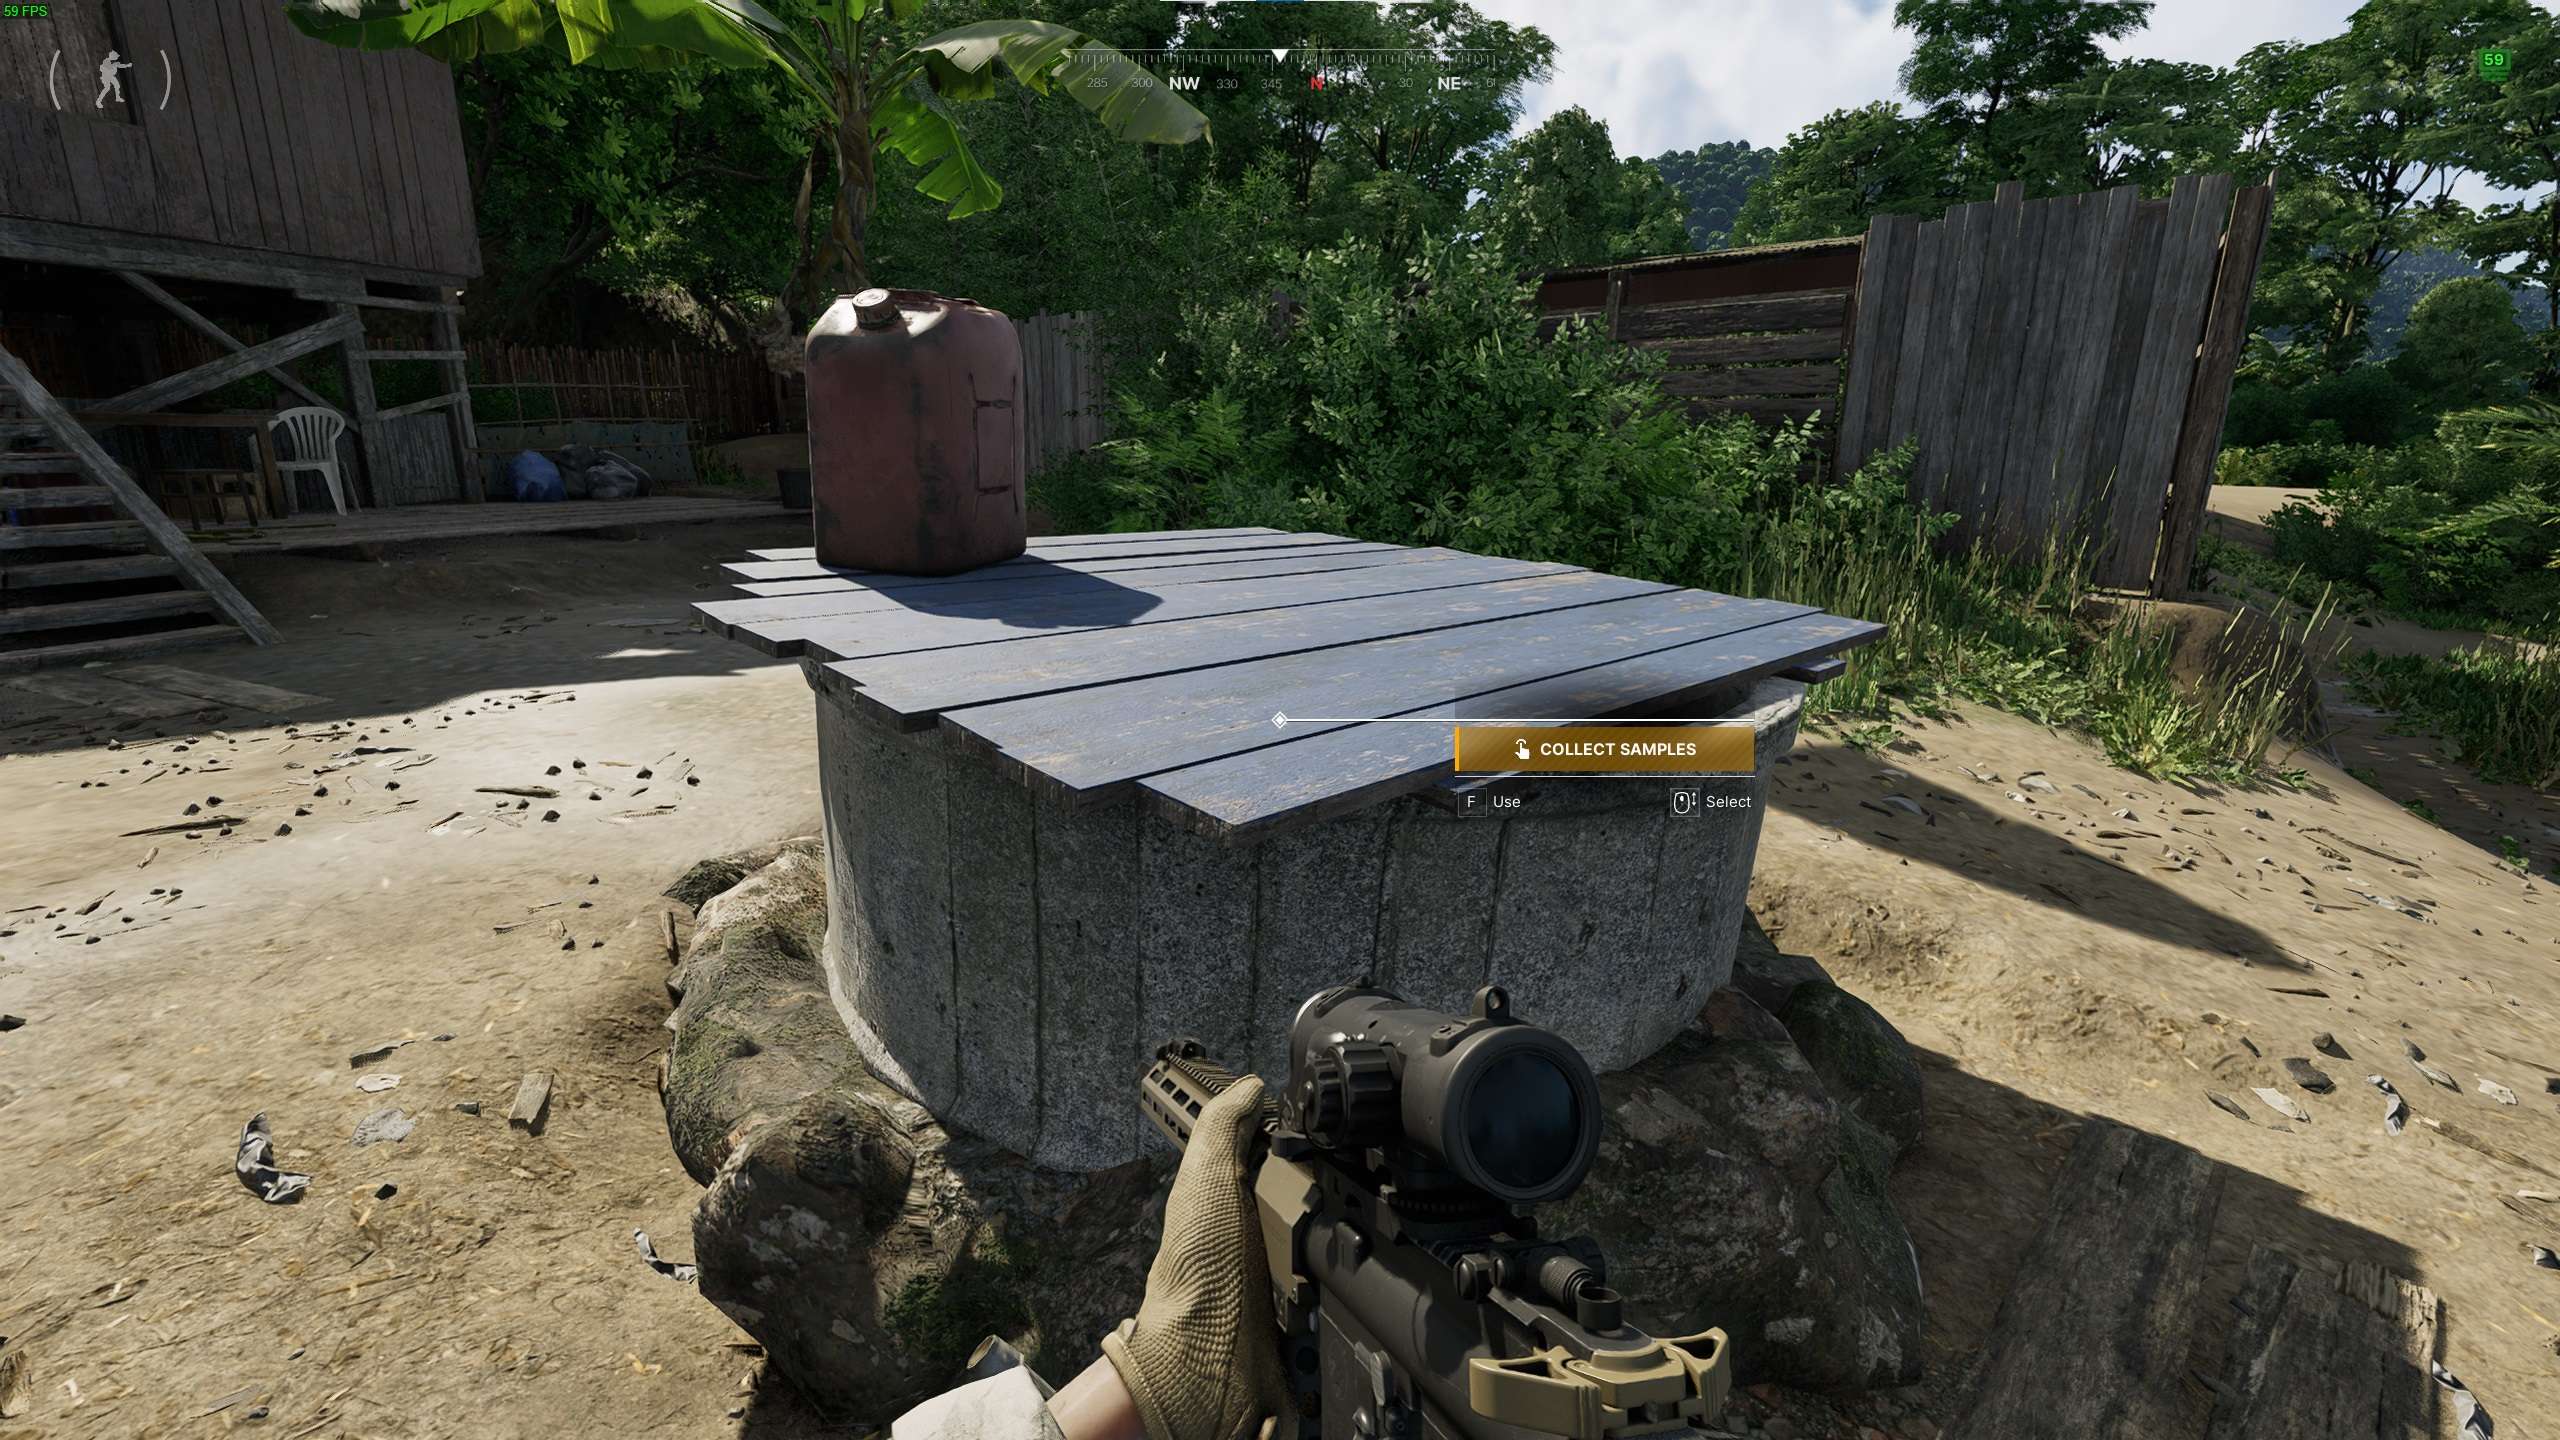
- Collect ground samples from a mound of soi – 206 137

Uninvited Guests
#24: Uninvited Guests
- You have to kill 20 bots in Ban Pa – 205 137

Save The Rebellion
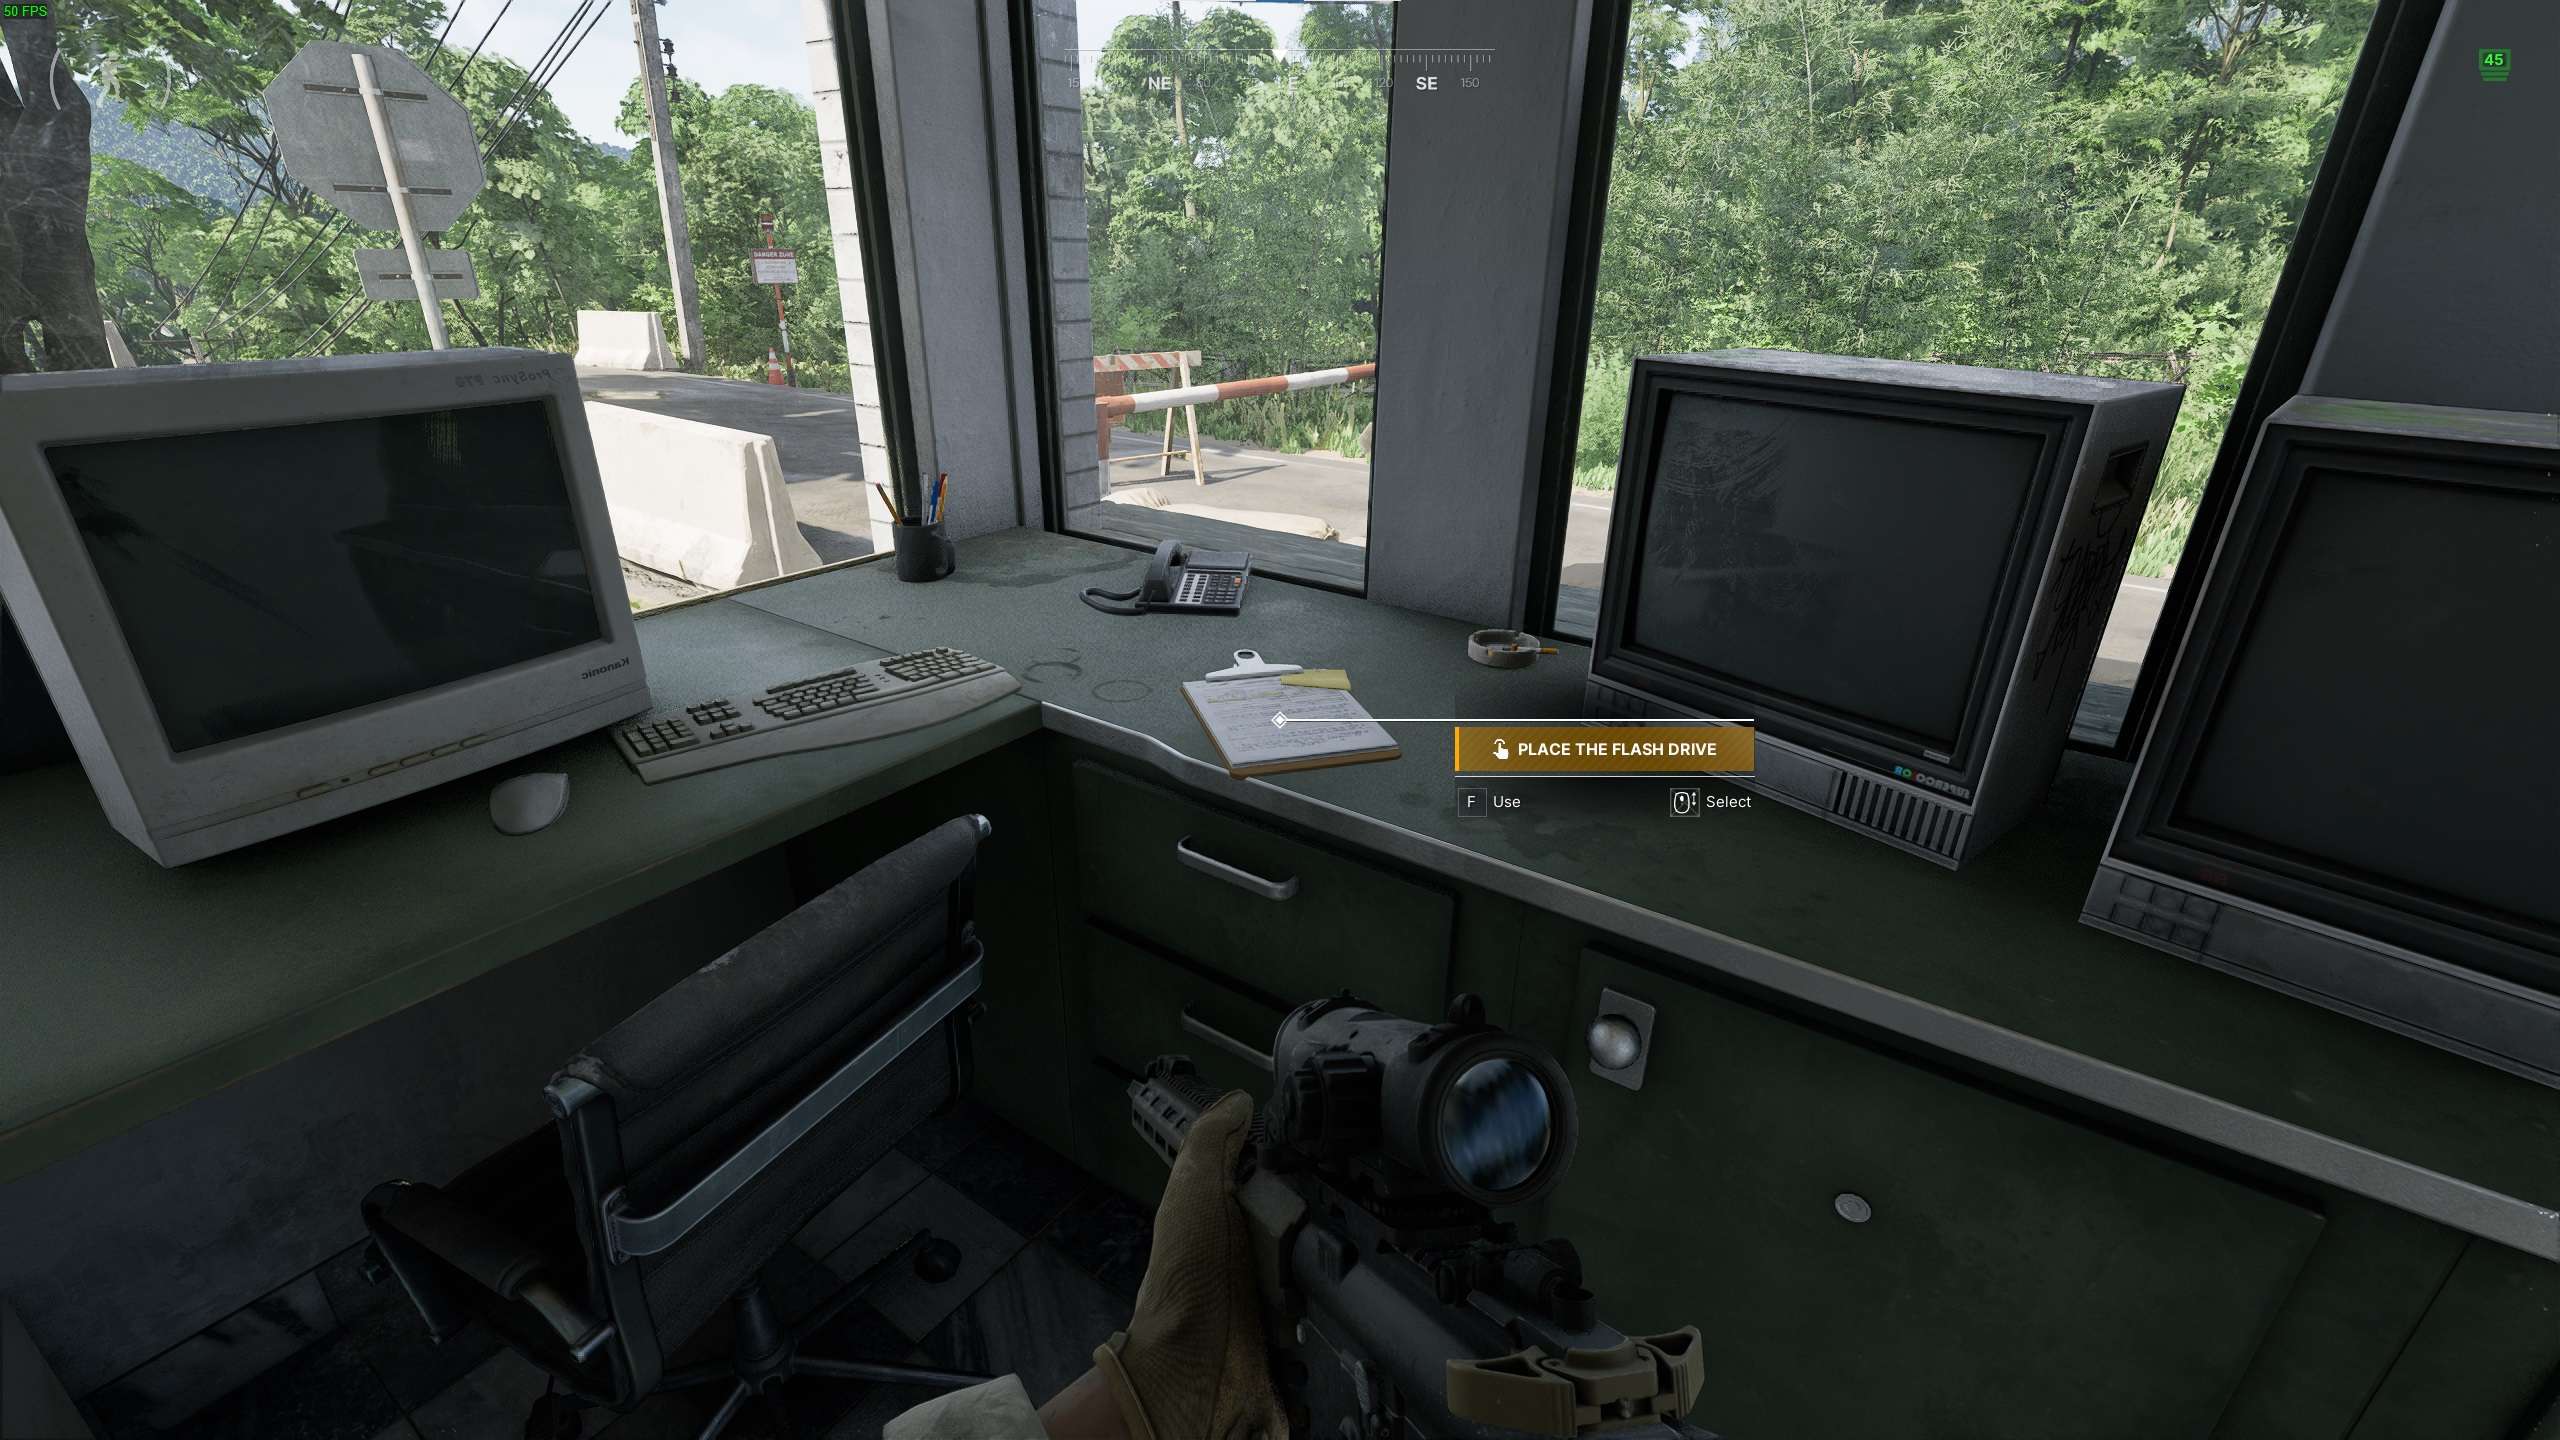
#25: Save The Rebellion
- Collect the flash drive at the command tent in the Base Camp.
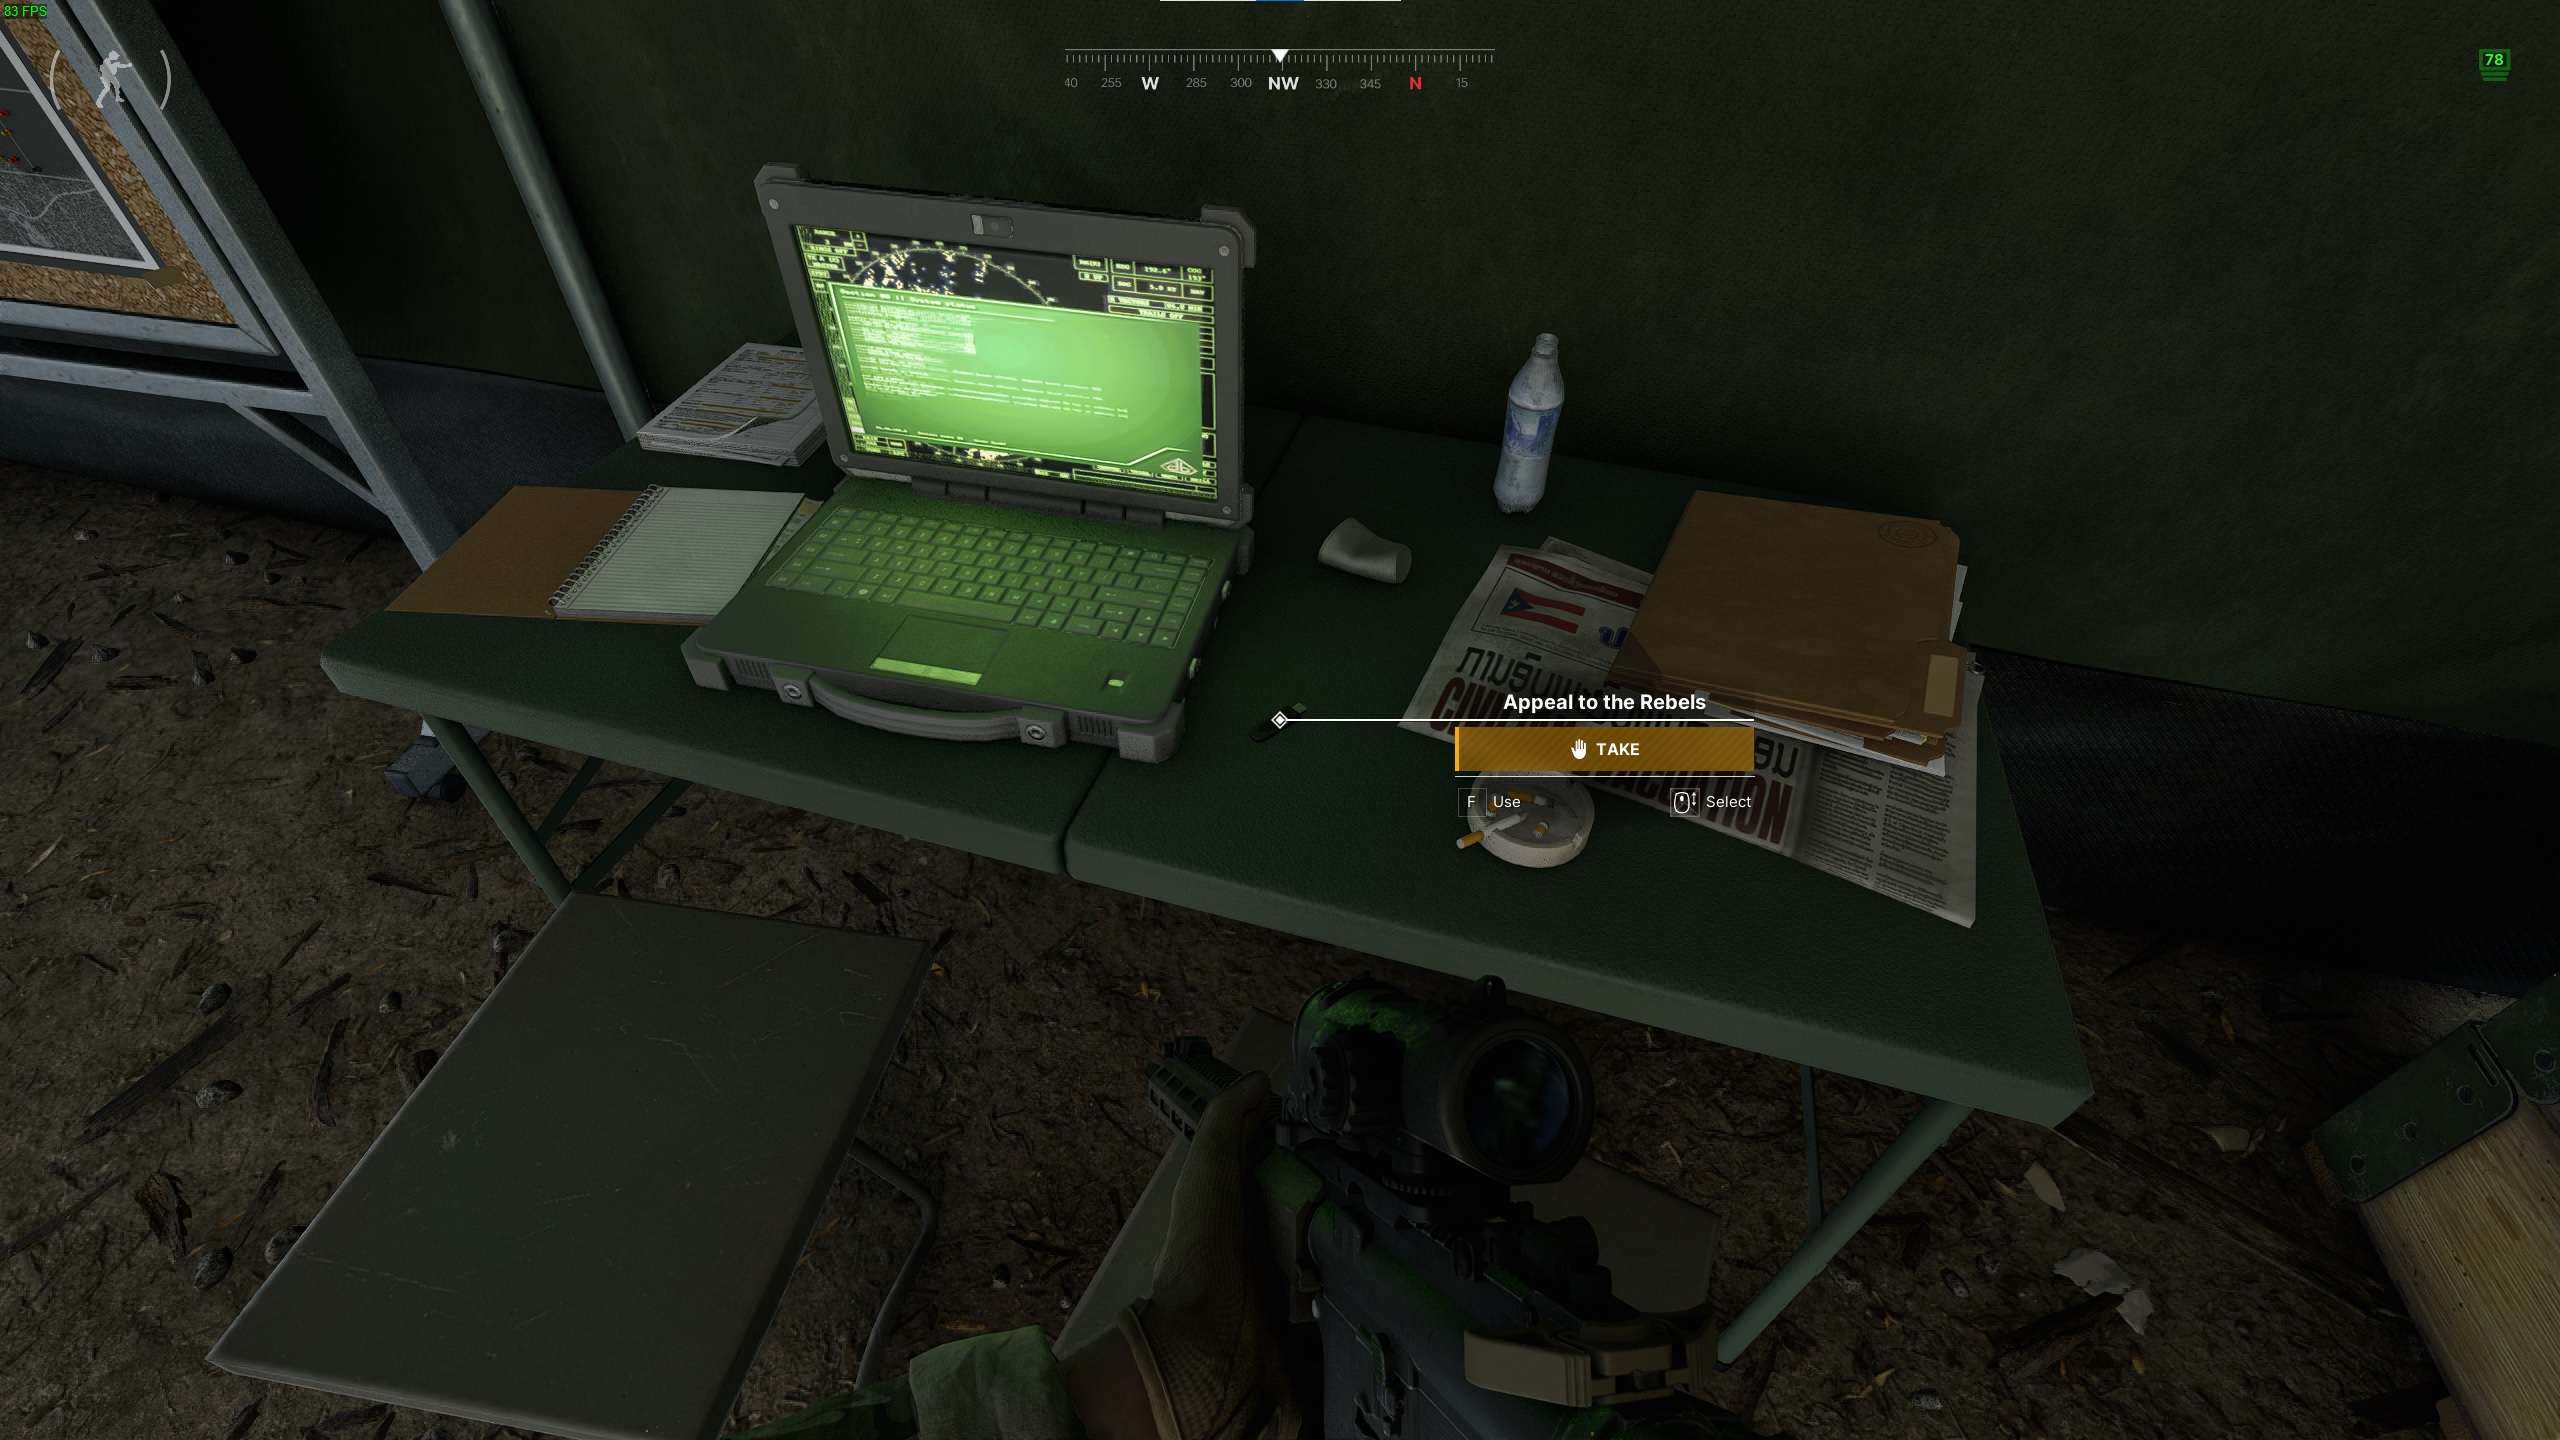
- Place the flash drive in the guardhouse
Shortcut
#26: Shortcut
- In the bunker at -2 in the debris – 142 121
Warm Welcome
#27: Warm Welcome
- You have to kill the boss in town of Ban Pa – 204 136
The boss spawn seems to be constant at the stilted houses.
At The Mounds Of Madness I
#28: At The Mounds Of Madness (Part 1)
- Find an ominous mural – 205 135
- Find an eerie mural – 204 137
- Find a chilling mural – 206 138
- Find an disturbing statue – 207 137
At The Mounds Of Madness II
#??: At The Mounds Of Madness (Part 2)
- You have to choose beetwen The Shadow Over Ban Pa II or At The Mounds Of Madness II – 205 137
The Shadow Over Ban Pa II
#??: The Shadow Over Ban (Part 2)
- You have to choose beetwen The Shadow Over Ban Pa II or At The Mounds Of Madness II- 205 137


Shooting Gallery
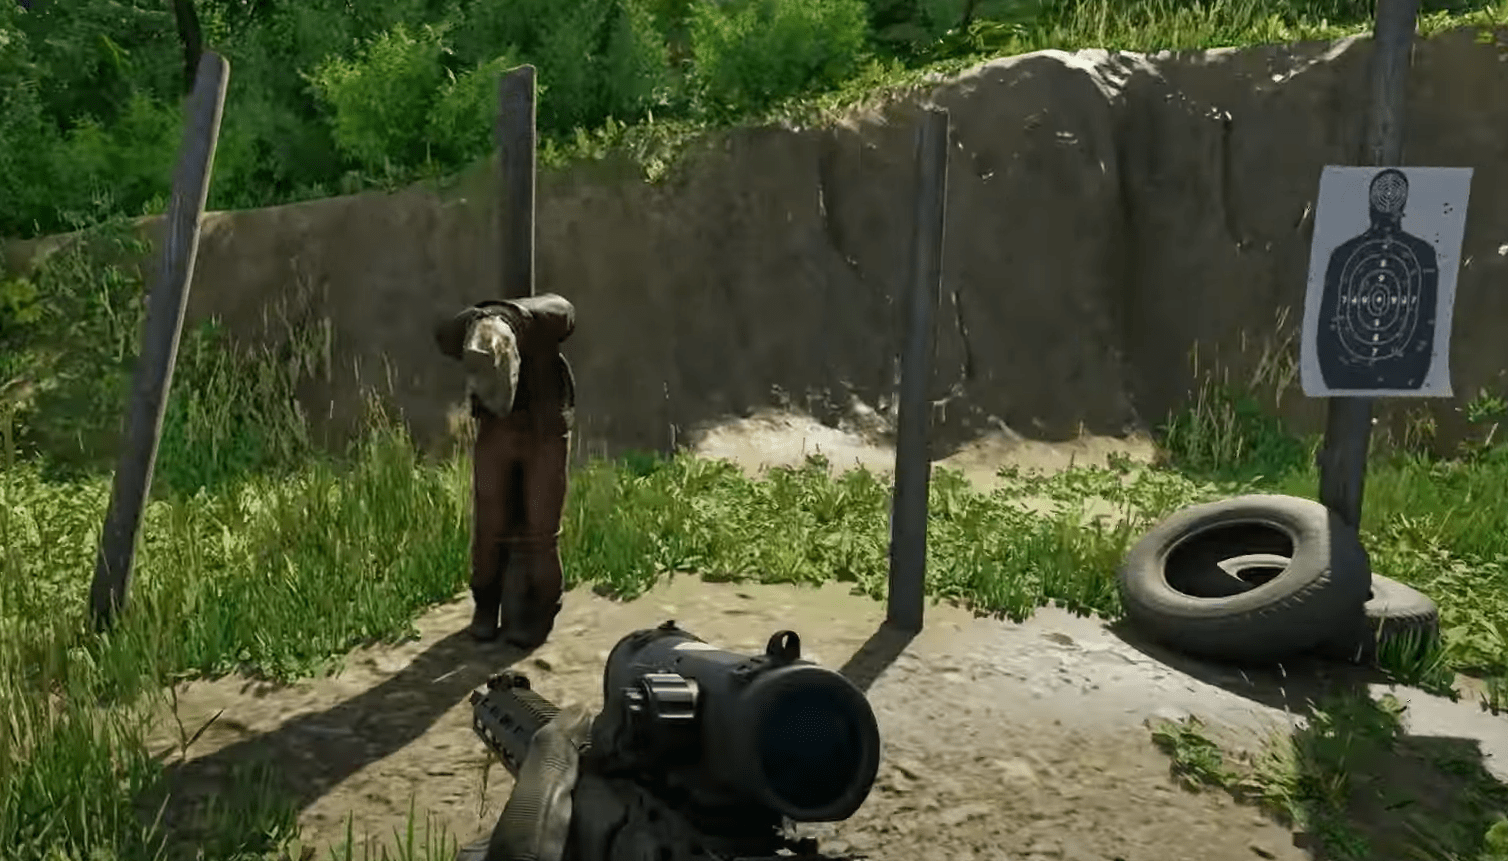
#??: Shooting Gallery
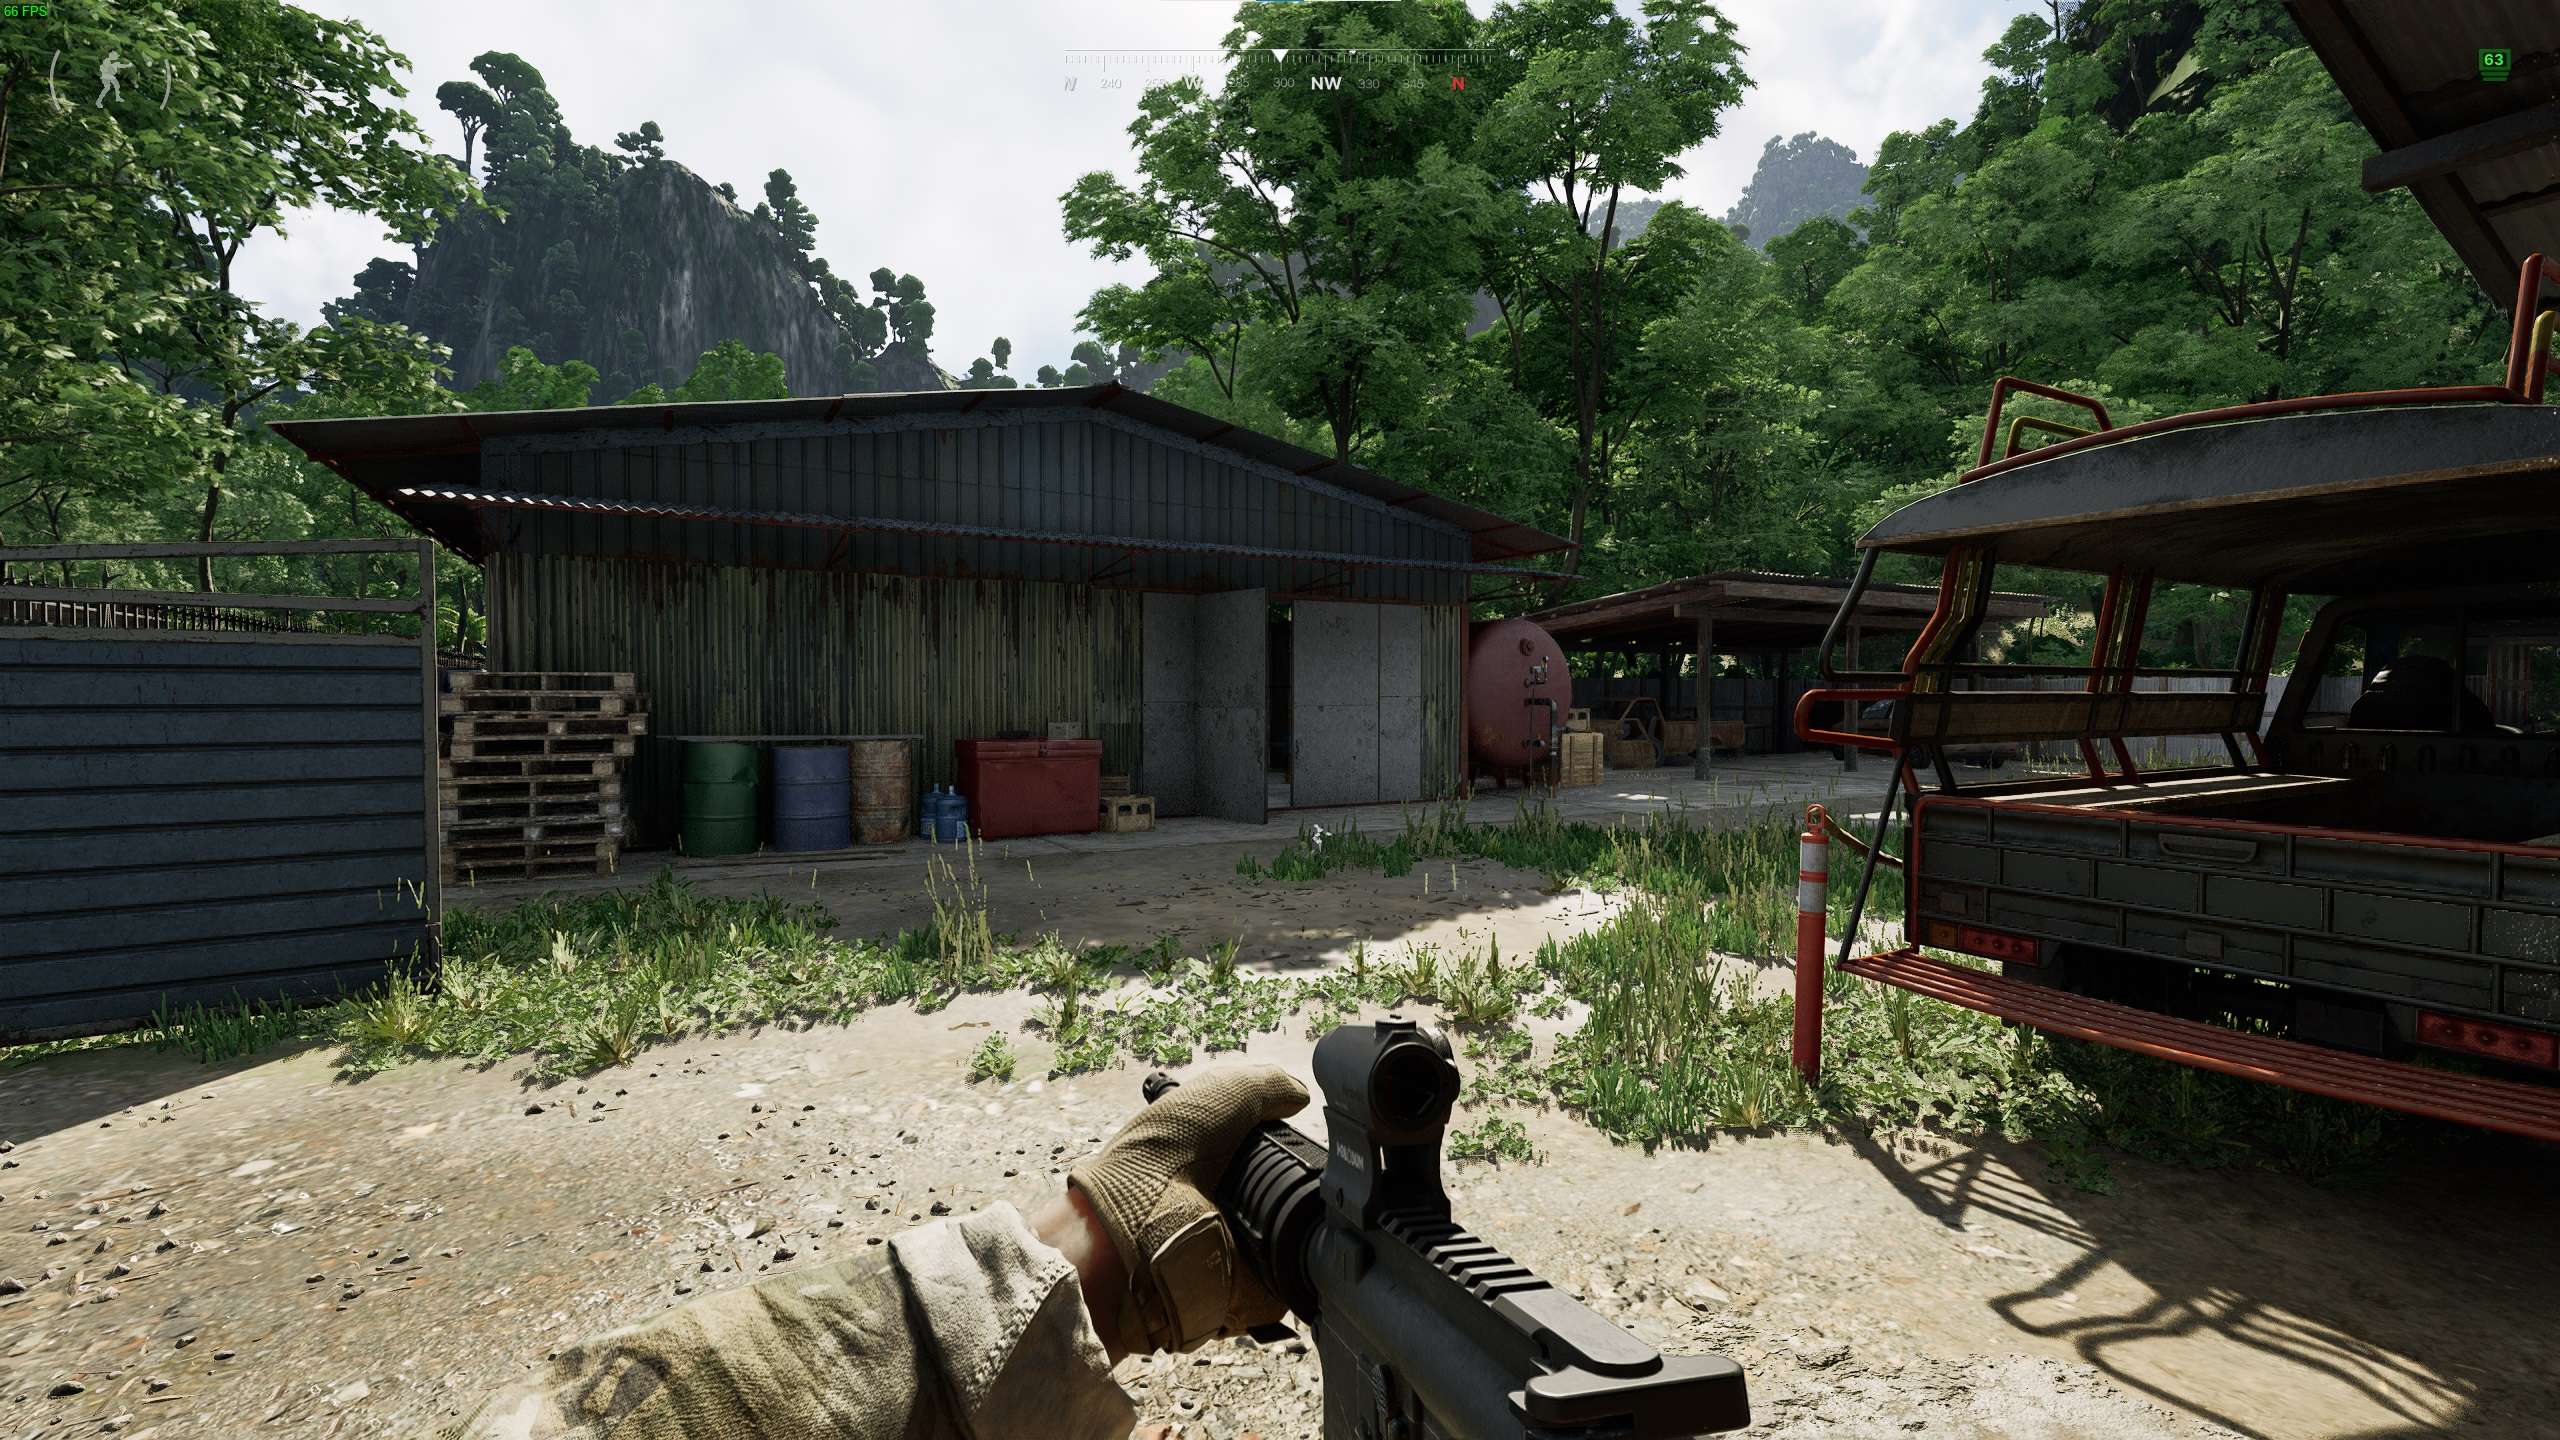
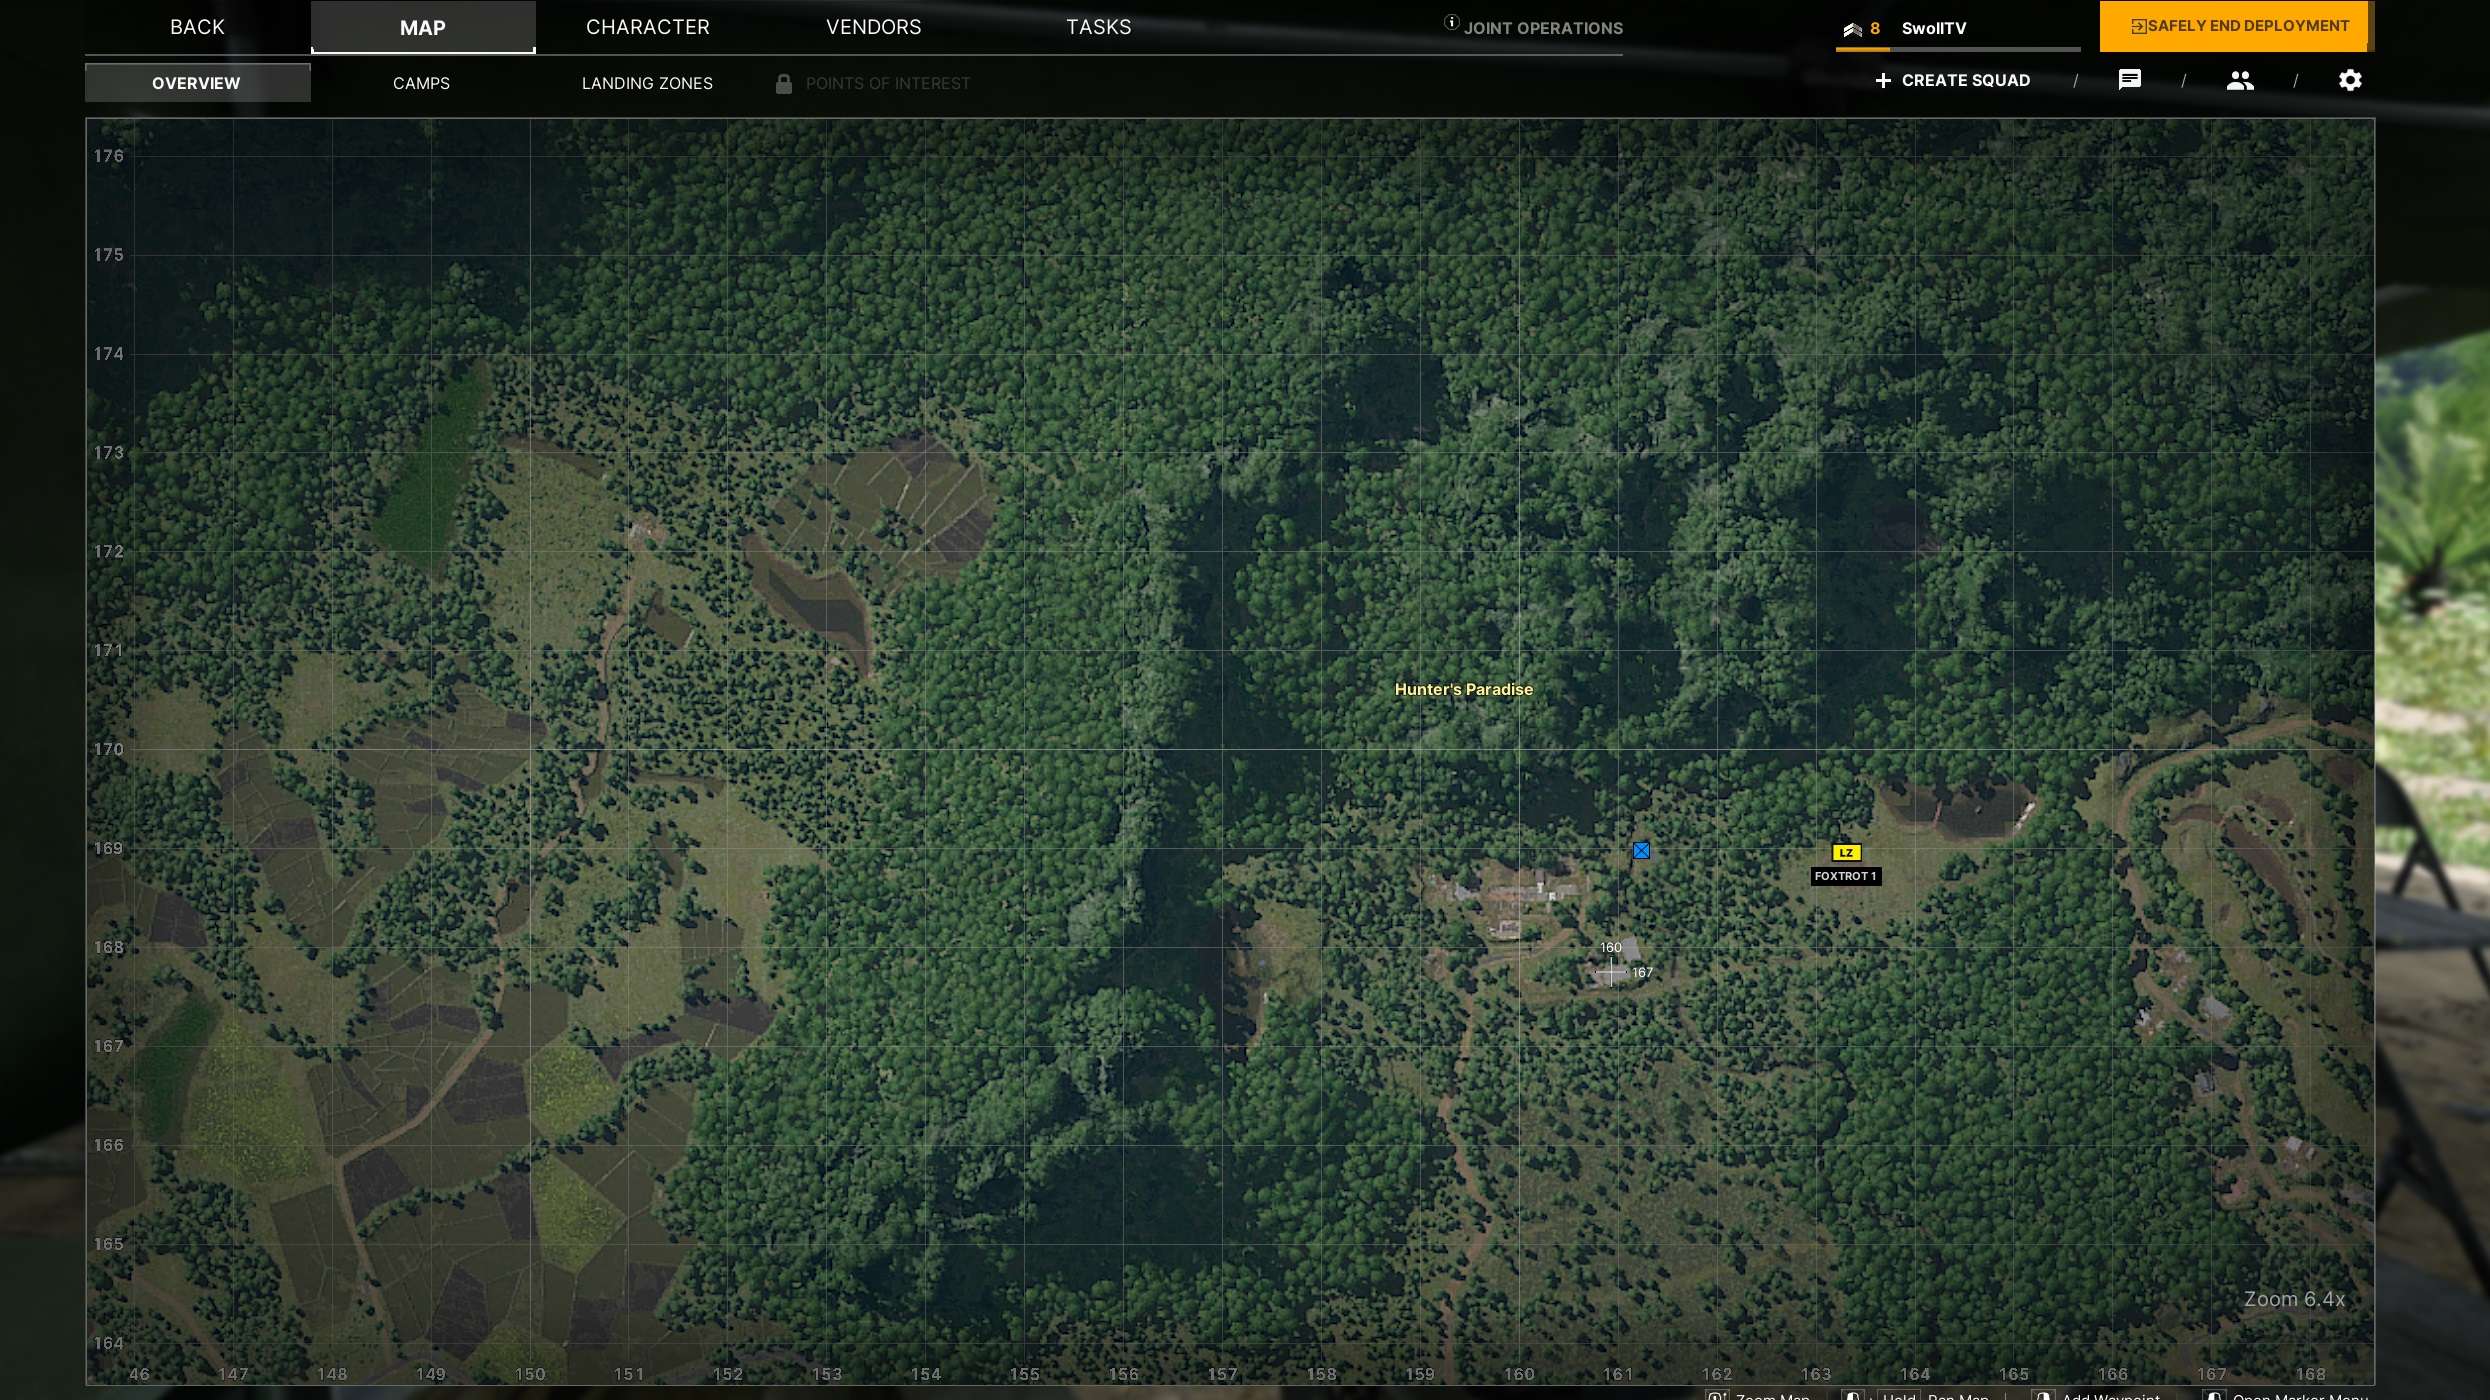
- You have to kill 20 bots at Hunter’s Paradise – 159 158
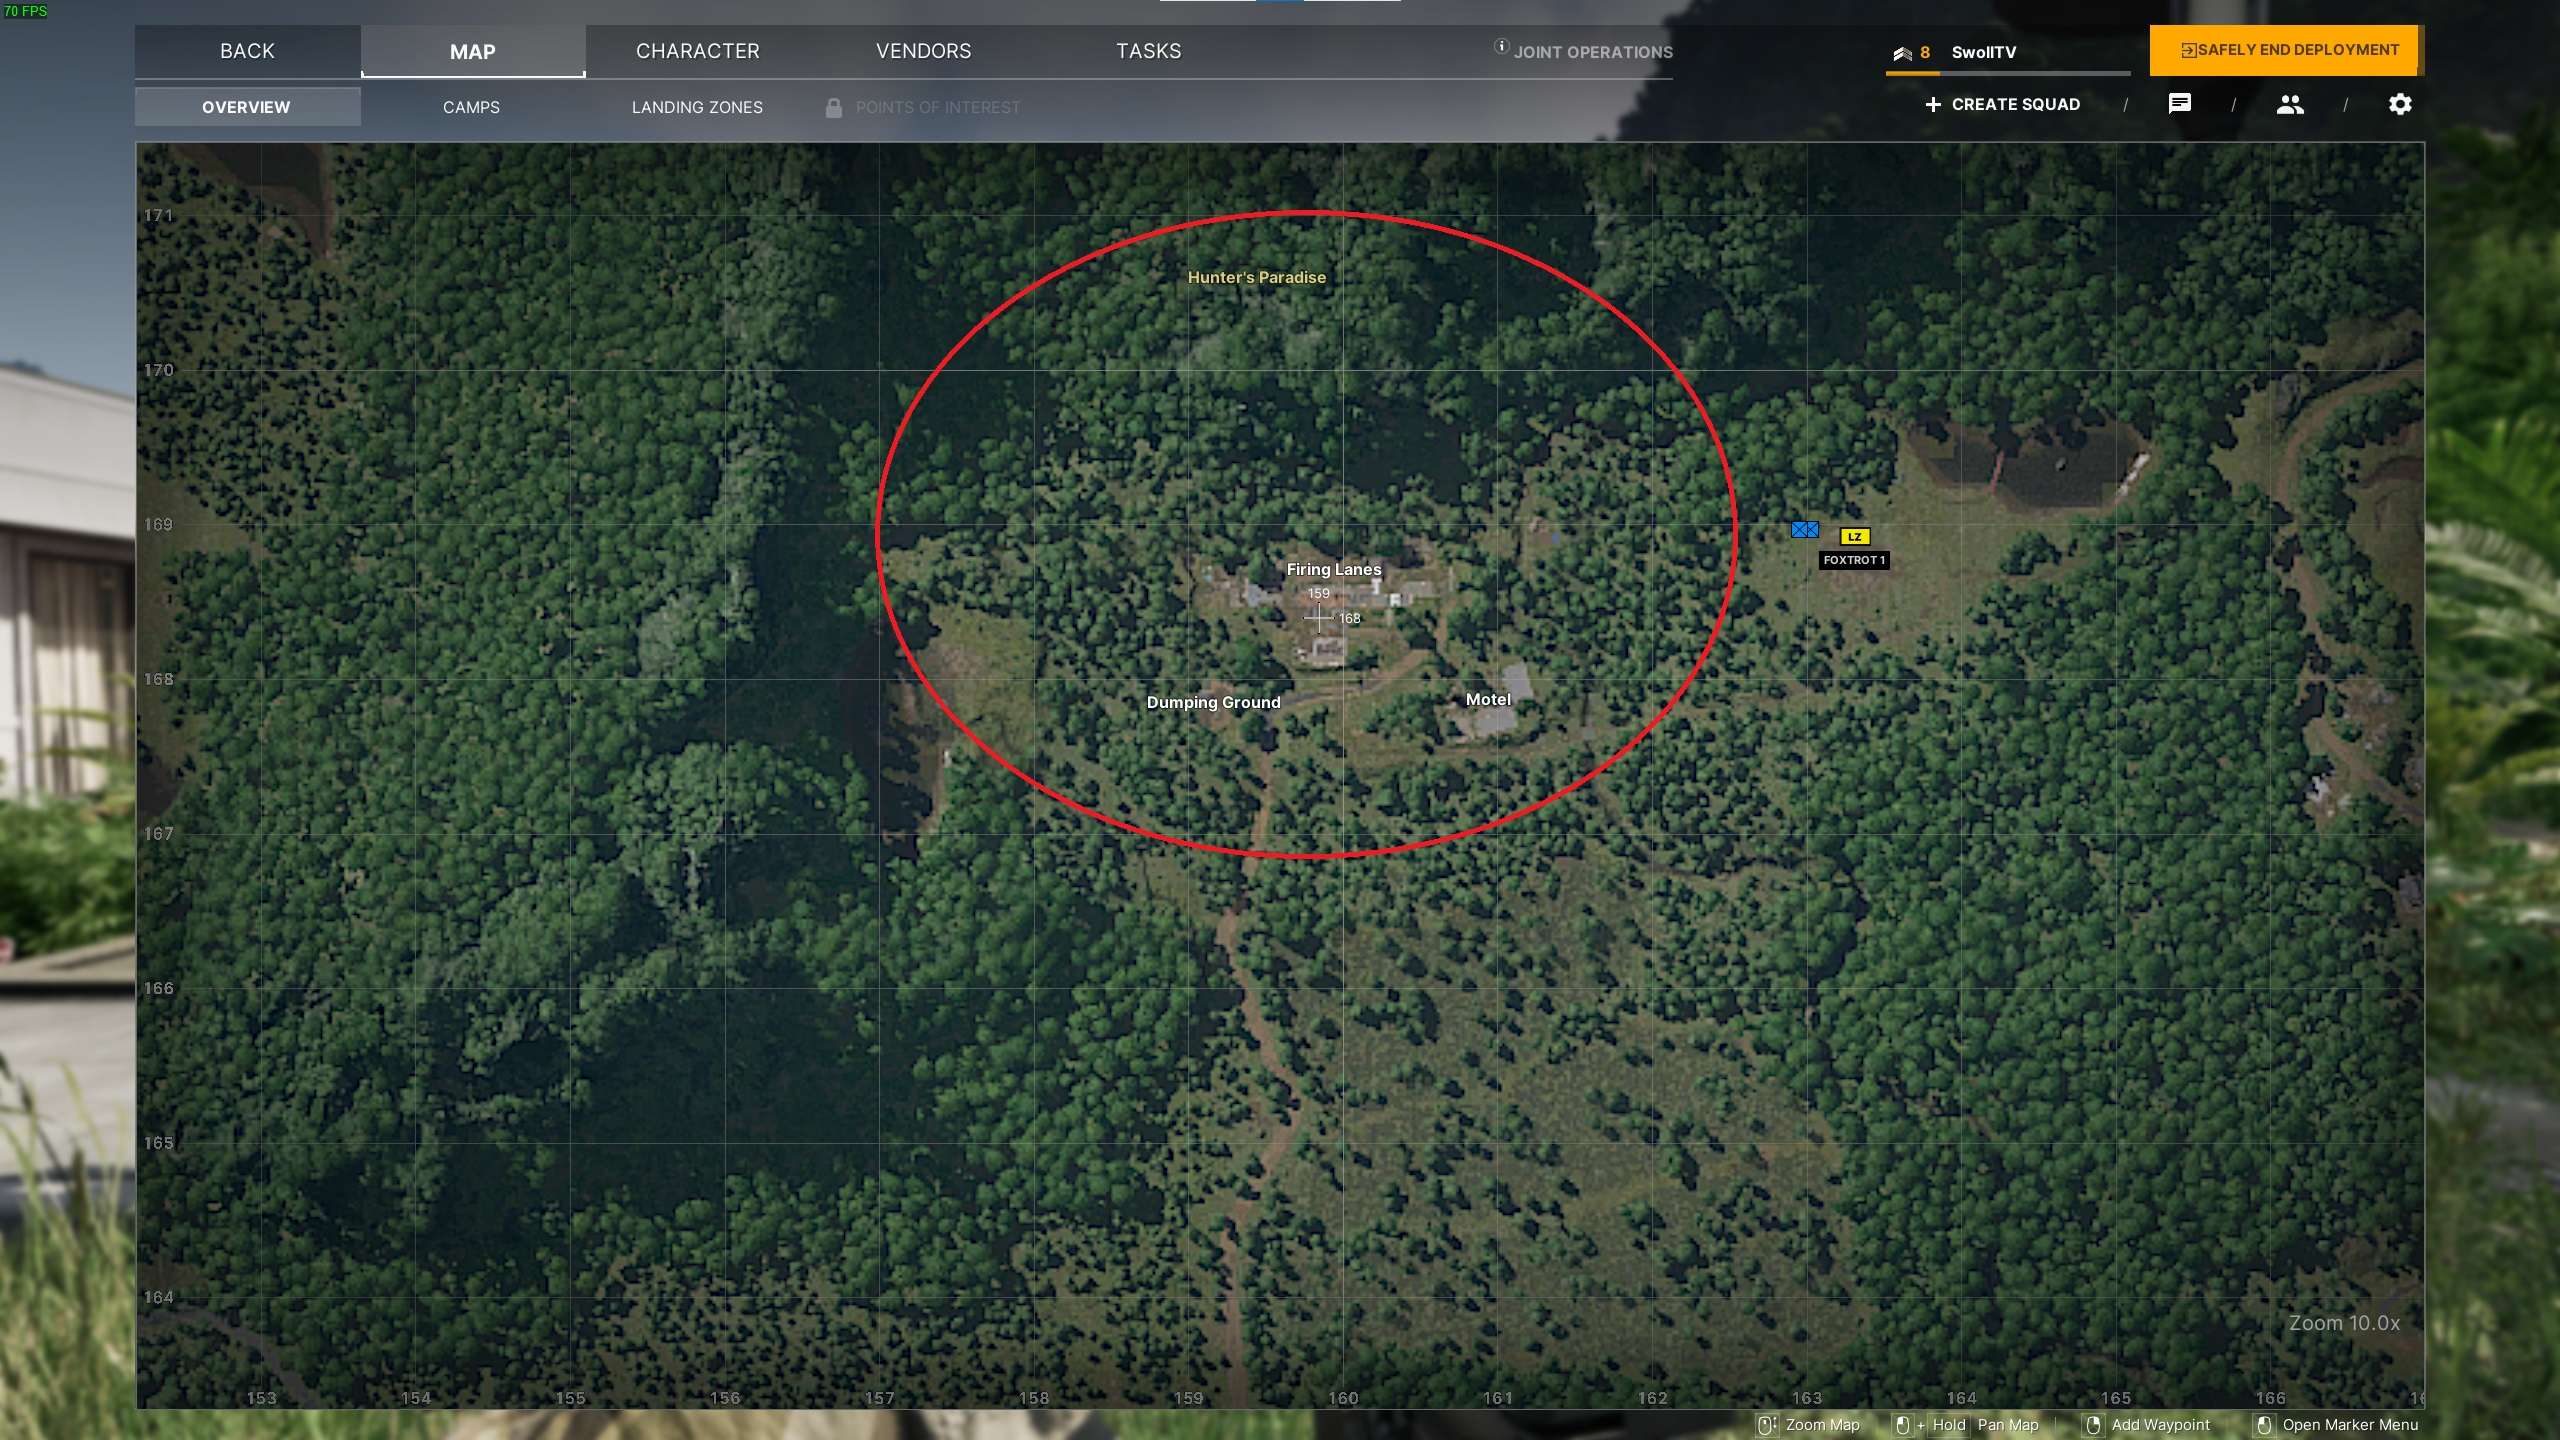
The Brave
#30: The Brave
- Behind the body on post at the ground – 159 168
Up To Snuff
#31: Up To Snuff
- In the building on the desk at the right – 160 168

Final Liberation
#32: Final Liberation
- You have to kill the boss with a blue Bandana in the bunker – 142 121

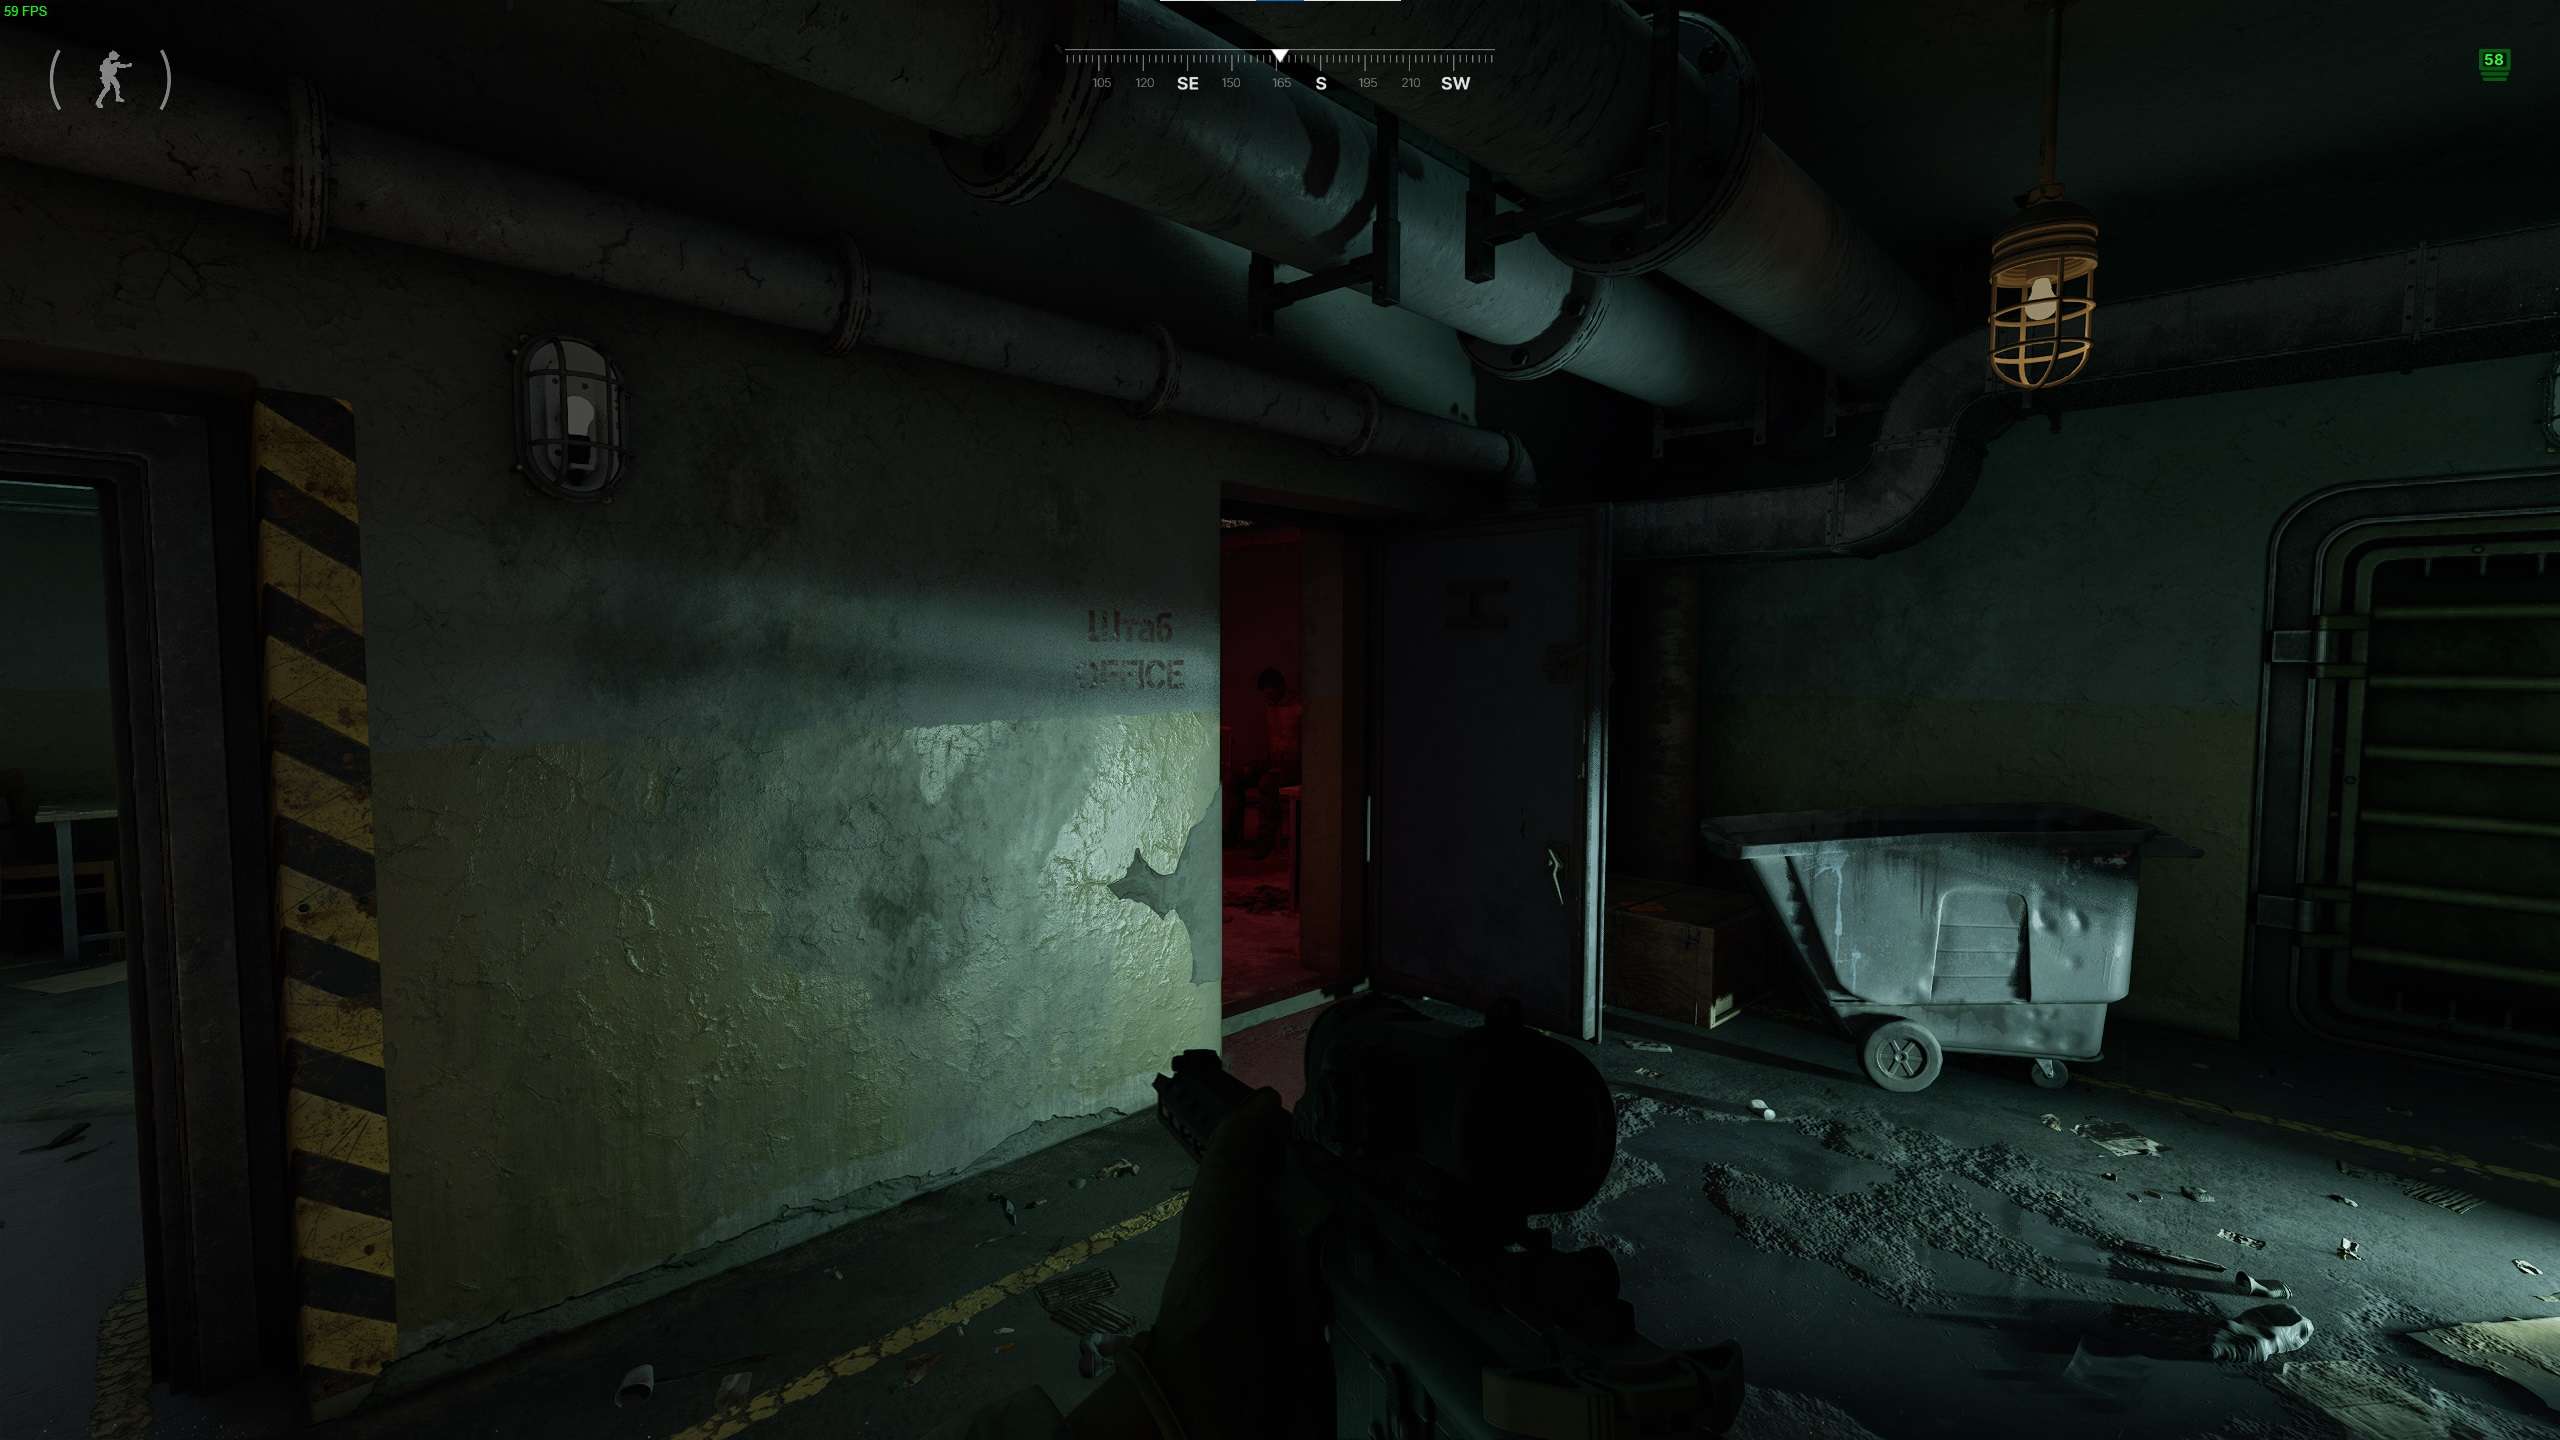
Check Out Computers
#33: Check Out Computers
- In the bunker at -1 / Server room – 142 121


It’s In The Water II
#36: It’s In The Water II
- You need Elder Key – 205 137


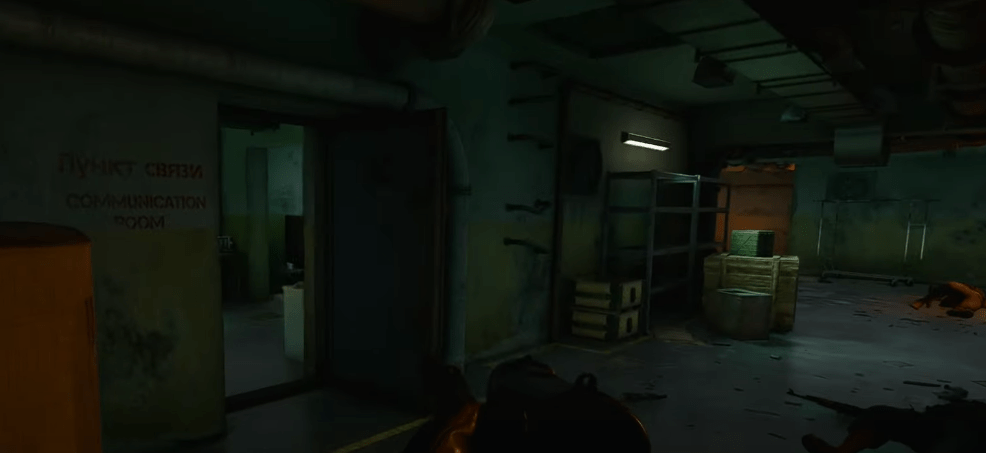
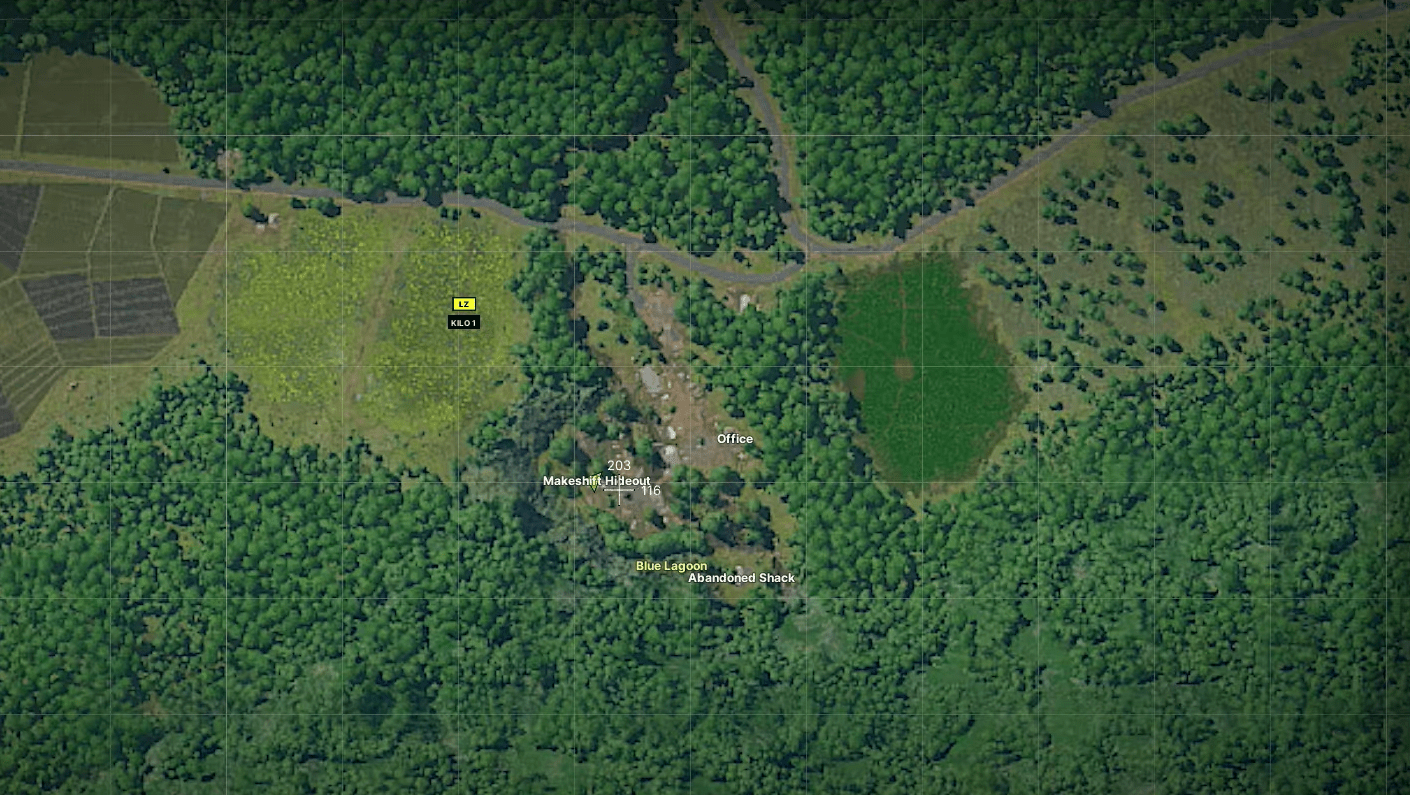
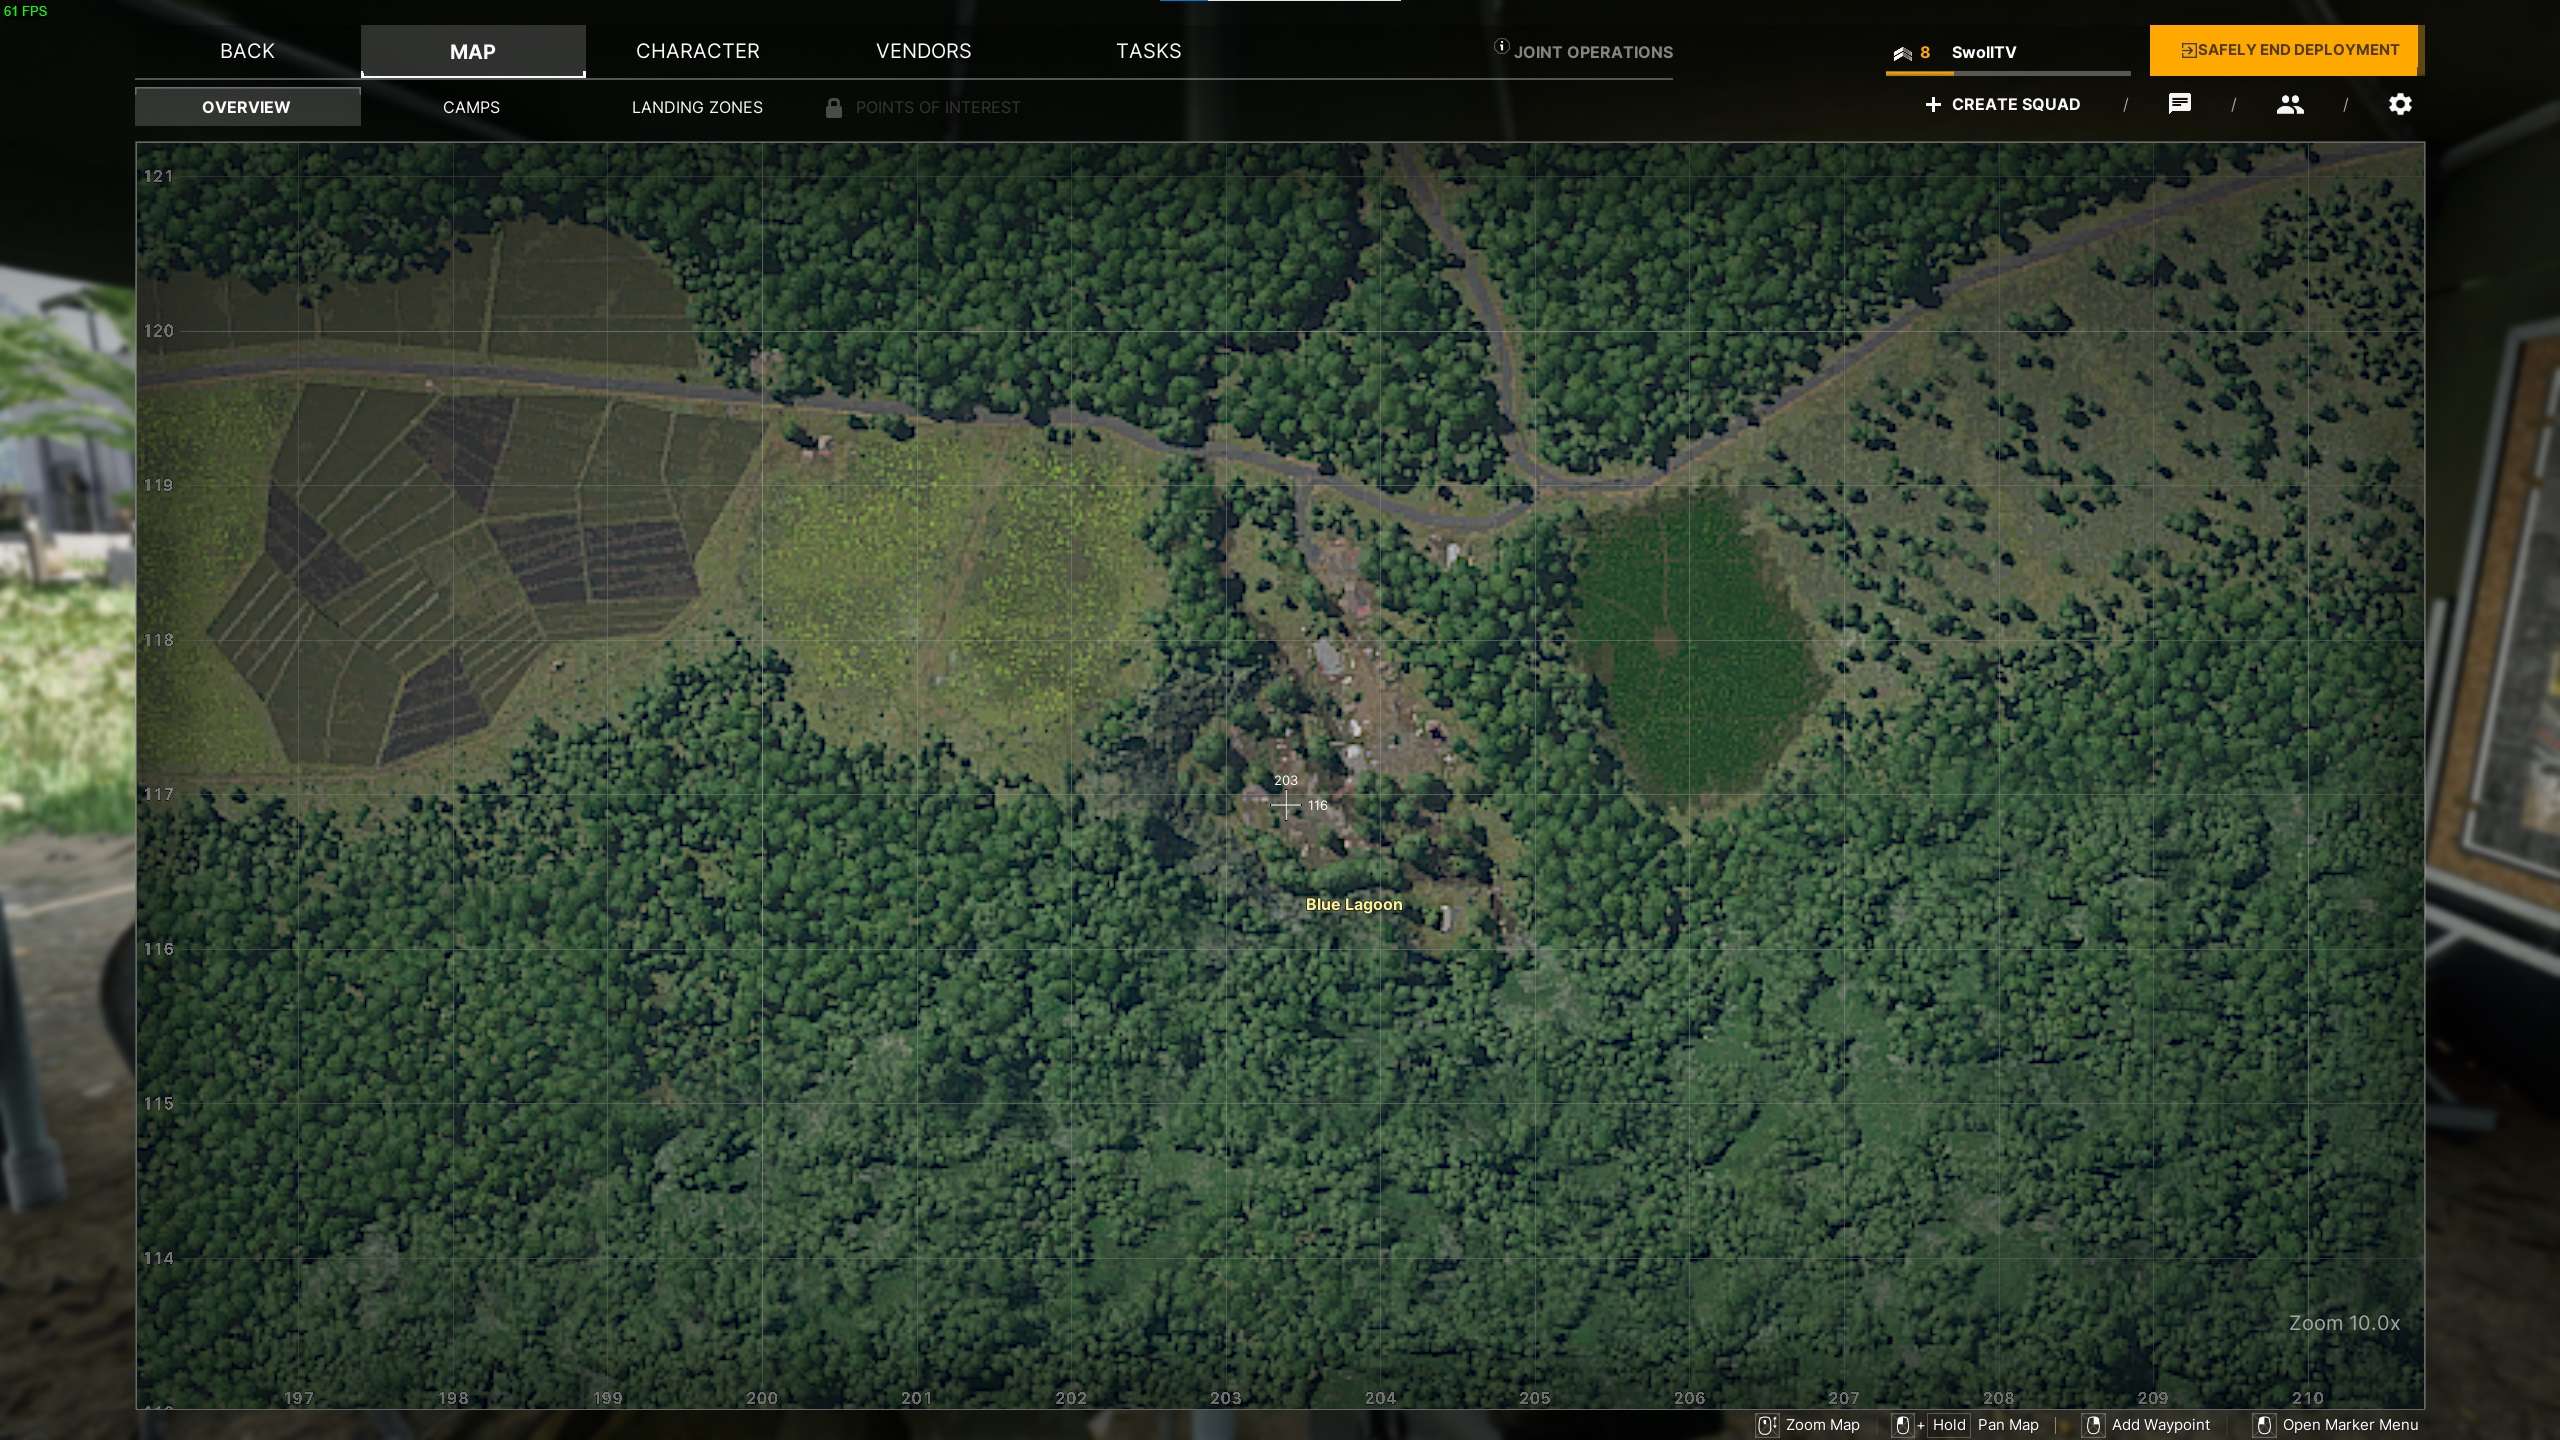
Out Of The Blue
#37: Out Of The Blue
- 203 116
Duty to The Country
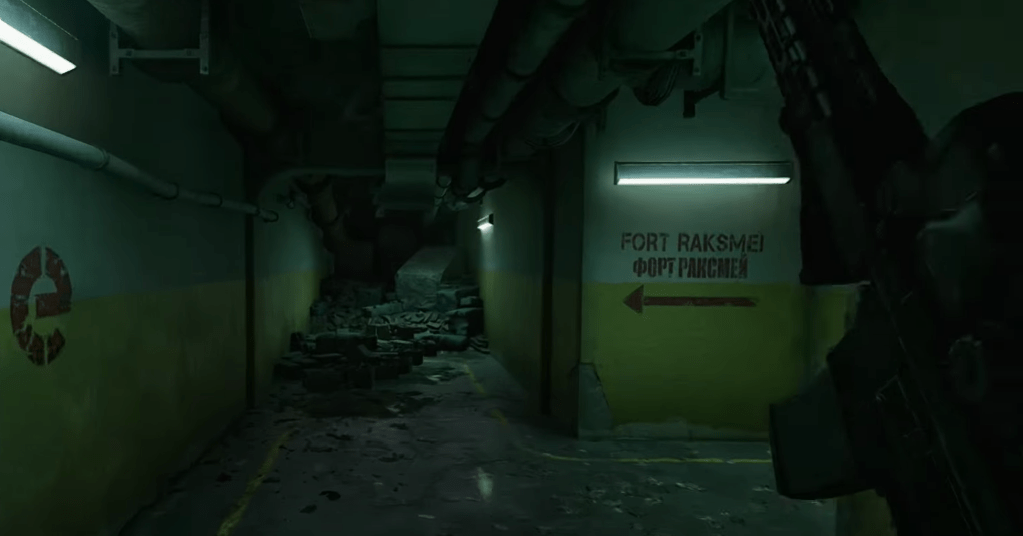
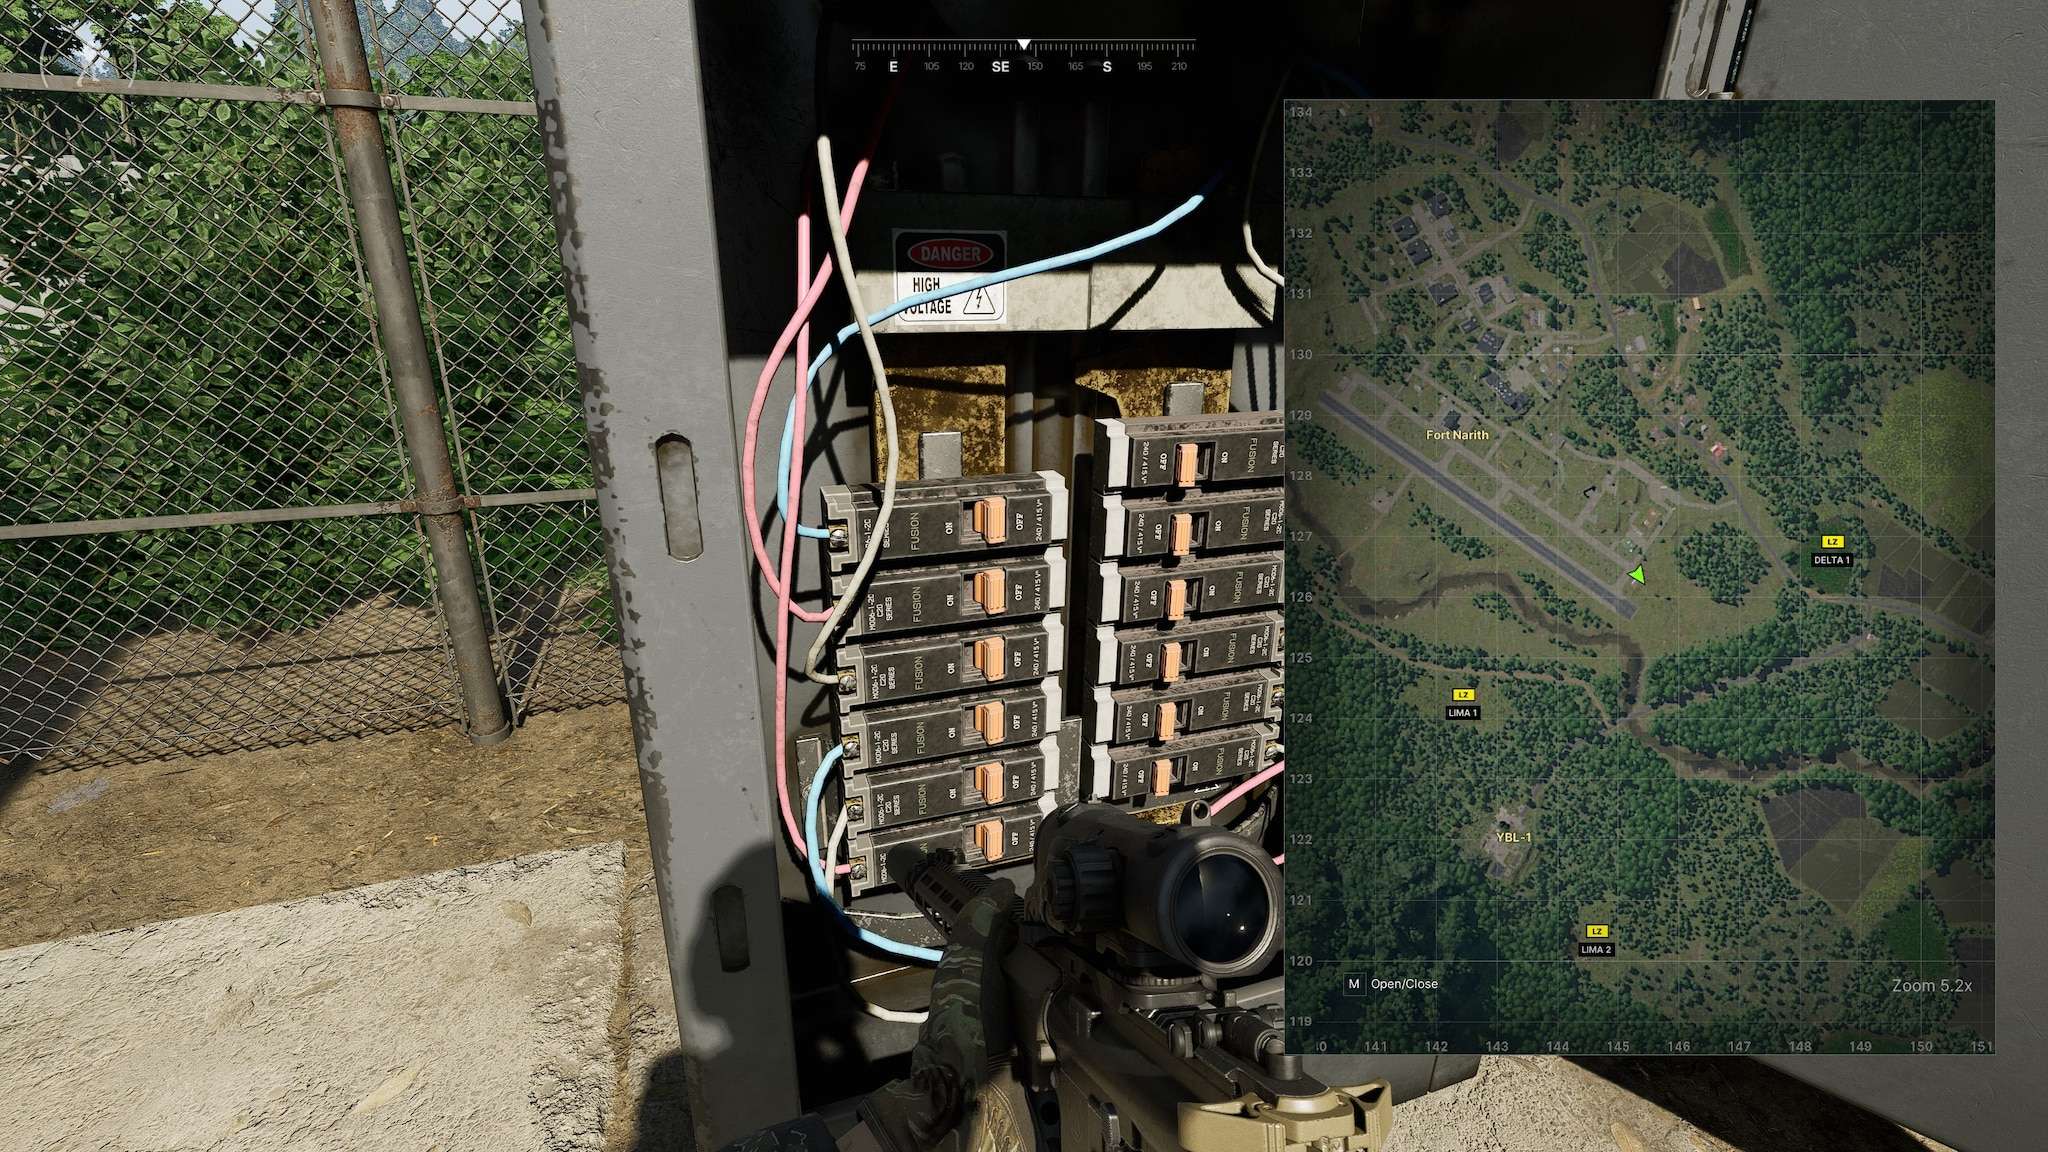
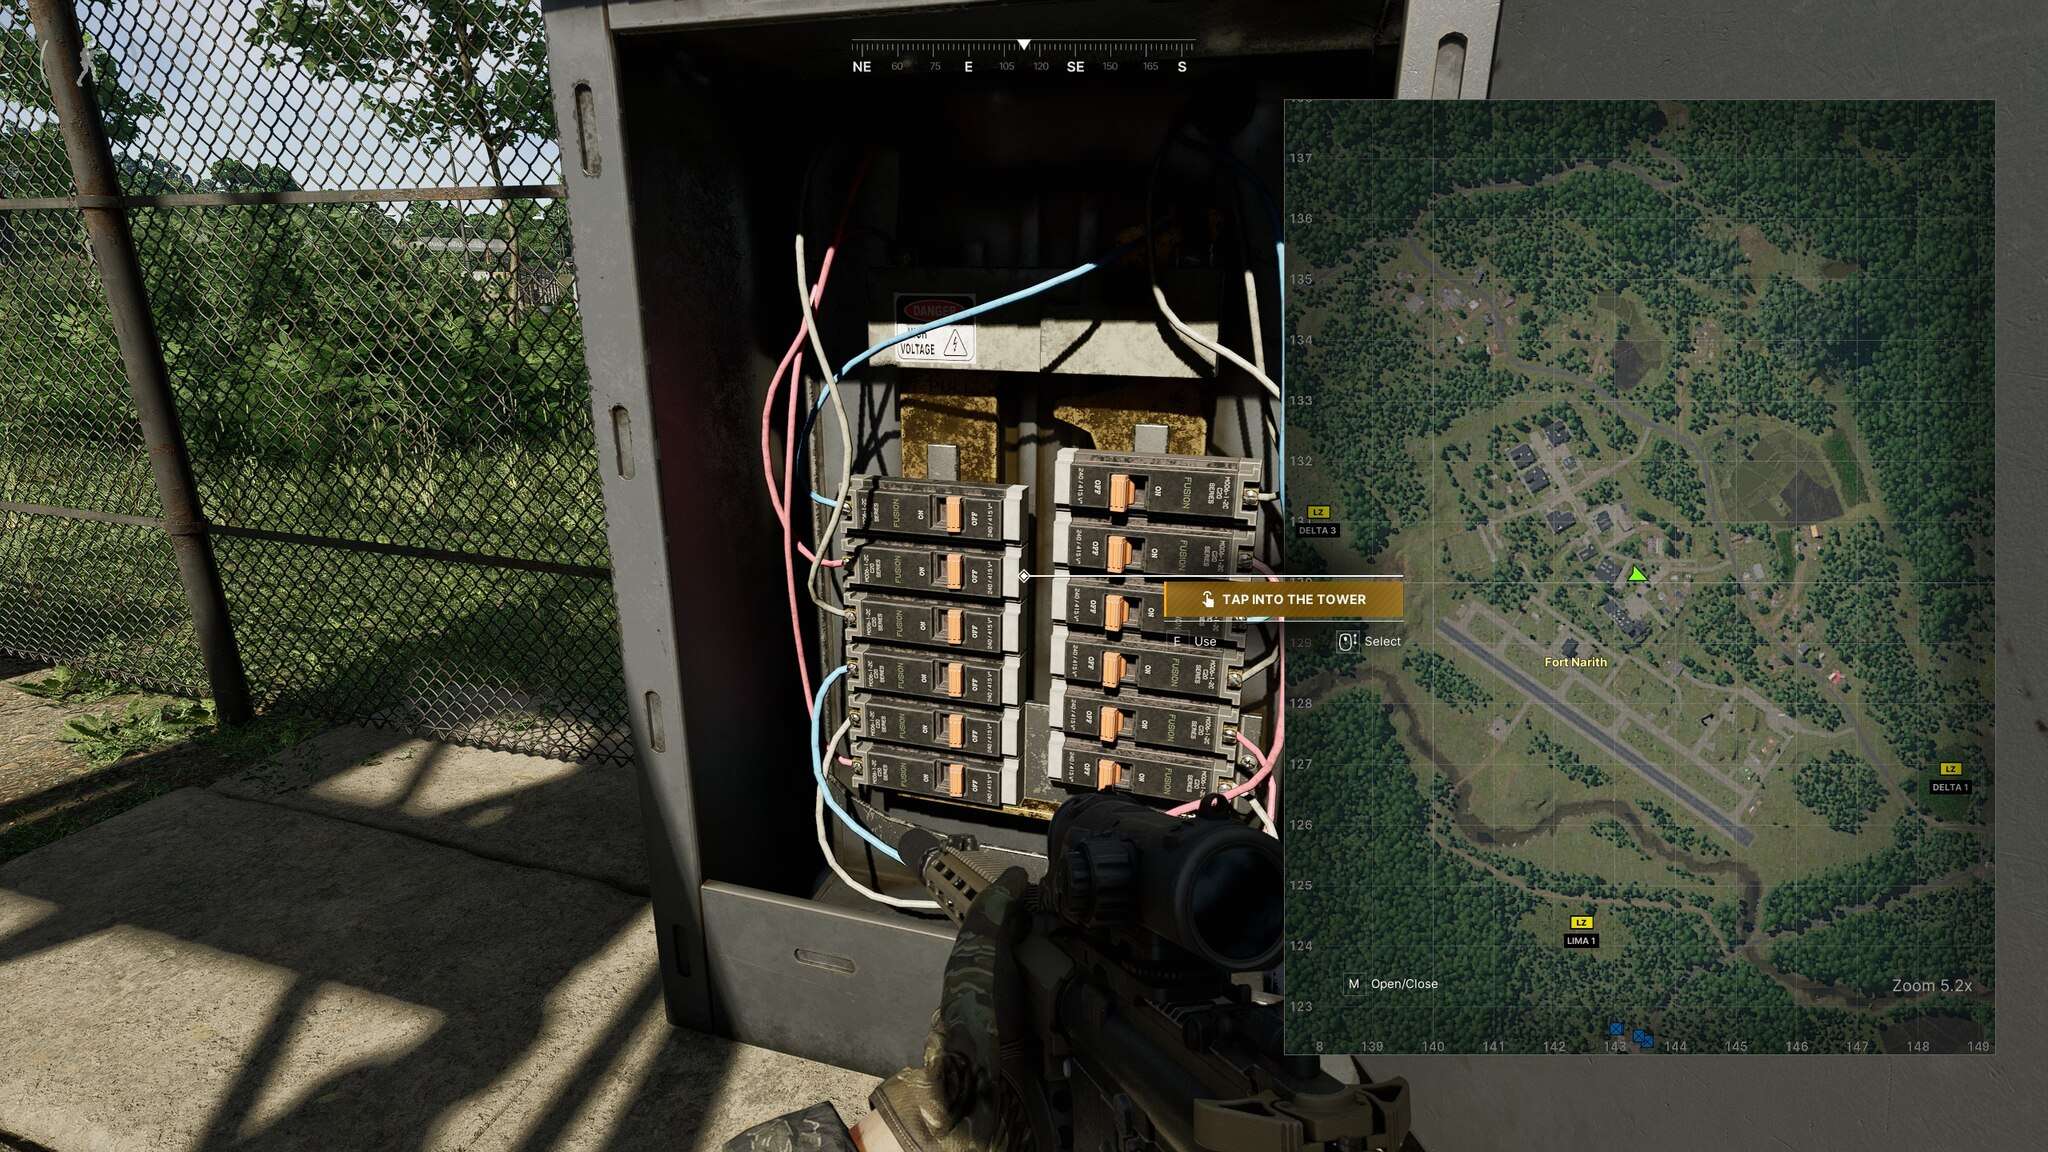
#36: Duty To The Country
- You can drop down through the ventilation shaft from outside. Look for the small fenced-off area with an open gate outside the wall on the western side. From there, you can drop into the bunker and head straight to the right area without any detours – 142 122
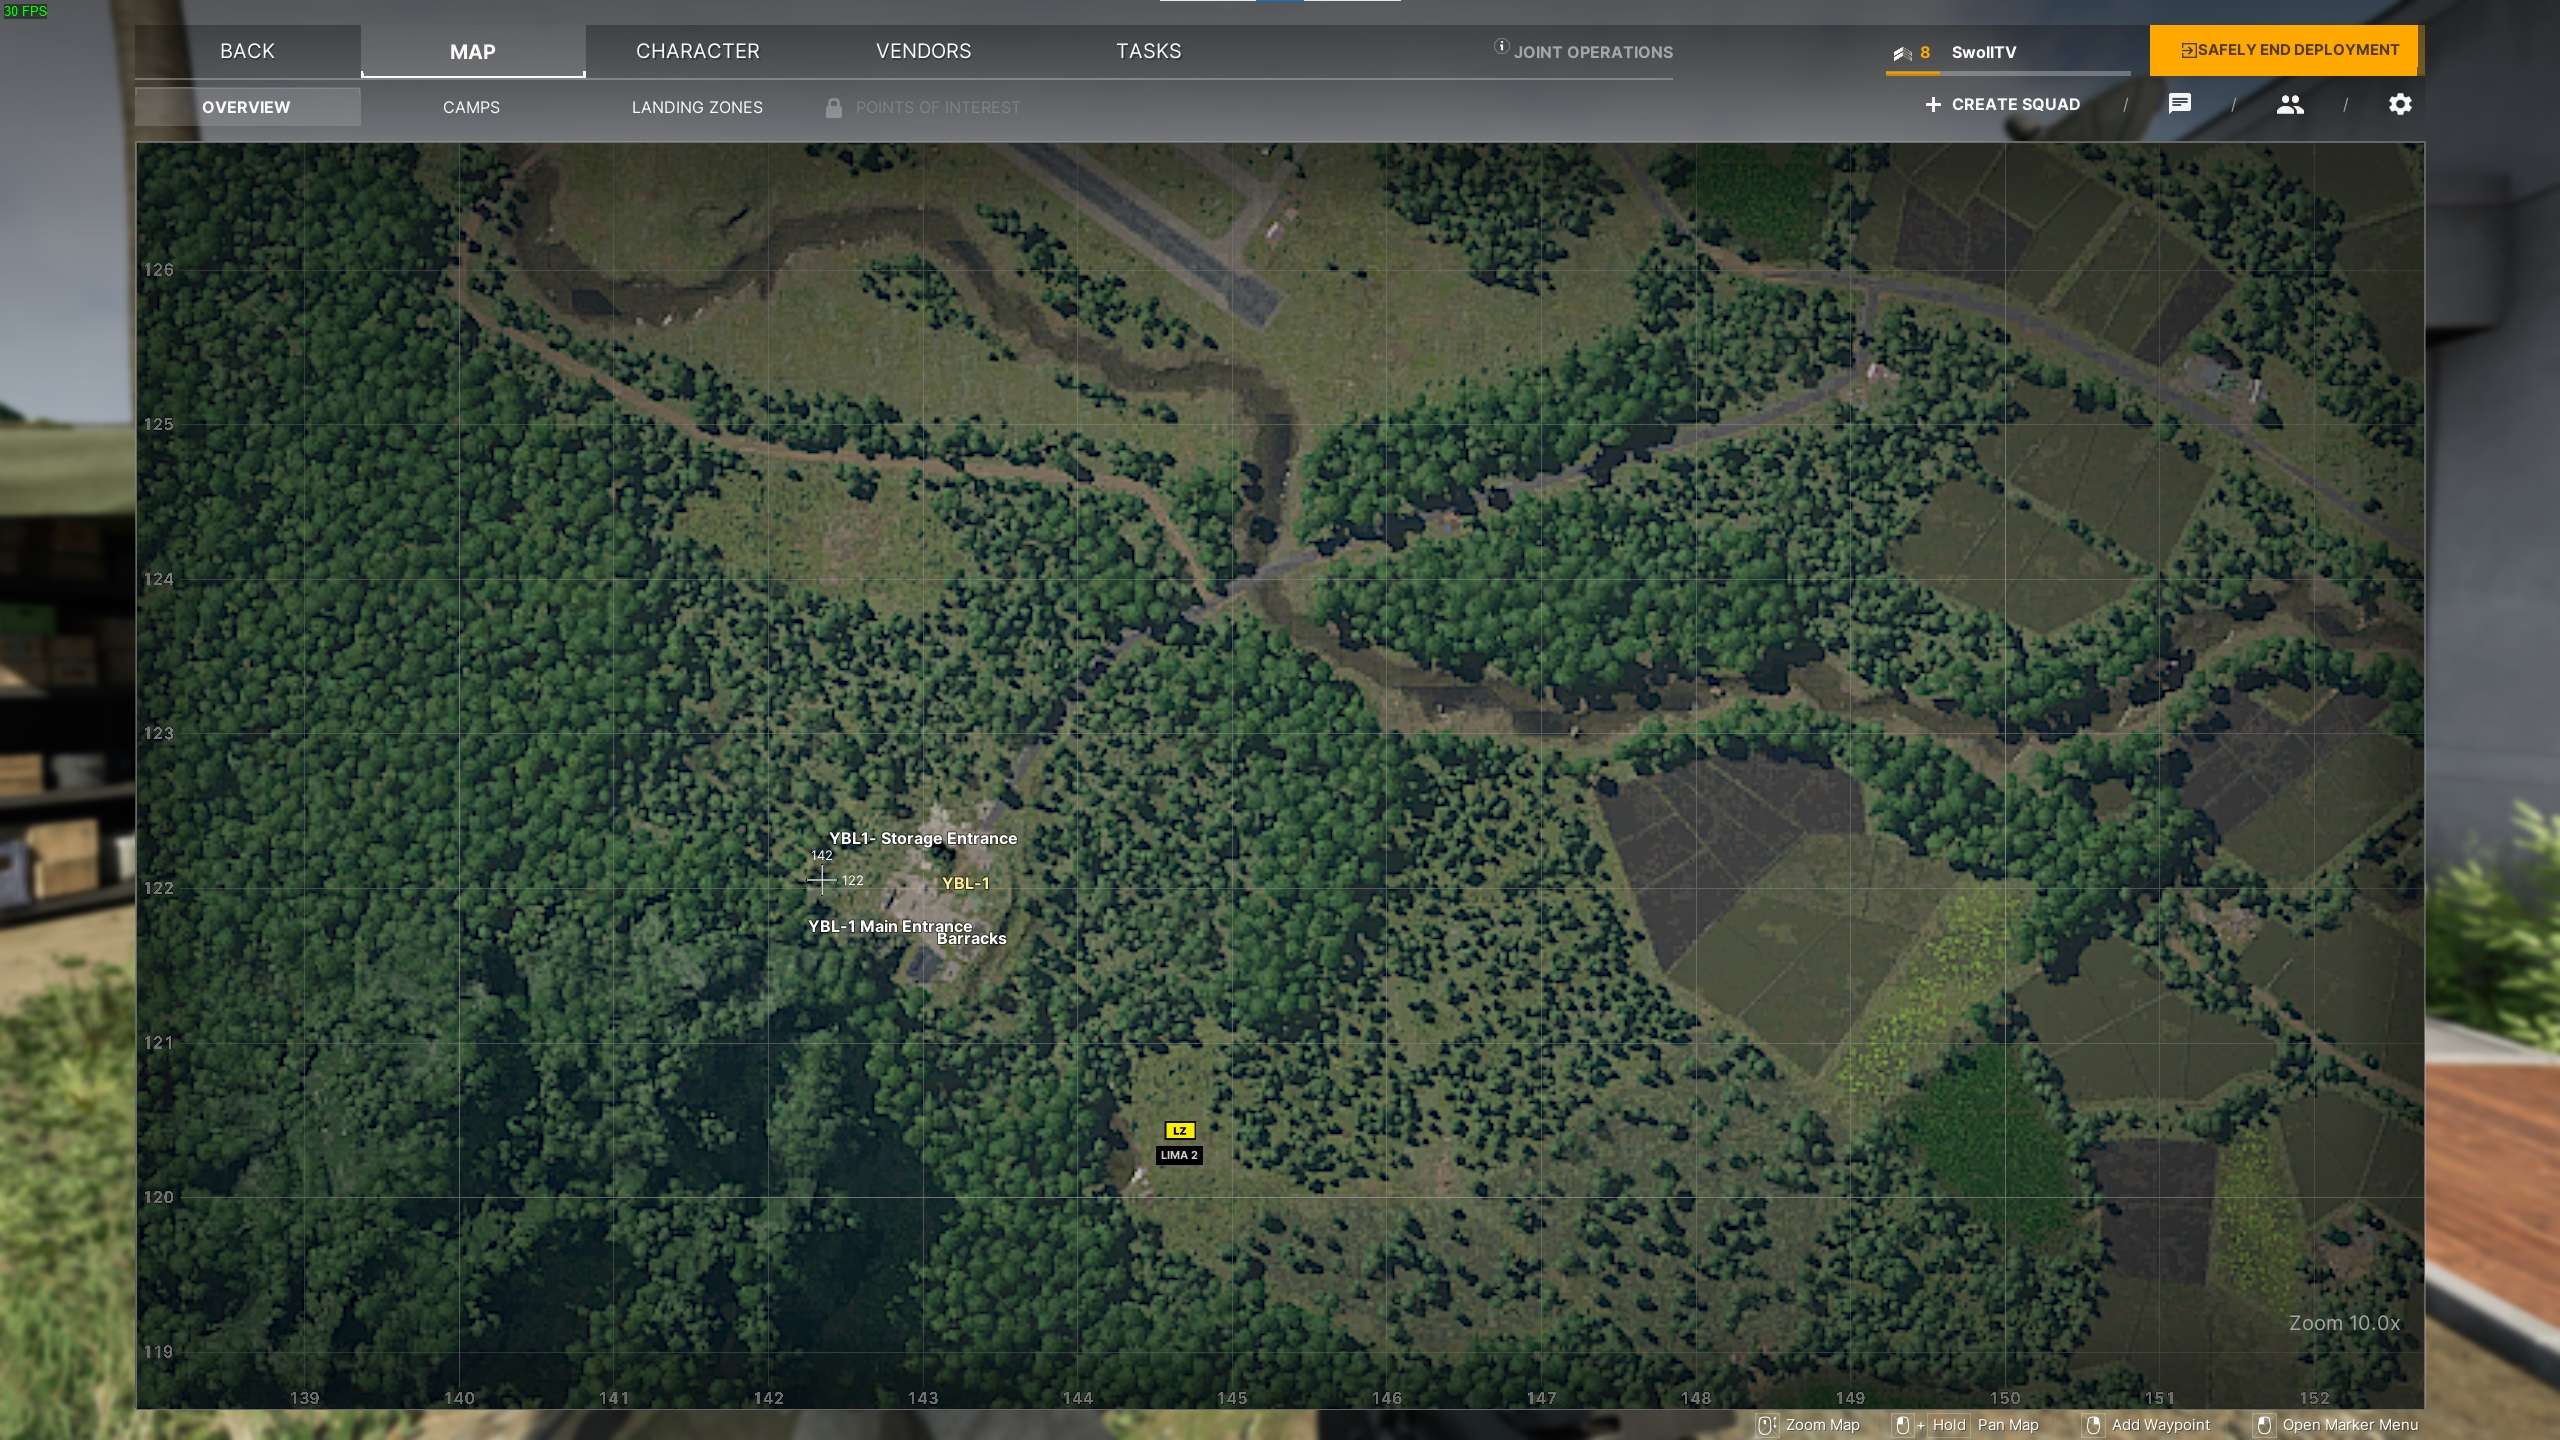
Rebel Scum
#37: Rebel Scum
- You have to kill 20 bots in the bunker – 142 121.

One Shot One Kill
#38: One Shot One Kill
- To take down the boss at Hunter’s Paradise, keep an eye out for a dude rocking a cap and a purple tee-shirt. He’s usually patrolling the area around the shooting range and the restaurant. So, if you wanna bag that boss, that’s where you should be staking out. – 159 168


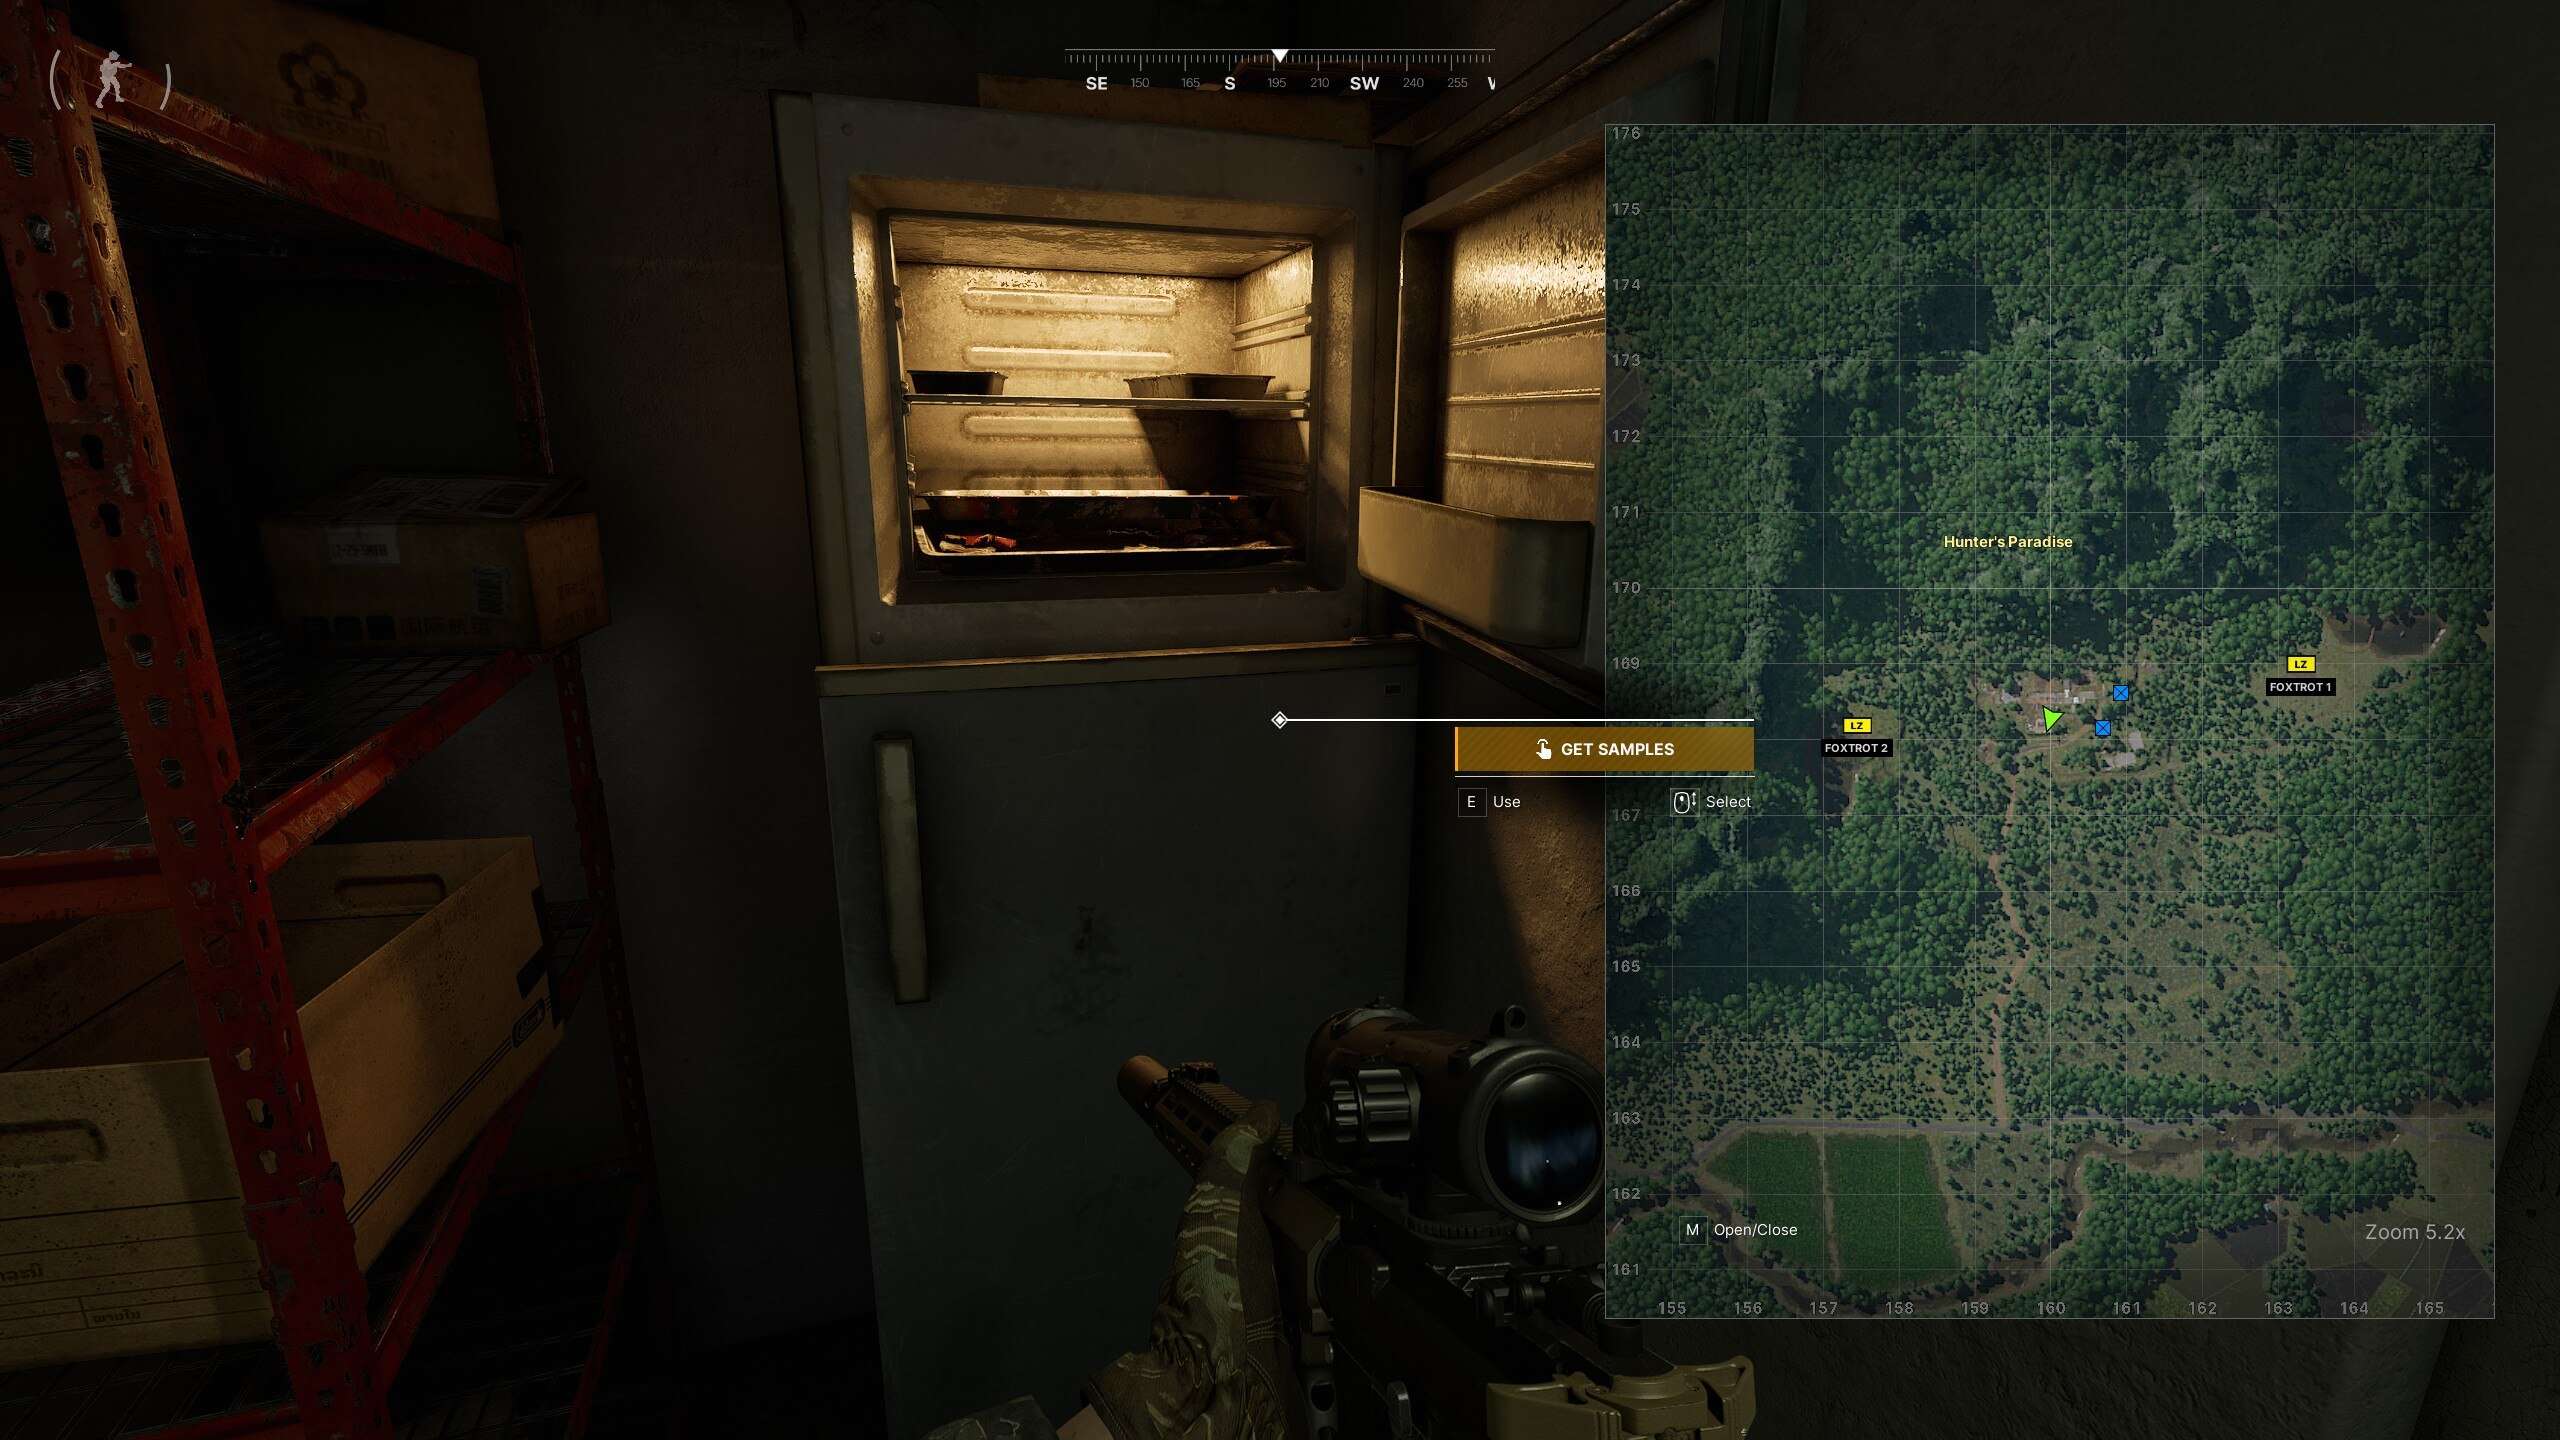
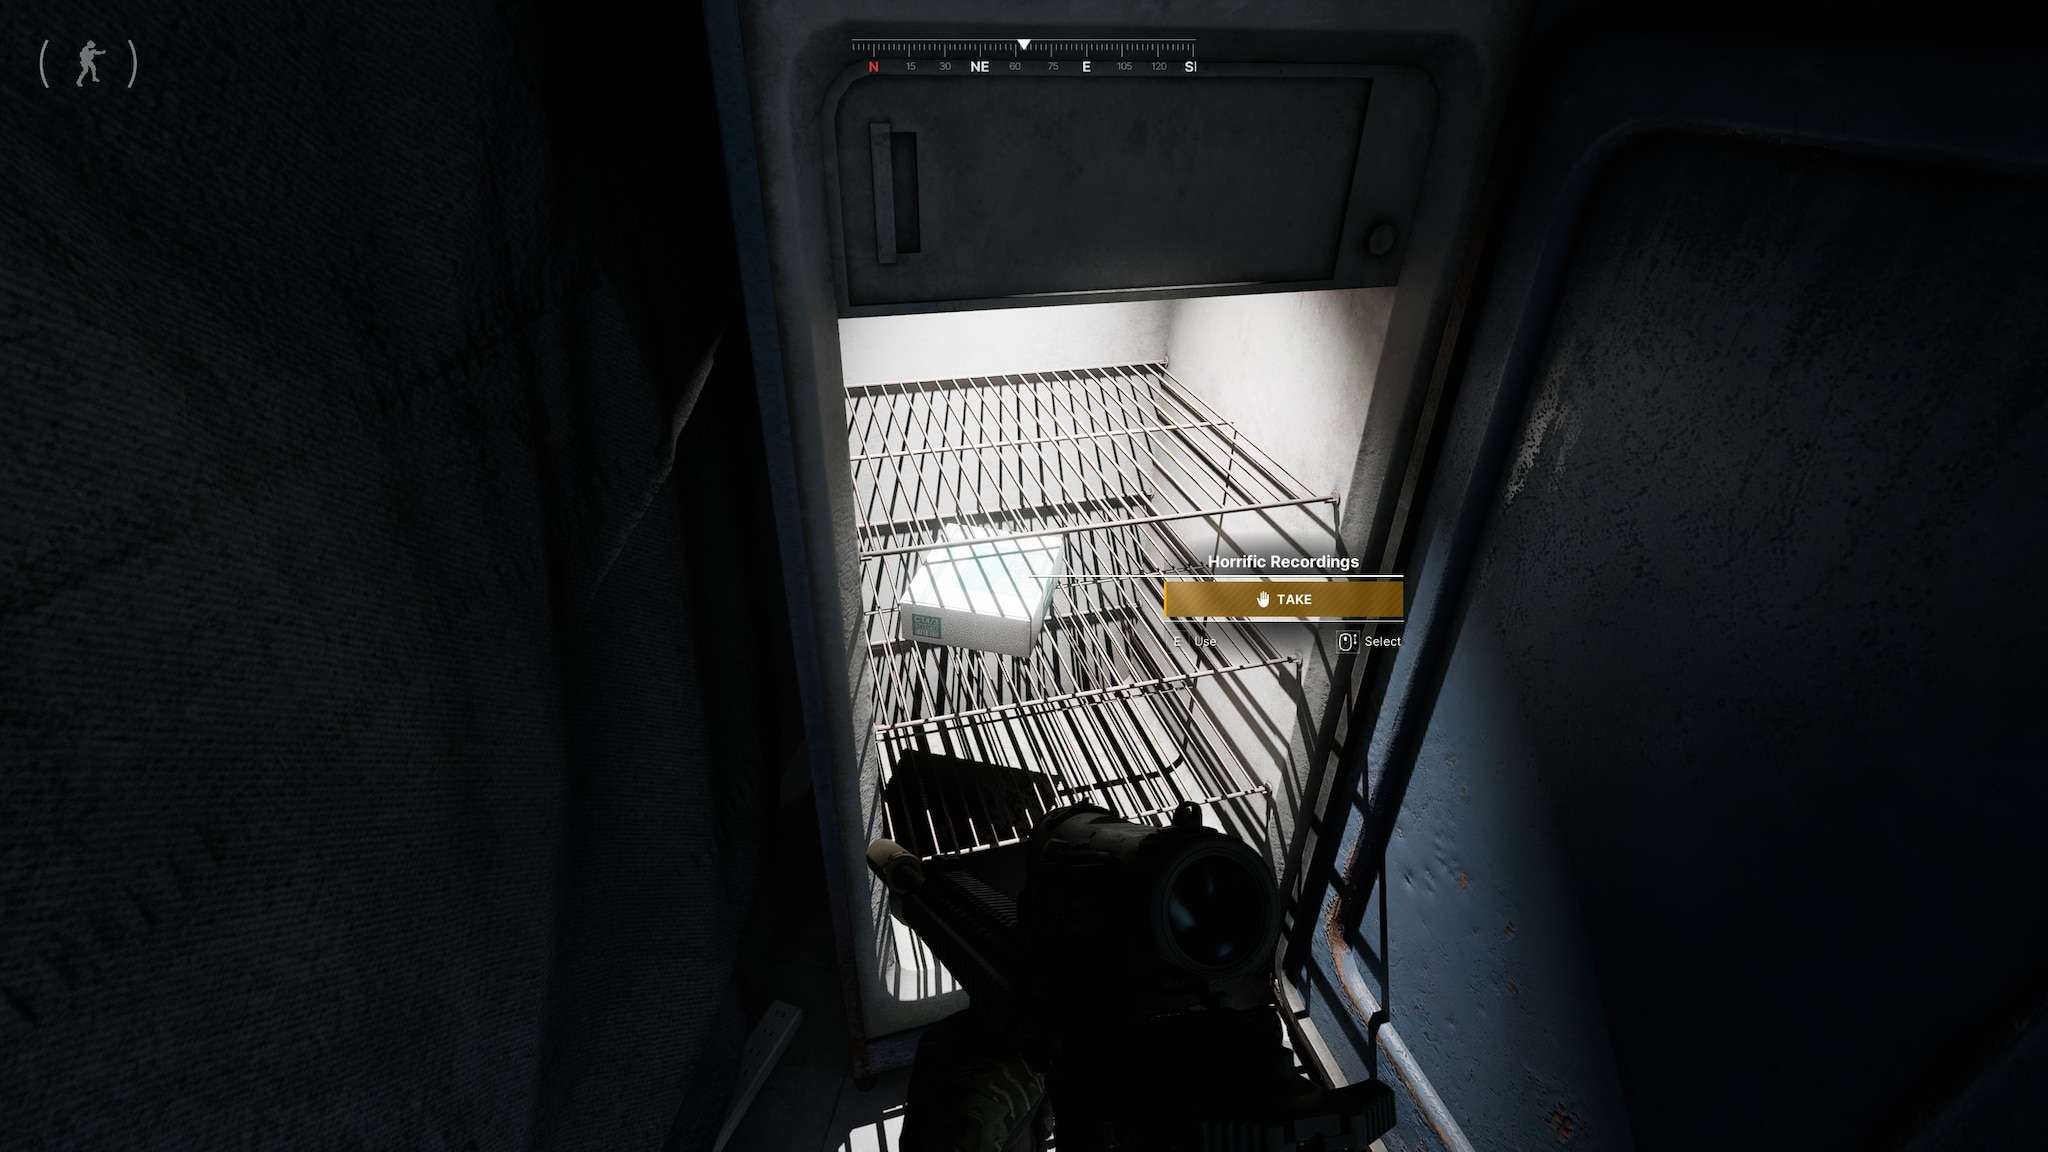
Carnivore
#39: Carnivore
- Head to the back of the restaurant and check out the refrigerator in the bottom left corner. Open it up and take a peek at the “food” sitting on the top shelf. Sounds like there might be something interesting hidden in there – 159 168

The Most Dangerous Game
#40: The Most Dangerous Game
- Ascertain the true nature of the VIP section – 159 168


- Retrieve intel about Hunter’s Paradise VIP program


Night Ocean
#42: Night Ocean
- You have to kill the boss in the area – 203 116
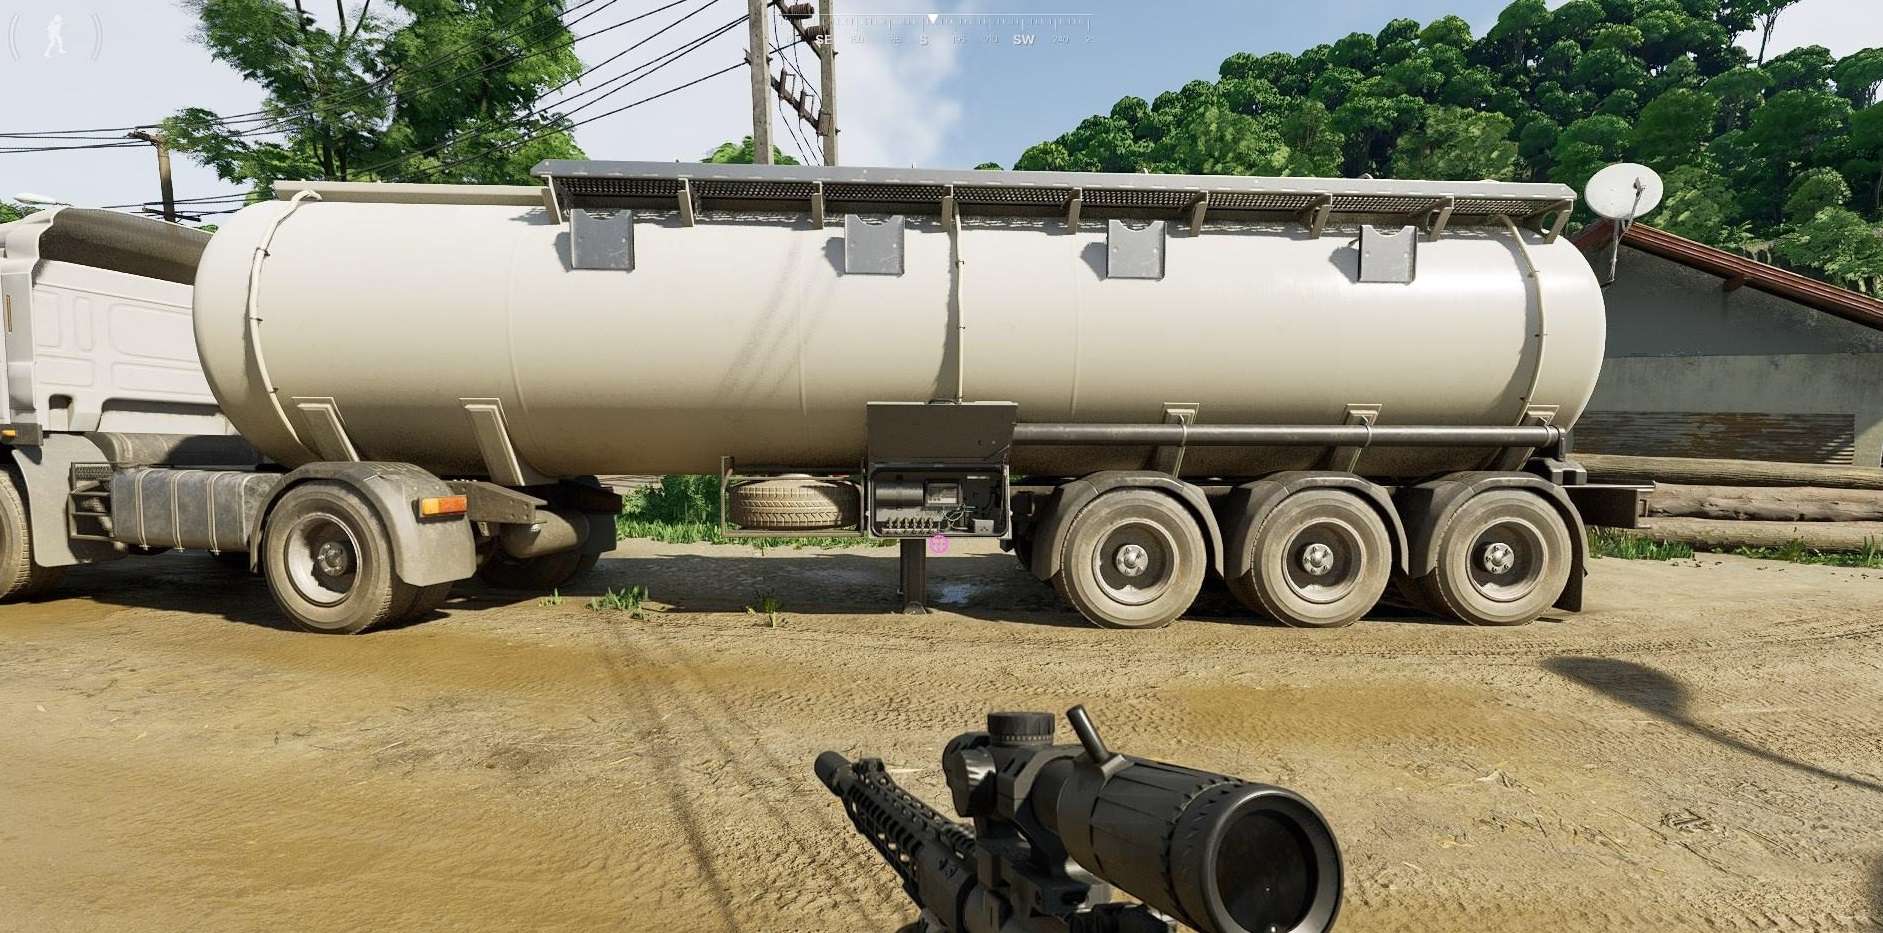
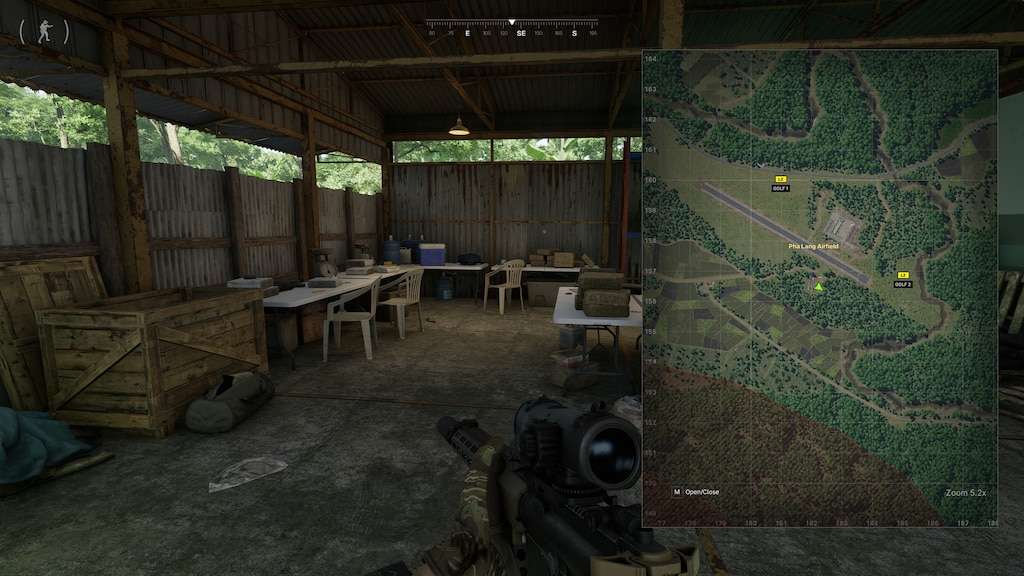
A Single Drop
#43: A Single Drop
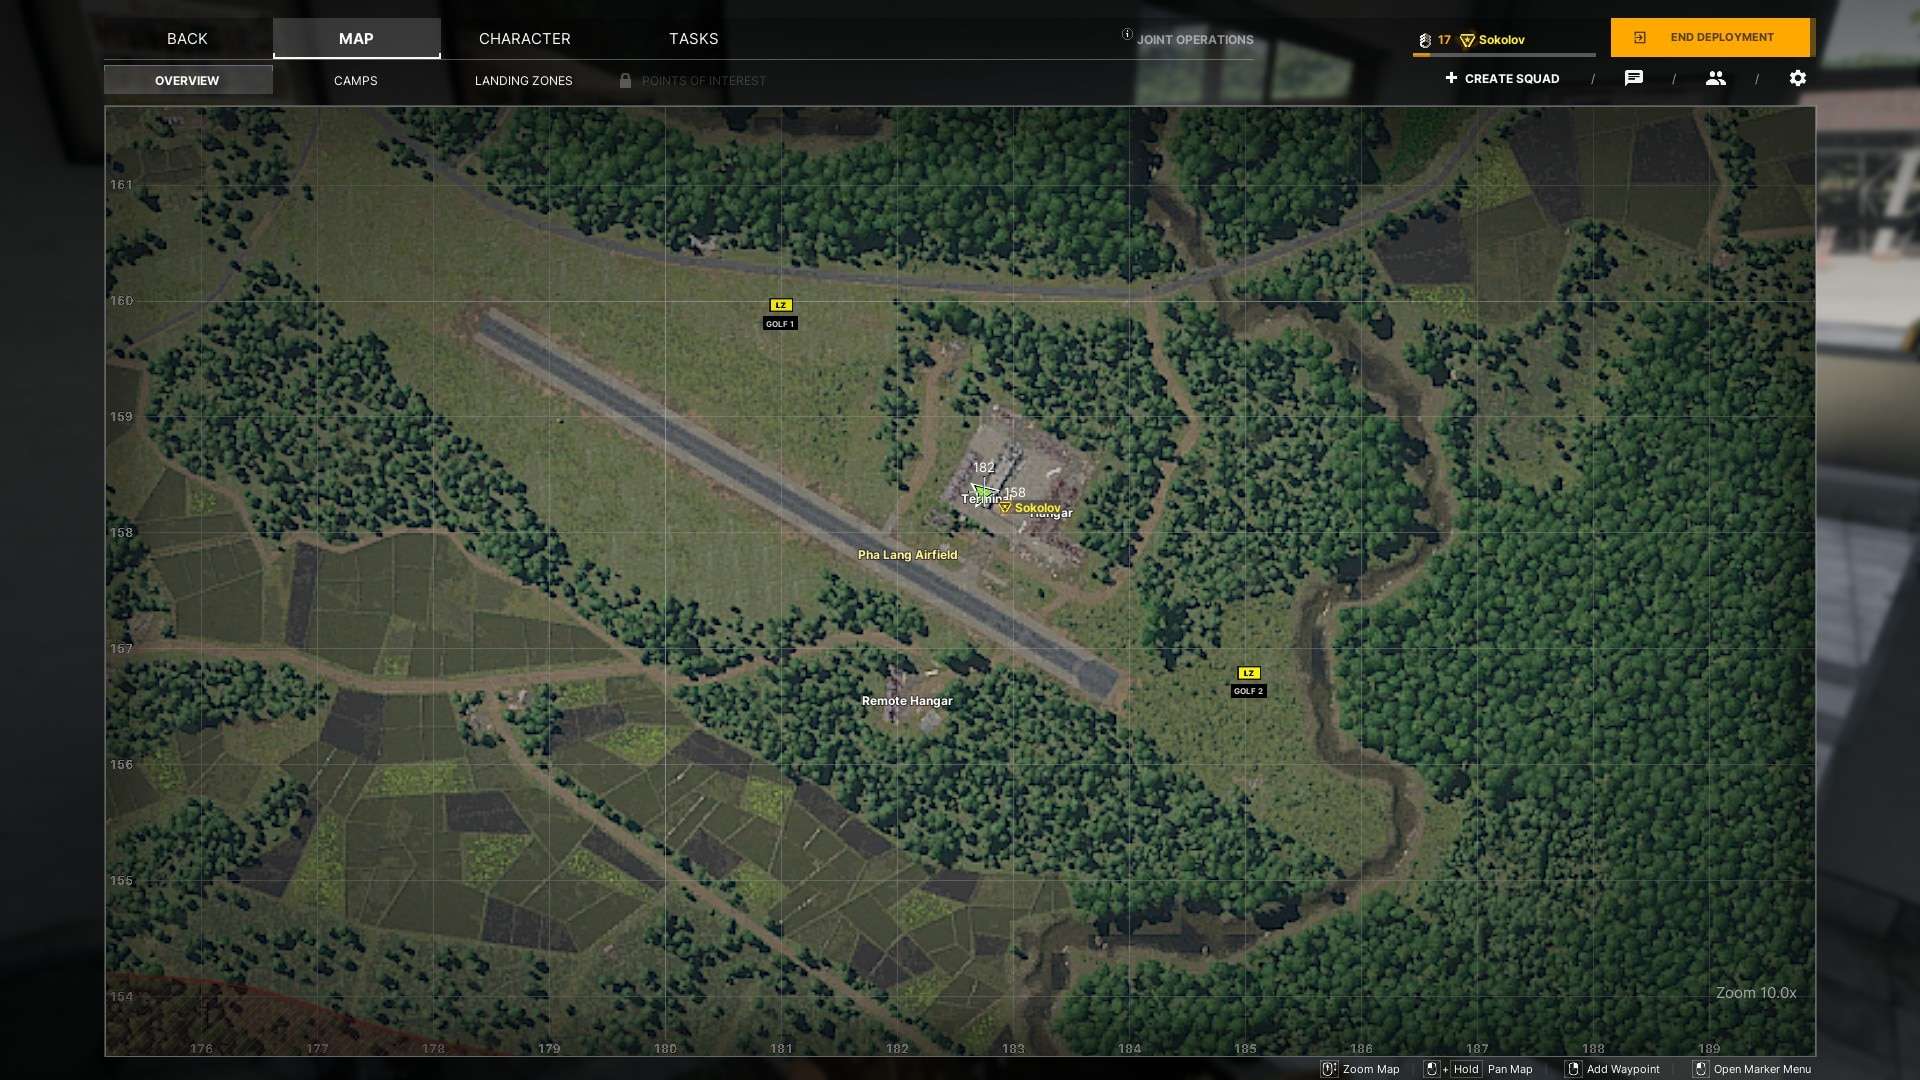
- Pha Lang Airfield. Check the first tanker truck – 182 156
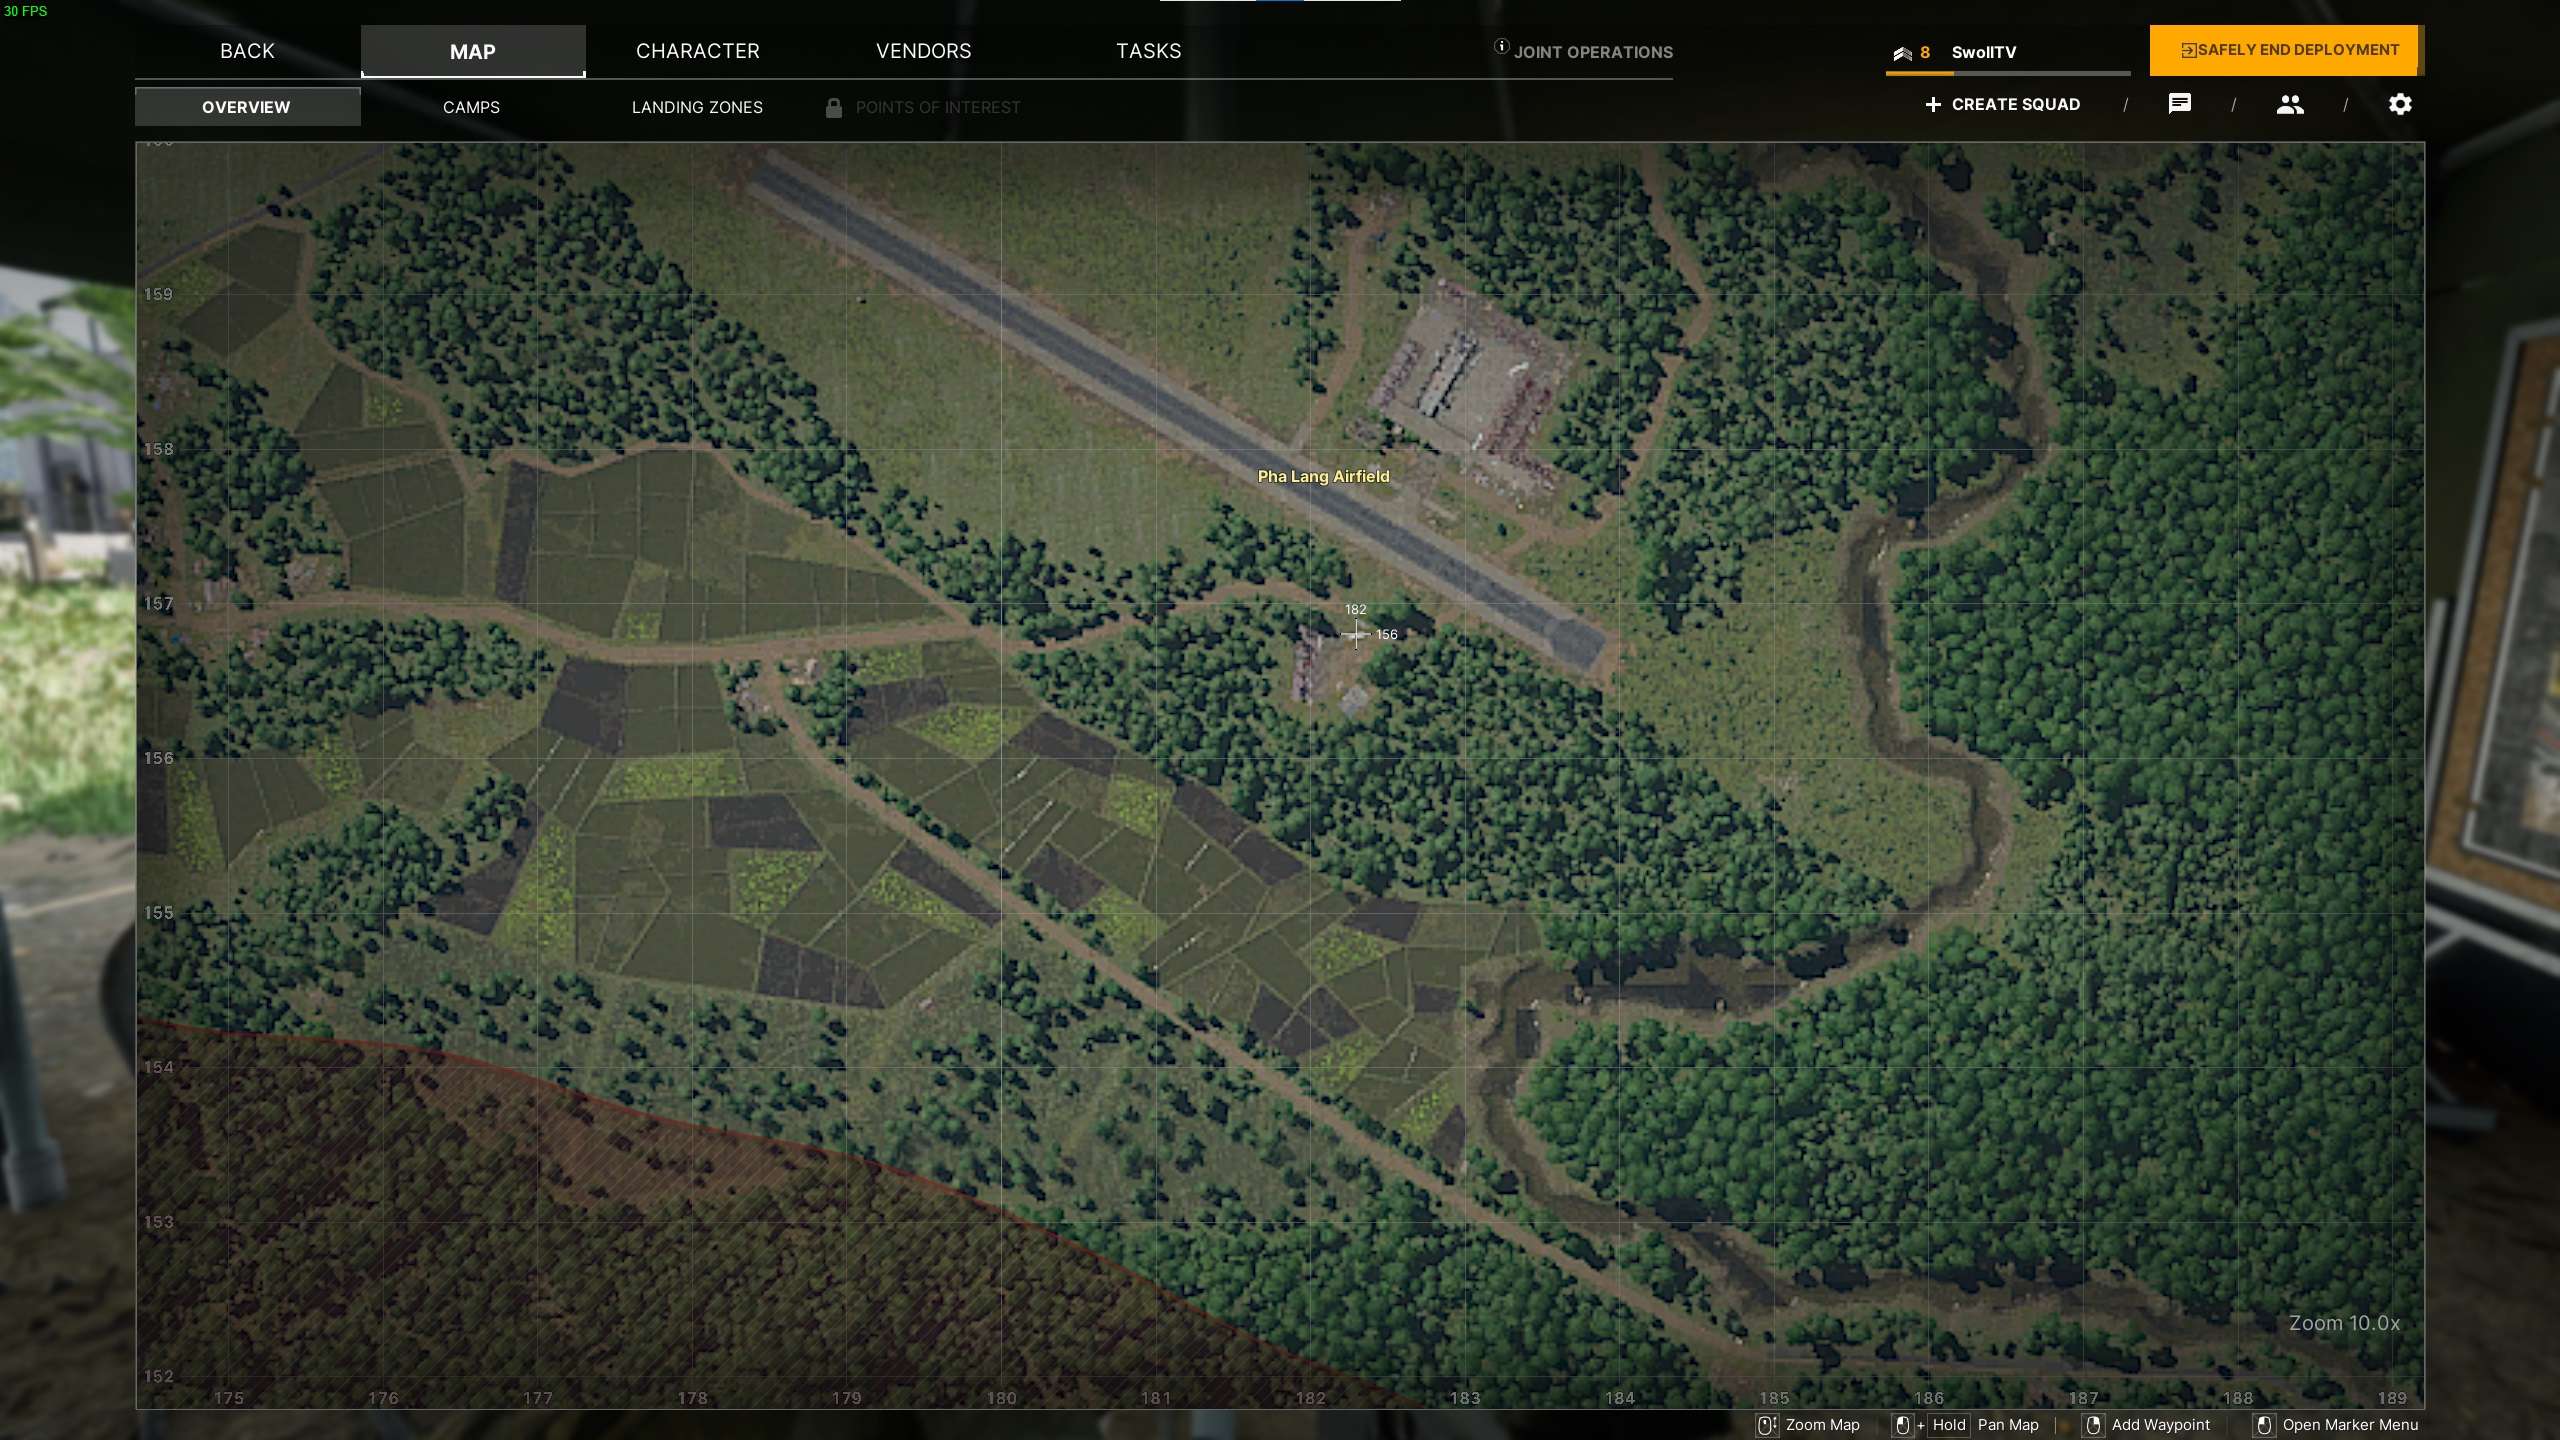
- Check the second tanker truck – 183 158

- Check the third tanker truck – 183 158

Living In Burrows
Living In Burrows
- In the bunker. You need Ybl-1 Generator Room Key – 142 121
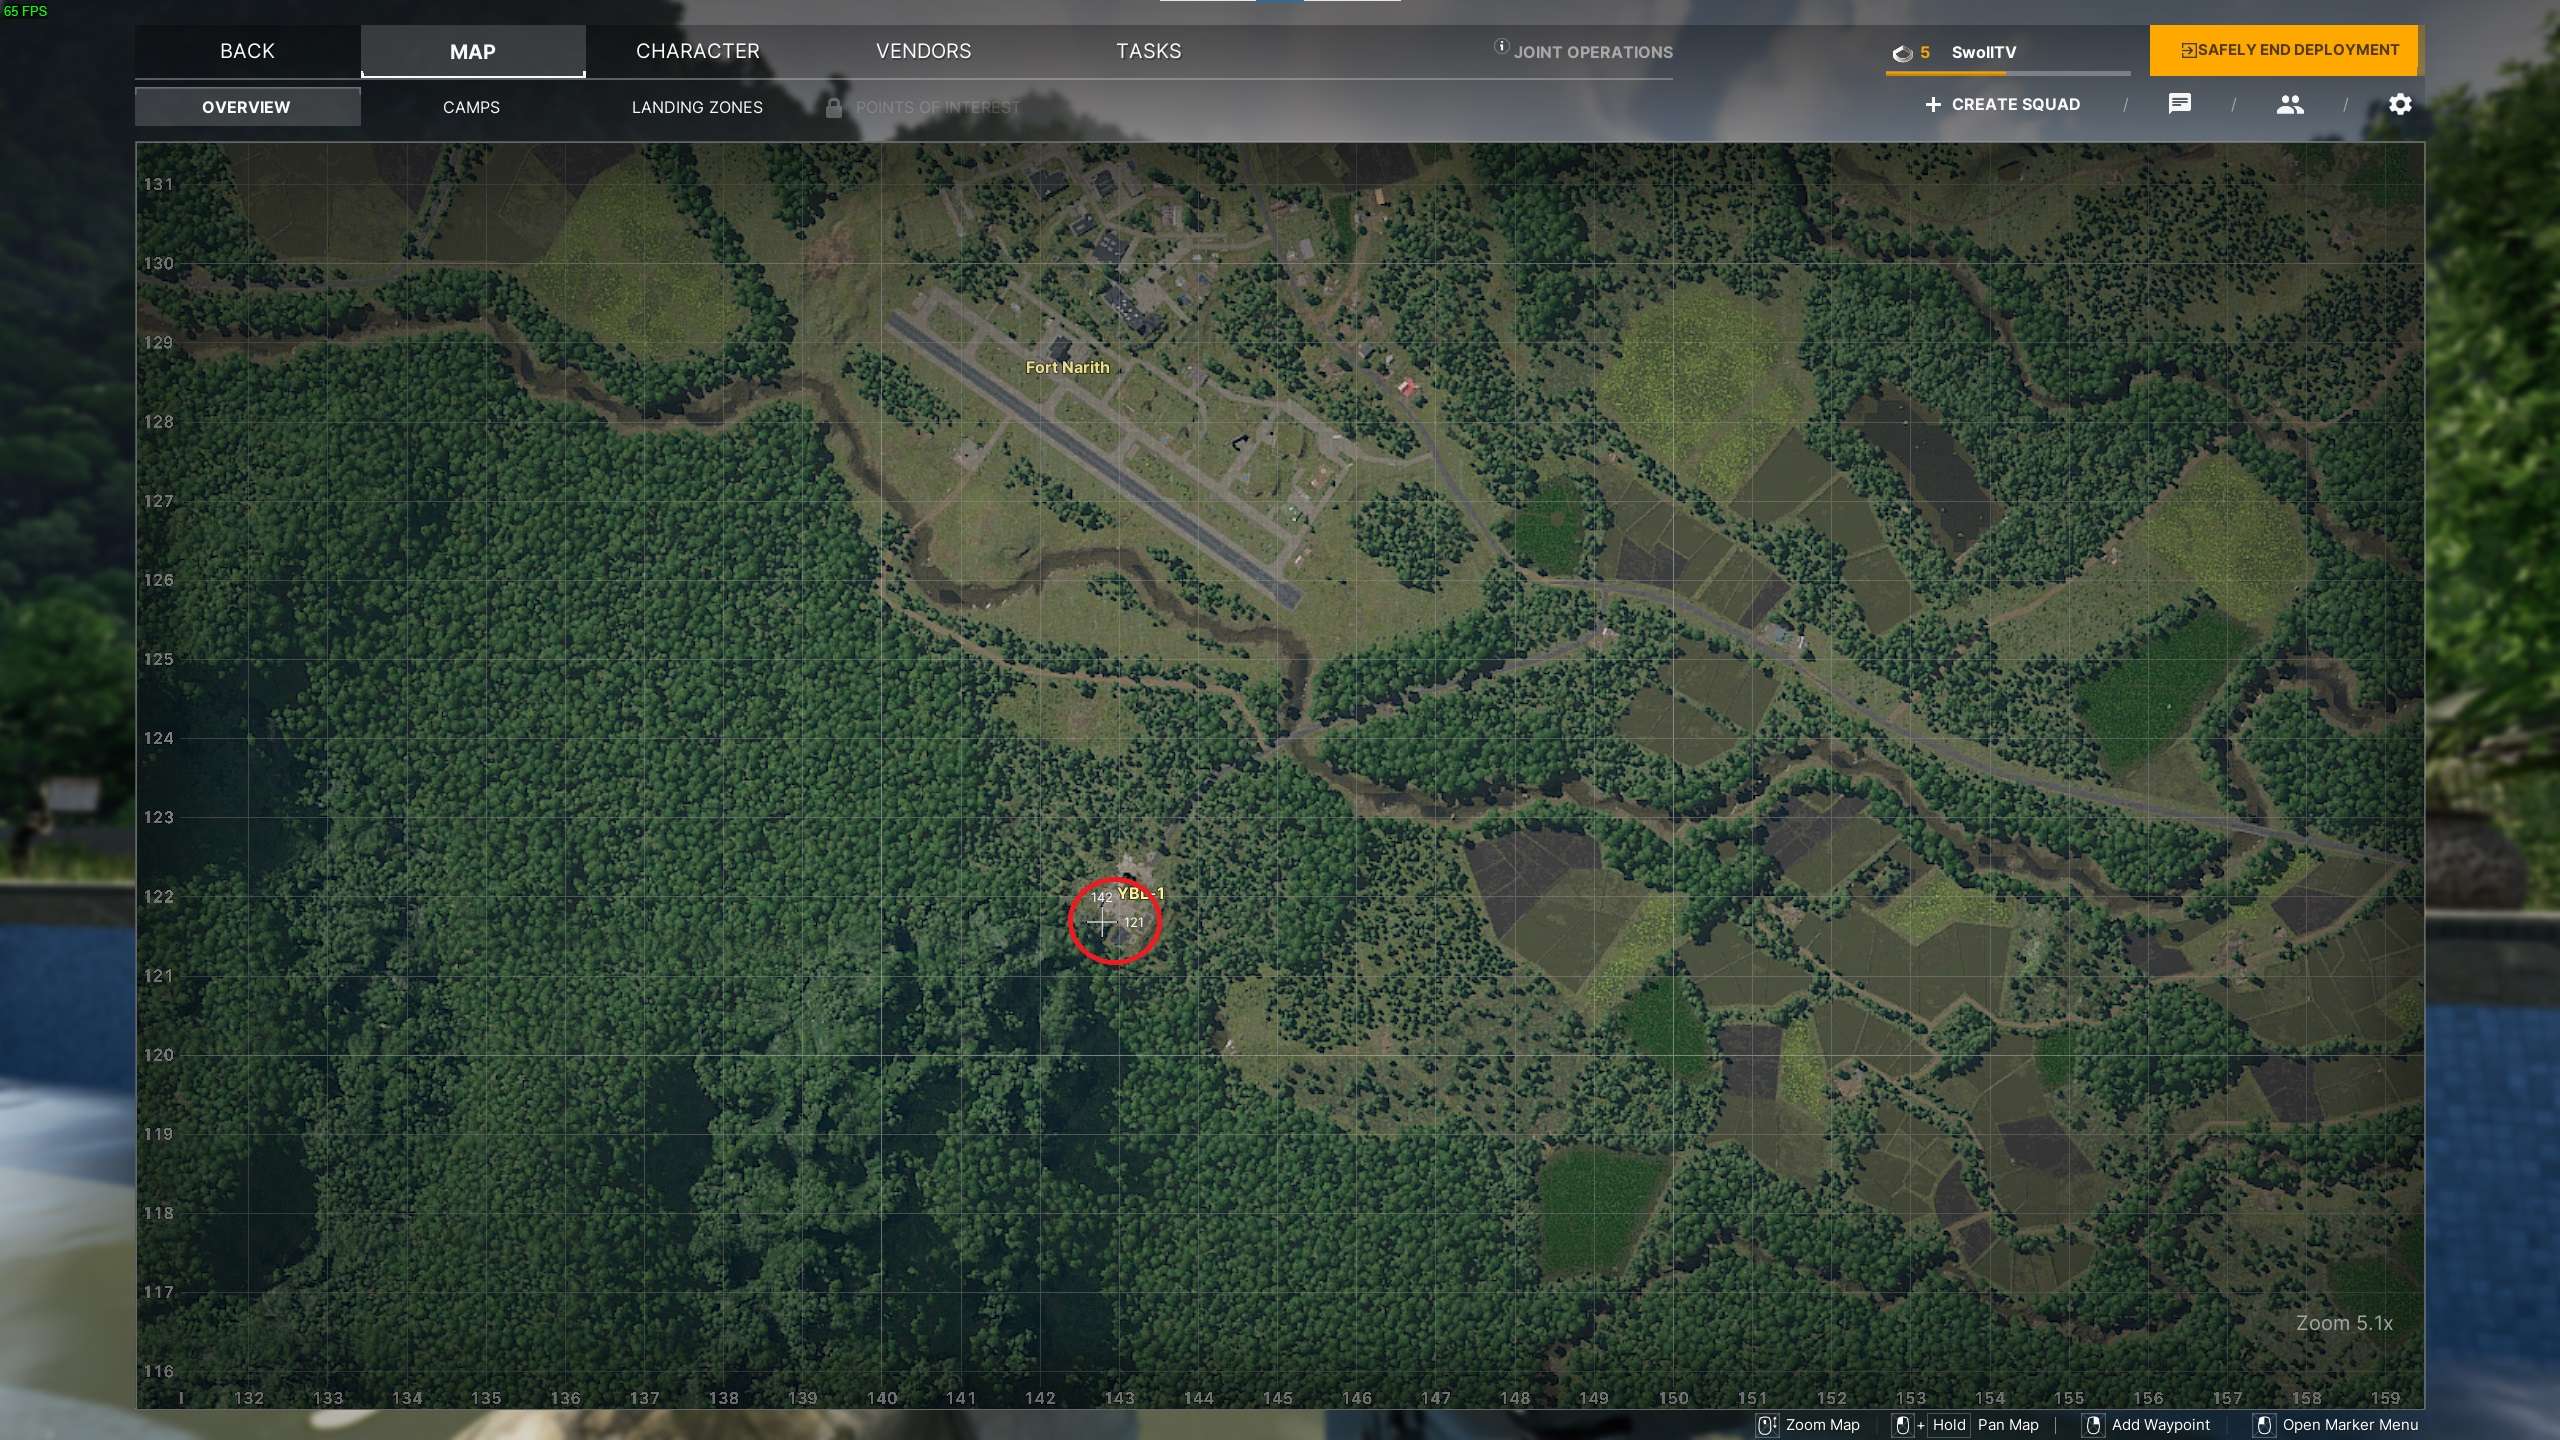
- Check the state of the water filtration unit.
- Check the state of the generator.
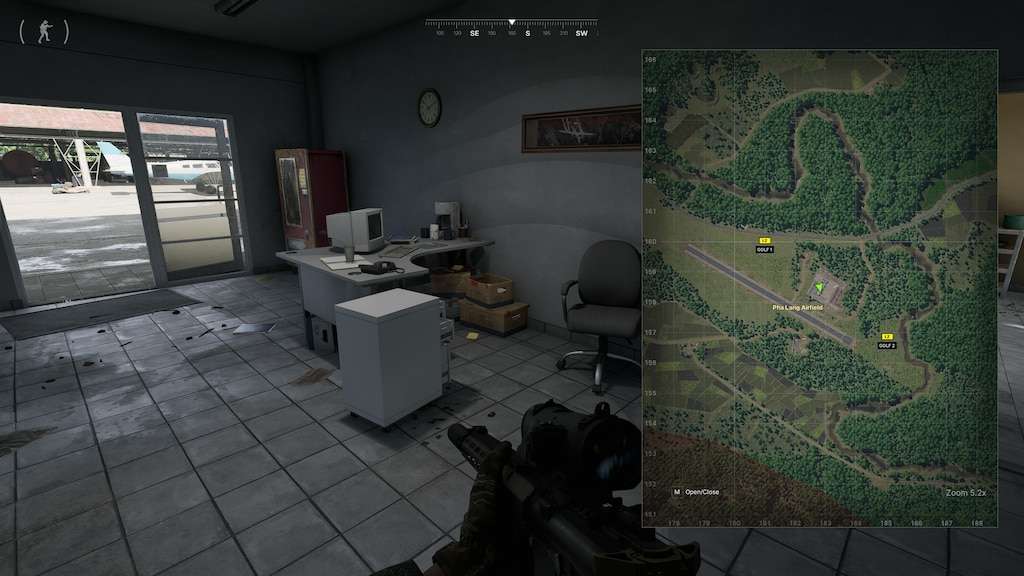
Manifest Destiny
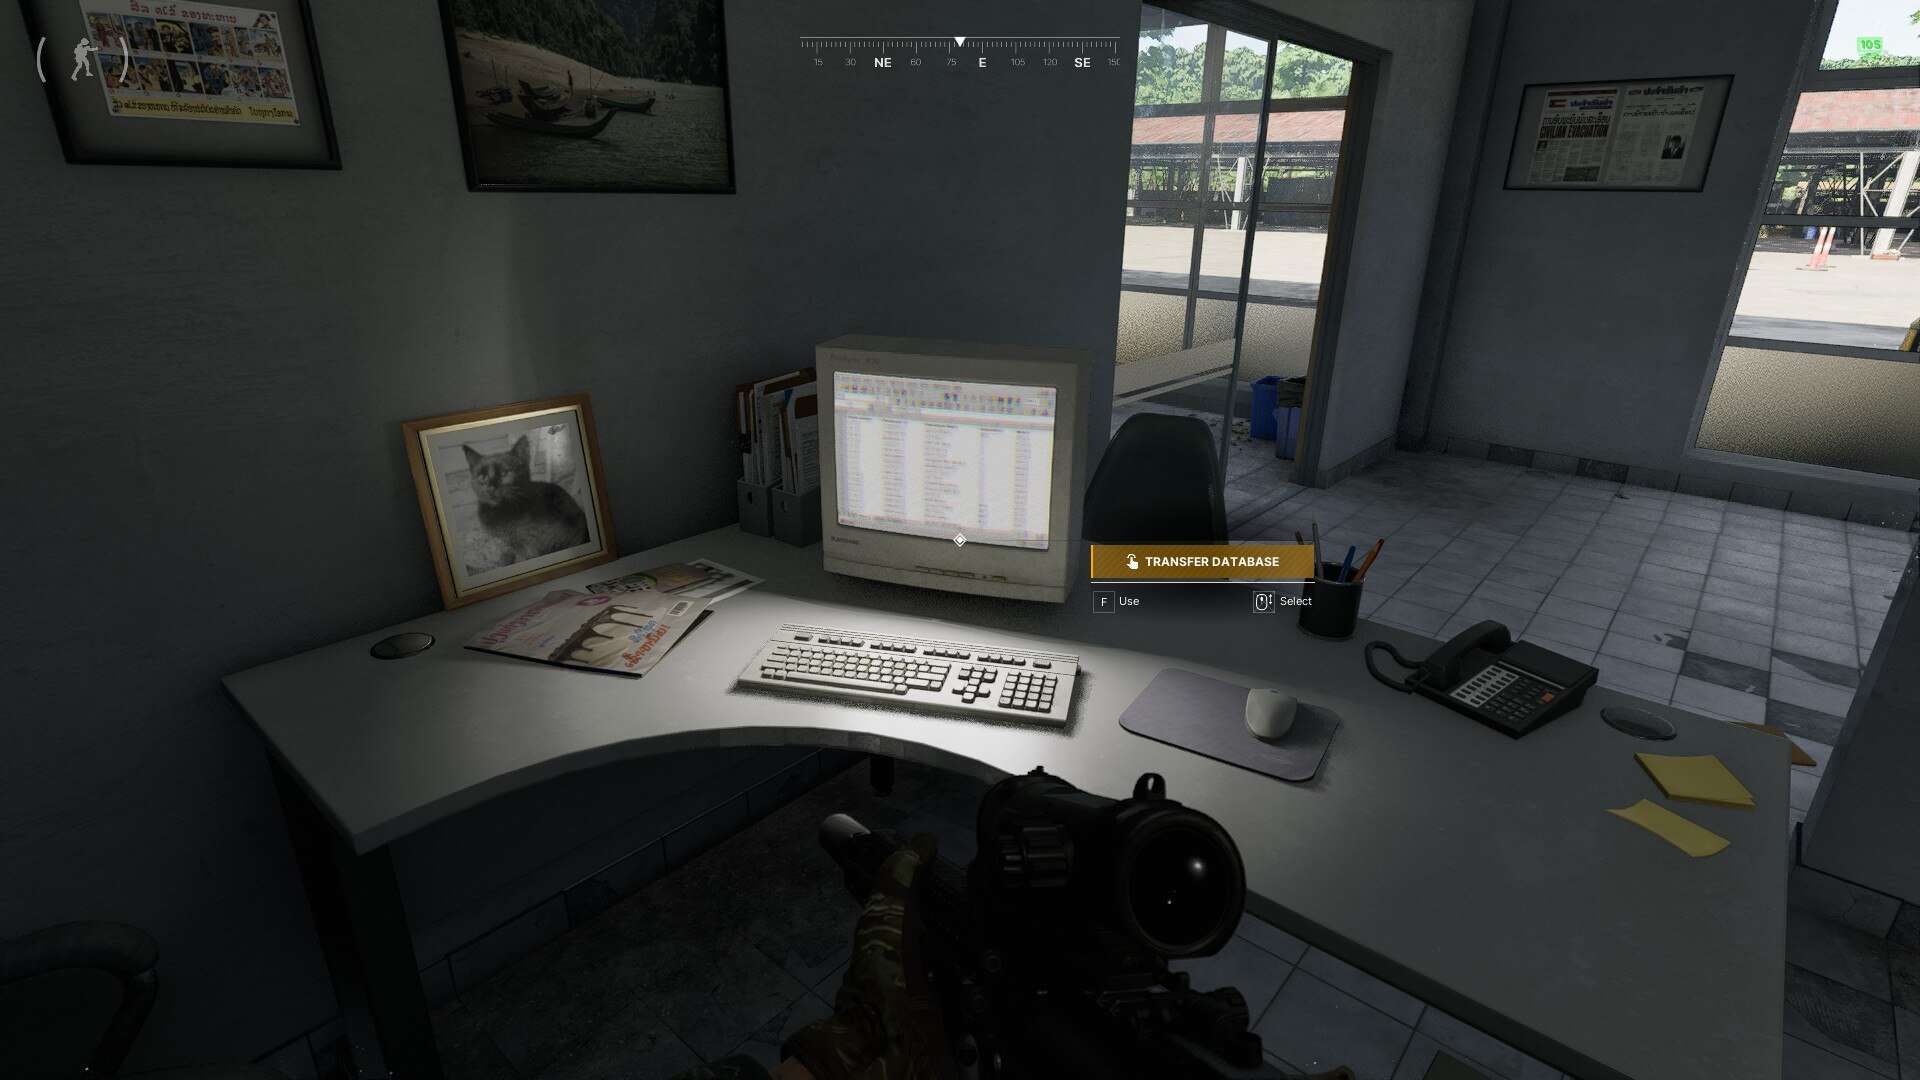
Manifest Destiny
- Find the data base on the computer – 182 158
Final Checkout
Final Checkout
- Coordinates – 183 158

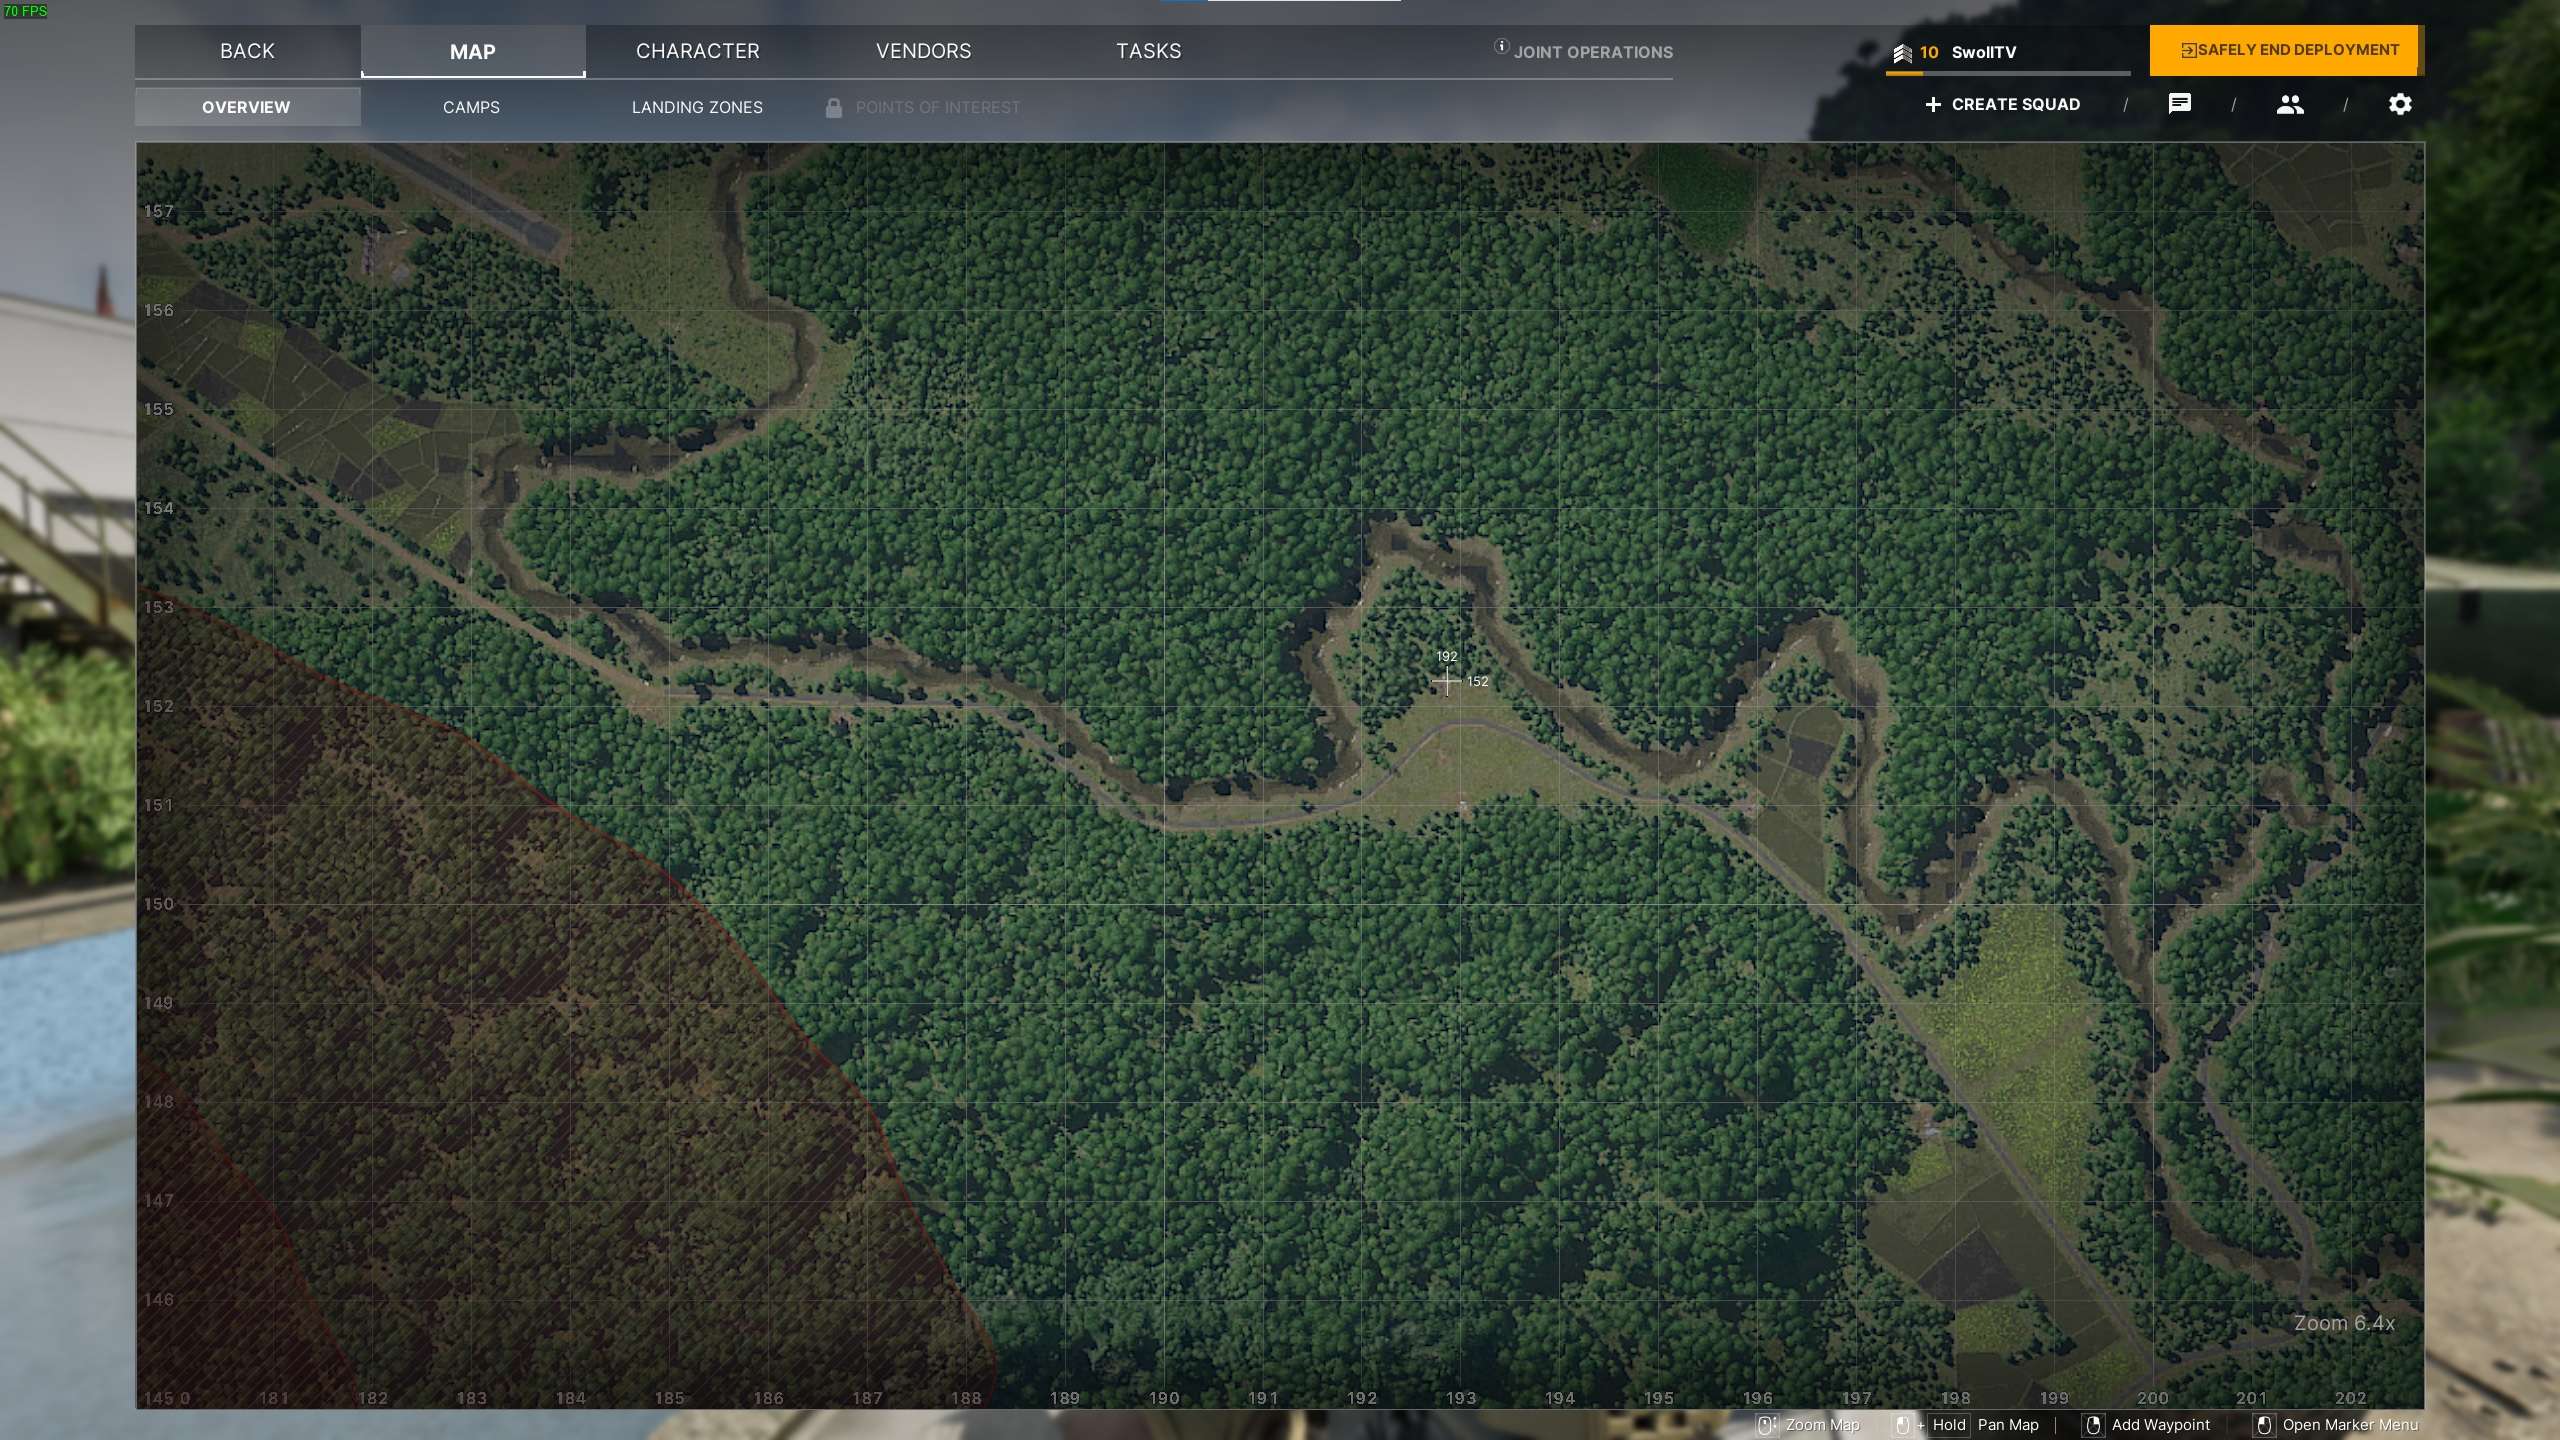
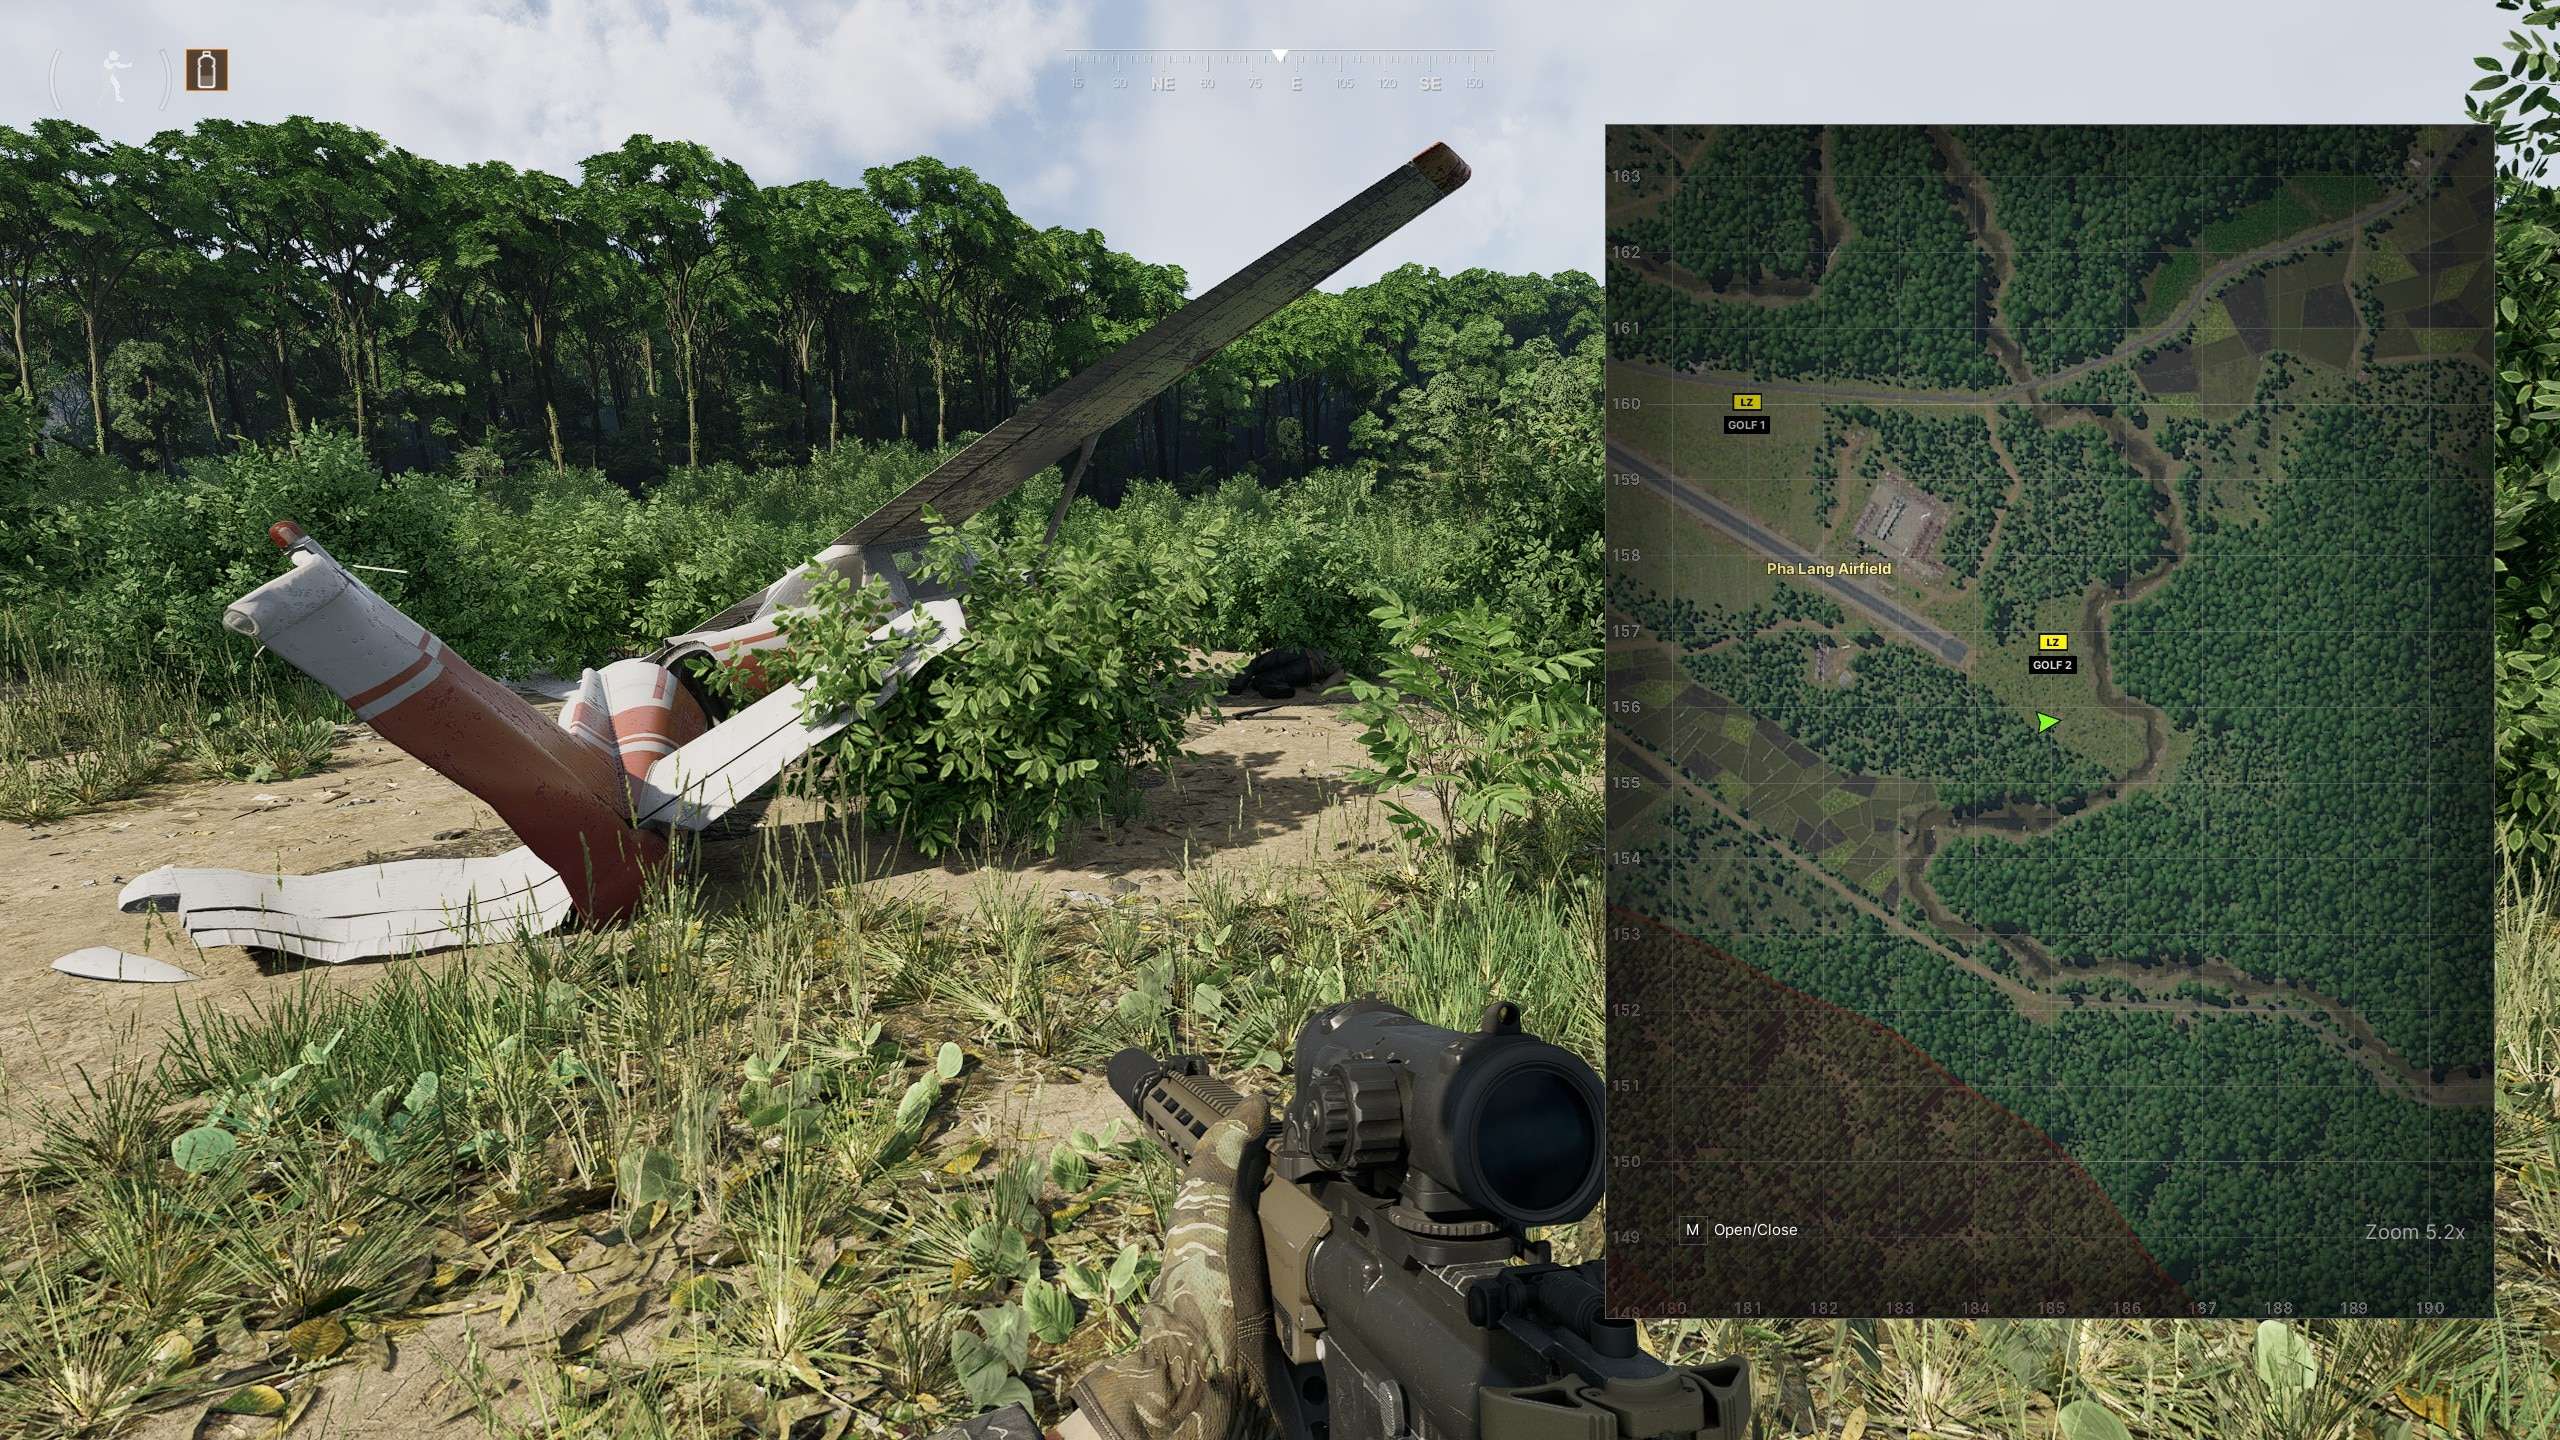
What Comes Up
What Comes Up
- Find the black box on the crash plane – 192 152
Too Close Too Sun
Too Close Too Sun
- Coordinates – 192 152


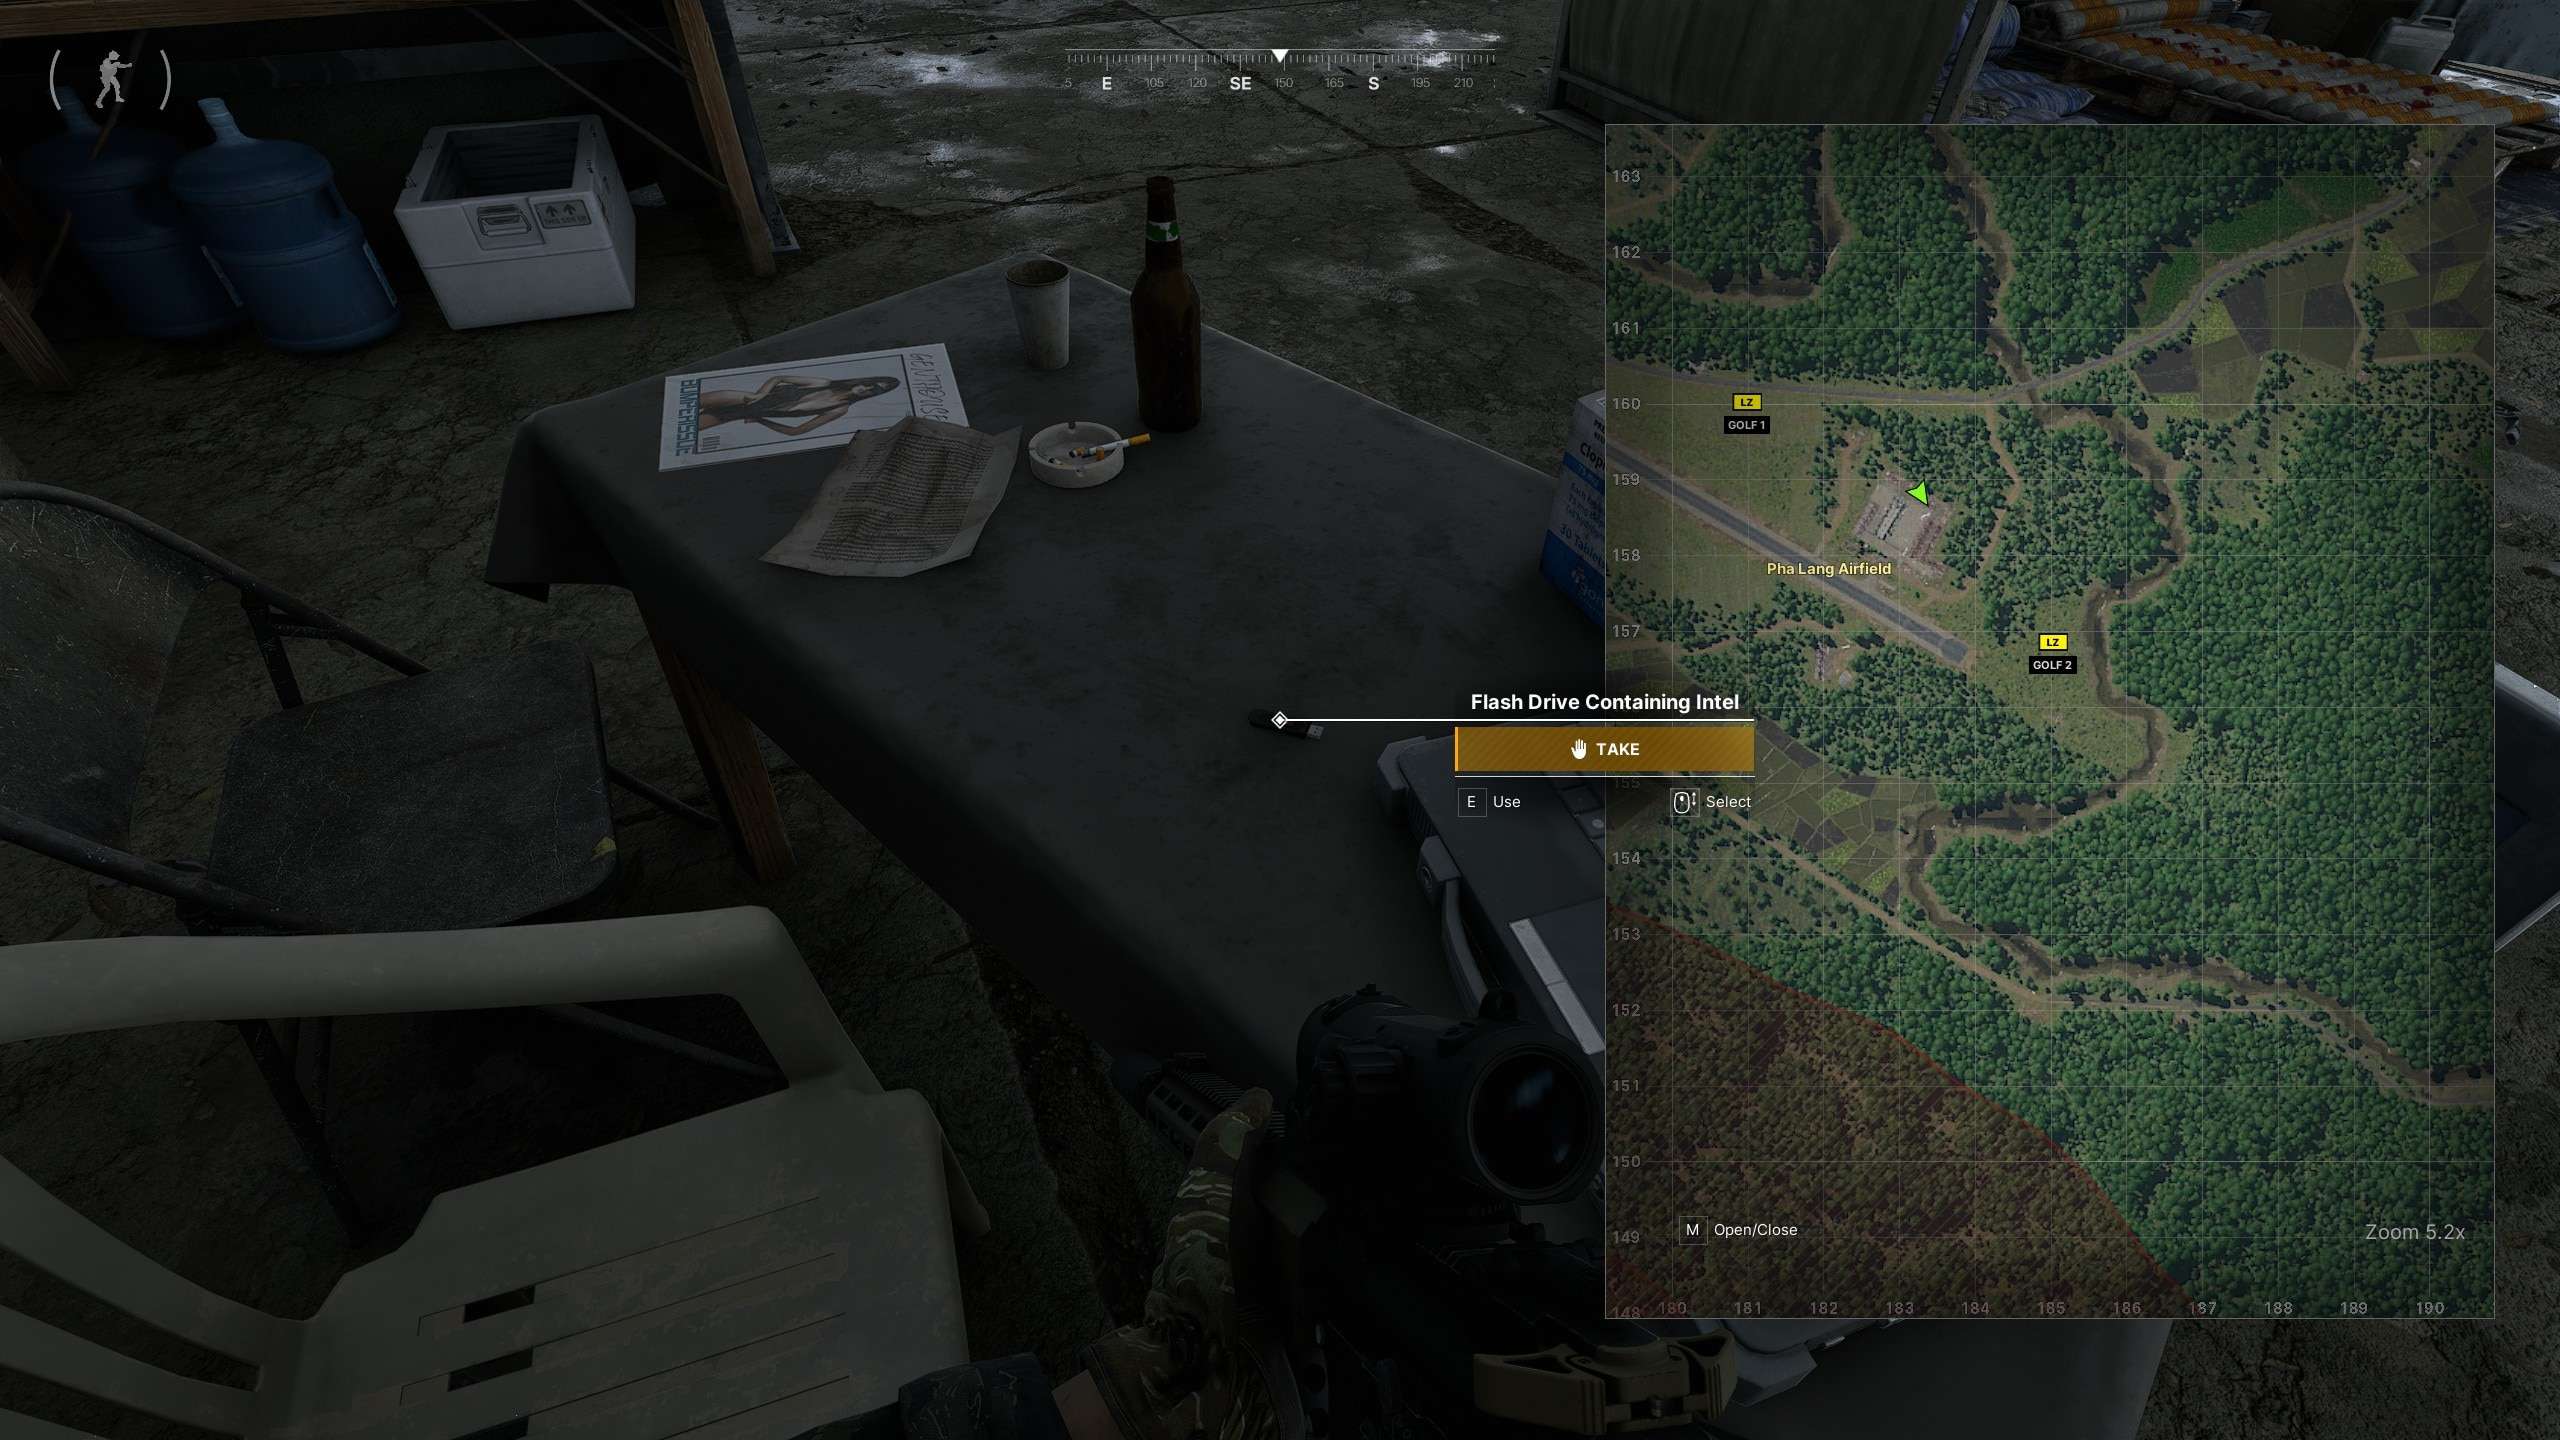
Business Or Pleasure
Business Or Pleasure
- Its a flashdrive on a wooden table with a grey tarp covering it next to a small military laptop – 183 158
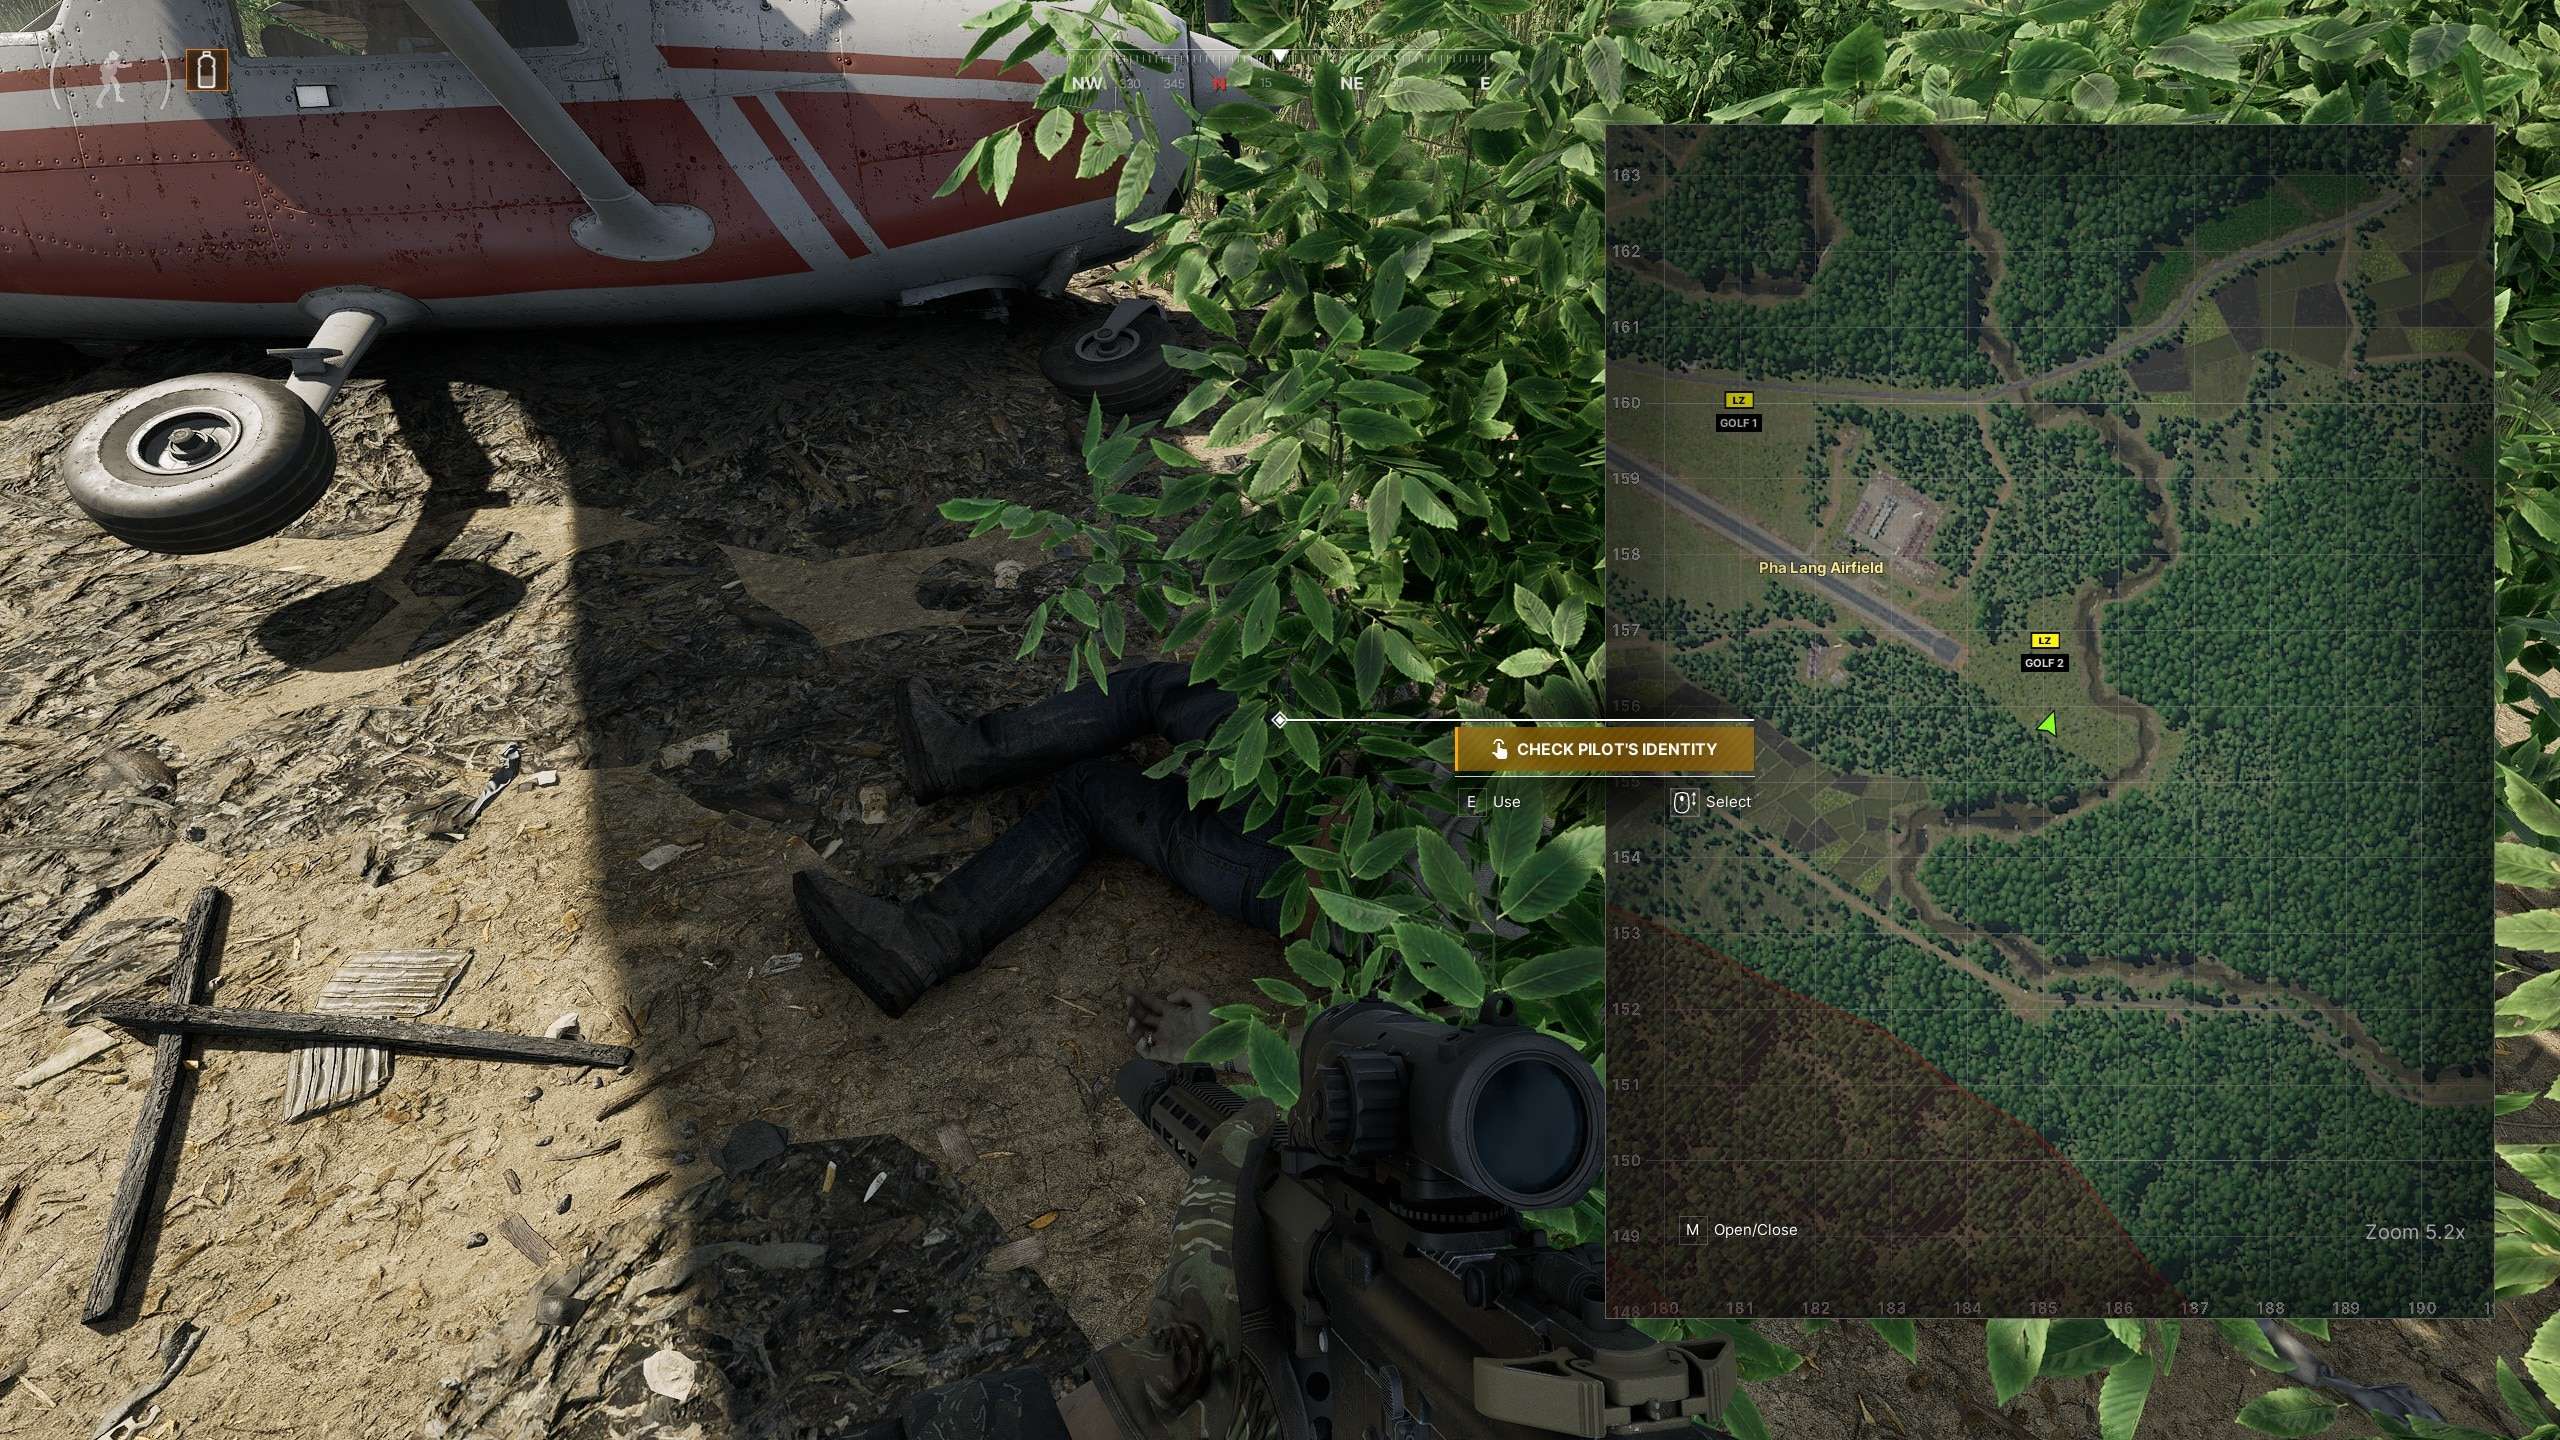
Last Flight
Last Flight
- There’s a plane crash and you need to interact with the pilots body – 185 155
W.I.P. Below!
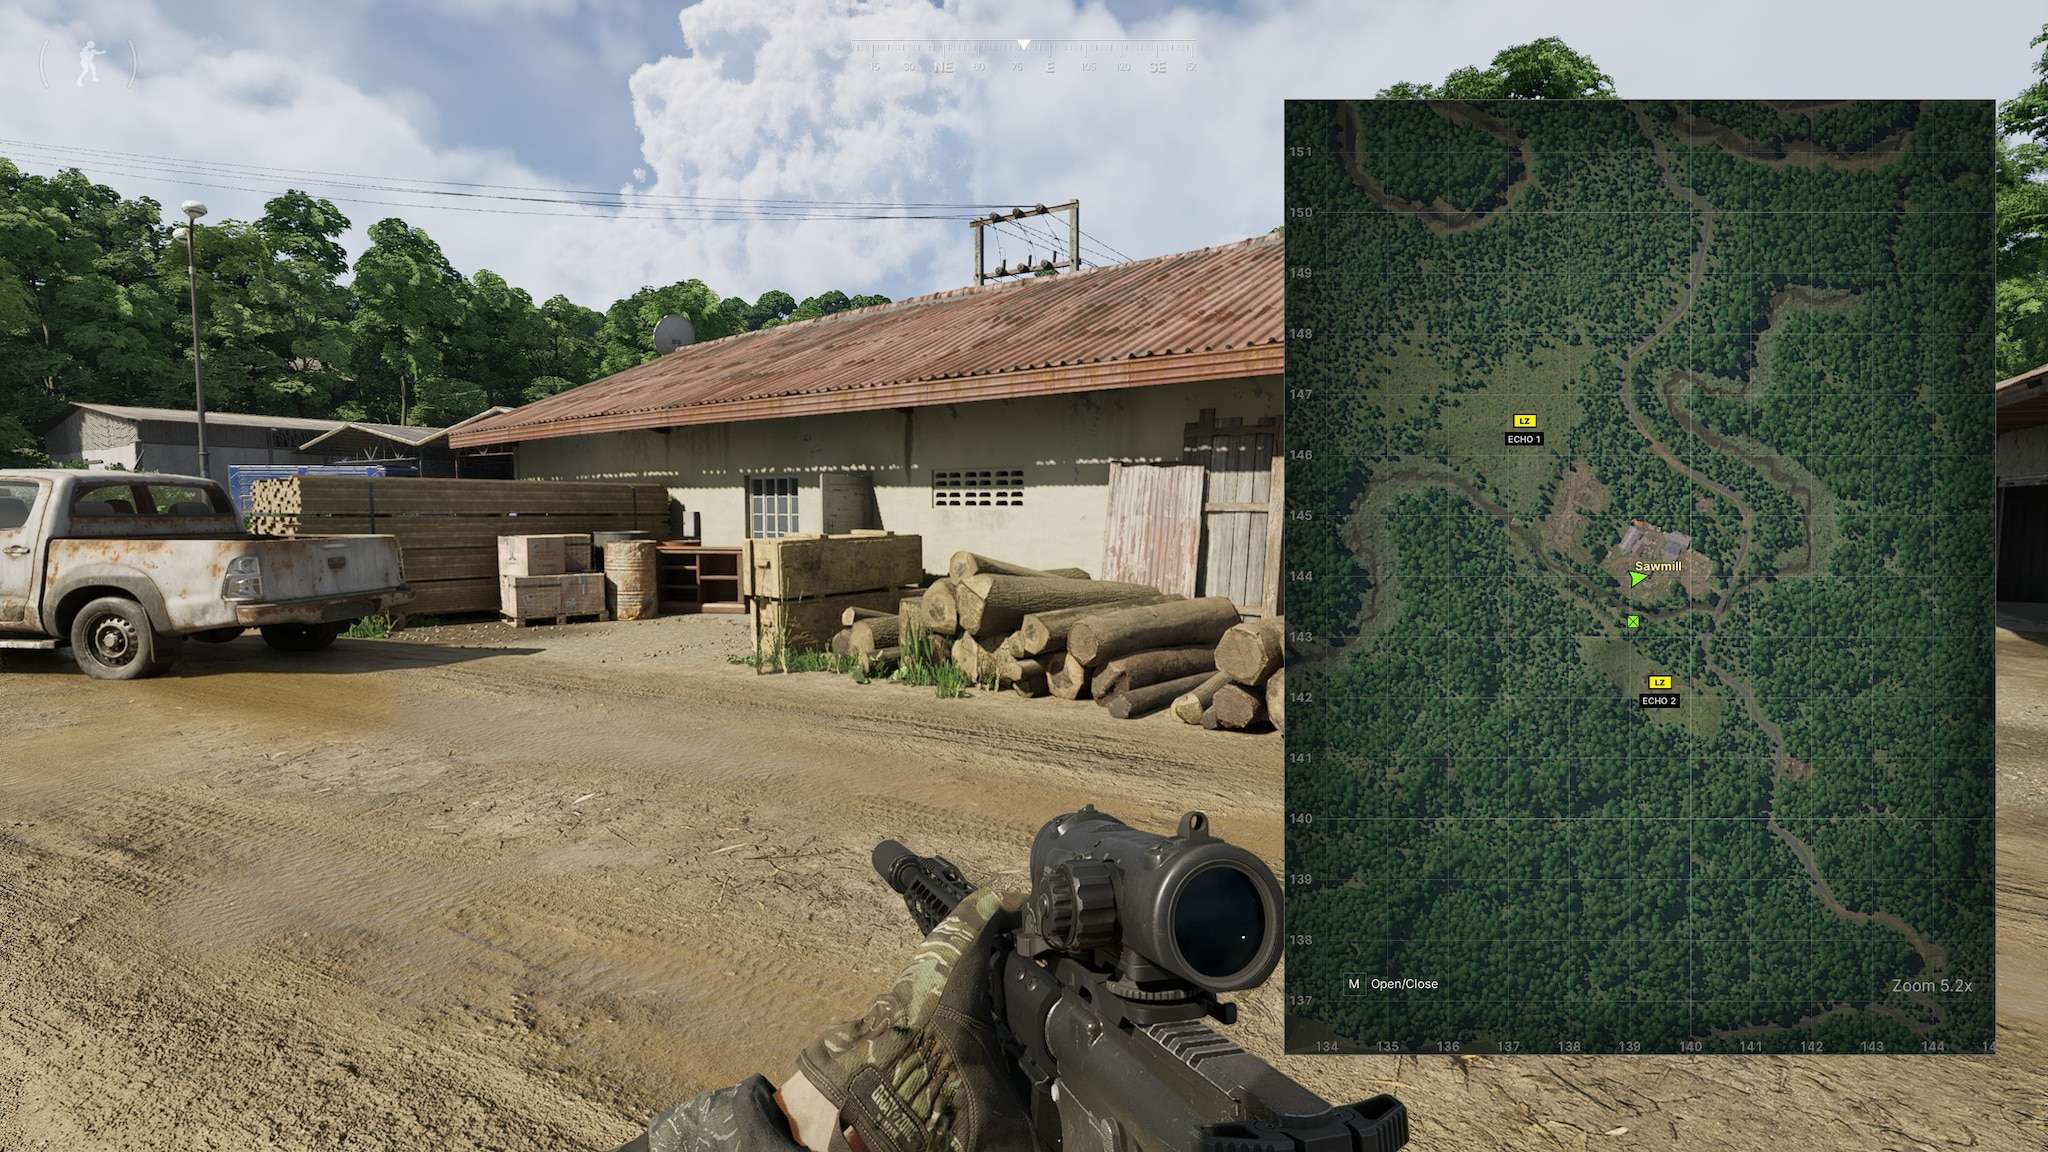
I Went, I Saw, I Conquered I
I went I saw I conquered – 138 143
I Went, I Saw, I Conquered II
I Went, I Saw, I Conquered II
If you’re trying to complete the task in the Sawmill, just start moving around all the buildings in the area. Keep exploring and you’ll eventually get it done. And hey, while you’re at it, keep an eye out for keys ’cause they might lead you to some sweet loot rooms.
When A Tree Falls
When a Tree Falls – 138 143
Fuel Shortage
Fuel Shortage – 139 144
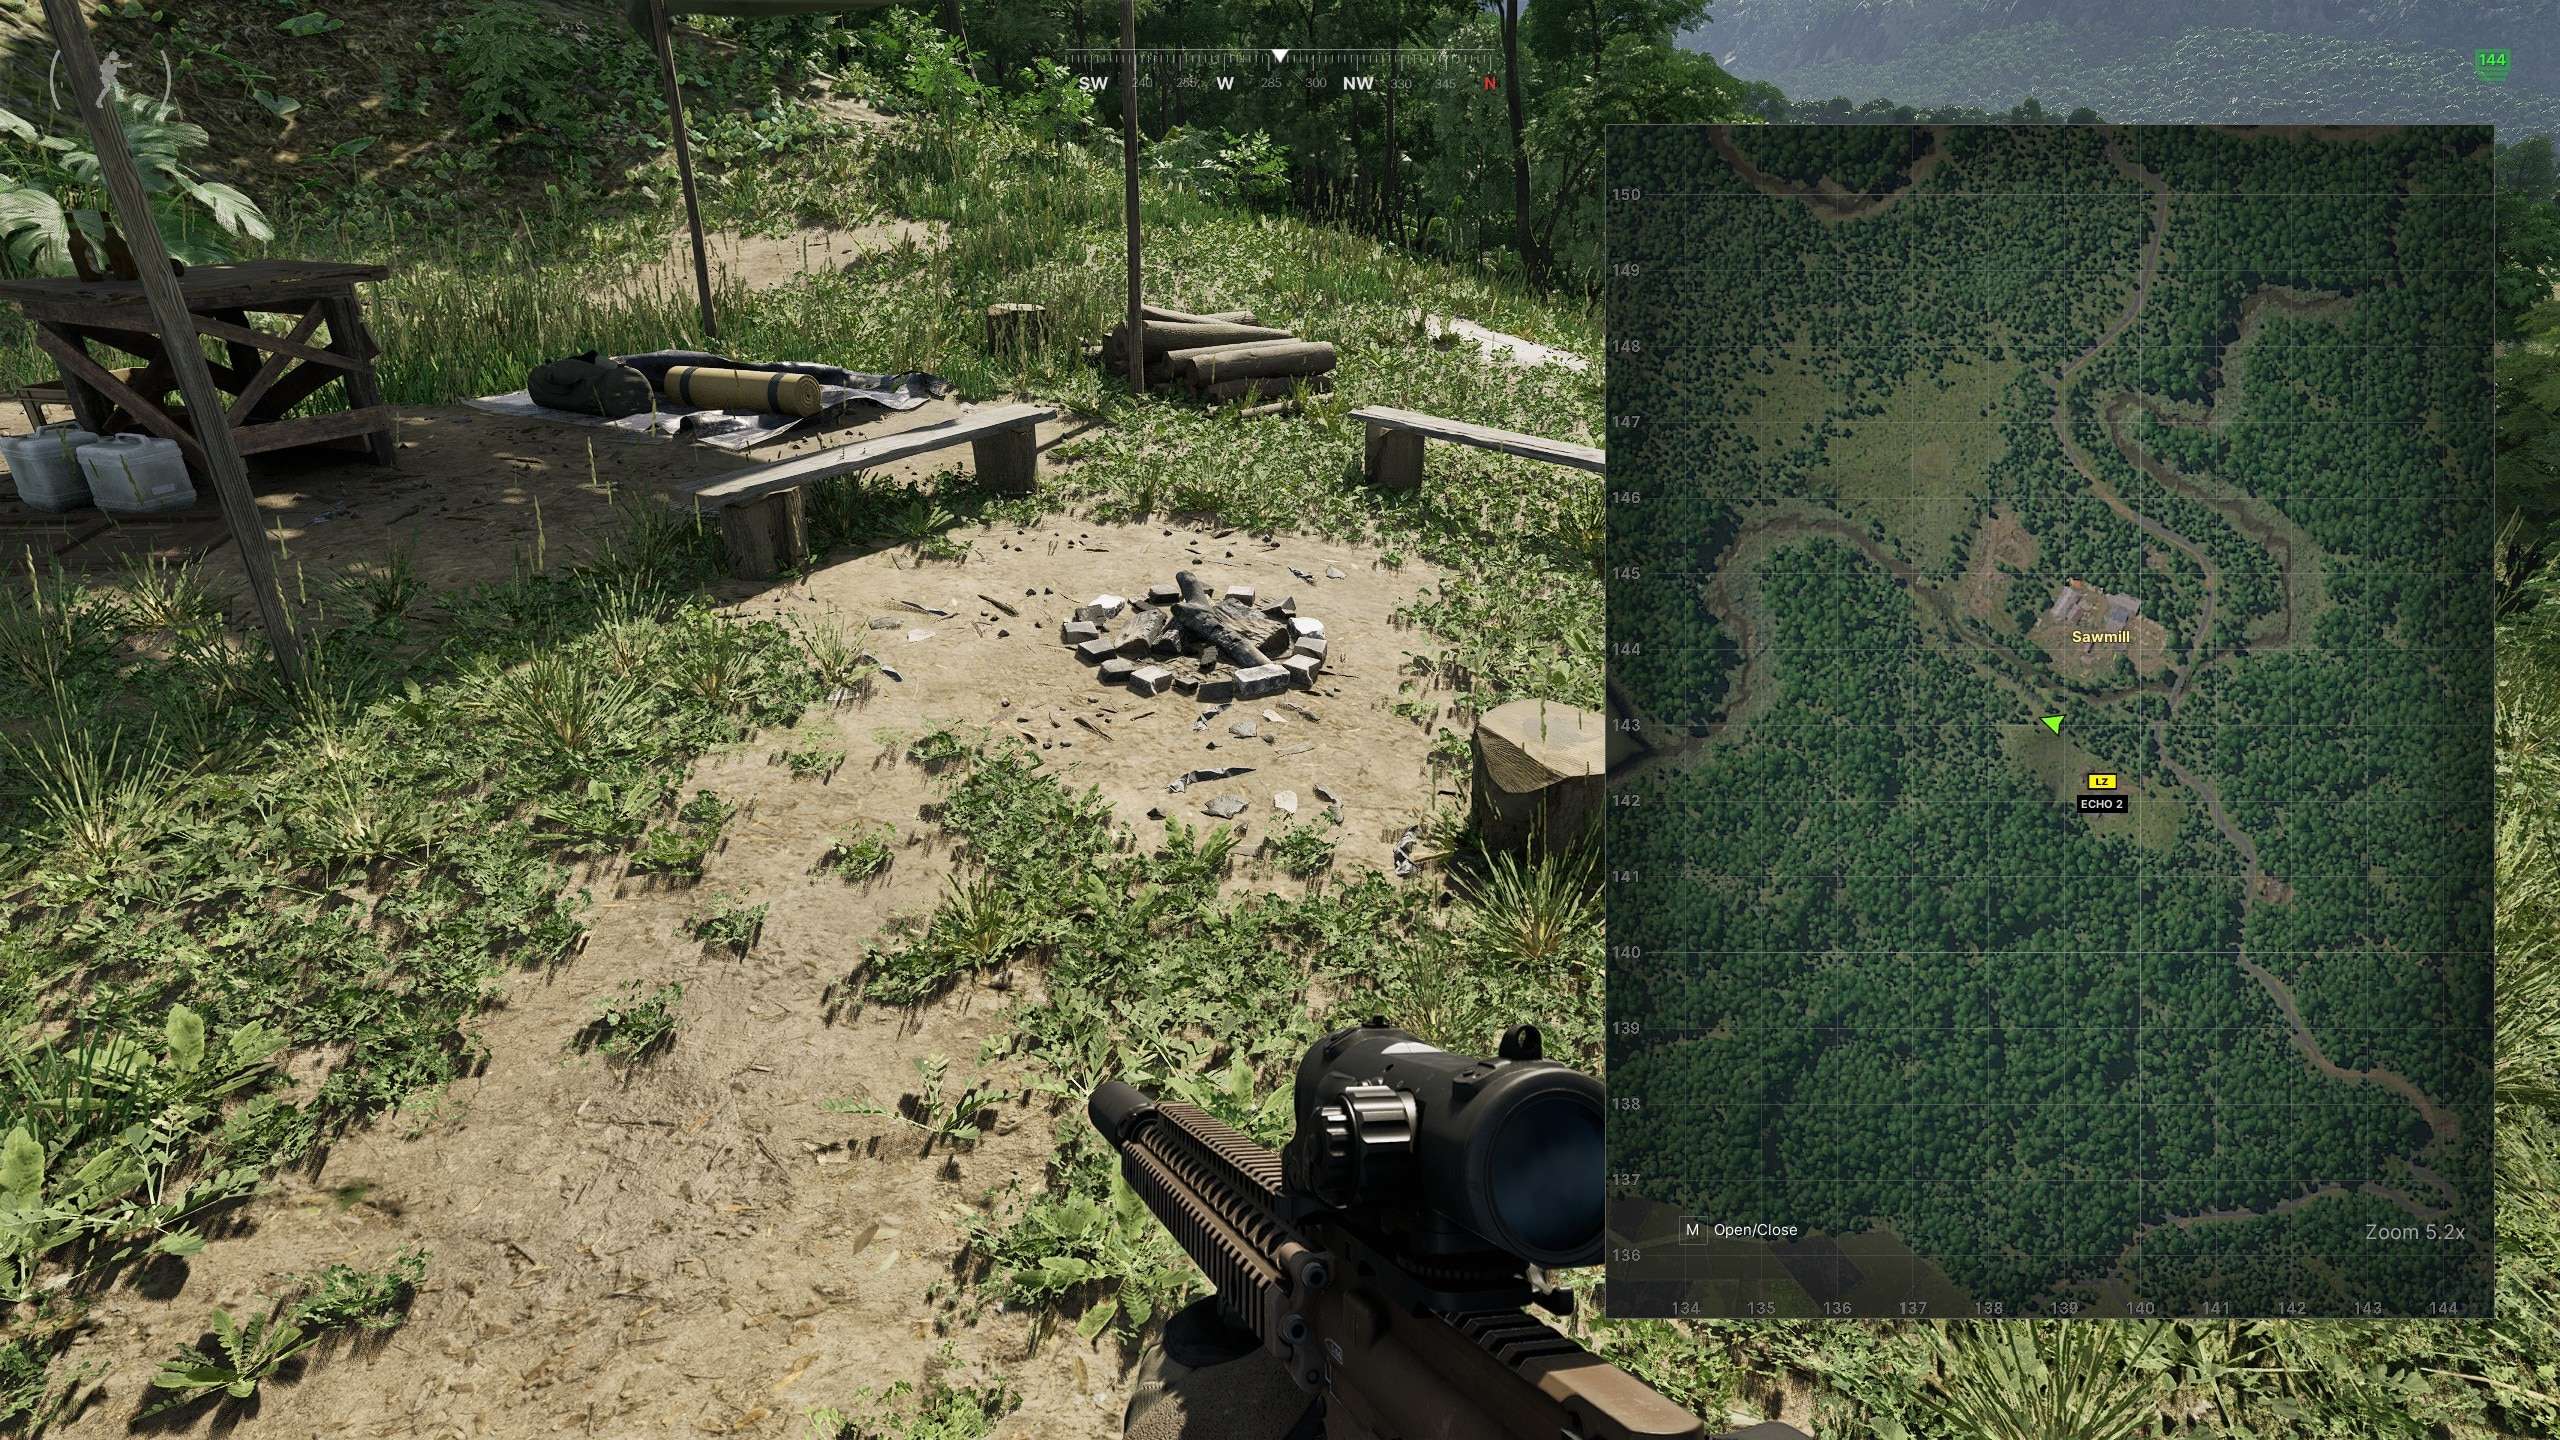
I Went, I Saw, I Conquered III
???
Invaders From Afar
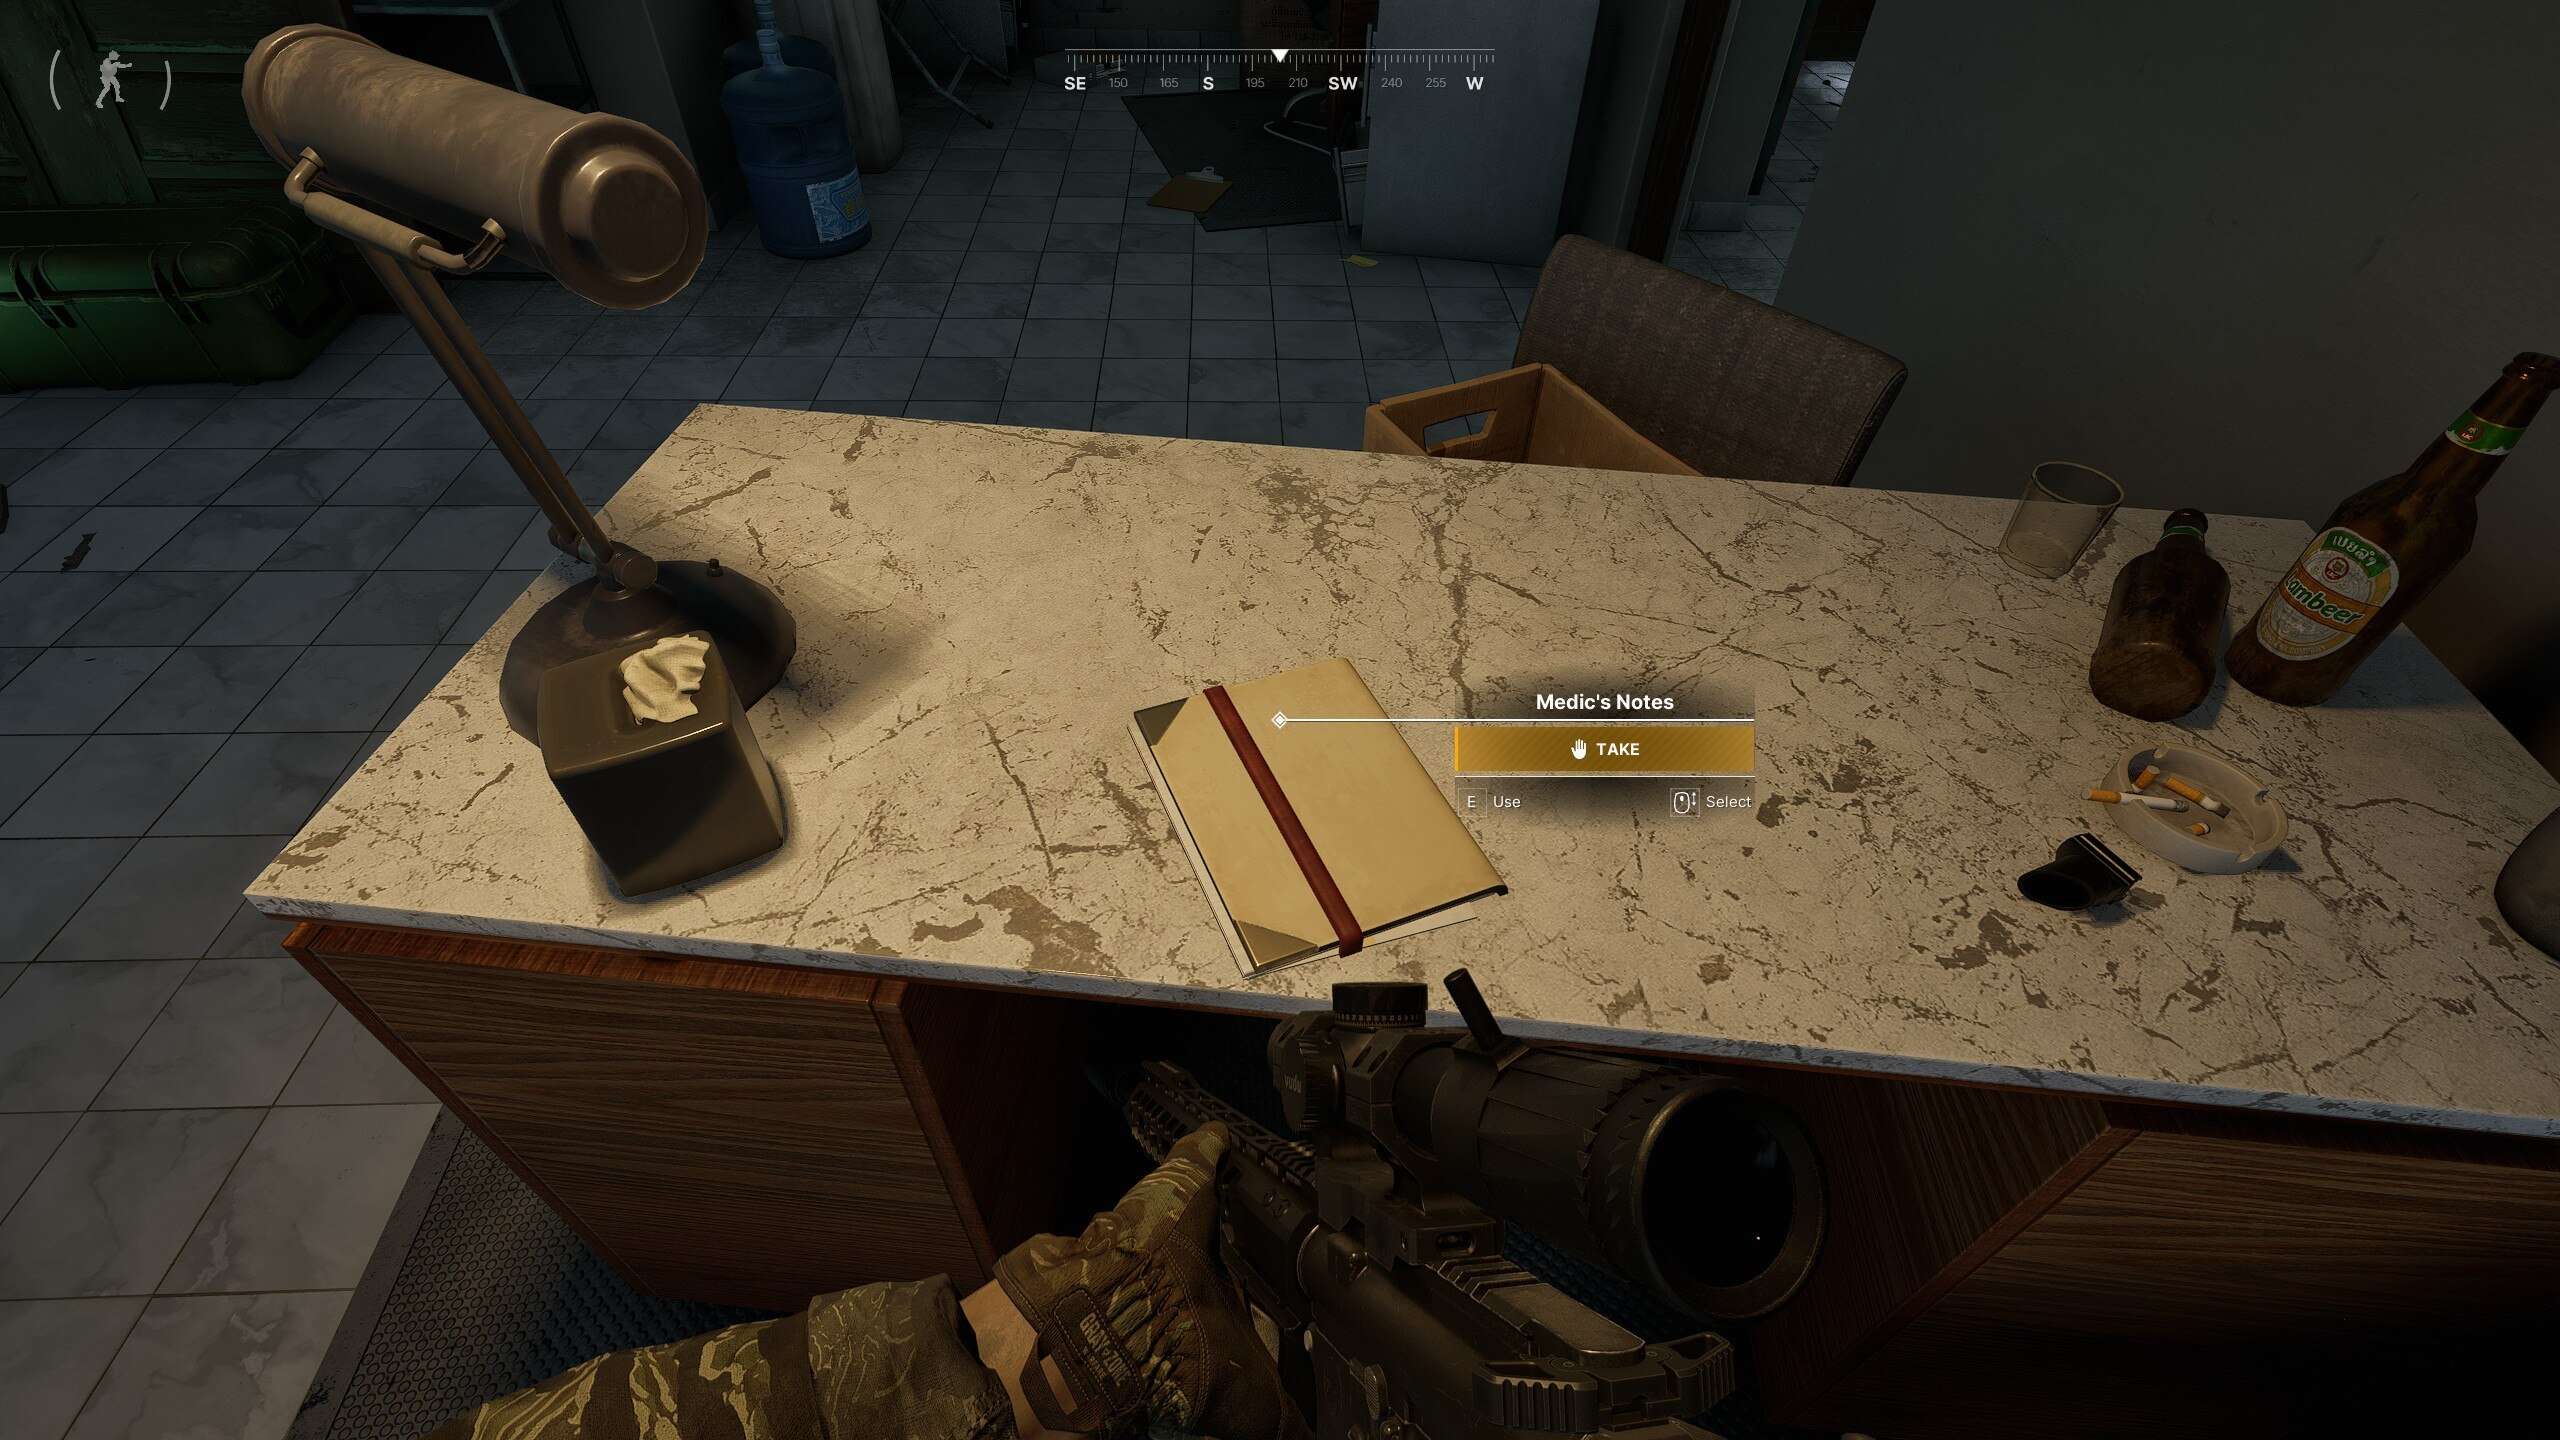
Lead location – 139 144
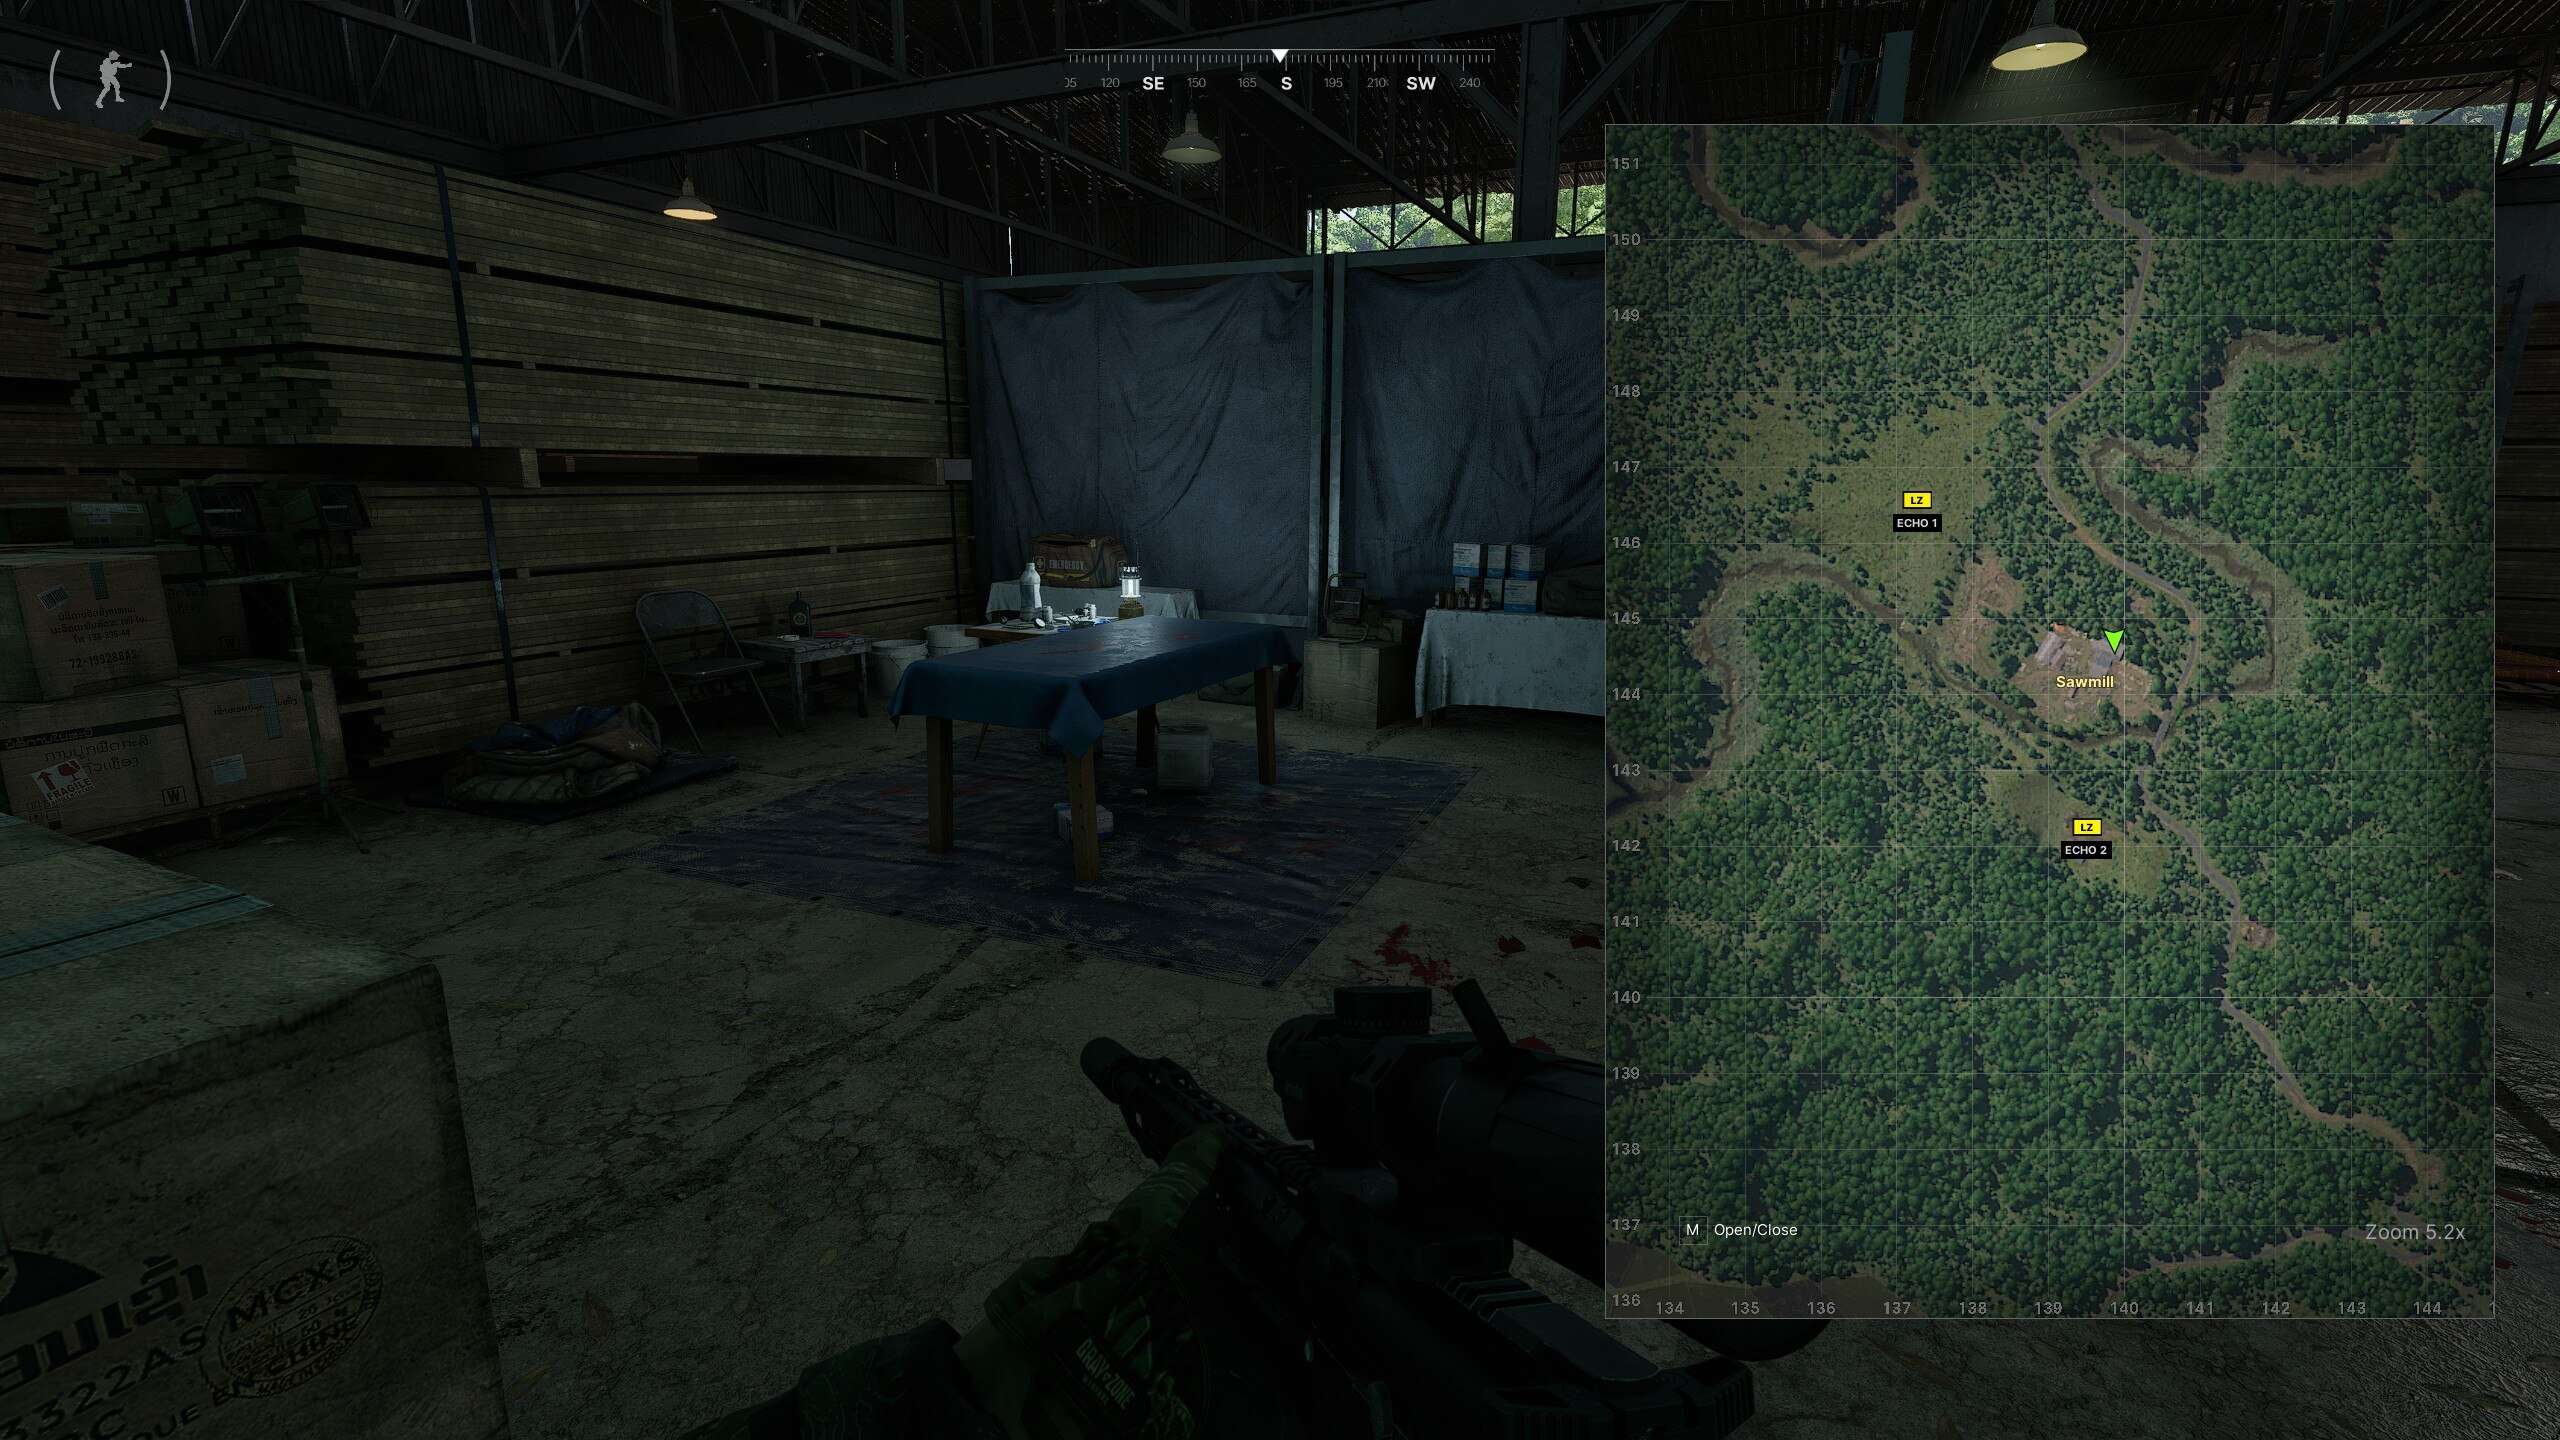
Medic’s Note – 139 144
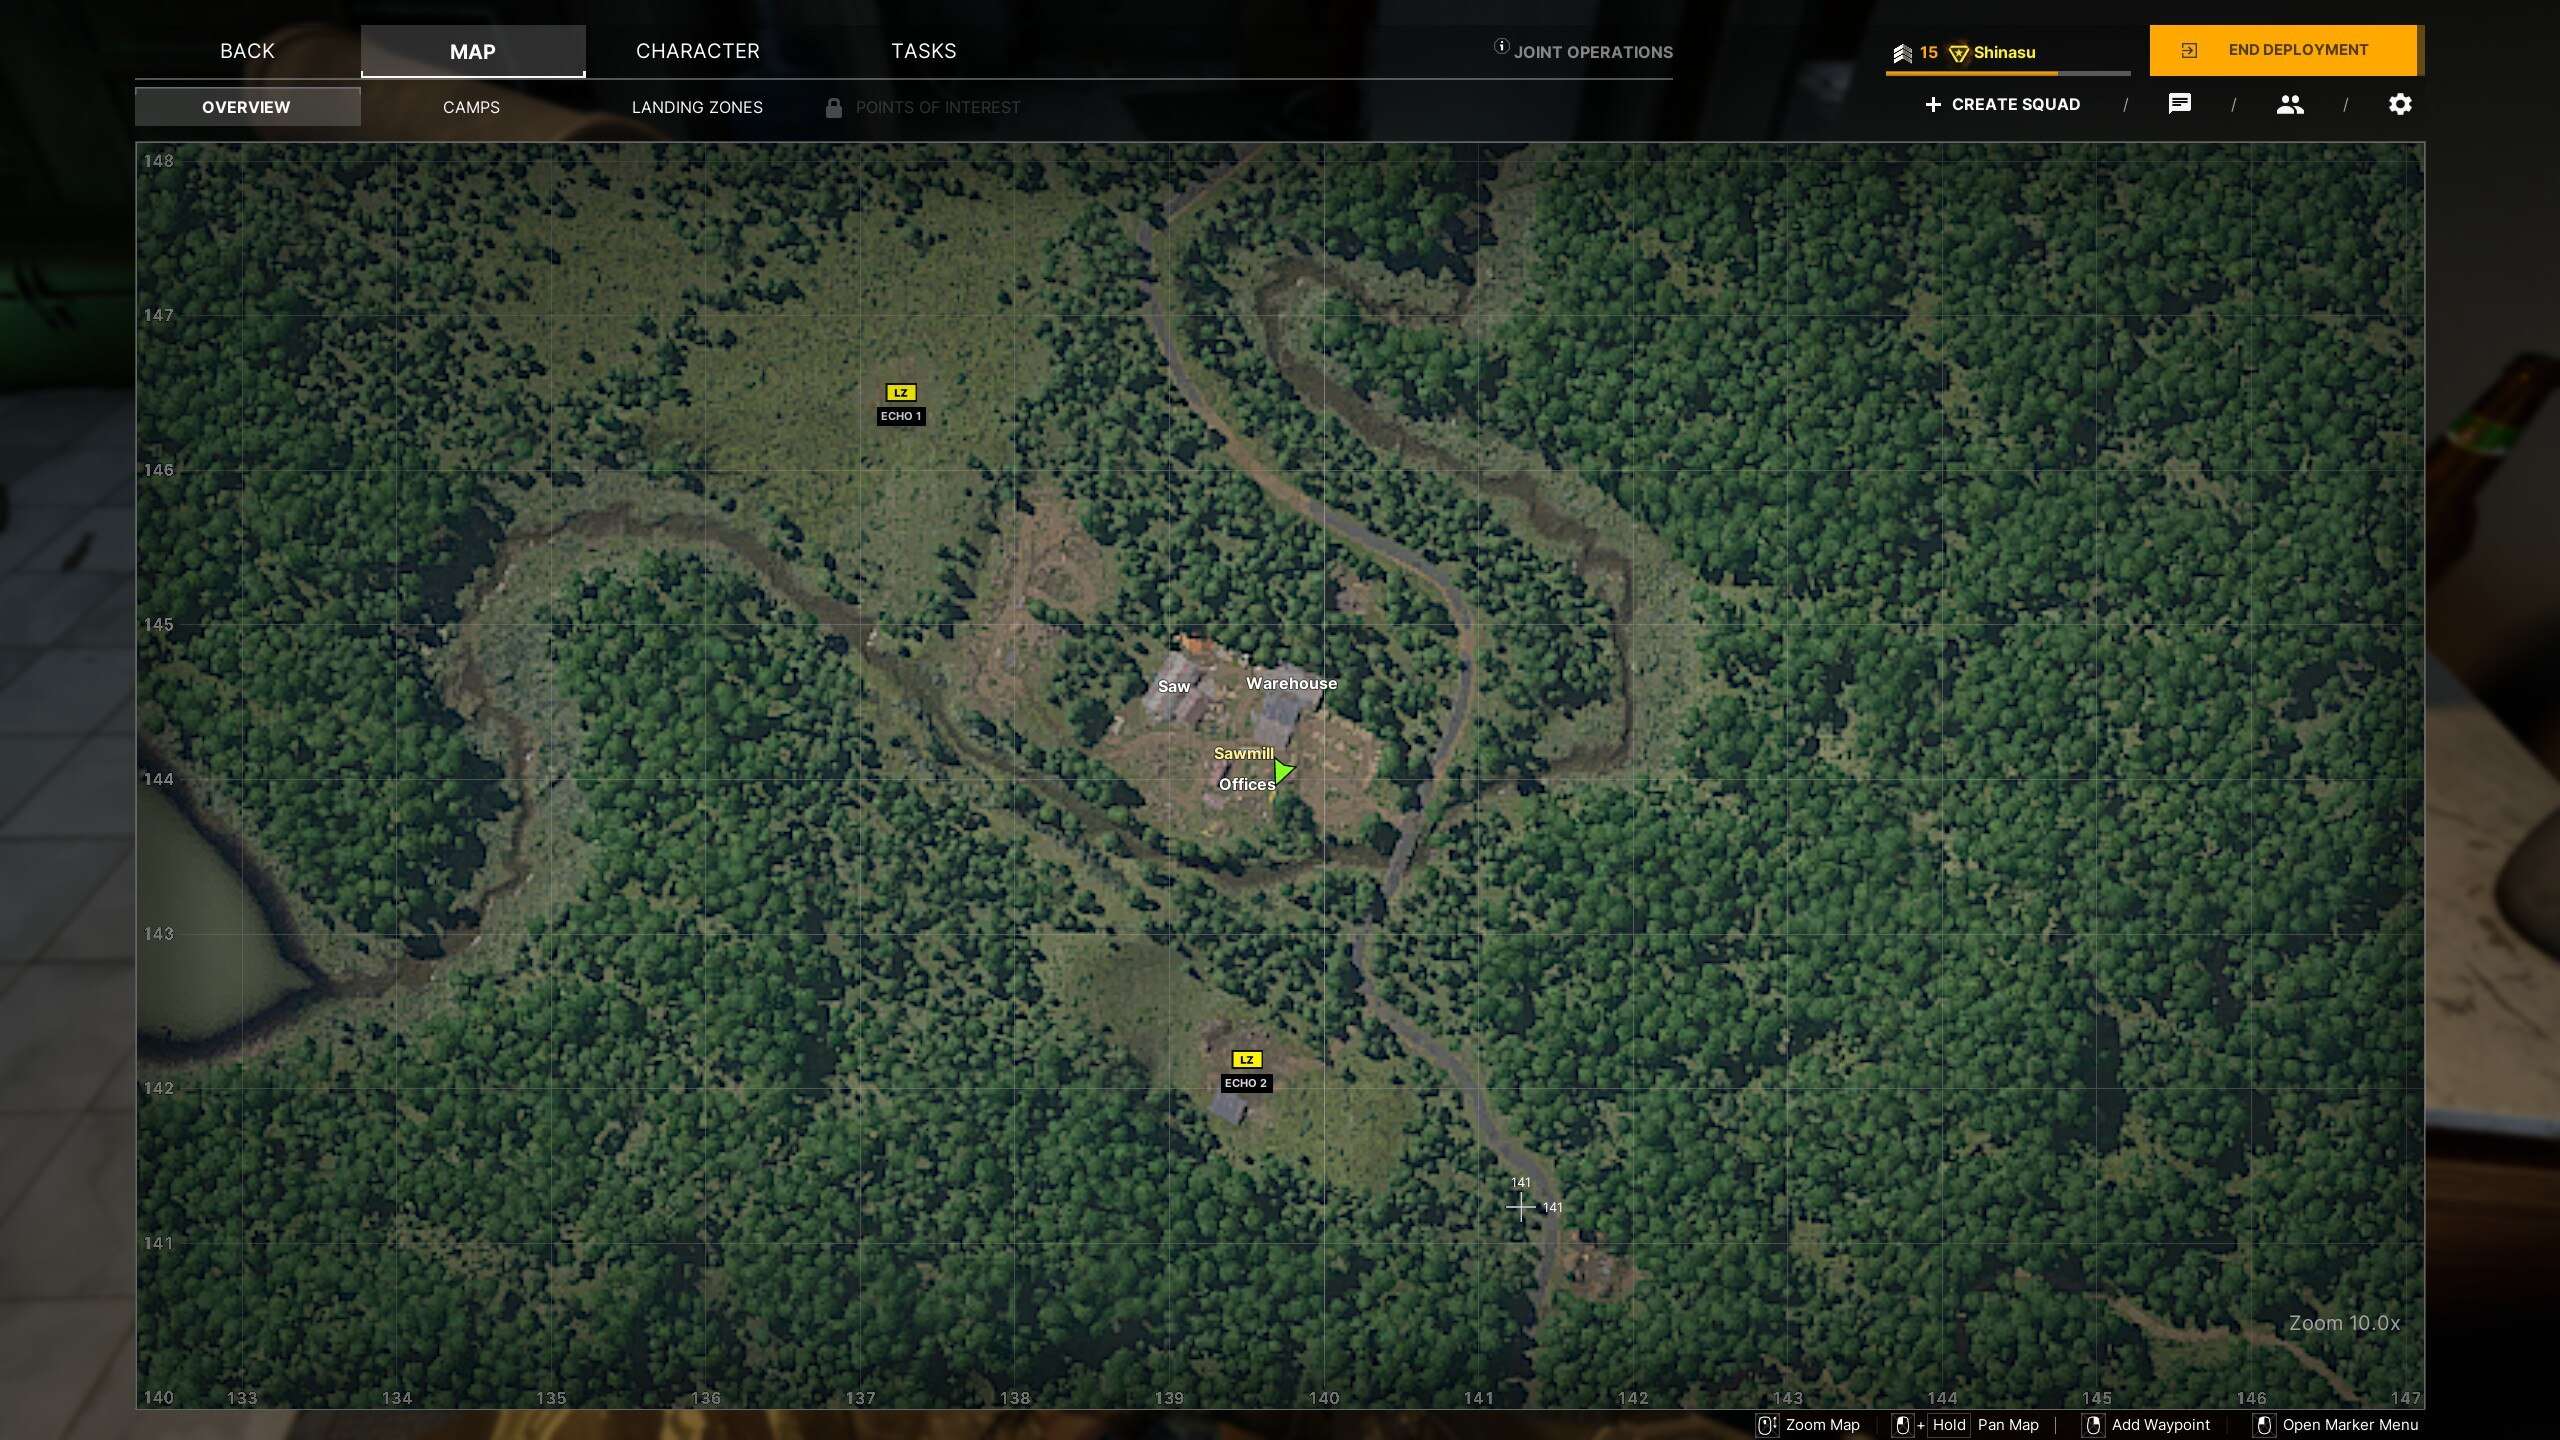
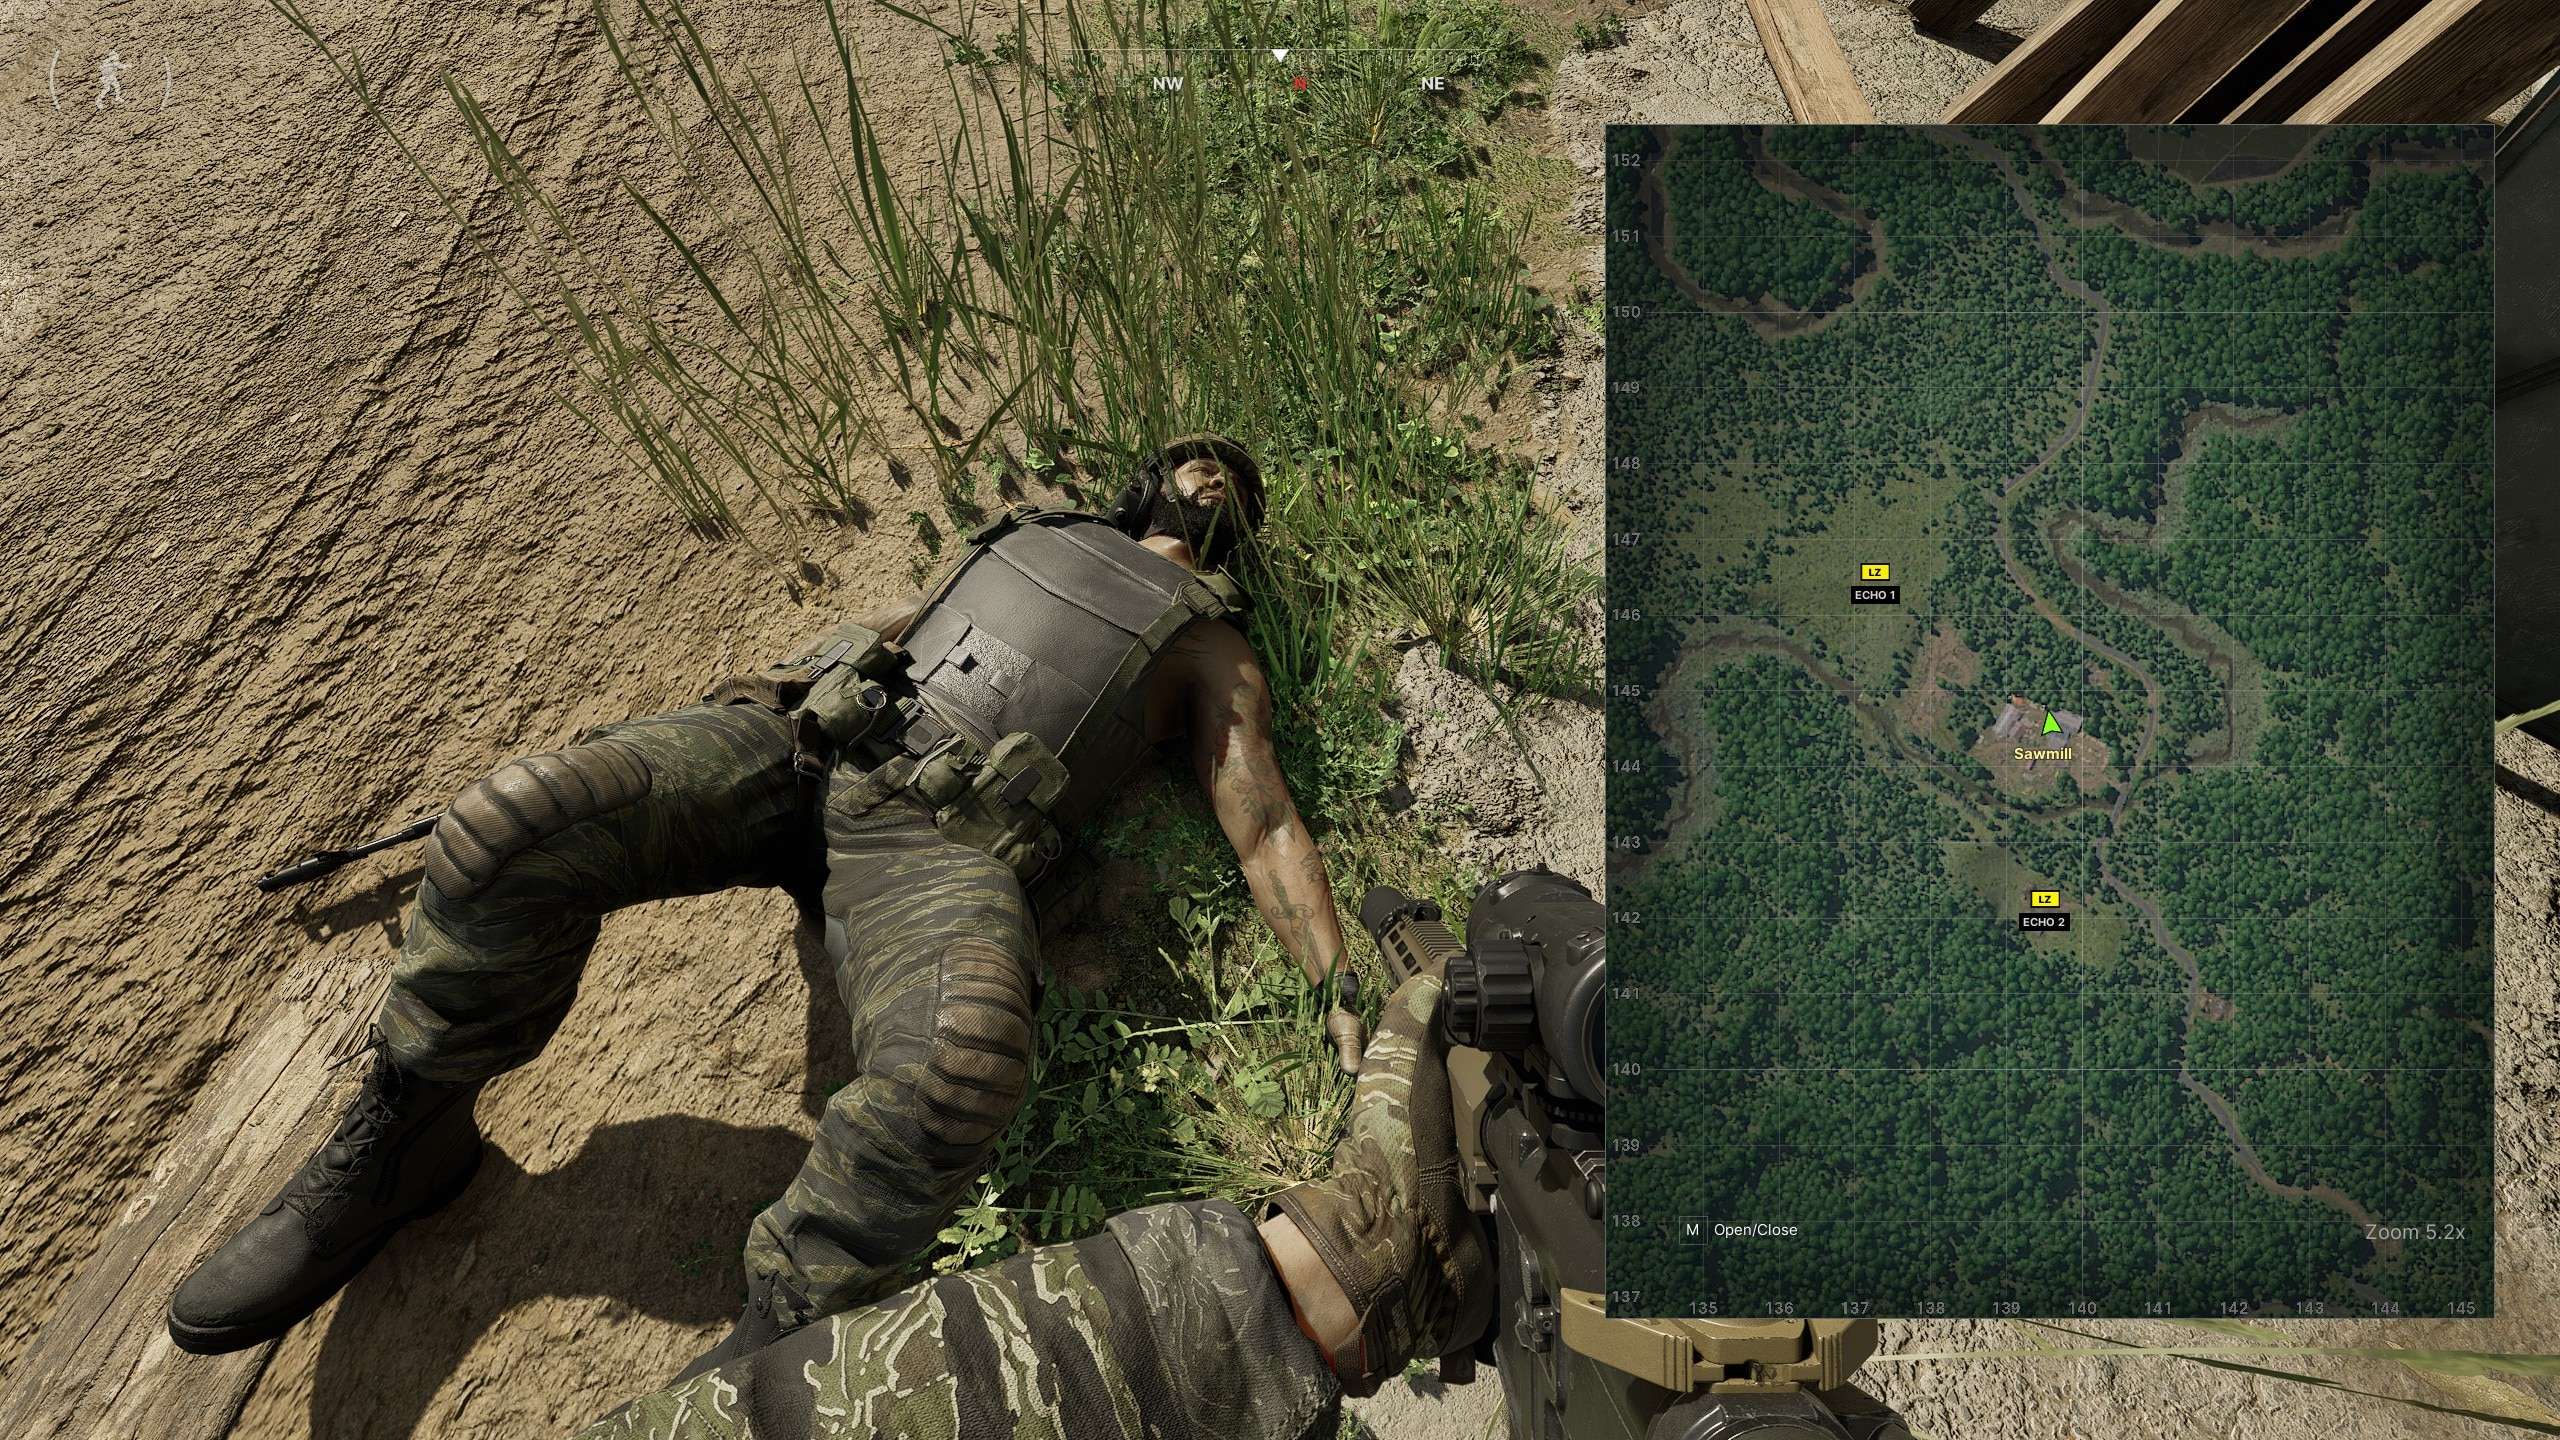
Timber
Timber – 139 144
The boss you’re after patrols the northeast and east areas of the Sawmill, including inside the large building in the northeast corner. If you’re looking to catch him off guard, try getting an angle from the overlook near LZ Echo 2 during his patrol. That should give you a good shot at taking him down.
Equipment view of the boss:
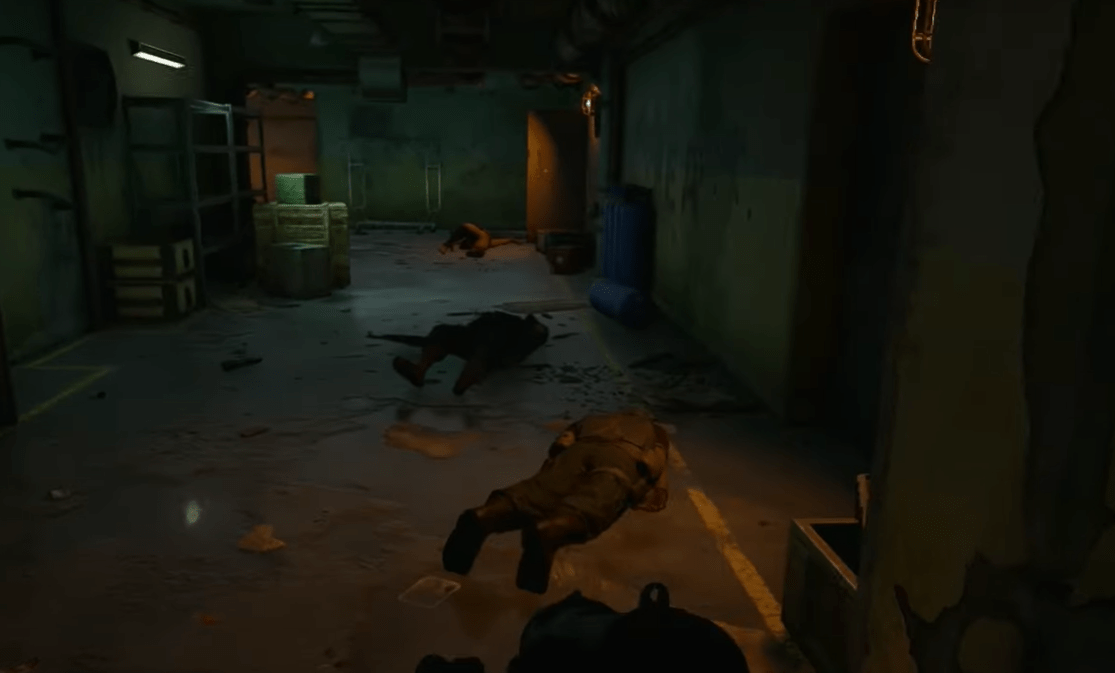
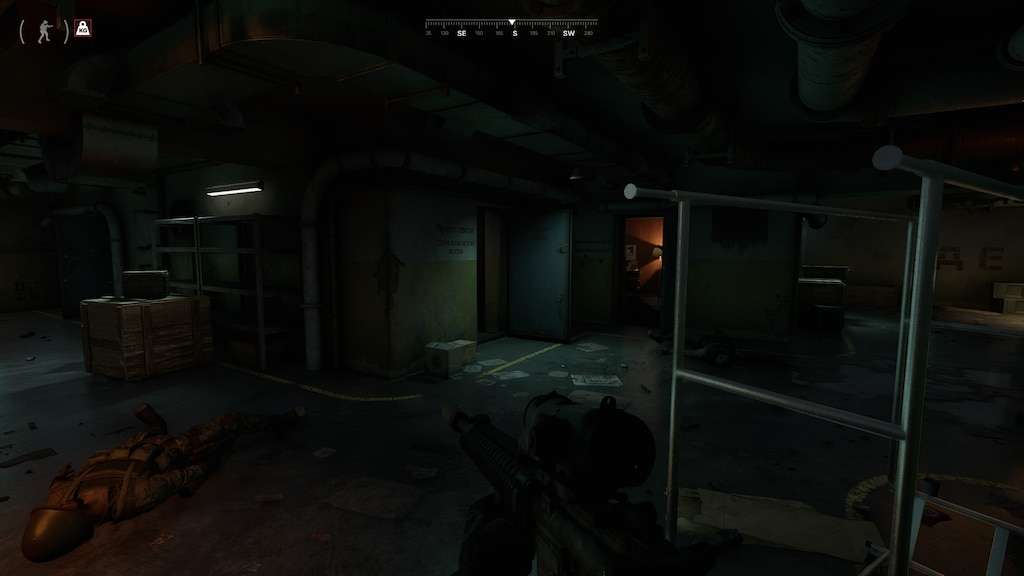
EOD
EOD location 139,144. Inside offices, Need SM OFC key

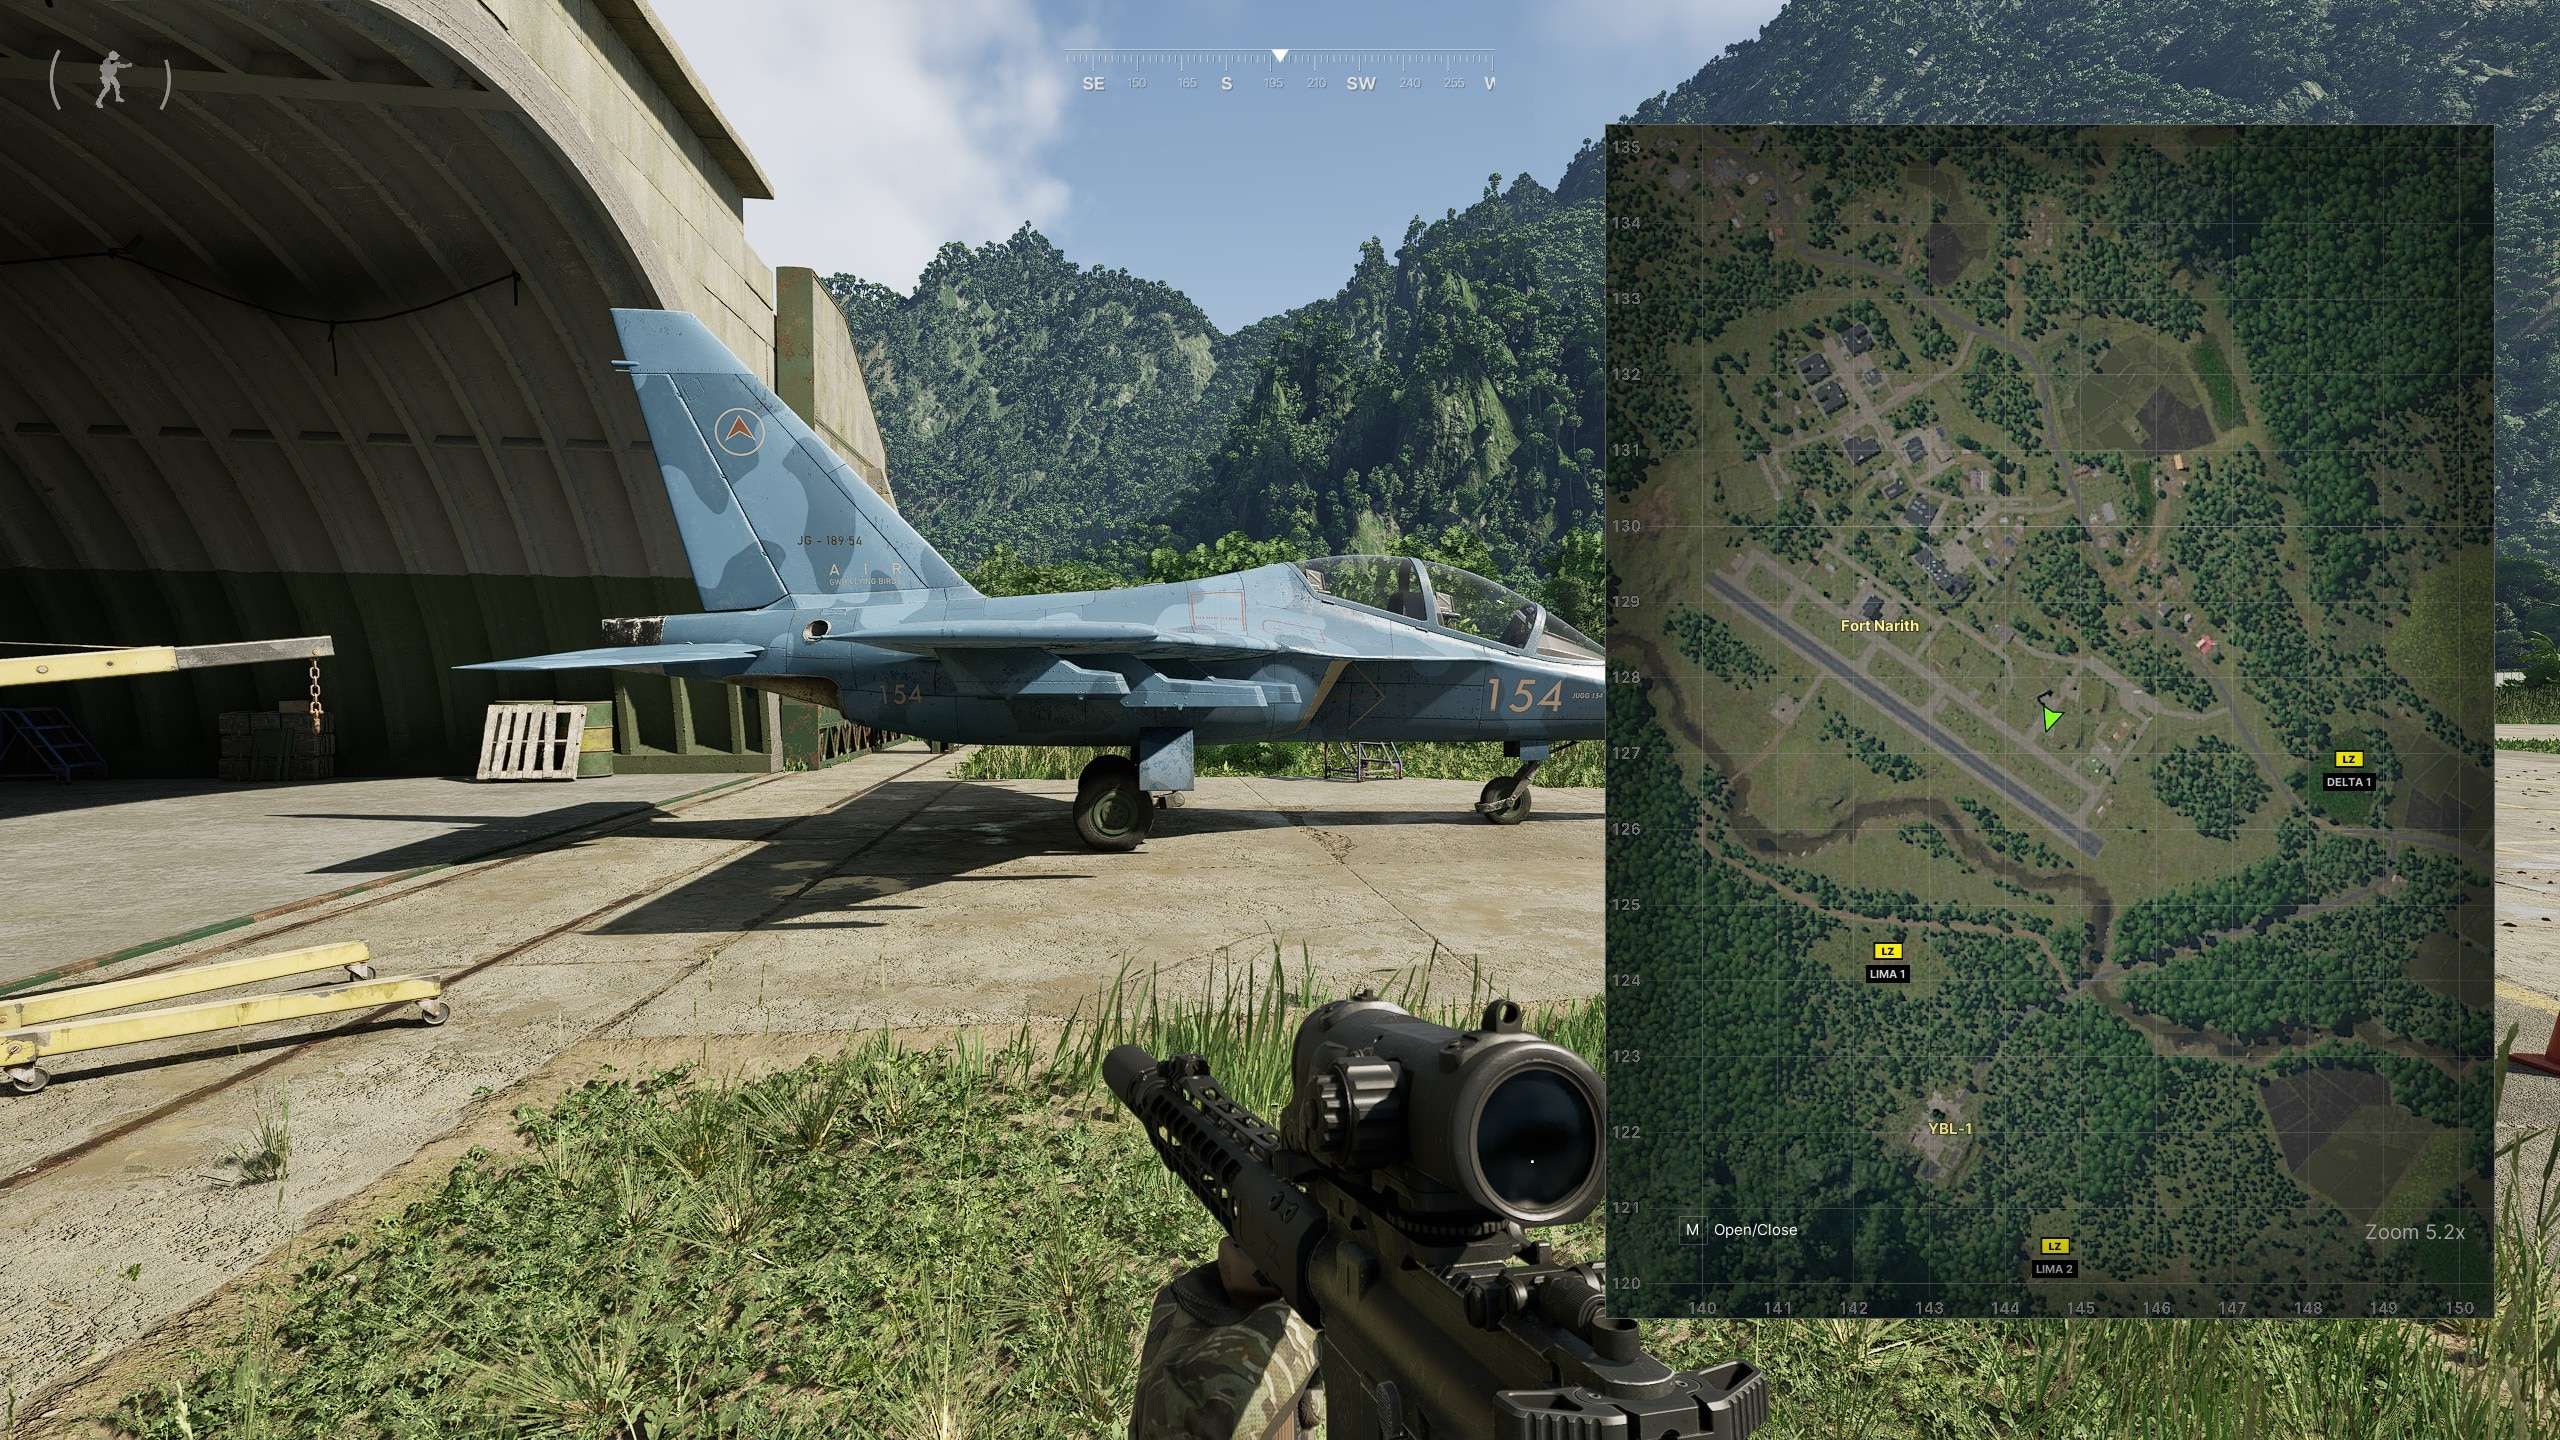
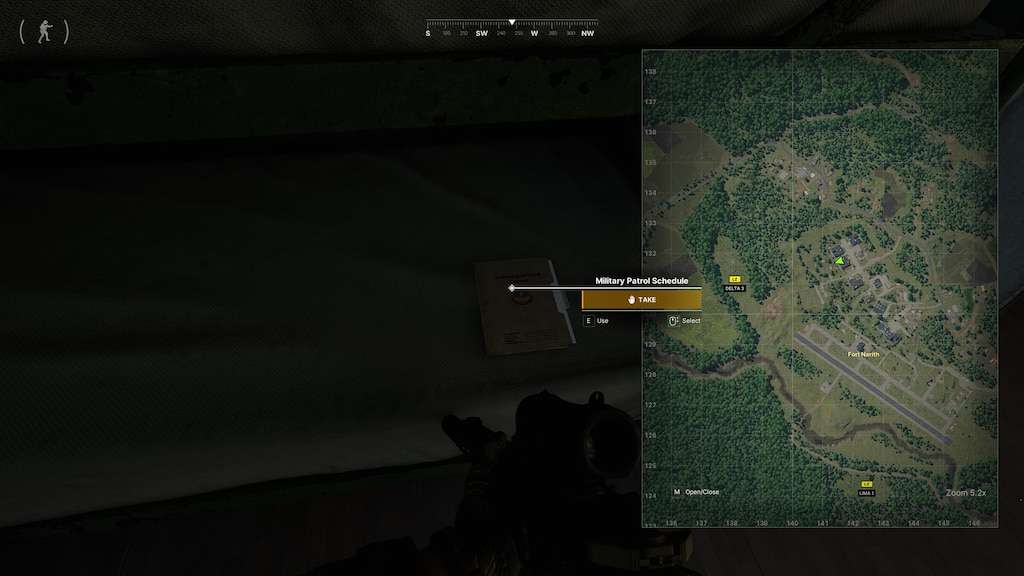
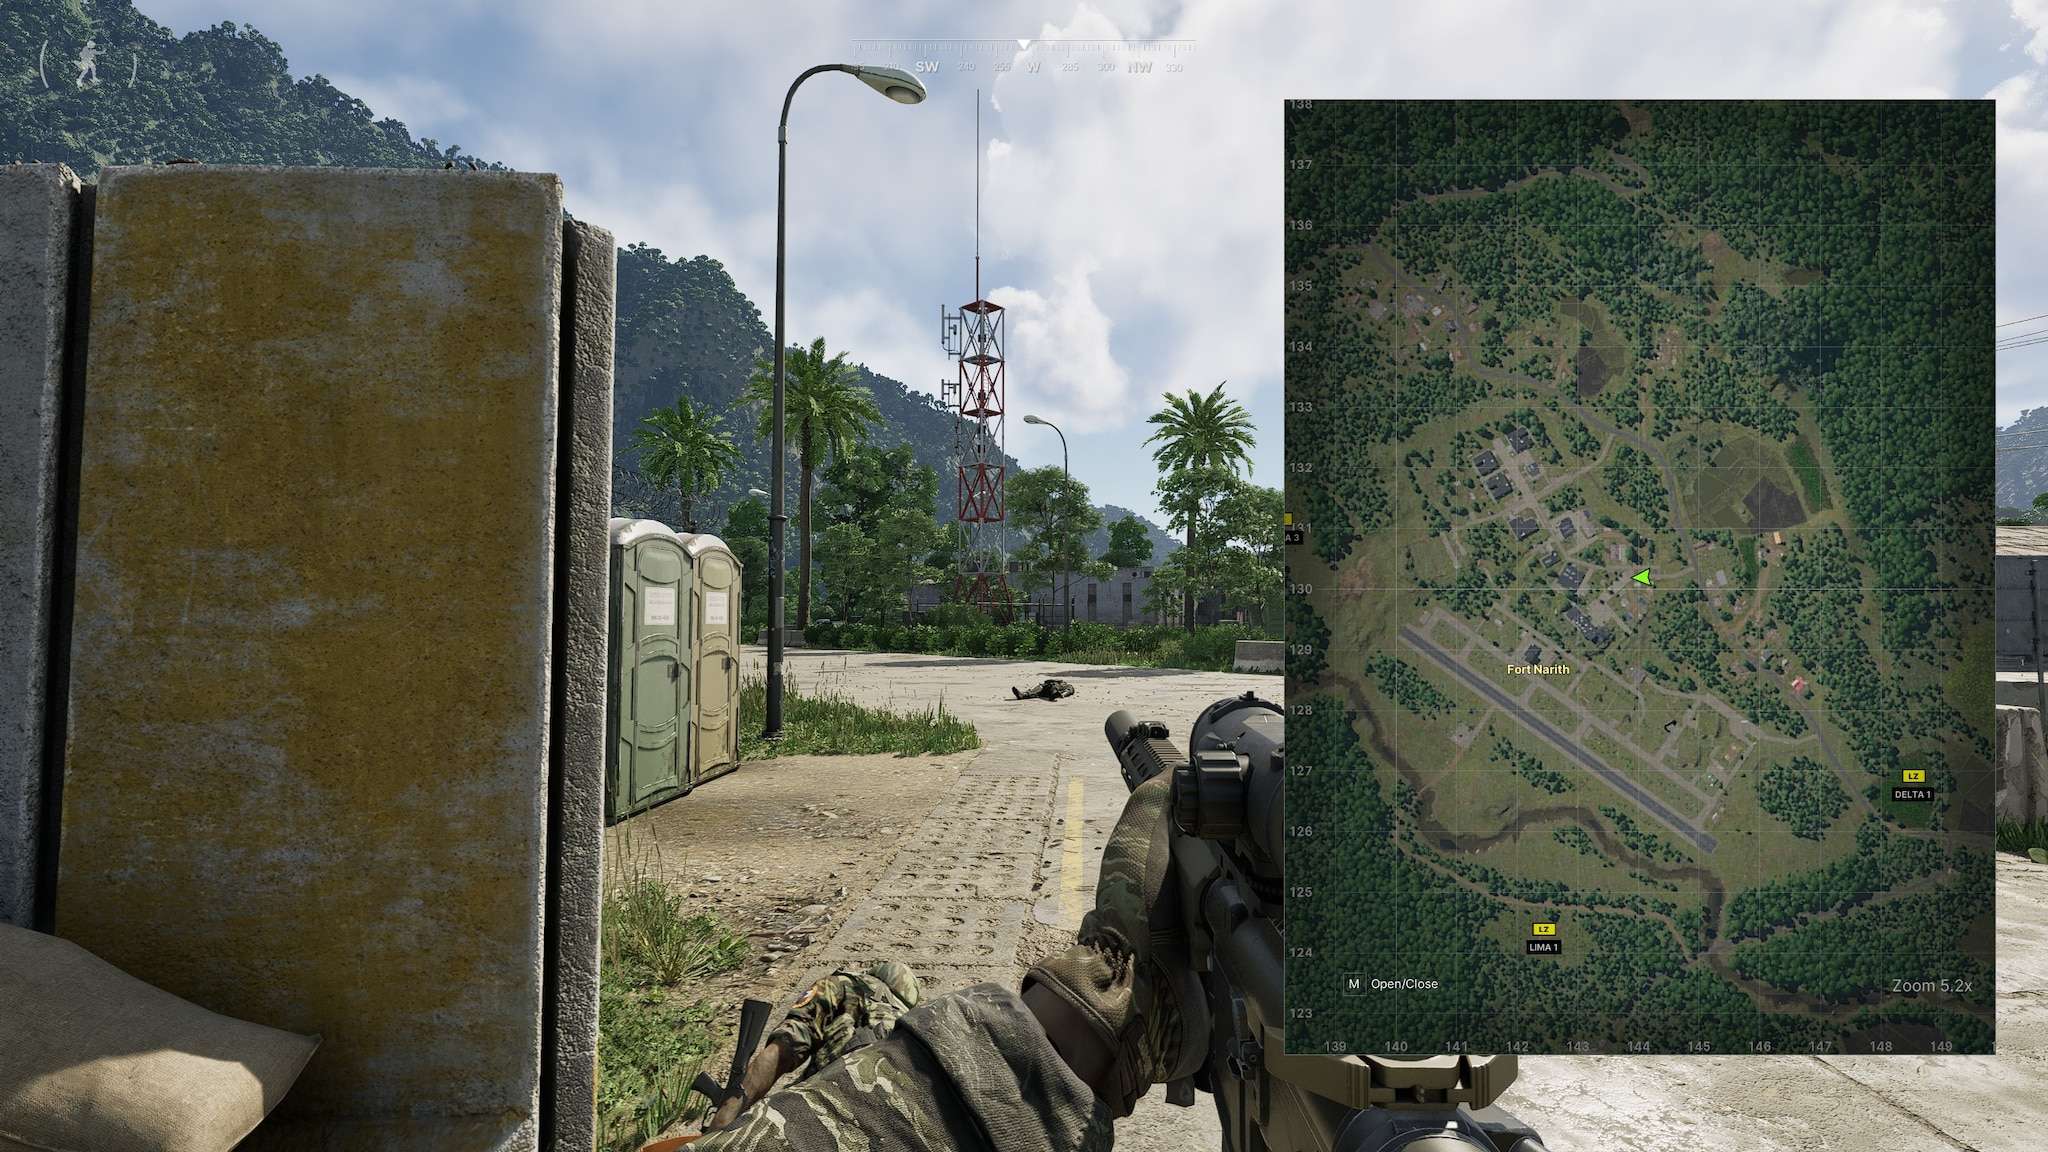
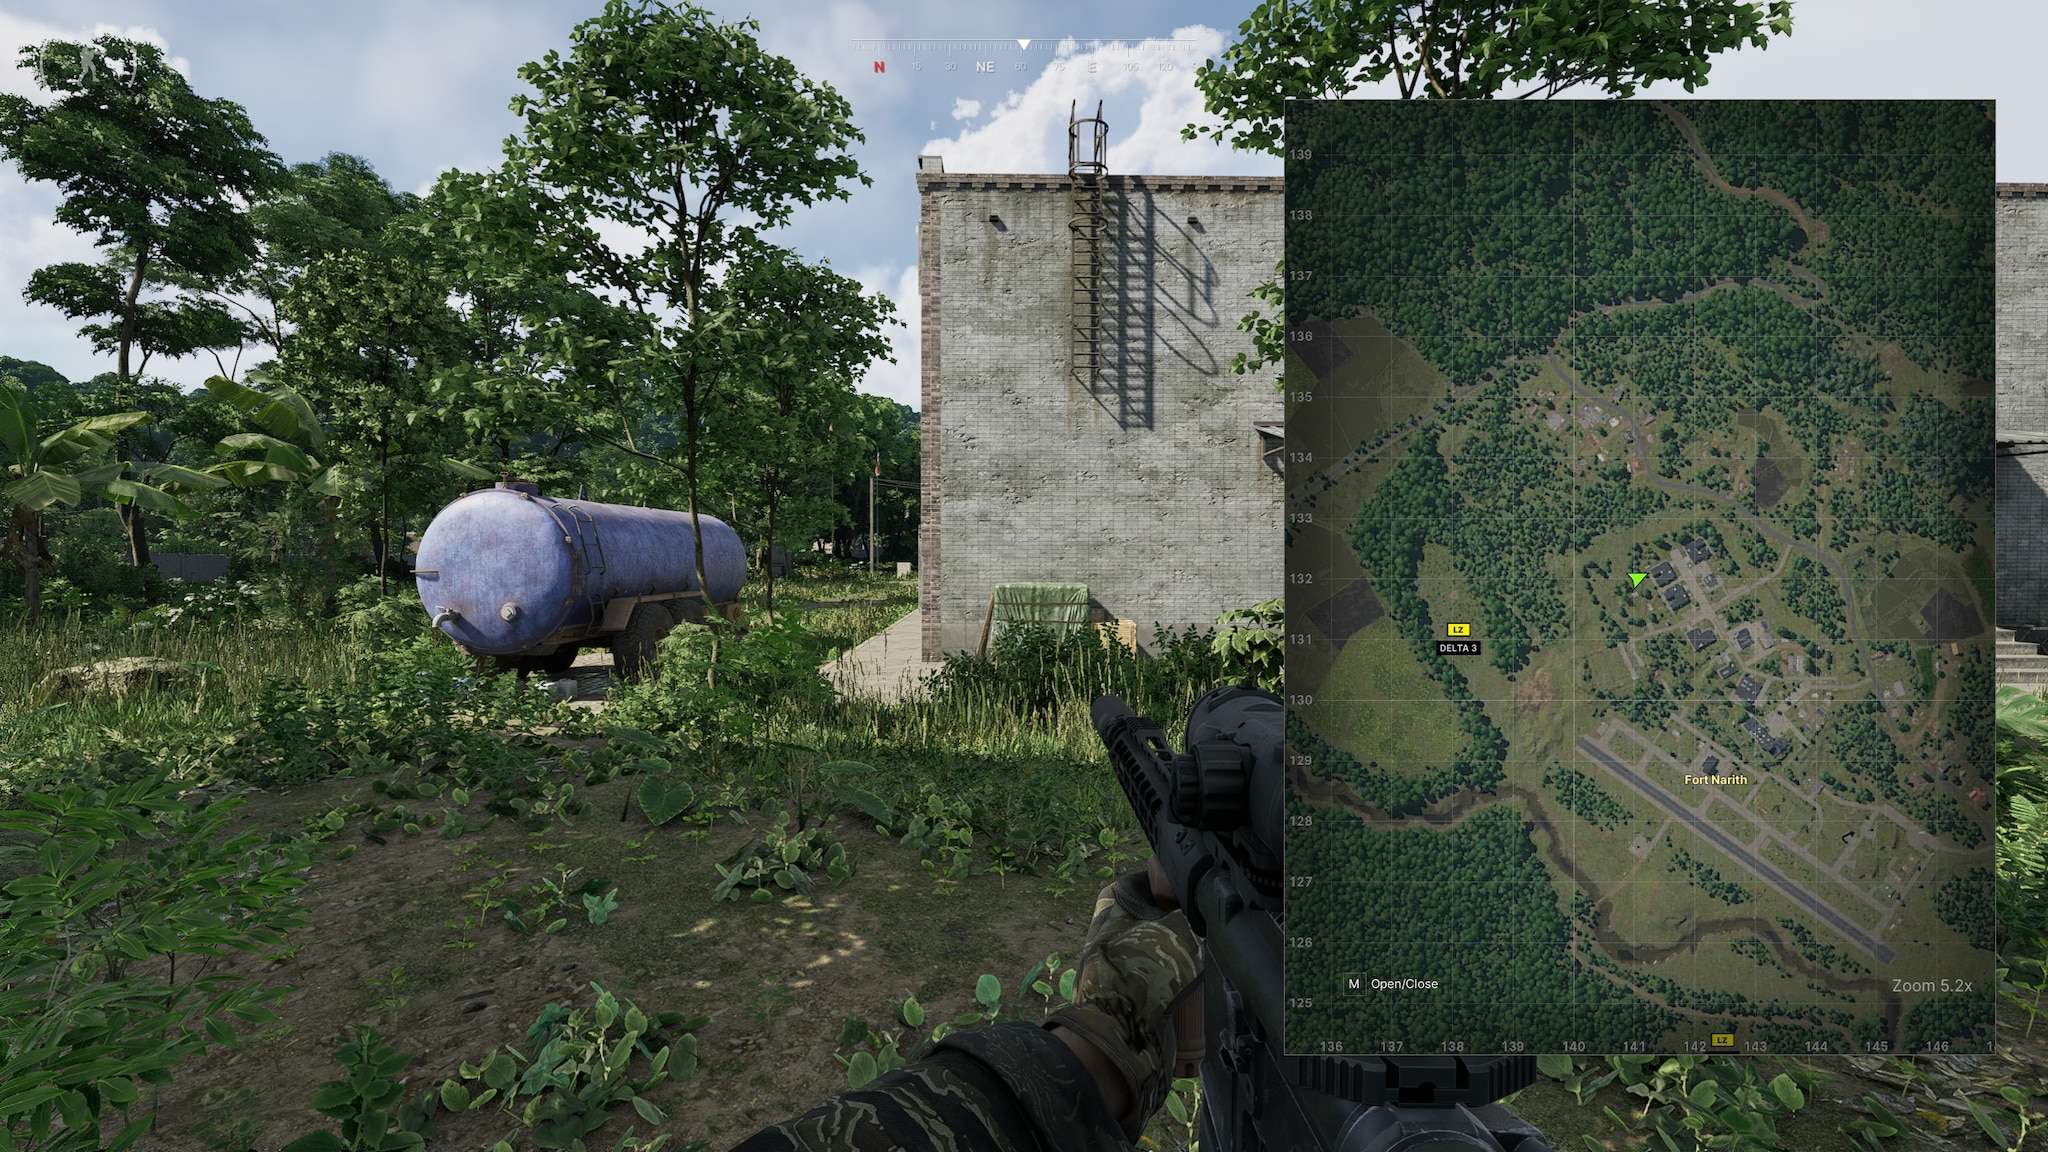
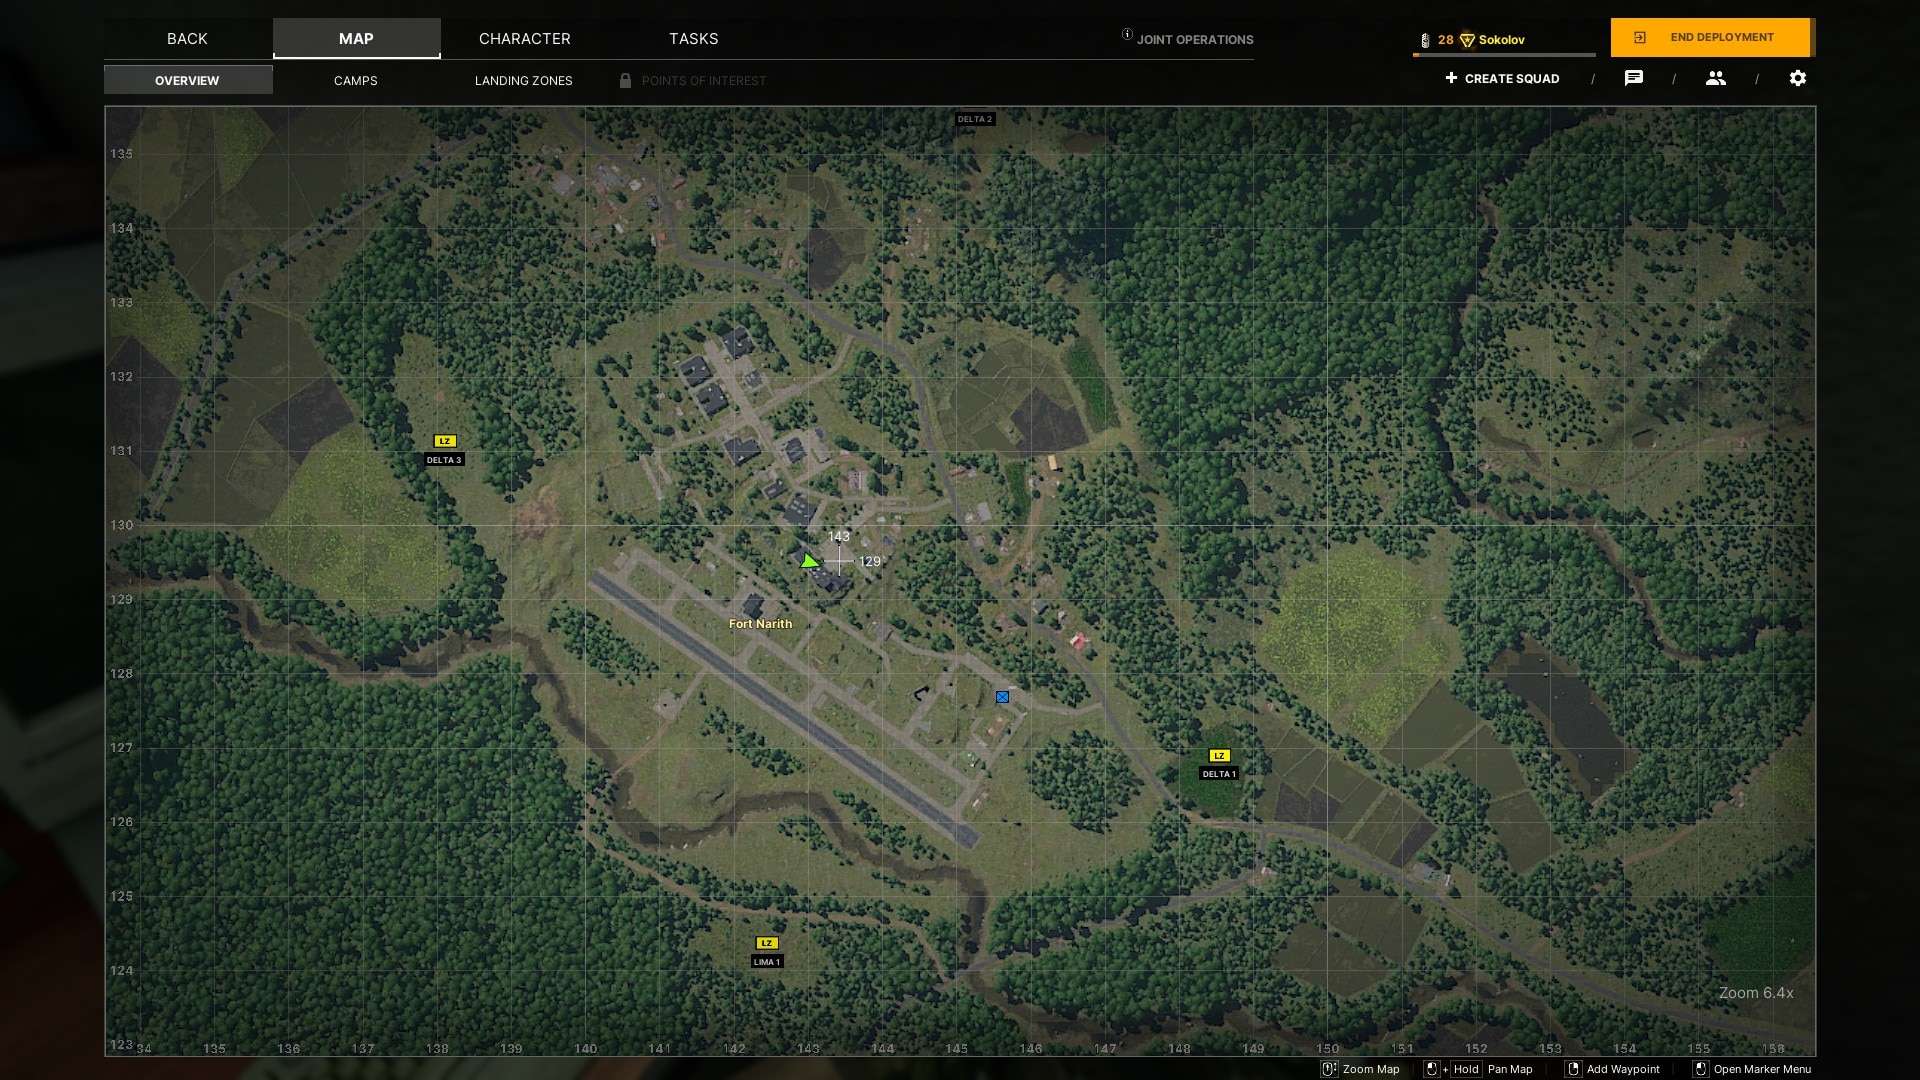
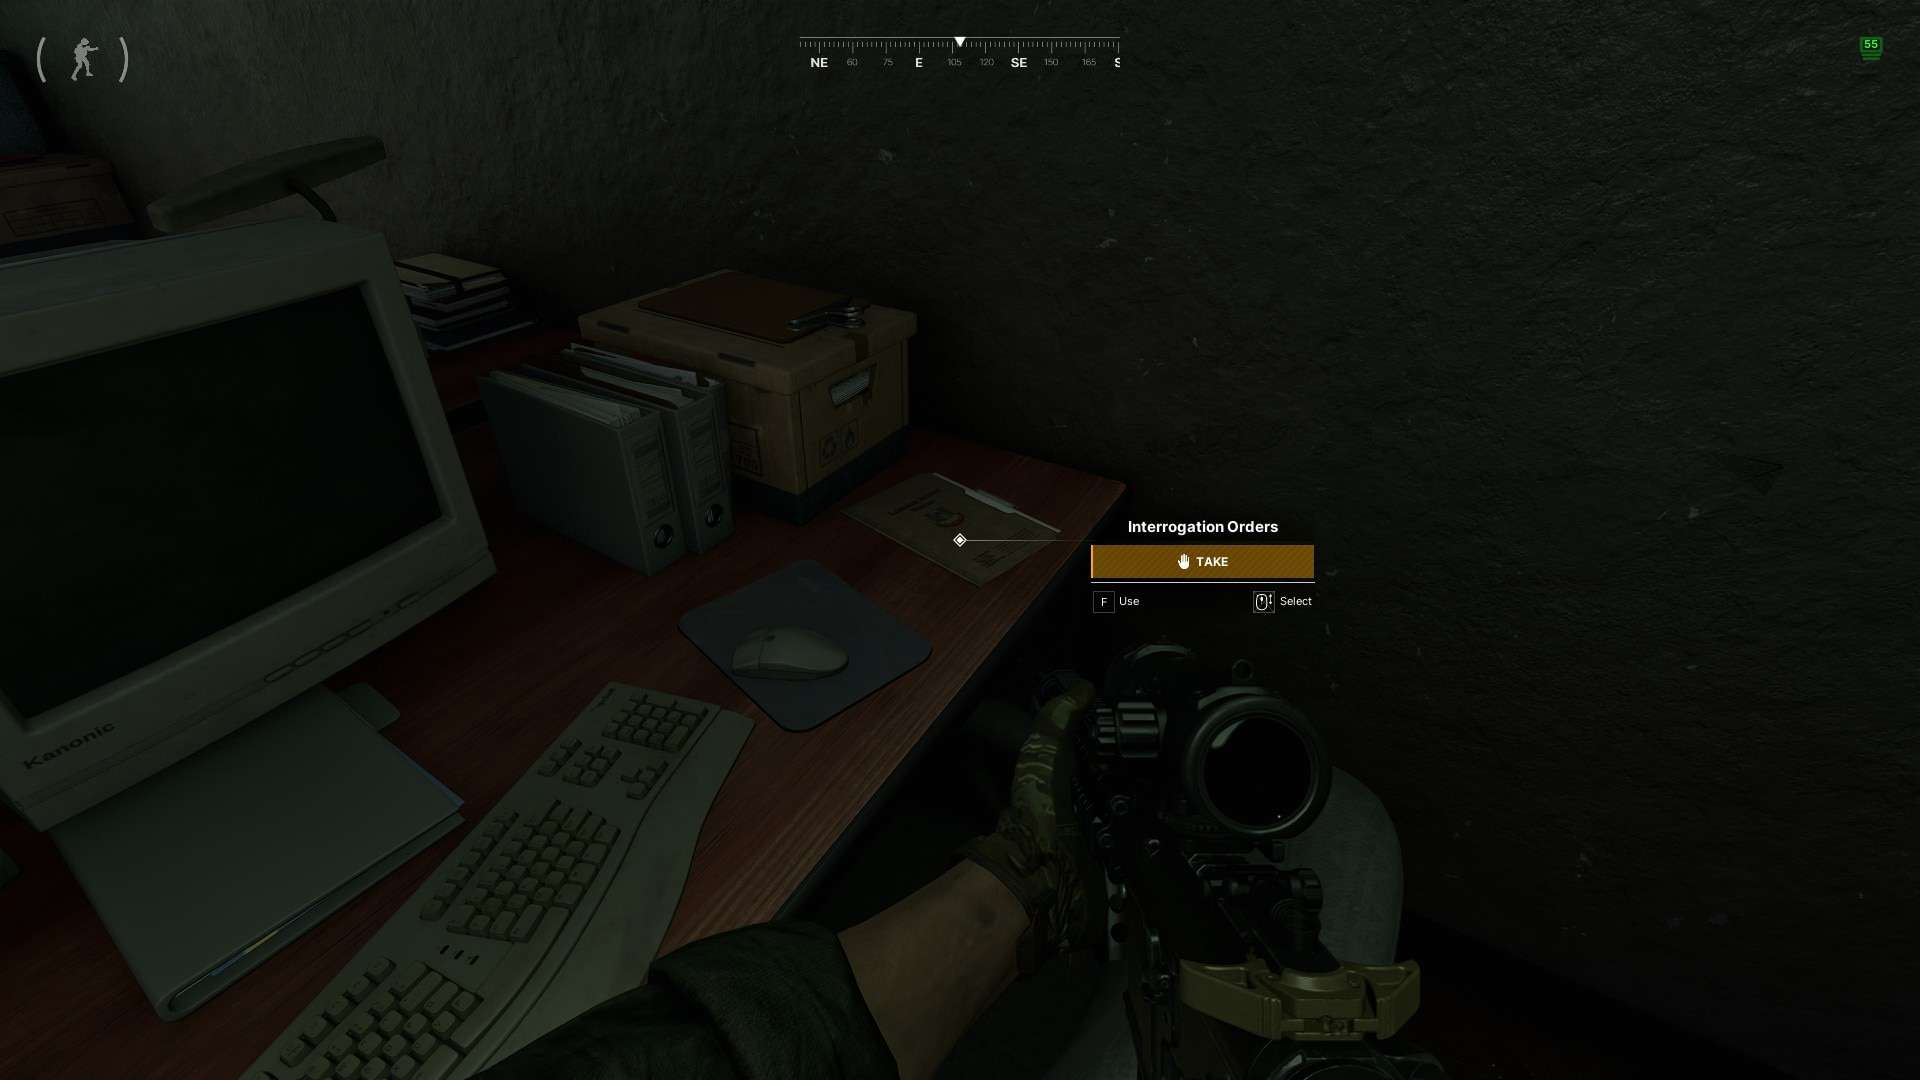
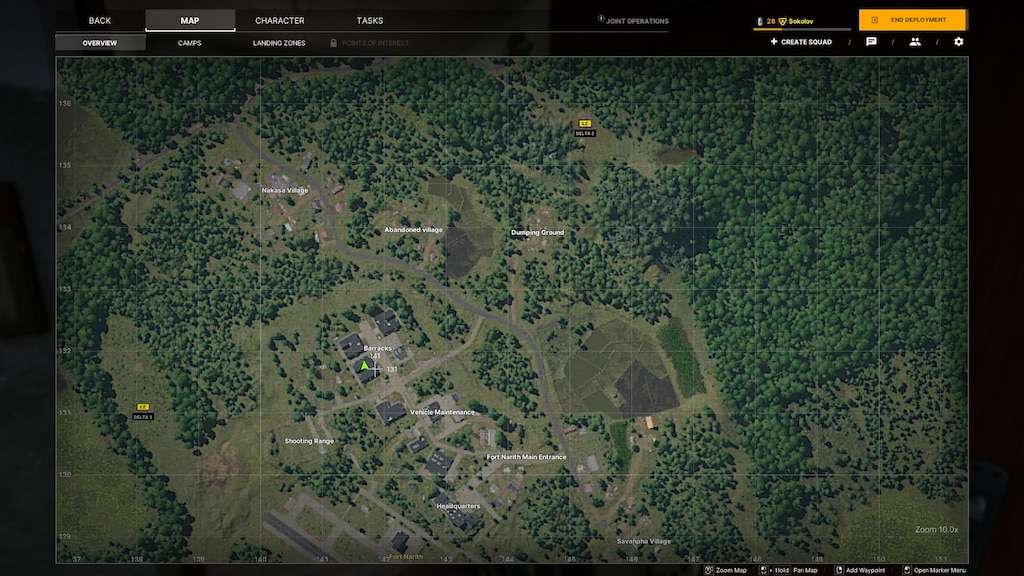
Forth Narith Stroll
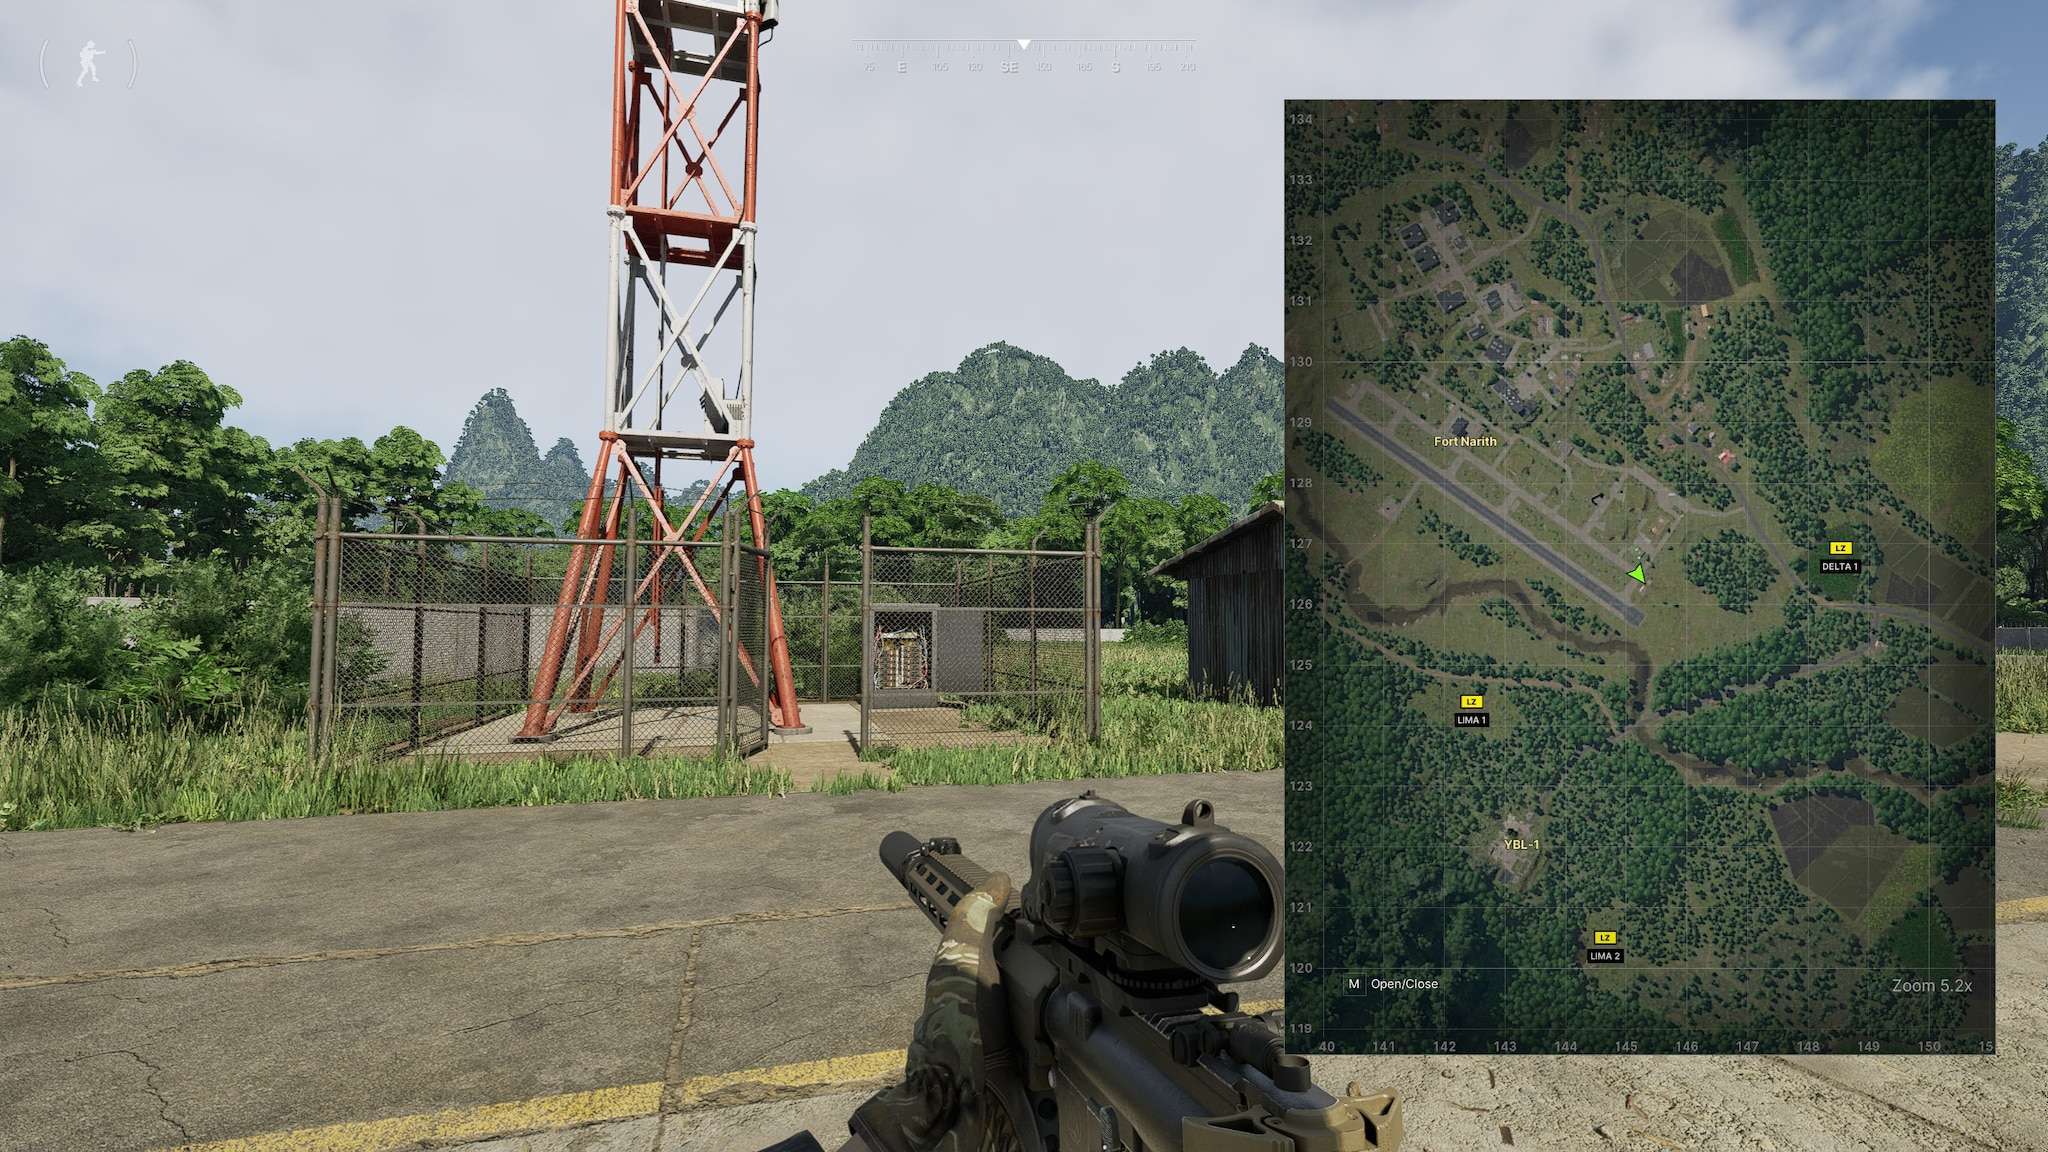
Forth Narith Stroll
Airfield – 141 126
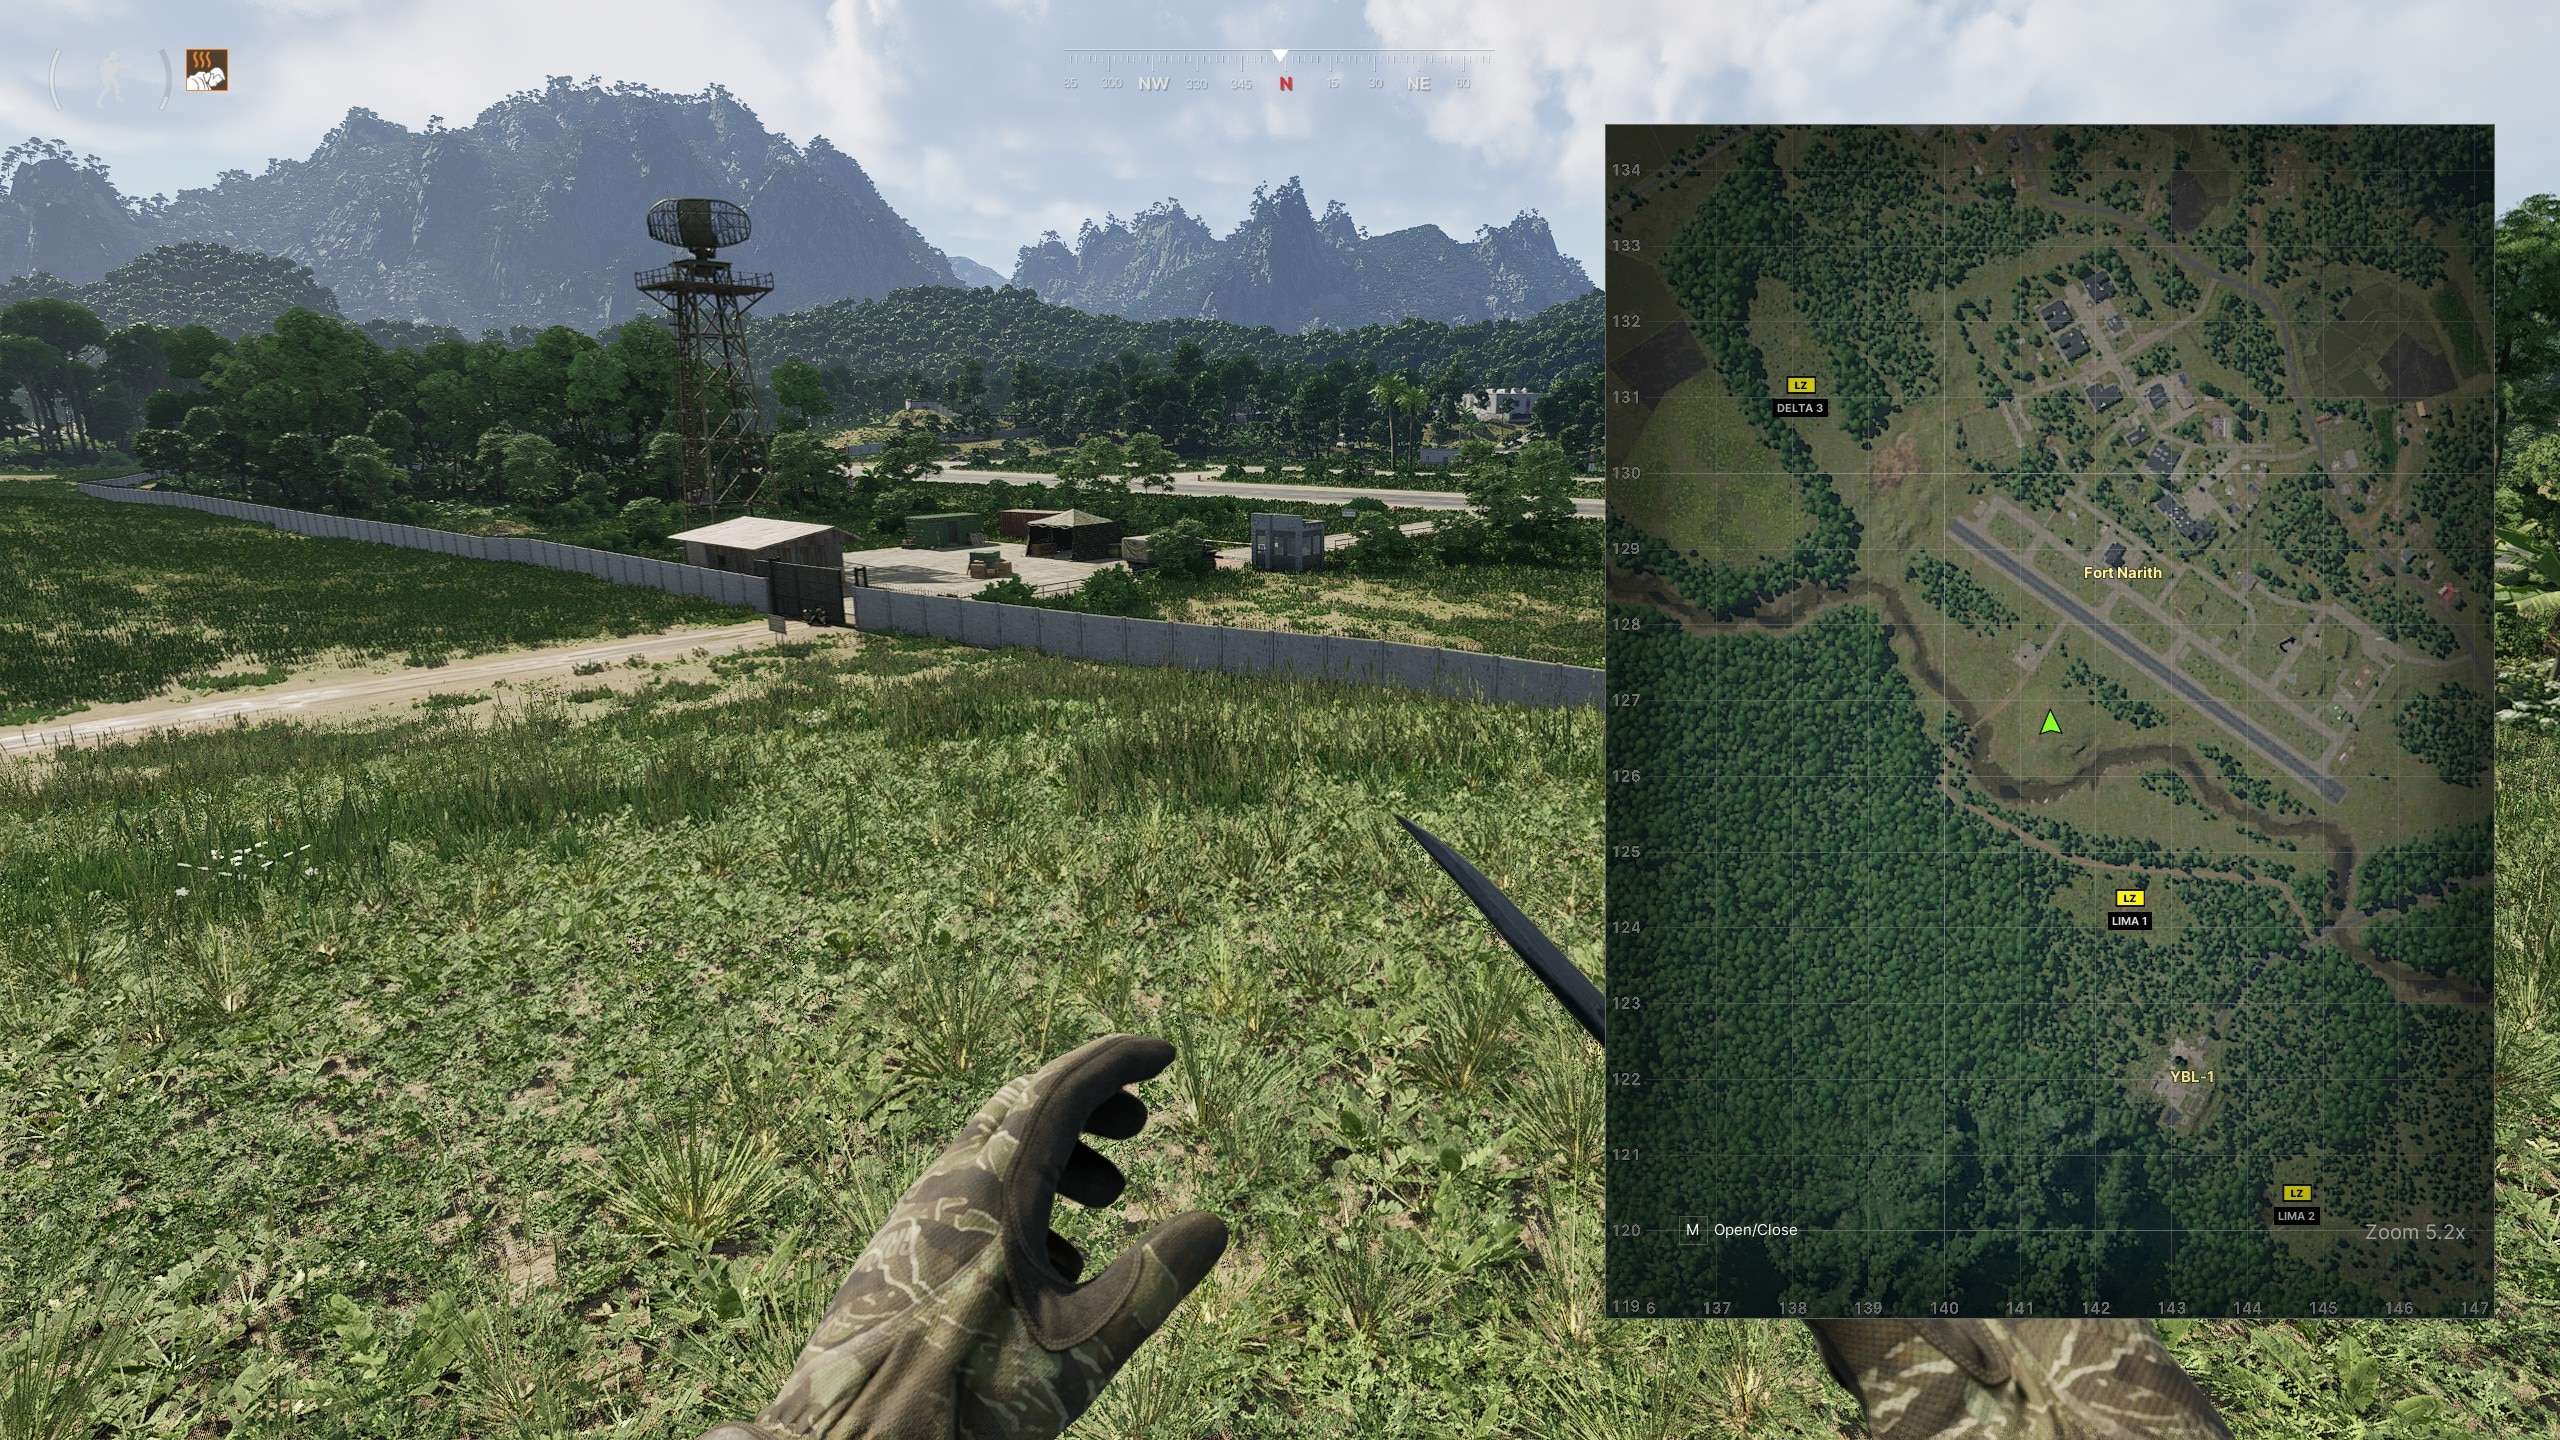
Fuel Supply – 146 127
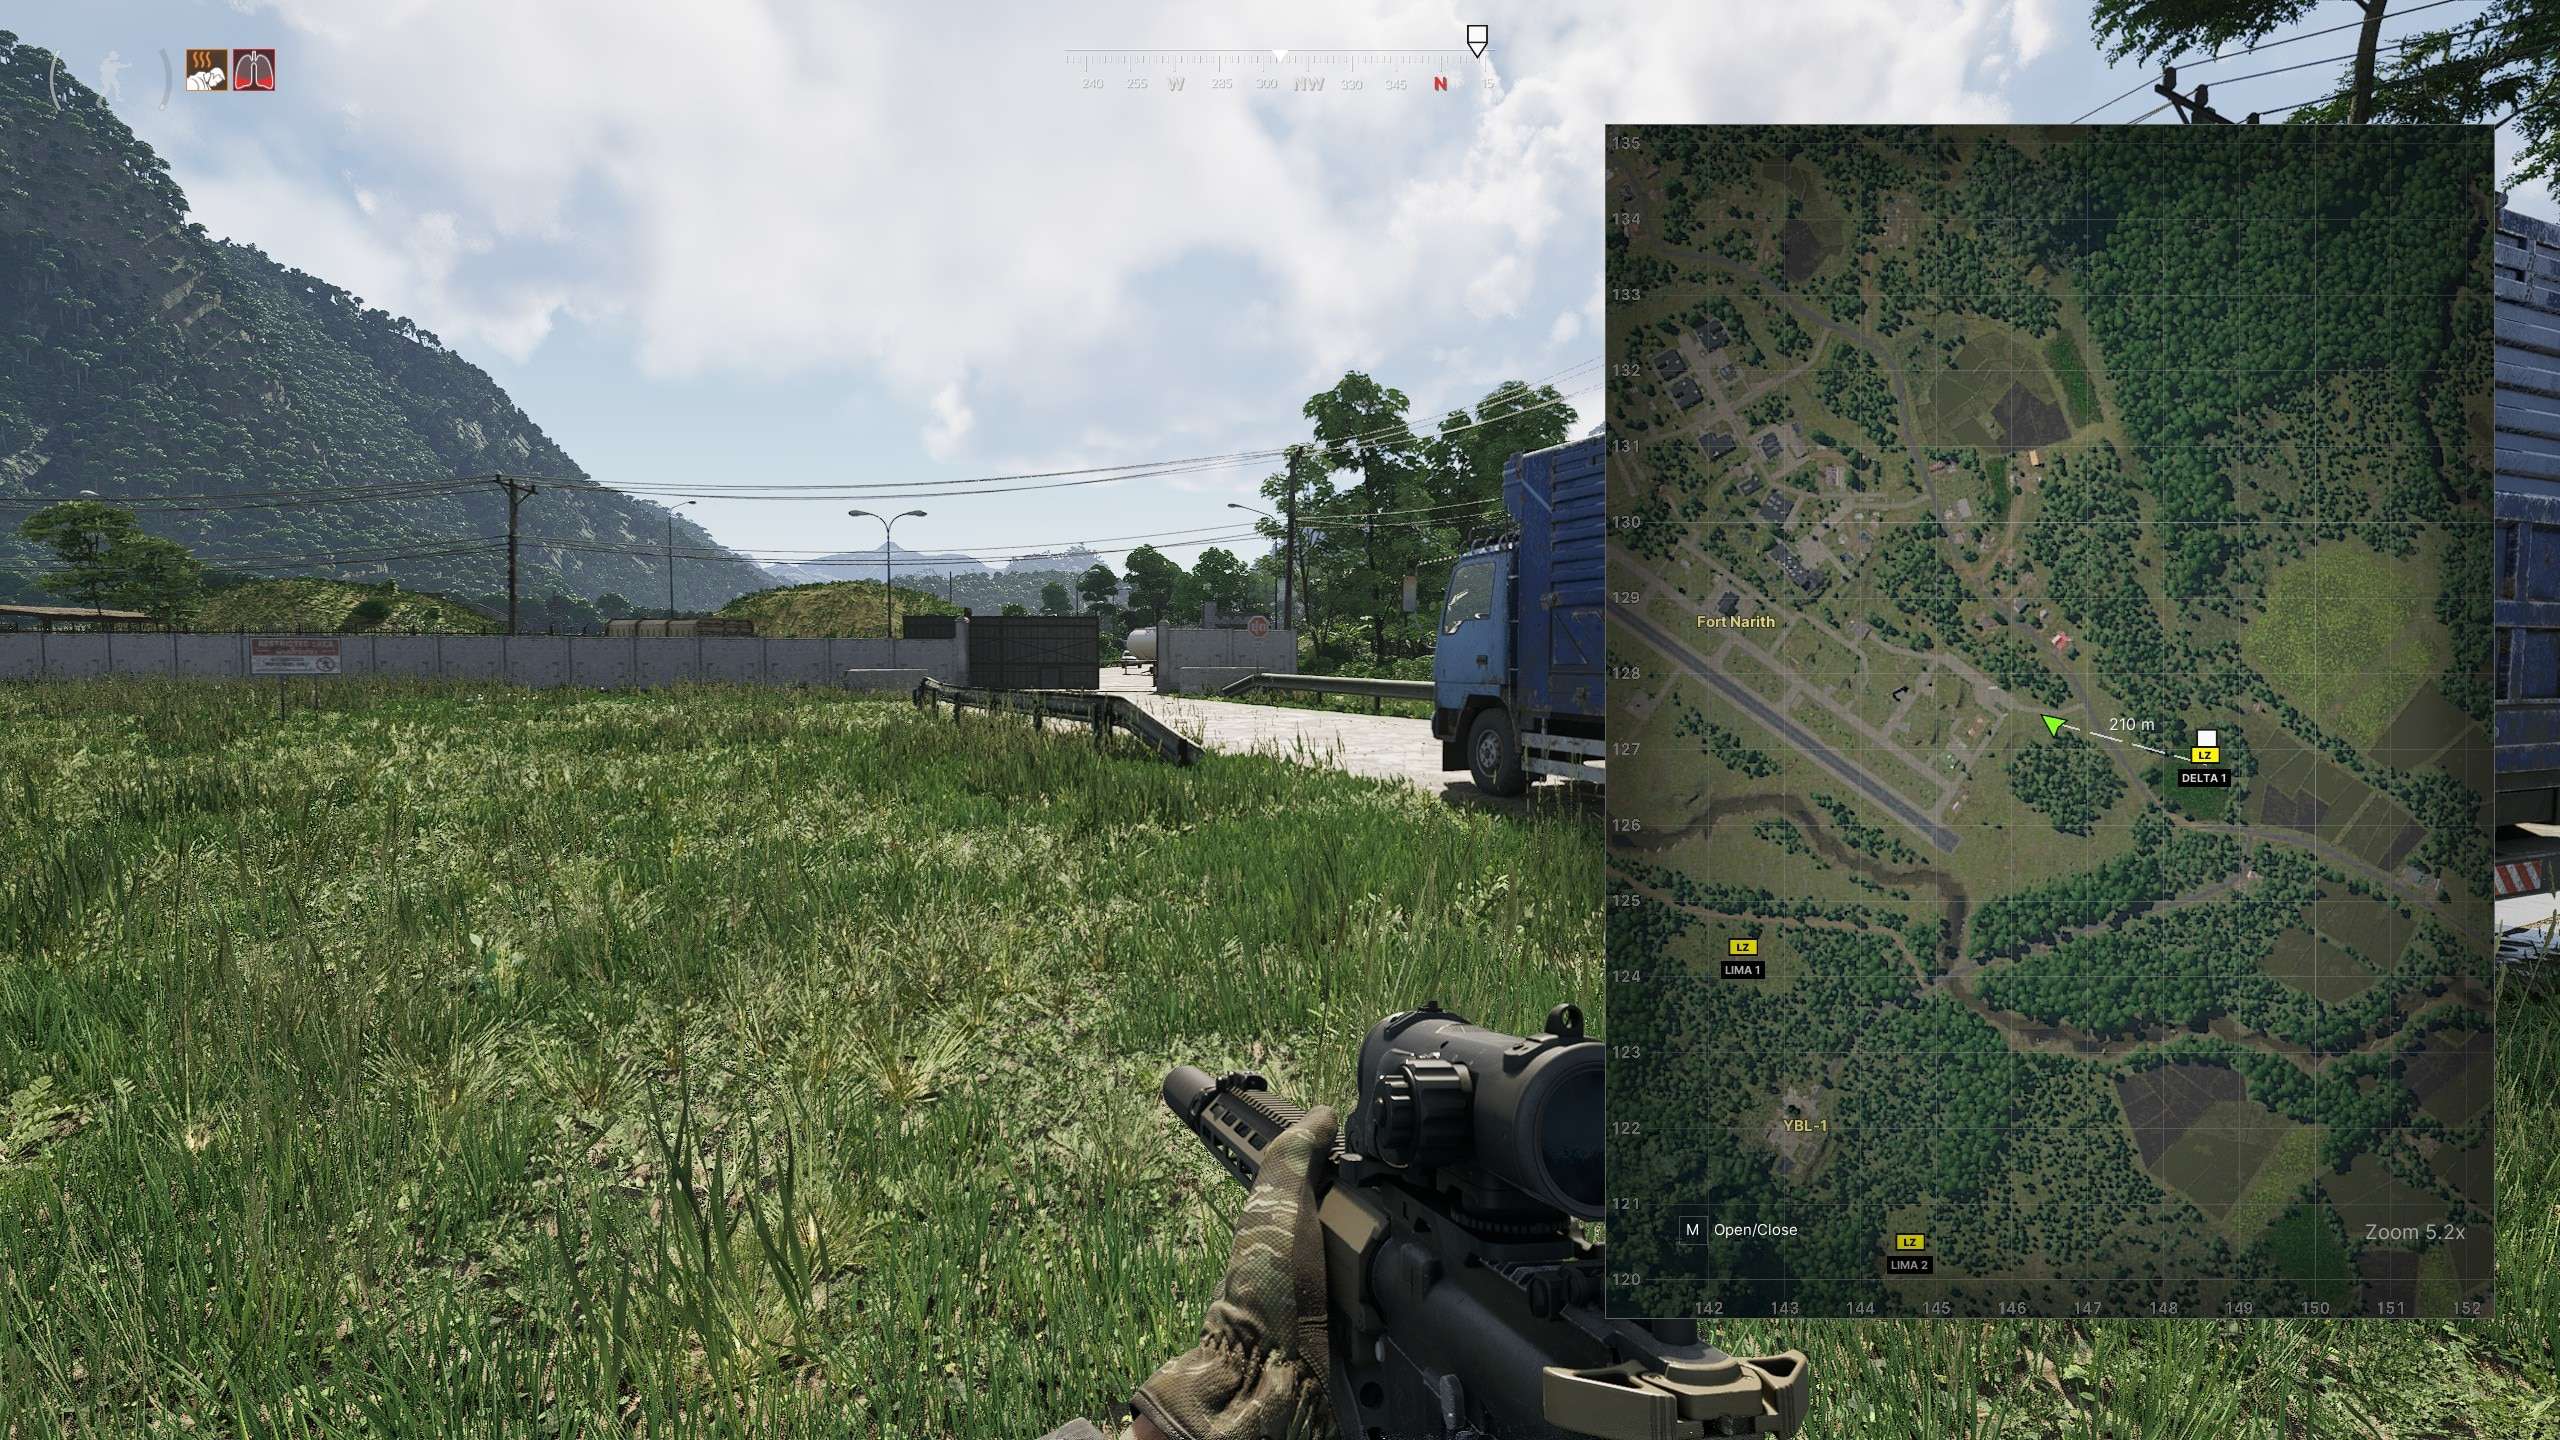
Main – 145 130
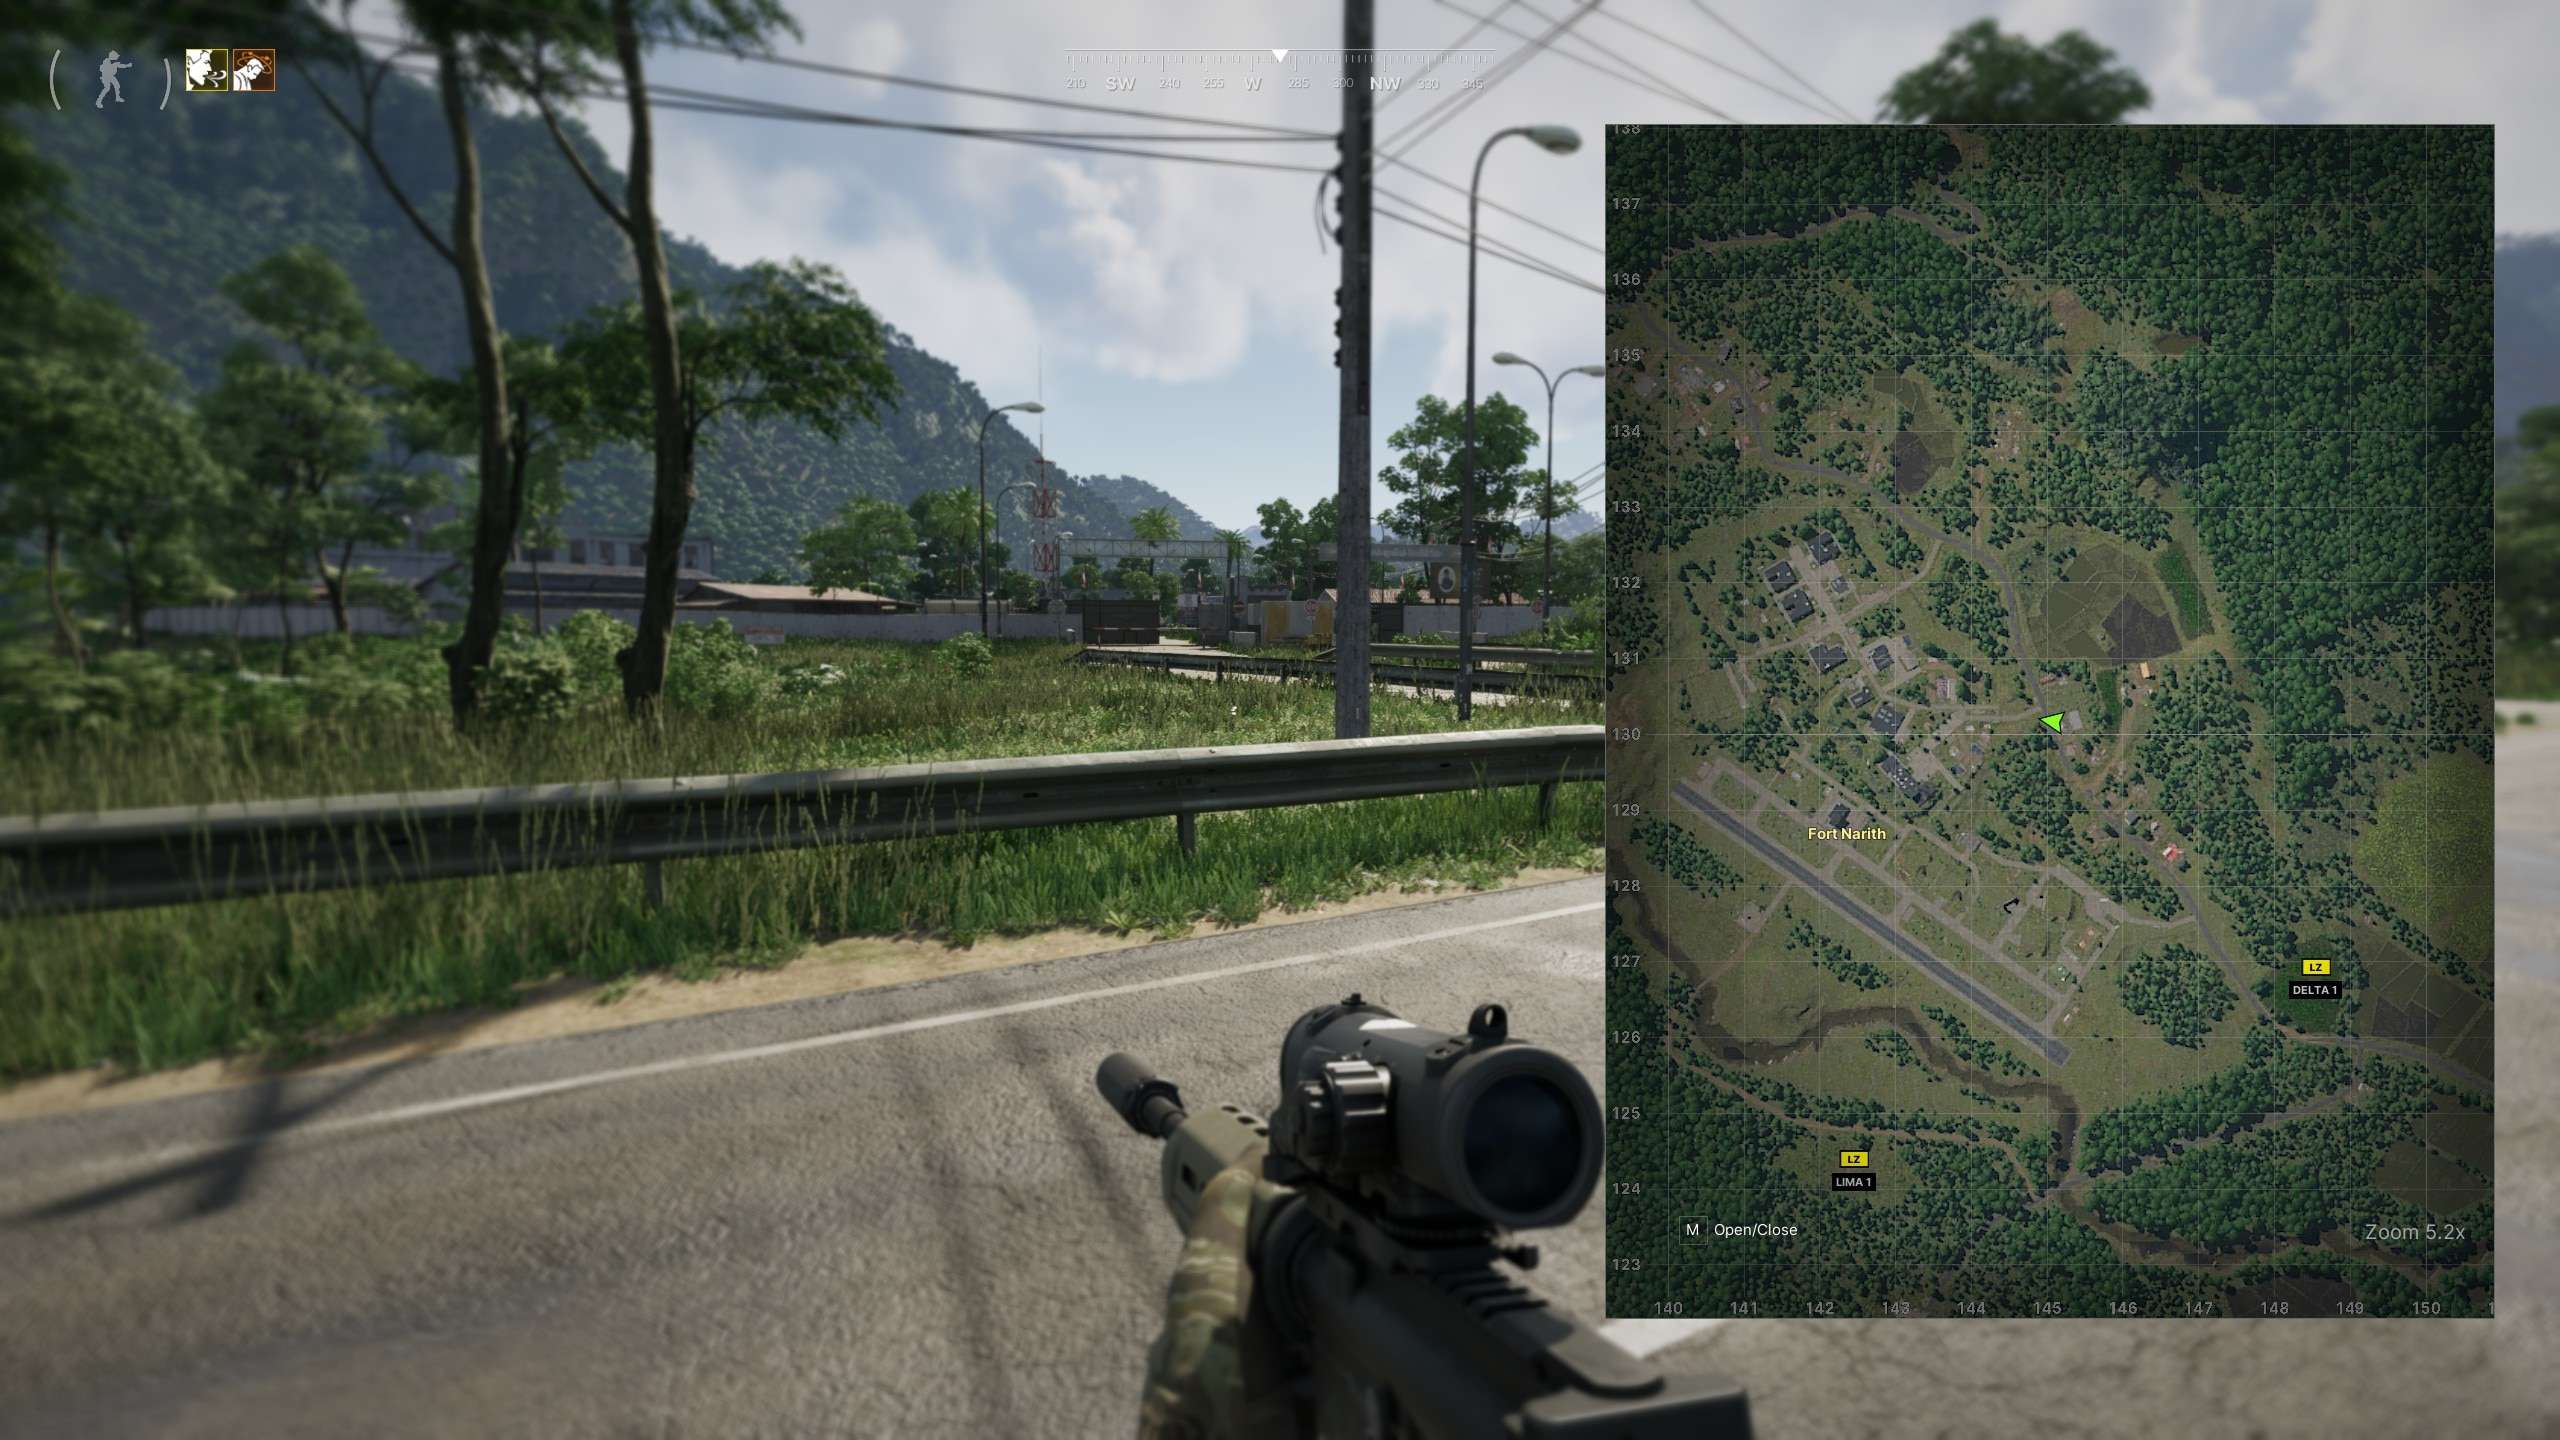
Barracks – 143 131
Missing Colleague I
Missing Colleague 1 : 145, 129
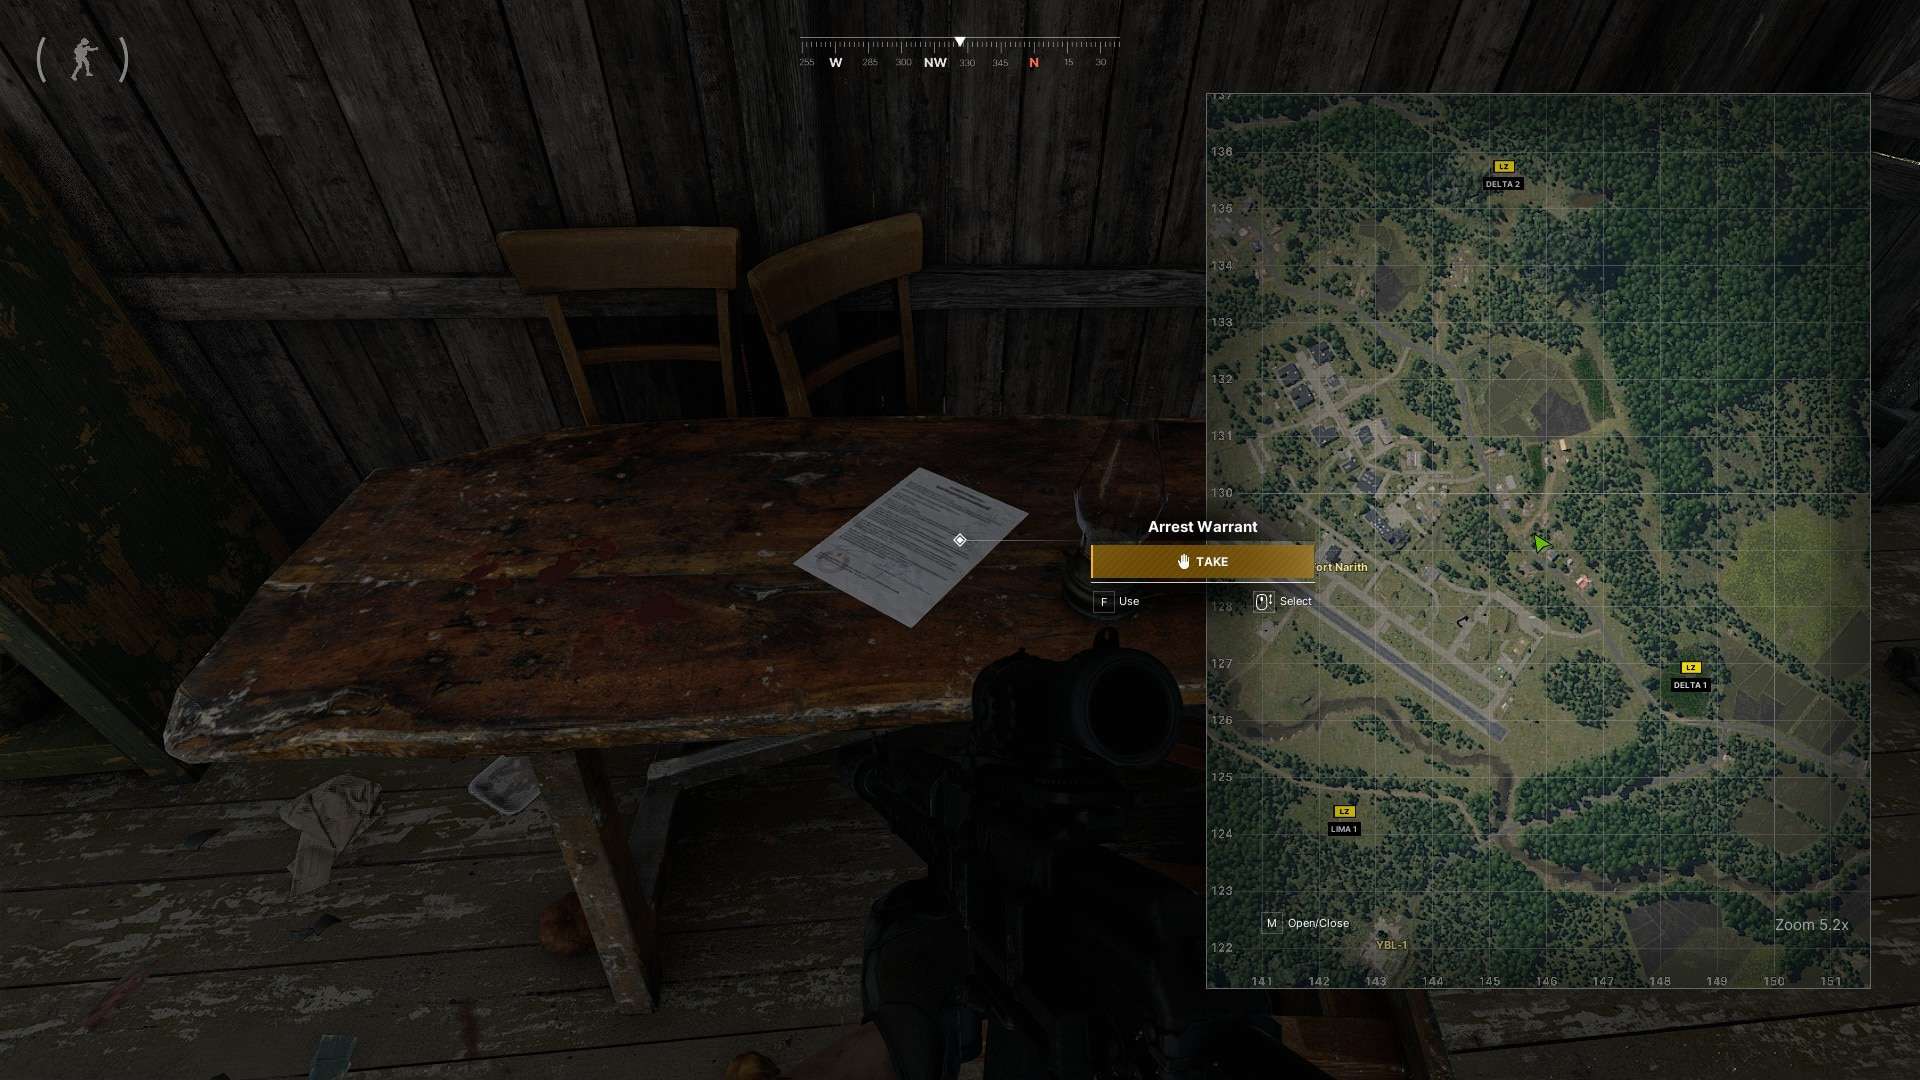
Evacuation Question
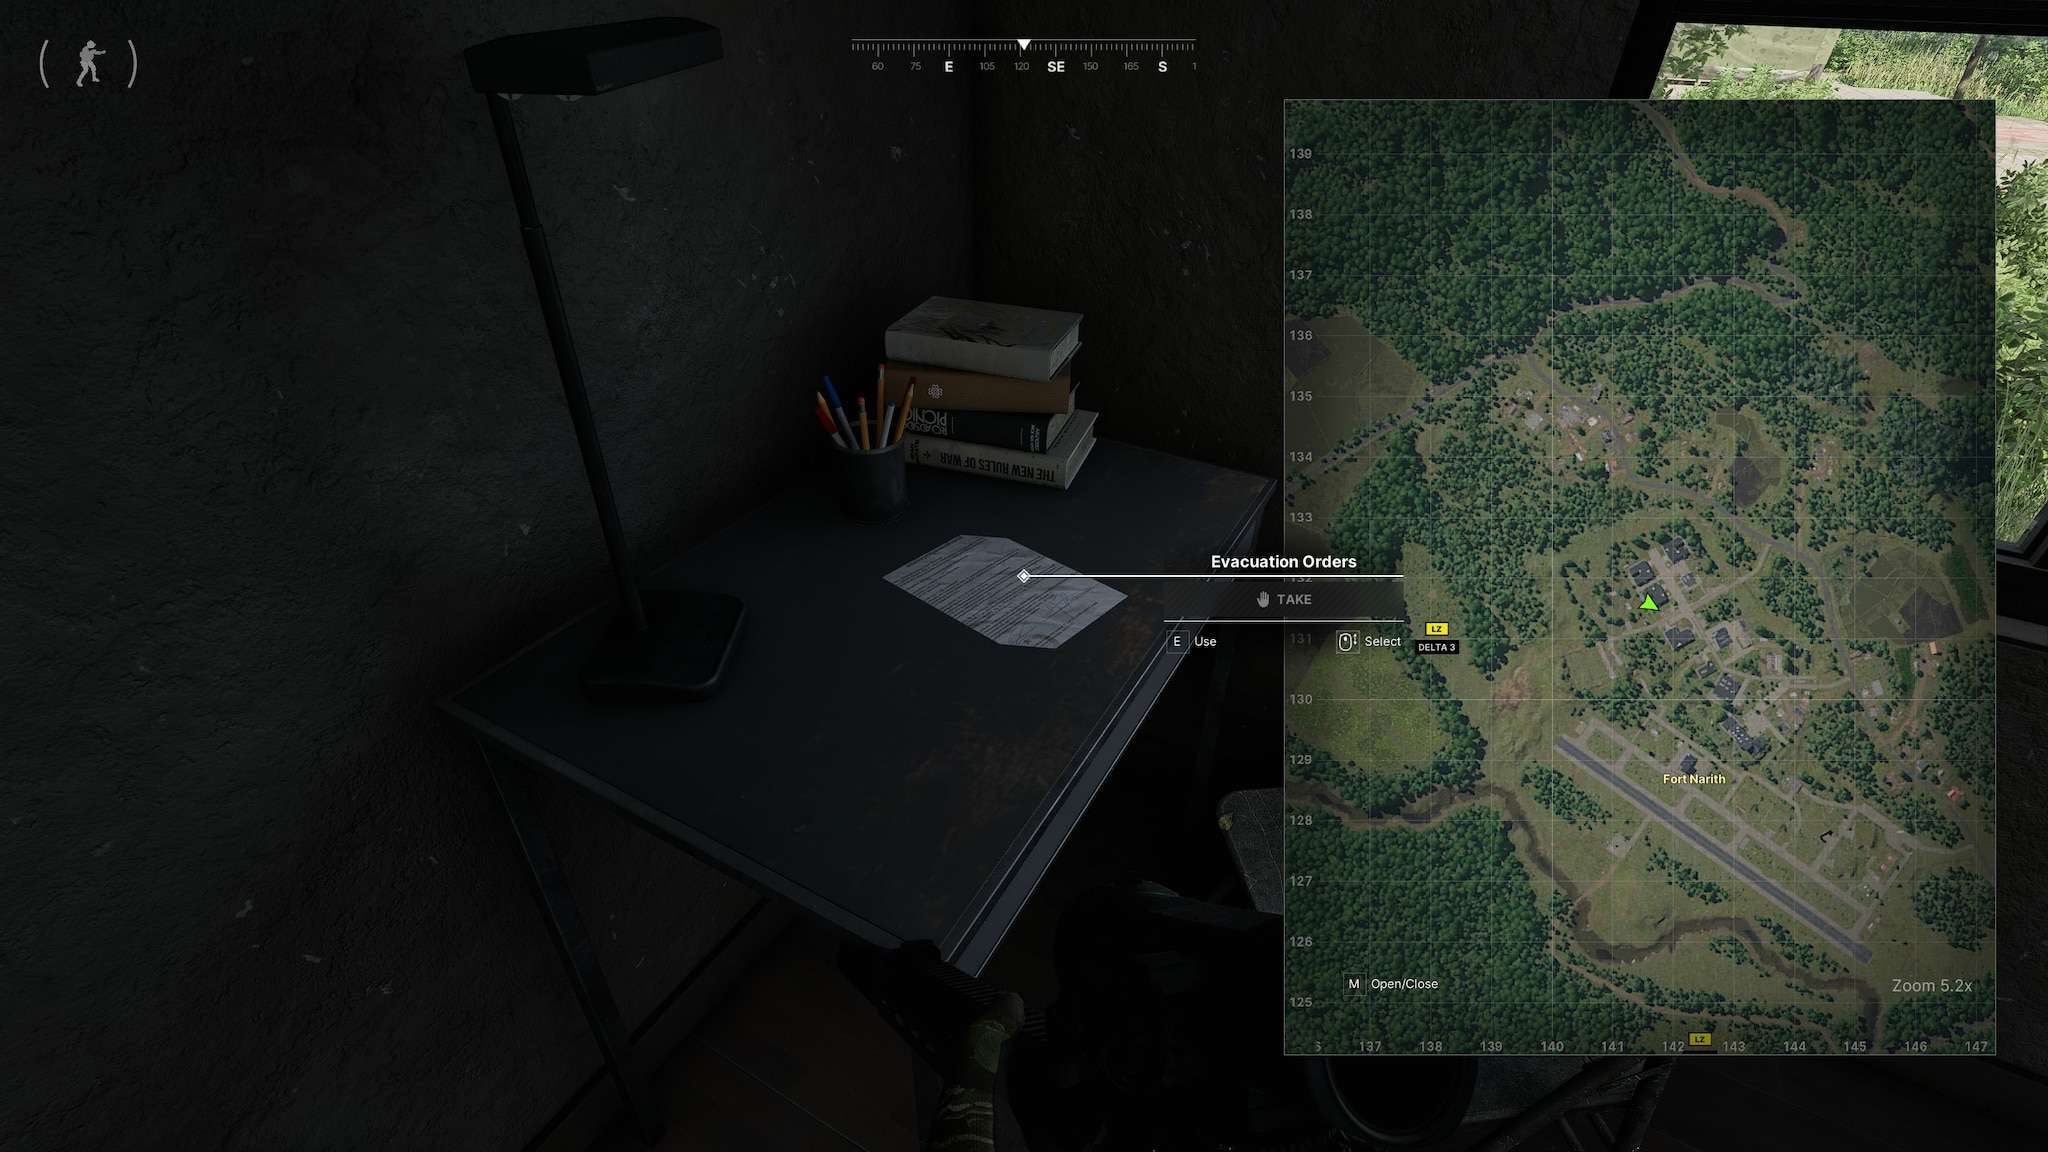
Evacuation Question – 141 131 Room A 112

Missing Colleague II
Missing Colleague II – 143 129
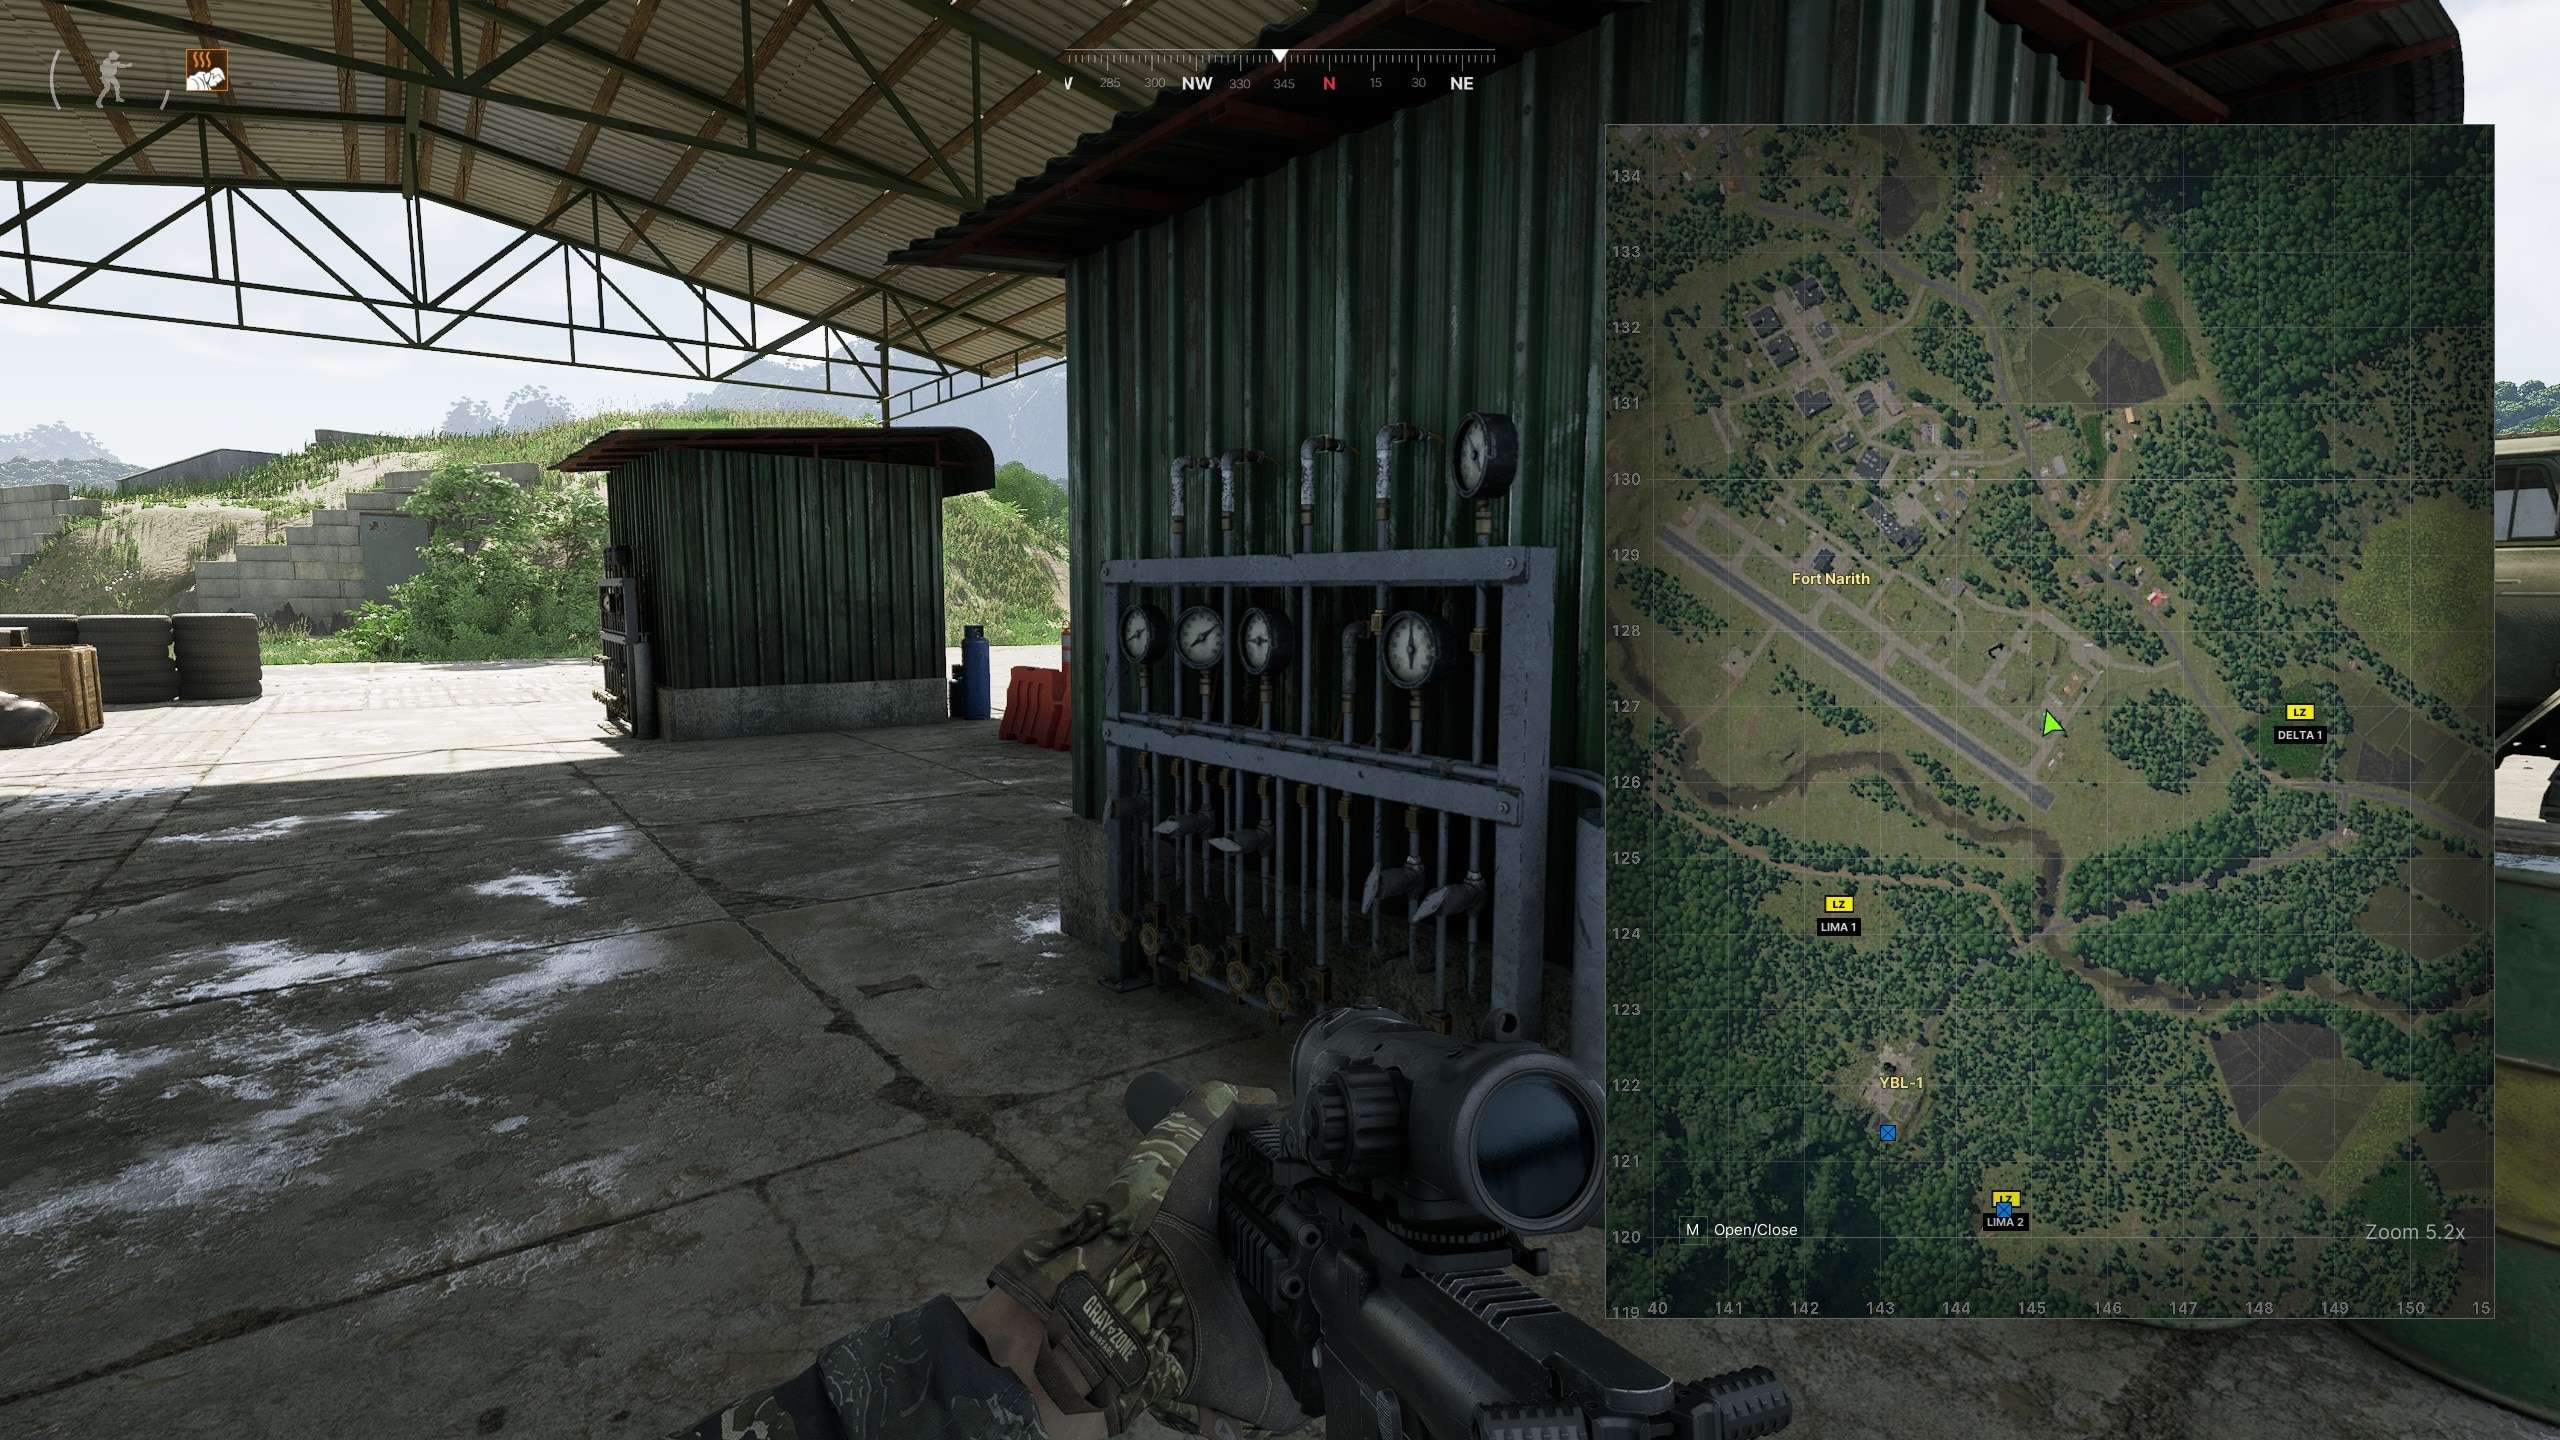
Neighbourly Help
Neighbourly Help – 145 126
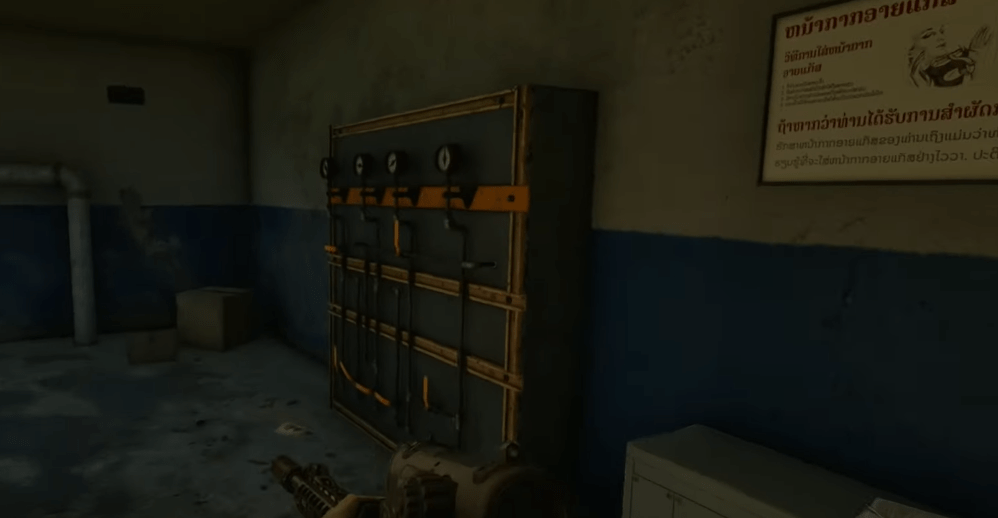
Gauge 1
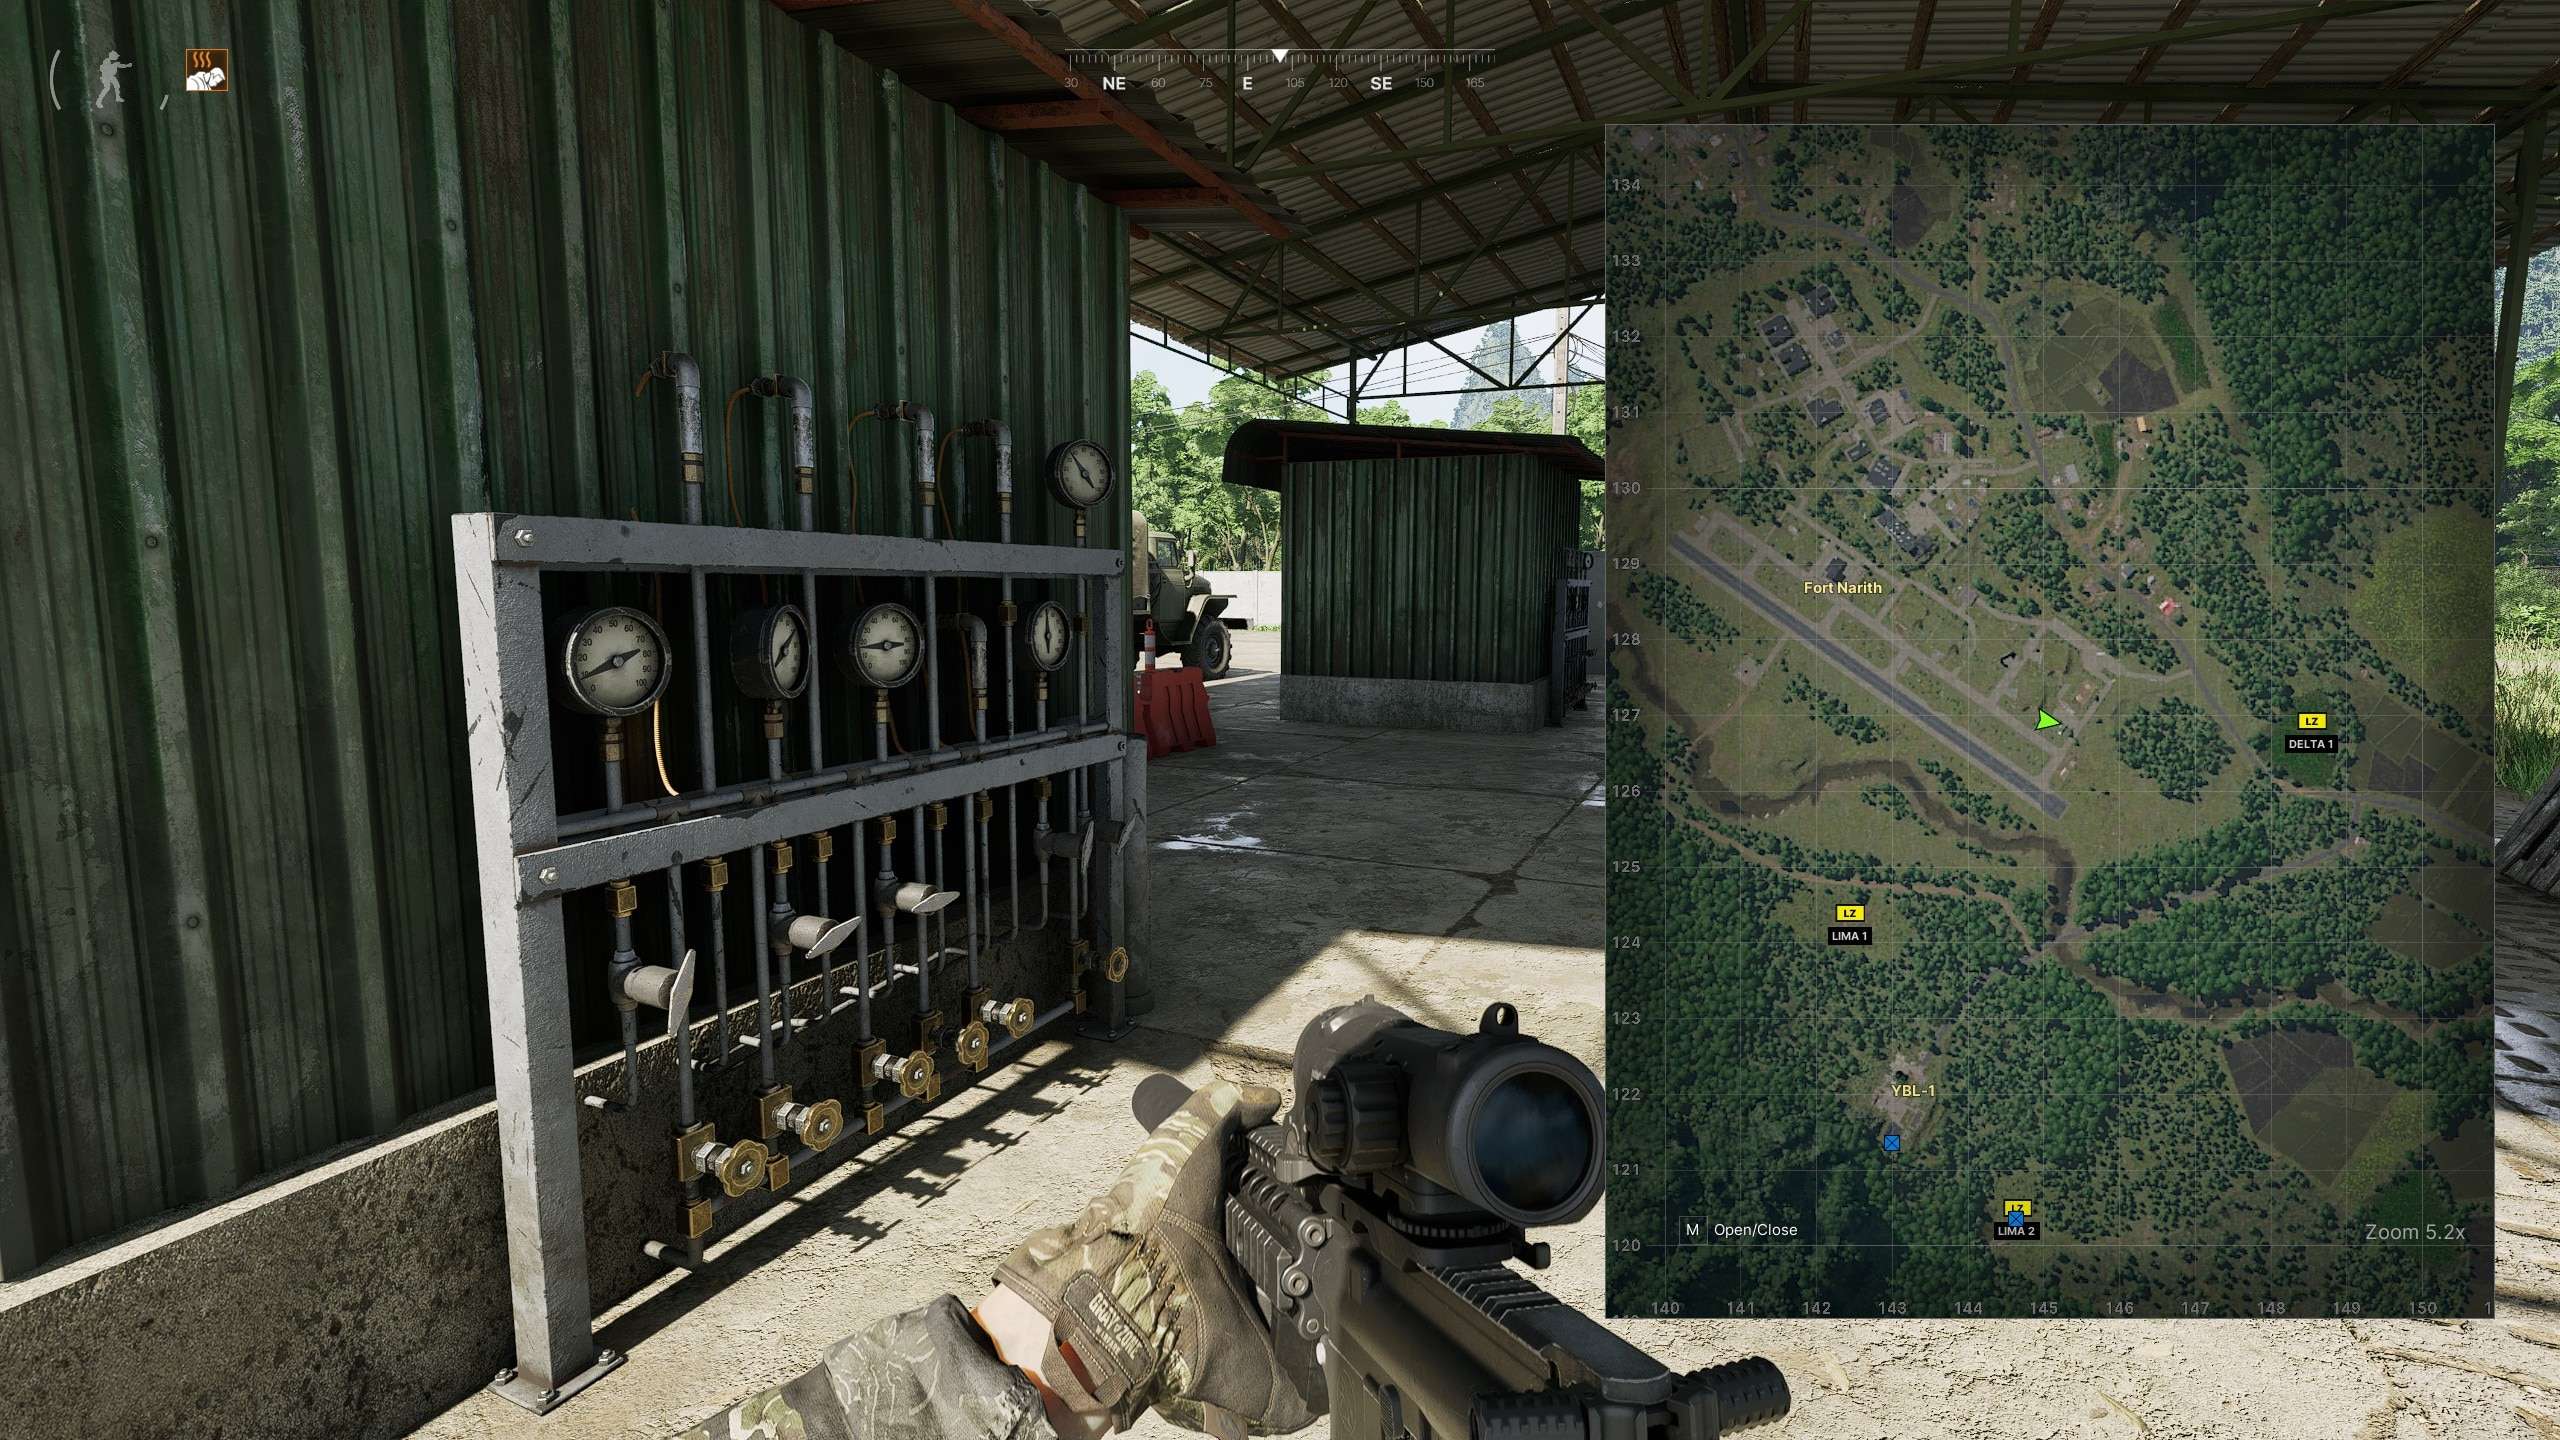
Gauge 2
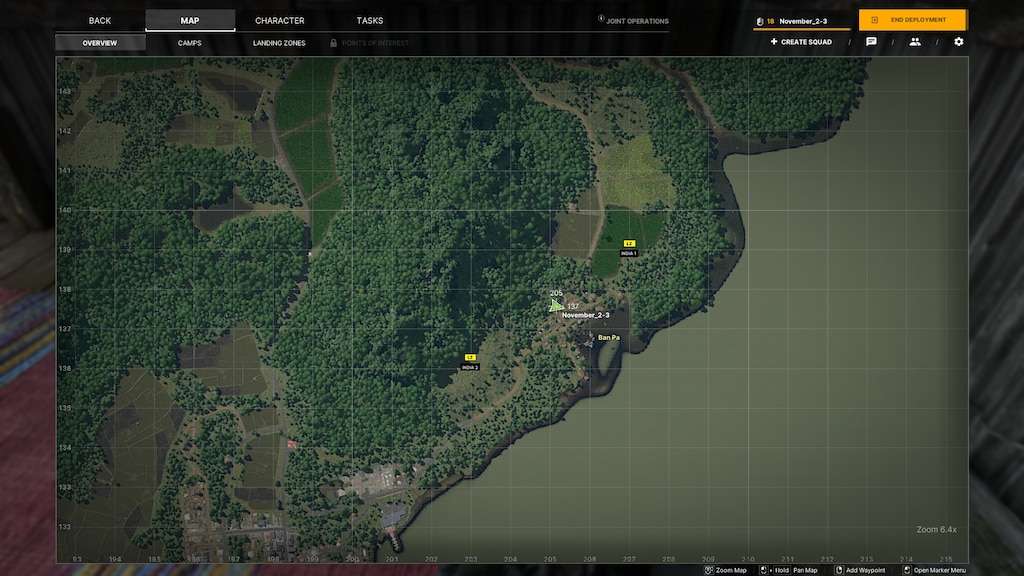
Line In The Sand
Line In The Sand 205,137

Line In The Sand Pier 206,137

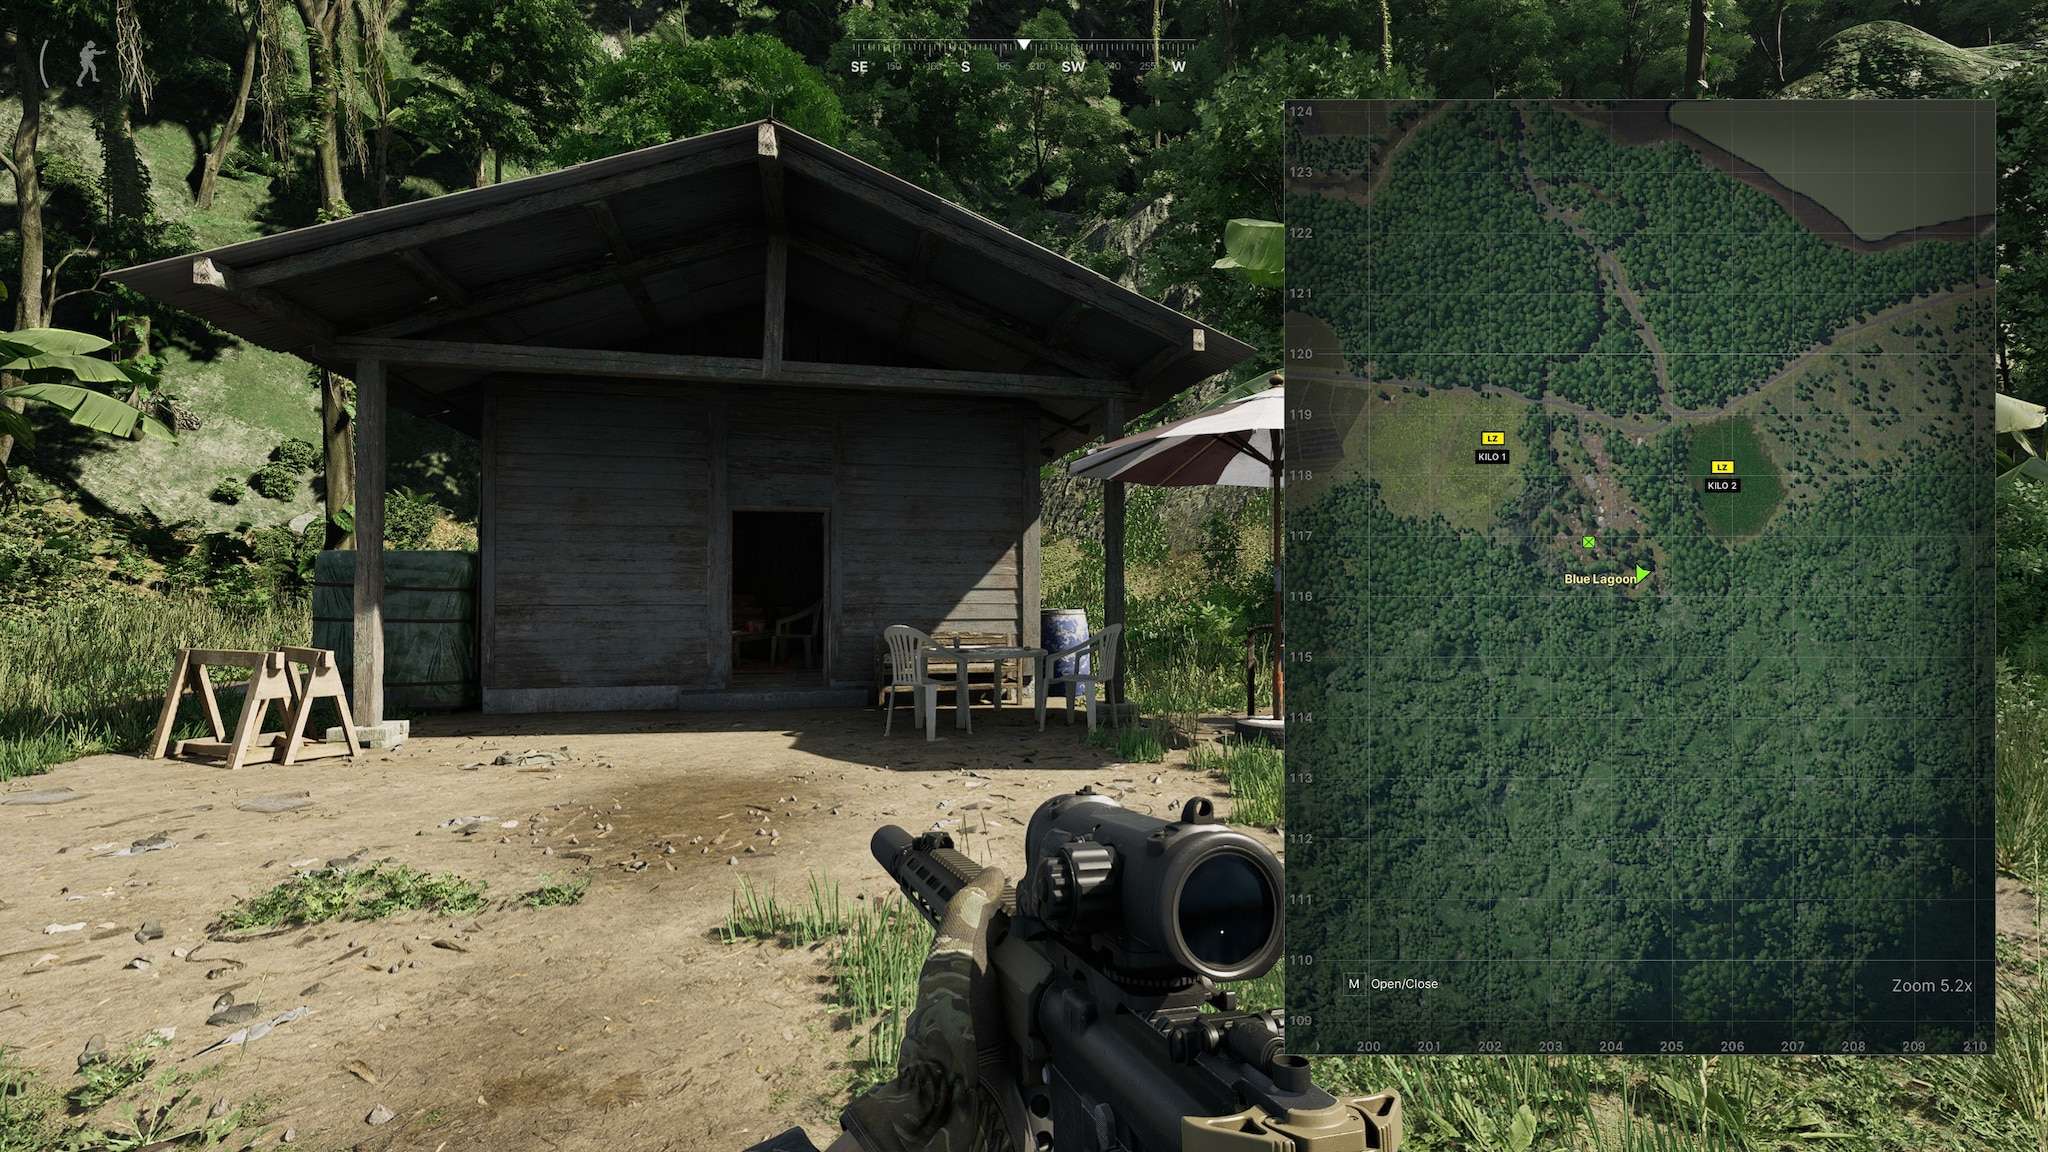
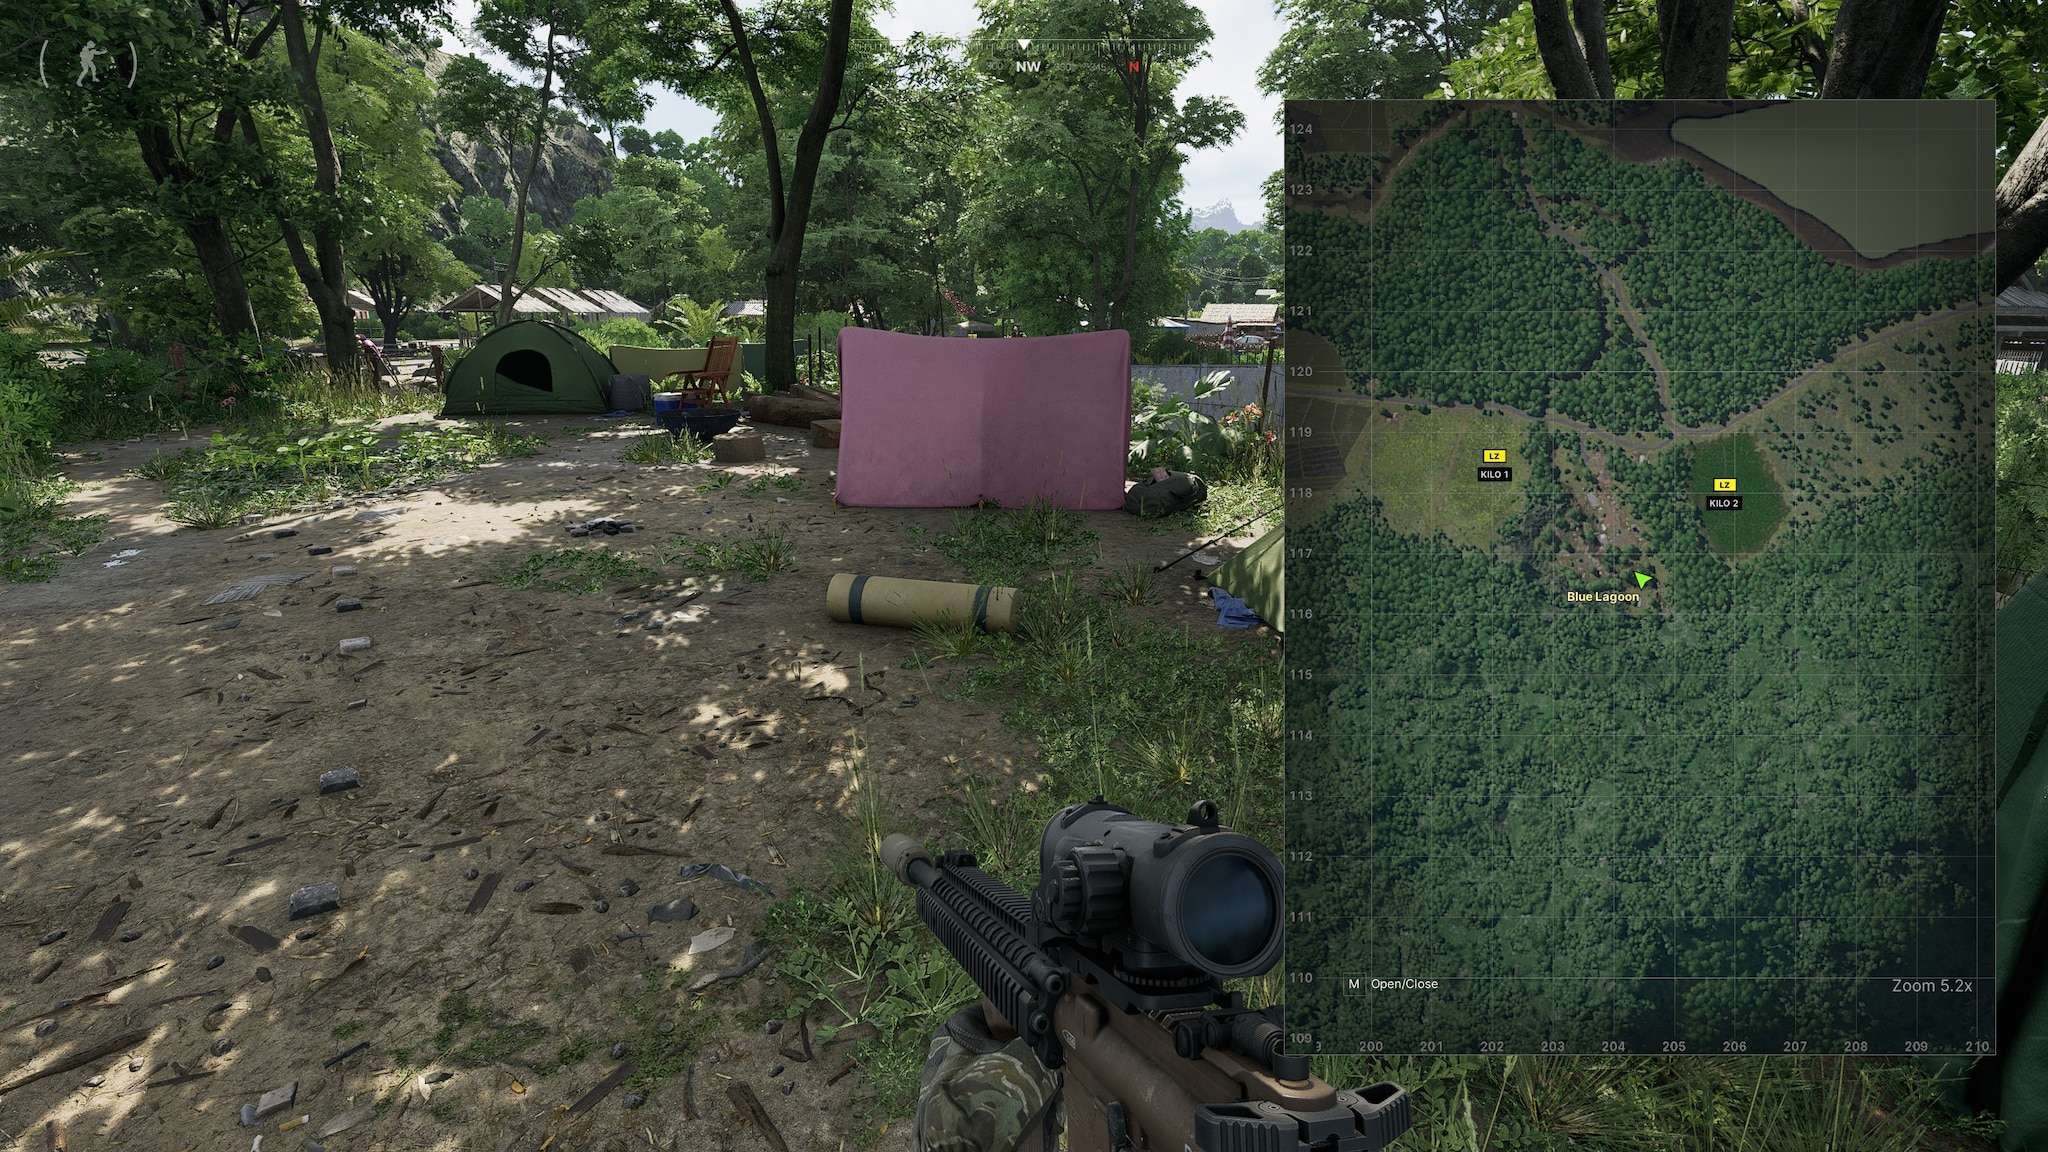
Deep Waters
Deep Waters – Kill 20 bots at Blue Lagoon
Hazardous Treasures
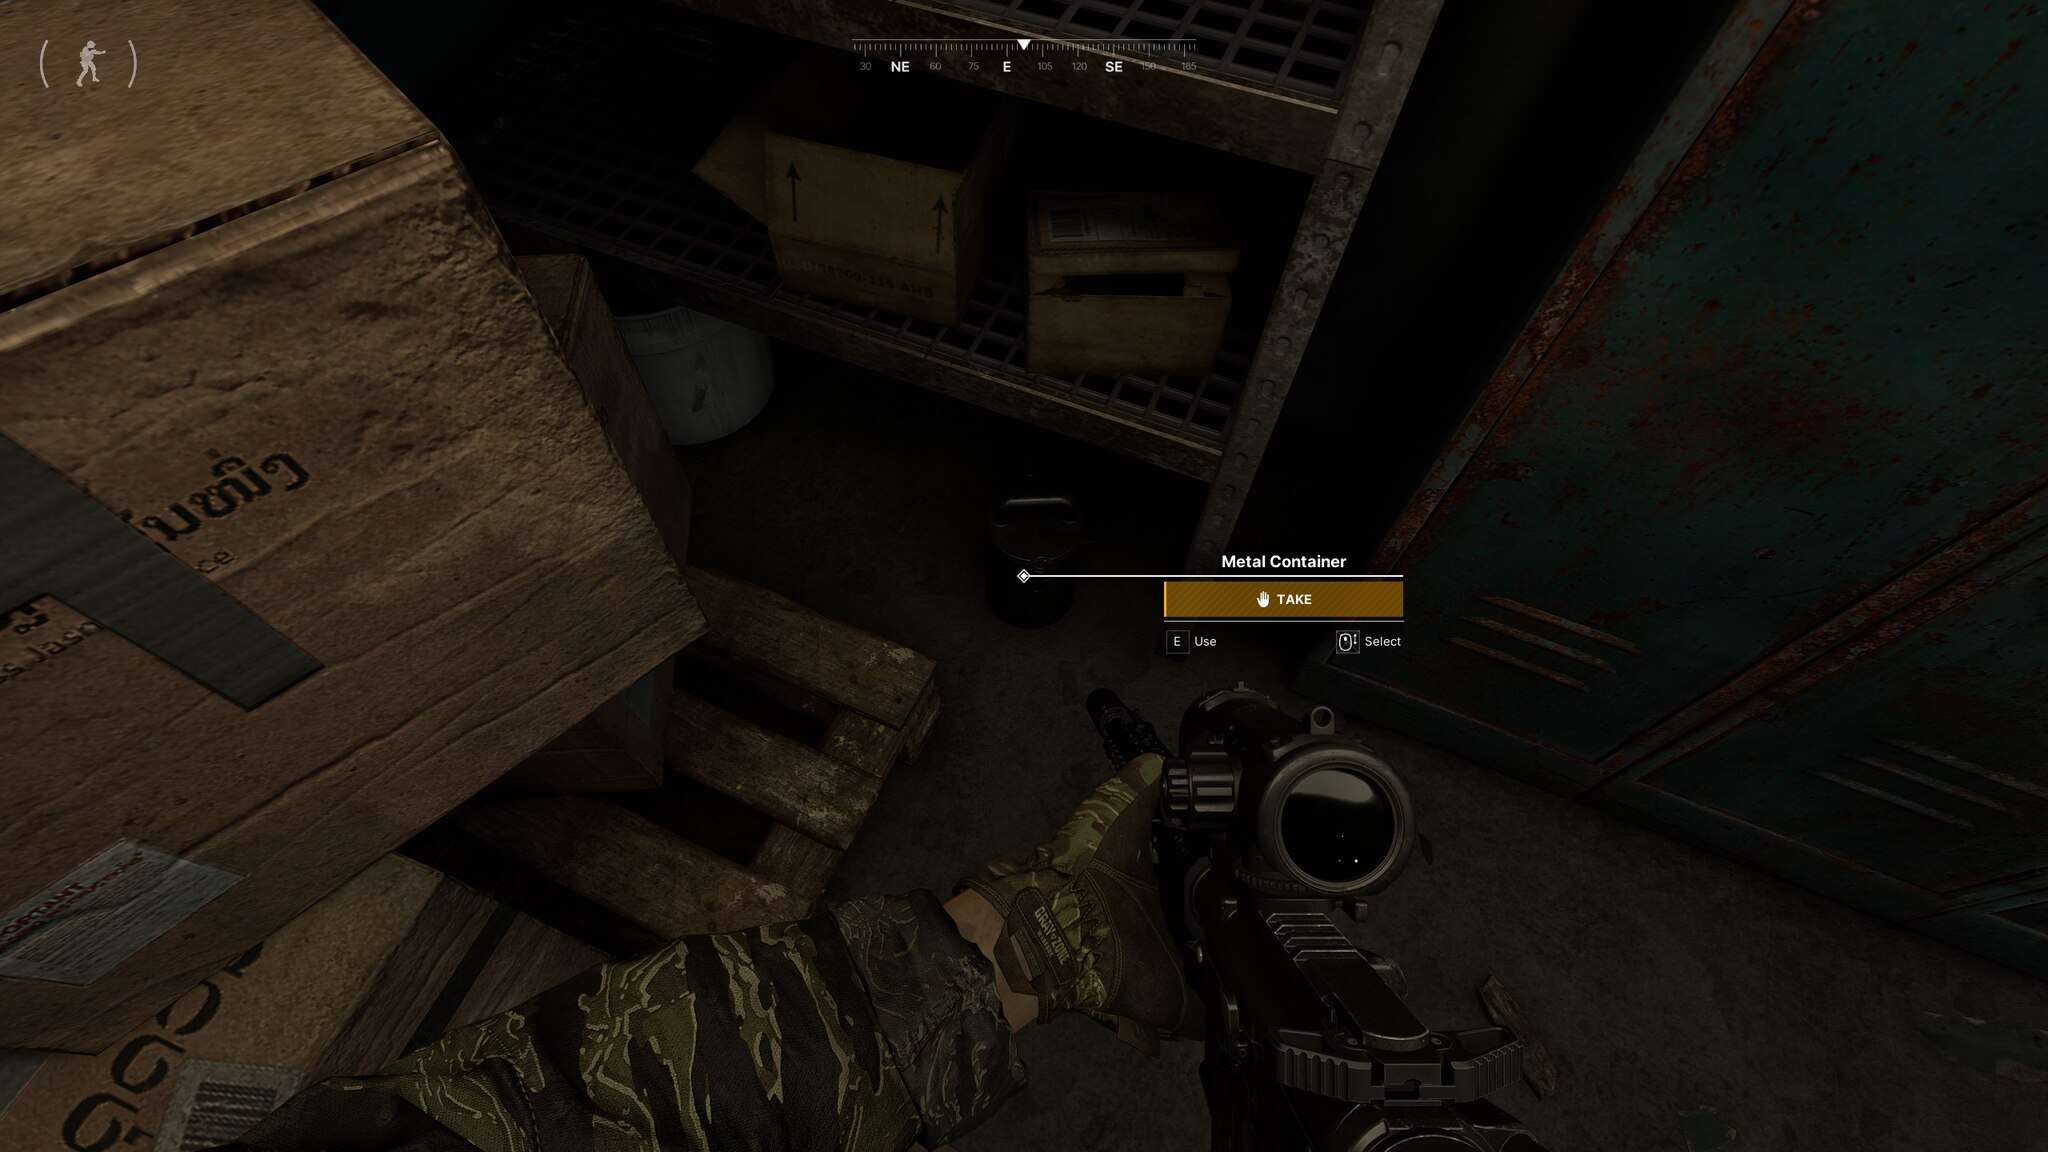
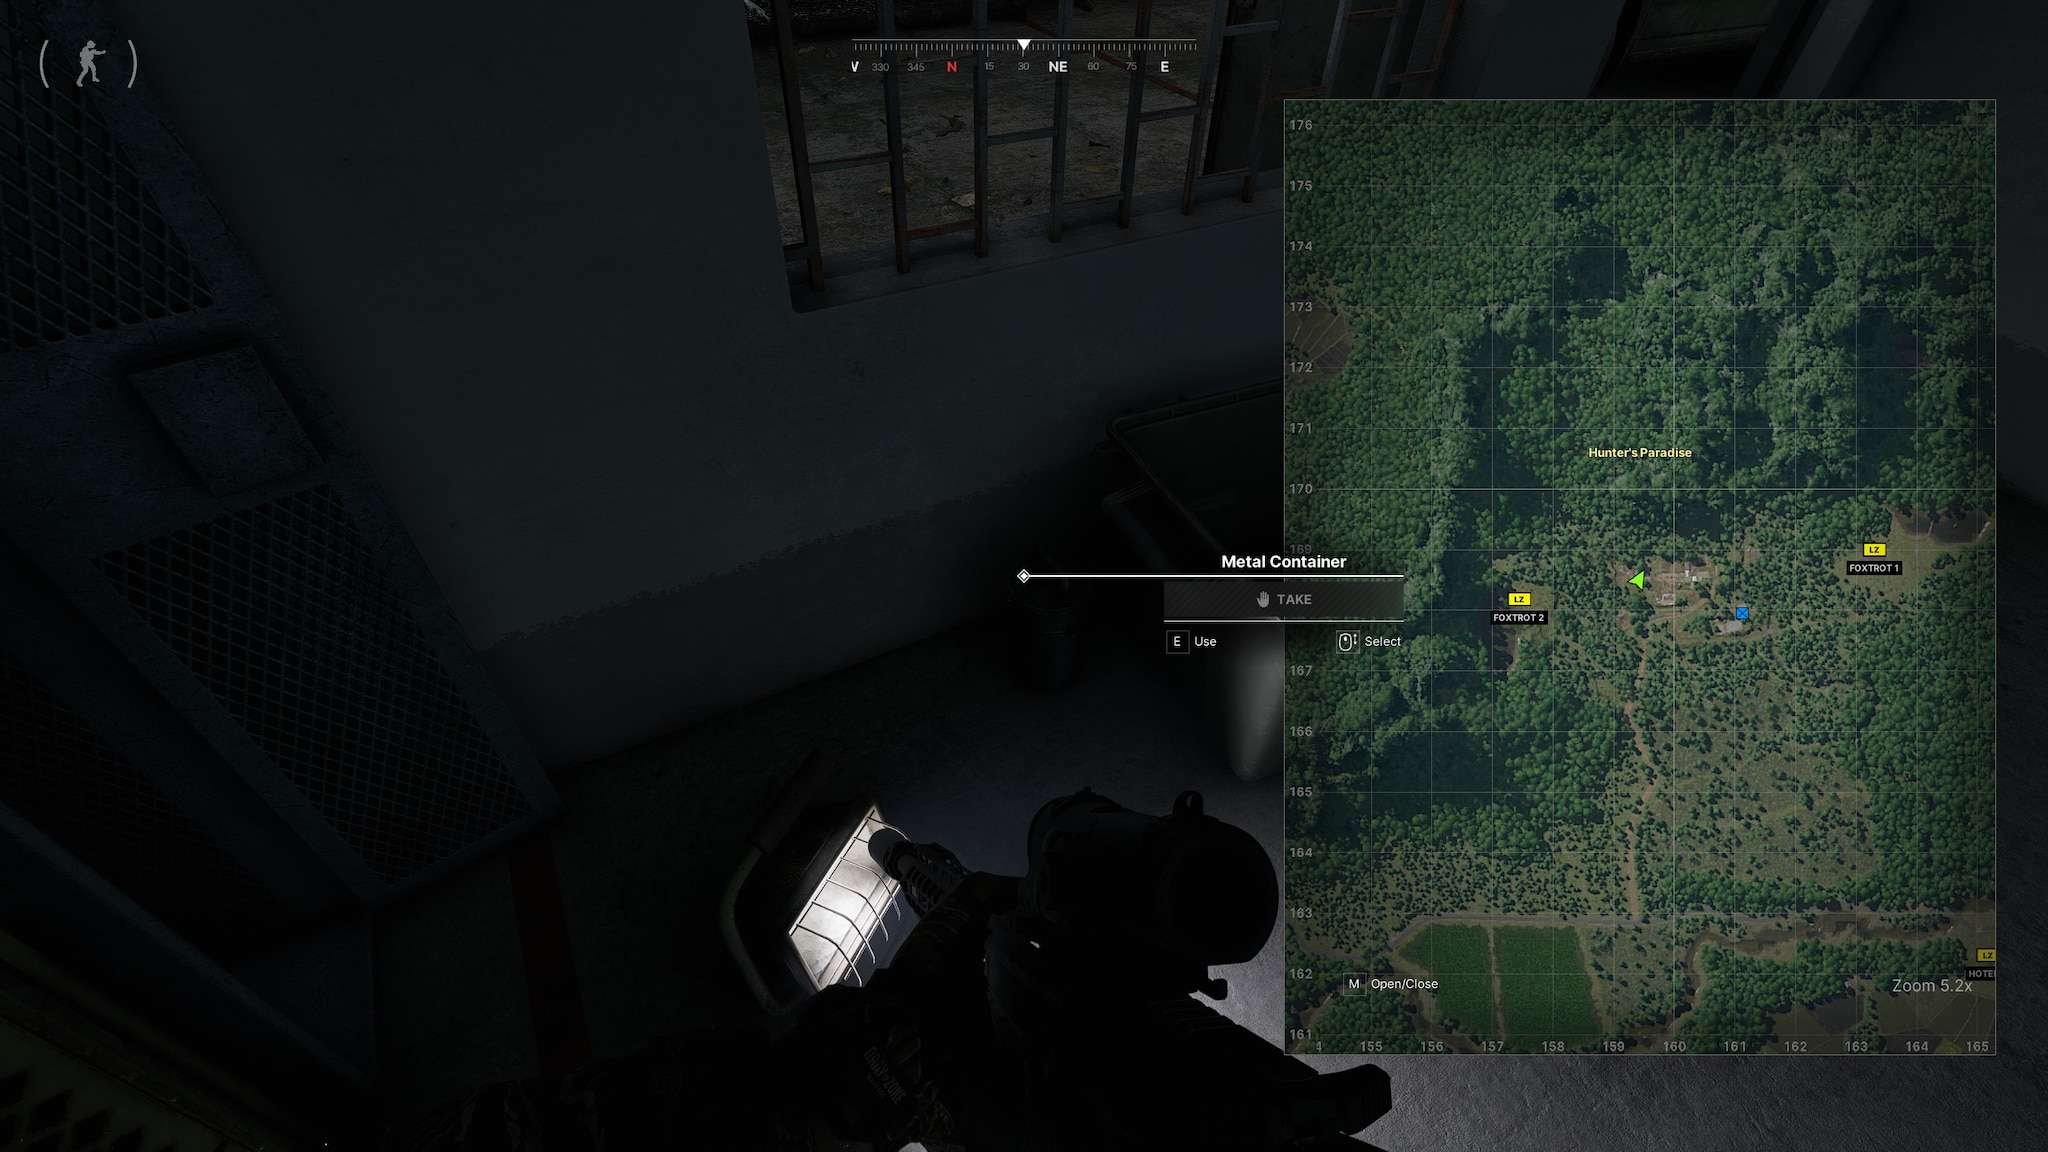
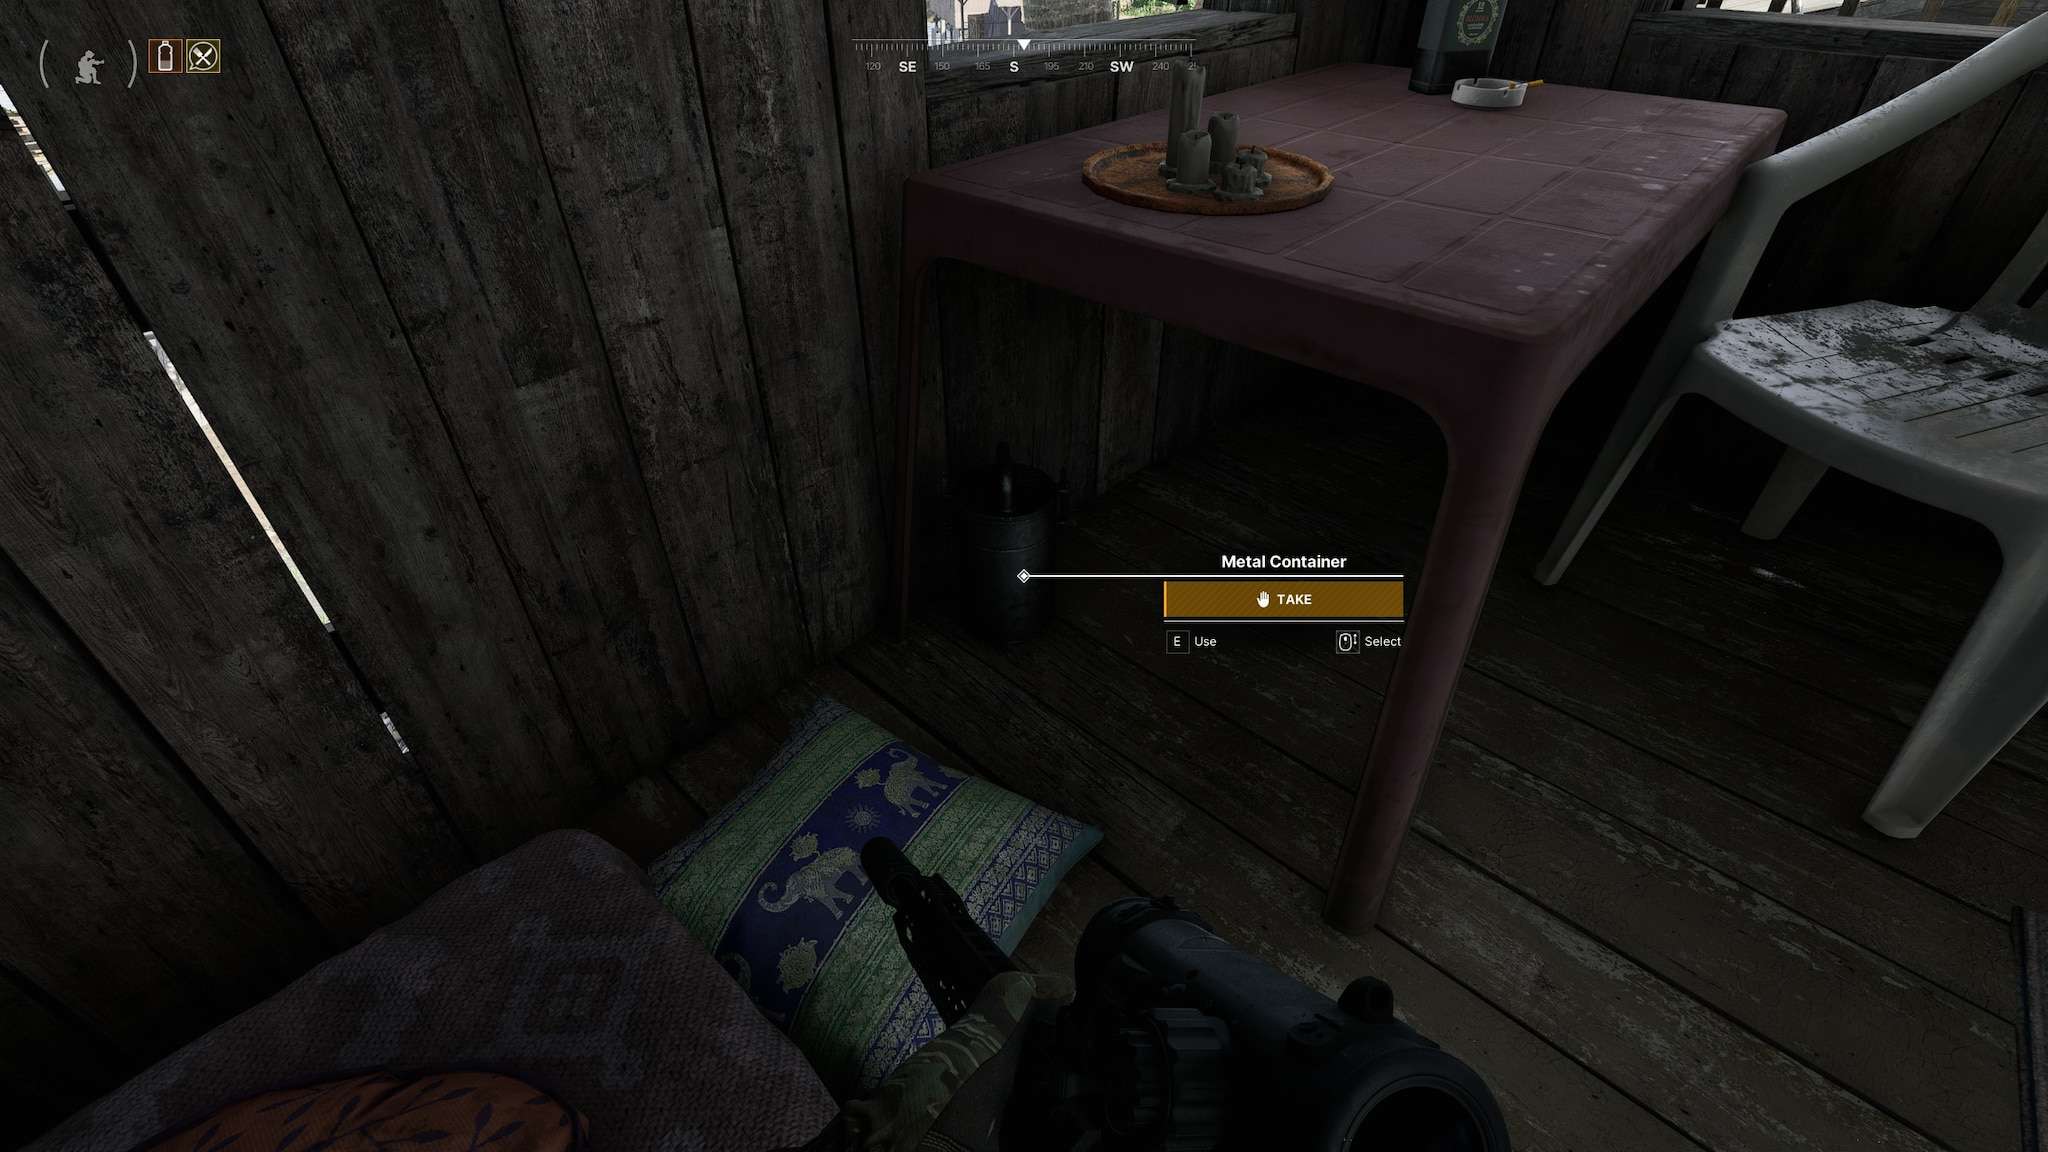
Hazardous Treasures (Part 1) Kill 10 bots at the Sawmill
Hazardous Treasures (Part 2) Find and retrieve the Metal container.
The item is in the central-building of sawmill and requires the “Sawmill Office Storage Key” in order to reach:
After entering the room, the item is in the back corner on the right:
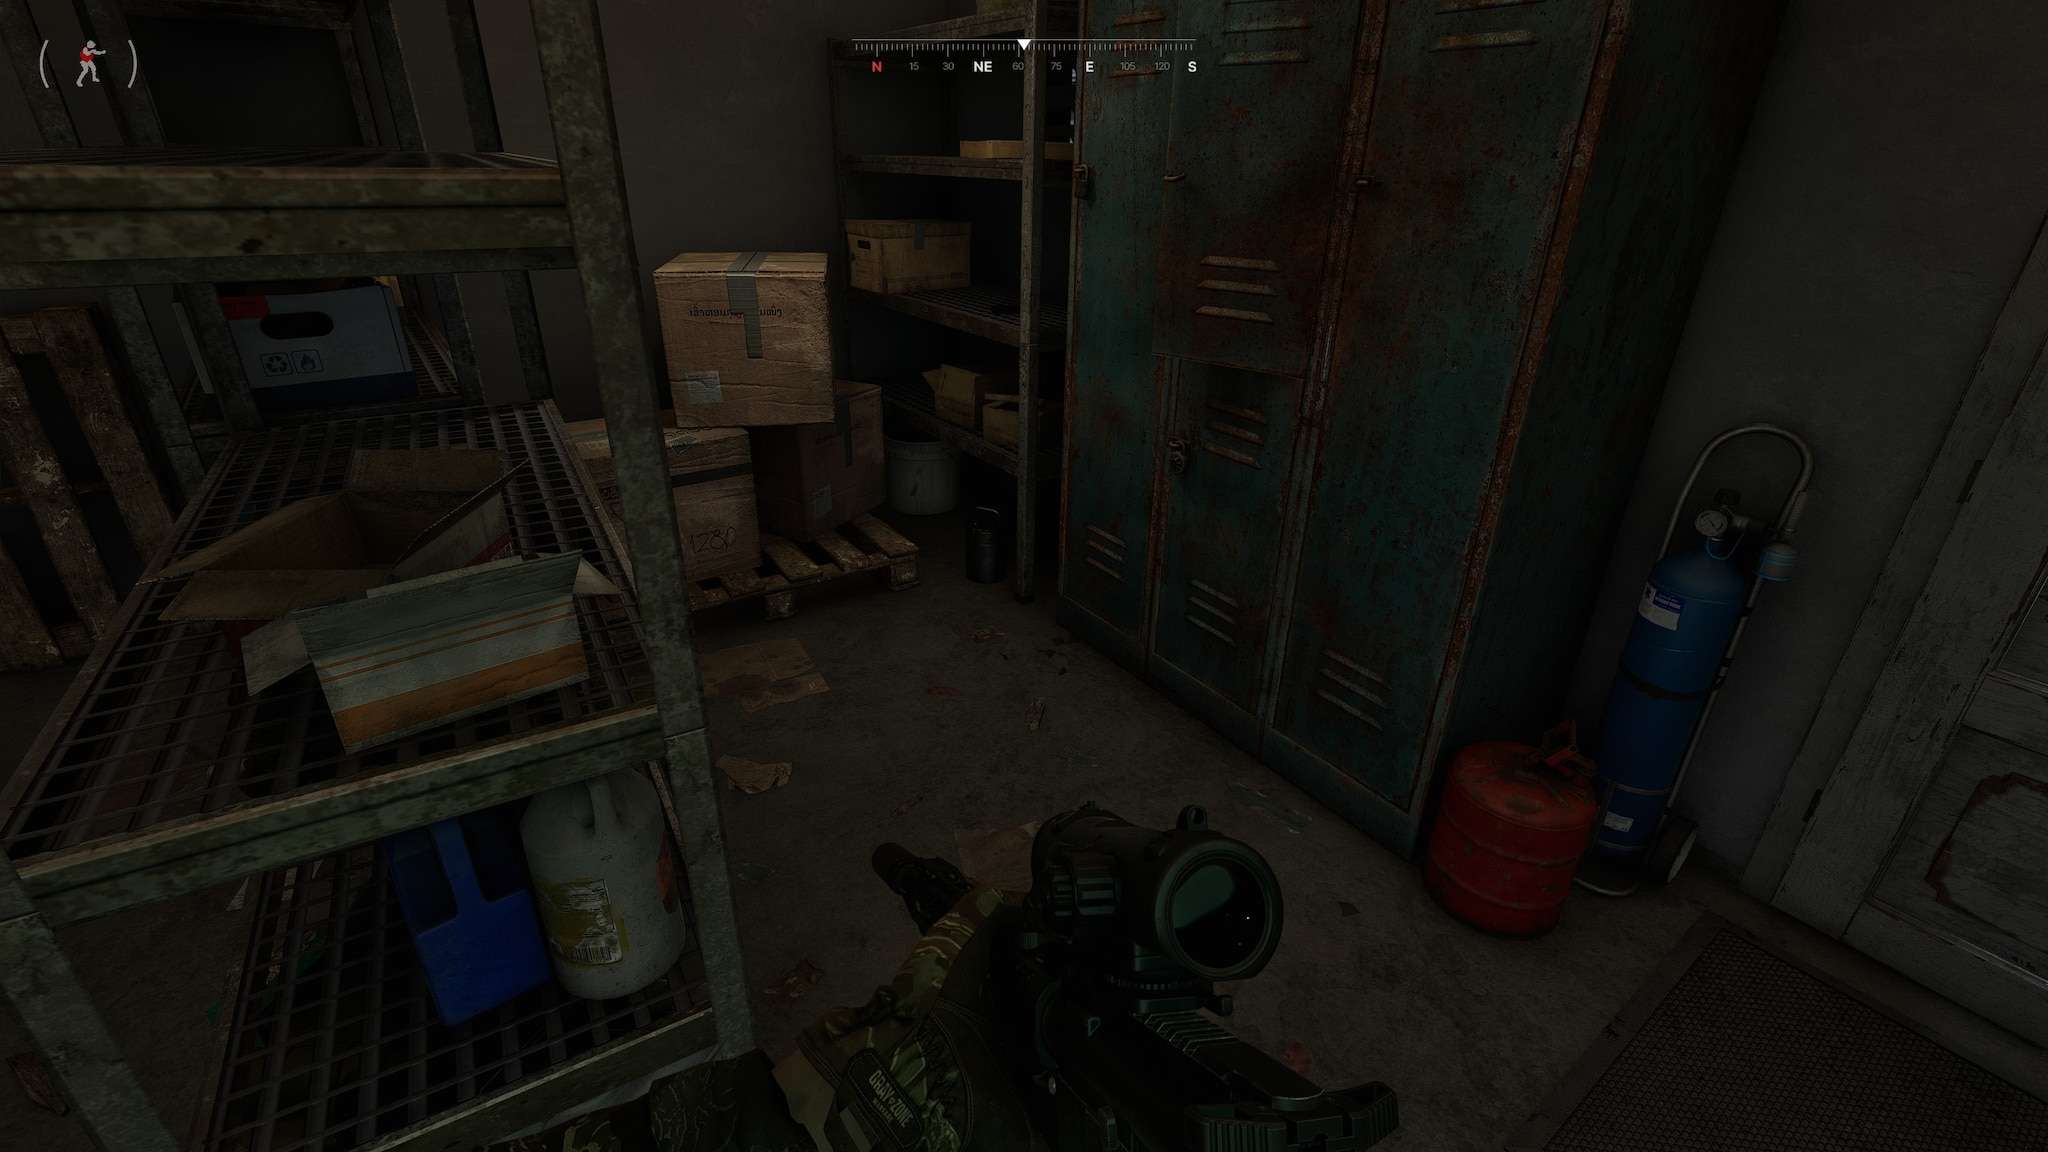
Item is a 3×3 that weighs 30kg, so likely to make you encoumbered:
Hazardous Treasures (Part 3) Kill 10 bots at Blue Lagoon
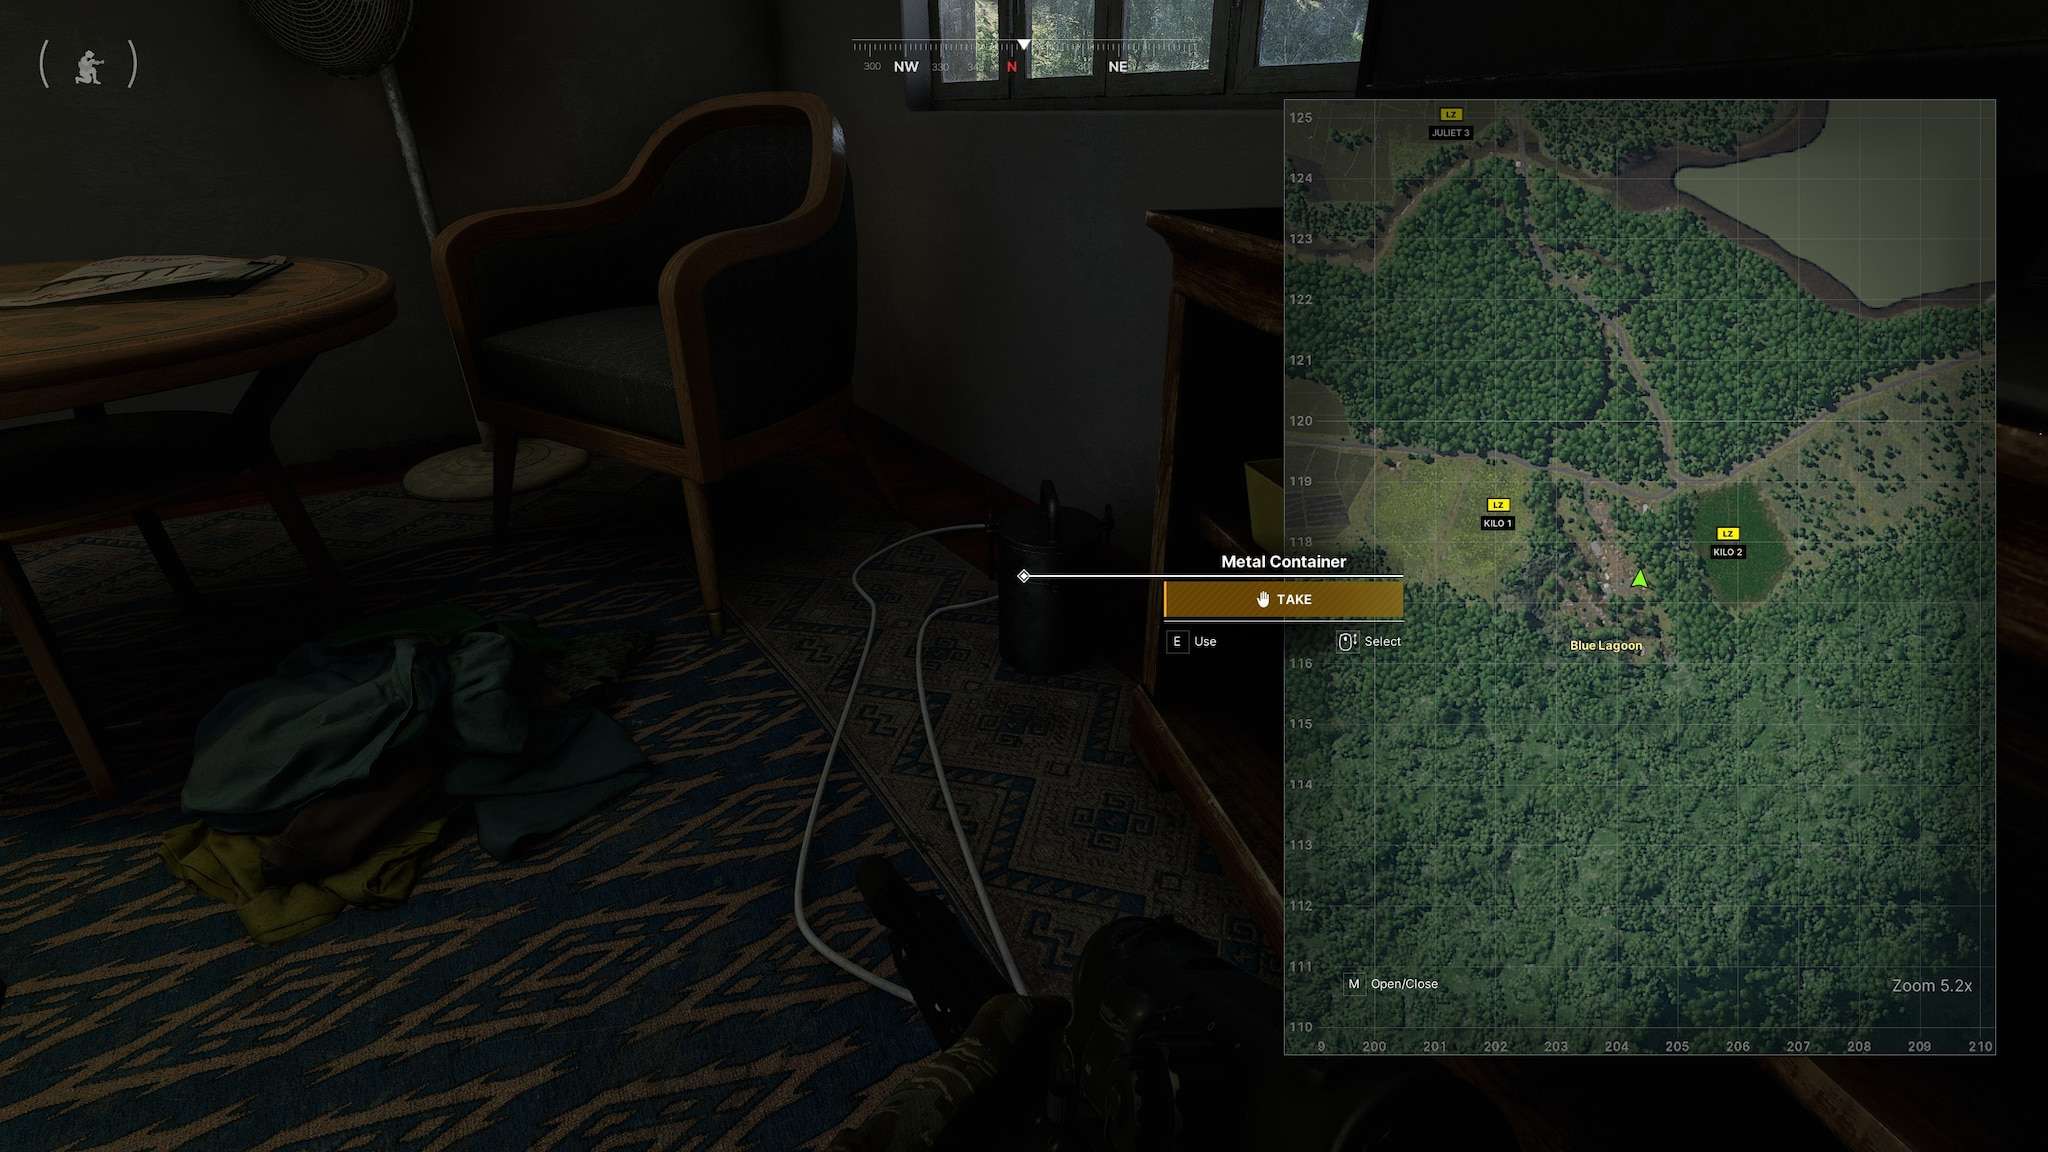
Hazardous Treasures (Part 4) Find a metal container.
The container is in the eastern house, connected with the wall.
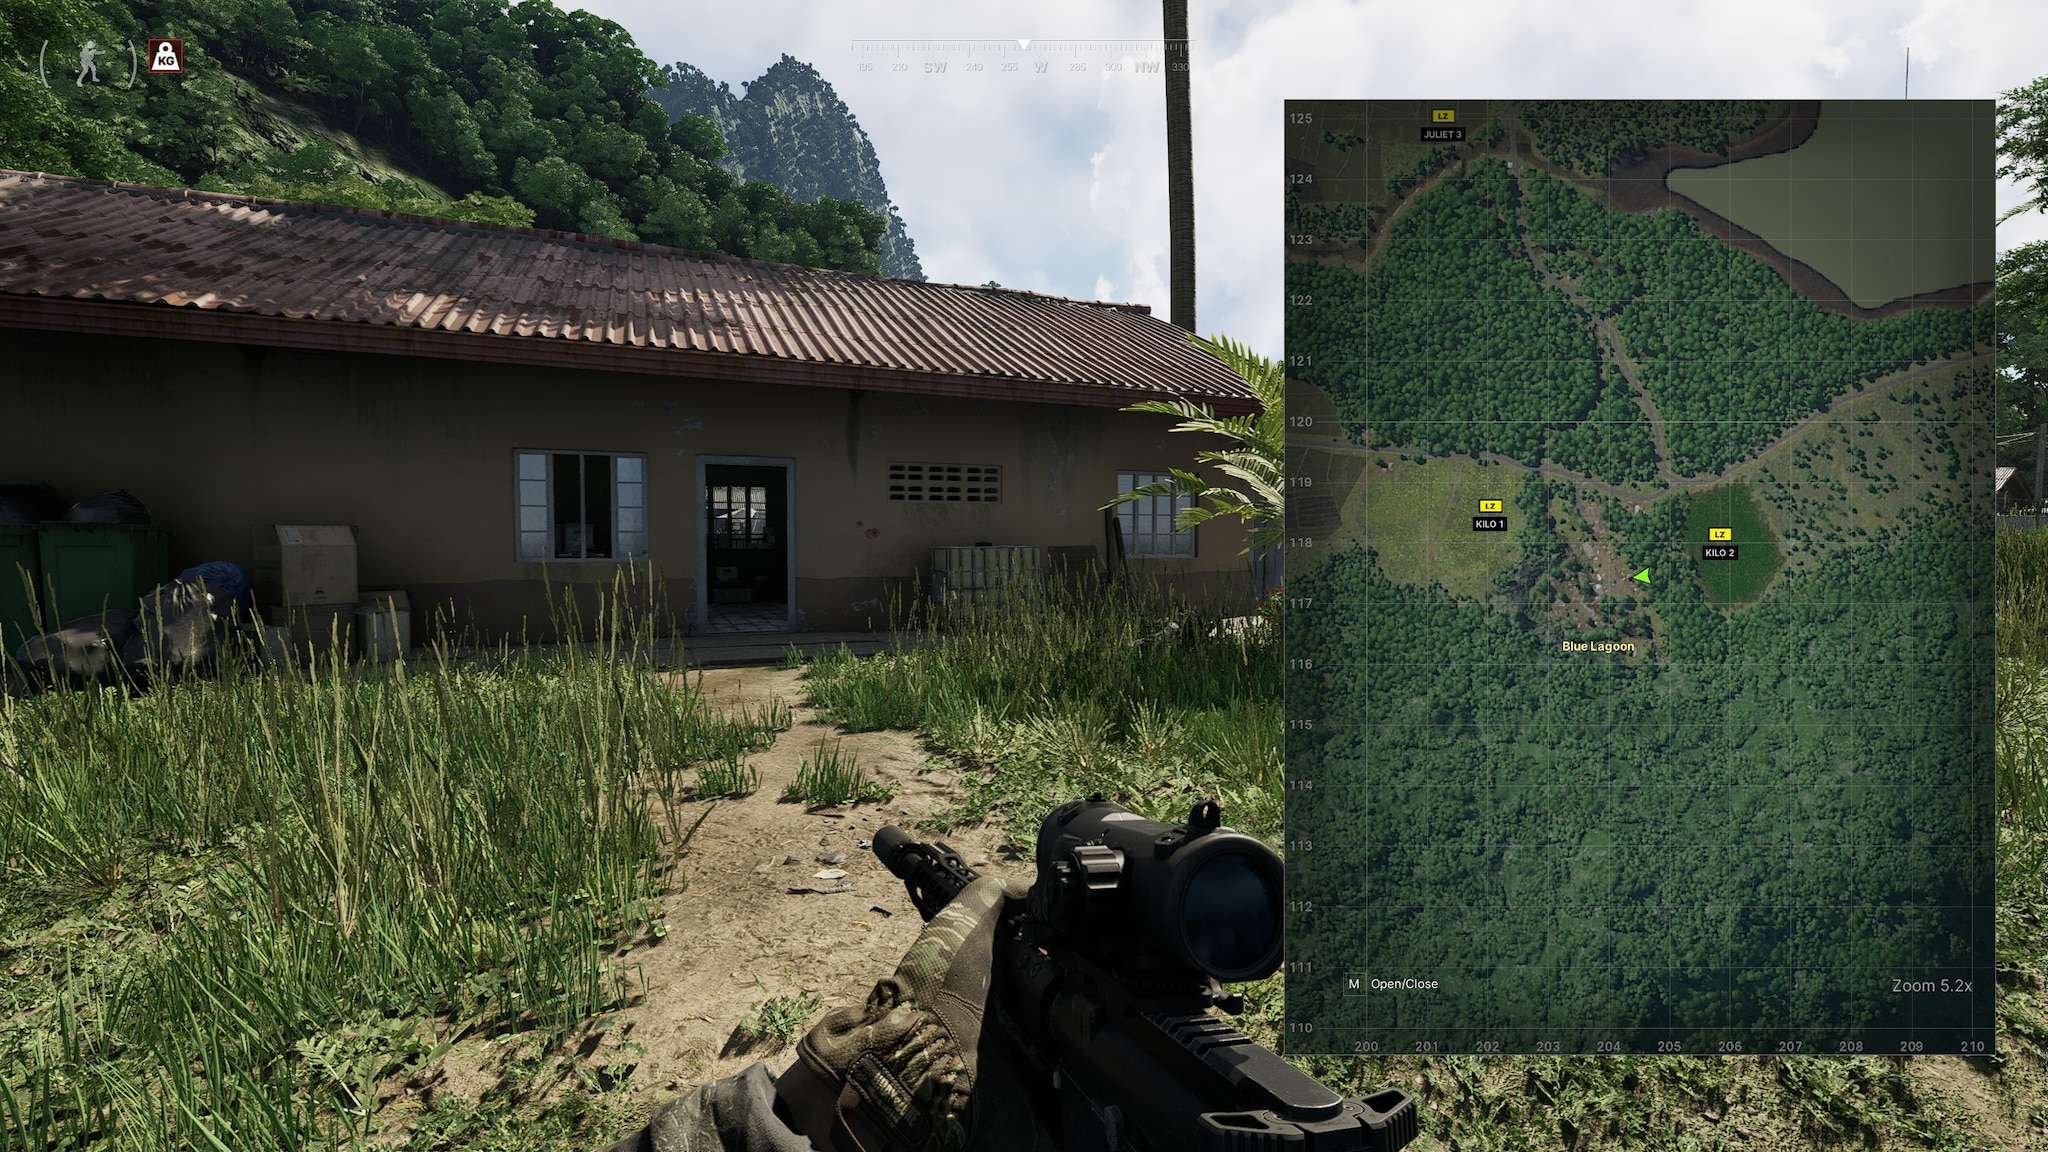
If you enter from the eastern side, go to the right-most room and the item will be on the ground, on the right side when you enter the room.
Hazardous Treasures (Part 5) Eliminate 10 hostiles at Hunter’s Paradise
Hazardous Treasures (Part 6)
Find and retrieve the Metal container from Hunters Paradise. The item is inside the far west building.
In order to enter the room you are required to have access to the “Hunter’s Paradise Weapon Storage Key” (HP Wep) as the item is inside the loot-room.
Hazardous Treasures (Part 7) Eliminate 10 hostiles at Ban Pa
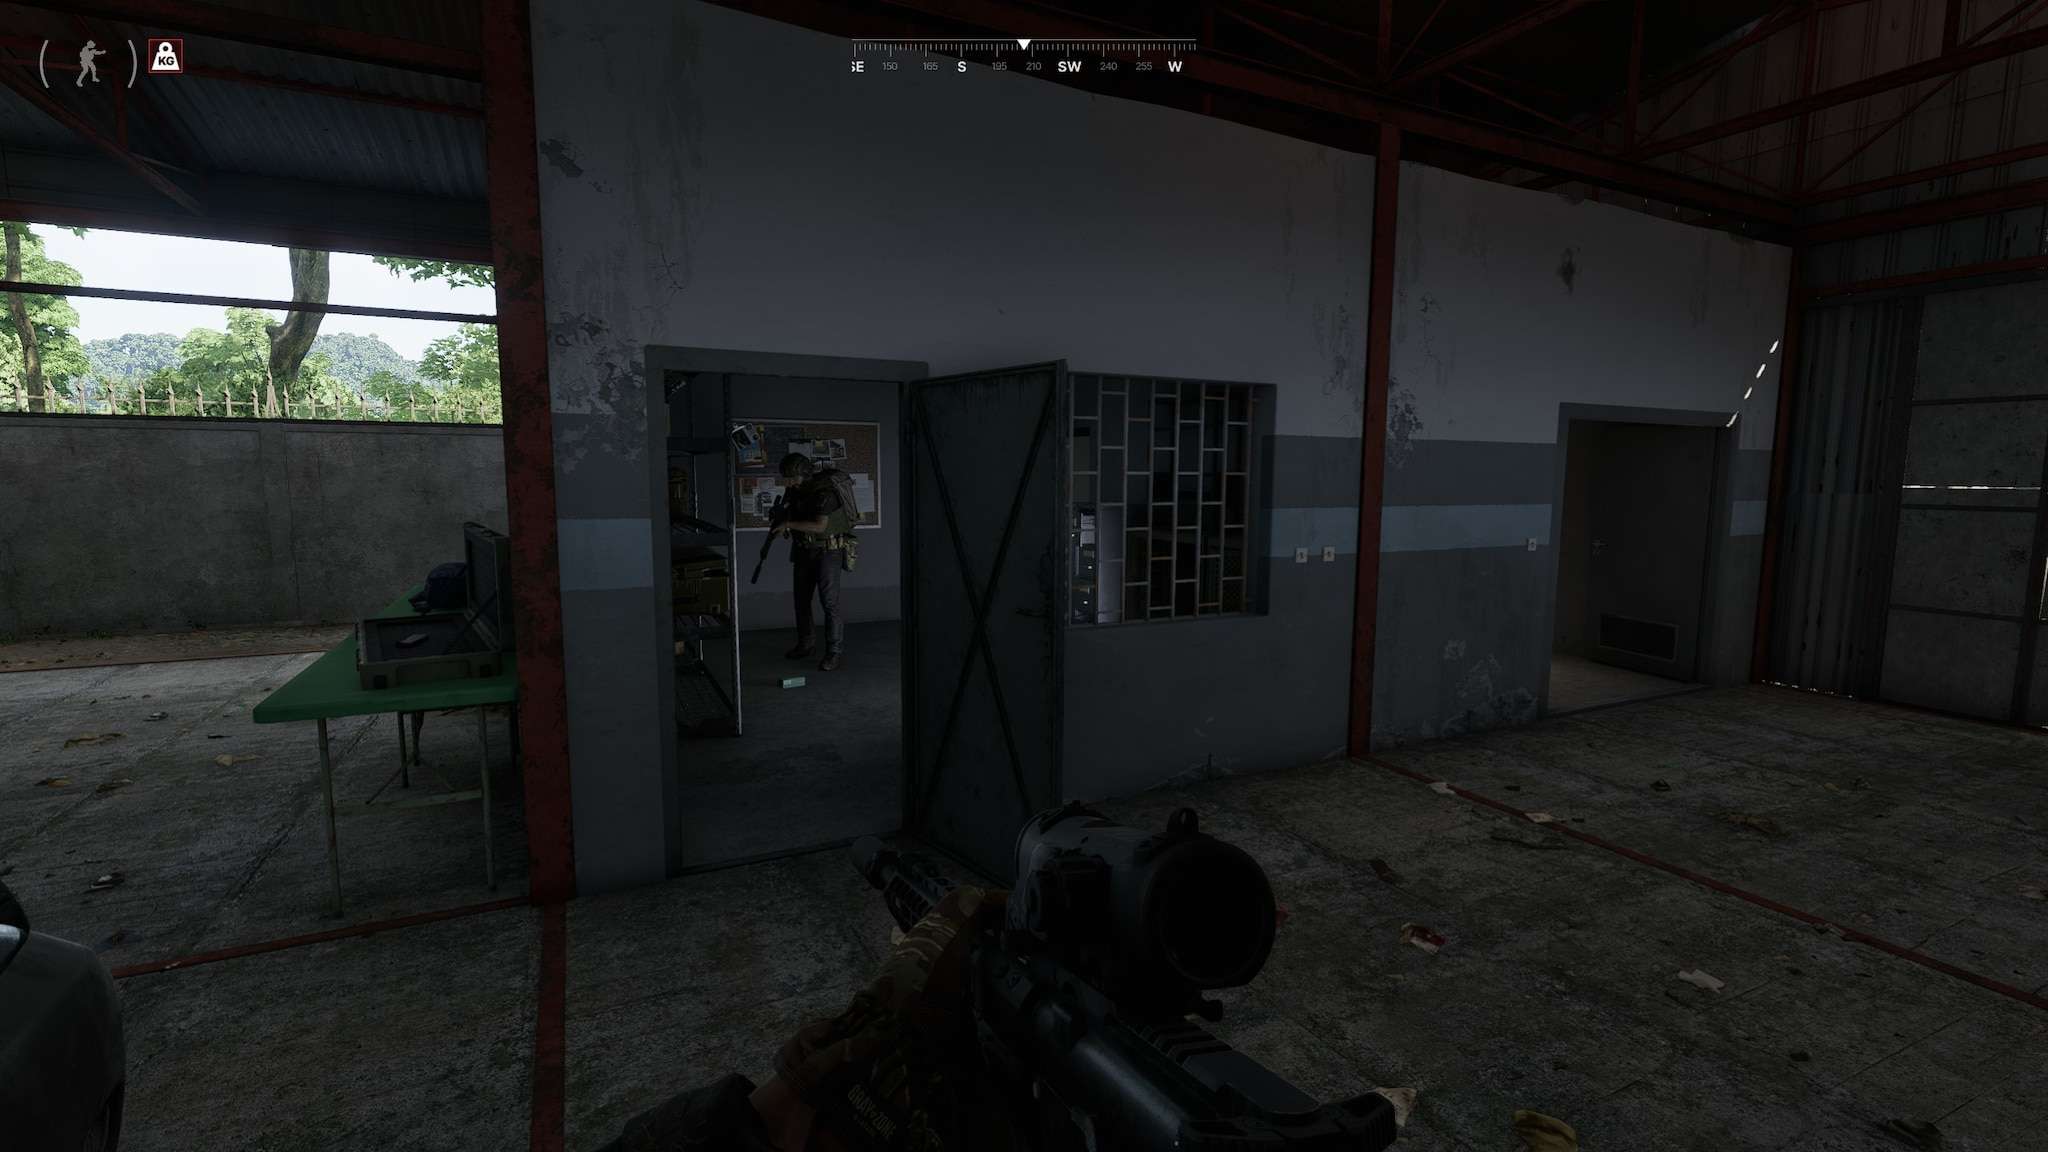
Hazardous Treasures (Part 8)
The item is inside the Elders House, on the second floor:
Enter the 2’nd room on the 2’nd floor:
Under the table in the back-left corner is the item:
Hazardous Treasures (Part 9) Eliminate 10 Hostiles at Pha Lang Airfield
Hazardous Treasures (Part 10)
Find and retrieve the metal canister (this one is inside the Storage Room at the remote hangar, south of the landing-strip.182,156)
Hazardous Treasures (Part 11) Eliminate 10 Hostiles at YBL
Hazardous Treasures (Part 12)
Outside the conference room on Floor -2 (door on right):
Item is in the backroom on the floor, on the floor to the right when entering:
The hidden reward for Hazardous Treasures:
It is the same 3×2 safe-container as you get in the “Elite Edition”-package of the game.
Wing Clipping
Wing Clipping – Kill 20 bots at the airfield (Pha Lang)
Deepest, Darkest Fantasies
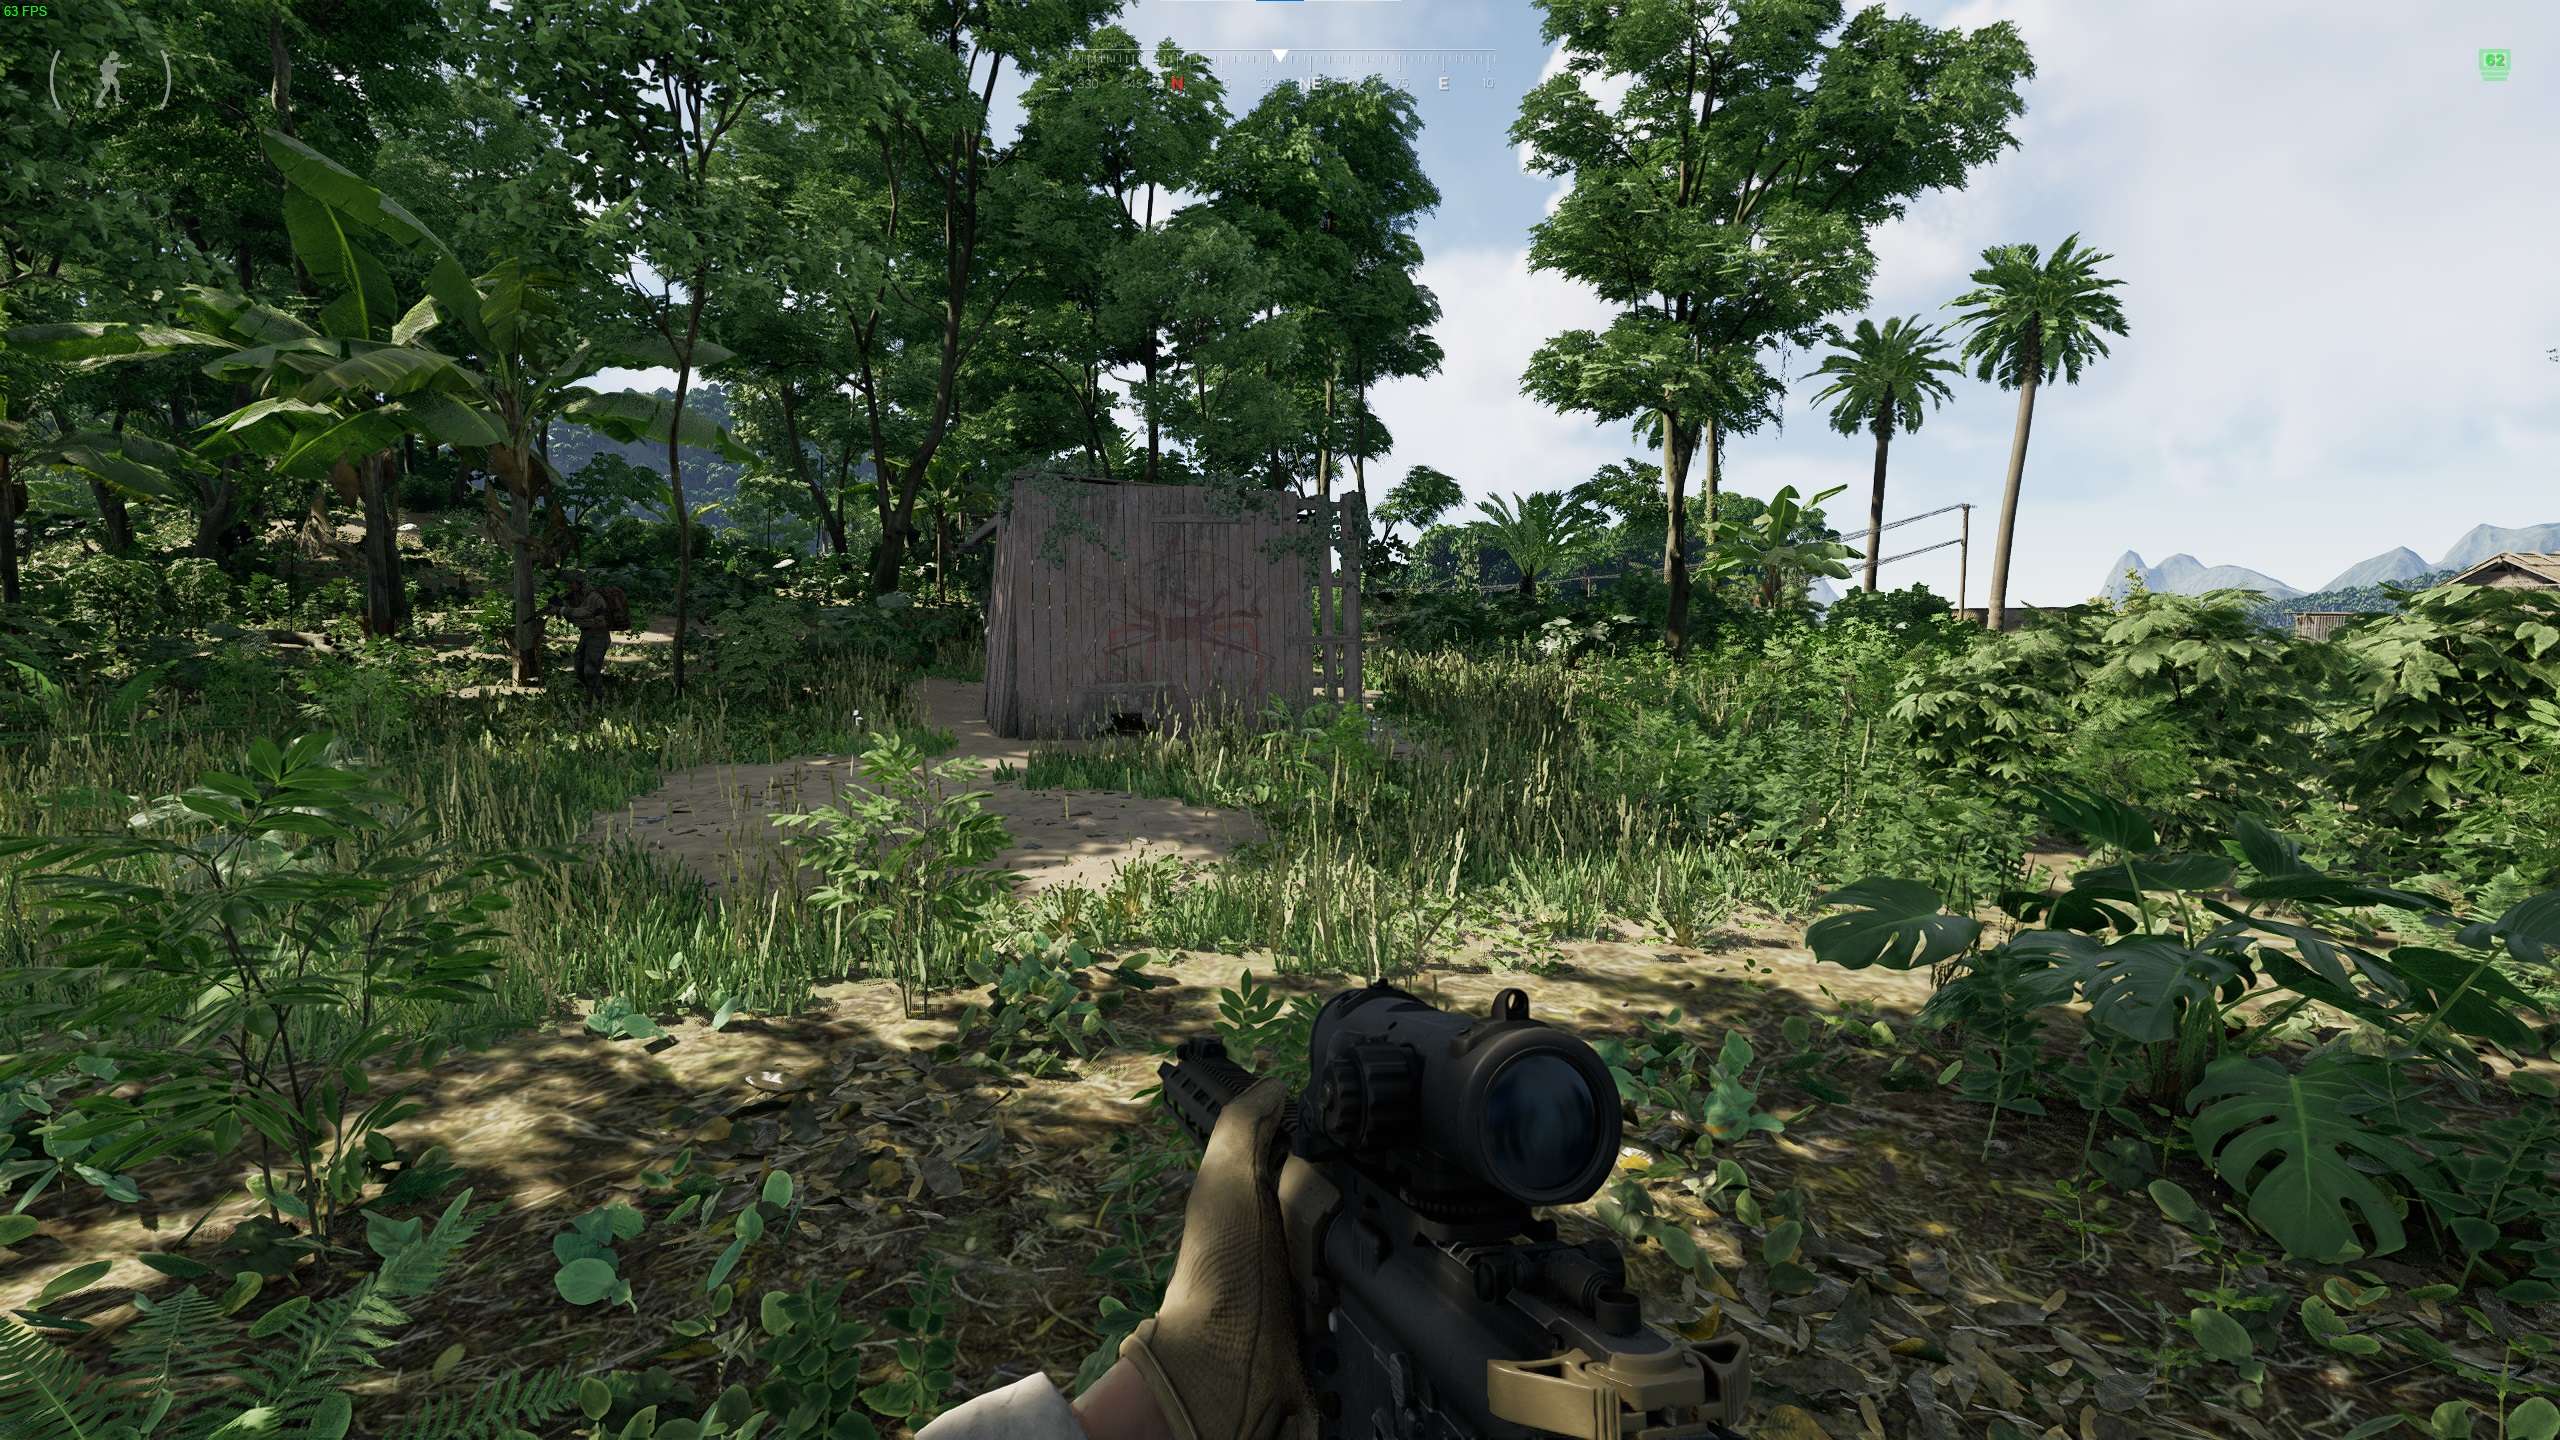
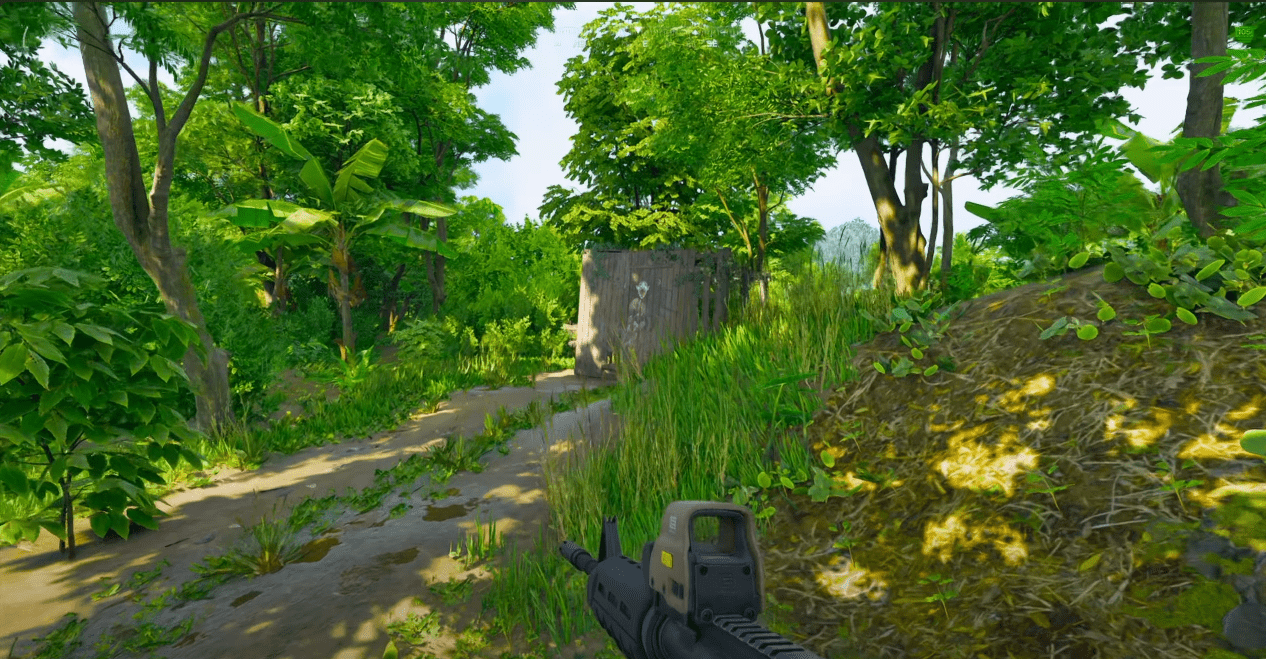
Deepest, Darkest Fantasies – 174 167 – Retrieve the flash drive and report back to handshake
Inside on the table in front of the tv should be a flash drive.
Reconnaissance In Force
Reconnaissance In Force – Kill 30 bots at military base (Fort Narith)
Jets’N’Marks
Jets’N’Marks
144 127
144 127
143 127
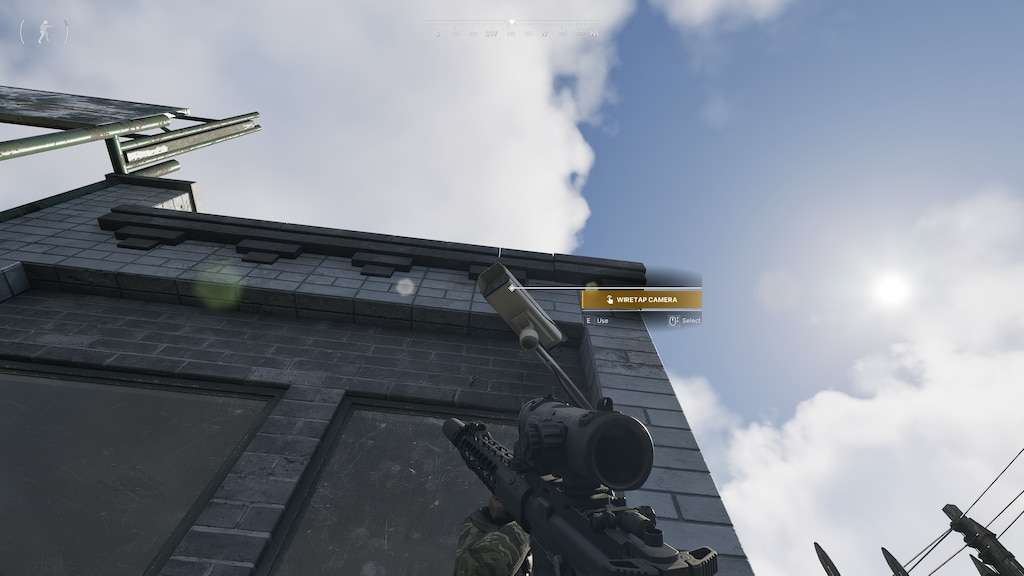
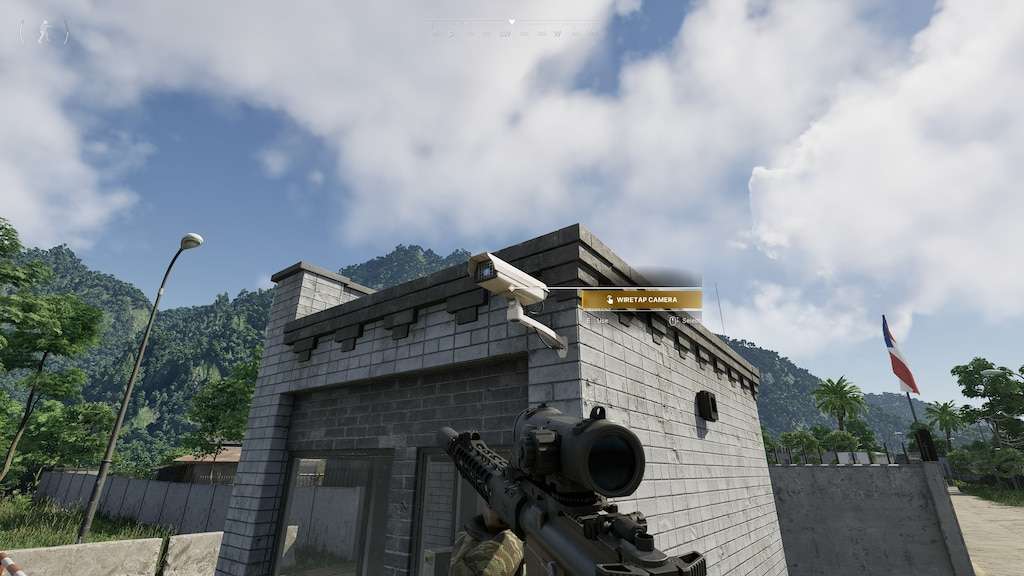
Hacker
HQ:
Inside the main entrance, directly on the right as you enter.
North Gate location:
North Gate Camera:
Attached to the guard hut on the outside of the wall.
Main Gate Location:

Main Gate Camera:
Attached to the Guard Hut facing outwards
Air Control Tower Location:
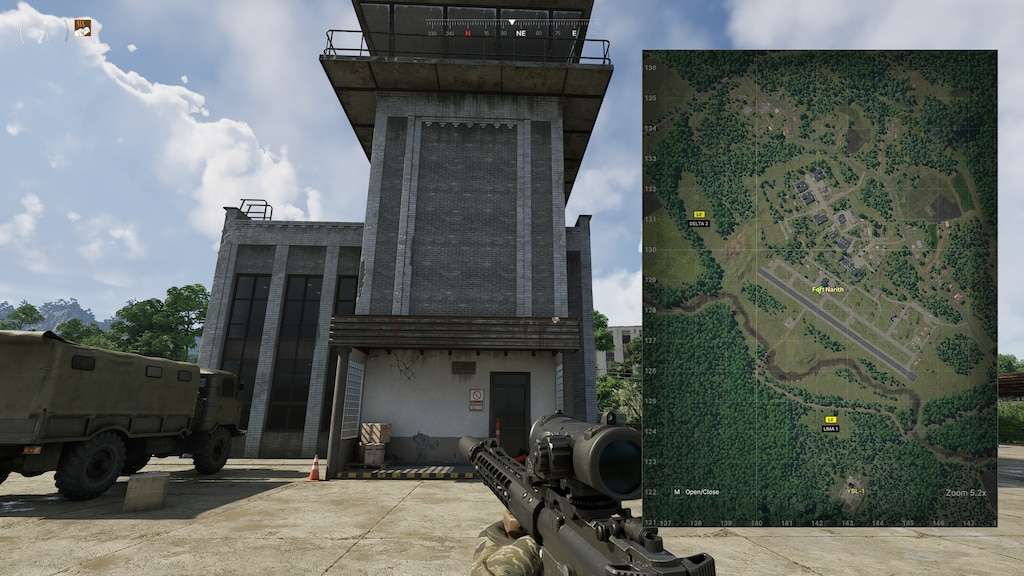
Air Control Tower Camera:
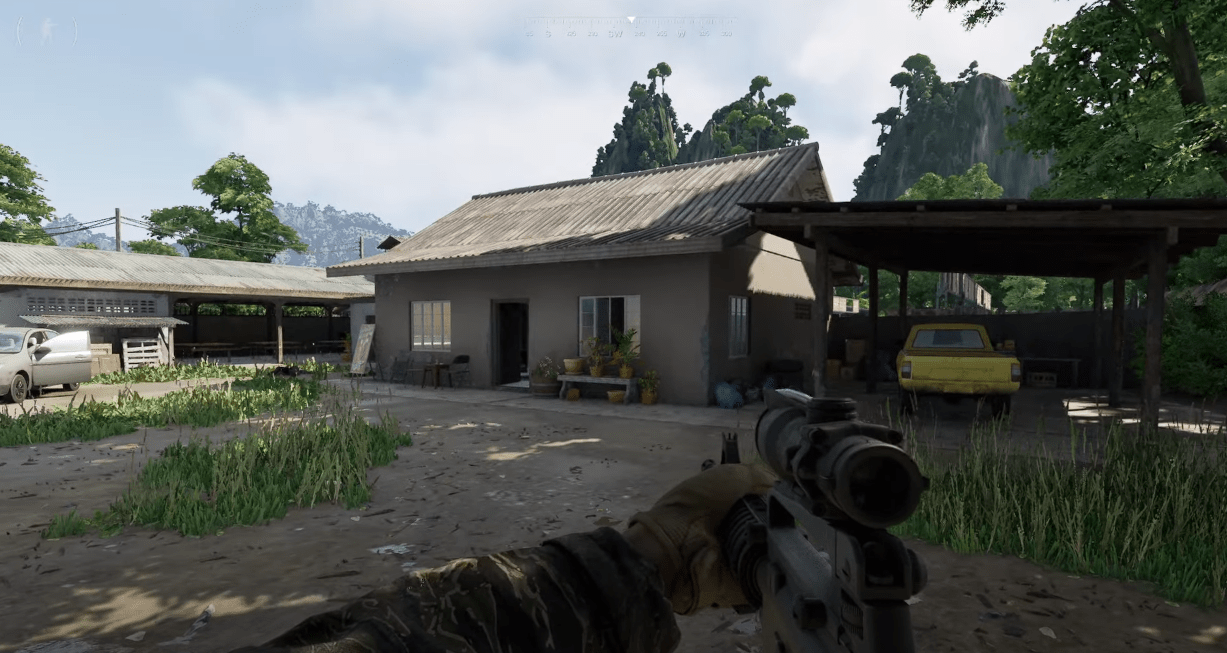
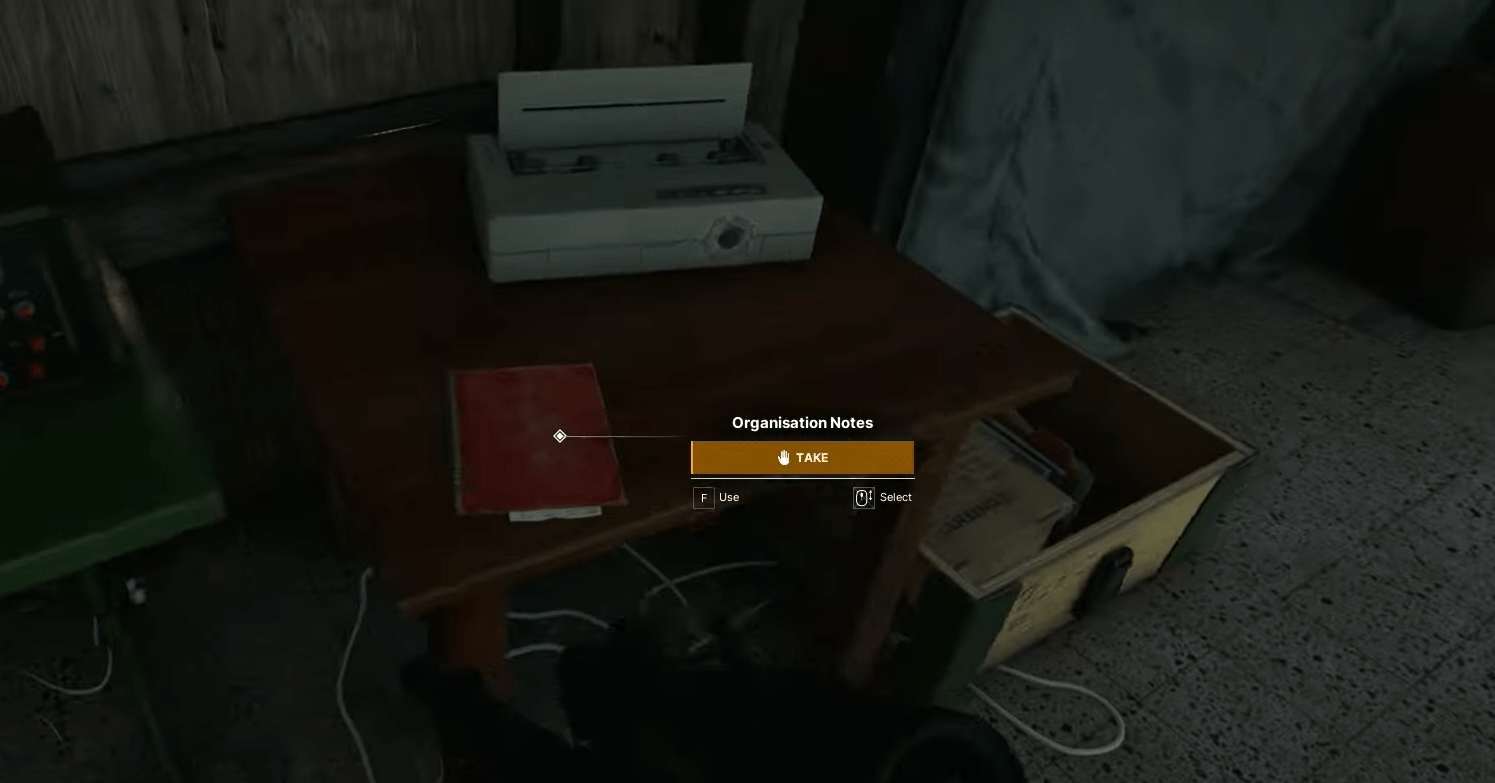
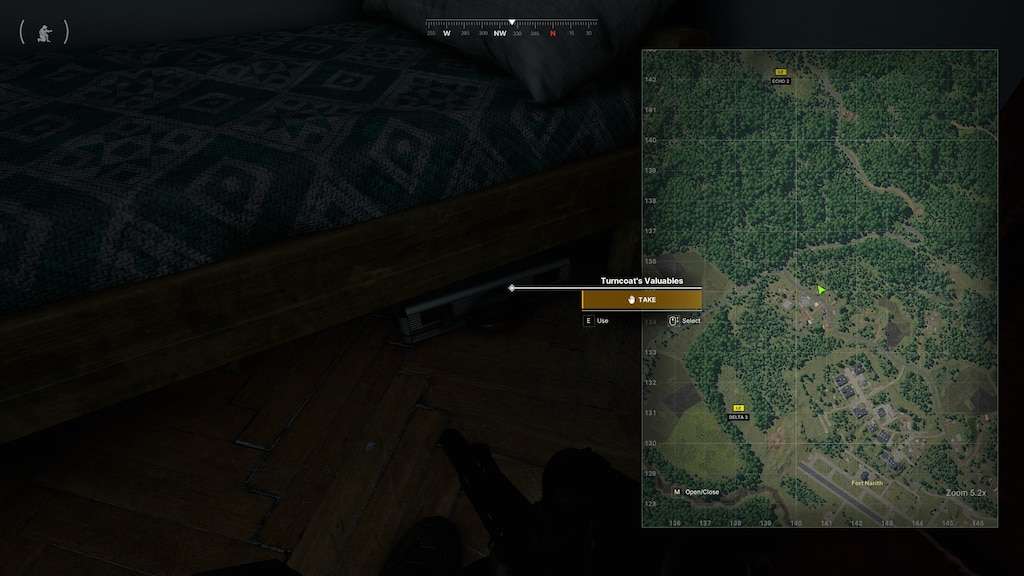
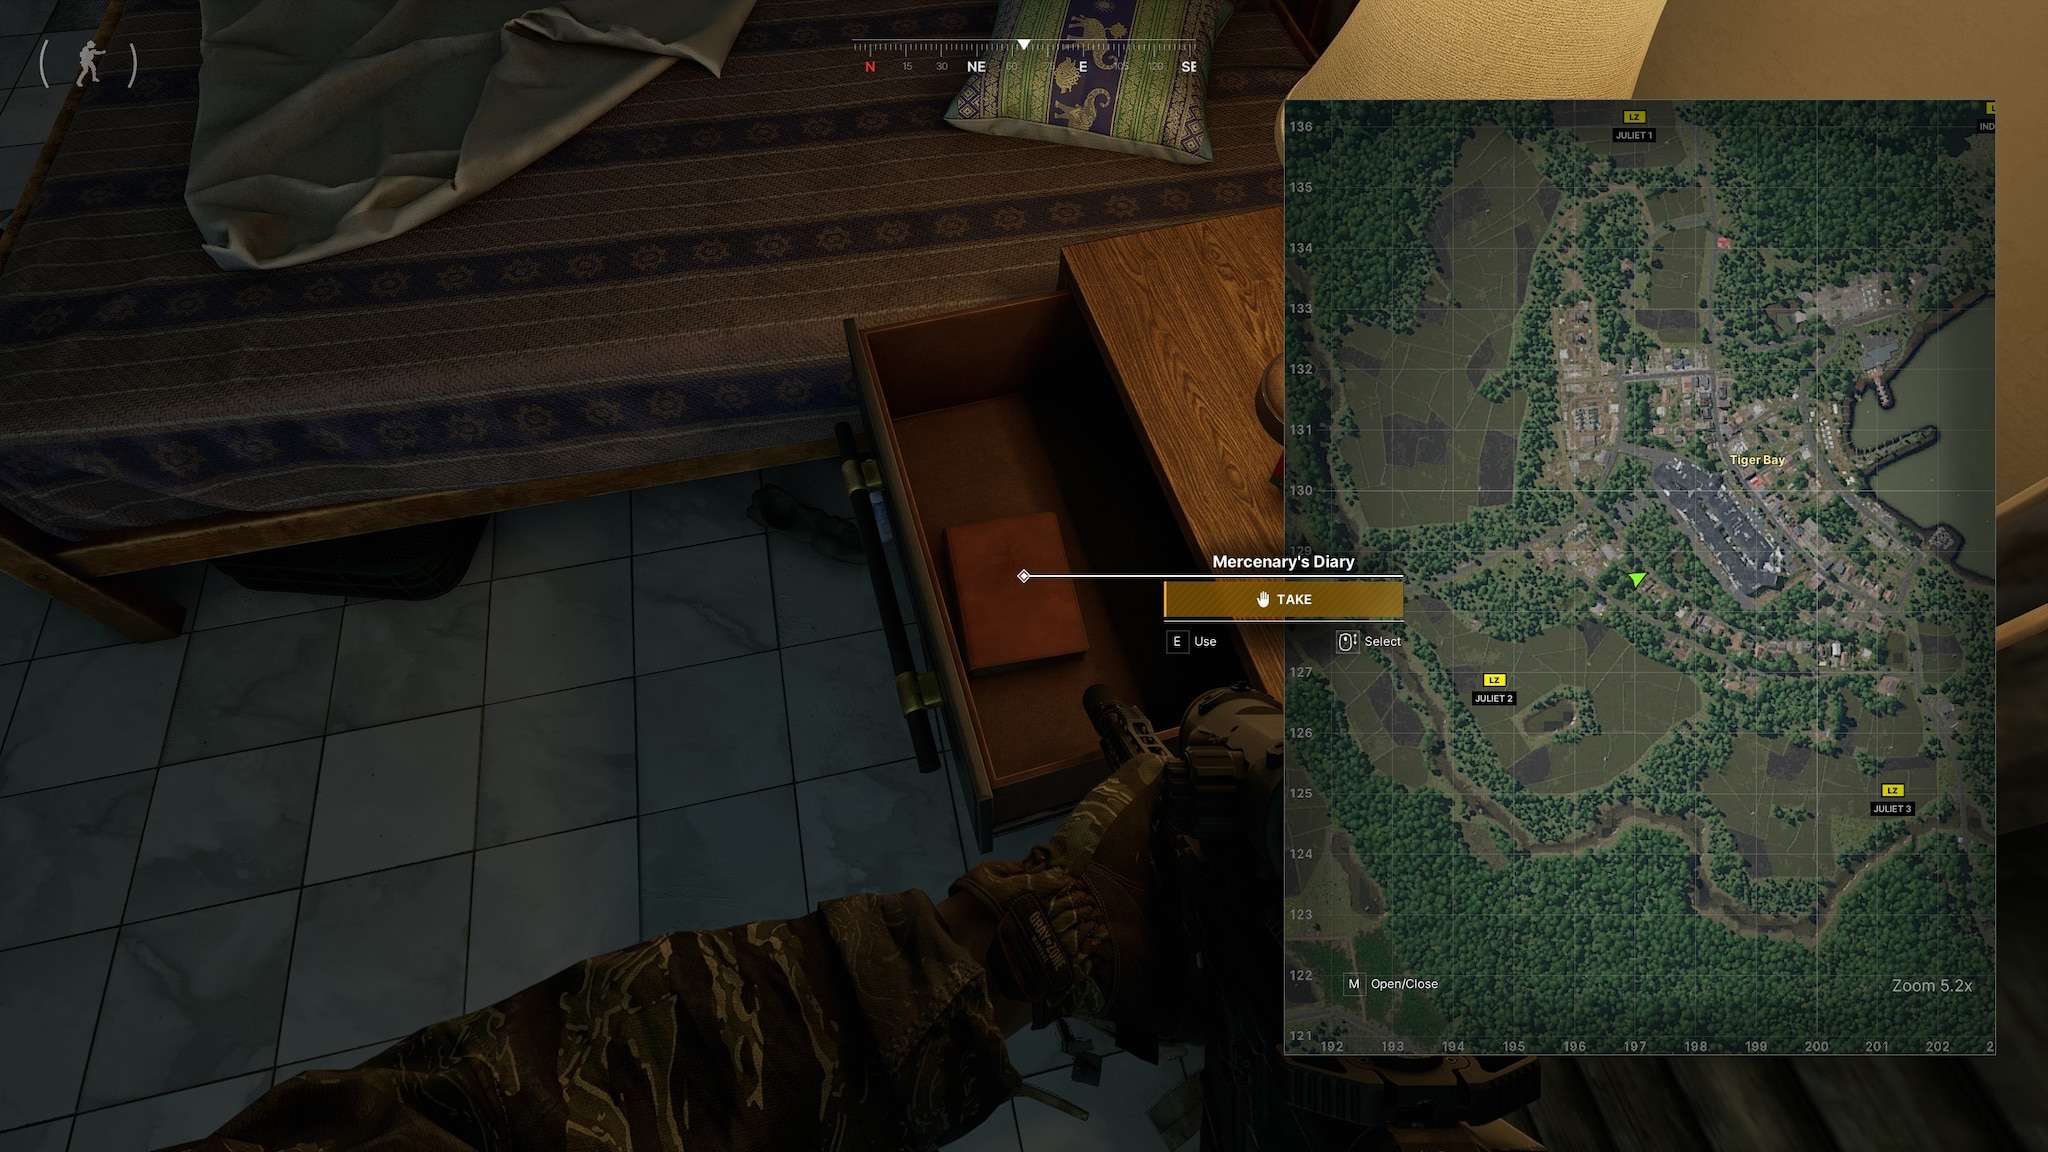
Family Heirloom
Family Heirloom
If you want to get into the house, head around to the back and take the left side. Once you’re in, make your way up to the second floor. You’ll find a briefcase with some valuables stashed away in the room directly above the stairs, tucked under a bed. Keep your eyes peeled, and you’ll bag yourself some goodies.
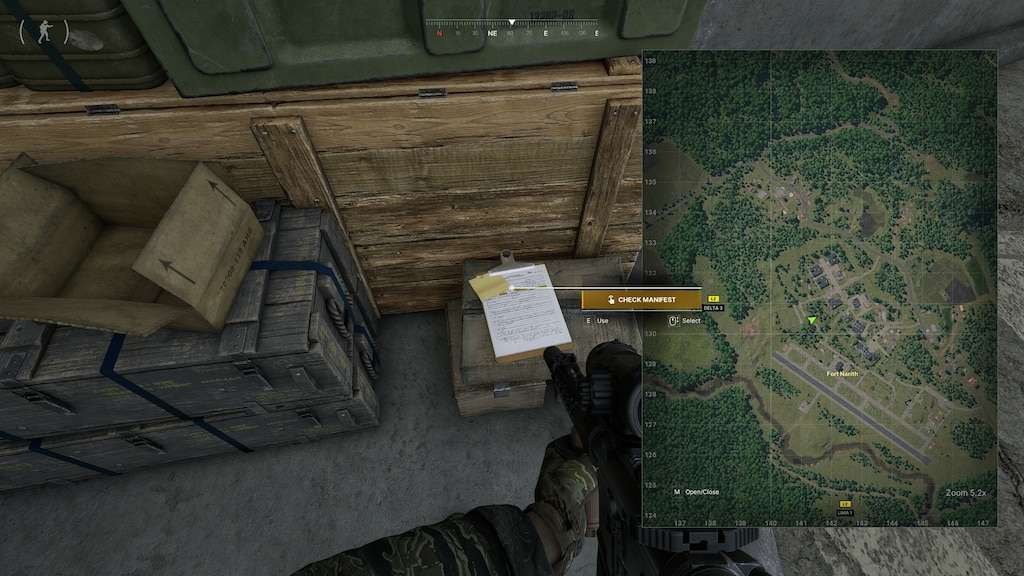
State of Weapon Shipment
State of Weapon Shipment
A Small Favor
A Small Favor
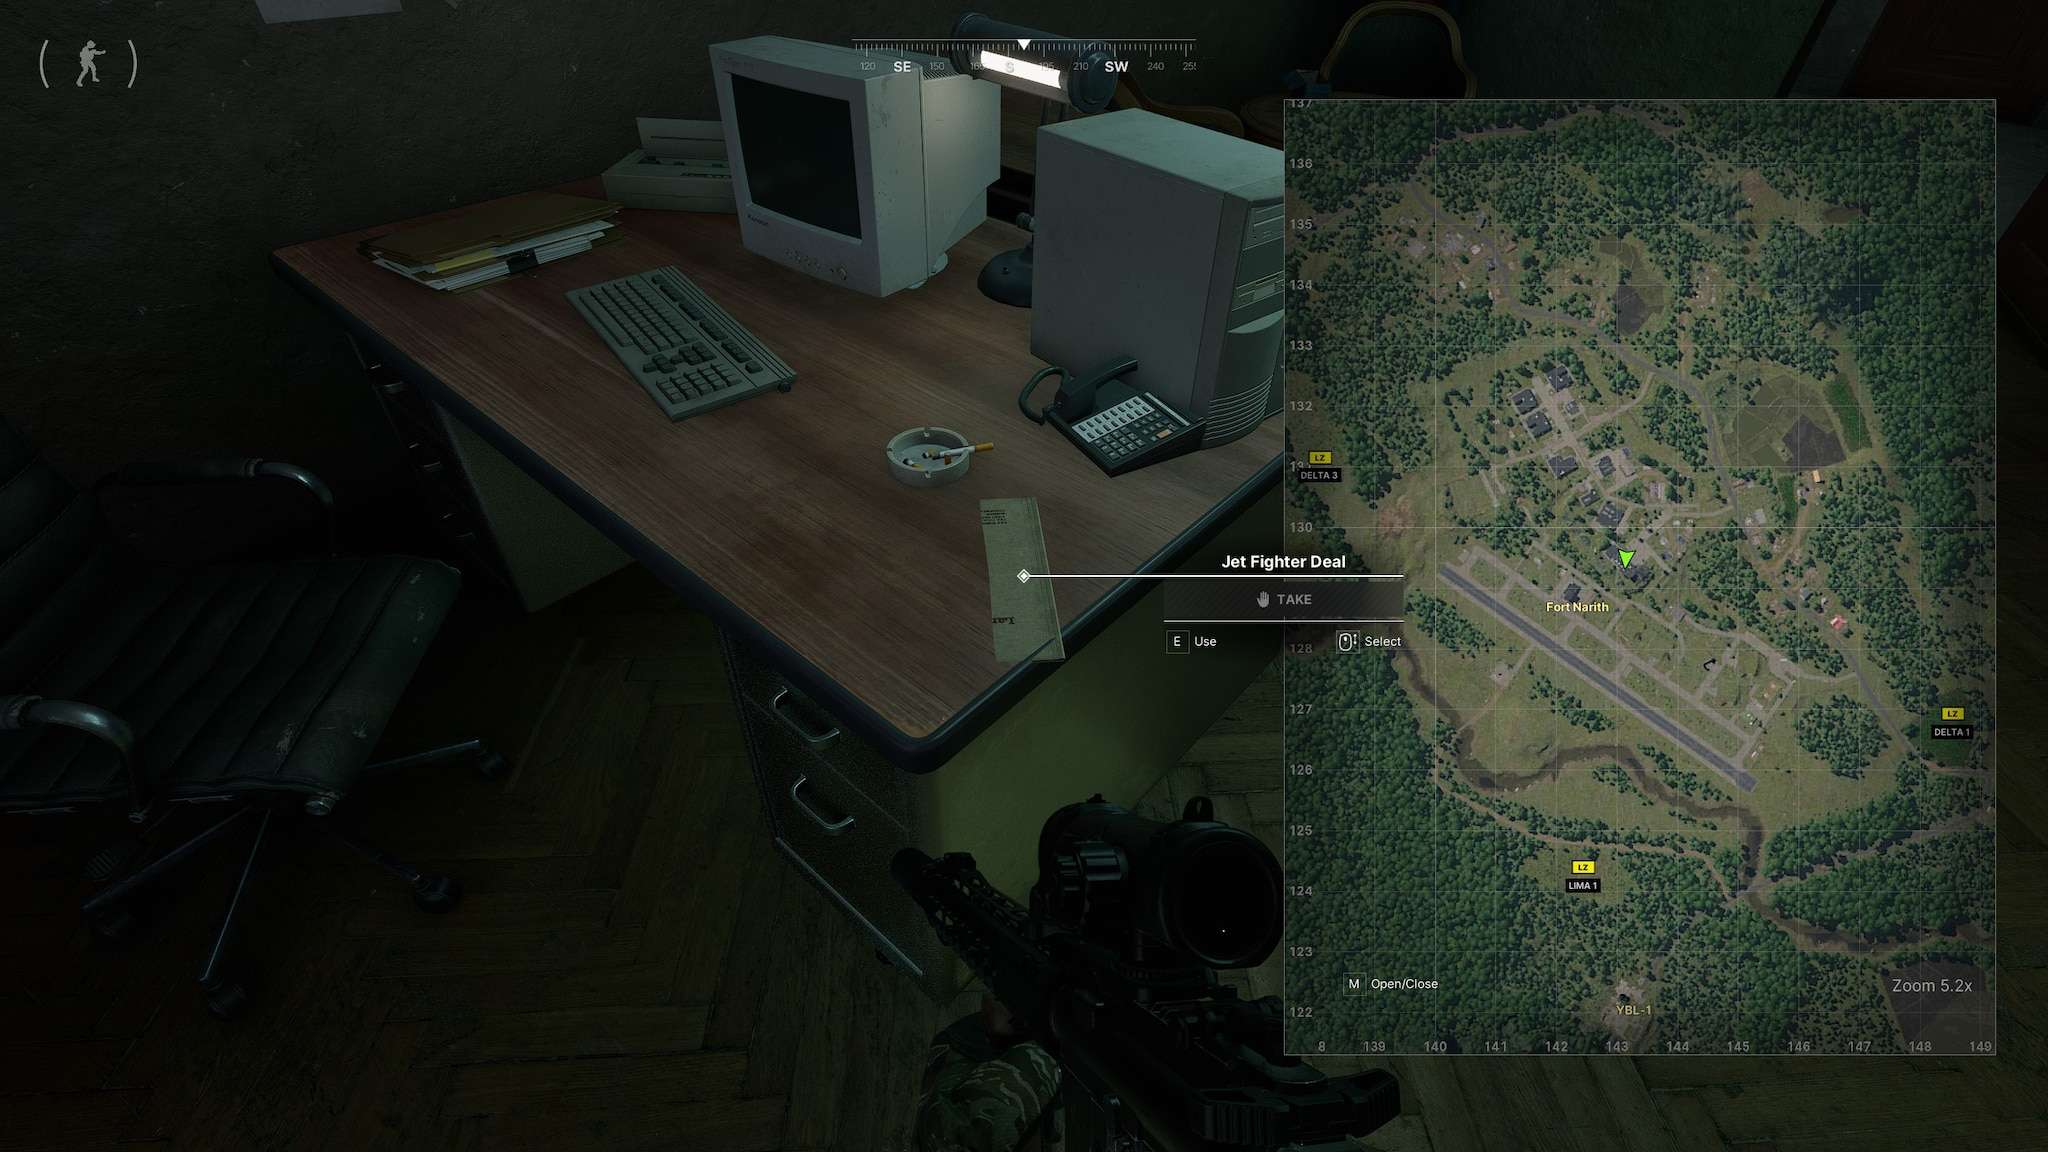
Deal of the Century
Deal of the Century
Lost Lover
Lost Lover
Initial objective:
Follow-up objective:

The More The Merrier
The More The Merrier
Skycrawlers
Skycrawlers
Skycrawlers II
Skycrawlers II
Location:
Logbook:

(Map on logbook-screen is incorrect, noticed after grabbing it, the location-screen have a correct map position).
Delayed Package
Location:
Requires Hangar 03 Key:

Placement is on the top of the wheel and requires you to crouch:
Deep Depravity
Deep Depravity
Conference room at -2:
Item is a USB in the backroom:
Prisoner 23
Prisoner 23
The house containing the intel:
The intel is on a desk in middle of the house:
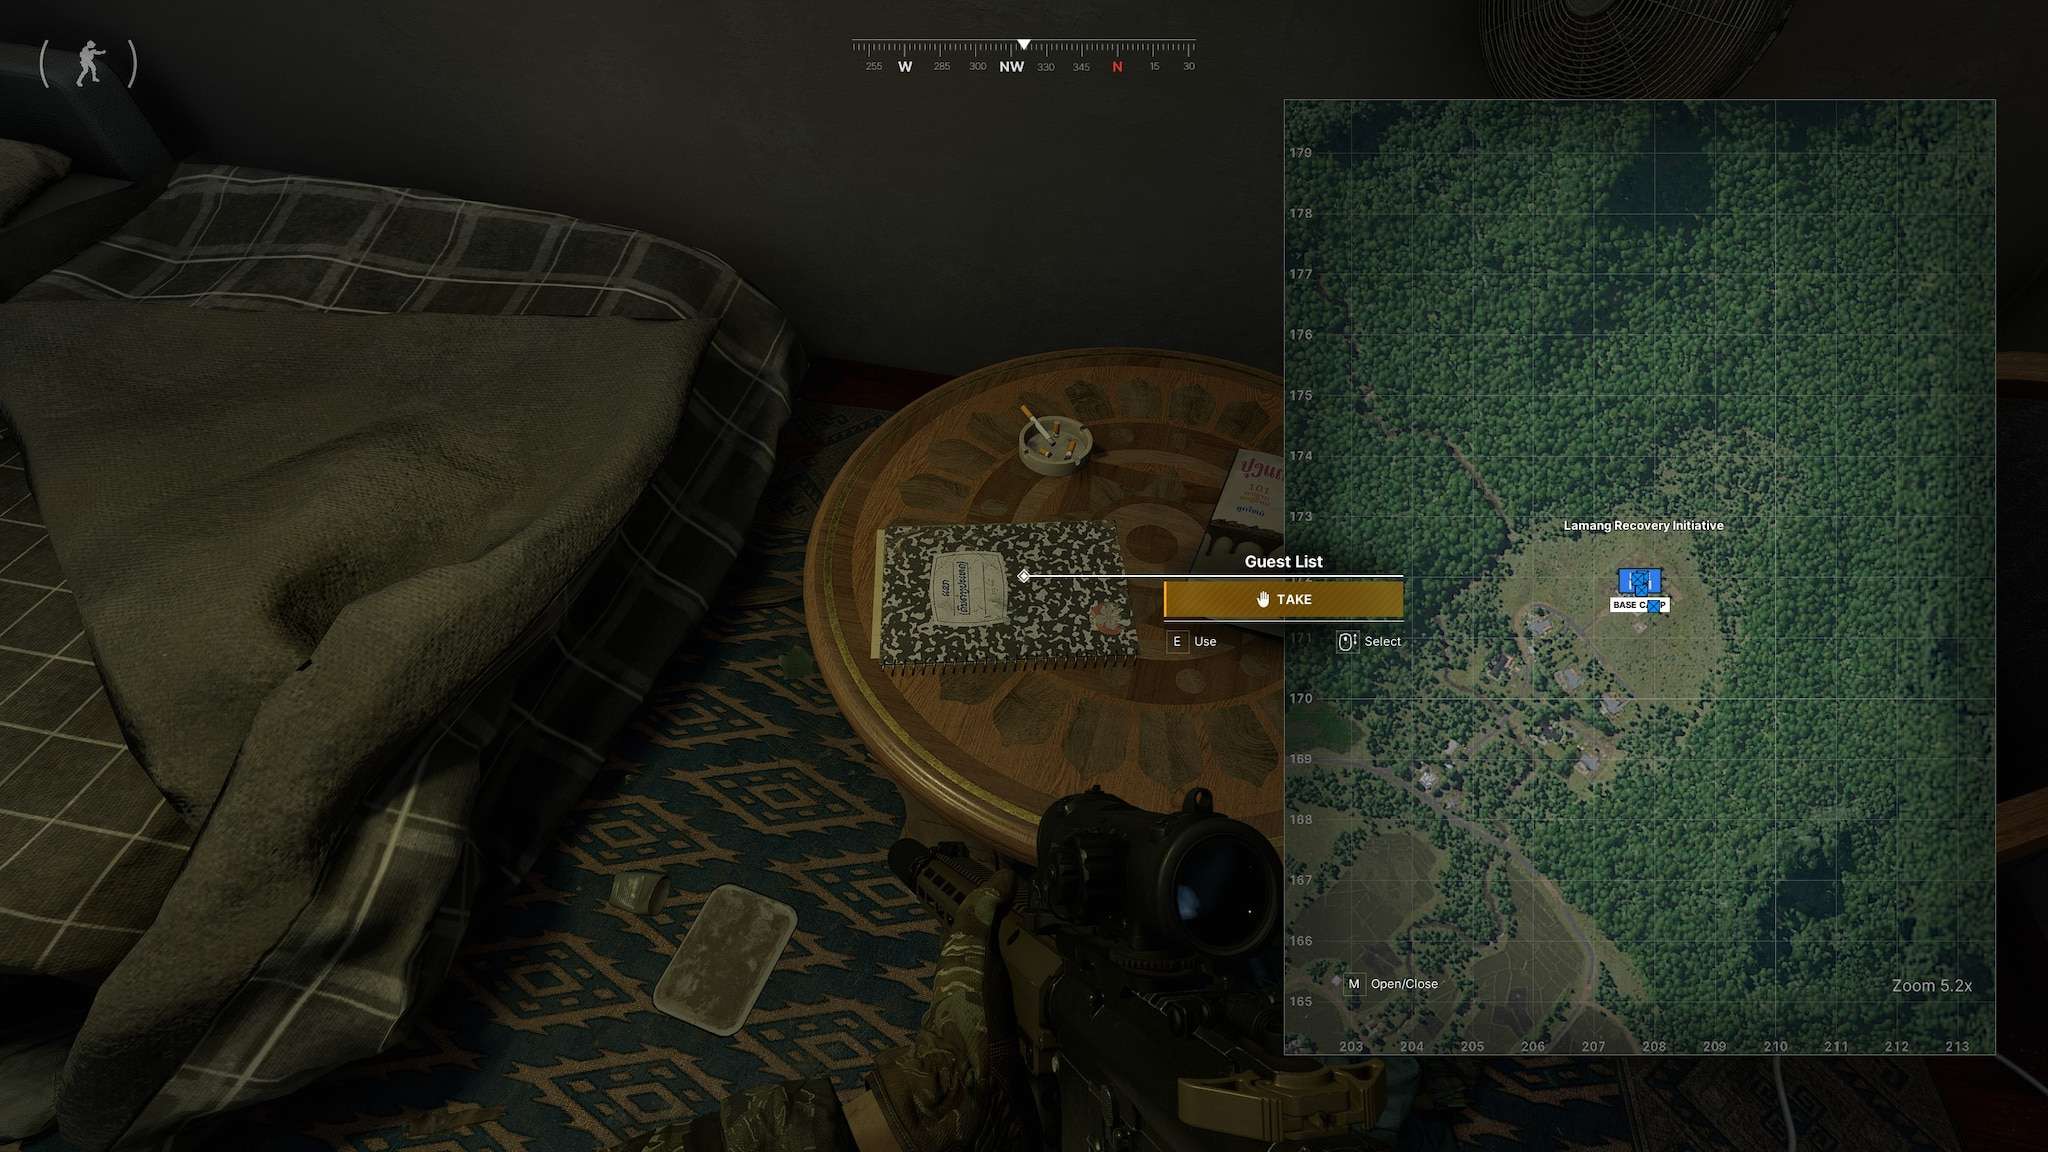
Lamang Connection
Lamang Connection
If you’re facing the elders’ house looking towards the water, the house with the item you’re after is on the left. Keep that in mind as you’re scoping out the area.

Ban Pa Hut key is required to open the door.

Item will be on the desk on the left.

Fresh Meat
Fresh Meat
If you touch down on Kilo 2, keep your eyes peeled for the item in the house closest to the landing zone. It should be tucked away in the wall there. Easy to grab if you know where to look.

Turn right as you enter and go past the front door and into the bedroom.
Item is on the small table next too the bed.
Downsizing
Downsizing
Kill 30 Lamang Armed Forces at Fort Narith
Evacuation Question
Evacuation Question
You have to choose between Evacuation Question or In The Right Hands
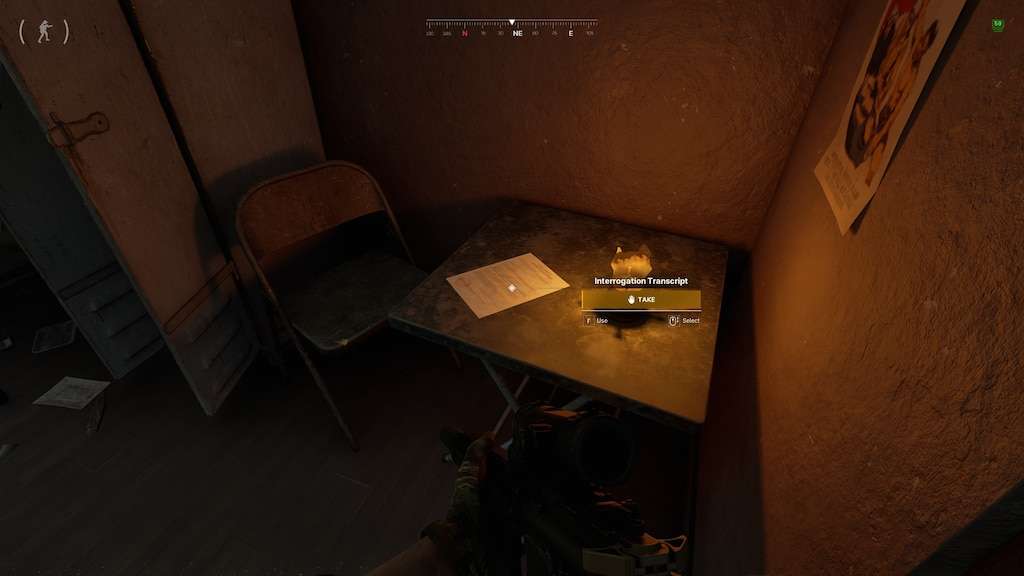
The documents can be found in Barracks A in room 112:
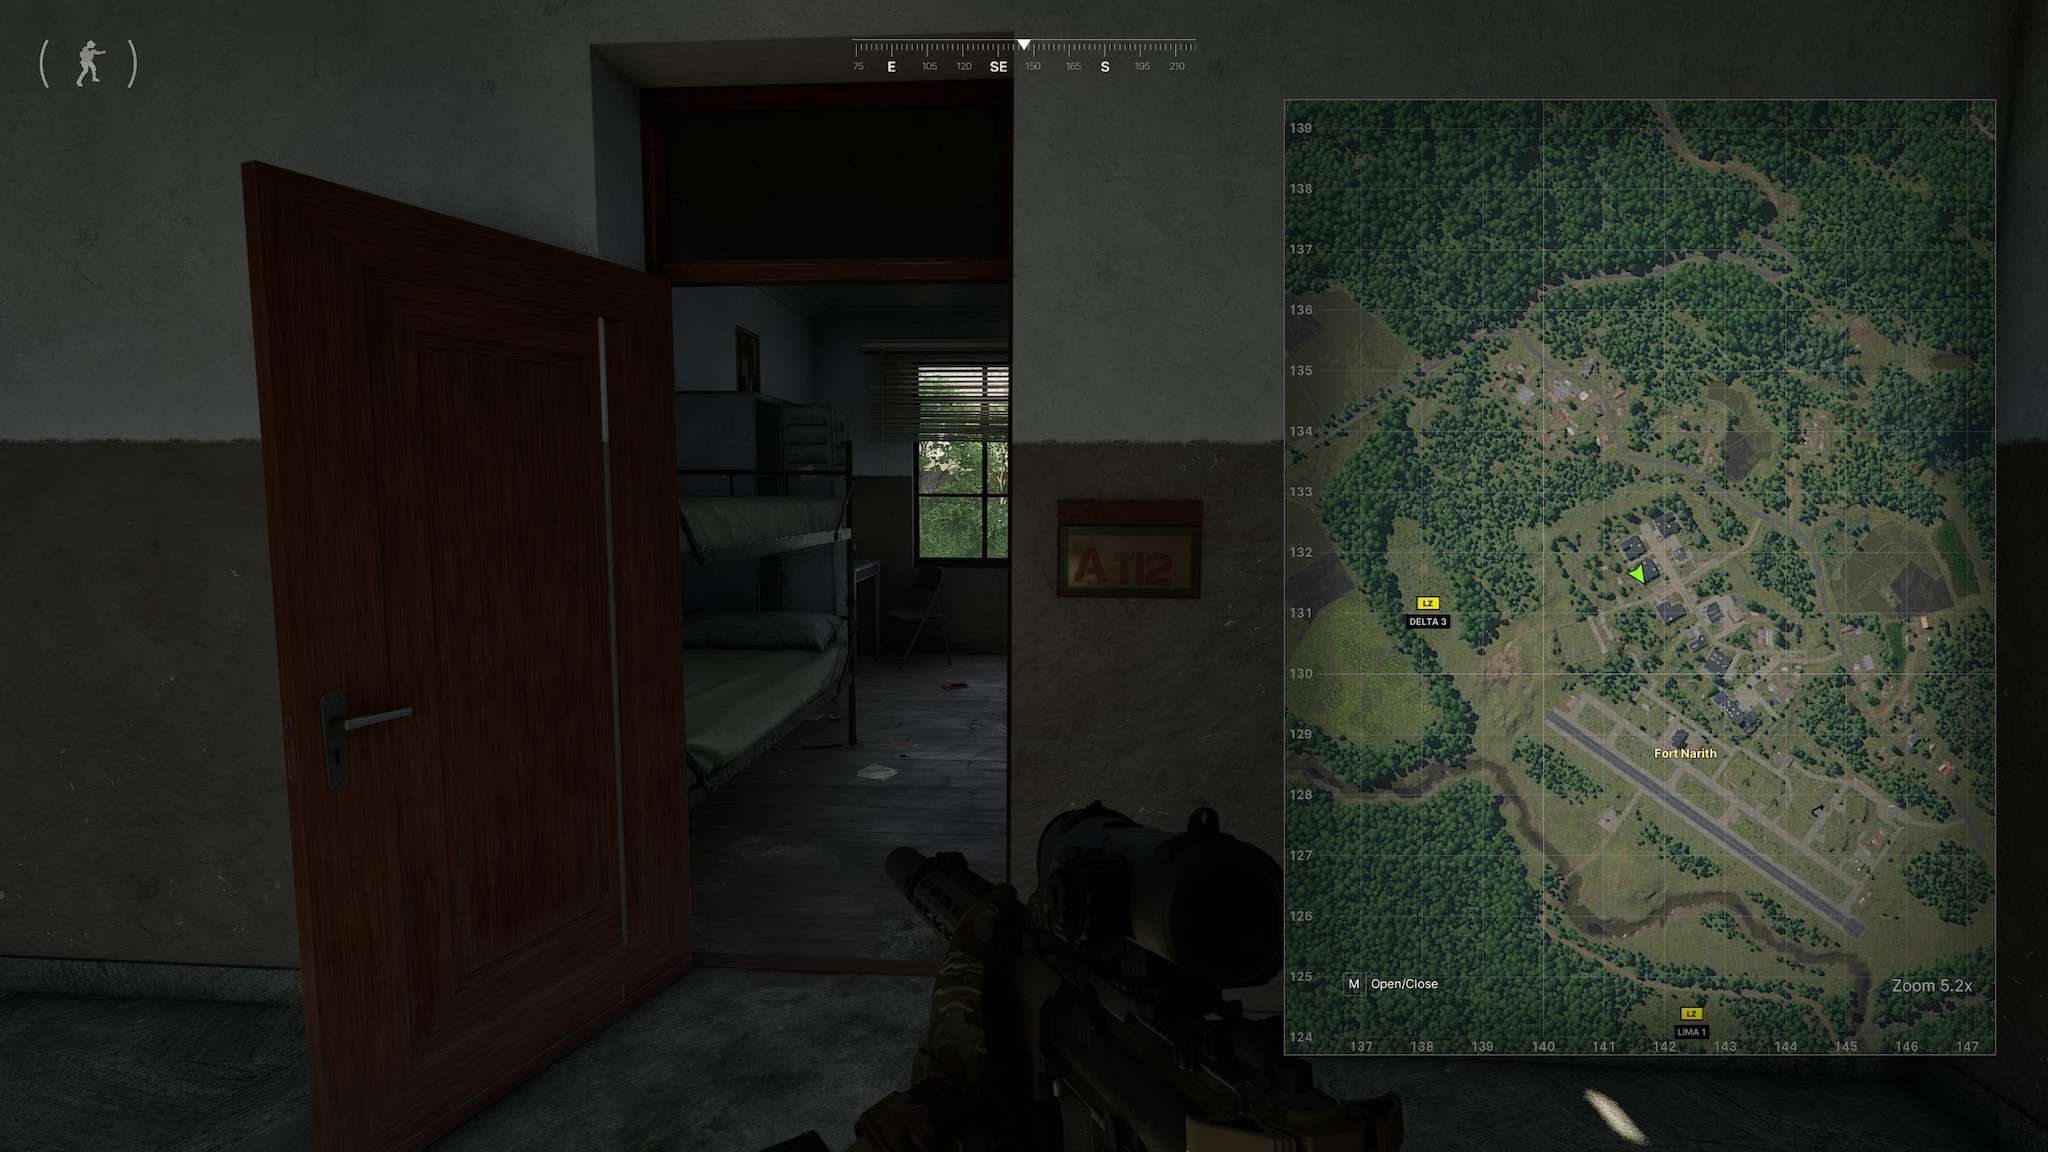
The Evacuation orders are on a table on the left side:
In The Right Hands
In The Right Hands You have to choose between Evacuation Question or In The Right Hands
The documents can be found in Barracks A in room 112:

The Evacuation orders are on a table on the left side:

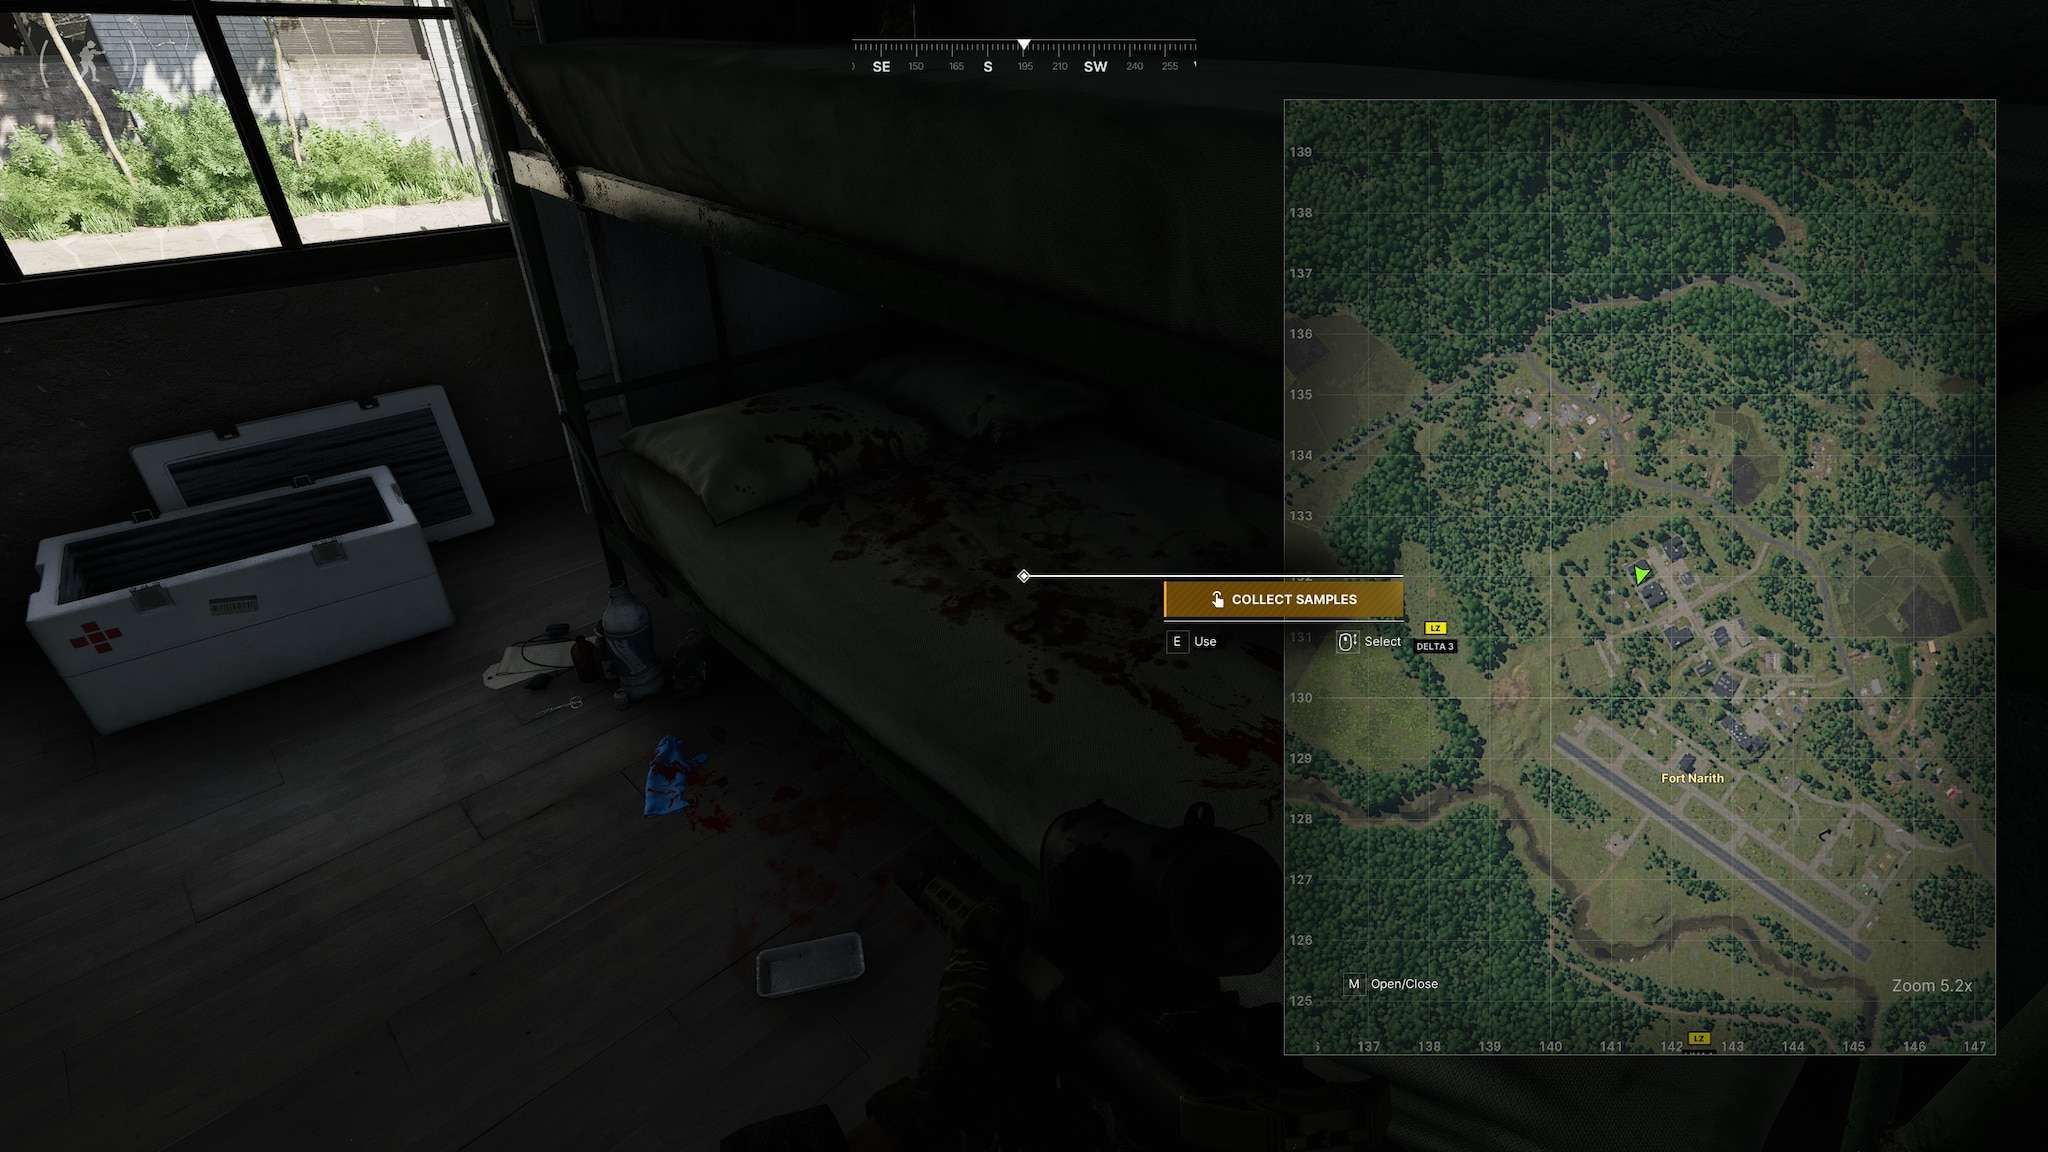
Seeker of Change
Seeker of Change
- The samples can be taken in Barracks C in room 110 – 141 132
The samples are extracted from the bloody bed by using a Kit item:
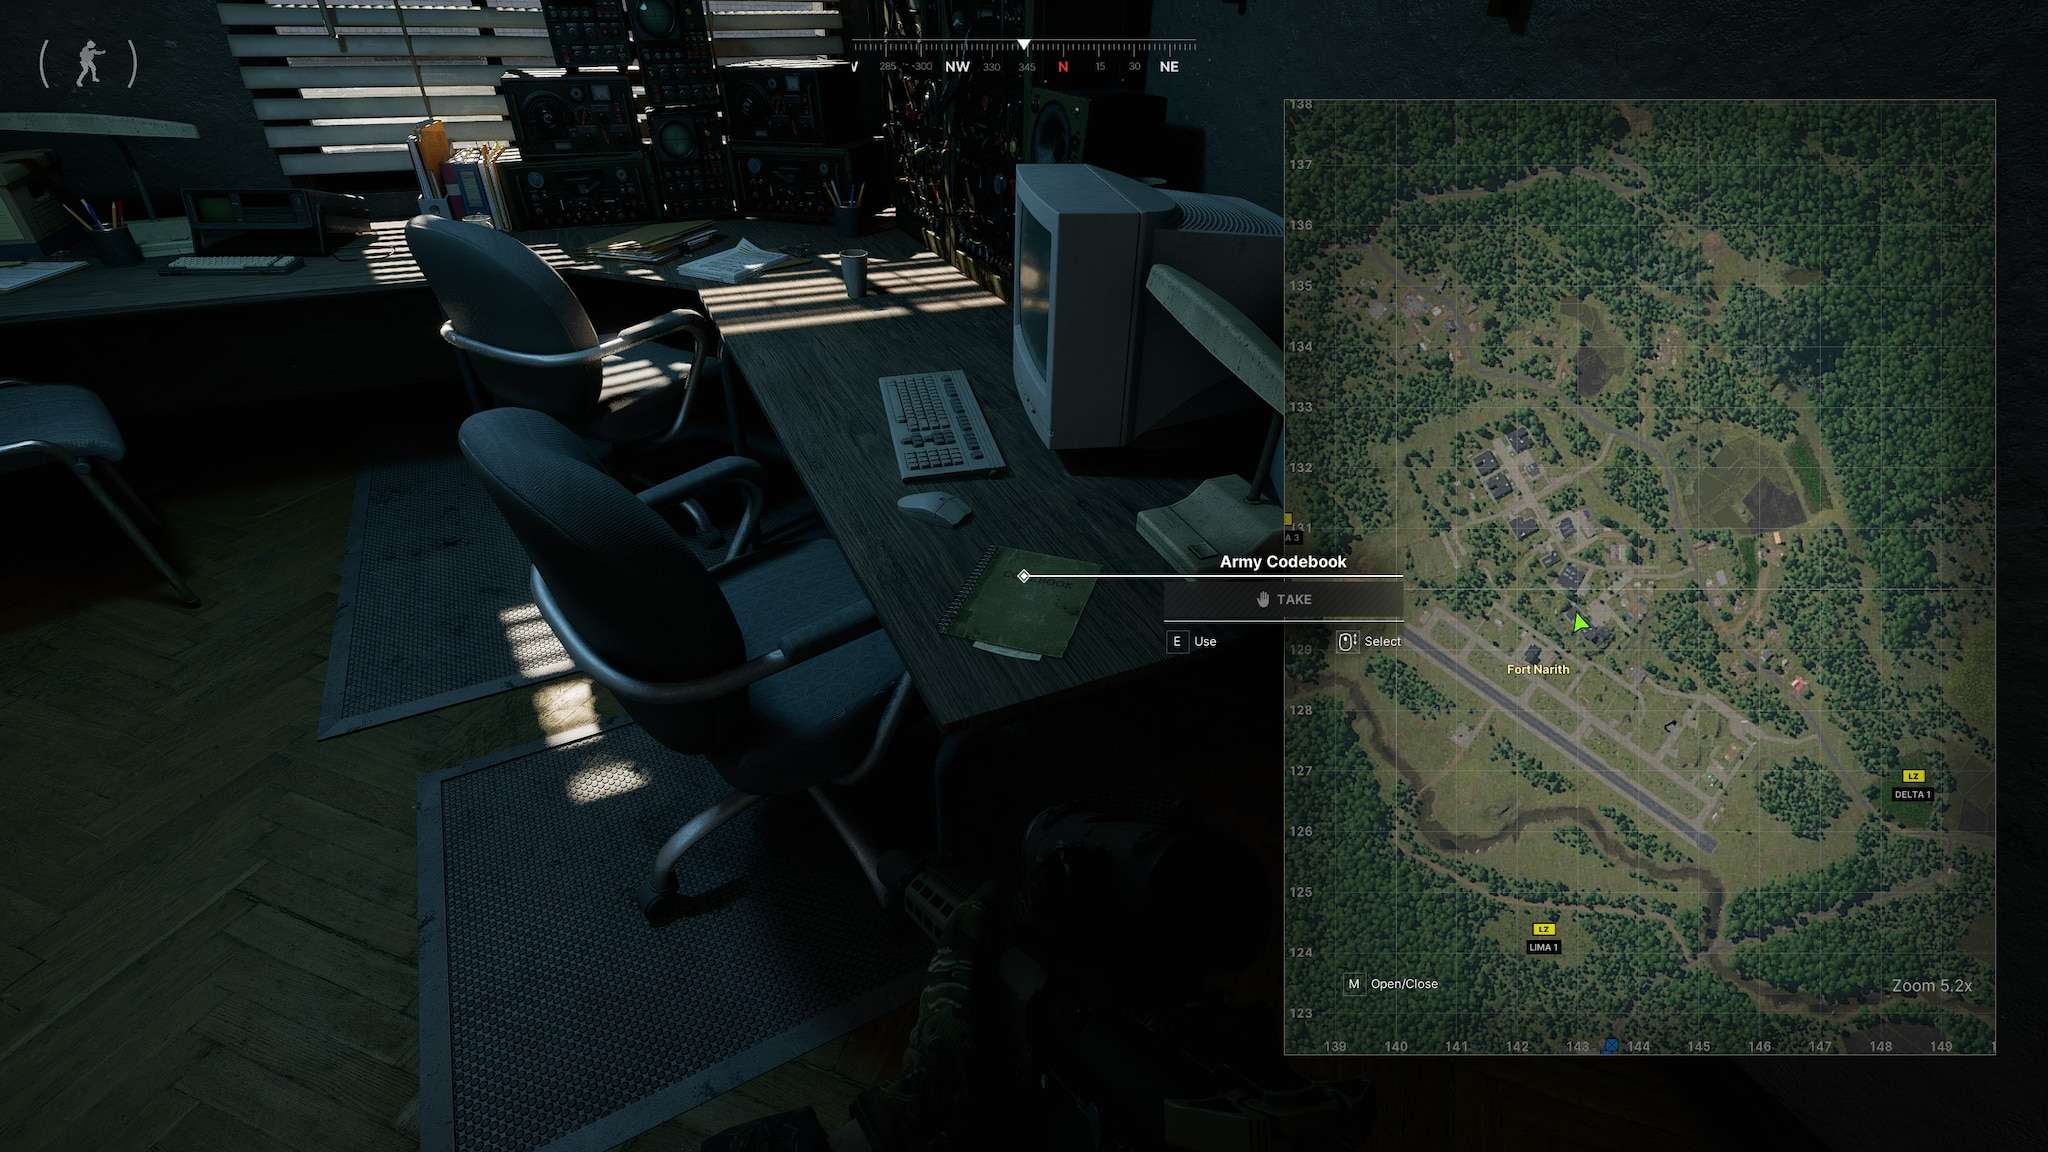
Hacker II
Hacker II
The Air Field antenna is located far southeast of Fort Narit, right at the end of the landing strip, in the fuel storage area. Head over there if you’re on the lookout for it.
Main Base antenna is found directly inside the main gate, on the way too HQ.
If you’re searching for the satellite dish at HQ, you’ll find it on the roof of the building. Once you come up the stairs, take an immediate right, and you’ll spot it right next to the tent. Keep an eye out for it when you’re up there.
To find the codebook, head up to the second floor. Go down the left corridor, and you’ll come across a room on the right. Inside that room, you’ll find the codebook waiting for you. Keep your eyes peeled as you make your way through.
Name Your Poison
Name Your Poison
(Lab rat have an alternative quest, but forgot name).
Warning! Completing this task will remove the alternative quest from Lab Rat.
Water tank next to Barracks:
Interact with the tap to insert poison:

If you’re opting for the Lab Rats alternative, your first move is to stash the poison under the water tank. Keep it hidden away there to execute your plan smoothly.
Uncanny Files
Uncanny Files
If you’re on the hunt for the Medical Tent, you’ll find it close to the Barracks on their southwestern side. Look for it along the road leading to the shooting range. Shouldn’t be too hard to spot once you’re in the vicinity.
Medical records is on the table in the back-right corner:
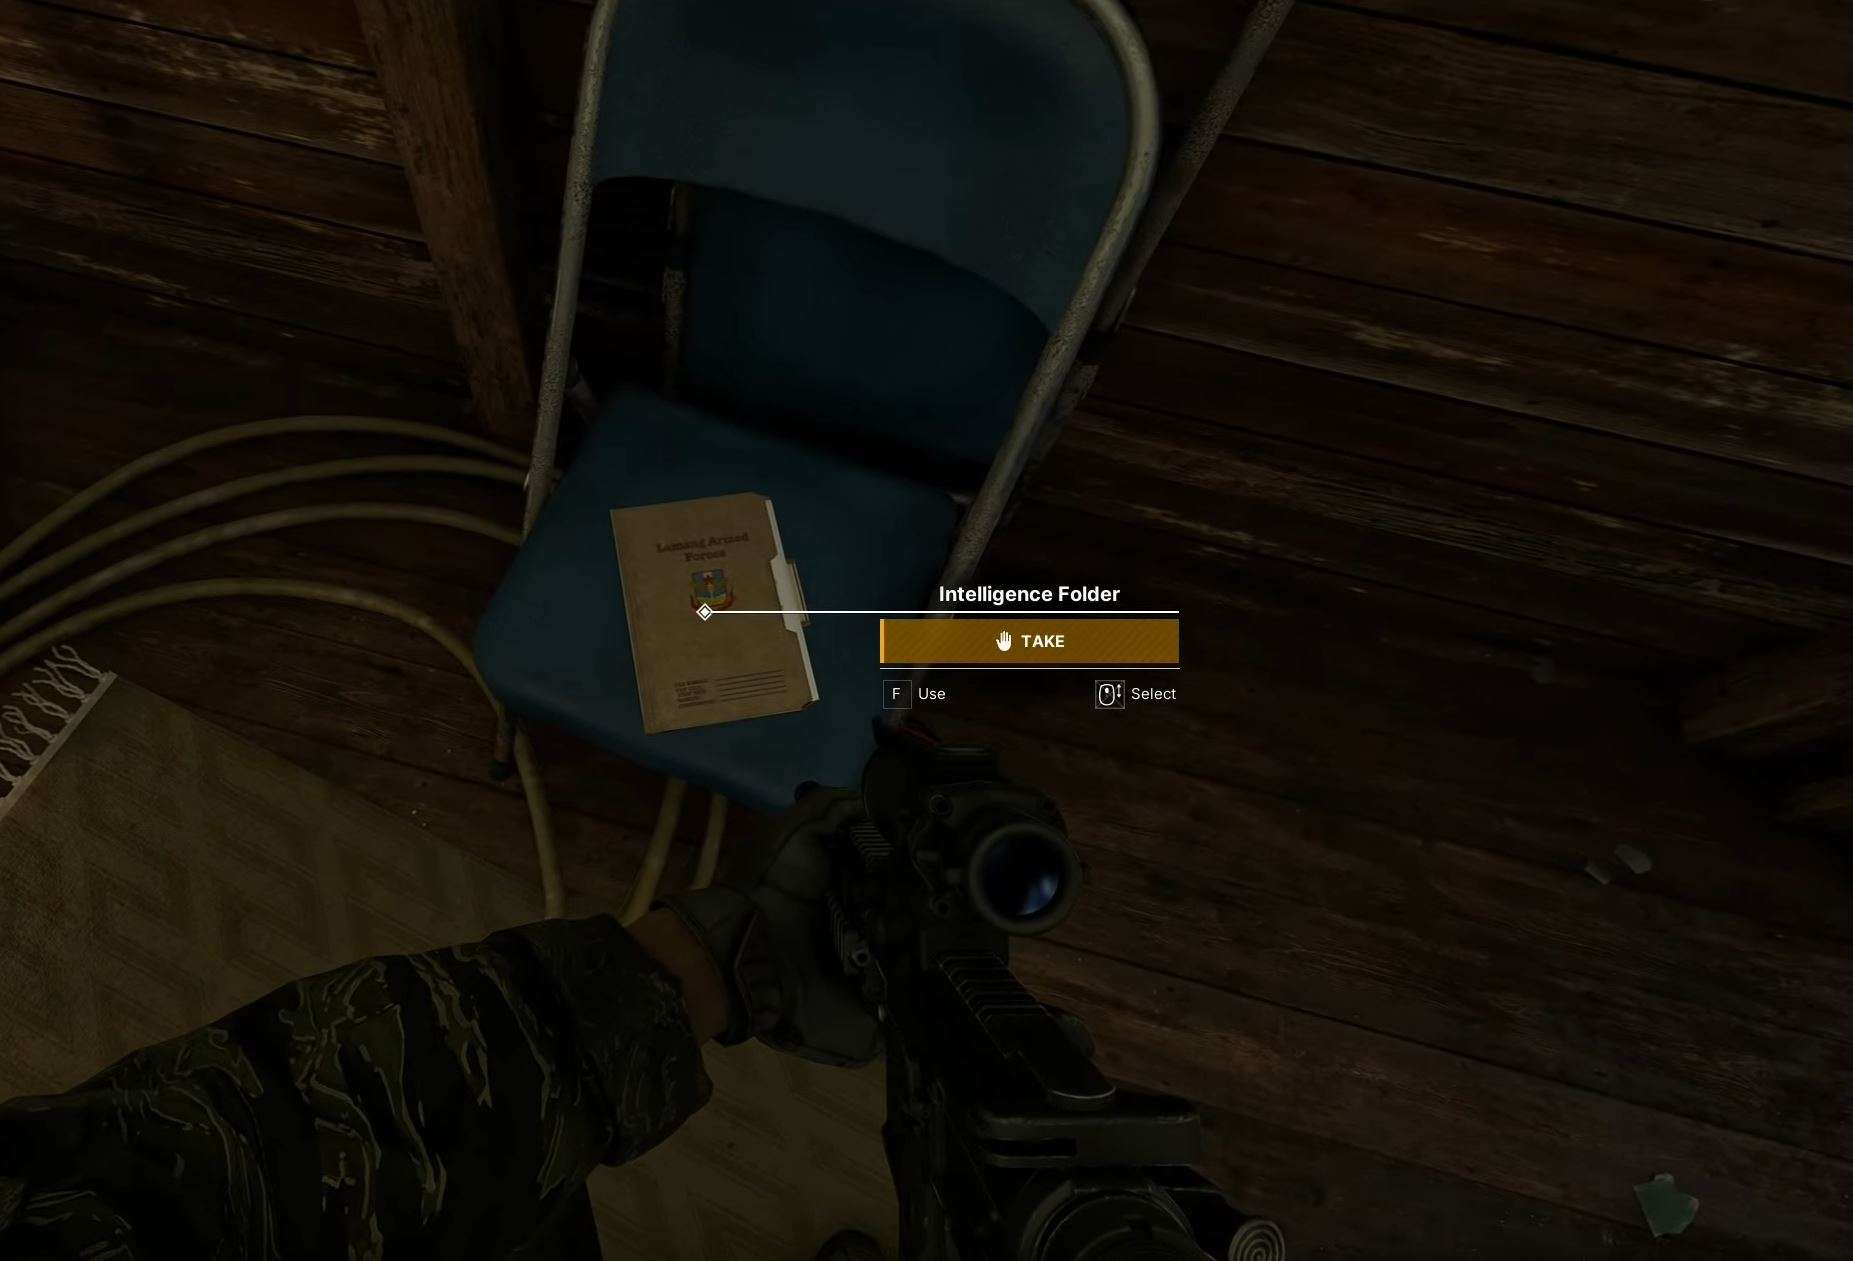
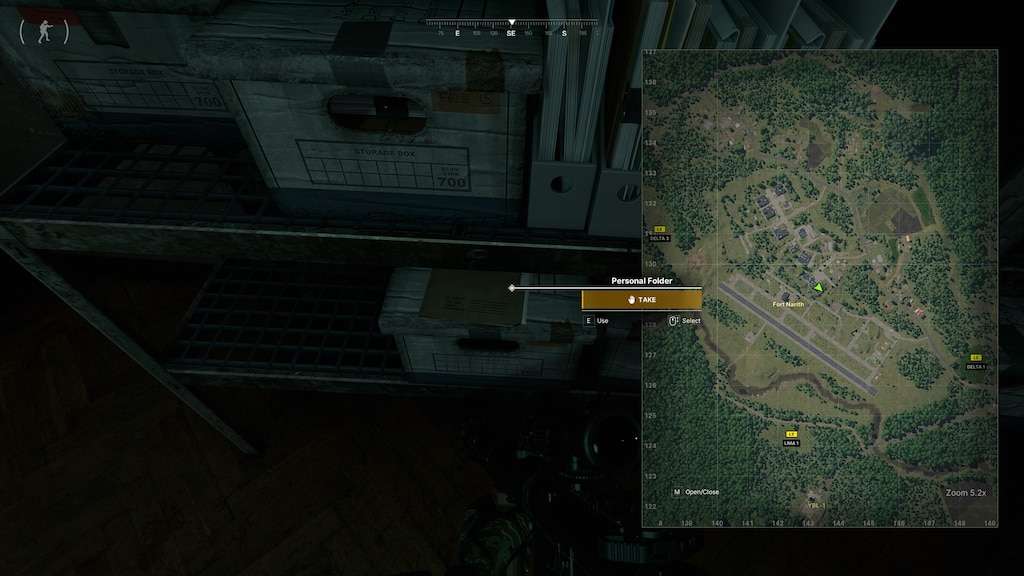
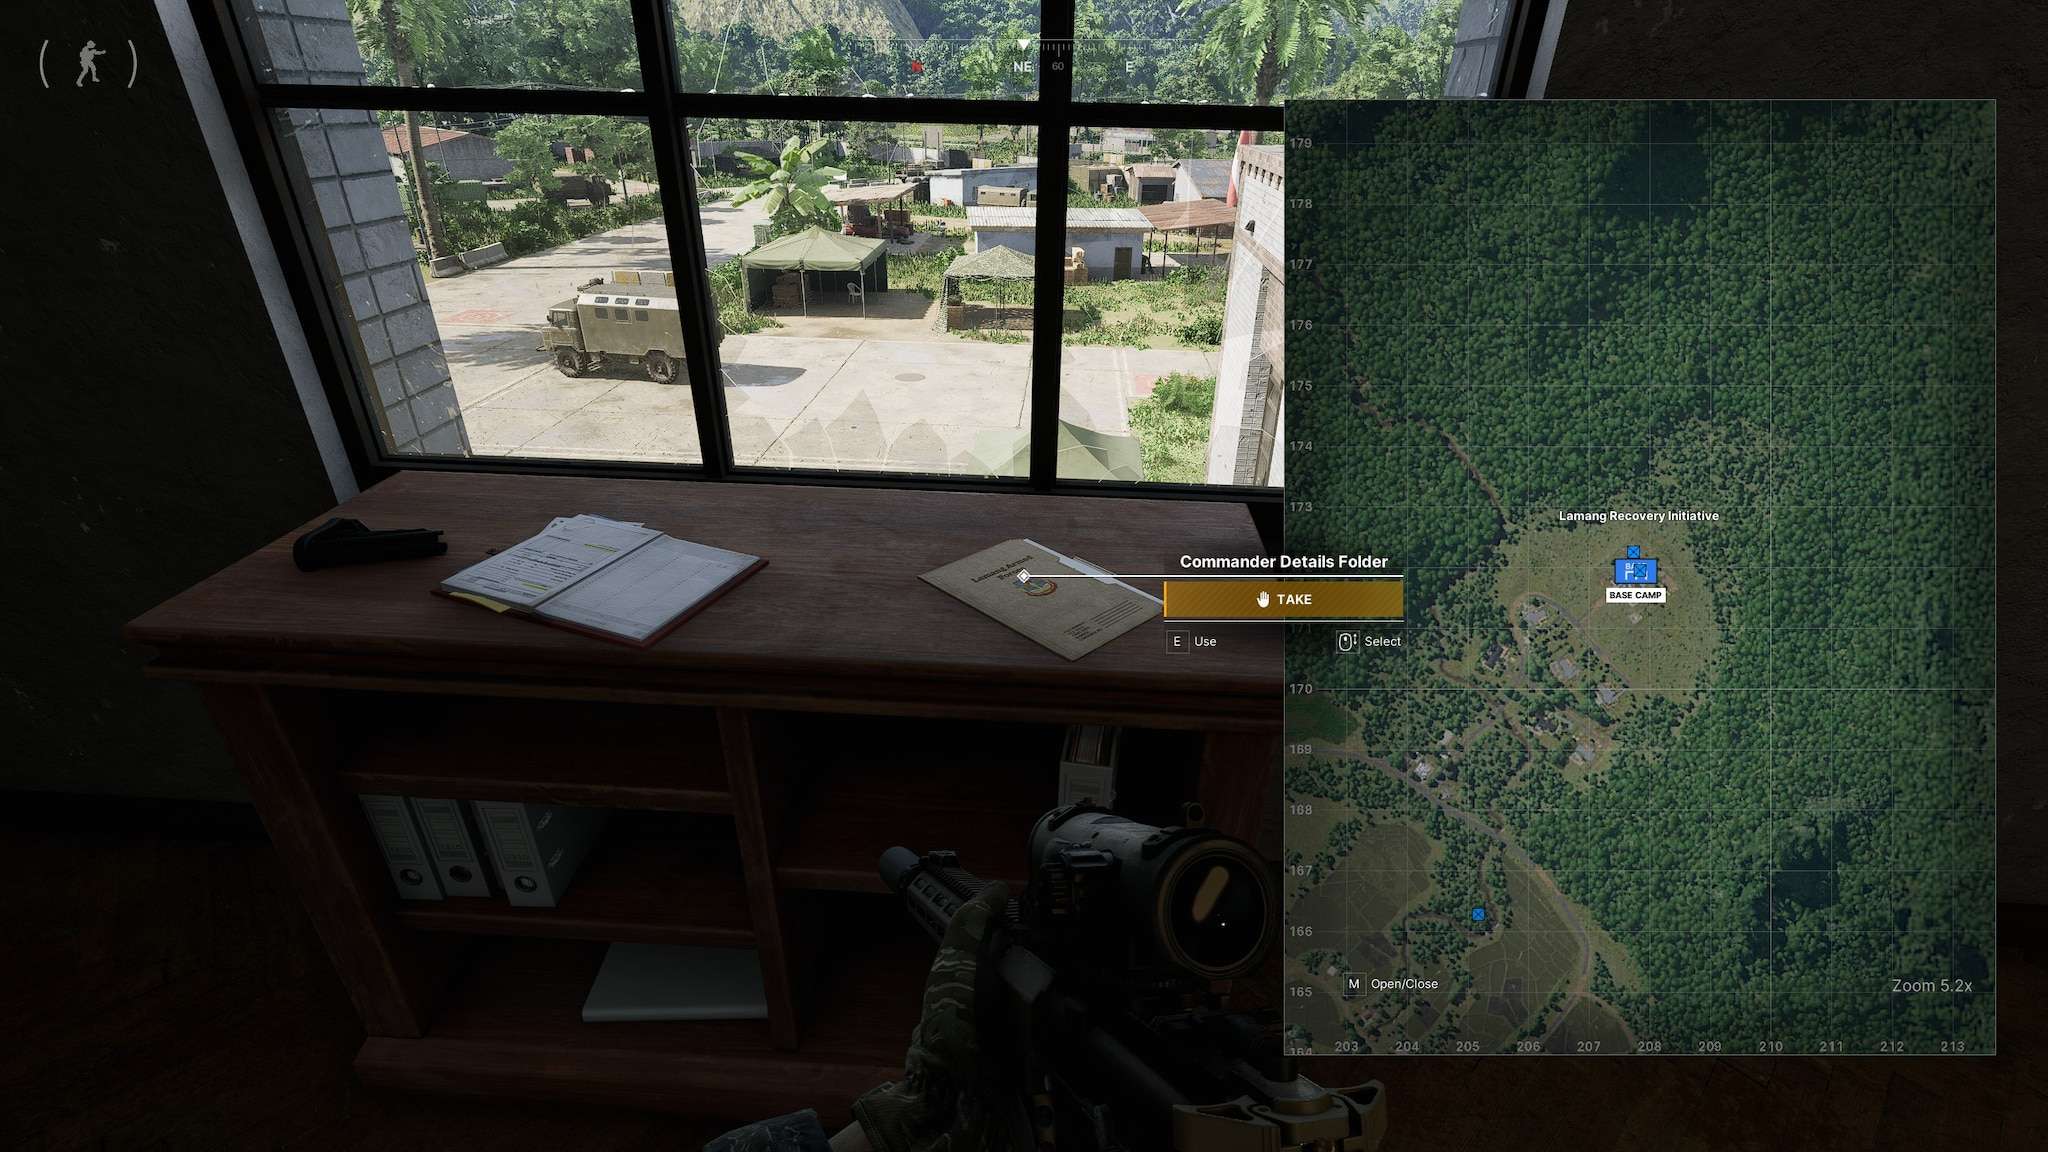
Who’s in Charge
Who’s in charge
Item is in the Generals office, top floor and first door to the right:
Go through the secretary room and into the generals office, the folder is on the left as you enter:
Fresh Meat II
Fresh Meat II
Key required: Blue Lagoon Shack Key
Location is inside the “Abandoned Shack” at the south-east of the village:
After opening the door, go near the bed on the left to get objective-trigger:
Dragonslayer
Dragonslayer
We’re on the hunt for the Lamang Armed Forces Commander at Fort Narith. The guy’s usually chilling at the HQ, but keep your eyes peeled ’cause he might pop up elsewhere in the base too. There’s a chance you might encounter more than one of him at the same time, so stay sharp.
The HQ is your best bet for finding him, probably a guaranteed spot whenever the place resets. But don’t rule out other areas, even though they’re less common spawns.
How to spot him? Look for a dude packing a suppressed AK-74M with an Elcan Specter-sight, sporting a black beret and rocking green Aviator-glasses. Once we’ve got him in our sights, it’s game over for the Lamang Armed Forces Commander.
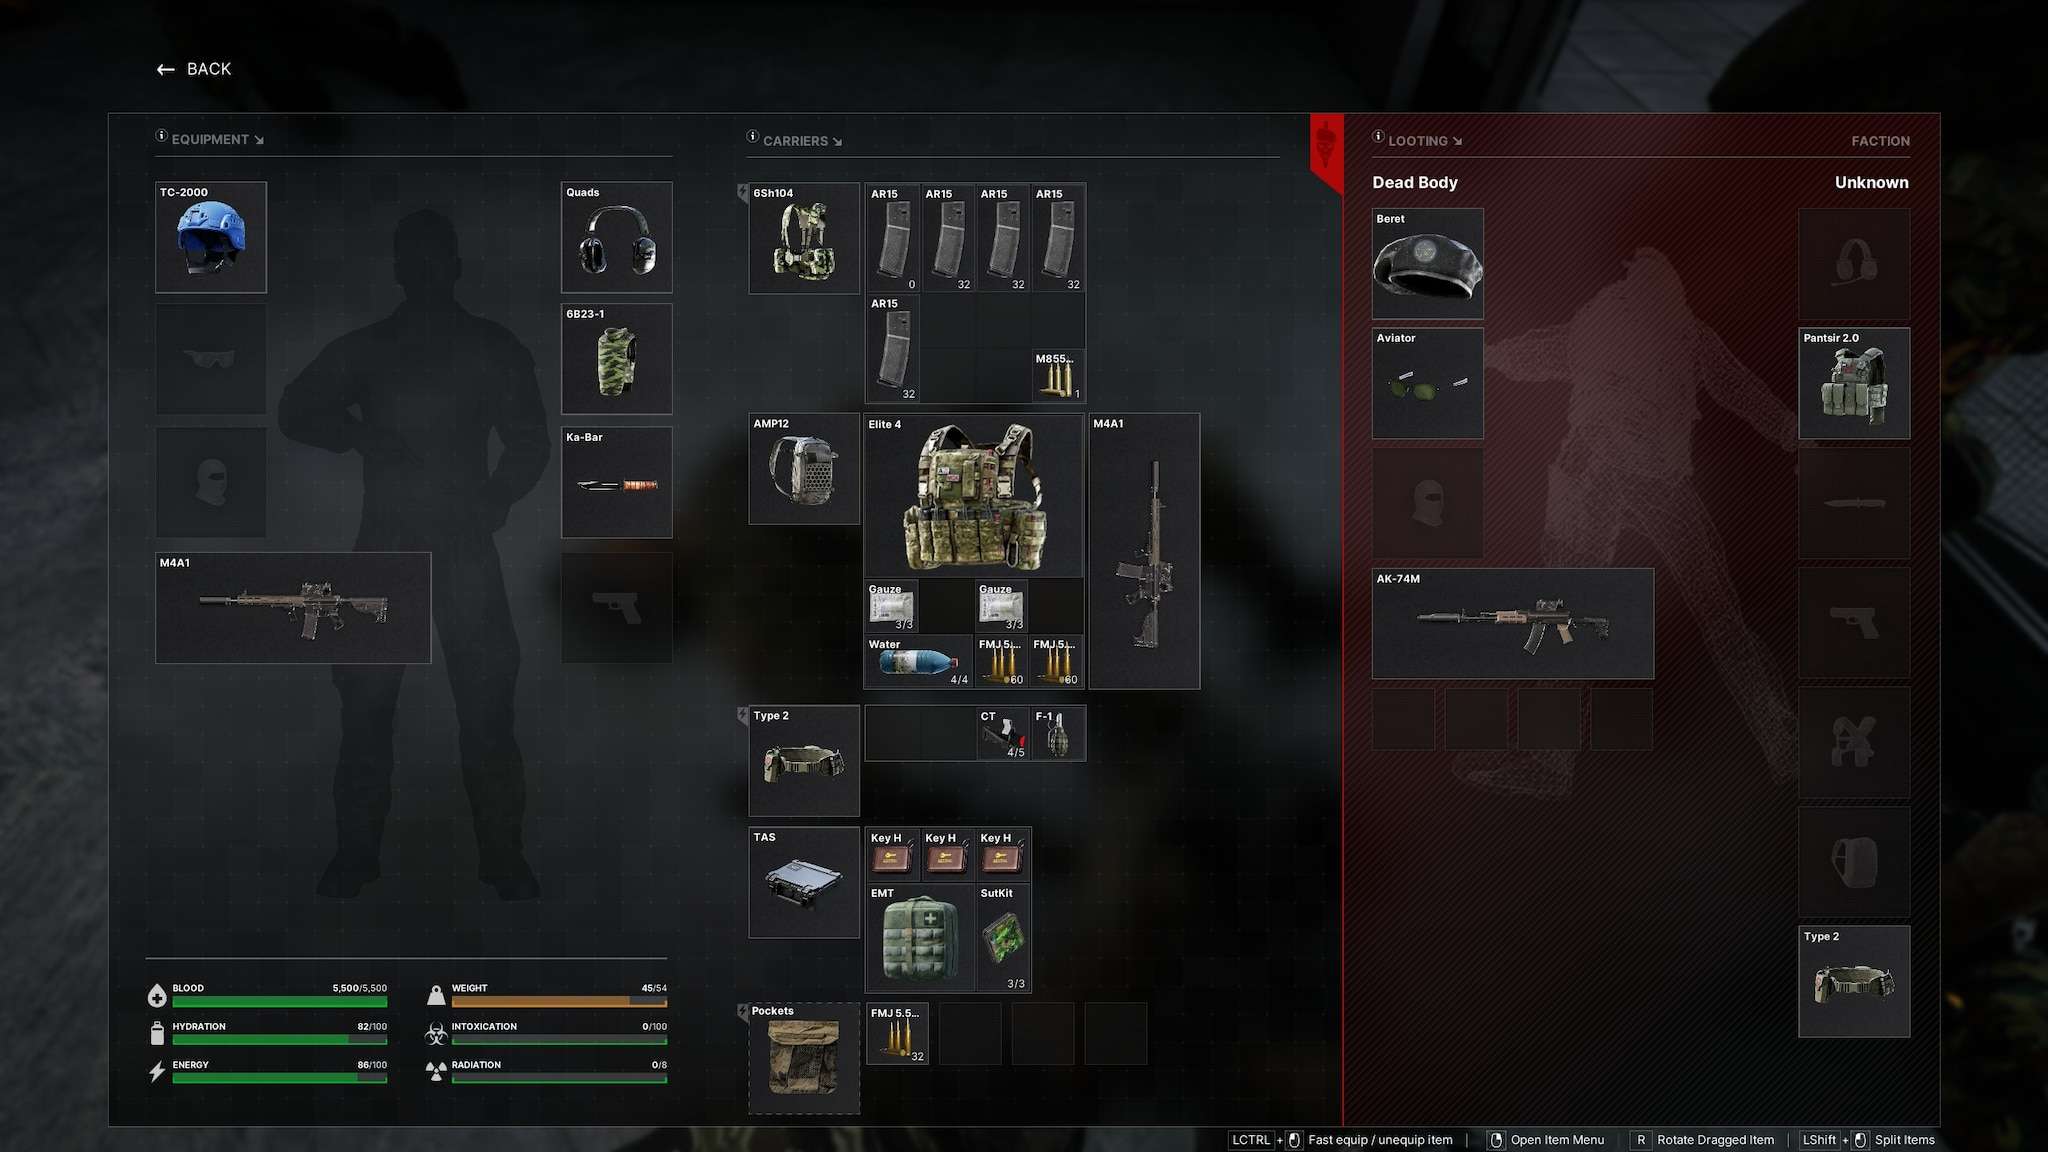
Corpse:
Loadout:
Fresh Meat III
Fresh Meat III
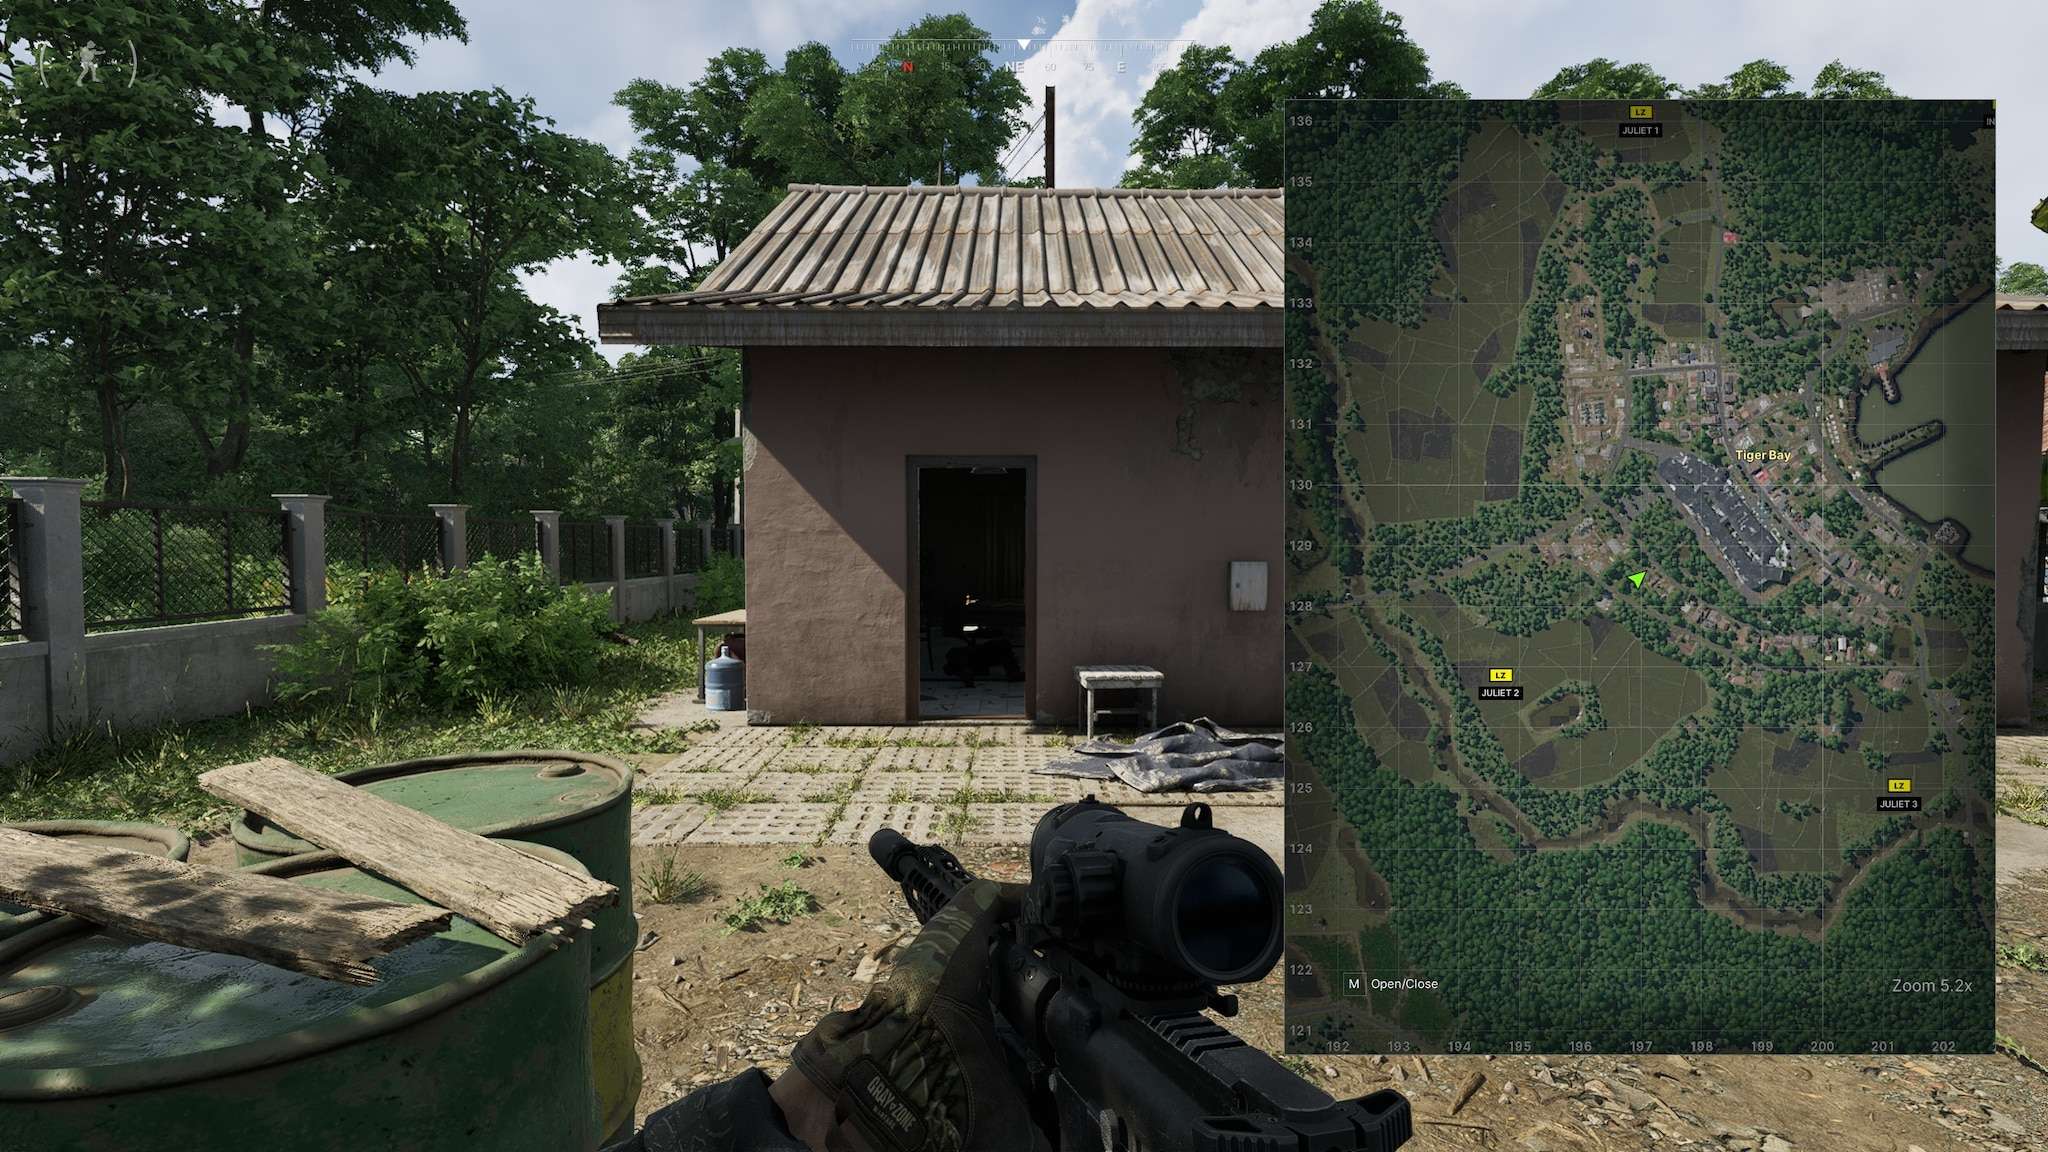
From Blue Lagoon, just head north on the road towards Tiger Bay. Keep your eyes open for a crashed car in the woods on your right. And oh, there might be a body chilling on the road nearby. Once you spot that scene, you know you’re on the right track.
The item is right next too the body, covered in blood.
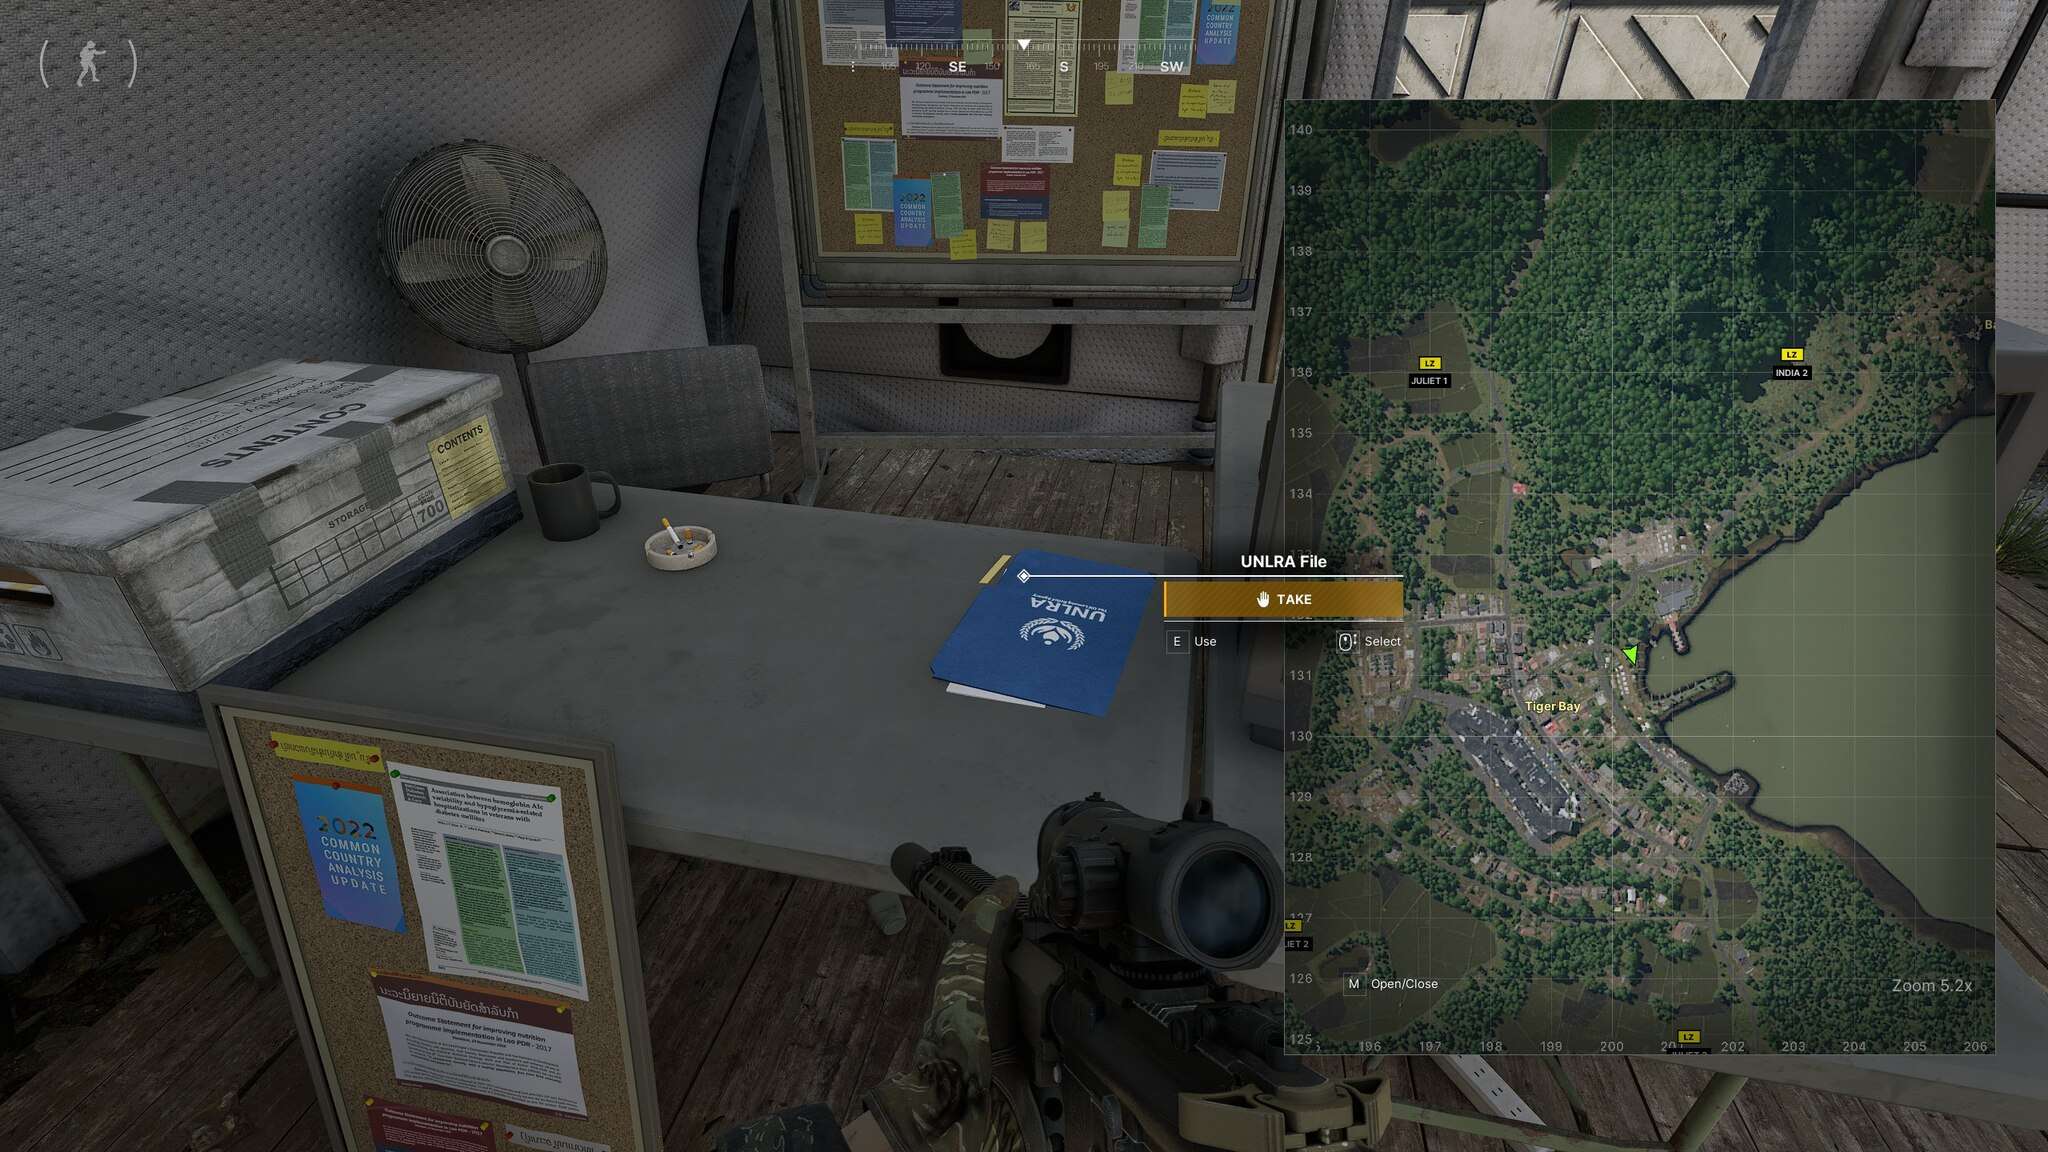
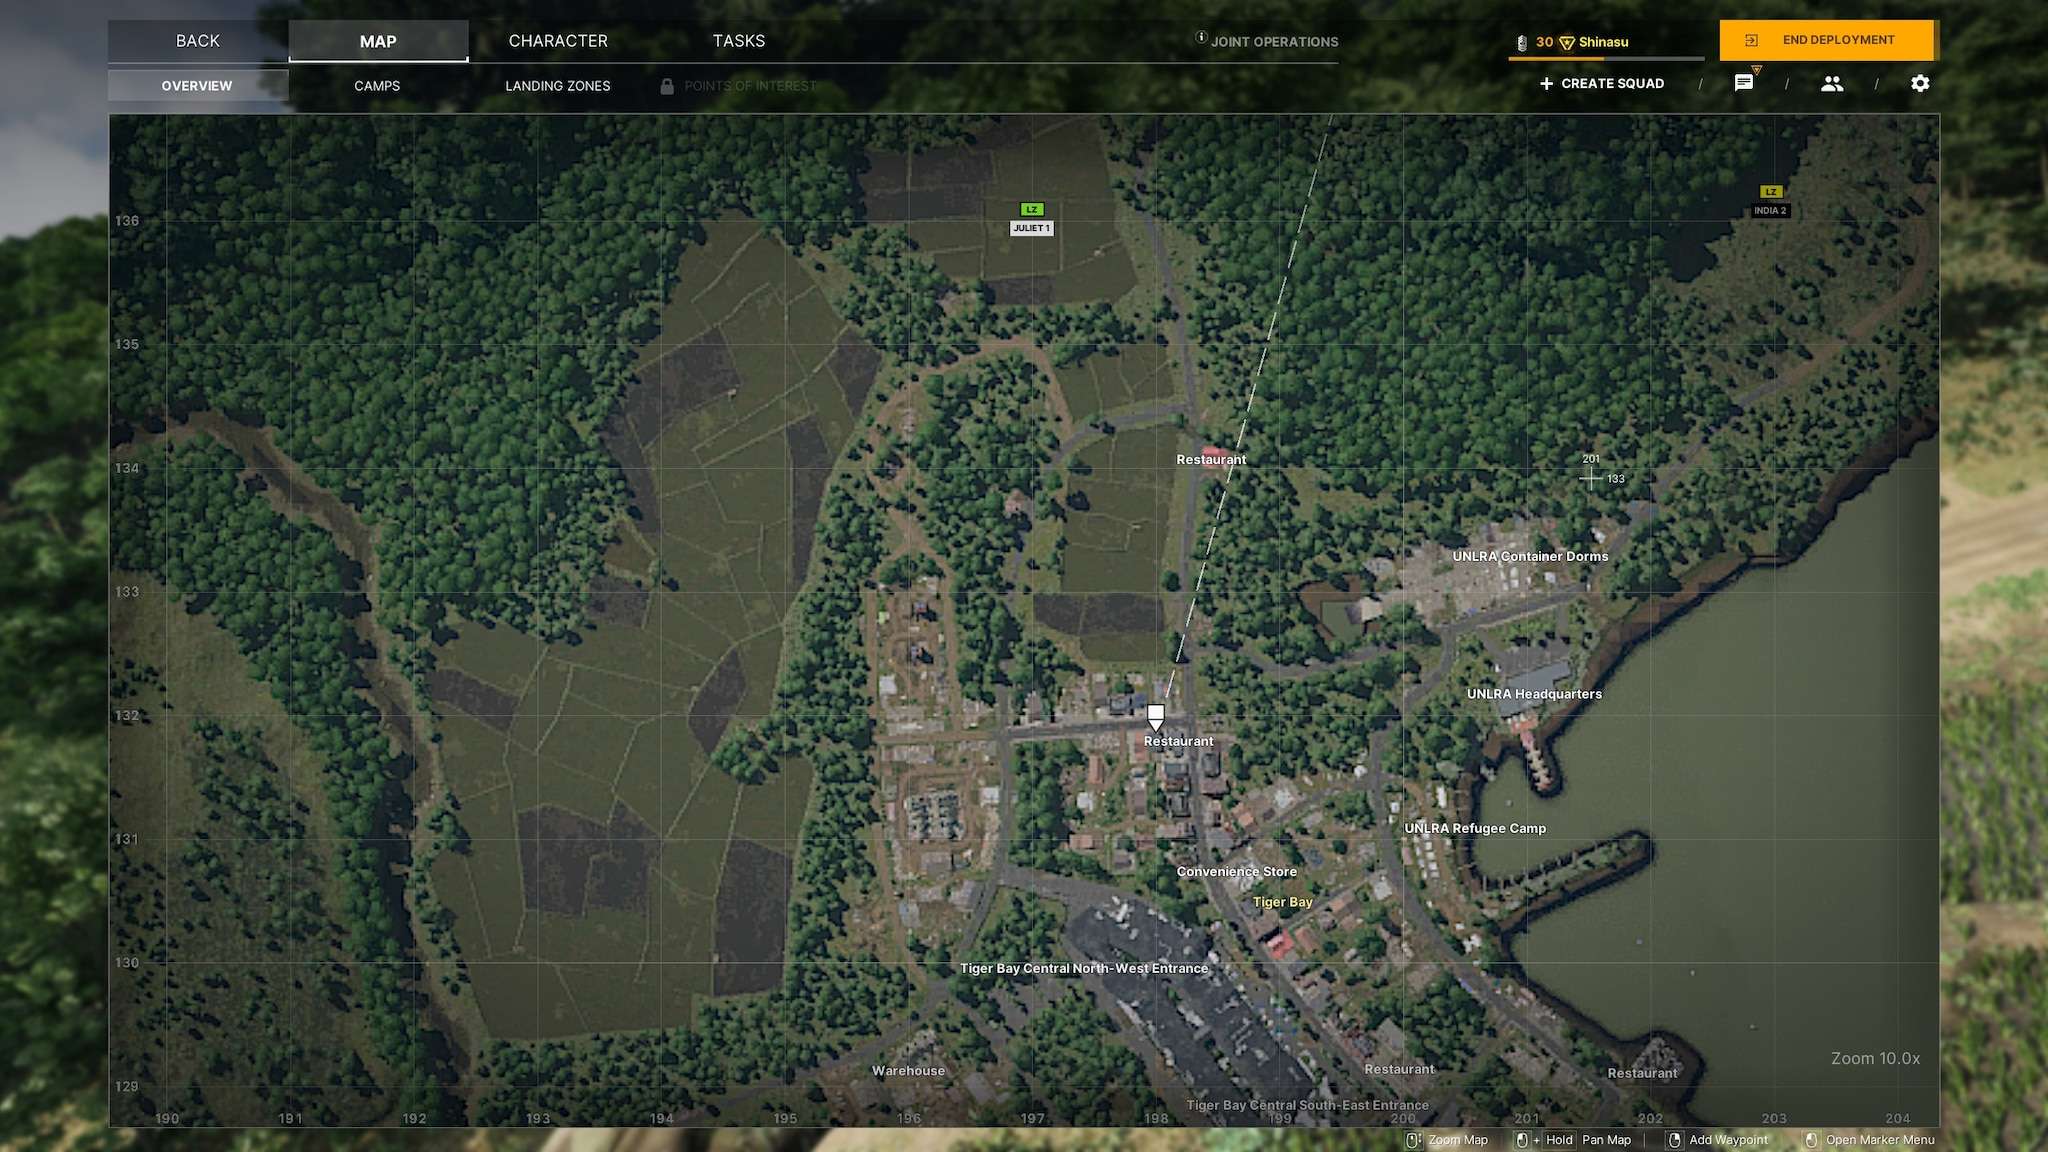
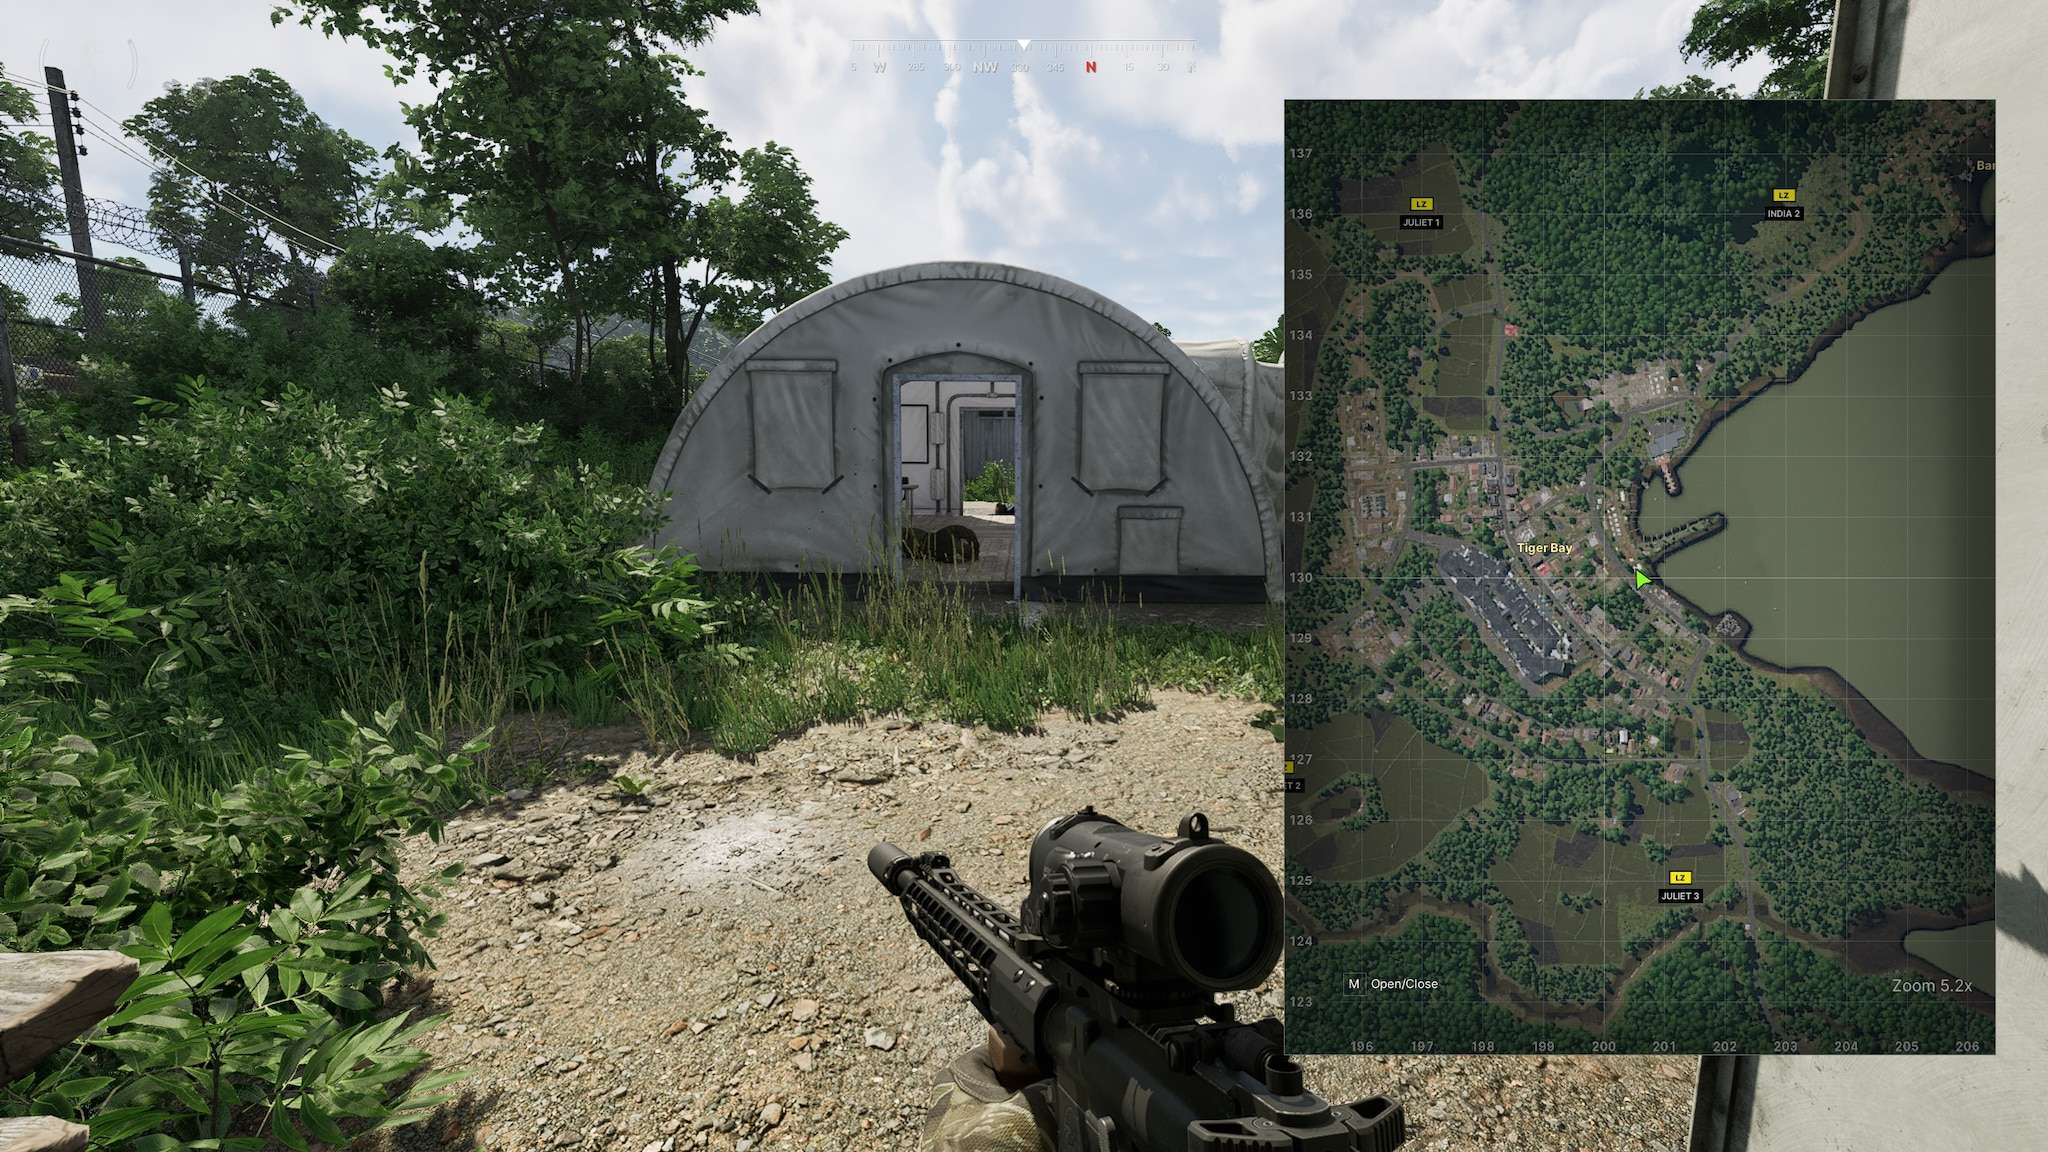
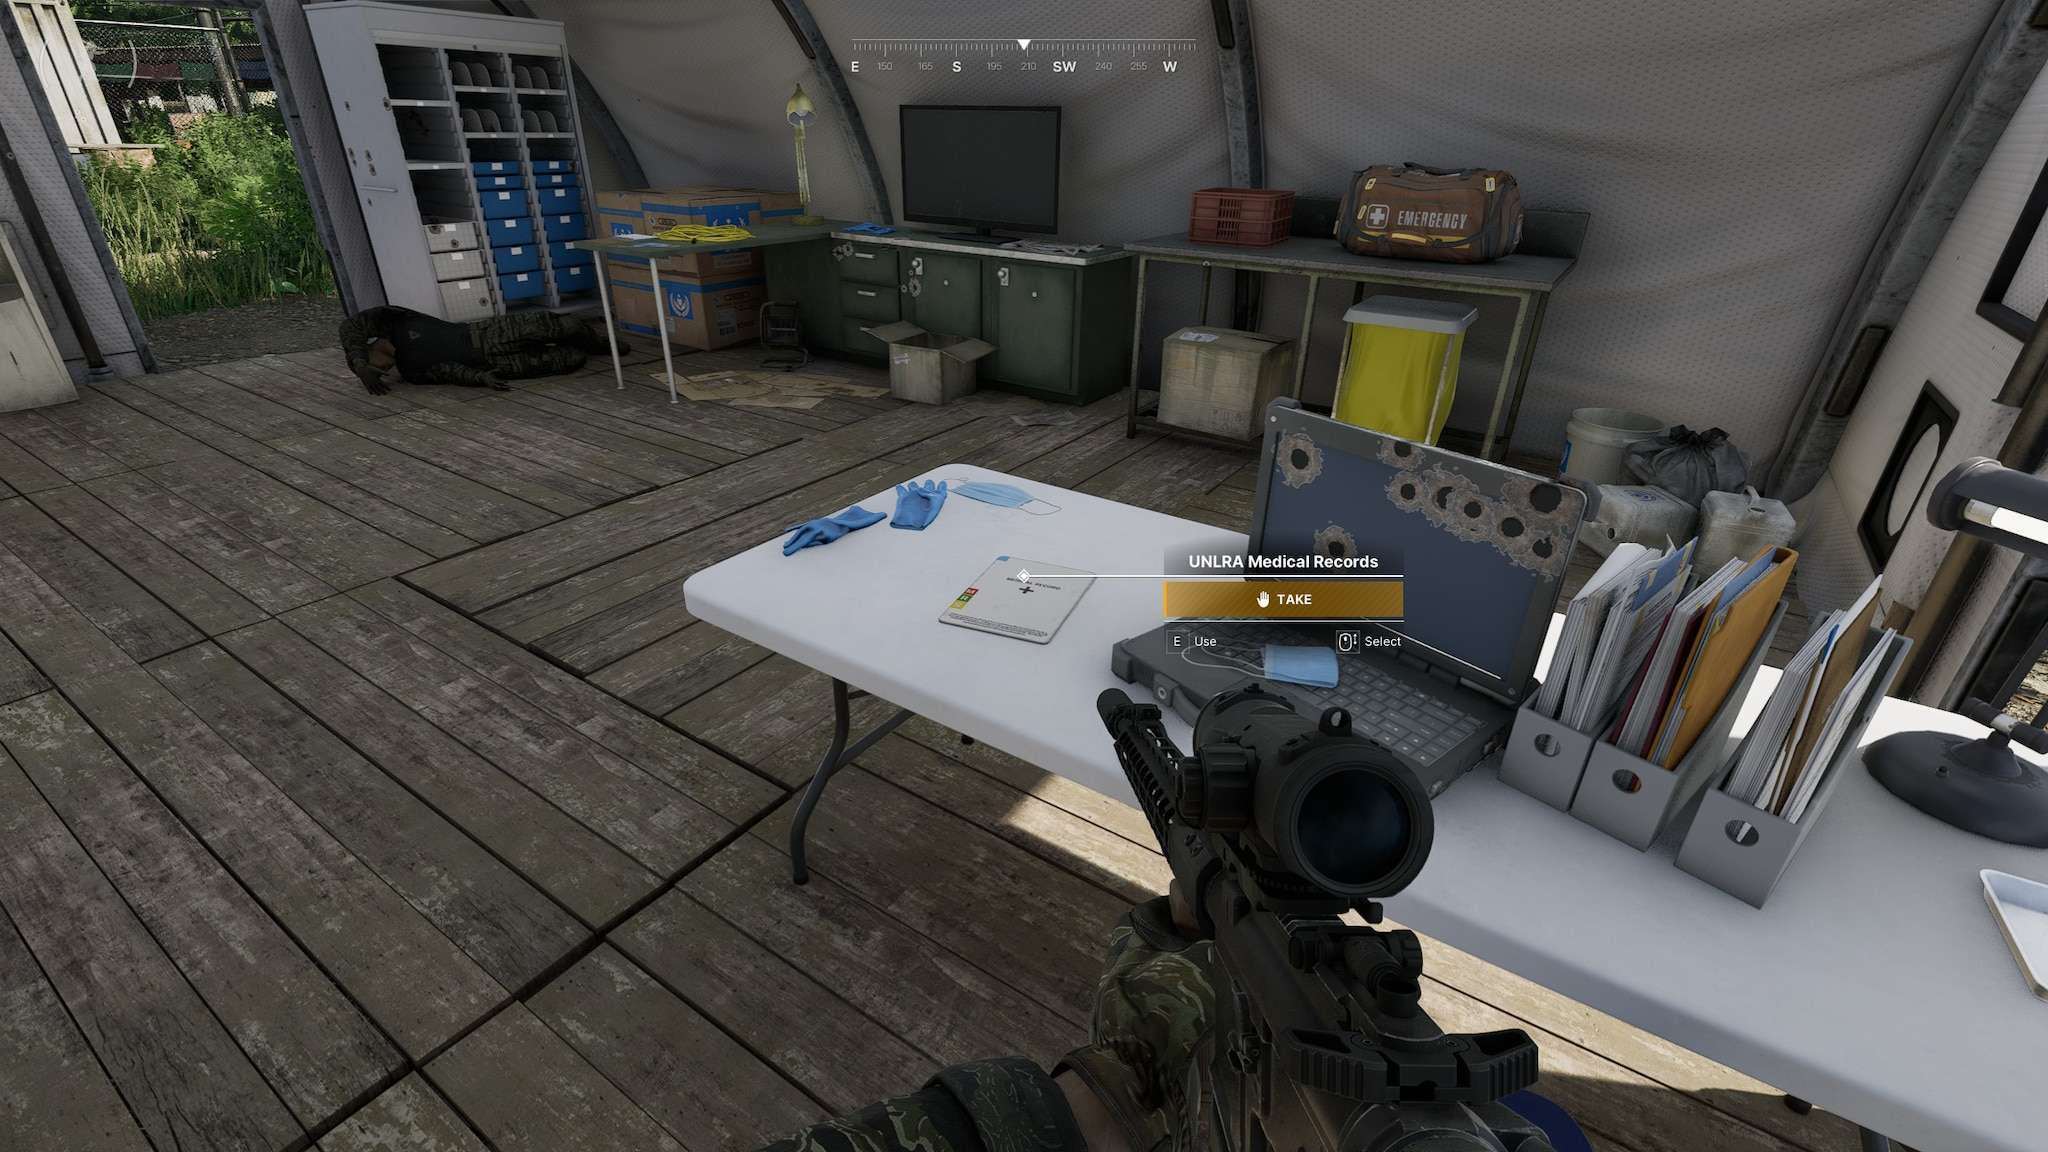
UNLRA
UNLRA
The refugee camp sits right by the shoreline, south of the UNLRA Headquarters. You’ll find it tucked away in the northeastern part of Tiger Bay. Just follow the shoreline down from the HQ, and you’ll stumble upon the camp in no time.
The large tent in the north contains the folder:
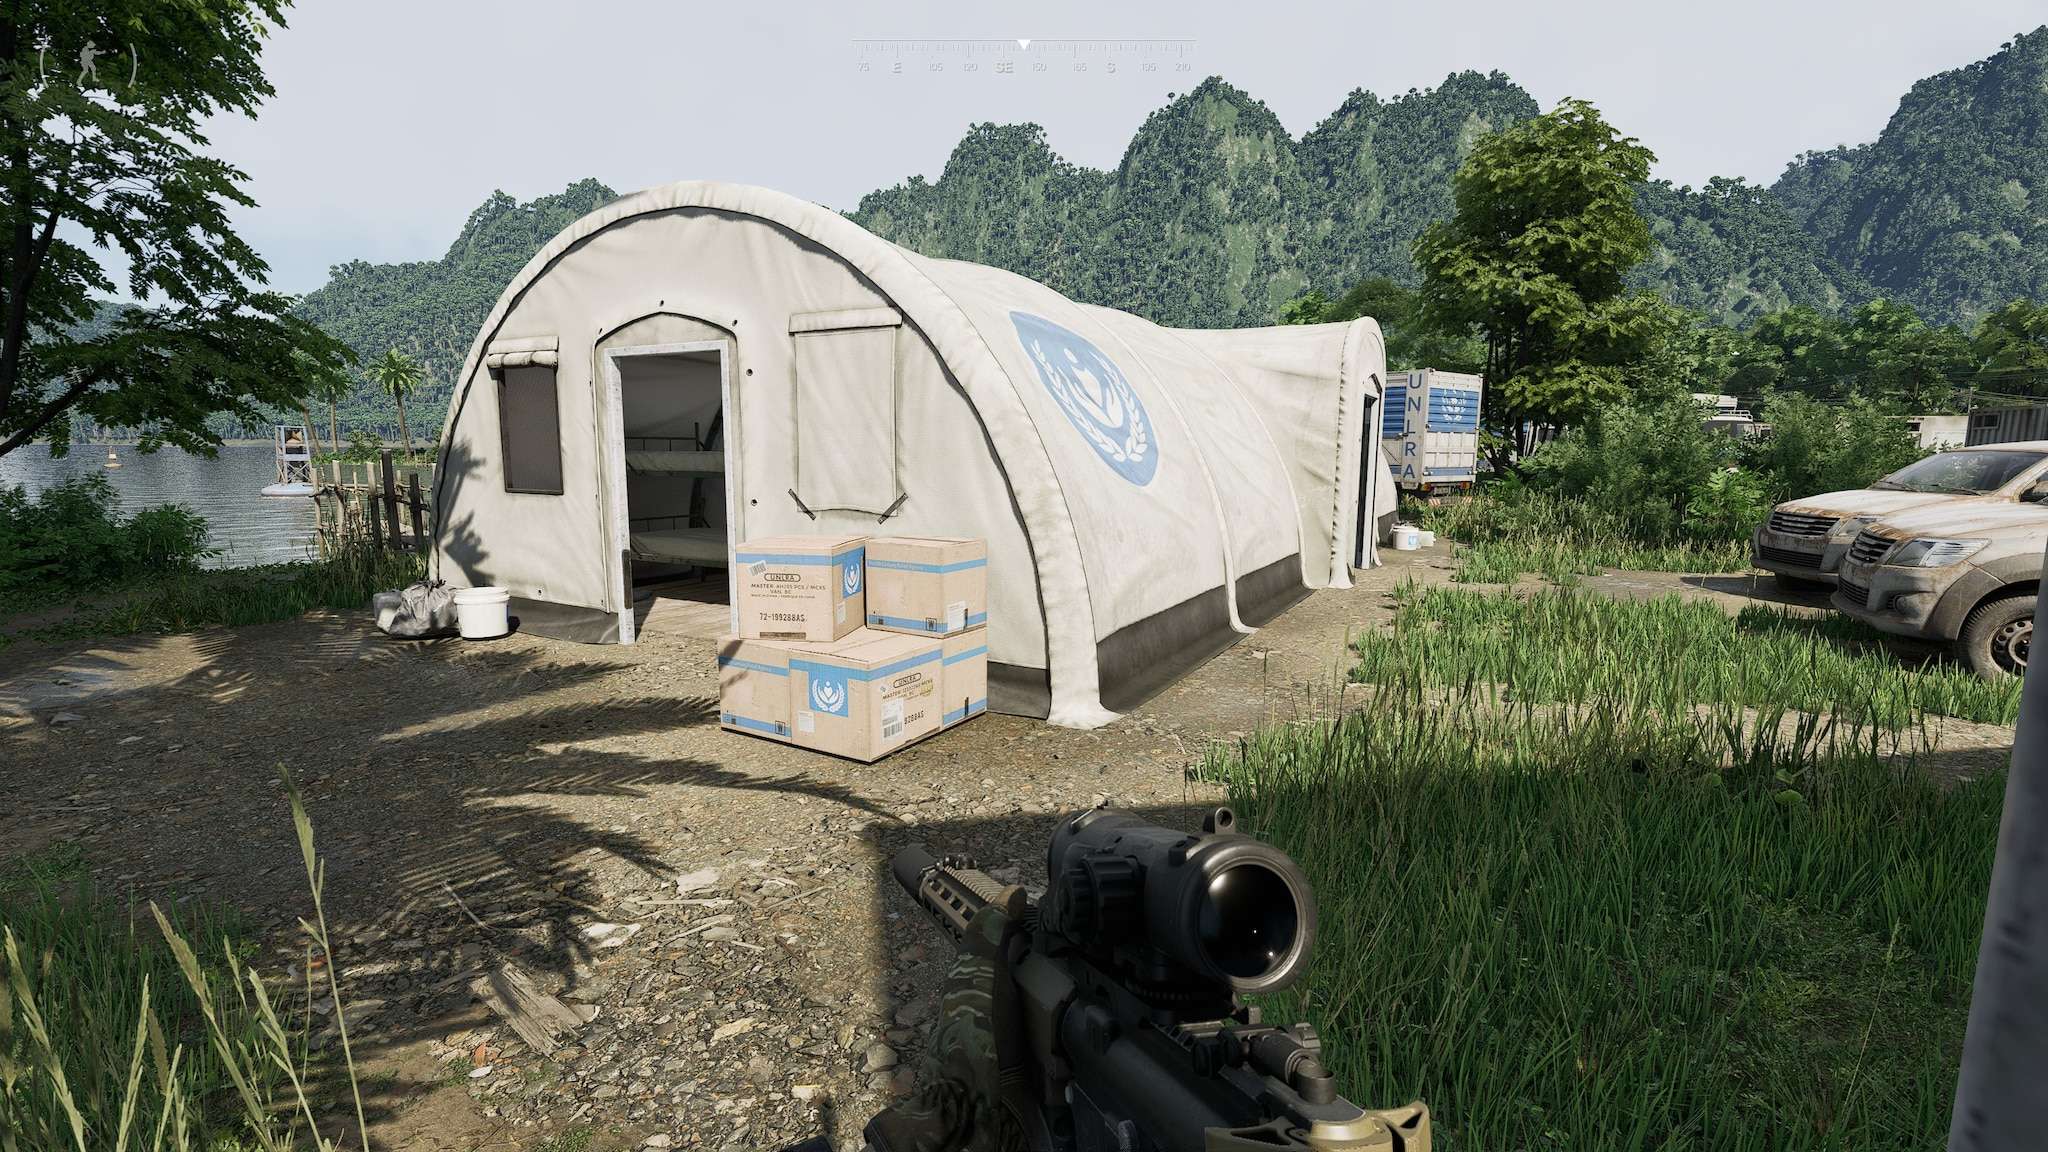
The folder will be on the table inside:
Aye Aye, Captain
Aye Aye, Captain
To make our approach smoother, we’ll come in from the south and deal with any enemies blocking our path. As we reach the houses before heading into the open, we’ll take out the UNLRA HQ across the water while keeping ourselves safe behind cover. By picking them off from a distance, we can thin their numbers and force the rest to come at us. We’ll take it slow, keep our ammo topped up, and have a couple of grenades handy, just in case things get hairy. If we play it smart and don’t rush, we can clear out any hostiles that might otherwise catch us out in the open on our way to the target location.
Baked
Baked
Item can be found in the back of a storage room on the first floor of the eastern building of the mall, central-area:
The door into the storage-room containing the item is directly to the right of the stairs:
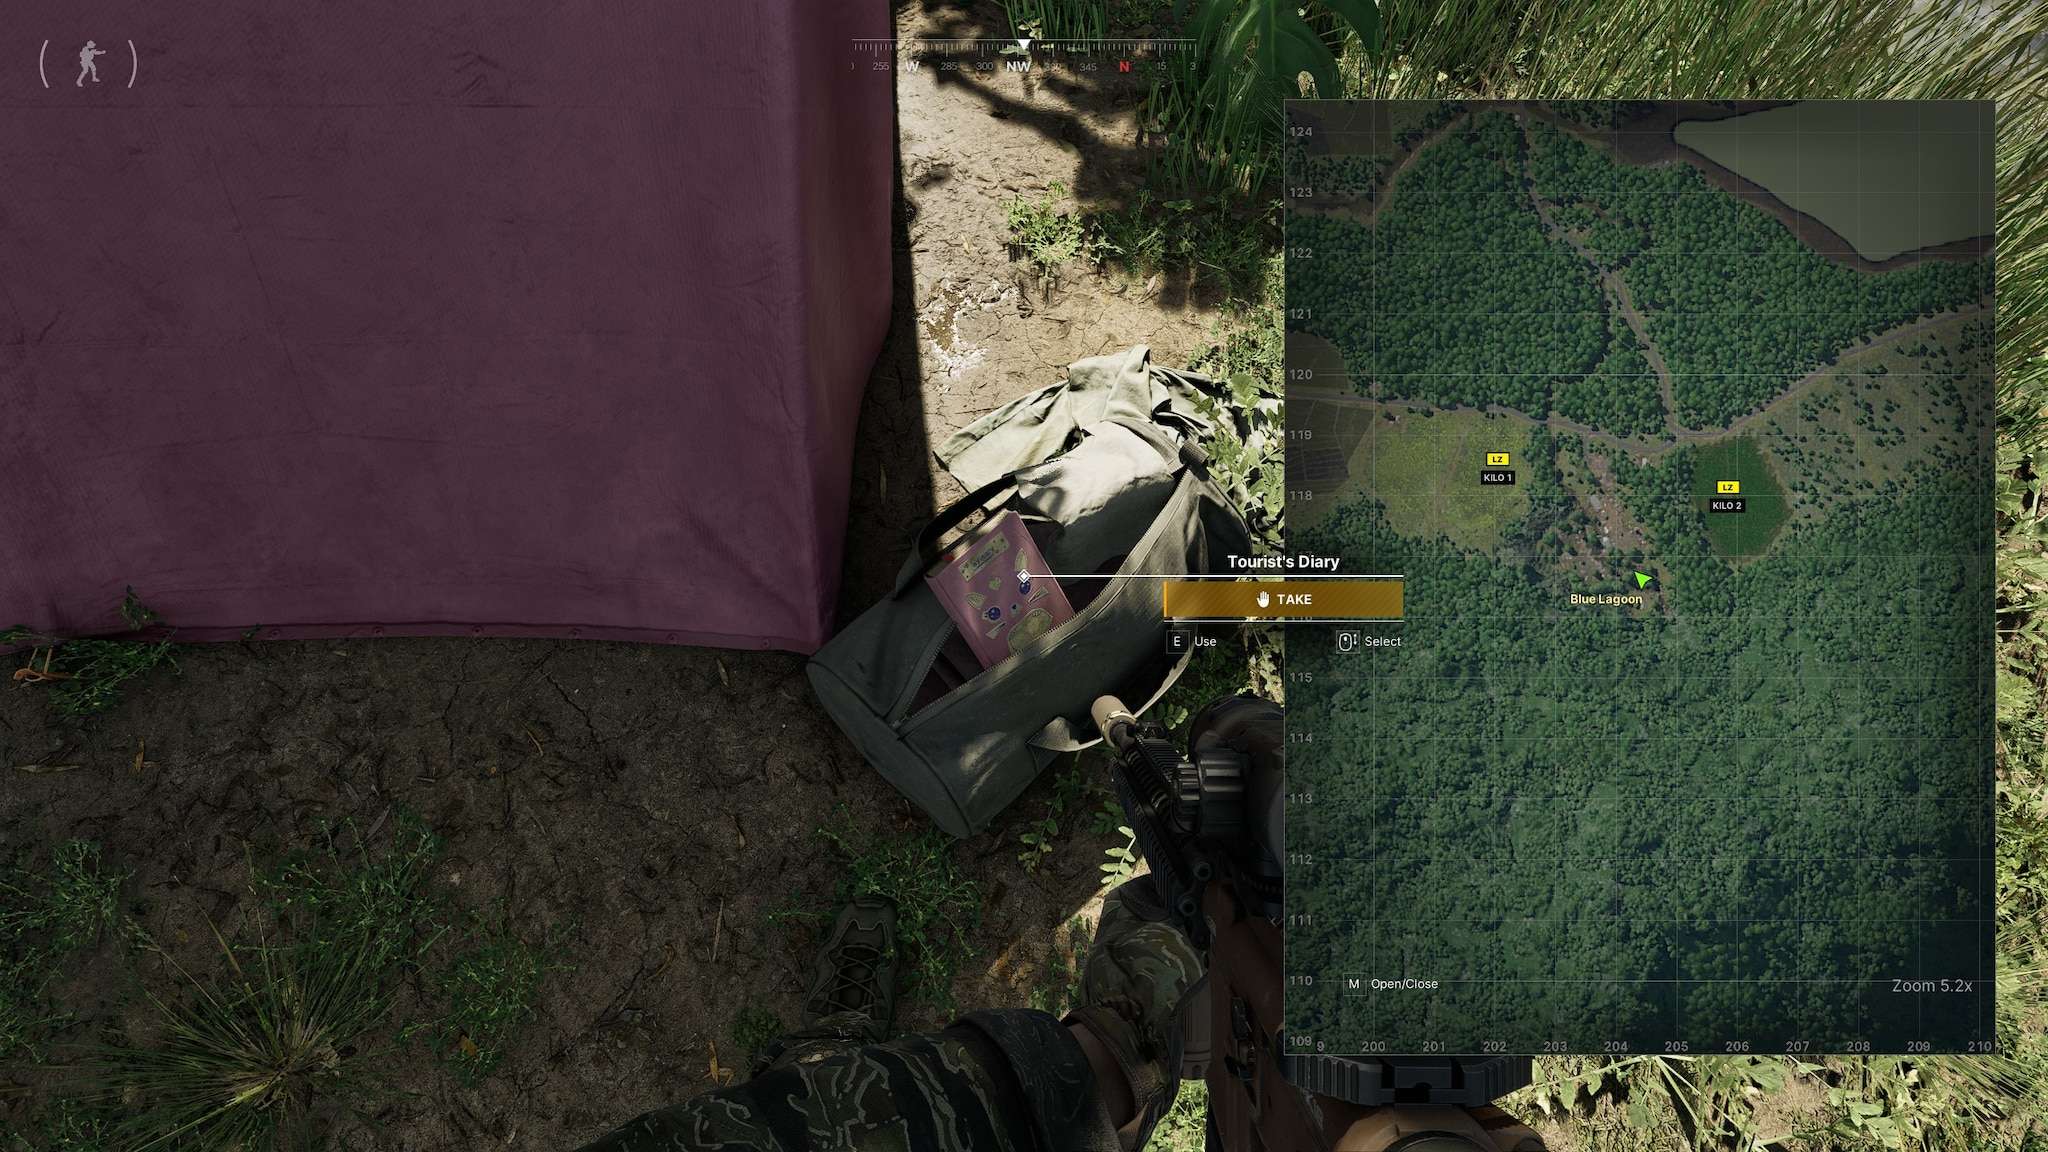
Lost Girl
Lost Girl
- Go into the furthest room to the right and read the pink document – 199 129

Crime Doesn’t Pay
Crime Doesn’t Pay – 168 165
Motel, Second room to the right

Check on purple shirt man
Priceless Possessions
Priceless Possessions 169 169
Inside the wooden shed left most door
Golf club on the ground under the shelf, 1×3 slot item
The Value of Sharing
The Value of Sharing
Wanted Man
Wanted Man
In the HQ of Fort Narith
The room is on the 1st floor “Office 1-3” and search on the desk on the right of the room.
Wanted Man II
Wanted Man II
In Fort Narith, go to the A Barracks
After go to the A 102 Room, You don’t need a key to open it.
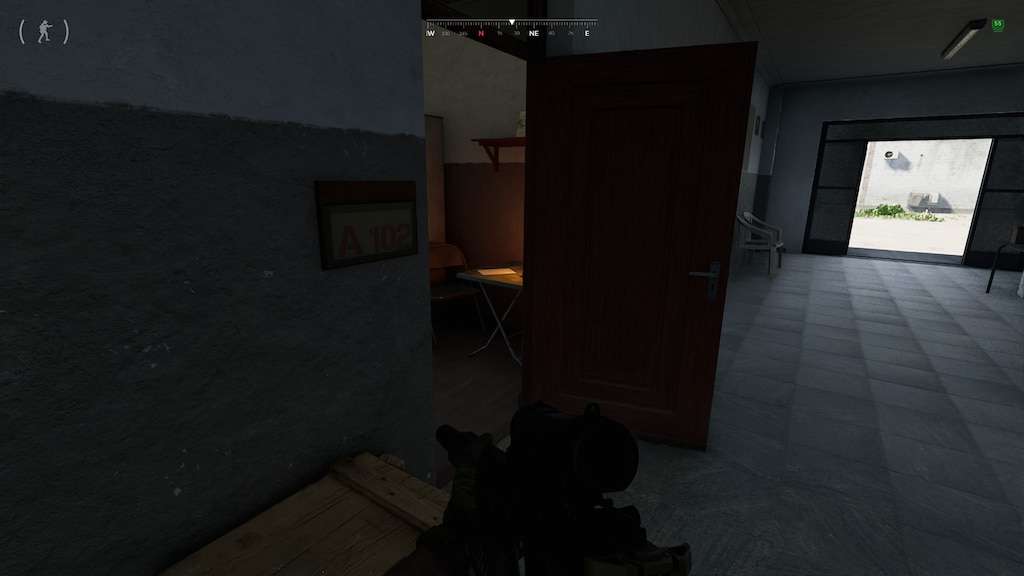
After, You just need to take the intel on the little table on the right just after the door.
Lost Girl II
Lost Girl II
Pink tent is in the South-east (near the abandoned shack):
Diary is right next too the tent:
Unnameable
Unnameable
Find the body of the missing UNLRA staff member.
The body is in a house in the northern part of Tiger Bay, right next to a restaurant.
House marked on map:
Go upstairs to the 2nd floor from the backroom:
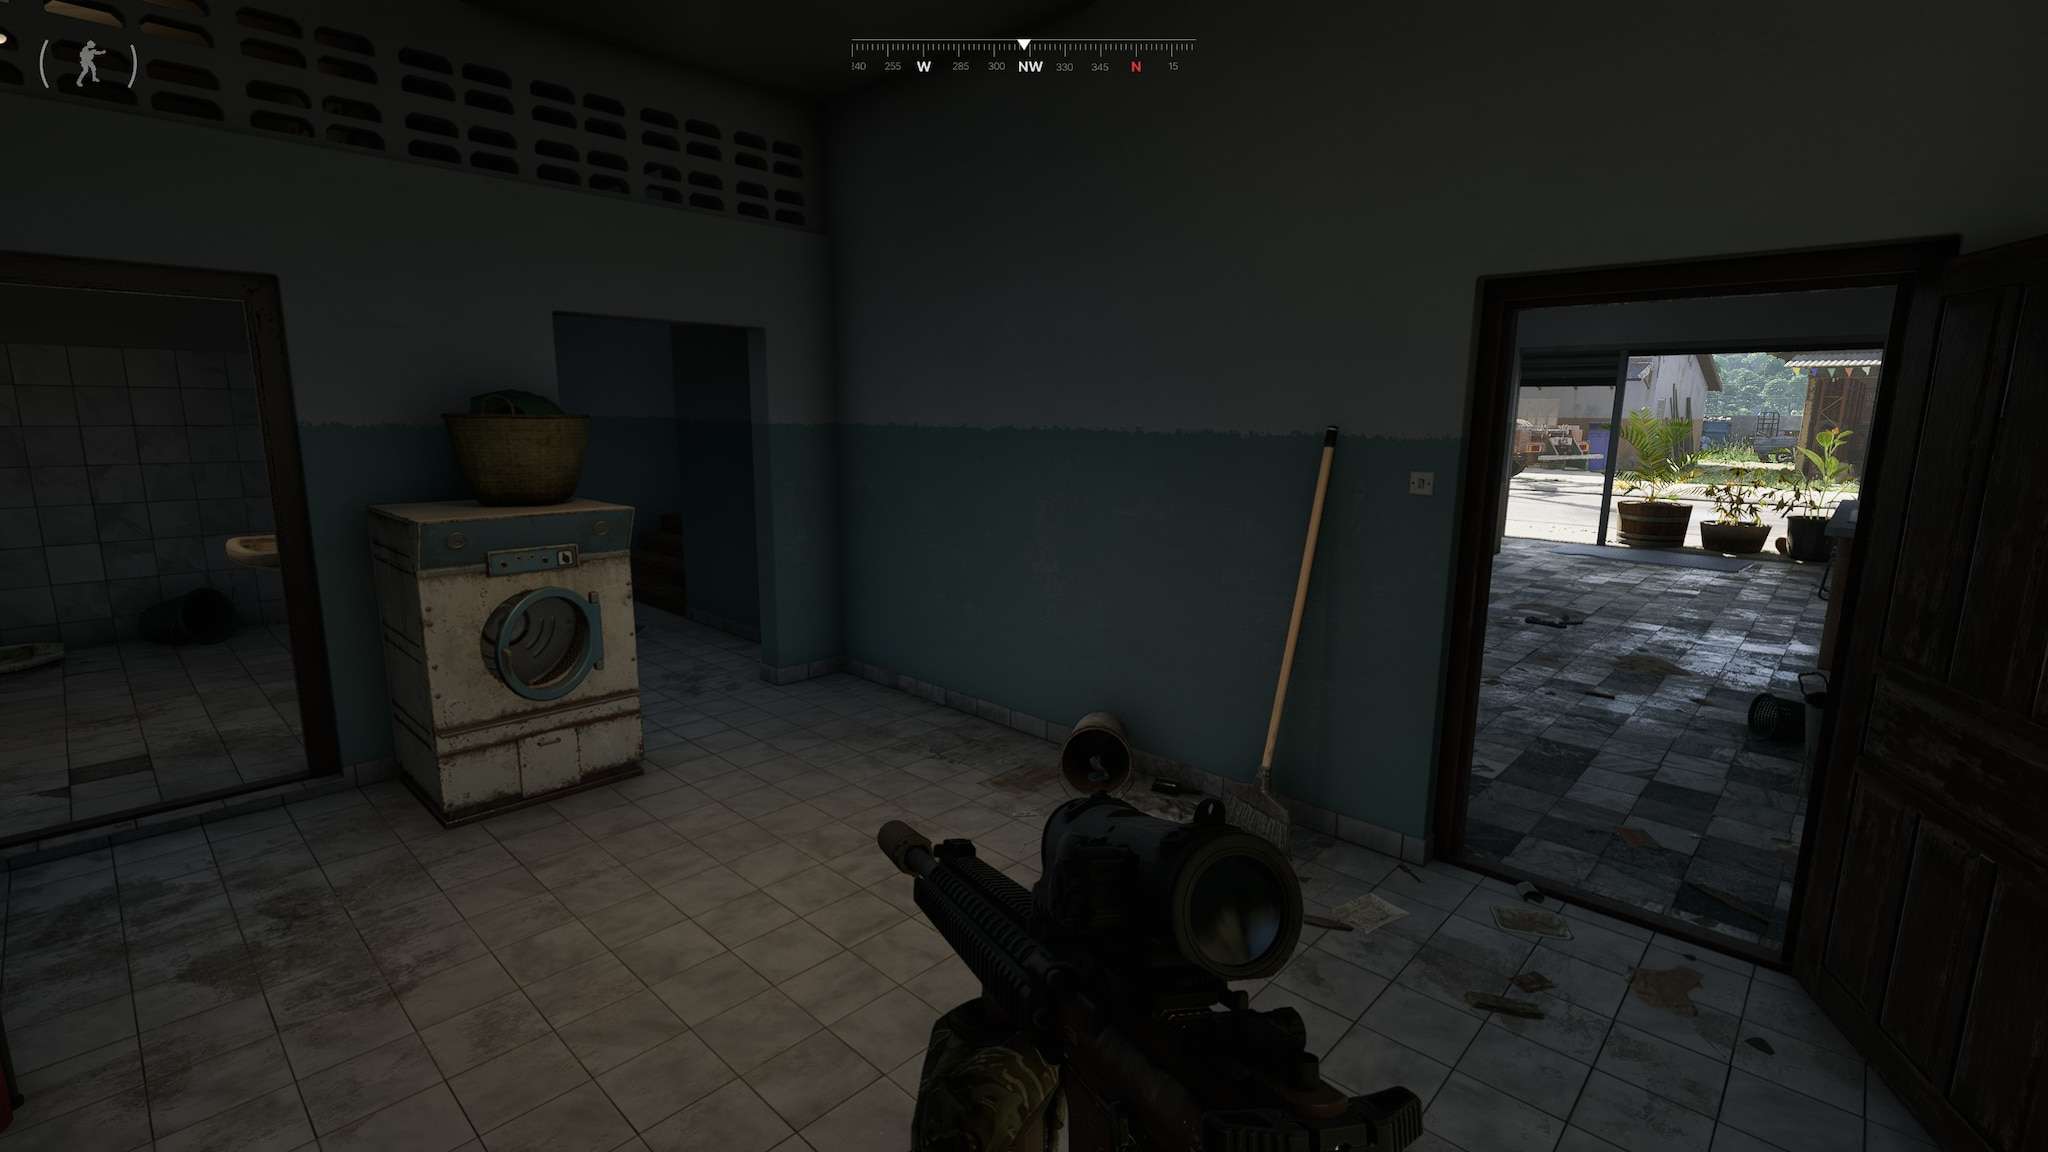
The body is inside the room furthest in, on the bed:
What Remains
What Remains
UNLRA HQ Lab Key is required to enter the Lab at UNLRA HQ in Tiger Bay.
Door into the lab:
The item is inside the fridge in the back-left corner:
Incognito
Incognito
Front Entrance:
Back Entrance:
The object is located in the bedroom (back entry leads directly into it), inside a nightstand drawer:
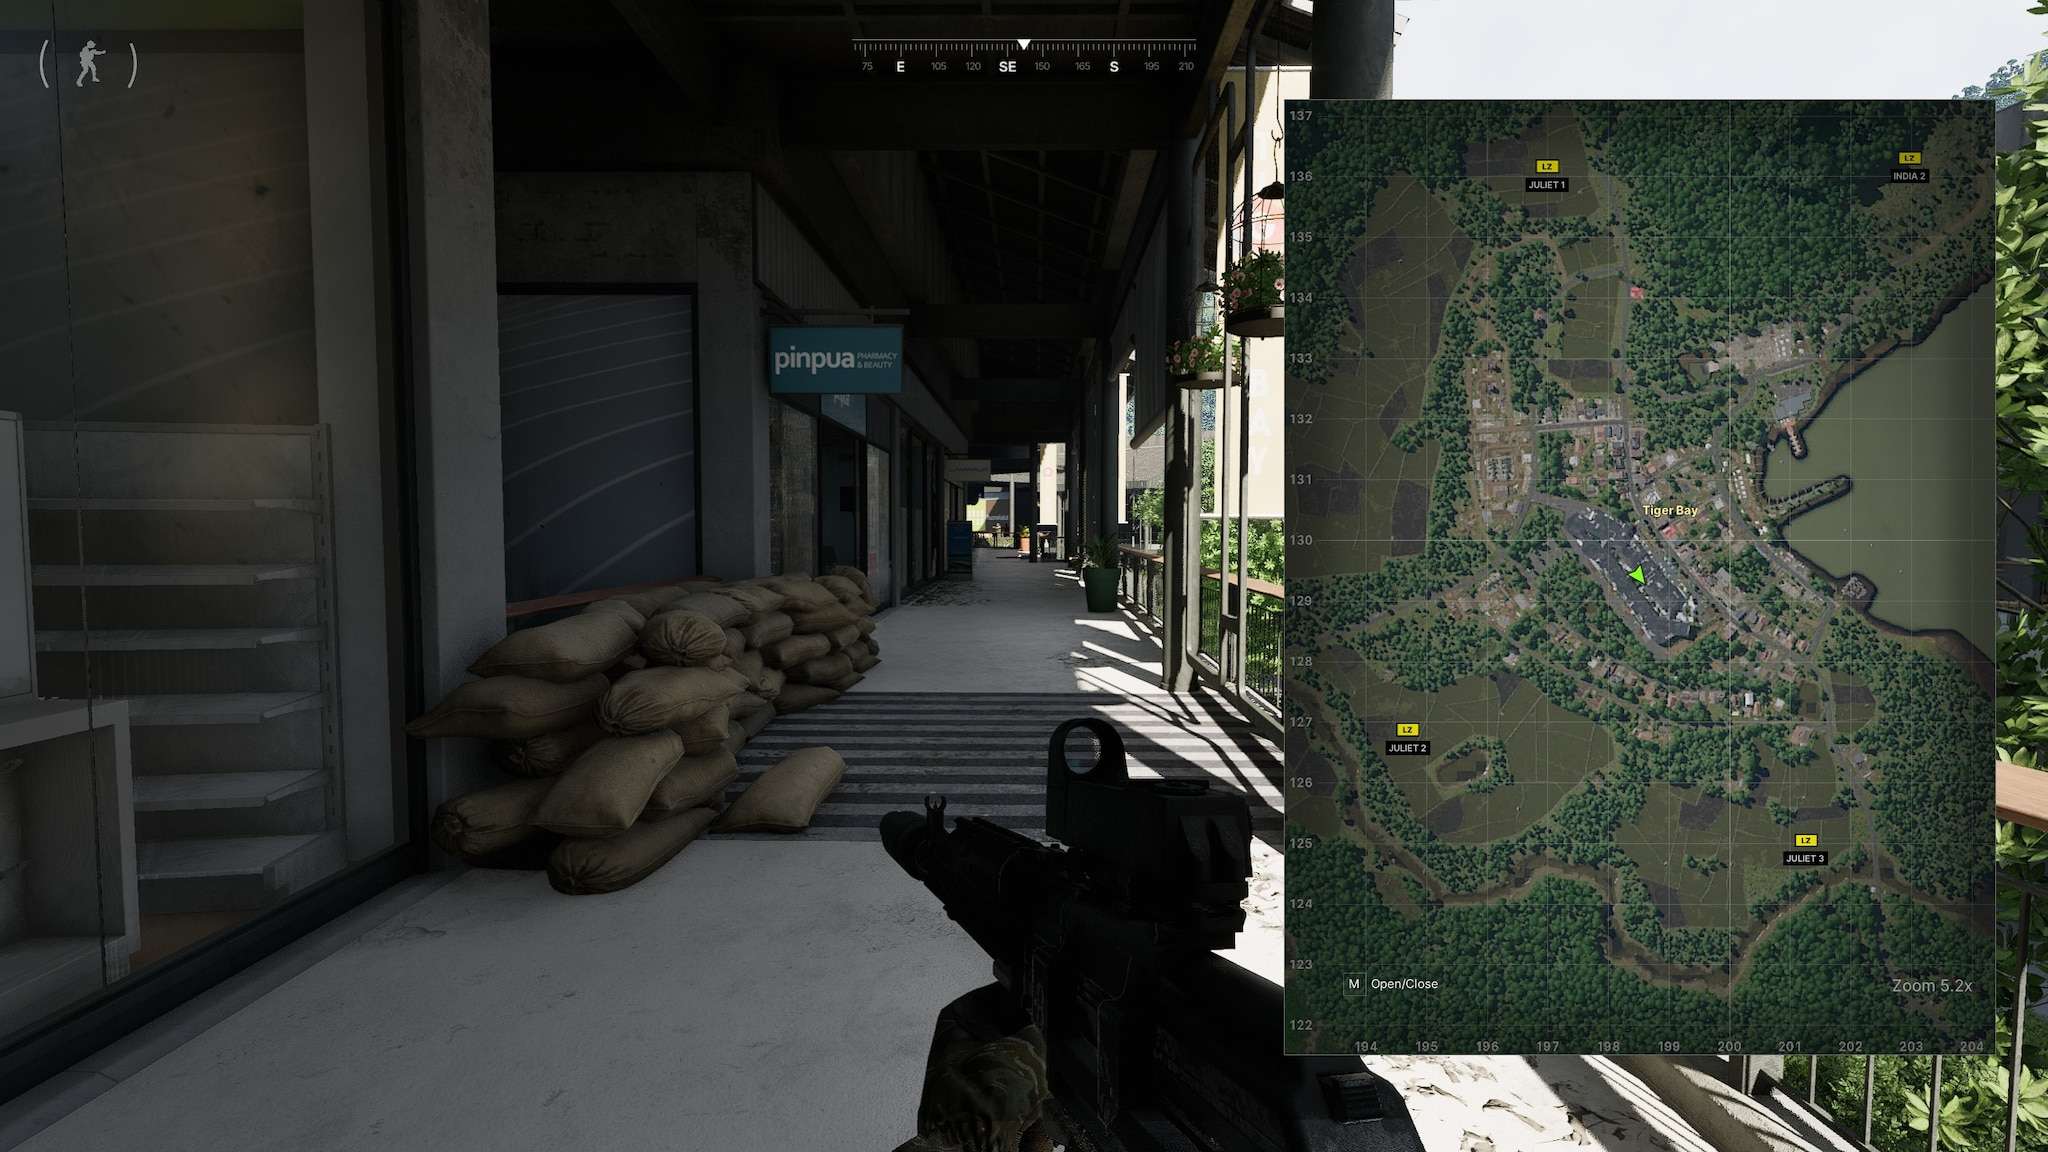
Test Results
Test Results
Go to the 2nd floor of the mall and enter Pinpua at the east-central area:
Enter the storage area in the backroom:
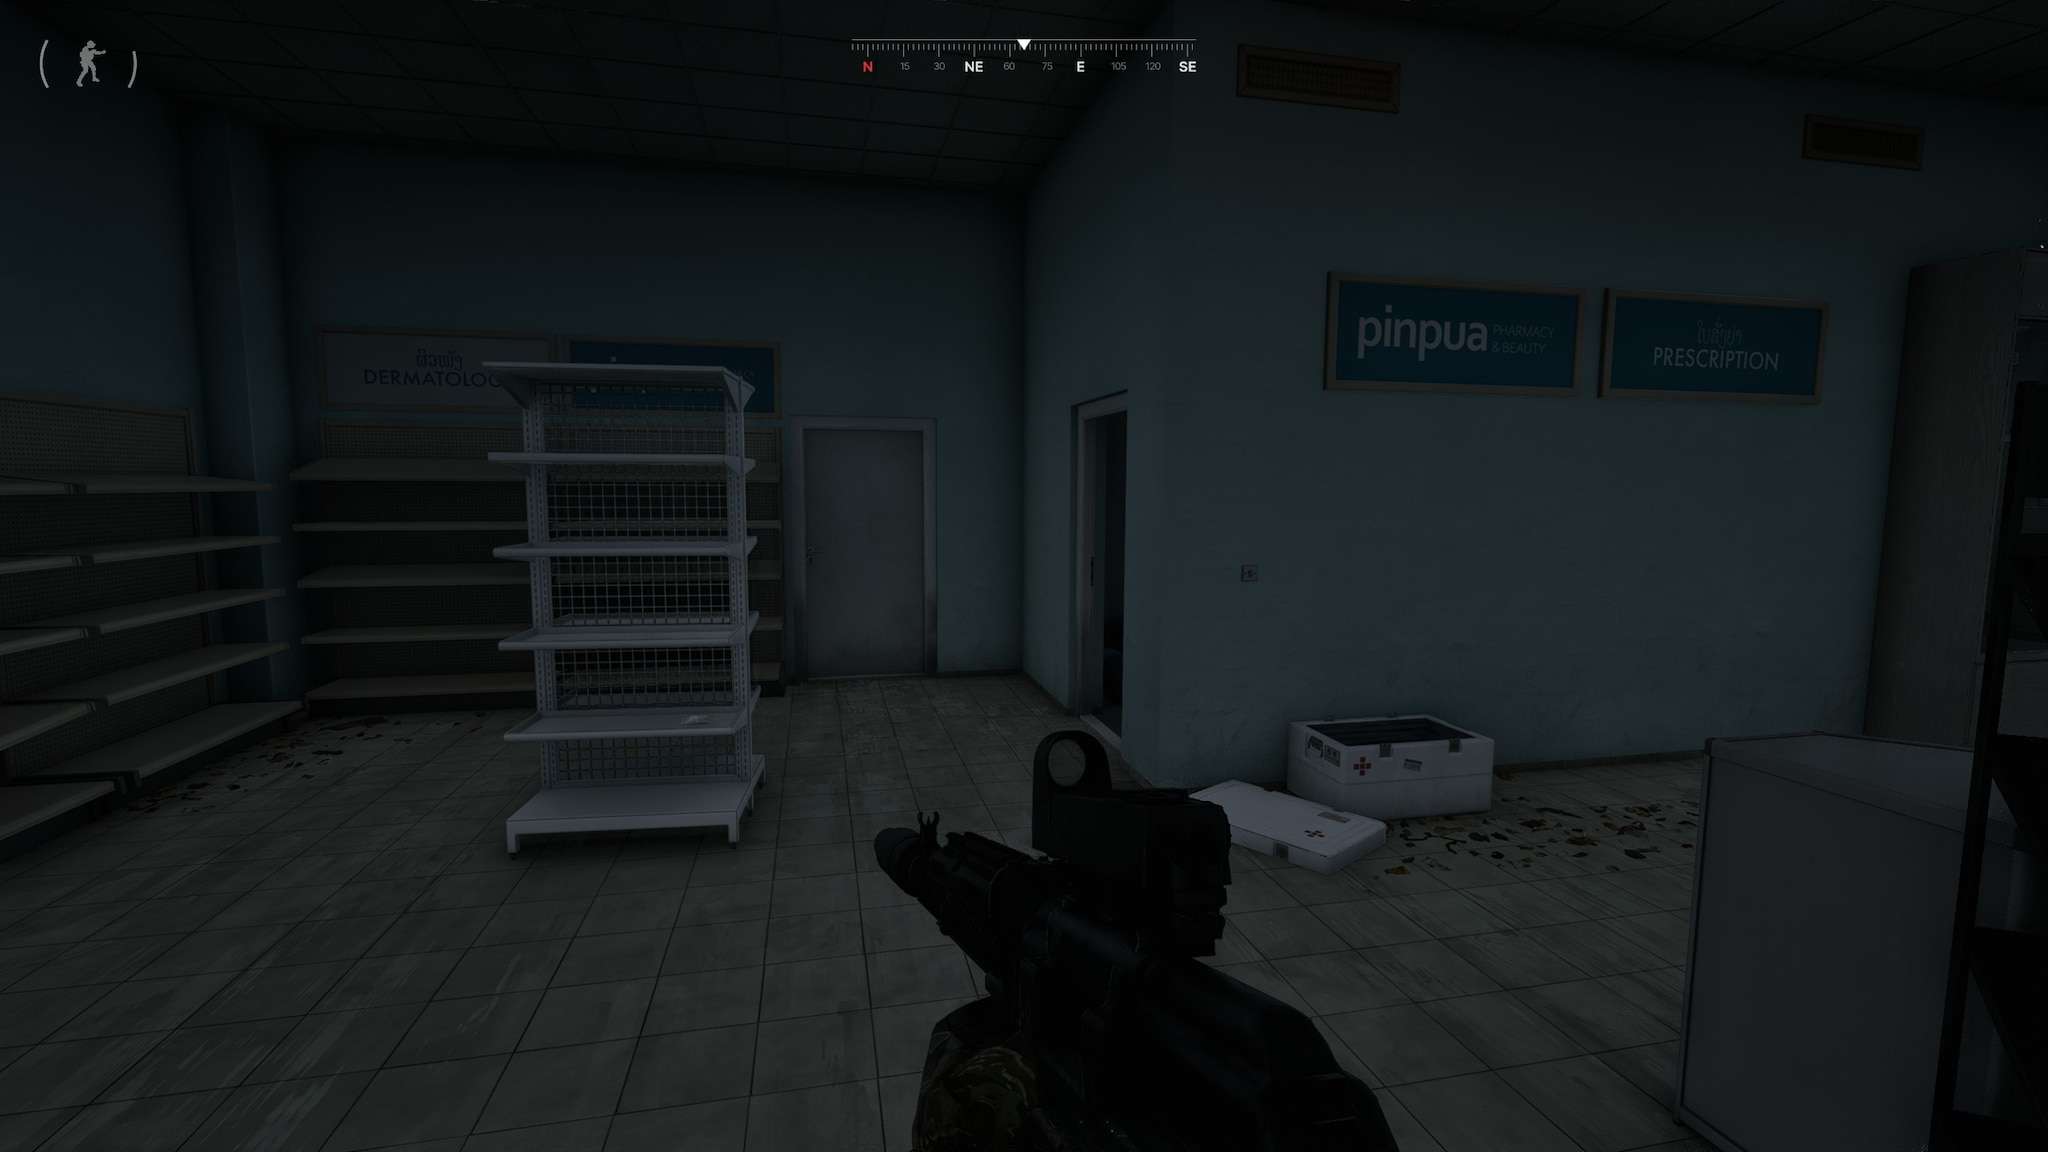
The item will be on a shelf in the far back, in the left corner:
Crumb Collector + Buyer of Untold Truths
Crumb Collector + Buyer of Untold Truths
You can only turn in one of the quest. The other quest will fail.
The item is found in the tents at the far south of the refugee-camp:
It will be on one of the tables in the western-tent:
How to Play Tips (Beginner, Intermediate & Advanced)
Using the Helicopter:
- Press [Tab] and open the map.
- Pick a spot where you want the helicopter to land.
- Select “Base” on the map if you want to head back to your base.
If You Die:
- You’ll respawn at the basecamp.
- If you can, try to get back to where you died to grab your stuff. Make sure you’re careful or have a buddy to help.
- If you die again before looting, your gear will vanish.
Lost Your Trackers?
- No biggie. You can buy new ones from the Vendor for a bit of cash.
More Tips for Beginners:
- Press TAB to access your menu, where you can find vendors, your character, and the map.
- Use the map screen in the menu to select landing zones for helicopters to pick you up. Remember, not the ‘M’ keybind for the mini-map, but from the Menu screen.
- Hover your cursor over the map to figure out coordinates, and use the grid numbers for navigation.
- Check your character’s equipment for an Energy icon next to certain items. These can be accessed via Hotbar ‘4’ and corresponding keybindings for medical supplies and provisions.
- Remember, when calling a helicopter, select where you want to go on the map, not the pick-up point. The game will mark the nearest landing zone, and you need to reach it in time to jump on the heli.
- Put your magazine in a reachable pocket for quick reloading with “R”. You can also manually insert spare bullets into empty mags.
- Avoid muffling sounds by not wearing ear protectors if you want to hear footsteps and other noises.
- Keep your bars for drinking, eating, and health condition in check. You can directly use items without picking them up first.
- Check remaining ammo with “V” and switch fire mode with “B”. Single shot is good for conserving bullets and engaging at medium to long distances.
Little tip for hardcore about the last killed place and understanding who’s who
Just throw the map up quickly and see if they are friend or foe that way, yeah can’t see directly but gives you more of an idea.
Combat Tips
- 1) Ammunition plays a major role in gameplay, whether you are fighting other players or enemies controlled by the game. These ammunition types have proven effective so far:
For 5.56mm, at minimum use M193 ammunition. While hollow-point rounds expand more on impact, they require 3 to 4 shots to defeat basic enemies. M193 works well against unarmored and lightly armored foes. The best 5.56mm choice is M855A1, a well-rounded, high-penetration round.
For 7.62x39mm, wait until unlocking higher levels like Artisan or Turncoat 2 to access 7.62×39 PS ammunition, which performs decently against most enemies. Its lower velocity limits mid-to-long range capability. 7.62×39 armor-piercing ammo is versatile overall.
Early on with Turncoat faction, 5.45x39mm PP and BT are good bets for that caliber.
The Mosin and M700 sniper rifles will drop any enemy with a well-placed headshot, regardless of ammunition type.
These recommendations prioritize high velocities and penetration over expansion, as overpenetration increases chances of hitting vital organs or multiple targets from favorable angles.
- 2) Shot placement is crucial for quickly defeating enemies. While the AI system can be inconsistent, center mass shots to the chest, angled shots through the side of the chest, or high shots to the middle back tend to be effective with proper ammunition against an enemy’s armor. Headshots will likely drop targets in one hit.
- 3) Continuously relocating during enemy encounters is important. The AI tracks and suppresses your last known position if you break line of sight. Avoid taking cover behind bushes, rotten wood walls, doors or tarps, as bullets will penetrate. Use solid cover like trees, rocks, concrete, vehicles or steel walls that will stop incoming fire. Scout areas thoroughly to identify potential hardcover positions.
- 4) Teamwork becomes very valuable in challenging late-game areas like Midnight Sapphire, Fort Narith and Tiger Bay due to dense enemy concentrations and formidable gear. Coordinate and communicate with teammates. If playing solo, consider teaming up with others to have backup and support.
Ballistics & Firearms
Gray Zone offers a variety of types of firearm rounds the most common being; Full Metal Jacket (FMJ), Armor Piercing (AP), and Hollow Point (HP) | The game has incorporated, and is using a ricochet system as well.
- FMJ rounds are effective on armored targets
- AP rounds are effective on heavily armored targets
- HP rounds are effective on unarmored targets
Buckshot rounds.
Assault Rifles:
- AKM
- AKMN
- AKMS
- AKMSN
- AK-74M
- AK-74N
- M4A1
- MK18
- CQA1
Bolt Action Rifles:
- SKS
- Mosin
- M700
Shotguns:
- Mossberg 590
- Remington M870
Pistols/SMG:
- Glock 17
- Type 51
- Sa vz. 61 Skorpion
The best firearms to use for when starting brand new to the game (on my personal opinion) are; the Mosin (Recoil is vertical, with a heavy recoil), Sa vz. 61 Skorpion (Recoil is horizontal, with a moderate recoil), M4A1 (Recoil is vertical, with a moderate recoil), M870 (Recoil is vertical, with a heavy recoil), AK-47 (Recoil is vertical, with a moderate recoil).
Medical Tips
When you get hit by bullets or blades, you can get different types of wounds – light ones heal over time, but medium and severe need bandages to patch them up.
Body armor stops projectiles from cutting you, but you’ll still get bruises that go away eventually.
After treating medium or severe wounds, you’ll be sore for a bit but then heal up.
Vital organs like brain, heart, lungs can get messed up too – see discoloration on x-rays. If those get ruined, it’s an instant death. Use surgery kit for organ repairs.
Broken arms and legs show similar damage – use splints to fix those up.
Bleeding means you’re losing blood, which has nasty effects if it gets too low. Blood bags refill what you lost, but tourniquets just stop the bleeding temporarily.
Stimulants cause intoxication that wears off or needs pills.
Pain is…well, pain. Pills help with that too.
Same for radiation exposure – stay in hot zones too long, and you’ll need anti-rad pills.
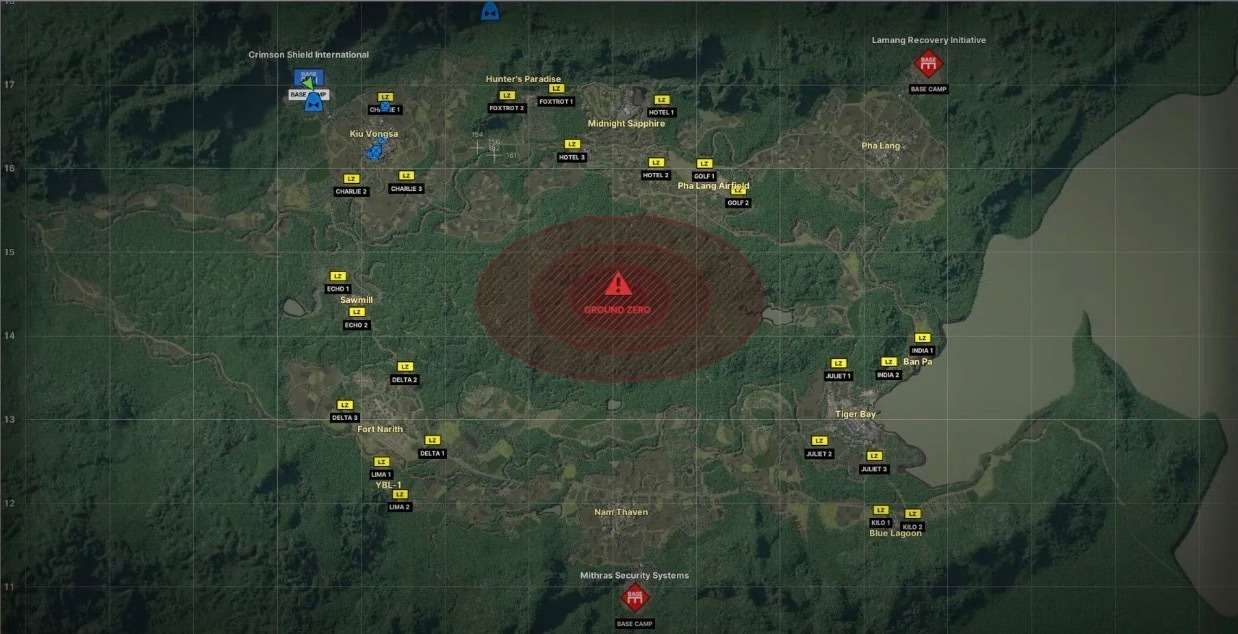
Map / Geography
Shows all possible LZ/DZ in the map.
Click to enlarge…
Armor Ranking [Worst to Best]
Worst.
- Type I
- Type II A
- Type II A+
- Type II
- Type II+
- Type III A
- Type III A+
- Type III
- Type III+
- Type IV
Best.
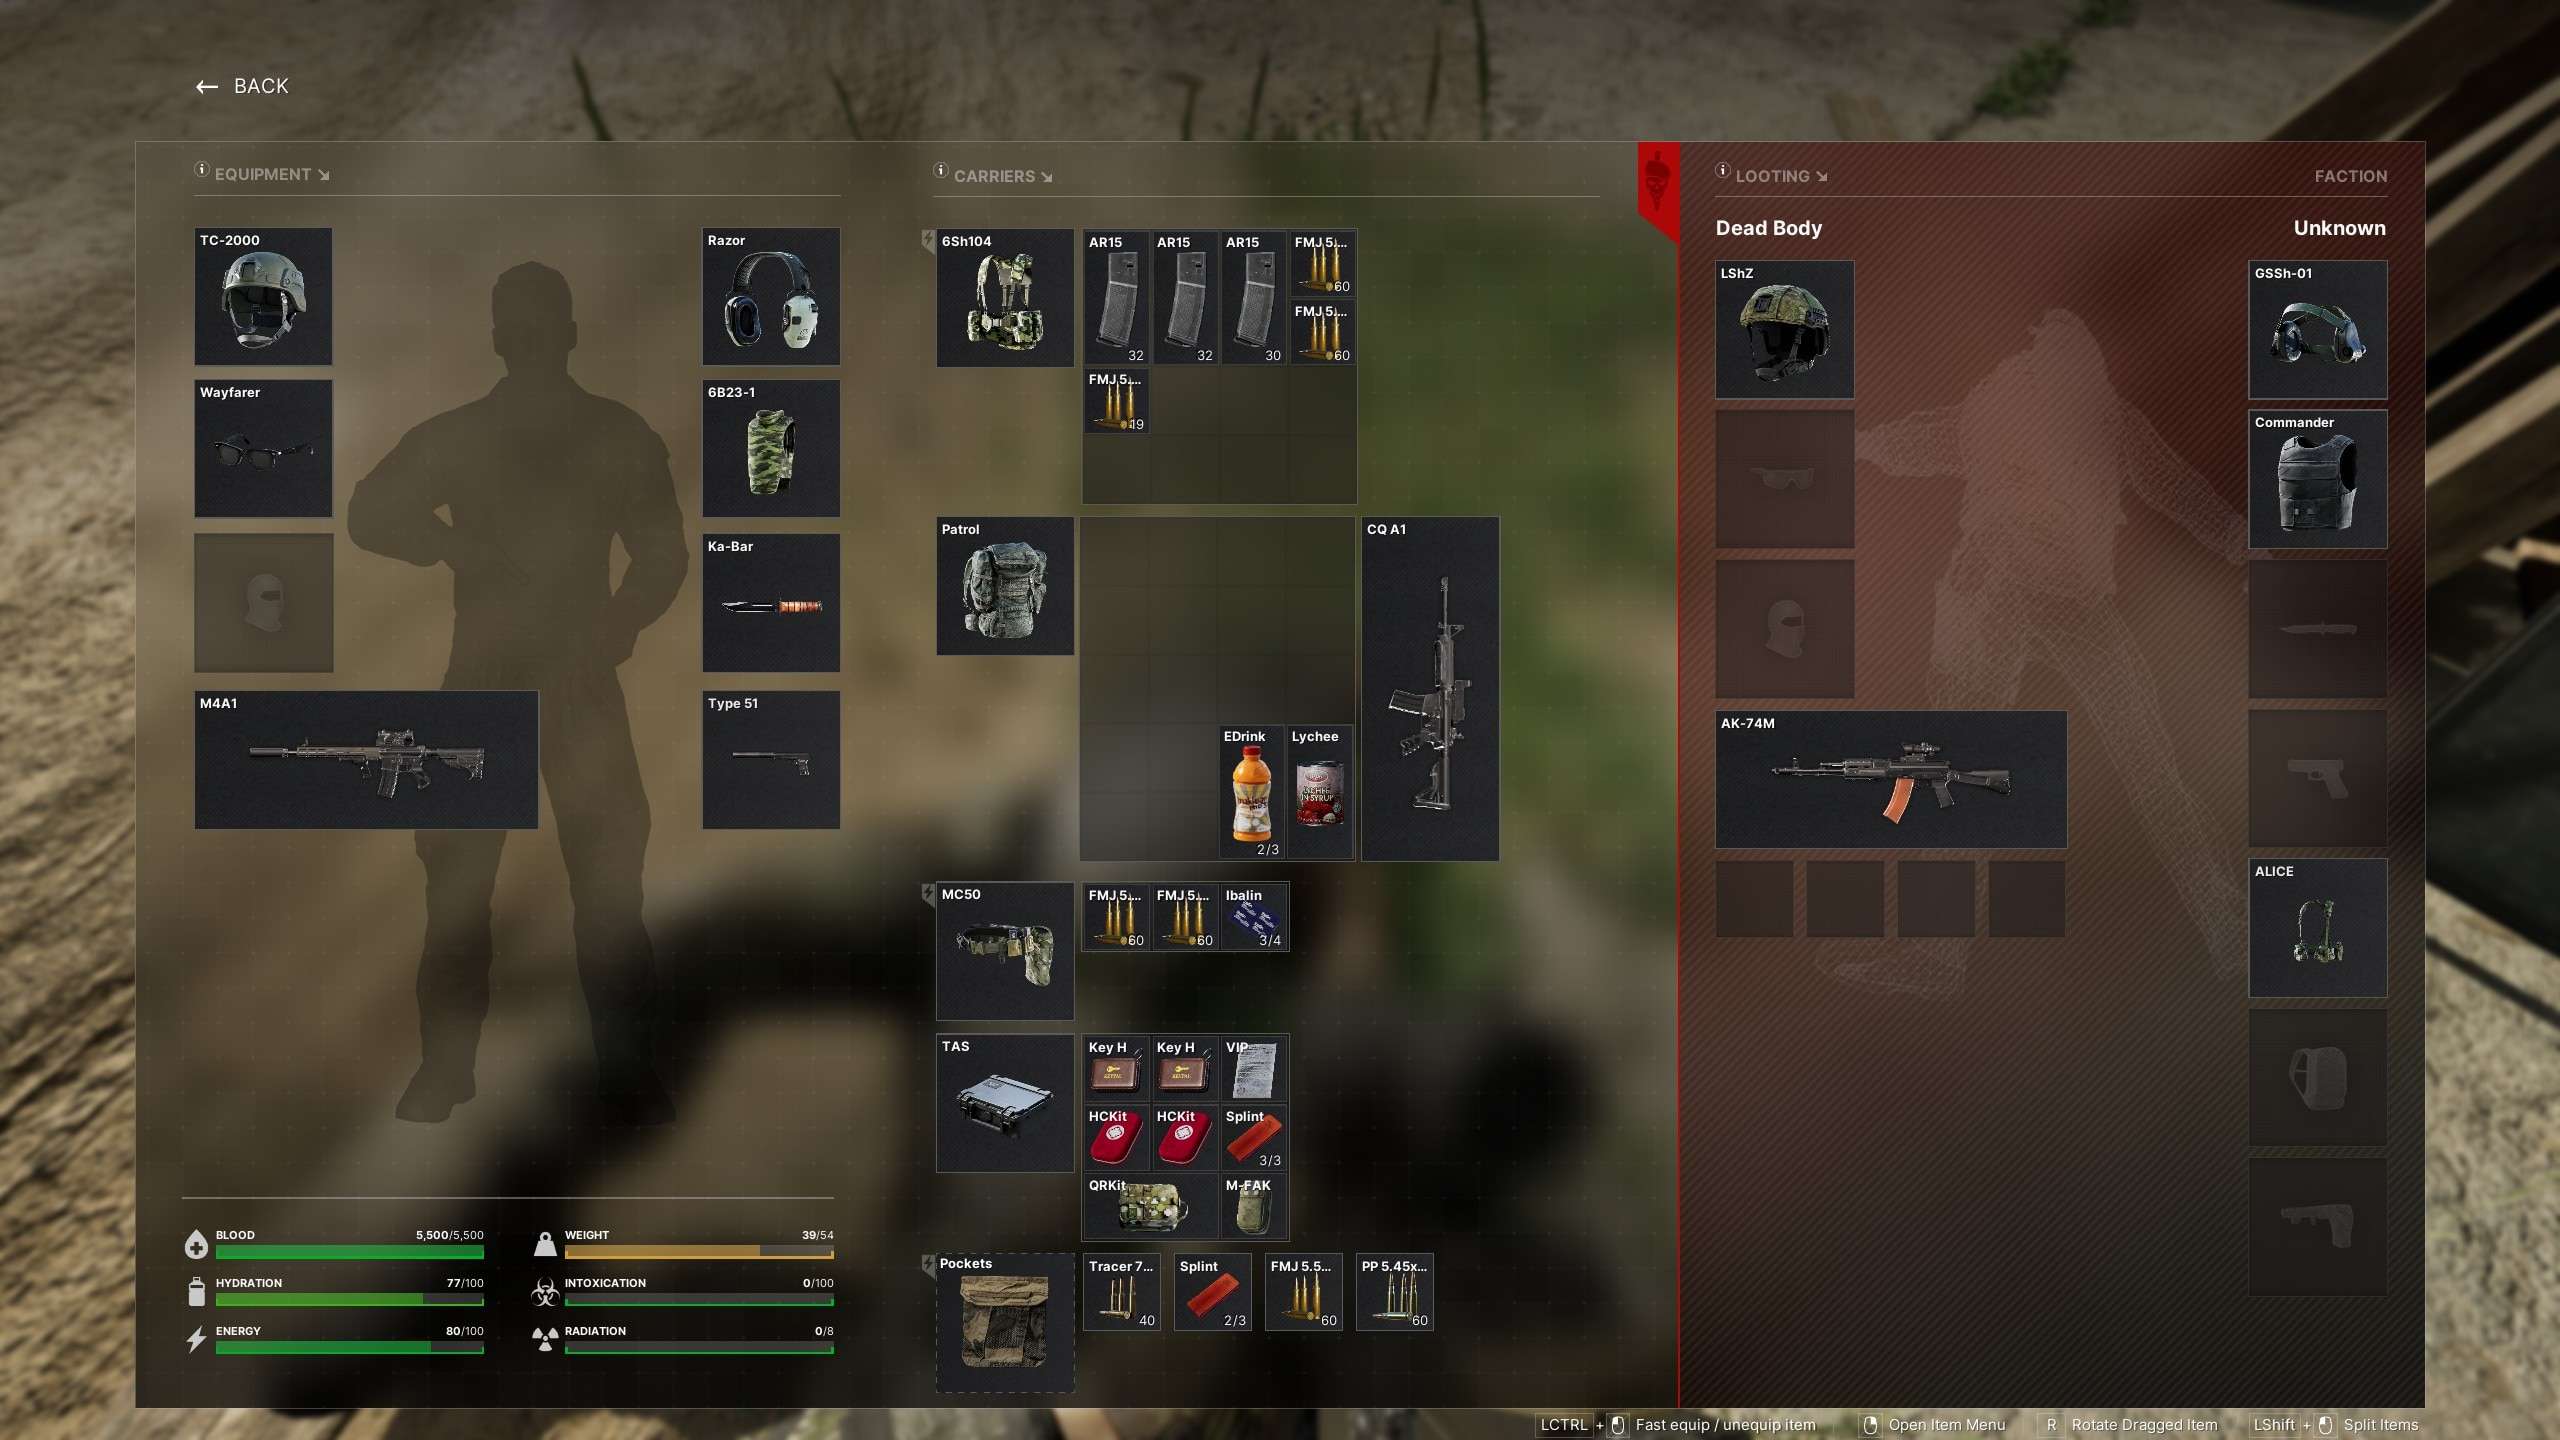
Loot Sell Prices
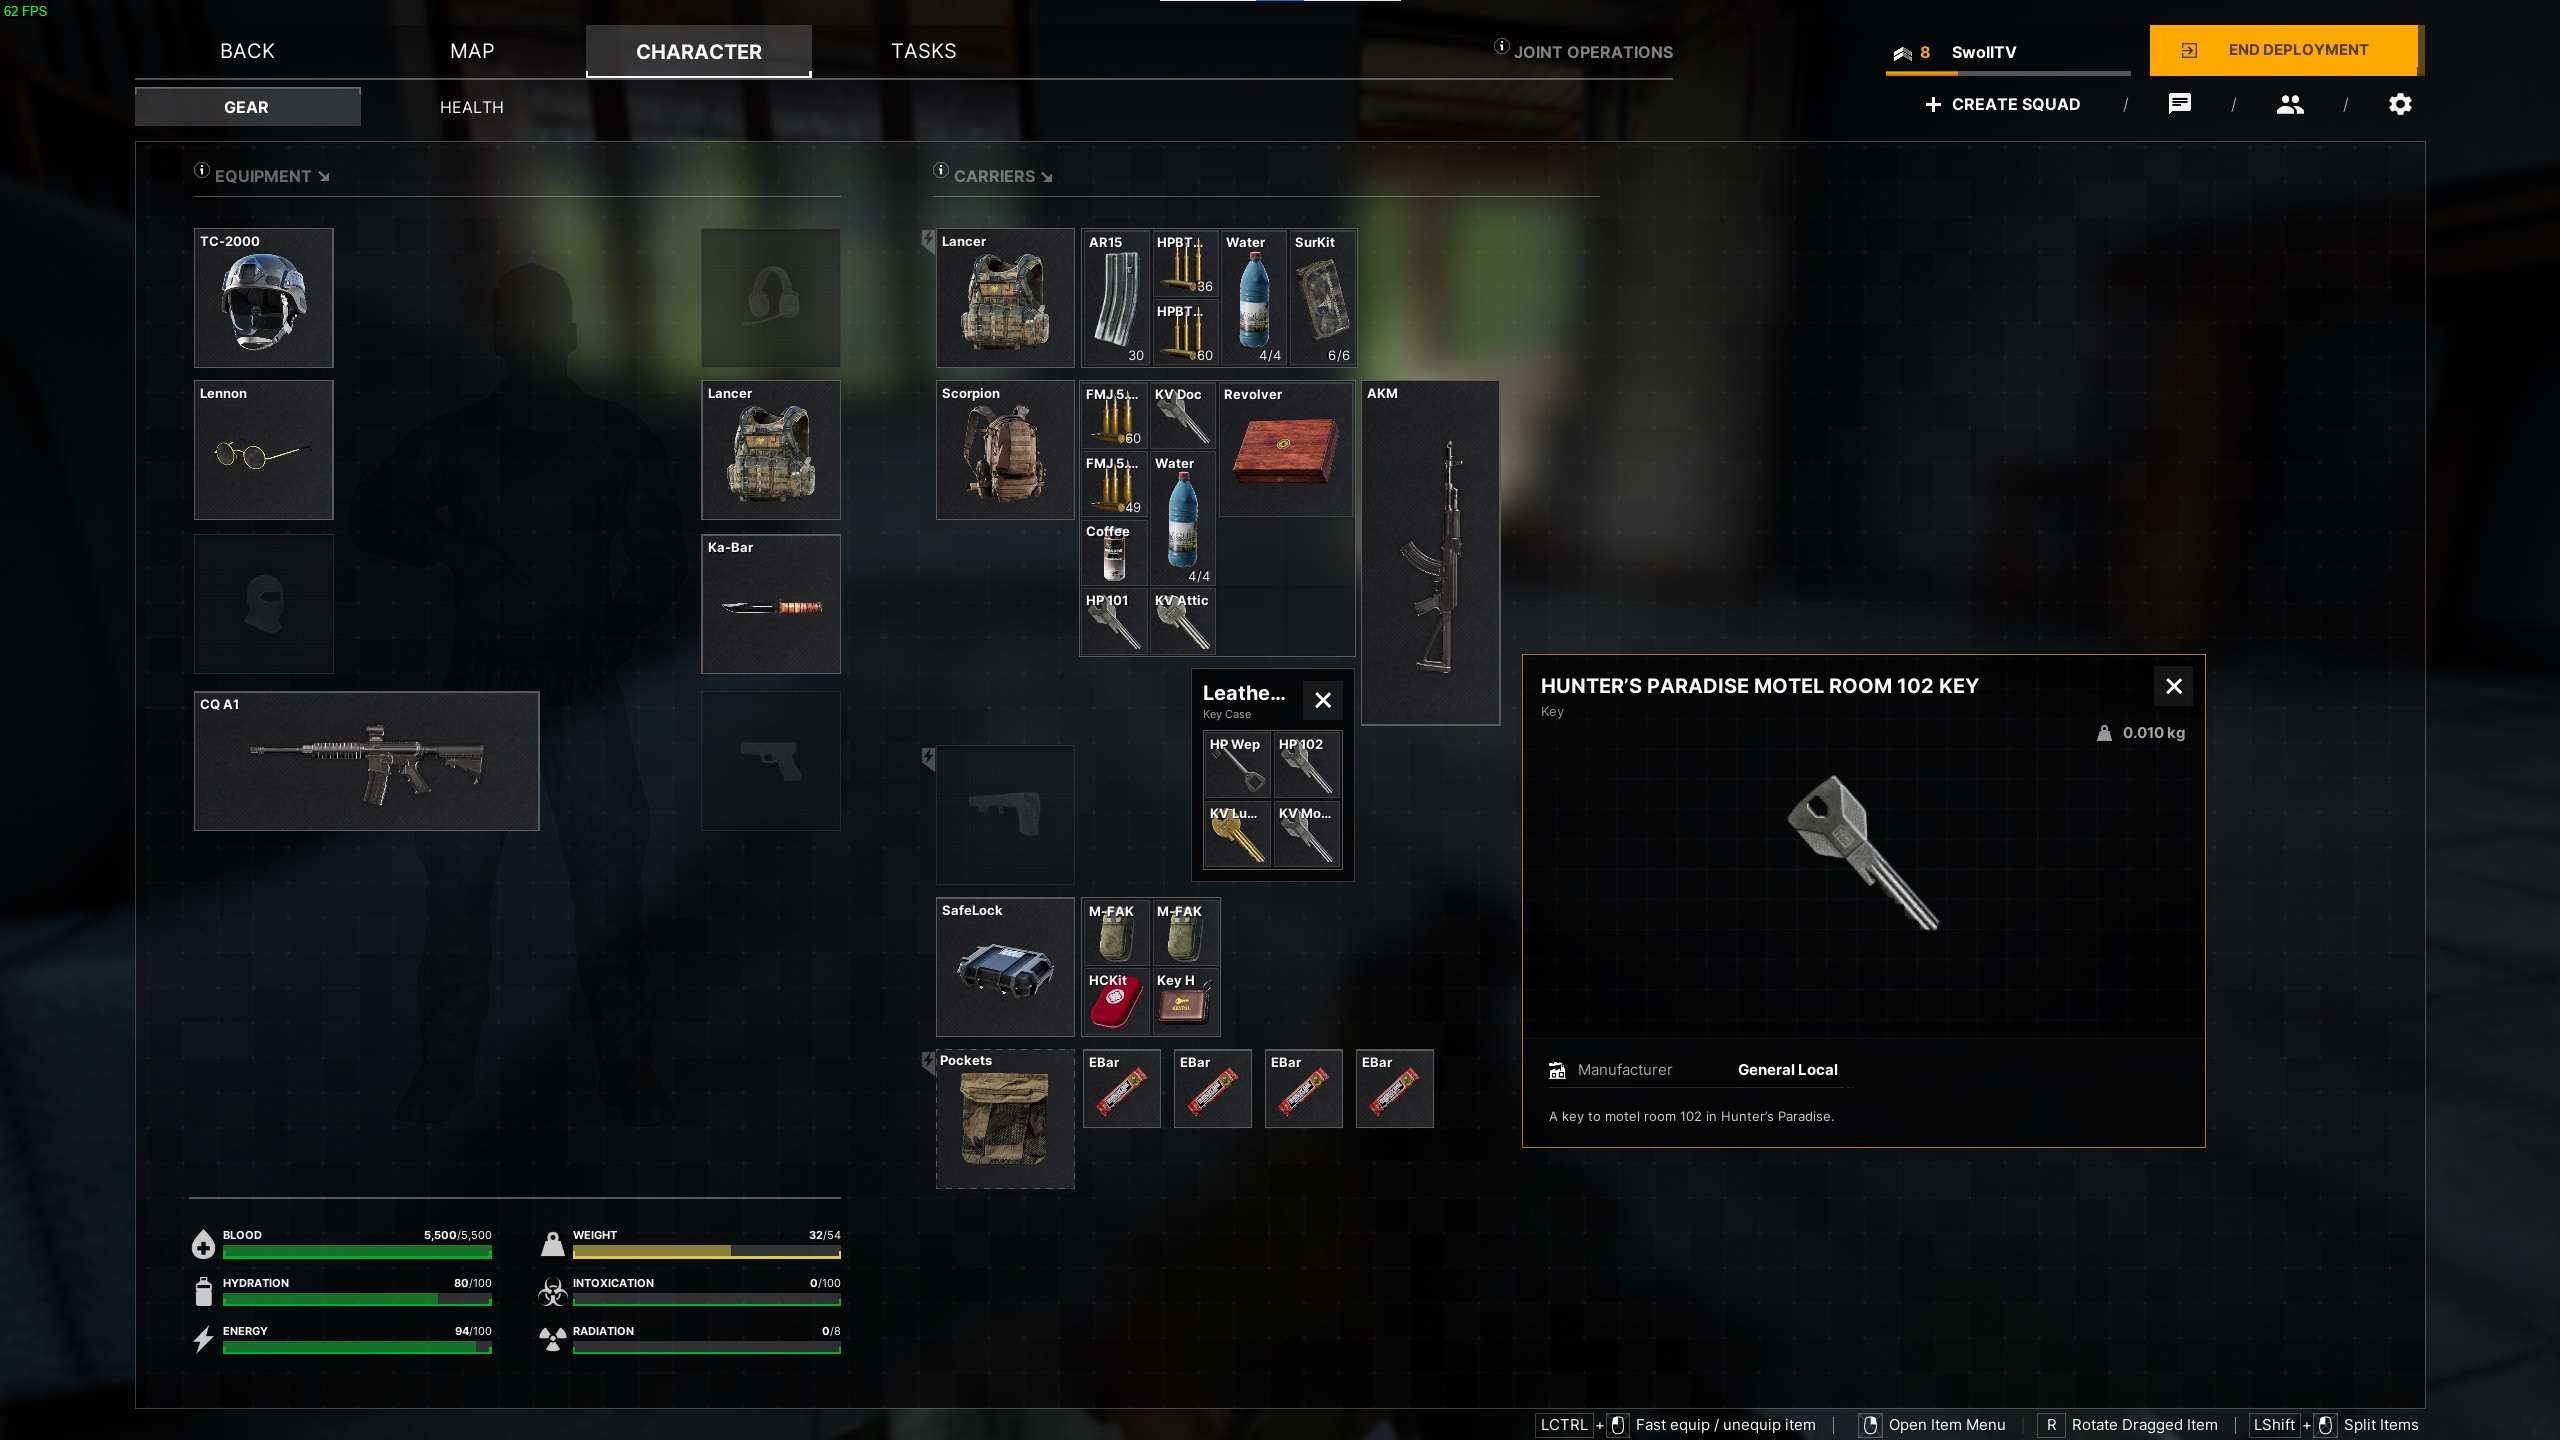
This list will help you identify which loot items to pick up in order to maximize your profits. Use the CTRL+F search function to quickly find specific items you are looking for. The loot is listed in alphabetical order, and the manufacturer name is included when available.
Weapon Attachments
Charging Handles:
- AK RP-1 Charging Handle = $12
- AR-15 Grip-N-Rip Charging Handle = $31
- AR-15 Supreme Charging Handle = $38
- CQ A1 Charging Handle = $12
- F-1 Charging Handle = $19
- SCH 5.56 Charging Handle (DDC) = $37
- Standard GI Charging Handle = $12
- Vz. 61 Charging Knobs = $1
Dust Covers:
- AK-100 Series Dust Cover = $25
- AK-AKM Dust Cover (Late) = $36
- Dog Leg Rail = $62
- PDC Dust Cover (AK) = $75
Foregrips:
- DD Vertical Foregrip (Milspec) = $21
- M590 Tri-Rail Forend = $8
- Pro M-Lok Handstop = $10
- Shift Vertical Grip = $18
- RK-0 = $15
- RK-1 = $16
- RK-2 = $17
- RK-4 = $15
- RK-5 = $14
- RK-6 = $12
- RVG = $15
- Ultraslim Angeled Foregrip = $14
- Ultra Slim M-Lok MT-FGM01X Foregrip = $16
Gas Blocks / Tubes:
- AK74 Gas Tube = $1
- AKM Gas Tube = $2
- AR-15 JPGS-10D Gas Block = $40
- DD MK12 Low Profile Gas Block = $24
- M4A1 Standard Gas Block = $16
Handguards:
- AK B10M + B19 Handguard = $38
- AK B30 + B31S Handguard = $40
- AKM/AK-74 Wooden Handguard = $13
- AK MOE Handguard = $34
- AK-74/ Polymer Handguard = $33
- AK RIS Polymer Hanguard w/ Picatinny Rail = $20
- AR-15 MOE M-Lok Carbine Handguard (FDE) = $61
- CQ A1 Carbine Handguard = $39
- DD Ris II 12 (Milspec) = $116
- DD Ris II 9.5 = $116
- M4 RAS = $104
- M870 Forend (OD Green) = $11
- M870 Walnut Forend = $7
- M870 MOE Handguard = $19
- MK16 13.5″ (DDC) = $107
- MK16 23.5″ (Standard Black) = $107
- X7m-7 Hanguard = $100
- X7M-15 Hanguard = $117
Magazines:
- AK 5.45x39mm 10-Round Polymer Magazine = $6
- AK 5.45x39mm 30-Round Black/Bakelite Magazine = $13
- AK 7.62x39mm 10-Round Steel Magazine = $9
- AK 7.62x39mm 30-Round PMAG Magazine = $19
- AK 7.62x39mm 30-Round Stamped Magazine = $14
- AR-15 5.56x45mm 30-Round PMAG Magazine = $19
- AR-15 5.56x45mm 30-Round PMAG Magazine (FDE) = $13
- AR-15 5.56x45mm 30-Round Stanag Magazine = $16
- AR-15 5.56x45mm 32-Round DD Magazine = $19
- AR-15 5.56x45mm 60-Round S60 Magazine = $28
- Glock 17 9x9mm 17-Round Magazine = $16
- Glock 17 9x9mm 27-Round Magazine = $31
- M590 12GA 7-Round Magazine = $19
- M700 7.62x51mm 5-Round PMAG AC Magazine = $10
- M870 12GA 6 Round Mag = $28
- SKS 7.62x39mm 20-Round Archangel LVX Magazine = $23
- Type 51 7.62x25mm 8-Round Magazine = $6
- VZ.617.65 Browning 20-Round Magazine = $9
Mounts:
- ACOG mount = $28
- AK/AKM BP-02 Side Mount = $30
- Glock 17 P40 Warhawk Cover Stripe = $14
- Glock 17 Vortex Viper Adapter = $11
- High Sight Mount = $58
- Keymod Rail – 5 Slot = $87
- Keymod Rail – 7 Slot = $87
- Kochetov Mount = $8
- LEAP/01 Mount = $63
- Low Sight Mount = $56
- M590 Picatinny Rail = $36
- M700 Picatinny Rail = $14
- M870 Picatinny Rail = $57
- MT-MB590 Optic Rail Mount = $22
- M-Lok rail – 3 Slot = $4
- M-Lok rail – 5 Slot = $5
- M-Lok rail – 7 Slot = $6
- M-Lok Rail – 9 Slot = $7
- Micro Standard Mount = $31
- Mosin-Nagant Tri-Rail Scope Mount = $8
- PU 3.5×22 Kochetov Rings = $5
- Z17 Citadel Cover Stripe = $14
Muzzles / Suppressors:
- 3 Prong Flash Hider = $28
- AK Adapter 14-1LH TO 24-1.5 = $9
- AK Bulgarian Flash Hider = $30
- AK 100 Series Muzzle Break = $16
- AKM Muzzle Brake = $6
- AKM Slant Brake = $3
- Banish 45 Suppressor = $178
- Carlson’s Tactical Muzzle Brake = $40
- CQ A1 Flash Hider = $11
- CQ A2 Flash Hider = $11
- DD Extended Flash Suppressor = $28
- DTK-2 Muzzle Brake = $27
- Glock 17 Comp Weight Compensator = $37
- Glock 17 Velocity Muzzle Brake = $34
- KAC M4QD Flash Hider = $80
- M700 Thread Cap = $6
- Mosin-Nagant Bramit Suppressor = $145
- Mosin-Nagant Howling Raven Muzzle Brake = $18
- Mosin-Nagant Tanker Muzzle Brake = $30
- PBS-01 = $69
- PBS-04 = $100
- SKS muzzle brake adapter = $12
- Socom 3 Prong Flash Hider = $34
- Socom556 RC1 Suppressor (FDE) = $236
- Type 51 Suppressor = $39
- Ultima Suppressor = $101
- Vulcan F1 = $33
- X-Factor Choke = $14
- XM177E2 Moderator Flash Hider = $17
Pistol Grips:
- A2 Pistol Grip = $6
- AK Bakelite/Polymer Pistol Grip = $6
- Archangel AK-Series Pistol Grip = $16
- DD Enhanced AR Pistol Grip = $20
- MAID Pistol Grip = $16
- MOD Pistol Grip (FDE) = $20
- MOE Pistol Grip (FDE) = $10
- MOE AK Grip = $9
- Norinco CQA1 Pistol Grip = $6
- RK-3 Grip $22
- Torque Pistol Grip = $17
- VZ. 61 Wooden Pistol Grip = $4
Sights / Scopes / Collimators:
- 503CU Micro Sight = $113
- ACOG 4x = $291
- AK Rear Iron Sight = $6
- AR-15 Carry Handle = $9
- EKP-8-18 = $69
- EKP-1S 03 dovetail sight = $82
- Folding Micro Rear/Front Iron Sight = $18
- HS507C X2 Reflex Sight = $116
- Micro T-2 Red Dot Sight = $125
- Mosin-Nagant PU 3.5×22 Scope = $95
- Mosin-Nagant Rear Iron Sight = $6
- OKP7 Red Dot Sight = $78
- PILAD P2.5x24L Brevis Assault Scope = $60
- PK-01 VS Red Dot Sight = $45
- SpecterDR 1-4x Assault Scope = $303
- EOTECH HWS EXPS2 Holographic Sight (1 Dot) = $102
- EOTECH HWS EXPS2 Holographic Sight (Circle 2-Dot) (FDE) = $102
- EOTECH HWS XPS3 Holographic Sight (Circle 1 dot) = $123
- EOTECH HWS XPS3 Holographic Sight (Circle 2 dot) = $123
- Razor 1-6x Rifle Scope = $421
- T-1 Dot Sight = $111
- Viper Red Dot Sight = $68
Stocks:
- AK-74M Polymer Stock = $19
- AK MOE Stock = $33
- AK PT adapter = $11
- AK PT-1 Stock = $68
- AK PT-3 Stock = $68
- AK Zhukov Stock = $52
- AKM Zhukov Adapter = $18
- AKMSN Foldable Stock = $21
- AK-74M Polymer Stock = $19
- AK-47/AKM Wood Stock = $33
- AR-15 Archangel Low profile Buttstock = $30
- AR-15 M401 Nylon Stock = $18
- AR-15 MOE Stock = $61
- AR-15 Sopmod Stock = $27
- CQ A1 Buttstock = $11
- DD Adjustable Buttstock = $33
- Extended Rubber Butt Pad = $27
- Low Profile O Ring 30MM = $62
- M4 Buffer Tube = $20
- M590 SGA Stock = $21
- M870 Express Stock = $13
- M870 SGA Stock = $40
- Mosin-Nagant Folding Stock = $38
- Mosin-Nagant Wooden Stock (Sniper)= $39
- RR Pad (AK) = $22
- SKS Sabertooth MKII Stock = $39
- SKS Stock = $26
Weapon Cores:
- AKM (1×4 Slots)= $24
- M4A1 (1×2 Slots) = $48
- Mossberg 590 (1×3 Slots) = $18
- M700 (1×2 Slots) = $150
- M870 Shotgun (1×3 Slots) =$18
- Mosin Nagant (Sniper) (1×2 Slots) = $45
- Type 51 (1×2 Slots) = $26 (full standard issue type 51 is $87)
- SKS (1×4 Slots) = $33
Player Gear
Bags:
- AMP12 = $87
- Assault Backpack = $53
- Drawstring Backpack = $12
- Gunfighter 14 = $40
- JDEN Jam Ball = $38
- Patrol Backpack = $85
- Small Tourist Backpack = $19
- Sport Backpack = $29
Belts and Packs:
- ALICE = $28
- Civilian Leather Fanny Pack = $29
- Civilian Sports Fanny Pack = $20
- Leather Belt = $24
- MC50 Laser Edition = $60
- Tactical Belt = $30
Body Armour:
- 6B23-1 (Digital/Flora/Etc) = $130
- Commander (Black/Blue) = $91
- Covert Tactical Body Armour (UN) = $101
- CZ VIP (Black) = $121
Chest Rigs / Plate Carriers:
- 6SH104 = $60
- Biker Chest Rig = $14
- CGPC3 TQS = $156
- Chest Rig 901 Elite 4 = $180
- IRig = $7
- Lancer (CZ 4M Lancer) = $250
- Modular Operator Carrier (MOC II) Gen II = $175
- Pantsir 2.0 = $252
- Recon Chest Rig = $42
- Recon Plate Carrier = $263
- Specter = $147
- TacTec Chest Rig = $36
- Training Mini Rig = $35
- Type 56 Rig = $22
- Universal Chest Bag = $14
Glasses and Eye Protection:
- Ballistic M Frame 3.0 (clear) = $34
- Wayfarer= $12
- Aviators = $16
- Desert Locust (Clear) = $20
Headsets:
- Earmuffs = $15
- GSSH = $64
- Quads = $128
- Razor = $105
Helmets and Hats:
- Bandana (All Types) = Worthless
- Baseball Cap (Green) = Worthless
- Baseball Cap (Khaki) = $2
- Beret (Black) = $4
- Exsof Cap = $4
- EXFIL (Multicam) = $198
- Fast MT (Tan/Multicam) = $199
- MICH TC-2000 (UNLRA) = $179
- MICH TC-2002 (TAN/GREEN) = $185
- Headscarf (Black) = Worthless
- Military Cap = $3
- SSh-60 = $37
- LSHZ 1+ (Black) = $119
- LSHZ 1+ (Multicam) = $131
- 6B47 Ratnik = $99
Grenades:
- F-1 Hand Grenade = $22
- M18 Smoke = $11
- M26 = $18
- M67 = $18
- M84 Stun Grenade = $12
- RGD-5 $14

Task : What comes up.
Coordonate : 192, 152
Task : Manifest Destiny
Coordonate : 182, 158
Error spoted for “Check Out Computers” quest.
Room at -2 in the bunker, not -1 !
Thanks for this guide !
Description update for “One Shot One KilL”:
The boss patrols the area around Shooting-range and Restaurant.
I went, I saw, I conquered II – Just move around all the Buildings in the Sawmill and youll eventually complete the task, make sure to find Keys because theres pretty good loot rooms
I went I saw I conquered – 139-142 Echo 2 LZ, 138-142 Top Right of the Square is the Ridge
When a Tree Falls – 138-143 top right corner of the Square on the map is the body
Too Close to the sun/what comes up is actually at 192 152 not in ground zero
39 – Carnivore
The refrigerator in the back of the restaurant (no key req) 159 168 bottom left corner
in there look at the “food” in the top shelf of the fridge (sample collection kit not required)
I think it’s worth noting, this guide is effective for ALL factions. The starting towns are ALL the same layout, just rotated slightly. I’m using this guide while playing for the Lamang faction and it works a treat!
25 – Warm Welcome
The boss spawn seems to be constant at the stilted houses and you can do it from next to India 1
One Shot One Kill, The boss wears a bright blue shirt and uses a shotgun.
“Duty to the country”
Instead of jumping on railing to get up the stairs, you are able to drop down through the ventilation-shaft from outside.
Outside the wall on the western side, there is a small fenced-off area with a open gate where you can drop down into the bunker to get directly into the correct area of the bunker.
38 – He walks around the shooting range
to people doing IN THE WATER PART 2
GO AROUND BACK OF THE ELDER HOUSE, JUMP ON THE BOXES, THEN THE STICKS HOLDING UP FISH. GO TO THE FAR RIGHT WINDOW, GO AS FAR RIGHT AS POSSIBLE, THEN VAULT THROUGH
Save the rebellion, forgot that one, Grab the flash drive in the Extracts Command tent and go to
143-122 and put it in the guard house,
you dont have to jump up the staircase on duty to the country. theres a square entrance in the ground, just to the west of the compound, up the hill by the fence. you just drop down, and youre in corridor d, then you can drop down the stairs
The brave is at the end of the western firing range in Hunters paradise. The letter is by his feet.
You need Elder Room key for its in the water 2 in Ban Pa
Follow up to my comment, the Elder Room is in the Cult Leaders house from one of the other quests
Check out computers – server room in bunker (forgot the level, but there is only one server room in bunker). Bunch of disks on desk in that room.
anyone know where black box is for what comes up?
the black box (what comes up-too close to the sun tasks) map location 192-152 inside the the plane
“The last flight” quest from Artisan is about 100 meters south of gulf 2
Idk If I was crazy lucky or what but I found the HP 102 key on the desk with the computer in the eastern most room of the firing lanes at Hunters Paradise
its water part 2 you need to get the elder key and go in the room it has a lab it in
Duty to the country – you need to find collapsed staircase on bunker level -2. You can actually get to 2nd level by jumping and grabbing ledge. Body will be in corridor right after staircase exit.
(might be level -1 too, i forgot, but collapsed staircase is present on only one level)
you get the key from killing scavs that spawn in the same area
Antique revolver is on the table at one of motel rooms at hunters paradise
slight correction you dont need a kv key specifically, the three starting towns are the exact same but have different names
kv is for crimson
nt is for mithras
pl is for lamang
where is the antique revolver?
Antique revolver is in motel room 102 on Hunters paradise
Left Behind & Last farewell coord : 147/162. (Crimson)
secret compassion southwest – 141 160 BOTTOM LEFT
Duty to the country – you need to find collapsed staircase on bunker level -2. You can actually get to 2nd level by jumping and grabbing ledge. Body will be in corridor right after staircase exit.
Check out computers – server room in bunker (forgot the level, but there is only one server room in bunker). Bunch of disks on desk in that room.
All of this guide are from mine on steam guide.