
A visual guide to enemies’ weaknesses and tips on how to easily defeat them in the HELLDIVERS 2.
Contents
Intro
Please take note:
- AP = Armor Penetration (value that represents its ability to penetrate armor. This value is expressed on a scale from 1 to 10).
- ARM = Armor Value (similarly, each enemy’s body part has an armor value, also rated from 1 to 10).
To inflict maximum damage on a targeted part, it is essential to use a weapon whose AP is at least 1 level higher than the armor value of the targeted part.
If the AP value is equal to the armor level, the weapon will inflict around 50% of its damage (the reduction value may vary according to the enemy targeted).
If the AP value is lower than the armor level, the weapon projectile will inflict no direct damage (AoE splash may inflict some damage).
The HP values in the various infographics have been estimated using the weapon with sufficient AP to inflict maximum damage and the lowest base damage to obtain the narrowest HP range. Then, by cross-referencing the data obtained with weapons of the same AP level, the HP range is further narrowed.
How to Easily Beat Terminids (Bugs)
Scavenger
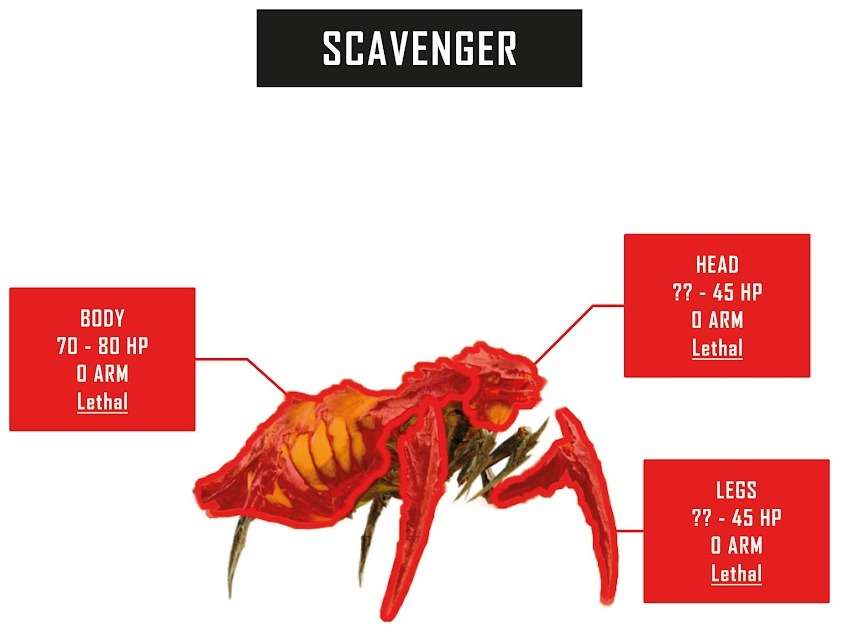
Combat Tips:
- Avoid shooting the BODY but aim for the HEAD / LEGS.
- Scavenger’s entire body is unarmored (0).
- The Bile Spitter variant can spit acidic projectiles that slow you down, and has a slightly more resistant body than the classic variant (~1 more ammo with 50 – 80 damage weapons).
Hunter
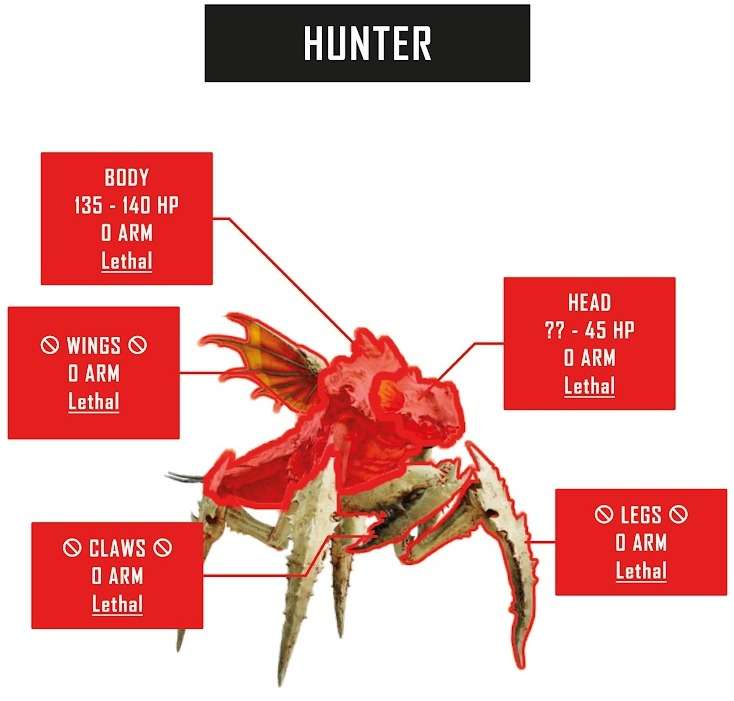
Combat Tips:
- Avoid shooting the LEGS / CLAWS / WINGS / BODY but aim for the HEAD.
- Hunter’s entire body is unarmored (0).
- A hunter has many independent, non-lethal parts (claws, paws, wings), which can give an impression of tankyness, since damage will be spread over different parts without ever being lethal.
Warrior (T4+)
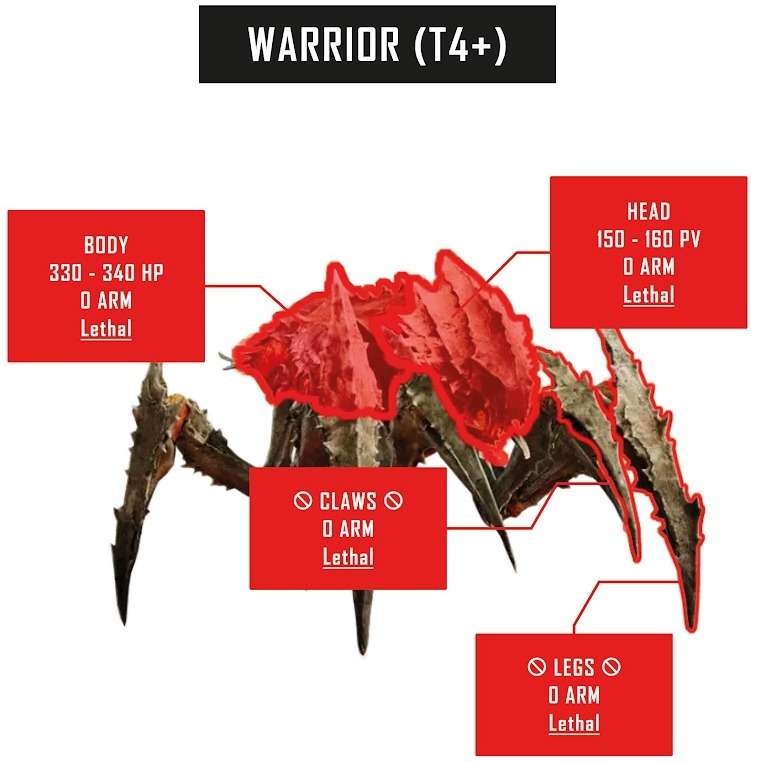
Combat Tips:
- Avoid shooting the LEGS / CLAWS / BODY but aim for the HEAD.
- Warrior’s entire body is unarmored (0).
- Those datas are based on tests carried out on the standard Terminid Warriors (non-corrosive) from difficulty 4 upwards. At lower difficulties, the standard warrior is a little more fragile, while its corrosive variant has the same level of resistance.
- It’s not good to target the legs or claws, given the small size of these parts and the fact that it’s often necessary to break 3 or 4 of a warrior’s legs for this to be fatal.
- The values in the “Head” column refer to the number of bullets required to break it. The warrior then switches to “zombie” mode, running up to a nearby player to land a few blows, before quickly dying. Don’t waste ammos in this state; instead, try to position yourself or gain some distance.
- The duration of zombie mode will vary according to the weapon stopping power.
Hive Guard
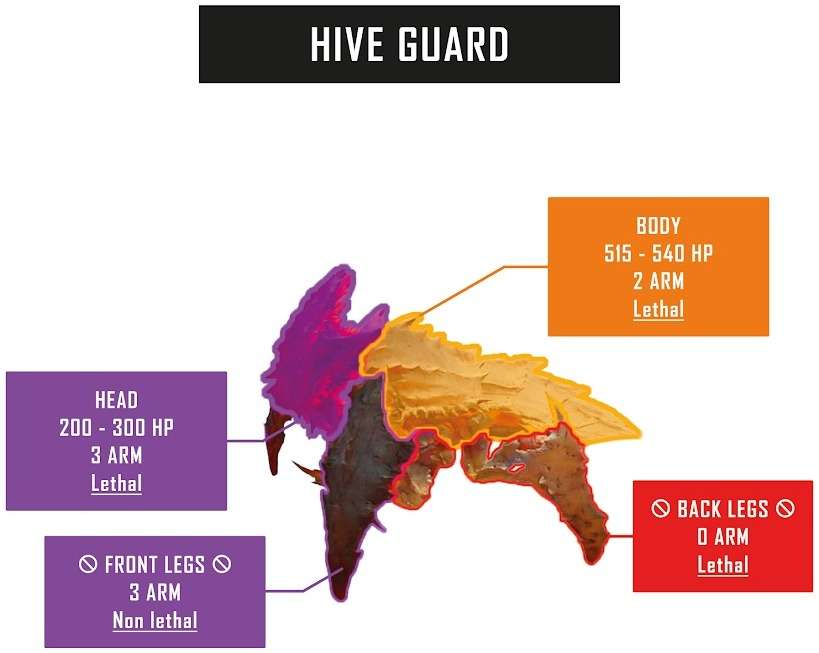
Combat Tips:
- Destroying the two mandibles under a Hive Guard’s head is fatal, but their hitbox is very small.
- The values in the “Head” column refer to the number of bullets needed to trigger a hemorrhage (a spray of blood will appear on his head). The Hive Guard will die a few moments later.
- It’s not good to target a Hive Guard’s legs, as these parts are not lethal but will only slow him down slightly.
Brood Commander
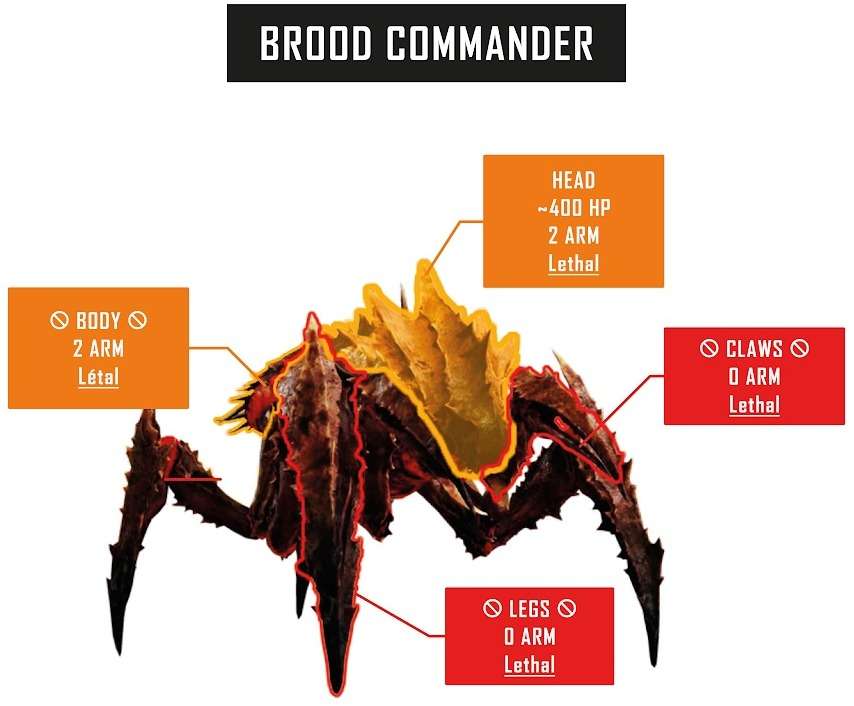
Combat Tips:
- Avoid shooting the LEGS / CLAWS / BODY but aim for the HEAD.
- Body has TONS of HP (30+ AR23P bullets), avoid shooting at it.
- It’s not good to target the legs or claws, given the small size of these parts and the fact that it’s often necessary to break 3 or 4 of a Commander’s legs for this to be fatal.
- The values in the “Head” column refer to the number of bullets required to break it. The Commander then switches to “zombie” mode, running up to a nearby player to land a few blows, before quickly dying. Don’t waste ammos in this state; instead, try to position yourself or gain some distance.
- The duration of zombie mode will vary according to the weapon stopping power.
Nursing Spewer

Combat Tips:
- Avoid shooting the LEGS but aim for the HEAD or the BELLY (if explosive / high damage).
- On difficulties below 7, you may also encounter Bile Spewers, which can’t fire mortars and have the same armor (2) as the Nursing Spewers.
- To kill a Nursing Spewer in 1 shot with the Eruptor, aim for the ground beneath it rather than its head or the belly.
- The Belly is a Squishy part, meaning it will only take -90% damage from non explosive weapons (this may also vary depending of the weapons AP level).
Bile Spewer (T7+)
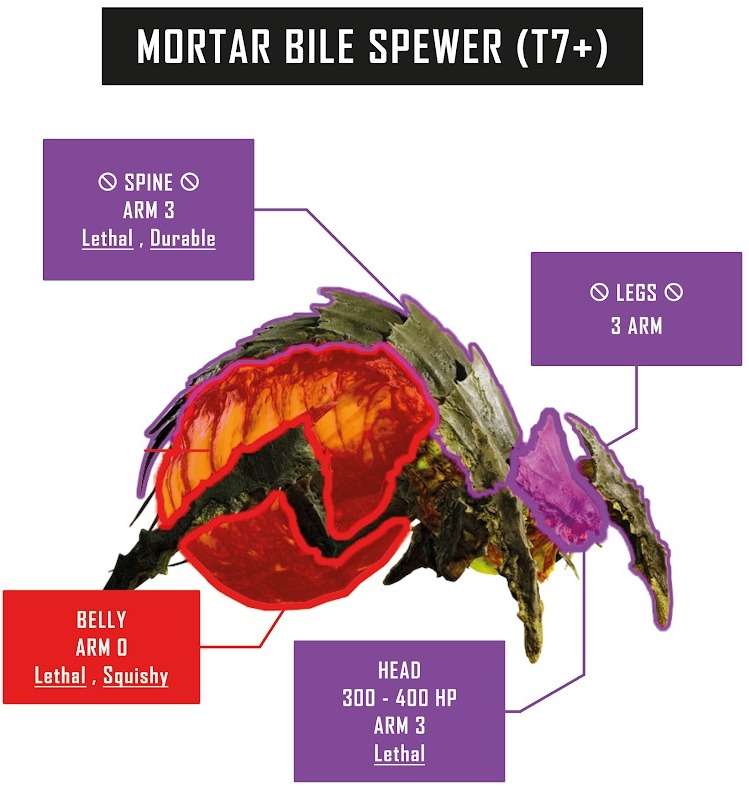
Combat Tips:
- Avoid shooting the LEGS but aim for the HEAD or the BELLY (if explosive / high damage).
- Bile Spewer can fire mortars and only appears on difficulty 7 or higher.
- To kill a Bile Spewer in 1 shot with the Eruptor, aim for the ground beneath it rather than its head or the belly.
- The JAR-5 can kill a Bile Spewer with 2 shots to the head, sometimes in 3 shots (~50% of the time).
- The Belly is a Squishy part, meaning it will only take -90% damage from non explosive weapons (this may also vary depending of the weapons AP level).
Stalker
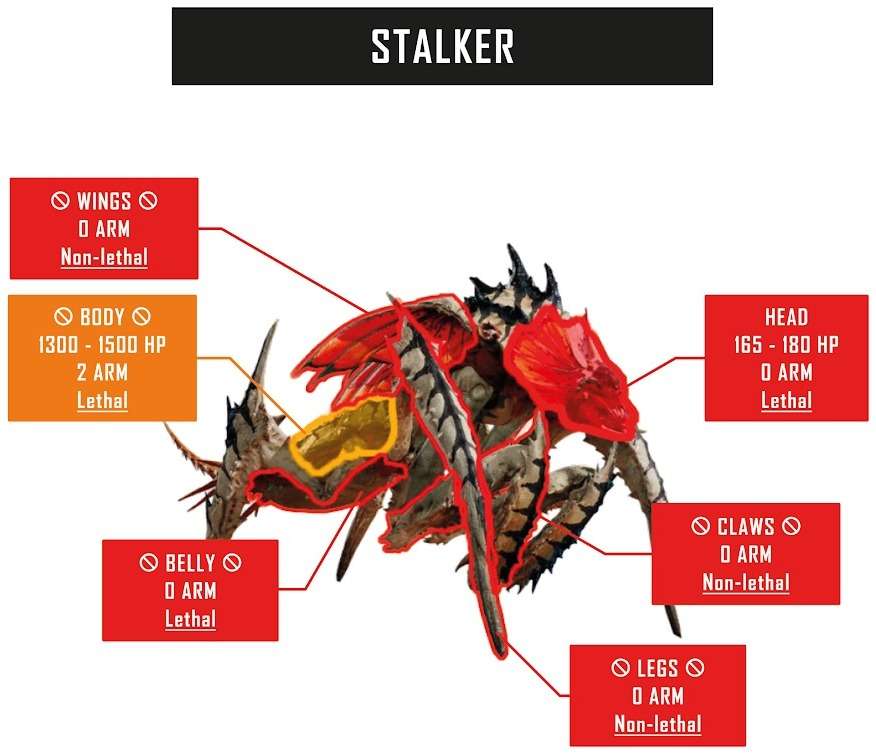
Combat Tips:
- Avoid shooting the LEGS / CLAWS / WINGS / BODY but aim for the HEAD.
- The Stalker’s body is very tough and has light armor (2). For this reason, i strongly advise you not to waste your ammo on it. Hovewer, high-damage weapons remain effective against this part.
- A Stalker’s head is particularly fragile. Combining an incapacitating grenade or using a weapon with a stunning effect (Dominator, Concussive Liberator, etc.) allows you to aim precisely at the head and kill the Stalker in a few shots.
- A Stalker has many independent, non-lethal parts (claws, paws, wings) and a huge HP pool, which can give an impression of very high tankyness, since damage will be spread over different parts without ever being lethal.
Charger
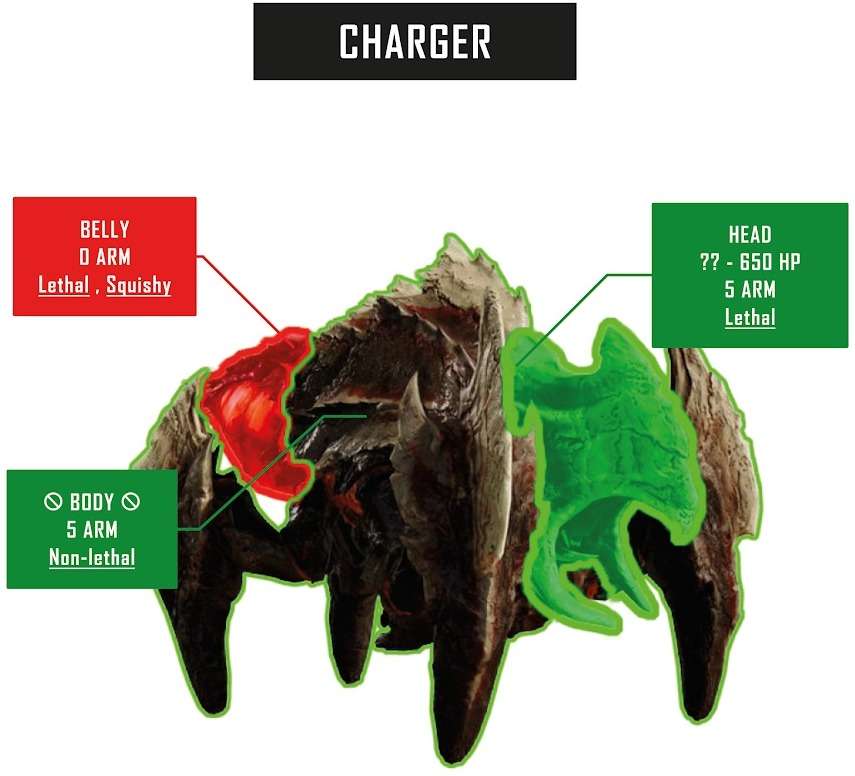
Combat Tips:
- A Charger’s body has Tank armor (5).
- It is also possible to reveal a “weak point” without armor (0) by breaking the armor of a Charger’s leg or flank.
- The Belly is a Squishy part, meaning it will only take -90% damage from non explosive weapons (this may also vary depending of the weapons AP level). If you destroys it, the Charger will lose a lot of blood and die quickly.
How to Easily Beat Automatons (Bots)
Trooper / Commissar
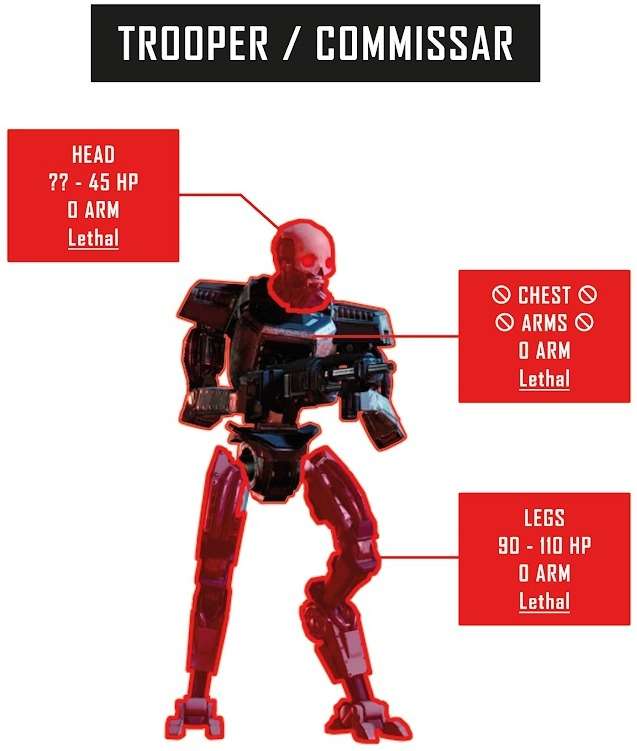
Combat Tips:
- Avoid shooting the BODY/ ARMS but aim for the HEAD.
- A trooper’s entire body is unarmored (0).
- There are many variations on troopers, which do not change their HP, but will modify the weapons used.
- In some cases, troopers armed with a blade will protect their head up to 1-3 times, which can make them harder to kill.
- It is also possible to disarm Troopers, but this is not very interesting given their fraglity.
Devastator
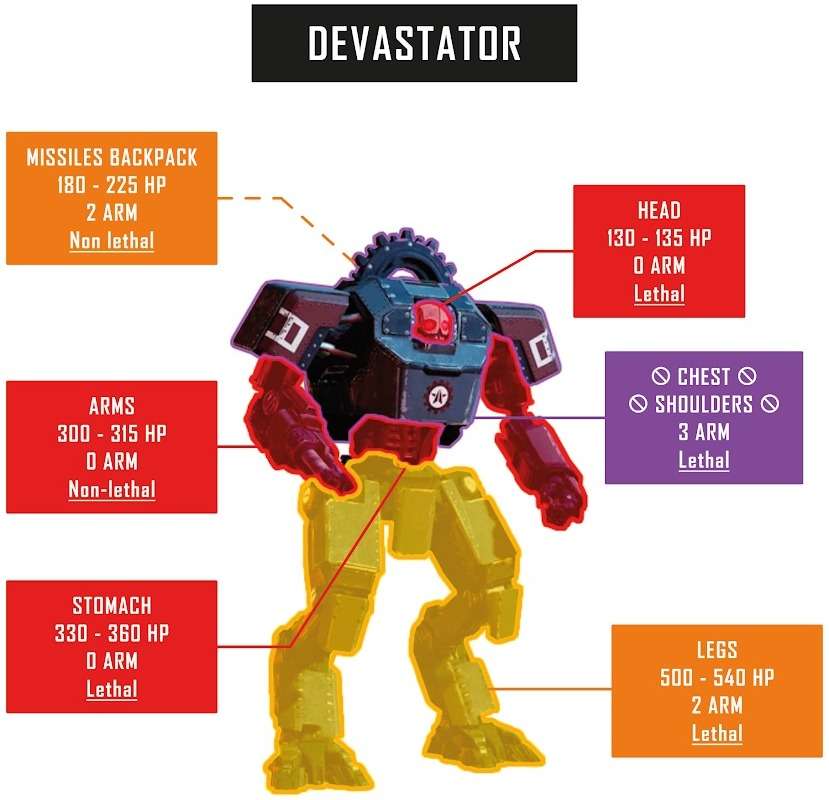
Combat Tips:
- Avoid shooting the BODY/ STOMACH / LEGS* but aim for the HEAD / ARMS.
- A Devastator’s stomach is more fragile and unarmored (0) than its torso, but tougher than its head. Given the size of this area, it’s sometimes difficult to hit the stomach consistently. In most cases, aiming for the head with a fast automatic weapon will be more effective, given its fragility.
- To qualify the previous statement. Explosive weapons AoE are effective against the stomach area.
- Destroying a Devastator’s weapon or backpack will disarm it and considerably reduces the danger it poses.
- If you engage a Devastator with the Eruptor, aiming at the ground beneath it, the hip or a leg, will generally kill it in one shot.
- JAR-5 / Railgun are really effective and can 2 shot a Devastator if you aim for the leg.
- The Diligence CS can one shot a Devastator with a headshot from 25m or less.
Berserker
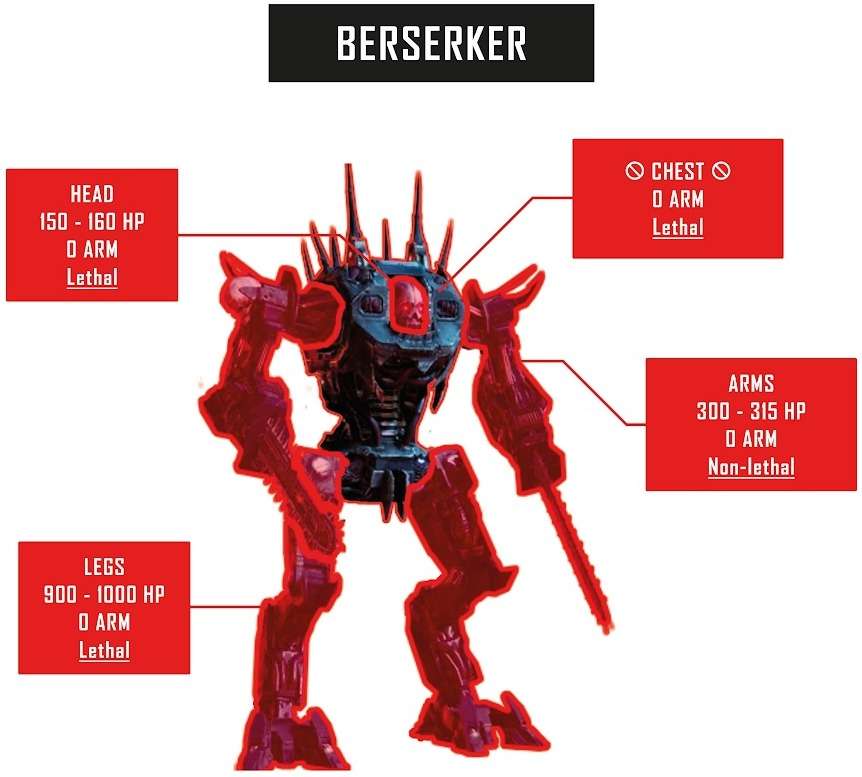
Combat Tips:
- Avoid shooting the BODY/ STOMACH but aim for the HEAD / ARMS / LEGS*.
- It requires ~28 Liberator bullets to destroy the torso, i.e. ~1500 HP. Don’t waste your cartridges there.
- A Berserker’s stomach is much more fragile than its torso, but tougher than its head. Given the swinging motion of the torso, it’s sometimes difficult to hit the stomach evenly. In most cases, aiming at the head with a fast automatic weapon will be more effective, given its fragility.
- To qualify the previous statement. Explosive weapons AoE are effective against the stomach area.
- Destroying a Berserker’s arm will disarm it and considerably reduces the danger it poses.
- If you engage a Berserker with the Eruptor, aiming for a leg or the hips will generally kill him in one blow.
Scout Strider
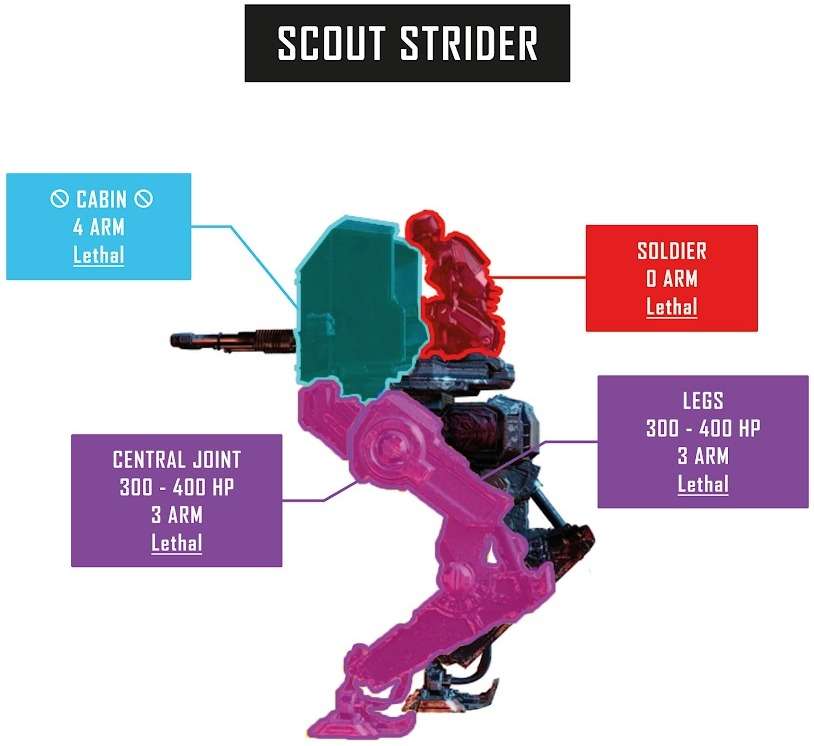
Combat Tips:
- Avoid shooting the CABIN (if non exposive) but aim for the PILOT / LEGS.
- The central joint is a little more fragile than the legs, but the hitbox is fairly irregular. Depending on distance, angle of fire and whether or not the Scout is moving, a ricochet can occur despite the use of a suitable weapon. The upper part of the legs (at the level of the axis of rotation) is easy to reach and enables a Scout to be destroyed quickly.
- Similarly, it’s generally more effective to target the upper legs rather than the cabin when using explosive weapons, as the explosion will usually kill the pilot.
- The pilot is a Trooper class enemy.
- Depending on the angle of fire, you may need 1 extra ammo to kill a Scout by targeting the cabin with the Eruptor, Scorcher or Plasma Punisher.
Hulk
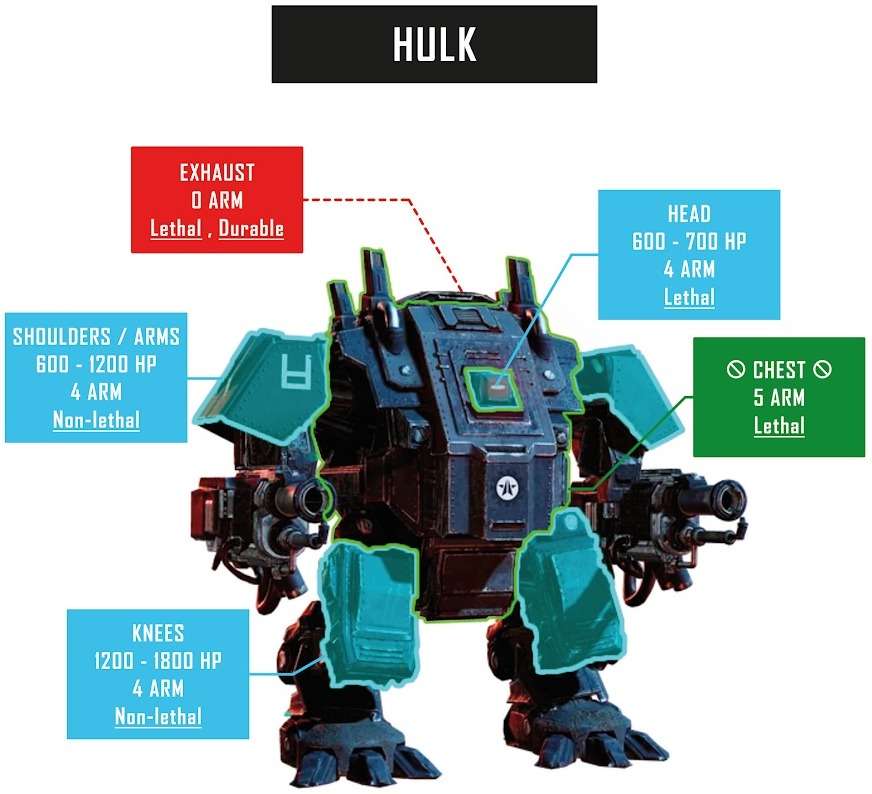
Combat Tips:
- Avoid shooting the BODY but aim for the EYE / EXHAUST / ARMS.
- Don’t hesitate to destroy a Hulk’s weapons to render him harmless if you’re not confident enough to make a precise eye shot. Use and abuse stun grenades to shoot a Hulk in the eye.
- A Hulk’s back is vulnerable to all weapons, but it’s a durable part. This means that non-explosive weapons will only inflict durable damage instead of base damage. So give preference to weapons with the Explosive attribute.
- The values in the “Exhaust” column refer to the number of ammos required for the Hulk to ignite and then explode / dies after a few seconds. Don’t waste ammos in this state, and try instead to take cover or distance yourself, then let him burn.
- The rest of the Hulk’s torso has Tank armor (5).
- 1 shot in the eye (EAT-17 / GR-8 / Quasar) is fatal.
- 2 shots to the body (EAT-17 / GR-8 / Quasar) are fatal.
- 1 shot in the knees/arms (EAT-17 / GR-8 / Quasar) to weaken him.


Be the first to comment