
Contents
Beginners Tips to Early Game
Foreword
Character Paths
Paths are Character Classes. It determines what role a character plays in a team.
| Path | Role | Notes |
| Hunt | DPS – Single Target | Excels against bosses and elite enemies |
| Erudition | DPS – Wide AOE | Excels against mob enemies and multiple waves of enemies |
| Destruction | DPS – Blast AOE | Mix of the above paths, typically does strong damage in the center and lower splash damage on the side Good generalist DPS |
| Nihility | DPS – VariesSupport – Debuffers | Unique class that can be DPS or Support depending on the character Please read the character’s kit to see if they are the DPS or Support variety |
| Harmony | Support – Buffers | Exactly what it sounds like |
| Preservation | Sustain – Shielding/tanking | Focuses on preventing damage |
| Abundance | Sustain – Healing | Focuses on undoing damage |
Character Elements
Elements are simply strengths and weaknesses. There are no elemental reactions in HSR.
Their main purpose is to wear down an enemy’s Toughness Bar by hitting it with super effective attacks.
No element is more valuable than another.
| Element | Weakness Break Bonus Effect |
| Physical | Bleed DOT |
| Fire | Burn DOT |
| Ice | Freeze (Stun; Crowd Control) |
| Wind | Wind DOT |
| Imaginary | Imprisonment (Turn Delay) |
| Quantum | Entanglement (Bonus damage based on number of hits applied afterwards) |
Quick Terms You Should Know
- Trailblaze Power (Tb power) – Equivalent to Stamina, Resin, Energy, etc
- Trailblaze Level (TL) – Account level
- Equilibrium Level (EQ) – World level
- Paths – Character Class
- Light Cone (lc) – Weapons
- Relics – Character Equipment
- Traces – Character Skill and Ultimate levels, special passives, and stat boots
- Toughness Bar – Special HSR battle mechanic. Reduces enemy damage taken and can only be worn down and broken through supereffective Element attacks
- Weakness Break – Triggers when you completely wear down the Toughness Bar
General Tips
Light Cones are basically “weapons” and are very important. Level them up!
Level up your main team’s Character level and Light Cone level to the maximum allowed level for your point in the game, and try to keep them up to date.
Physical Destruction Main Character is not that strong, feel free to use other characters. MC will get new elements and paths in the future that are better.
Who to pull for?
See a character you like? Just pull them. Waifu/Husbando > meta. All 5* Limited banner characters are solid picks.
Aside from completing the Story, getting two full teams to be able to clear endgame modes “Memory of Chaos” and “Pure Fiction” will be your main goal at first. Once you get two full teams then you are free to get as many characters of any path or element as you wish.
A 5* limited banner sustain is very good value for most players and can make the biggest difference in making the game easier, much more than getting your first 5* dps or 5* support. Keeping your main DPS and supports alive is key.
Supports are very valuable and are the biggest factor in multiplying any DPS’s damage output.
5* DPS are good, but there are quite a few DPS characters & paths (Hunt / Erudition / Destruction) and you don’t need to get every DPS character to clear content.
Don’t use 3 DPS (damage dealers) on the same team. It actually does worse damage than using less. Use 1-2 dps early game. Support characters do the heavy lifting in terms of damage output. If you lack damage, you probably need a support character or better relics but not another DPS.
Who should I level up?
Early game (Pre-Character level 50) you can level and build almost anyone you want without worrying about “wasting” resources.
This is because the materials required for leveling 1-50 are extremely cheap compared to level 50+. If you have extra leveling materials, ascending characters will reward Standard Passes at ascensions after levels 20, 40, and 60.
Once you hit level 50+ you will want to level up your main DPS to max level first, then your sustain then any supports.
What are some good early-game characters to invest in?
You can breeze through early game with pretty much almost anything. Play what you want!
Still want suggestions?
In Herta Space Station
- Dan Heng (despite being free, is a top 4* DPS)
- March (free)
- Asta or Any Support character that you happen to pull
- The 5* character that you pulled from Departure Warp (optional)
- Trailblazer (optional)
In Belobog
- Serval (free), because many enemies here are weak to lightning
- Natasha (free), to replace March.
- Trailblazer, because they will be required for the Main Story. You can just level them and leave them on the side if you don’t want to use them.
- Qingque (free, the top 4* DPS), after reaching TL 20, talking to PomPom for a quest, and beating Stage 3 of Forgotten Hall). Note that Qingque works best as a solo DPS, so you will need to drop your other DPS from the team if you want to use her. Also, note that Qingque’s damage is inconsistent, she will sometimes do poor damage and sometimes do huge damage. If you want more consistent damage, use Dan Heng.
In Xianzhou Luofu
- At this point in the game, you should own a decent amount of characters. You can reevaluate your main team drop characters you don’t want and add in new ones.
- Enemies hit harder, you may need to use 2x sustain characters if you don’t have a 5* sustain (healer, shielder, or tank)
List of Free Characters and How to Obtain Them
All characters are 4* rarity unless otherwise noted
- Trailblazer – Physical Destruction: Start the game after Kafka and Silver Wolf leave
- March 7th – Ice Preservation: Unlocked alongside Trailblazer – Destruction
- Dan Heng – Wind Hunt: Unlocked after meeting Dan Heng at the elevator in the Herta Space Station
- Asta – Fire Harmony: Unlocked after the character-warping tutorial
- Herta – Ice Erudition: Unlocked after Simulated Universe Test 1
- Serval – Lightning Erudition: Unlocked after accessing the phone and checking the mail
- Natasha – Physical Abundance: Unlocked after clearing “Lying in Rust”
- Trailblazer – Fire Preservation: Unlocked after clearing “Not Good with Farewells”
- Qingque – Quantum Erudition: Unlocked after clearing Forgotten Hall (Last Vestiges of Towering Citadel) Stage 3
- Yukong – Imaginary Harmony: Unlocked after clearing Memory of Xianzhou Stage 1
- Lynx – Quantum Abundance: Clear Pure Fiction stage 2 during any rotation
- Dr. Ratio – Imaginary Hunt – 5* limited unit: Limited Time Event. Unlocked after accessing the phone and checking the mail between versions 1.6.5 and 2.1. After 2.1, he is no longer free.
- One Standard Pool 5* of Your Choice: After your 300th warp in Standard Banner
Basic Team Building
If you have trouble learning how to teambuild, this is for you. Otherwise, you can skip if you want to just learn on your own.
There are 4 slots on a team. To build a team, you have to keep one thing in mind: is there enough SP (Skill Points) for every person on the team to do their job? If the answer is no, then the team will struggle. Some characters need a lot of SP to do their job and others very little. Not enough SP or too much SP means that your damage output is suboptimal.
This is why having 3x or 4x DPS on the same team produces so little damage. Everybody is fighting for limited skill points, and half the team has to do basic attacks which do no damage.
Another thing to think about: Do any of my chosen characters have anti-synergy with each other? Some characters have special buffs or abilities that may hinder another character. Different character Paths also have different Aggro values, which can cause characters to fight each other for aggro. See the end of this section to learn about Aggro and Positioning.
Team Roles Explained
There are 3 main roles on a team:
| DPS | Damage dealers | 1 per standard team |
| Support | Buffers and debuffers (damage amplification) | 2 per standard team |
| Sustain | Keeps team alive; healing, shielding, or tanking | 1 per standard team |
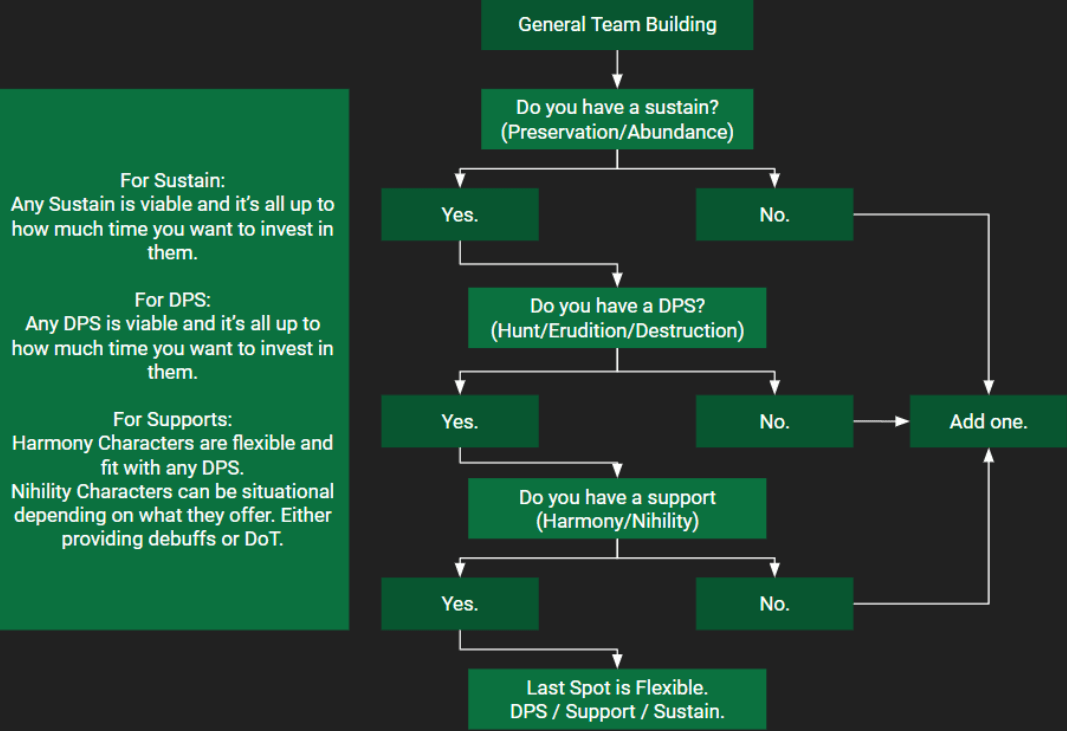
Choosing a Team Comp
Here are common team compositions and when to pick them.
Basic Team Comps
Survival
- DPS / Support / Sustain / Sustain
This comp focuses on surviving. It’s also useful for players whose teams are dying constantly. Your main DPS will do less damage, but it’s much more comfortable to use because you have two people dedicated to team survival. Oftentimes this is done with one healer and one shielder/tank.
If you are early/mid-game and have trouble with the Story, this team comp is generally the most comfortable to use.
Hypercarry
- DPS / Support / Support / Sustain
This is the standard team comp.
This comp aims to produce the highest damage output from a single character. Since you only have 1 sustain, it’s important the sustain can do their job solo without any help.
Situational Team Comps
Dual DPS / SubDPS
- DPS / DPS / Support / Sustain
Some characters work well as secondary DPS because they use very little to no SP, allowing other teammates to use SP (Clara is one example of a sub-DPS). Note that not all characters can be a good second DPS and often it is better to use a Hypercarry comp.
Early game, this is an option when you may not own enough supports to do a Hypercarry comp or if you want to use two DPS characters that you like.
Late game, it is only recommended with specific characters whose kits allow or encourage them to sub-DPS or dual DPS.
Don’t Dual DPS unless you know for sure that you have the specific characters needed for viable Dual DPS team comps.
DoT (Damage over Time)
- 5* DOT (Kafka, Black Swan, etc) / DOT / DOT / Sustain
- 5* DOT (Kafka, Black Swan, etc) / DOT / Support / Sustain
This is a special team comp just for the DoT playstyle and is one of the few situations where having no support can be viable. Most viable DoT teams use Kafka in them, although it is not required; just realize the overall damage dealt will be lower without Kafka. It is theorized that as long as you have at least one 5* DOT, the team is viable.
Other compositions, but not recommended:
- DPS / DPS / DPS / Sustain or DPS / Sustain / Sustain / Sustain
These team comps are used if you want to have fun, there is no purpose using these team comps for beginners.
Double or Triple DPS comps are viable for advanced accounts aiming to perform specific strategies that use very specific characters.
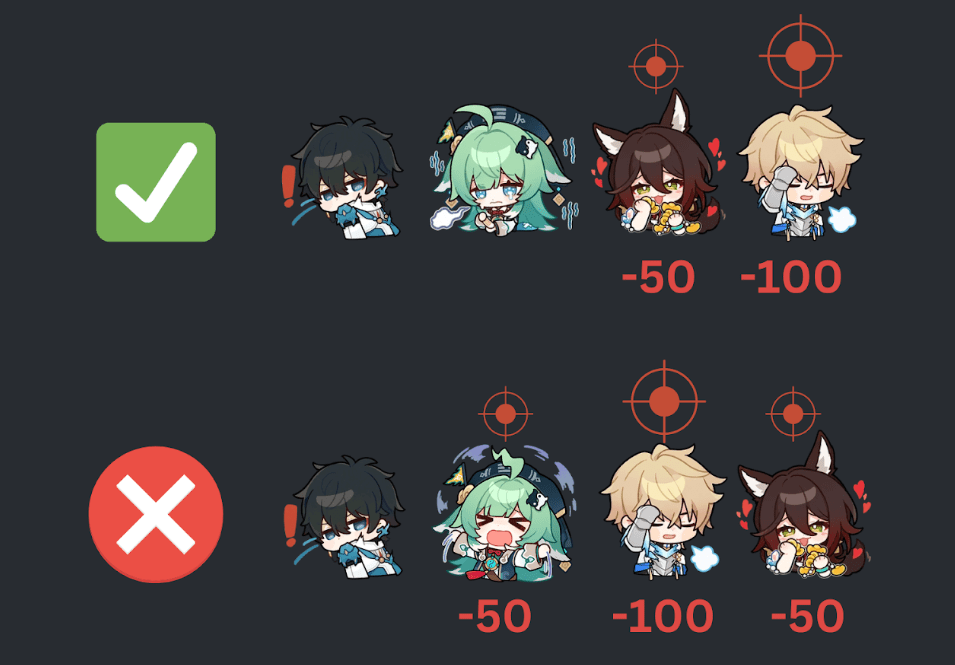
Aggro and Positioning
Does the position of a character on the team matter? Yes because of AOE splash attacks!
- All character paths have an invisible Aggro value.
- Aggro value determines the chance of being targeted by an enemy.
- The higher the Aggro value, the more likely they will be targeted.
Here are the Aggro Values for different character paths:
- The Hunt: 75
- The Erudition: 75
- The Harmony: 100
- The Nihility: 100
- The Abundance: 100
- The Destruction: 125
- The Preservation: 150
If you put a squishy character next to a character with high aggro value, they will get hit by AOE splash damage that targets the high aggro character.
Tips on choosing a position
High aggro characters should generally be put on one of the far edges of the team to reduce splash damage from AOE attacks.
Put squishy characters farthest away from the highest aggro character on the team.
Generally, squishy DPS should get the priority on being farthest away, rather than a squishy support. You can still win a battle with a dead support, but rarely a dead DPS.
Who should I put next to the highest aggro character?
- Option A: The second tankiest character on the team.
- Option B: A character who wants to get hit so they can regenerate more Energy (Characters regenerate energy when hit). Just make sure that your sustain is sufficient to keep this character from dying.
Weakness Break and Toughness
All enemies have a grey bar called the Toughness Bar. When an Enemy has their Toughness bar active, they take 10% reduced damage.
To break a Toughness bar, you deplete it with super-effective attacks that match the enemy weaknesses. Once you deplete the bar, you trigger a Weakness Break.
There’s a lot of important benefits from Weakness Breaking:
- Enemy no longer receives 10% reduced damage.
- Interrupts charging attacks.
- Deals bonus Break damage.
- Delays the enemy’s turn by 25%.
- Has a 150% base chance to apply a debuff corresponding to the element used to inflict Weakness Break.
On the enemy’s next turn, the Toughness bar regenerates. Weakness Breaking is very important for fighting Bosses and Elite Enemies. You can not only deal extra damage, but you avoid taking massive attacks by interrupting enemies’ charged attacks with a weakness break.


Be the first to comment