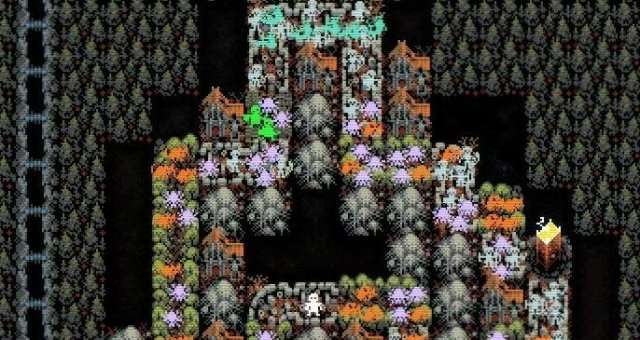
How to get the hero to run in circles without enemies and collecting endless resources.
Synopsis
Infinite looping: Pick Rogue, and Village, Outpost, Spider Cocoon and Oblivion (and something else to fill in the deck, like Grove, Forest and Suburbs and Arsenal).
Go to tier 4 boss difficulty (no resource limit), beat the bosses while placing villages. If you can fill the board with Villages before loop 35 (enemies start to become too strong and even few will kill you), and you can block Bandit camps from spawning (with Outposts and Spider Cocoons) you can go infinite loops since there are no enemies spawning.
Combine this by equipping Miner’s Pick for infinite (although slow) loot. You will also get metal from villages.
About This Guide
Here’s a short guide for how to survive in the game endlessly, all the way to infinite Loop counts.
This strategy can have some minor variations, but I will only explain how I accomplished “Going infinite”.
This guide isn’t for beginners. My instructions are short, and you have to fill in the gaps with what you’ve already learned of the game. However, if you haven’t beaten the last boss (Tier 4) yet, the strategy used here works pretty well I guess.
What you can accomplish:
- As many [Stable Metal] and [Preserved rock] resources you want, if you have the time to wait.
Why use this strategy instead of just playing the game?
- Actively playing the game for 6 hours will yield more resources than using this strategy for 6 hours. But once you have “Gone infinite”, you no longer need to overlook your game to get resources. You can leave the game on for hours and do housework, go to grocery store and resources will keep coming while you’re away. You can stop any time you’re bored and start a new expedition.
- Also, you get bragging rights :D.
What you will need:
- You have already beaten the last boss (chapter 4/tier 4) at least once.
“To infinity, and to the pebbles beyond!”
Preparations: Expedition (Cards and Hero)
Choose Rogue as your Hero. (Warrior is weaker, and gets less loot. Necromancer I haven’t tried, and I doubt it will ever work.)
Pick these 7 types of cards for your deck. (Mandatory cards are in bold.)
- [Village]
- [Grove]
- [Spider Cocoon]
- [Outpost]
- [Forest]
- [Suburbs]
- [Oblivion]
- [Arsenal]
Preparations: Supply (Camp items)
- Miner’s Pick (Tool): “+1 Pebbles when passing the Campfire tile.”
- This isn’t needed to go infinite loops, but this will give you infinite Stone resources. The more picks you have, the faster you grind loot. There are no more enemies left after the build is complete, so there are no other sources of loot than this pick either.
- Anything you need to beat the bosses on Tier 4: I prefer Old Painting (Jewelry), Alchemist’s shelf (Furniture), Kitchen knife (Tool), Herbalist’s sickle (Tool) and some healing from food items.
Preparations: Build (Camp buildings)
- Watchtowers are a really good investment. You should upgrade them as much as you can.
- Only (Supply Depot) is *actually* necessary, and it is required to equip the Miner’s Pick item for endless loot.
- Does nothing for preparing the build, but this is how you get Loot (also Villages give items that gets turned into scrap metal)
- Realistically speaking, for you to beat the Tier 4 Boss you probably want to have buildings all the way to (War Camp), which gives more strength to your selected Hero.
- (River), (Alchemist’s tent) and (Crypt) are not needed for this build.
Starting the Expedition
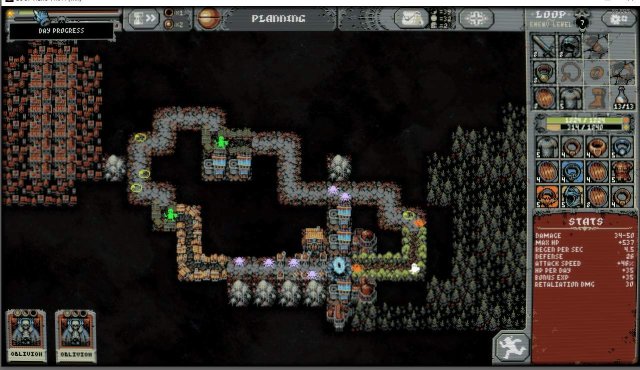
Here’s a picture for what you are aiming to do at the beginning of this strategy.
(This is from my successful Warrior run. Rogue is a better choice.)
Strategy (1/5): Blissful Gambit
- Lich-boss is going to spawn first, and every empty tile location 2 square-distance from the Campsite will have [Lich’s palace] cards placed on top of it.
- Place [Arsenal] near your Camp, but not so it interferes with [Outpost] placements.
- Place 2 Outposts so that they help you with all the upcoming Boss fights.
- What you want to do is to place as many cards, and to get as many enemies early on, while they are still weak. Then you want to remove those tiles later with [Oblivion] cards, and replace all Road tiles with Villages.
- Placing 2 [Villages] will spawn [Bandit Camps]. Block them from spawning by placing [Outposts] and [Spider Cocoons] next to those Villages. Some of them you will have to remove by Oblivion cards, because you can’t wait for the right opportunity (you are fighting time, as the enemies will grow too strong for you around Loop 35, you need to have only few monsters on board around that time).
- Good traits to pick:
- Omicron’s technique, Card sharp, Smoke screen, Lethal weakness, Skilled architect
Also note this:
- “Blissful Gambit”: Do NOT pick the trait “Blissful Ignorance” early on, even to clear [Lich’s palace] cards off the board. You will have to suffer the extra damage instead. Wait for later, to get the full use out of the trait. Also hope that you will get the trait as an option when you have plenty of stuff to remove.
- “Outpost Oprah”: Give 1 Outpost to every road tile, except 2 for camp. “You get an Outpost, and you get an Outpost. Everybody gets an Outpost”. Place a [Spider Cocoon] opposite to the Outpost, so that there is a supply of Spiders to give loot and cards, but also Guards from Outpost to help killing them.
- Guards scale with every Loop, which is even more useful after Loop 20-30 when you have difficulties trying to keep up with the enemies damage.
- “Archer Insurance”: Start by placing spawn-tiles like Spider Cocoons and Groves close to camp, so that your Watchtowers can shoot at them. Later when you start removing Groves, and placing Villages next to Cocoons (to block Bandit camps) the tiles closest to your camp should be the LAST ONES to be replaced/removed.
Strategy (2/5): Glass Ceiling
- For the next boss, attack speed and evasion are good. This is a toughest fight in my opinion (third boss is slightly weaker, but still dangerous).
- Good traits to pick:
- Omicron’s technique, Card sharp, Smoke screen, Lethal weakness, Child of the forest
- [Child of the forest] Trait for Ratwolf. Helps little bit with second boss, same as attack speed. Also your Ratwolf scales with Loop, like the enemy ratwolves do, which is good.
- You want to place as many cards at the start as possible, to get as many of low-level enemies and loot early on as possible. Later you want to remove those Grove-cards and replace them with Villages.
Strategy (3/5): Good Luck Hunting
- Now you have already filled the board for experience points and loot. Pray for Village-cards, and Oblivions, but keep a good supply of enemies: More enemies mean more weapons and traits.
- Hunter-boss ignores your evasion, but it still works against the Hunter’s Hounds.
- Good traits to pick:
- Omicron’s technique, Card sharp, Their own peril, Smoke screen, Lethal weakness, Fuss.
Strategy (4/5): Omega Is Just The Beginning
- Omega-boss is usually not a challenge if you got this far. Especially since you can get him early, before he scales with the Loop and grows too strong. This is only possible by having plenty of enemies to spawn, so you can kill them, so you can get cards and equipment.
- Around this time I managed to pull the Blissful Gambit. Best timing is right after this bossfight.
- Good traits to pick:
- Omicron’s technique, Card sharp, Smoke screen, Lethal weakness, Blissful ignorance
Strategy (5/5): To Infinity… And Pebbles!
- Keep blocking road-tiles with villages. Pray for more villages and oblivions.
- You can remove the [Spider Cocoons] with Oblivion cards, but if there is a place for [Bandit camps] to spawn, which creates more problems.
- Hopefully you get to use the Blissful Gambit now. Also remember the Archer Insurance.
- Good traits to pick:
- Blissful ignorance, Card sharp, Nothing is sacred, Smoke screen
Mission Complete!
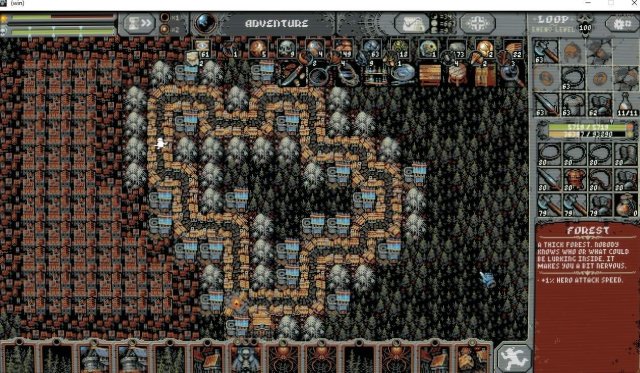
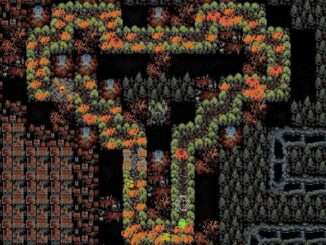
At this point your board should look something like this:
Extra Notes:
- You can hit infinity at Loop 36, if you’re lucky probably around Loop 30 in the earliest.
- Earliest tested infinity Loop: 36
- You leave the Loop Hero-game screen to do something else with your computer, and the game keeps pausing itself as you go doing something else (no automated loot).
- Clicking the game icon itself to <minimize> it pauses the game.
- Clicking the <minimize> button at the top right of the game screen pauses the game.
- Solution: Do not “put away” the Loop Hero game, instead just open Chrome or Word directly, without ever pressing the Loop Hero-game icon to leave.
- Resource cap for resources in campsite is ABOVE 999 (not sure if it above 9 999). You can safely get over thousand Rocks, and that progress is not capped.
- Game will not crash during Loop 100. You can safely go pass that.
- Max Loop tested so far: 504
Stats for Nerds
Looping dаta:
- Running an empty round (after there is no more enemies to slow you down) takes 25.4 seconds (your mileage may vary).
- 10 pebbles = 1 Rock, 13 scrap = 1 Metal.
- Every round gives you 1 Pebble for each Miner’s pick (I had 7), and 1 Scrap metal for every village (I had 35).
- 7 Rocks every 254 seconds (4 minutes and 14 seconds). (10 loops)
- 9 Metals every 330.2 seconds (4 minutes and 14 seconds). (13 loops)
Fun Facts:
- I hit 1000 Full resource orbs at Loop 207.
- Max evasion (hard cap) is 75%.
- Boots that are level 35 or so will have maximum evasion. Regular common (white colored) Boots with higher level have no difference to these boots.
- Level 51 Armor gives about 3727 max HP. Level 317 Armor gives about 24 612 max HP.
- When I got bored of my first infinite run, I took from that run 1 916 completed resource Orbs, 712 of them Metal and 894 of them Rocks.



Be the first to comment