
This is a General Guide for the Lizardmen in the Vortex Campaign, and eventually, the Grand Campaign.
Other TWW2 Guides:
- Brief Description of Each Faction.
- Vampire Counts Hints & Tips.
- Skaven Guide.
Lizardman Basics
Army Basics
The Lizardmen are a pack of beasts, and this is both metaphorically and literally true. You can basically divide your units into the swift, relatively cheep skinks, and the hard hitting sauruses and beast units. Your Sauri hold your lines, and deliver the hammer blows, while Skinks can be used to reinforce your flanks, redeploy quickly on the battlefield, and even excute hit and run tactics you might have seen in the let’s plays.
The important thing to remember about Lizardmen is that you WANT them to get stuck in. But importantly, you want to get them stuck in DEEP into enemy lines, and for Sauri, you want to be sure to do so against units that aren’t much faster than they are. Chances are, that even on your best days, your units are going to frenzy. This gives them mad buffs to damage and makes them unbreakable, but you lose control over them. They’ll focus on whatever foe is closest to them. That’s why you want to make sure your Sauri are stuck in deep, that way they’ll focus on the mobs near them rather than chasing lone units halfway across the map.
Your skinks will tend to run away from things, this is generally a good thing to allow to happen, let it happen, let them peel off enemy units from the main fight, let your Sauri do their job.
For your magic, throw it around, get good at figuring out when and where to use it, don’t be afraid to pause the game, scope out the map. If you have to toss down some blasts that hit your own dudes but will hit way more of their dudes? Do it. Always remember, your magic is hellishly long range, use it to snipe enemy artillery, because lord knows, the Lizardmen aren’t rocking the artillery department.
Campaign Map Basics
Lizardmen are reasonably fast for group, and importantly, they have a ton, and I mean this, a ton of structures that really boost their abilities on the campaign map. Use ambushes, get your guys up and running around the place, wage tons of battles. Don’t be afraid to break alliances when you have too, and get in good and tight with the foe.
Importantly, use the geomantic web map to chart out how you should expand. If you have to choose between a place that is part of the geomantic web, and one that isn’t, always go for the option that has the geomantic nexus on it. Don’t bother building geomantic improvements if you can’t capture the whole territory, but grab it anyway and get it improved as best you can, make it a tough nut to crack. The geomantic web is just USEFUL, and grows more useful the more of it you control. When you control a province entirely, always build the necessary upgrades for it, because they’ll really force multiply your edicts.
The Rite of Ferocity is your cheepest, and honestly best, Rite. Pop it any time you’re planning on really rapidly building armies and have the economy to sustain constant army growth for 5 turns in a row. Take your time, use the local province thing, not the global province queue, to save money, because what you lose in time you make up for in getting higher ranked, better units right out of the gate, and the experience gain is enormous. The post battle loot is really just a nice extra, because all the other benefits are in your recruiting.
Lord Mazdamundi
Lord Mazdamundi starts in a fairly nice position, but you have skaven to your north, and norscans to your east. You want to start out aggressively, ignore the Empire colonies to your south, they’ll try to buddy up with you, and as this is part of the Old One’s plan obviously, you should do so, and take advantage of it.
Early Game Units
Before I get into depth about this too much, something I should explain is two consistent features found in almost every unit of the lizardman army. Predatory Instincts, Hiding (Forest), and Primal Instincts. Predatory Instincts, from what I can tell, increases the detection range against hidden units. Almost every single unit that isn’t a large unit (Kroxigors and most of the dinosaurs you can get from the beast pit) can hide in forests, and Primal Instincts is something you’ll find in a ton of Lizardman units, which means that if they get damaged too quickly, they’ll go on a rampage and focus fire on just one guy. Also, all Lizardmen have resilience Desert and Swamp, meaning they never take attrition in those locations, use that to your advantage, if you’ve got to run, flee into swamps or deserts and let the persuing army take some hits, then ambush them if you can.
Saurus Warriors
The bread and butter unit for your armies even late into the game. Eventually you’ll only have your first wave of guys who manage to survive until the mid game, but the Saurus Warriors are your go to guys for the fight. They’ve got armor and leadership and weapon for days, just don’t expect them to get anywhere fast, nor to do especially better on the charge (It’s not bad, but it could be better). Importantly though, these guys eptiomize what it means to play as a lizardman player. They are tough, they are unwieldy, when they get too badly hurt they berserk, and while they might not hit as often as other guys, when they DO hit, the enemy -will- feel it. Keep throwing these guys into fight after fight, pull them back if they get too low without rampaging, and then replenish them, and they’ll go up in ranks blisteringly fast. All the same, stop producing them unless you’re having serious economy troubles the moment the shields variant becomes available.
Saurus Warriors (Shields)
Literally identical, only now they have sheilds meaning that they can take a charge from their front arc better and they have a slightly higher cost. There’s literally no reason not to swap to these guys at every opportunity given barring reasons of budget, the need to raise a quick army from a low level city, or similar ‘forced by circumstances’ actions. At the same time, it’s also arguable that the shields just aren’t that big of a deal when lizardmen already have massive amounts of armor, leadership, and weapon strength, anyone who inflicts too much damage on a charge is going to be bogged down for days.
Saurus Spearmen
Slightly more melee defense, considerably less weapon strength, what they do have is both massive amounts of charge defense and the ability to chew through large units faster than normal Saurus warriors. Don’t be as eager to get these guys stuck in as Saurus Warriors, keep them on your flanks, use them against large units and
Saurus Spearmen (Shields)
See Saurus Warrior Shields, apply all of that to Saurus Spearmen.
Skink Cohorts
I’m personally not a fan of this unit, but that’s because I feel like anything these guys can do, a Saurus Spearman can do better. This isn’t entirely true of course, because they start with shields, and they lack the primal instincts draw back. What does this mean? They might be more delicate, but they can redeploy much faster than Sauri can, and more importantly, are more reliable. Their anti-large bonuses are there, and they can take charges reasonably well, making them excellent support units. Their aquatic ability assists in this as well, but I haven’t seen aquatic terrain all that often on any of the maps, so it’s really a situational bonus.
Skink Cohorts (Javelins)
These guys gain a poisonous ranged attac, and they’ll make up your opening ranged fighters. That said, Lizardmen really aren’t all that into the ranged fight, so while Javelins are better than nothing at all, I wouldn’t put more than 2 or 3 of them in an opening army, and phase them out in favor of the Skirmishers. They have poison damage as well, and hit harder than the skirmisher baseline. Same deal with aquatic as with the normal cohort.
Skink Skirmishers
Sneaky, forward deployment, poison attacks, and the ability to move really quickly while attacking on the move. Set them up on skirmishing mode so they’ll run away from enemies, then use them as a -really- juicy target to peel off units from the enemy’s advance. Provided cavalry doesn’t run them down (and even then it’ll take longer for the cavalry to do so than it would for most other units given how speedy these guys are), they’ll take the enemy forces for a merry dance and pump them full of poison, chipping away at their health again and again and again. Can also be useful, given their ability set, of striking enemies from behind or taking out artillery.
Midgame Units
Chameleon Skinks
Chameleon Skinks are, basically, skink skirmishers with all the extras. You really really want to replace your skink skirmishers with these over time, for basically the same reason you replace your saurus bands with the shield bearing versions. The expense is worth it. In this case you are paying for chamelonic, which means with few exceptions the enemy really won’t see them coming provided they never break cover, and they are rediculously hard to hit with ranged weapons, meaning they can harass and screw with ranged units, something skirmishers were not fantastic at due to their subpar range and the fact that most ranged enemy units wouldn’t have to run after them as much. Chameleon Skinks are still cheaper than a basic saurus unit, and arguably the most effective harrasser you have. They also have poisoned melee weapons, and while chameleons in melee are still probably going to have an aweful time of it, it won’t be quite as bad as that by skink skirmishers
Terradon Riders
Really your only true answer to screwing with enemy artillery in this game before they put you in for a world of hurt. Never leave home without at least one of them whenever you think it’s even moderately likely you’ll face serious artillery (late game skaven and any chaos army being the favorite picks, elven artillery is just not anything to write home about). Fly them over, drop rocks, keep them hovering and causing fear and attacking the artillery until it’s done with.
Cold One Riders
A pretty decent cavalry unit. Their stats are nearly identical to saurus warriors, except having lower weapon strength, an greatly increased armor and speed. They do much better on the charge than in straight melee, but that’s not unusual for cavalry units that I’ve been able to see. A solid choice and very affordable (only 20g higher in cost than saurus warriors), especially considering they are both armored, shielded, and have armor piercing.
Cold One Spear-Riders
Cold One Spear-Riders are kinda hard to justify. They’ve got identical stats to the normal riders, but come with the usual spear goodies of anti-cav and anti-large. That said, they cost around 40gp more than the normal riders do, so I’d never field them in bulk really. That said, they got speed, charge bonuses, anti-armor, anti-large, and anti-cavalry. So if you see a bunch of heavily armored elven cavalry or a swarm of rat ogres, these really are the guys to throw into it.
Feral Bastilidon
The Bastilidon is a walking, angry, fortress of armored plates and angry spikes. It’s not fast, and when compared to the other two feral dinosaur units, it’s damage is pitiful (Of course compared to everything except those two unit’s it’s scary as all hell). But what it has far more than any other unit I can recall is armor. As long as you don’t throw it into melee against anything that is anti-large and/or anti-armor, then chances are it will hold the line and win through sheer attrition (plus the insane amounts of damage it would inflict on most things. This is a tarpit unit if I ever saw one, just keep it away from anti-large units. Also handy for letting you get into sieges faster.
Feral Stegadon
A charge monster if there ever was one. Whatever it hits IS going to break if that unit can be broken. It’s not as tanky as the Bastilidon (but what is?), and I’m not entirely sure how it’ll do if it gets bogged down, but given how rediculous it’s damage is on the charge I’d say it’s got a good chance of breaking even low to medium moral spear units if it catches them in the flank. I wouldn’t try it except as a desperation move though, these guys are EXPENSIVE.
Late Game Units
Warning: Due to IRL obligations, I’ve only been able to fool around with Temple Guards and Solar Engine in my game, so the rest of these are going to be based on the stats I’m reading from cards until I can get them running in the campaign, which is where I like to get a feel for these guys since it lets me judge them based on overall economy as well.
Temple Guards
I consider these guys a fairly expensive, but still pretty damn worth it, upgrade to your Shielded Saurus Warriors. They are a definitely worth it upgrade to your Spear Sauri with Sheilds. More defense and accuracy, same weapon strength as your spear sauri, same abilities, and now with armor piercing. I’m not gonna say that they should outright replace your warriors and spear sauri, not like how you eventually replace all of your production of dwarf warriors with ironbreakers and long beards, but I’d say you still want a pretty even mix of normal shield spears and Temple Guards. The Temple Guards can very easily shore up the center of your lines, bogging down stuff for your much killier normal shielded warriors to smach in, while your regular spears can sit on the far flanks waiting to take cavalry charges. But it’s just a generally flexible unit that can do a ton of damage with their halberds. Thankfully, you shouldn’t have to make TOO many of these guys, as they tend to come from blessed spawning quests, which give you way better versions of them anyway.
Kroxigors
Big heavy monstrous units that fit the usual monstrous units catalogue. Armor piercing, anti infantry, siege-attacker, buckets of armor, hp, and damage, but low numbers. Decent turn of speed for them too. I’ve genuinely got no idea how well they’d fare against non-armor piercing anti-large infantry, but I wouldn’t risk it. Pity, since there’s just not a lot of seriously armored infantry that’s not also antilarge. I’d say useful as any other monstrous unit in the game, but nothing that makes it stand out as unique in that respect. Just throw it against non-anti-large infantry and watch it chew through the poor footsloggers.
Terradon Riders (Fire Leech Bolas)
I’ll be honest, I have no idea if the extra 37 gold tacked onto these guys it worth it. That said, they’re basically the same thing as the Terradon Riders but with anti infantry instead of poison, meaning they’ll kill stuff harder, but not debuff it very much. They also do fire damage, and there’s more than a few units vulnerable to fire, so if you see any fire vulnerable units on the field, these guys can definitely pull their weight for that. I’d include one in any army you’re throwing at enemies who might have fire vulnerable units.
Horned Ones
Cold one rider’s bigger, angry, harder hitting older brothers. Better charge, better hit rate, better armor, better damage, all at the low low price of having to worry about them rampaging a bit. Honestly I say these guys are worth it just from the stat plate alone, they’re basically speedier, more accurate, and better armored versiosn of your normal saurus warriors with fewer guys in a unit and with armor piercing as well as armor and shields. They could probably outright replace your normal cold one riders.
Stegadon
A nice, tough, mobile, anti-armor, poison damage dealer. You can smack folks from far away, does impressive damage, and like all dinosaurs, can hold it’s own in melee if it gets swamped.
Bastiladon (Solar Engine)
A really good support range unit. Don’t bother firing this sucker at artillery or gates, you have better things for that. Where the solar engine shines is the fact that the Beam of Sotek does fire and magic damage at the same time, and most importantly, blinds whoever is hit by it. The damage it deals is also really really nice. It’s range is nice, but not quite long enough to qualify for real artillery in my books, more a field artillery piece. Also, it has a pretty damn fast set up time compared to most artillery, given it’s mounted on a walking pile of plated anger and rage that’ll lay down the hurt as well as a normal Bastiladon. Still, not what you want it to be doing most of the time, so don’t use it as a tar pit like you’d use the feral Bastiladon.
Bastiladon (Revivication Crystal)
Oh look at this, a non-caster or winds of magic dependent healer unit. This thing, just from it’s stats, is incredible, and keep it tucked away from the fighting and get him to pop those abilities whenever you can. They can seriously turn the tide of battle, not just healing injured units, but reviving dead ones. I have no idea what effect this has on rampaging units.
Ancient Stegadon
See Stegadon, but give it really impressive damage and the ability to fire on the moon. It’s not got a lot of ammo though, so get it stuck in once it’s used up it’s 10 shots obliterating whatever poor idiots were caught in the explosions.
Feral Carnasaur
Do you like killing absolutely everything and causing massive amounts of damge? Do you like doing to monsterous units what monsterous units tend to do to infantry? The Feral Carnasaur is for you. This guy can, and will, murder just about everything it’s thrown against, devouring enemies, stomping them, eating trolls, the whole 9 yards.
A Note on Blessed Spawnings
From what I’ve been able to see, Blessed Spawnings are, stat for stat, superior in every way. To prove this I’m gonna give you a side by side snapshot of the same unit, one of them with 2 gold ‘elite’ stripes, and the other blessed and having only a tiny sliver of experience, no ranks.
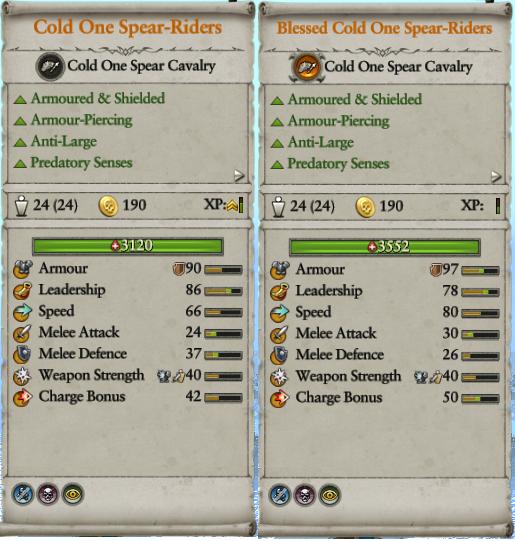
As you can see, with the exception of the melee defense and leadership that the non-blessed unit has, the Blessed Spear-Riders are just straight up better in terms of raw stats. This has been the trend in almost every single case I’ve come across. Some blessed units also come with additional abilities like Perfect Vigor, meaning they never counts as tired more or less. I’m sure there are other little bits and pieces, but in general, assume that Blessed Units are out of the box better than any normal unit ever can be.
Lizardman Economy
The Lizardman Game is not quite as economically dependent as the dwarf game, but it’s very close. Where as dwarves depend on their structures and technologies to push their economy forward, for the Lizardmen it’s based around their geomantic web and to a lesser extent, their structures. Any province you intend to focus on economy should be filled to the brim with Stone Markers and Lodestones on their minor settlements. As always, build any resource structures that you should, and for these provinces, more than any other, make sure there’s room in your capital for the geomantic structures, because you REALLY want to boost the gemantic webstrength for any economic provinces.
One of the things that -really- helps alleviate the burden of recruitment is the ability to have blessed spawnings. Anytime you have a quest for those, make sure to take it, as having additional blessed spawnings is never a bad thing, allowing you to quickly replenish, reinforce, or recruit new armies entirely!
The other part of the Lizardman economy is the important of geomantic lines and the orders you can give to your provinces. Craftsmen and War are the two big ones. When you’re ready to pop a rite of ferocity, then the turn before swap out craftsman for war, and see those levels truly pump up. Do it during a ritual event and the levels grow even more. Blessed Units aren’t effected by this however, but they come with special traits, and in a few cases that I’ve seen, can be superior even to single gold ranked normal, but I’m experimenting to see what’s true or not there.
Lizardman Tech Tree
Now, anybody here who read my old guide knows how important tech was to the dwarvish economy and warmachine. Getting your tech up was vital, and your tech tree was more or less independent of what structures you actually built, which should have told anybody paying attention that Dwarves needed to be constantly pushing their tech.
Lizardmen are more tranditional technologically speaking, they unlock rows based on structures. Honestly, you shouldn’t sweat the tech tree overly much with lizardmen, as the tech that opens up will, by and large, be the stuff related to what you are doing. Be flexible with what you research, don’t tunnel vision on one particular row just because you want to see it done (Another difference with the dwarves, who often benefited from toughing it out and going for deep techs early game while sacrificing early but quick and broad stuff). Jump around, do what feels best at the moment, and don’t sweat the small stuff. The only advice I’d really give is that you should buy the Scrying Pool, Shrine of the Old Ones, and Geomantic Pylon as soon as you can, just because that +1 Public Order tech is very very useful given the sheer number of corruptors you’ll be facing (Skaven, Chaos, Vampires) in short order and every little bit helps. It also opens up the research lines at the middle of the tree, meaning that if you fill out all of your research lines you’ll be stuck without those 3 structures and the technology they unlock finished.
Mazdamundi’s Early Campaign
Chief Priorites are to focus on the Skeggi to your west, and the Skaven to your north. Ignore the west and south for the time being. Your capital province will be in some serious need of reordering, and to fix that you should build the underground lagoon, followed by the monument to the old ones as soon as you can.
The Skeggi can be broken down very very quickly, and the moment you clear them out of the Monolith of Fallen Gods (something you should prioritize even over hunting down skeggi armies), you should buy a second lord, and have him start building up his forces. Get Mazdamundi’s growing army out in the front, and for the Old Ones’ sake, don’t use autobattle if you’ve got your starting silver ranked cavalry in the army, the AI seems to love throwing them into the meat grinder, so you’ll lose them and not be able to get them back until around turn 30ish, so just deal with it.
Once your second lord’s army is up to snuff (Call it turn 10-15ish), send him north, start conquering places. The Fallen Gates -matter- and you want to turn this place into a power house in terms of army defense. Grab the two minor settlements (the northern most one should be unoccupied by skaven, so search it first. Always search ruins first if they’re unoccupied), then start building them up, get them slotted with defensive enhancements, and camp an army there. Keep building them, and Mazdamundi’s forces.
By this point, you’ve probably begun starving out the Skeggi capital, if you didn’t just go and take it outright. Send Mazdamundi north, and grab the last settlement in your primary province, and then let it roll. You’ll want to build some defenses on this point eventually, cause it’s out in the middle of nowhere and a prime target for Dark Elves, but don’t get too fussed about it.
By around, call it turn 25ish, you should have, one way or another, (assuming you’ve been focusing on your quests) gotten enough tablets to begin your first ritual. Do so, it should require you to defend Choteck’s Causeway, the Ziguratte of Dawn, and Hexoatl. You should also get some wandering armies spawning in. Deal with them if they walk into your territory and raid you, otherwise ignore them, march Mazdamundi’s army north, and have his army run interference against the Chaos armies marching from the north while your other dude goes south and begins expanding into the west. Remember, always go for the geomantic cities -first-. Treasure Hunt, then occupy. Depending on your difficulty, you might have the Ziguratte of Dawn come under attack. If you think it’s likely, then move your second army over there, or buy a new lord.
If you’ve been doing well, and the Skaven to your north haven’t been wiped out already, towards the end of all of this you should move in to knock their teeth out, taking the northern province. This will be a fortress province, then you can focus on your western province and turn it into an economic engine.
You’ll notice that Lizardmen are expensive, they require a lot of upkeep, and so you should, throughout all of this, keep your eye on your income level, and invest in trade, in money boosting stuff, and economic buildings. The reason you pick the Western Province for this is that the Dark Elves are unlikely to launch any naval attacks down this side of the coast, and by the time they do you’ll have your cities upgraded and can put in some defenses if absolutely necessary. Otherwise, just camp an army on the western most city and call it a day as this place funds 2 or three armies on it’s own over the course of it’s lifespan.
Mazdamundi’s Mid Campaign
By the time you’ve secured the three northern most “suitable for lizardmen climate” provinces, assuming you haven’t accidentally (or deliberately) stomped the Humans, one of two things will have happened to them. First, they might have started and lost a war with one of the two hostile groups south of them (Skaven and Orks), or be in the process of losing. Get your armies prepped, snipe any of the enemies. If the Humans are doing well (as they were in my game given that they only had to focus on their southern front given that I took out Skeggi so early and bottled up the skaven to the north), then you want to grab a few of the cities, keep them from gaining any full provinces. If you’re lucky, then the Orks or Skaven might take out Swamp Town or their Capital for you, in which case go in and ‘rescue’ it for yourself. You might end up losing the southern geomantic nexus point for the province south of your starting province. If so, fine, deal with it. At least it’s owned by an ally. You can always take it later once you’ve grown three times bigger than them.
Start taking apart the Orks to your south, the province to the West runs down the coast and can be a tough nut to take, the Skaven tend to have it by this point and are dug in. I tended to march two armies through here, then swung up to take the other cities on the opposite side of the mountains. From there, you’ll see a province capital that produces tablets. It doesn’t matter if there’s an ally or anything sitting on it, grab it. You need it more than them, and the Great Warding has to be bolstered. If you’ve been lucky with some of your interventions by this point, you’ll be a head of anybody else. Sit on a nest egg of like, 10,000 cash, smack down anybody you feel it getting too close.
By this point in the campaign, some of your blessed spawning quests will probably be directing you to start attacking ally cities. My advice is to check out their relative strength on the map compared to you, and to have heroes scout around them. If they’re sitting against a bunch of ruins, assume the ruins are all captured by skaven by this point, and deal with them first. Your income generation should let you wage at least a two front war with 4 to 6 armies. Always keep an army camped in your northern most province, because chances are the Dark Elves are going to be your biggest rival in these things, as they have just the right mix of backstabbing, common foes, and similar things to fuel their growth without stuning it (Unlike Skaven, who never get along and tend to fight rather than work together, and High Elves who rarely stab each other in the back and need lots of diplomacy, stuning their growth because they build tall and narrow in a game that really favors building moderately wide), so you never want to show an opening. Also, it tends to be the direction Chaos invades from, so having an army or two on site to intercept any idiots who try to disrupt your rituals is essential. I find keeping an army camped on my main capital helps as well, for sniping any problems that come up in my heartlands. Both of the lords you have leading these armies should have move-distance boosting abilities to get them where they need to go fastest, and ambush improving abilities as well, since the Lizardmen already get some structures that help boost ambushing enemies defensively. Use that to your advantage.
From this point on, keep expanding south, make allies where you can, try to confederate any lizardmen you can, but honestly I find that it’s a lot harder to confederate in this game, probably the lack of ‘defenders of civilization unite!’ bonuses. Just keep pushing your rituals forward, you should be well onto Ritual three by the time you grab the second tablet production city. Lizardmen play better on the defense with their infrastructure all self supporting and the scrying pool structure. Plus, they lack serious artillery, at least of the wall breaking sort, so you want to keep that in mind in how you strategize. It’s always better to take cities early on in their development as lizardmen, then sit pretty and let the enemy get caught in ambush after ambush by your armies. Mazdamundi could probably win a victory by conquest if he wanted too, but why would you want too when you can just camp ambush armies on the paths of attack leading into your territory, pump tablets into your rituals, and call it a day?
End Game
Given how this game works, I am making a SINGLE end game section for both the legendary lords. The reason for this is simple, by a certain point in the game, me giving you specific instructions is not going to cut it, because the Vortex Campaign is far more about the rituals than anything else.
You should, by this point, have secured the greater chunk of your continent, if not the entire thing in the case of the southlands (given the southlands are slightly smaller and more connected than Lustria is for the purposes of the Lizardmen campaigns). What’s most important at this stage is to figure out who is the most important enemy, the guy who is closest to gaining on rituals than you. Chances are, in my experience, it’s the Dark Elves just because they have exactly the right mix of alliances, brutality, isolation, and available targets to REALLY get down to brass tacks about reving their economy and rituals. At least when the AI play them, but depending on how things play out it could be the Skaven or High Elves giving you guff.
It is at this stage of the game, where you are probably going to have to give up on just playing the defensive game. Leave a handful of armies on your borders and corelands, and get 2 or three really good armies, probably your oldest two, and set them to RAMPAGE across whatever place is gaining on you. Give up on taking whole territories, instead go in, pinpoint strike cities producing tablets, and then take them, and pay whatever exhorbidant bribes are necessary to make peace. The reason I say this is that the Dark Elves or other factions might have SIGNIFICANTLY higher gain. For example, in my first campaign the Dark Elves went from the second ritual, to almost 3/4ths of the way to the third ritual just from the sheer backlog of ritual resources they had gained from expanding their empire in the time it took to finish the second ritual.
Whoever is gaining on you? Stomp them. Use raiding stance and astromancy stance to keep an eye on your enemies’ armies and avoid attrition in territories that inflict it on you. Your job, at this point, is to enact Sherman’s march to the sea. Loot, then raise, every single city you come across, or just raise it if you’re concerned about a supporting army incoming. Obliterate the enemy’s economy to the best of your ability. Do eveything to deny them sources of ritual materials and expand your own. Don’t go for the knock down kills if you can help it, let them scramble and screw with each other, defend your ritual sites and cut off their supplies above all else. With this gameplan, you should be able to get your ritual running.
Be the first to comment