
Build, card ranking, and strategy for Ascension Mode.
Build Basics
The build relies on a single “combo turn” utilizing Catalyst multiple times to exponentially increase poison damage.
This guide works as of the 1 February 2018 build.
Basic Strategy
- Apply a minimum of 6-10 poison to an enemy with Deadly Poison or similar.
- Use Nightmare, targeting Catalyst.
- Play Catalysts next turn for > 8100% poison damage.
Card Selection
This build is a combo deck and must run as small of a deck as possible (contrast to a traditional deck, which just picks up all the high-quality cards offered). New players often take far too many cards for a deck of this type, resulting in inconsistent draws and the core of the deck suffering (known as entropy). Maintaining temperance with card selection is a core component of optimal play.
Remember that each card added to the deck reduces the chance of drawing critical combo pieces. Most rewards screens will have their rewards left unclaimed, and this is an intentional part of the build. Even cards that seemingly “replace” themselves, such as Dagger Throw or Backflip reduce the likelihood of better draws, especially considering their energy cost (Prepared and Adrenaline are exceptions to this, and this guide discusses them in detail).
Once the deck acquires it’s core cards, remove every extra card possible. This includes all curses, not because of their negative effects, but because they increase the deck’s entropy.
Path Strategy
Fight as many elites as possible, especially after acquiring the core cards of the deck. Elites pose little more challenge than regular enemies after this point, and the relic rewards are substantial.
Required Cards
You must collect the following cards for this build to work:
Note: Some cards must be unlocked, this build will not work on a new game.
Catalyst (1, upgraded)
Catalyst offers multiplicative damage increases and is the core of this build. Stacking multiple Catalysts–even with low poison damage–quickly defeats the strongest enemies. This build requires only one Catalyst, as we combo it with Nightmare.
Upgrade: Triple damage

Nightmare (1, upgraded)
Nightmare enables massive poison stacking when used on Catalyst. With three upgraded Catalysts (plus the original one), Nightmare effectively multiplies poison 81 times. A measly 10 poison damage turns into 810 damage in two turns.
Upgrade: Costs 2

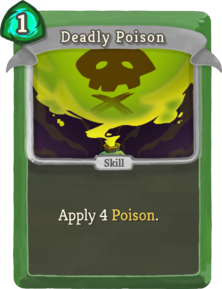
Deadly Poison (~2, upgraded)
Even with multiplicity, this build needs some way to get poison going initially. Deadly Poison offers the most poison for the least energy and stacks it on a single target to increase multiplicity with Catalyst. Additionally, being a common, rewards offer Deadly Poison more consistently than the others, and it combos with Nightmare early one, if rewards haven’t offered Catalyst yet. Poison Potions work in a pinch, though they are not a long-term strategy.
Upgrade: 6 damage
Note: This build can replace Deadly Poison with another poison card, such as Noxious Fumes or Bouncing Flask, though they lack the consistency of Deadly Poison. This guide discusses both alternatives in another section.
Useful Cards
The following cards make the build more consistent, though do no make up the essential combo pieces.
Burst (1, upgraded)
Burst is not one of the essential cards of this build, as this build realizes the 8100% poison with only Nightmare and Catalyst. Nonetheless, Burst allows greater flexibility with the limited deck size this build promotes. Doubling draw cards such as Adrenaline or Prepared, or doubling strength loss from Piercing Wail maximizes the limited resources in the deck, especially with cards that exhaust.
Burst can take the place of Nightmare as the core of the deck, though it’s much less capable when used with Catalyst. Burst + Catalyst only increases poison by 900%, meaning the average boss requires about 60 poison damage already, as opposed to just 7 with Nightmare + Catalyst. Burst needs two Catalysts in hand to realize the same impact as Nightmare, resulting in a three-card combo, which a non-upgraded Well-Laid Plans cannot hold. In short, it can offer the same damage, but much less consistently. Slightly advantageously, Burst combo goes off in one turn, as opposed to the two turns Nightmare takes.
This recommendation will be a point of debate, though, in my runs, Nightmare resulted in a more consistent combo. Optimally, pick up both Burst and Nightmare, though I would take Nightmare over Burst given the choice of only one.
Upgrade: 2 skills

Well-Laid Plans (1)
Well-Laid Plans allows you to hold a combo piece, such as Catalyst or Nightmare until the deck offers up the other. Additionally, it allows you to hold a situational card, such as a Piercing Wail or Corpse Explosion.
Upgrade (unnecessary): Retain 2 cards

Noxious Fumes (1, upgraded)
Noxious Fumes appears better than it turns out being with this build. It applies half the poison of Deadly Poison, and it requires a “waiting” cycle of one turn after playing it before the poison goes into effect, delaying Catalyst combos. Still, one Noxious Fumes allows simpler poison spread between multiple enemies and (perhaps, more importantly), removes instances of Artifact that otherwise absorb high-damage poison application.
Do not collect multiple Noxious Fumes–they work too slowly and delay more critical combo draws.
Upgrade: 3 damage

Bouncing Flask (1, upgraded)
Bouncing Flask removes multiple instances of artifact with one hit. Its poison damage is otherwise equal at best to Deadly Poison, though it’s doubled cost renders it less useful.
Upgrade: 4 bounces

Piercing Wail (2)
Piercing Wail negates damage from multiple enemies, as well as from multiplicative attacks. Poison builds struggle to kill multiple enemies quickly, and Piercing Wail buys time to enable poison to work.
Upgrade: 8 strength

Prepared (2+)
Prepared is a zero-entropy card, meaning it does not decrease our chances to draw other cards. A few fights, such as against the Gremlin Nob, or against enemies who cast Hex, become more difficult with Prepared, but the overall threat remains low.
Upgrade: Draw 2, discard 2

Adrenaline (2+)
Adrenaline is another zero-entropy card, like Prepared. The benefit of Adrenaline is simply to run through the deck more quickly to draw combo pieces. The extra Energy rarely impacts the game, though it could allow playing an extra block on Nightmare turns.
Upgrade: Gain 2 energy

Corpse Explosion (1, upgraded)
Corpse Explosion is the only reliable area-of-effect spell in a poison build (discounting The Specimen relic), with the considerable downside of losing all built-up poison. Save this card as a finisher, especially against Darklings.
In the build as of 1 February 2018, killing an enemy with Corpse Explosion while having The Specimen causes poison damage to transfer to another enemy instead of disappearing.
Upgrade: Triple damage

Bad Cards
These cards trick you into thinking they’re useful but end up being inadequate. They clog up an otherwise slim, efficient deck, with sub-par benefits while delaying essential draws.
Envenom
Envenom doesn’t outperform Deadly Poison or even Noxious Fumes, due to our lack of attacking after the first area or so.

Backstab
Backstab “uses up” one of our initial draws.

Crippling Poison
Crippling Poison is too expensive, and The Silent begins with Neutralize already (upgradeable to 2 Weak) for the Weak effect.

Poisoned Stab
Poisoned Stab doesn’t apply enough poison, and doesn’t work with Burst. This build wins by multiplicative poison with Catalyst, not a few points of attack damage. To compare, Nightmare + Catalyst with a single Deadly Poison results in 486 poison damage, while the same combo with a single Poisoned Stab results in 324 poison damage (47% less net damage, considering the six extra attack damage).

Terror
Terror serves no benefit in a deck that doesn’t attack.

Calculated Gamble
Calculated Gamble serves to “mulligan” a bad draw, speeds up the initial draw through the deck, and even adds block with Tough Bandages.
However, it’s entirely useless when holding a single combo piece (which this build often holds from Well-Laid plans), resulting in Calculated Gamble performing worse than Prepared in this deck.

Relics
This build doesn’t require any specific relics, though one relic offers a substantial benefit, especially against The Awakened One boss.
The Specimen
The Specimen transfers poison from one enemy to another after the enemy dies, allowing mass-poison cards such as Noxious Fumes or Bouncing Flask to maintain their poison quantities throughout the fight. Furthermore, The Specimen prevents “wasting” Deadly Poison or other single-target poison applications on targets other than the boss in a multi-enemy fight, since poison will transfer to the boss after minions die with it.

Other relics, (including Snecko Skull) aren’t critical for this build, though most offer some benefit. As relic distribution is mostly random, there’s no specific list of relics to seek out.
Note that this build is NOT an energy-demanding build, so Relics such as Cursed Key possess limited usefulness. A single energy potion is often more than enough for combo turns when the fight demands extra block.
Boss Strategy
Two specific bosses pose a threat to this build: The Awakened One (Act 3), and to a lesser extent, The Champ (Act 2).
The Awakened One
The Awakened One purges all debuffs (including poison) once you deplete its original 300 health. Correct use of your limited Catalysts will win the fight.
If you possess The Specimen, apply poison to the boss and use all combo pieces as usual. When the boss enters the second phase, the poison transfers to one of the cultists, killing it next turn, and then shifting back to the boss (or the other cultist) the turn after. The boss will attack once or twice, depending on whether the poison transfers to the other cultist or back to the boss. A post-combo Corpse Explosion will kill the boss outright during the second phase.
Without the Specimen, the combo must be repeated twice, making the fight substantially more difficult. It’s possible to use Corpse Explosion with one or two Catalysts to kill the boss in the first phase along with both cultists, by poisoning the cultists.
To deal 300 damage with Catalysts:
- One Catalyst requires 100 poison.
- Two Catalysts requires 34 poison.
- Three Catalysts requires 12 poison.
- Four Catalysts requires 4 poison.
Thus, consider how many Catalysts your deck holds in total, either through actual Catalysts or doubling with Burst, and use them once the boss reaches the appropriate level of poison.
The Champ
The Champ purges debuffs (including poison) at 50% health. Corpse Explosion or a total poison application kills him before he’s able to purge the debuff.


Be the first to comment