
This guide helps new players understand the in-game user interface.
The Main Icons on the In-Game User Interface
The picture below shows you the icons (bordered in red) that I will cover in this part of the guide. Click on the picture to make it larger.

I will cover the icons on the bottom left first.
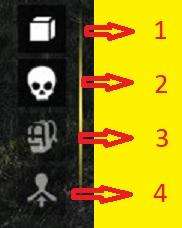
1. Highlight Items
This button is used to highlight those items on the battlefield that a soldier can interact with. Items will display as the colour red when highlighted. It is particularly useful when you are looking for weapons that have been dropped by dead soldiers.
Shortcut: C (can be changed by player)
Tips:
- Holding Alt and pressing C will keep the highlight items on permanently.
- To remove the permanent highlight, press C again.
2. Highlight Corpses
This button is used to highlight dead bodies that either player can loot. Each soldier carries an inventory that contains items that other soldiers can carry.
Shortcut: V (can be changed by player)
Tips:
- Holding Alt and pressing V will keep the corpses highlighted permanently.
- To remove permanent highlight, press V again.
- Dead enemy soldiers are shown in red and dead friendly soldiers are shown in yellow.
3. Inventory
This button is used to display a soldier or vehicle’s inventory. Each soldier and vehicle has a different inventory and these items can be removed or added to by the player.
Shortcut: i (can be changed by player)
Tips:
- Vehicles can transport anti-tank weapons or explosives for soldiers. Check the vehicle’s contents before sending it into combat. It is more efficient to take the weapons and explosives out of the vehicle and give them to soldiers before the vehicle is destroyed.
- You can put items into a vehicle’s inventory to transport them.
- Press the “i” key to hide the inventory display.
- To transfer items, select a soldier, press the “X” key, and click on the soldier or vehicle you want to see the inventory of. When both inventories are visible, you can drag and drop items between them. Dragging an item moves all of them. Holding the shift key while dragging moves only one. Right-clicking an item also moves all of them. The arrows at the top of the inventory panels move the entire inventory between units.
4. Direct Control
This icon allows you to take direct control of a unit you have selected.
Shortcut: E (can be changed by player)
Tips:
- Units are more accurate when in Direct Control.
- Allows you to use First Person mode.
- Press E to turn Direct Control off
Now the icons on the bottom right
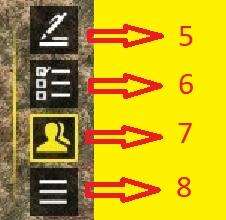
5. Message History
Clicking on this icon brings up the Message History overlay. It allows you to view those messages you may have missed in the heat of battle or whilst in Direct Control.
Shortcut: H
Tip:
- The game continues in the background whilst you view the overlay, don’t spend too much time going through the history or you will miss the action.
- The Message History panel can be moved around the screen by clicking on it and moving the mouse. The panel will display back in the centre when next used.
6. Mission Objectives
This icon brings up the Mission Objectives overlay. Handy in SP if you forget what your next objective is. In MP it shows you the objective of the game style you are playing.
Shortcut: O
Tips:
- The game continues in the background whilst you view the overlay.
- The Objective panel can be moved around the screen by clicking on it and moving the mouse. The panel will display back in the centre when next used.
7. Silhouette
Clicking this icon enables and disables a permanent silhouette around enemy units that are within the field of view of your soldiers or vehicles. It will also silhouette your units. Once those units go out of your units field of view, they are no longer silhouetted.
Shortcut: None
Tips:
- Enemy are displayed with a red silhouette.
- Allies are displayed with a blue silhouette.
- Your selected unit is displayed with a white silhouette.
- If a unit can be seen its silhouette will show through obstacles.
8. Game Menu
Clicking this button brings up the In-Game Menu. This gives you 3 options.
- Back – Returns you to the game
- Options – Gives you access to the Video, Audio, Game and Control panels
- Close – Quits the game
Shortcut: Escape Key
Tips:
- The game continues in the background whilst you are in this screen.
- Allows you to lower your video settings if you find you are getting FPS drops whilst in game.
Finally, the Top Right Icons
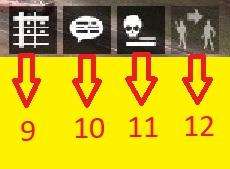
9. Score Table
This icon displays the score table.
Shortcut: Tab key
Tips:
- Used to see each players score during a game.
- Also used to view player ping and pc performance
- Gives the host the option to kick a player during a game if their ping or pc performance is bad
- Game continues in the background when displayed
10. Chat
Brings up the Chat overlay allowing you to chat to your team or everyone during game. Use the mouse scroll button to change between team and global chat.
Shortcut: Z (for team chat), Shift+Z (for global chat)
Tips:
- Good for organising team tactics or trash talk opponents
11. Event History
Displays the event history for the current game. Shows who killed who and by what weapon and when flags are captured and by whom.
Shortcut: None
Tips:
- Good to identify who did what if you were AFK.
12. Transfer Units
Allows a player to transfer selected units to another player.
Shortcut: None
Tips:
- Select unit then click button. Select which player you want to give your selected unit to. That player will now own your unit. You do not get it back unless they do the same as above.
- Good to use if you have to leave during the middle of a game.
- When giving a unit to a player it is a good idea to press N. N (team marker) is used to mark a location on the map thus giving the receiving player the location of the gifted unit. Only your team can see the team marker.
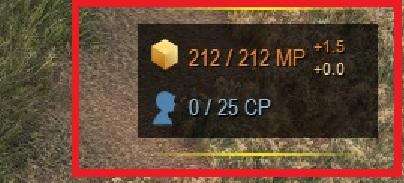
Resource and Manpower Overlay
This section covers the resource and manpower overlay shown within the red border in the picture below.

Here is a bigger picture for easier identification.

Each game has a CP and MP limit. These are set by the host using the custom game settings option (shown in below image) in the host menu before a game starts.

CP
CP is the Resource setting. It sets the upper limit of resource points permitted for each player in the game. In the example shown below, the CP limit is 25.
This means that I can have no more than 25 resource points on the map at any time. Each unit you bring onto the battle field is worth an amount of resource points.

In the example shown above, you will see the Engineer unit is worth 5 CP. You will note that my CP is already at 45/50. If I was to bring the Engineer unit into battle, my CP would be maxed out at 50/50 and I would not be able to bring any more units into play until I lost some to the enemy.
MP
MP is the Manpower setting. It sets the upper limit of available manpower to call in units and gradually increases until it reaches the maximum set by the host.

The image above shows (388/1203 MP).
The number to the left (388) shows the amount of MP I can spend at this present time or in other words the available balance. This reduces as I buy more units until I reach the max set by the host.
The number to the right (1203) shows the amount of MP that has accumulated since the start of the game. If no units were ever purchased for the entire game, the MP would eventually show as 3000/3000 MP which is the maximum Manpower set by the host for this game.
In the below image, I am purchasing Tank Crew, you will notice that they are worth 40Mp.

Once purchased, the 40 MP will be subtracted from the number on the left and the balance is what remains to be spent.
What are the Plus signs to the right of the MP you ask?

The top + symbol and adjacent number indicate how much MP you are earning per second until you reach the maximum MP set by the host.
The bottom + symbol and adjacent number indicate how much MP you earn per second if you lose a unit. When units die you get a portion of their MP returning to your available MP balance.
When you capture zones in some game modes you get a boost to your available MP giving you an advantage over your opponent, so it pays to capture those ‘x’s shown on the minimap in game modes such as Last Man Standing.
That concludes the Resource and Manpower Overlay section. Thanks for reading.
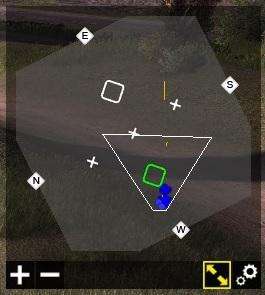
The Minimap
This section will cover the Minimap, shown below within the red border, and the Minimap settings shown below within the yellow border.

Shortcuts: M (hides and shows the minimap) Ctrl + M (shows and hides the map setup options)
The Minimap default position is as shown above. The icons beneath the Minimap are:
- + increases Minimap size
- – decreases Minimap size
- Diagonal Arrow minimises Minimap
- Gear icon opens the Map Setup overlay
Map Setup Overlay
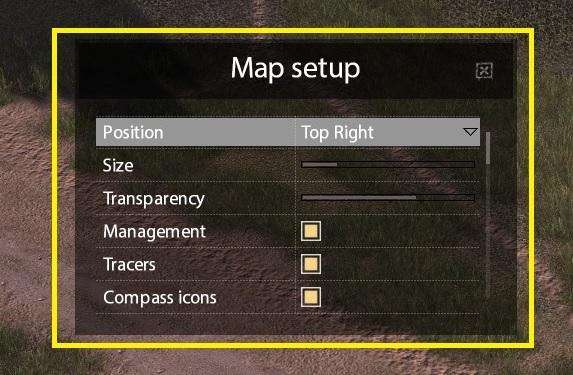
Accessed via Ctrl+M or the Minimap Gear Icon. The Map Setup Overlay contains the below options.
- Position: The options are Top Left or Top Right
- Size: Increases or decreases Minimap size
- Transparency: Makes the Minimap see through so you can see the game scene behind it or makes it solid so nothing can be seen behind it.
- Management: Enables and Disables the Minimap icons at the bottom of the minimap.
- Tracers: Enables or Disables tracers to be seen on the Minimap. Tracers can be seen in below image as yellow streaks on Minimap.
Enabling this allows the astute player to determine direction of fire from the enemy. Can be used to good effect when trying to locate an enemy sniper.
- Compass Icons: Shows or hides the N, S, E, W compass points on the map.
- Squad Icons: Shows or hides the squad icons shown in red in the below image.

- Enable/Disable Squad Icons: Couldn’t find what this does.
- Show Hit Information: Shows or hides a health bar for the unit being shot by enemy. Shown below in red box.

- Show Info Messages: Shows or hides information messages that appear during the game
- Show Waypoints: Cannot find what this does. When enabled or disabled, the waypoints and paths still appear on the map and in game.
That concludes the section on the Minimap.
Unit Statistics Panel
This section covers what I call the unit statistics panel, or stats panel for short. It is shown below within the red border. This panel provides important information about the selected unit.

And a close up version for ease of recognition.
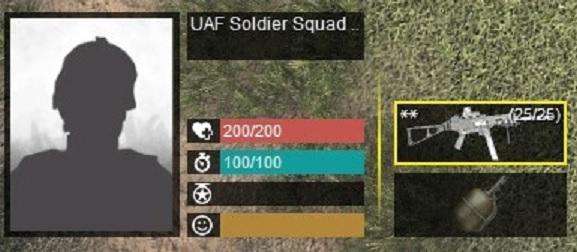
- On the left is a portrait of the unit.
- In the centre there is the unit name at the top.
- Beneath the units name you have four coloured bars.
The top red bar with the heart icon is a visual representation of the units health. Health will slowly regenerate over time.
The blue bar with the stop watch icon is a visual representation of the units stamina. Stamina is depleted by running and regenerates when stationary. Once stamina is all used up, the unit can no longer run until stamina has sufficiently regenerated.
The empty bar (normally purple) with the star medal icon is a visual representation of the units veterency. A units veterency increases as it kills enemy units. Veterency levels add minor buffs to the units ability with a weapon. I have not tested it but I believe the buffs include things such as reload speed and accuracy of shots fired. From testing it appears to be soldier specific not weapon specific so even if the soldier uses another soldiers weapon the veterency level remains.
The orange bar with the smiley face at the bottom is a visual representation of a units mental health or temperament. If a unit is under fire this will bar will slowly reduce. As far as i can tell, a reduction in the orange bar means the unit is more likely to be buttoned up (hide behind a wall instead of shooting). This bar slowly regenerates when the unit is no longer under fire.
To the right is Primary weapon and Grenades.
By clicking on the weapon panel you can change the weapon type if the soldier is carrying more than one weapon.
Clicking on the Grenade panel allows you to choose other items that are in his inventory. Items such as Smoke grenades, C4, Molotov cocktails and knife are available if the soldier is carrying such items.
That concludes the secton on the Unit Stats panel.
Unit Quick Action Icons
This section will cover what I call the quick action icon bar shown below within the red border, and the quick action icon library shown within the yellow border.

The quick action bar (red border) can be changed by the player so that it contains those actions that he/she uses regularly. The above picture is the default configuration for this action bar and can be altered by moving action icons from the library (yellow border).
To replace an icon in the action bar, right click and drag an icon from the library across to the intended location on the bar. Once the mouse button is released, the action icon from the library will replace the old icon on the bar.
The quick action bar contains space for 10 actions. This is convenient if you cannot remember the keyboard shortcuts.
In the picture below of the quick actions icon library you will see 3 icons that have an arrow in the bottom right corner, shown within the red border.
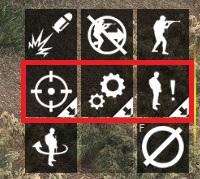
The arrow indicates that more actions are availabe by clicking on that icon. These 2nd level icons can also be moved across to the quick actions bar.
Those icons that have a keyboard shortcut will display the shortcut at the top left corner of the icon. The amount of that particular item is shown at bottom right of the icon. A greyed icon means that it is an action the unit cannot perform because it either does not have any of the item or cannot perform an action with the item that it holds.
In the below example, I have highlighted the healing kit icon.
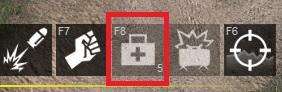
You will notice the keyboard shortcut for healing himself is F8 and he has 5 healing kits in his inventory. The icon is greyed out because he has full health and cannot use the healing kit. The Claymore icon to the right of the healing kit is greyed out because the unit does not hold any Claymores within its inventory.
Be the first to comment