
Bird-brained is not a good description for Hat Kid, so don’t feel like one while you try to complete the Death Wishes associated with Act 2: Battle of the Birds. This guide contains all information you need to know to complete everything the feathery directors can throw at you!
Other A Hat in Time Guides:
- 100% Achievement Guide (How to Unlock All).
- How to Get All Roulette Items (Cheat).
- Guide to Farming Pons.
- The Secret R. King Notes Guide.
- No-Death Wish: A 100% Guide, Mafia Town.
- No-Death Wish: A 100% Guide, Subcon Forest.
Security Breach: Solidified Snake Mode
Once again the Time Stop Hat proves to be a godsend (or, developer-send in this case?). This map mostly requires understanding of the map, enemy mechanics, and general mechanical execution. The Bonuses this time synergize with one another, for the most part; if you get one, you’ve probably gotten the other. Here’s some tips to better prepare you:
- Here’s a tip from Hotfire 90: “A little and very useful tip for Security Breach, also (technically) kinda an exploit. The vision of the owls and penguins are based on movement, if you’re not moving they can’t see you, note that popping out of the Ice Hat statue and being on a moving cart counts as movement. Turning into an ice statue renders you invisible even if you’re on a moving cart, plus it tanks the damage from any stray rockets.”
- The Sprint Hat is useful for quick bursts of speed through certain enemy sections, but the Time Stop Hat generally outperforms (especially since it slows enemy detection speed). However, the long cooldown with the Time Stop Hat can leave you in some awkward spots.
- Enemies have 3 stages of detection: detect, spot, detain. In detection, the enemy makes their “I see you” noise, but they do not add any charge to your bill. In spot, you’ve lingered in their vision long enough to have their charge billed to you. In detain, you take damage and get kicked back to the last checkpoint; reaching detain ends the associated Bonus. These phases swap quickly from one to the next, but you can be quick enough to dart directly through one foe’s vision!
- Find “empty” spots to relax and read your next obstacle. Observation improves execution.
10 Seconds until Self-Destruct: Mechanical Mastery
Over 40 attempts and I have still yet to complete this Death Wish. As a result, I cannot make a video to post as a completion guide myself! However, here’s what I have observed:
- There are no Health Pons. At all. Any damage taken is permanent.
- If it’s not obvious from the first car, you’ll obtain time bonuses that are necessary to complete the level. Miss one, and you’re as good as dead.
- Gates start pushing in from the sides in the radioactive green goop car, use the Sprint Hat or Time Stop Hat (preferably the former) to beat them and protect precious seconds on the clock.
- The buzzsaws will both fling and hurt you, so make sure you don’t hit them, else you’ll waste a lot of time!
- You can directly (and quite easily) skip some platforming sections almost entirely by cutting out the middle man. For example, the double hookshots leading to platforms with fire spewers; you can skip the one on the left side and hop directly to the last one that is right before the flaming hoop.
- The falling platforms you have to stand on to activate the next area in the open tracks section is best done with the Time Stop Hat. Make sure you leave a path for yourself to press them all, and remember pressing all of them summons the entire set back up into their original position.
- The lava car will heavily depend on your use of the Time Stop Hat for safety, but don’t shirk your work! You’ll have to keep moving when the hat is on cooldown or you’ll be out of time.
Rift Collapse: Dead Bird Studio
Remember to complete this Rift Collapse before attempting any Bonuses, so you don’t get locked out by the life limit! This Rift Collapse has the same bonuses of all Rift Collapses: obtain all Treasure-Pons, and complete with 30 seconds still on the clock. Given the pace at which I’ve completed this and the generous amount of time given to the player, it would not surprise me if someone did a Perfect Bonus single run for this. Here are some possibly-run-ending mistakes I’ve noticed:
- Falling off of the stage takes longer than in the Mafia’s, so it shaves off even more time.
- Falling off the boxes in Map 2 is time-consuming to climb back up.
- Getting spotted is a complete nightmare, as not only does it make you take damage, but it also freezes your controls and stops the action for a couple seconds before you respawn. This one is the shortest and can be made up for, but it’s very punishing and hurts your emotions the most.
The All-Pon Run
Map 1:
- Skip the second platform and go straight to the third. Scale the boxes quickly and get into the hatch promptly.
Map 2:
- Hop atop the suitcases and use them to double-jump into dive onto the platform. Then, double-jump to scale the wall and climb atop it for the first Pon.
- Hop onto the top of the cage to grab the second Pon. As you do so, go straight forward and leap once towards the Pon on the pipe. I prefer using the second jump to prevent stumble rather than a dive, as I tended to hit the wall.
- Double-jump into dive to reach the fourth Pon. Sprint-jump into dive to land on the rope, then bounce from one to the next in succession.
- Ignore the hatch for the moment and leap over to grab the fifth Pon. Make sure you don’t fall to the bottom, and follow your same path back to the hatch.
- You can skip an extra jump by leaping onto the wire roll when you’re going for the ground, and then leap directly into the hatch from there.
Map 3:
- This is the hardest one, so don’t goof up! Before climbing the boxes, run forward and to the left to the pipe with the Pon. Use your double jump to leap down, grab it, and come back up unscathed.
- Run to the double jump section and clamber up. Then, use a sprint-jump into dive to reach the Pon on the nearby reachable box stack.
- From that stack, leap onto the destroyable box’s platform and then hop onto the lonely box across. Platform your way to the Pon below, then use a double-jump into dive to scale back up to where you were.
- Ignore the Hookshot and leap your way across with sprint-jump, dive, and maybe a bouncing sandbag. You don’t have to land anywhere near the cameras blocking your way; instead, sprint-jump and dive to reach the box standing outside of them. From there, leap over and grab the Pon.
- Make your way to the hatch, but run past it. Instead, leap down to grab the last Pon, and then make your way back up and into the hatch.
Map 4:
- Make an immediate left and grab the Pon floating there. Then, sprint to the Pon in the hole, and use double-jump to grab it safely.
- Turn around, follow the terrain until it opens up again, and avoid the Owls at all costs as you make your way up the platforming. Use slow double-jumps to leap over the first camera, then the same for the second camera. Good luck trying to blitz your way through these two, you’re better off taking your time than losing it.
- Be sure to use double-jump to get down, grab the Pon, and come back up onto the platform.
- Scale the last of the platforming section as normal, then grab the final Pon on the extended railing.
- Leap into the hatch!
Map 5:
- Sprint forward and turn right into the broken glass room. Make sure you scale the railing, else you’ll whiff entirely. Beat up the Time Piece and collect it!
The Perfect Run
Map 2:
- Leap onto the suitcases and use them to reach the platform. Grab the Pon and scale the wall.
- Jump from the top of the wall and onto the cage, then leap down to the Pon on the pipe.
- Leap from the pipe to the Pon next to the wall, and scale the wall.
- Sprint-jump onto the wire and use the wires to leap to the top.
- Ignore the hatch and run for the Pon down the way. Obtain it and leap into the hatch. This Pon is easier to obtain than some later ones, invalidating a later more time-consuming one.
Map 3:
- Climb the wall with the painting to get atop the boxes. From there, leap to the Pon nearby.
- Leap onto the platform with the breakable box and use that to make it to the boxes across. After that, jump down to the Pon below.
- Scale back up to where you were and use the sandbag bounces to reach the higher box stack. Leap to the box unwatched by cameras and snag the Pon across.
- Make your way past the hatch and to the Pon down below. Grab it, leap up, try to avoid hitting the T-Pee, and make your way down the hatch.
Map 4:
- Grab the Pon on the left as soon as you enter.
- Make your way up the platforming and snag the Pon on the right as you climb up.
- Use the electric box to ignore the rope section entirely and scamper up and down the hatch.
Map 5:
- Sprint forward and turn right into the broken glass room. Make sure you scale the railing, else you’ll whiff entirely. Beat up the Time Piece and collect it!
Zero Jumps: Matter of Finding
Reward: Nostalgia Badge
This Death Wish only activates its jump-slaying effect when you’re actively on a map hunting down a Time Piece. While on your space ship, you receive no repercutions for jumping. Likewise, the Bonus counter does not reset if you do die by jumping, so don’t panic.
Here are the maps I’ve noted are good for no-jump runs. It’s less exection and more finding maps that can be completed without a jump:
- Welcome to Mafia Town- you can (and should) ignore Mustache Girl and go straight for the Time Piece. Try to kill the Mafia near the fountain for convenience!
- The Golden Vault- this one is very doable, if tedious if you’re not famliar with Code location. This is perhaps one of the hardest ones, as landing in the wrong pool of water or any kind of rope is a death sentence that will force you to start over. Still, if you like a challenge or want to see Mafia Town in an entirely different perspective, try this one!
- Cheating the Race- if you have the Time Stop Hat and have mastered dive-dashing, this one is both doable and quite easy!
- Picture Perfect- this one requires you to be creative and resist the Space bar by sheer force of will, but the springs can give you all the height you need to complete the level.
- Train Rush- the other Bonus on this Death Wish, it’s not that difficult if you abuse the lava/goop that makes you leap high into the air. There’s plenty of Heart Pons so death should not be a concern.
- Mail Delivery Service- this Subcon level is just about driving around and delivering mail, you may have completed it without jumping before this Death Wish!
Maps that almost can but don’t:
- Queen Vanessa’s Manor- there is a Dweller platforming section right at the beginning of the level that cannot be scaled at all due to Dweller platforms being unscalable from the sides. No ledge grabs, no wall climbing, no way to progress.
The Great Big Hootenanny: My Favorite Death Wish
This is by far the most enjoyable Death Wish I have played yet. Any path you take is blocked off for a long period of time (unless you’re amazing at timing and/or abuse the Time Stop Hat), and the lead Owl tends to follow a liiiiiittle too close for comfort. This level is more generalistic and rewards creativity (not that I could help myself from recording some videos you’ll see below) and the Bonuses can be easily obtained together.
Having trouble? Here’s some tips:
- Don’t swap off of the Parade Hat until you’ve begin moving around, else you’ll immediately get hit.
- Gravity is reduced for this level! If you platform right, you will never dangle from a ledge.
- There’s no Heatlh Pons in this level. Count on your damage being permanent!
- During your “free periods,” don’t be afraid to string the Owls along in weird, wacky, doublebacking paths. Abuse every inch of space you have to keep them moving and preventing yourself from being in an awkward position.
- Avoid rope when you can and definitely never stay on rope when you land. Generally, you have but a small moment before the lead Owl is going to smack right into your back while on a rope.
- Having trouble smacking the firework timers without being hit by the lead Owl? Use the Time Stop Hat!
- On that note, abuse the Time Stop Hat in conjunction with the Mad Hatter Badge. If platforming looks like it is about to get tricky, you can save yourself from the Owls for that brief period of time slow. It’s comical to see an Owl suddenly teleport a large distance with almost no in-between after its use as well.
- Keep tabs on the bar progression! Getting caught off guard at a bad moment can spell the death of your run if the camera positions itself right (or in this case, wrong).
- When going for the all-token run, prioritize the tokens over the completion objectives. The tokens expire far quicker than one seems to realize!
- Using the Sprint Hat is good to move quickly from one side of the map to the other, but it’s horrible for stalling until the next map phase. Use sprinting primary to get to tokens quickly.
- While doing both Bonuses at once is doable, I can’t say I encourage it. The map and the camera jank between phases has a tendency to mess with either one’s completion. Don’t sweat the small stuff, Hat Kid.
The Owl-less-hit run video:
The no-token-abandoned run video:
Snatcher Coins in Battle of the Birds
Reward: Detective Kid’s Hat
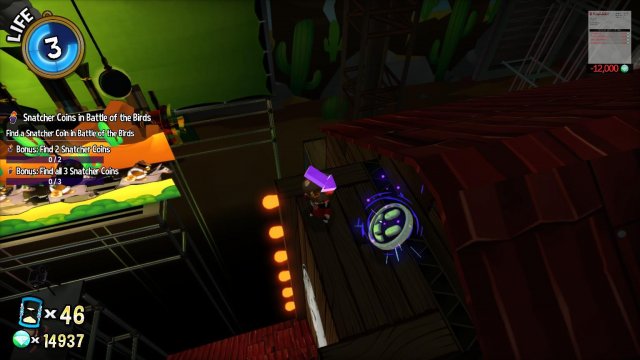
You can find the first in either “Dead Bird Studio” or “Award Ceremony” atop the barn-like building after the Conductor’s first movie shooting sequence.
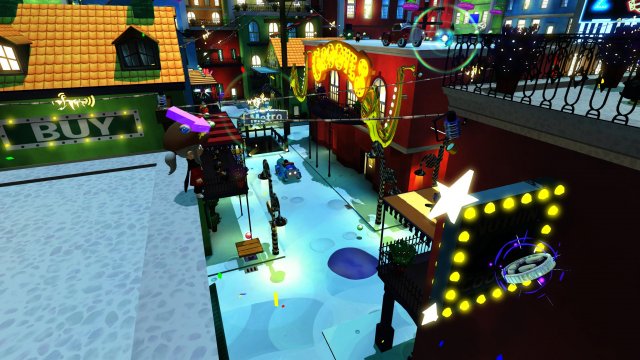
The second coin is located in either “Picture Perfect” or “The Big Parade,” behind a sign up high on the left side of the level when you enter “Picture Perfect.”
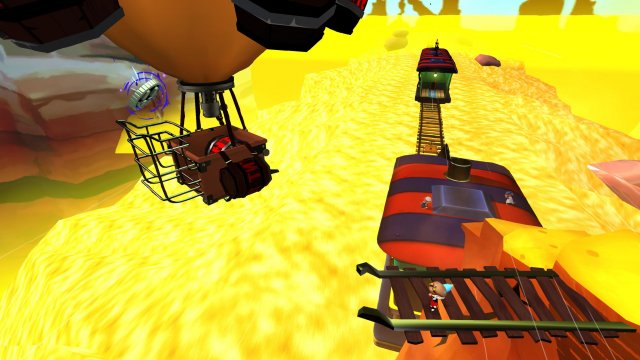
The final coin is located only in “Train Rush,” during the outdoor section. You will spy it atop the first hot air balloon, and it can only be reached with a perfectly timed Hookshot leap.
Community Rift: Rhythm Jump Studio
This one isn’t that difficult, to the point that I find making a guide on this one a bit redundant. Nevertheless, here’s the locations of all the Storybook Pages, which tend to be elusive:
- Stage 1 – Behind and above the hatch.
- Stage 2 – Behind the red brick platform.
- Stage 2 – Behind the lonely Pon reached only by rope.
- Stage 3 – Behind the speakers.
- Stage 3 – Atop the green parade “float” device.
- Stage 3 – Atop the stone building on your way to the Pon atop the metal boxes.
- Stage 4 – In the construction area, behind the red box used to progress up higher after a swinging disco ball.
- Stage 5 – At the top of the disco area, with the giant disco ball spinning above.
Killing Two Birds
Reward: Parade Outfit (equipped in color schemes)
This one is a hard test in multitasking. Both birds will be on the offensive, working together with attacks in tandem with one another. That is the key phrase- in tandem. Until you desync them by dealing damage to one and not the other, their attacks will mirror each other. This fight will challenge your movement skill and timing in a seemingly infinite possible sandbox of attack combinations, so psyche yourself!
- The homing attack is your best bet for dealing safe, reliable damage. Don’t stray too far from one of the birds and miss your opportunity!
- You’ll gain 1 HP every time you make the birds achieve an enrage level.
- The birds have different health bars. When one is about to reach a higher enrage state, they will wait for the other bird before attacking again. So, focus on one bird to give yourself some small breathing room! (needs fact checking).
- Their attacks behave mostly in-sync. Mostly. The timing on when they move to their next attack changes when you hit them, resulting in slightly varied attack combinations. Generally, however, they will always use the same attack combinations against you.
- The spinning car attack can be avoided by leaping to one of the back corners after the attack begins.





Be the first to comment