
This is a quick and somewhat energetic, somewhat humorous guide to finishing the House at the Edge of Time without stopping playing or becoming very frustrated with your computer.
It is not for very skilled combat players or puzzle experts, and it will not show you all the item locations or strategies. You will find the items as you play. This guide is for players who want to avoid being stuck in the dungeon, a list of faster ways to move through areas, and tips on identifying game errors, so you can restart the game or accept that some things cannot be fixed and continue playing.
More Pathfinder: Kingmaker Guides:
- Book Puzzle (House at the Edge of Time).
- Easy Guide to Wizardry.
- How to Defeat Tartuccio (The Kamikaze Strategy).
Against All Odds: House at the Edge of Time (and Sanity) – Intro
This is a guide for the well-known House At The Edge of Time quest, which can be difficult and confusing. It might not be completely correct, but after spending around twelve hours figuring it out the first time I played, and only about three hours the second time, I think I can offer some help to players who have become very frustrated with this challenging dungeon.
This guide will not provide combat tips, fancy loot locations, or the solution to both puzzles (though I shall try my best). It shall, however provide you with a few helpful tips on:
- Where it is located.
- How to access it.
- Where your companions are, or should be, located.
- How to navigate the fog portal inferno, to your advantage.
- Point you to the easiest and fastest way out.
- The side quests.
- That pesky third key – and it does not have to be third…
- Maps. With nice pointers.
- Known bugs, also known as ‘When it’s time to cut your losses’.
- Love and commiseration at each step. I already feel like Tristian.
This is not intended for the hard-corers, treasure hunters, or obsessive problem solvers amongst you. I salute you all, but as we all know that the House is still not fixed, in more ways than one, here is a handy walkthrough that should get you in and out fast, and hopefully, with all of your friends. It is not the only way through the House. It is just the simplest one.
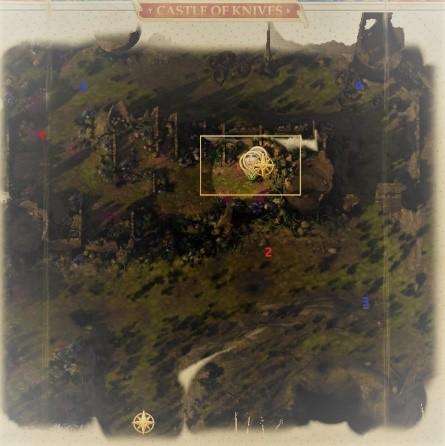
Location of The Portal – Castle of Knives
The House at The Edge of Time, or as I like to refer to it, House of Hell, or HoH, for short, is accessed though a portal in an area called The Castle of Knives, in the North West of the World Map. It will become accessible once the quest Against All Odds becomes active, after the sixth iteration of the Curse of Bald Hilltop.
You will be on a 60 day timer, and this may cause you to fail the seventh iteration of that quest. Do not be alarmed if you do – in my case, the Chapter transition was extremely buggy, so I ended up having 120 days to resolve Curse of Bald Hilltop, but only 60 to solve Against all Odds.

Now, as usual in Kingmaker, you’ll have a lot of running around to do in the Castle of Knives (and all around the world. Though I am unsure either of the two quests here are material to the portal being open, here’s a quick run through of both, with the locations of the quest giver NPCs.
The Secrets of Suramgamin
Test 1. On the north west edge of the map (location marked 1) you will encounter Kamala the Phoenix, who is conversing with two fey creatures. He will introduce you to his cult, which is one more peaceful than even that of Seranrae. These guys are reformed villains, and will not kill at any cost. To earn their respect, and the questionable title of Protector of the True Way, you will have to run all across the map – literally, they will send you to Talon Peak, and then rudely call you back.
Read their conversations with great attention, as there will be a pop quiz at the end. Kamala the Phoenix’s test is convincing the two fey creatures to go back home (Phoenix). You do this by passing Persuasion checks, in the dialogue with the fey. Mine were both Diplomacy, but an Intimidate check exists. Depending on your character build, this may be easy or hard. Don’t be happy either way, you’re off to the Temple of the Elk.
Test 2. Visaka the Unicorn. You will find him just north of the pool at the Temple of the Elk, and he will ask you to hold off a large number of first world monsters without harming them, for however long it is necessary for your appraiser to send them to their realm. I failed this one with flying colours, as I had no patience for the things. Not that it mattered; I guess if you have some good Monster Domination spells on you, you will be fine. And, off you are to Talon Peak.
Test 3. Puja the Wolf. Once at the peak of Talon Peak – I truly enjoyed the hike from north-west to south east of the world map… (It can be avoided if you place your villages in such ways that your teleportation circles get you close enough to the locations, but alas, by the time you read this, it will be too late to do so). In any event, once you get there, go to the center north of the map, at the very top of the ruined castle. You will find Puja there, and he is one very rude dwarf. This is the easiest test to pass or fail: to pass, be polite to the incomprehensibly impolite bugger. To fail, well, don’t be polite. Hope your boots are ready for the hike back, as you are off to the Castle of Knives again, for your fourth test.
Test 3.5. Once you have arrived back at the Castle of Knives, Puja will greet you, now being improbably polite. I am mentioning this, because the fourth test is an attention test.
Test 4. Vidya the Lion. Aforementioned pop-quiz. It will consist of an unpredictable mix of questions about the Cult’s lore. If you’ve read their dialogue attentively, they are easy, except for one – the order in which you took the tests. You might think you have taken three, but you have, in fact, taken four. Puja’s changing demeanor means that when you are asked to list the order of the tests you have taken, the correct response is: Phoenix, Unicorn, Wolf, Chameleon, Lion.
Follow Vidya the Lion (there is no need for a location marker for either him of Puja, just follow them as they walk), to receive the verdict, your title, and useless info on Nyrissa. If you are here, you have been through her dream world, and the Season of the Bloom, so you pretty much know who the puppet master is. Hint: looks like a pumpkin on fire.
The First Crown
At roughly location 2 on the map, you will make your first acquaintance of the Knurly Witch and the Wriggling Man, our lovely enemy’s lieutenants. It is a cutscene in which both have summoned some monsters, and are arguing about a crown that Nyrissa really, really wants. Truly high maintenance, this woman… You can intervene or not, the two will vanish, and the monsters will sort each other out.
Take notice that the Knurly Witch is summoning treants, and the Wriggling Man is summoning worms. Will save you a battle later on, if you choose not to fight it.
After the two have vanished, you will find that Shyka the Many appears from under your feet, and predictably wants that crown too. It’s been broken into three pieces, and you will find the three pieces at locations 3, 4 and 5 on the map above.
Location 3: Some treants are mourning destruction to their forest, caused by the crown being broken. Lie that the Knurly Witch sent you for the piece of the crown, and they will leave without a fight.
Location 4: You will spy, with your eagle eye, that a mass of writhing giant worms have dislodged a piece of the crown from a ruined castle wall. They are under the supervision of the Horned Hunter, a satyr who also says he wants Nyrissa’s favour, but is sadly an underling. Tell him that the Wriggling Man sent you, and he will go, but leave the giant worms behind. You will meet him again soon enough, and he’s not quite what he seems – so if you can avoid fighting him twice, do it. The giant worms are vastly preferable to Redcaps and Wild Hunt Scouts.
Location 5: Do your good deed for the day and help Salim Ghandafar, a rather unusual priest of Pharasma fight a huge linnorm that has swallowed the last piece of the crown. He’ll be fair, and let you have the bloody thing, and presto, you have the crown.
The soul of the king of the first kingdom Nyrissa destroyed is inside the crown. You will have a book event and get to chat to him a little, finding out precious little information, but hey, Linzi is talented, so it is well written. Lethariel, for that is the unfortunate’s name, wants out of the crown and a true death.
I’ve not explored that option as my Perception check said that there is something off about him. Others have, according to the forums, and freeing him gives nice rewards.
Go back to Shyka (he will have a red flag on the map from the game, so you’ll see him plainly), and decide whether to give him the crown, or give it to Salim, who is standing by his side. I don’t really trust Shyka, so I decided to do my second good deed for the day, and give the crown to Salim, so that the angry soul within it can be sent to the Lady of Graves under controlled conditions, by an appropriately trained professional. Oddly, Shyka liked my choice, and finishing the quest in this manner landed me a lot of XP.
Whichever way you went, the portal to the House at the Edge of Time is now open, smack in the middle of the map. Oh, joy!
You’ll still have to get past the Horned Hunter, and this time he won’t be sweet-talked. You might as well get used to the Wild Hunt, you’ll kill so many of them by the end, that were they not fey, they’d be extinct. The Hunter himself runs through the portal, and well… By this point, you should be ready to as well.
Strongly Worded Word of Warning!
Caution: Do not enter the portal if you have not fully completed your companions’ quests. Those companions whose quests you have only partially completed or failed will die or betray you. You will lose a minimum of two companions by the power of plot anyway, so…
The notable exception to this are the tiefling girls, so do not fret them. The second part of their quest actually starts in the House. Everyone else, though…If you care about them, or don’t want to end up with a terrible party, do their quests. I cannot stress this enough.
- Hoping that you have heeded my bold underlined, welcome to hell.
- Oh and one more thing: do a hard save before you enter the portal.
- See, I told you this was strongly worded…Now I’m even shouting at you.
- The house is still bugged to bits, as of 1.1.6d, and reloading from behind the portal will not save you.
- It did not save me; maybe it did others, but do err on the side of caution.
- Also, bring money. Lots of money. First World inflation is insane.
House at the Edge of Time, Overview
The basics will be re-explained to you by Evindra after you’ve seen a cutscene in which one of your friends seems to already have given up on you, and is enthralled by Nyrissa. As usual, for the First World, you’ll need a lantern to navigate the fog maze. As usual, there will be parallel realities, both full of monsters, and some objects will only appear in one reality, and not the other.
Prepare yourself for a difficulty level that is insane, even if you are in story mode, and let’s go. The house has five areas, and I will expand on each.
- Courtyard
- Basement
- First Floor
- Second Floor
- First World Pocket(s)
Once you have gotten to Nyrissa’s sanctum, there’ll be no more hardship, except for the fight itself. It’s getting to the heart of the house that is the horror.
Map 1 – House Exterior
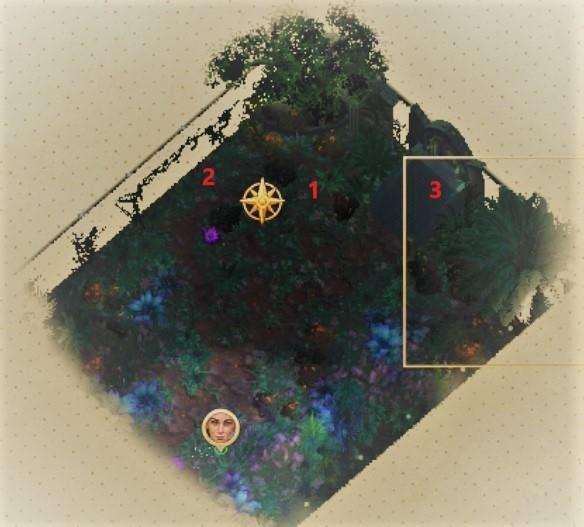
Not much to see or do here. The Area Transit star is your point of entry.
Location 1: Evindra, who will stay there to give you a kind word, but not much else.
Location 2: Issili (she is really easy to miss, amid all the excellent shrubbery) is your friendly neighborhood vendor. She has all your essentials (camping supplies, scrolls of all kinds, some limited potions) and a mind boggling assortment of amazing weapons. If you can afford to kit your main group from her, do so. The HoH may not be the end of all hostilities – but that will be up to you.
Location 2 is also where the companions you rescue but do not take in your main group will appear. A word of caution here: In my run, if I attempted to change my party in the courtyard, the companion I removed from the party vanished. I tried multiple reloads, multiple companions, it stayed the same – thus, as you move though the house, try to keep your A Team. You won’t have a choice, at first, but as you rescue more and more companions, keep the ones you want, because switching companions is problematic, or was for me.
Location 3: This an exit only from the house, and you’ll be able to come out and buy things, hopefully switch party and rest through here, once you’ve reached the appropriate gateway, on the first floor.
Map 2 – Basement
This is a completely uncovered map, marked for the route that I found quickest. Please note that you will not be able to access the full map immediately.
Location List:
- Location 1: One of two possible entry points, and the one I would strongly recommend you use. If you get sent to the Well on the First Floor (Map 3, Location 12), reload your last autosave. If you spawn here, you will be alone, and three rooms full of enemies away from your companions. The tiefling girls may spawn next to you on the first floor, but you won’t make it to the others even in 3.
- Location 2: The Knurly Witch (lamp on).
- Location 3: Up to First Floor.
- Location 3, in blue: Last mirror of the Mirror Memories side quest.
- Orange Bubbles A&B: Doors that can only be unlocked from the southern side.
- Location 4: Area Entry point from/to the Second Floor.
- Location 5: Entry point to one of the Keys needed for Nyrissa’s Sanctum.
- Location 6: Exit point after you’ve gotten the Key.
- Location 7: If you want to solve the book puzzle, this is the library. You will find a helpful imp inside the water clock, and Shyka will drop by for a conversation.
Basement Walkthrough Part 1:
- Talk to the witch and be polite to her. Find out that Nyrissa is at the center of the house, behind a door that requires three keys. The witch has one, the wriggling man has a second one, and one is held by one of the guards…somewhere.
- Promise the witch the wriggling man’s head or say you’ll think about it.
- If you want to do the book puzzle, the first book is in the chest behind her.
- Loot the room next to the witch, then proceed to Location 3, and go upstairs to rescue your companions. If you ignore the baddies in the third room to the left, they will mercifully ignore you.
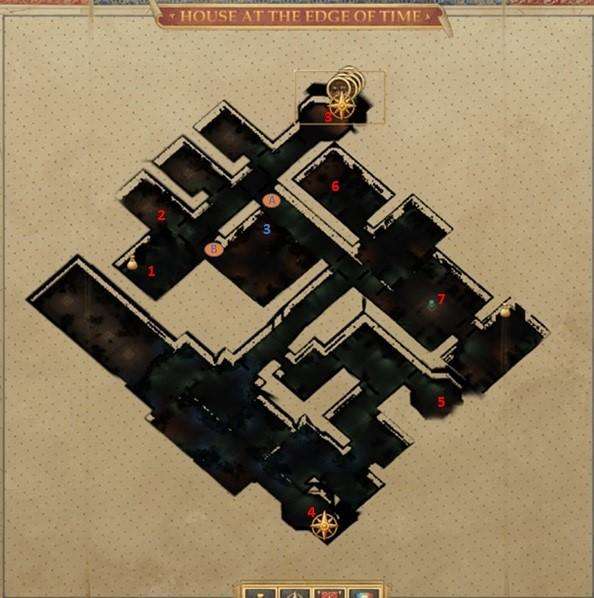
Map 3 – First Floor

Time to save our friends! Or at least all those we can save.
Keep your lamp on throughout.
Big word of caution: every single one of the companions you recruited should get a cutscene with Nyrissa taunting them; it does not matter whether you’ve done their quests or not, or if they die or not – and they may still die if you didn’t get their best outcome. If you’ve headed for one of them (I start with the closest, and you are NOT getting a cutscene, all the non-DLCs will be bugged.
Sorry, remember that hard save I pressed you about? You’ll have to re-start from there. Yes. I know.
The good news is that if one of them appears, all the others will too – with some exceptions noted below. The DLC companion is also problematic, I had to actively quit the game and reload (fortunately, from inside the house) to get them. This is the buggiest level by far, so the sooner you realise you’re hit, go back. You’ll get annoyed, but you will not have lost much.
Location List:
- Location 1: Olivia and Regongar. Go to them first, if you recruited them – if they get the cutscene, you are in business.
- Location 2: Amiri.
- Location 3: Valerie.
- Locations 4 & 5: Tristian & Jaethal. These two might bug out, as in not be there. This will be due to a big issue in Jae’s quest, but I think it is solved as of the 1.1.6d version. How you will know they are bugged is that there will be no cutscene, and the room will be empty. However, if you’ve gotten this far, it’s time to shed a tear for those the house ate and move on…Or reload several hours of gameplay. Your choice – them bugging does not affect anyone else.
- Location 6: Ekundayo. The reason why I have done them in this order is because Ekun has a very annoying troll in his pocket plane, and, if you look above, you will have a full party to take him on with by this point. If you played your cards right, you may have a full party + 1, but don’t go for Ekun without having back-up. You gonna die.
- Location 7: Harrim.
- Location 8: Jubilost.
- Location 9: Nok-Nok.
- Location 0, blue: Mirror Memories starting point. Nota bene, doing Mirror Memories saves you from fighting the Wriggling Man. You will have to fight both him and the witch, anyway, so spare yourself the headache, if you can. The Mirror quest is easy and on the way.
- Location 1, blue: The first mirror you need to interact with. It will explain that you need to go you to the second floor, Location 2, Blue.
- Location 10: Linzi.
- Location 11: The tiefling girls, if they deign to show up…(You only have to do one previous quest step for them, so if you have done the Forefather bit, they should be there). If not, try quitting out, and loading again. If not, I don’t know. Like Tristian and Jaethal, them bugging does not affect anyone else.
- Location 12: An unfortunate spawning point, if you did not spawn in the Basement. It communicates with a well on the Second Floor, but, meh. I will show you an easier way to work between levels.
- Location 13: Ascend to the Second Floor.
- Location 14: Exit to Courtyard, if you need a refill or a party change. Beware that sometimes the party member you replaced might disappear.
First Floor Walkthrough, Part 1 (and only, if you are not going for the book puzzle):
- Keep your lamp on at all times, and proceed north to south in rescuing your friends. The further south you go, the more enemy-heavy the map becomes, which is why Location 12 is not a good spawning point.
- Leave the throne room to the very last, and don’t forget to touch the mirrors at Locations 0 and 1, Blue respectively. You will be able to get to the interesting bits in the Basement and Second Floor soon enough, without passing through level 1 again.
- I guess by now it is time to tell you that Linzi will die, whatever you do. Before she does, though, she will tell you the last key fragment is in the basement.
- Her spirit will live on in her book, literally, but it is still very sad.
- In the throne room, you will encounter the Horned Hunter and a lot of enemies. He will run off again (He is starting to be annoying, isn’t he?).
- After you’ve wiped your tears for Linzi, go to Location 13, turn off your lamp, and go upstairs, to the last floor where the Wriggling Man is waiting. Sorta.
Map 4 – Second Floor
As you can notice, this level is like a horse shoe. Fortunately, you don’t have to clear it up and down at once. You will however have to do it in both worlds (lamp on, lamp off, little grasshopper), as the Wriggling Man won’t be there when your lamp is off.
Please enter this level with the lamp off, though. If you don’t use the lamp, your life will be better! At least for a while.

Location List:
- Location 1: Fog portal entrance. If you try to get in here without your lamp, it will transport you to…
- Location 2: Nifty!
- Location 2, Blue: The second mirror for the Mirror Memories quest. Lamp must be off.
- Location 3: The Wriggling Man.
- Location 4: Passage to the locked part of the basement. It is unhelpfully labelled as ‘Second Floor’ if you hover above it with your mouse, in-game, but trust me, it leads to the Basement (Map 2, Location 4). I did not mean for them to correspond, but, hey!
- Location 5: Passage to Floor 1, Location 12, if your lantern is on.
Second Floor Walkthrough, Part 1:
- Keep your lamp off (except to pass though the occasional fog wall, on the corridor). Just make sure it is off once you enter the Wriggling Man’s room. Kill off the army of foes, interact with the mirror at Location 2, Blue. It will also tell you to go to the basement. How fortunate.
- Continue up to where the Wriggling Man should be, but is not, and turn south to Location 4, with your lamp still off. There’s a good reason for this: the enemies on the ‘off’ side of the lamp are easier, and everything – Linzi, the man in the mirror – is pointing us to the Basement.
- You will emerge at Basement, Location 4, and you should turn on your lamp.
Basement Walkthrough, Part 2:
- Make your way to Orange Bubble A; it might not seem as though we were making progress so far, but, like Jubilost, we are free thinkers, one and all! We’re about to whirl around and get all our keys in a moment.
- The door will open from this side, and here we are, yet again, on the northern side of the basement. Go to Location 2, and attack the witch. She’ll flee, leaving you to deal with what should, by now, be super easy foes, but she will also open Orange Bubble B.
- Enter the room and kill her, looting your first key.
- Interact with the mirror at Location 3, Blue, and find out that the poor trapped wizard has actually become the Wriggling Man! His soul now free of the mirrors, he will ask you to break the mirror, and take a shard of it with you, so you can show the Wriggling Man he is serving his tormentor. Double check you have the shard, then go down to Location 5.
We’re about to get our second key here, in a moment.
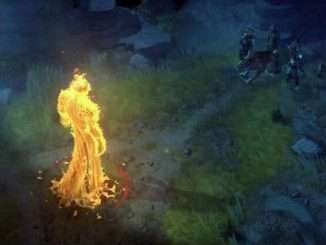
Maps for the First World Pocket(s)
Here, the game plays a nasty, nasty visual trick on us, and this is why people agonize so much over finding what should be the last key; I;m showing here that it is far more time efficient if you make it your second key, rather than your third. In any event! Notice that thick layer of fog?

That’s not one layer of fog, it’s two. I have highlighted the zone of free air, if you will, in between them.
Here’s what you do next:
- Lantern on, pass though northern fog. If you look like in the screencap above, you’re good. Quicksave though, just in case you have to rinse and repeat. I can swear I am lost in this fog…
- Turn lantern off, move a few feet forward, aaaaand…The southern layer of fog is a portal that will transport you to the actual pockets as below.
However, if you did it right, by both sets of instructions, you should end up here:

- Follow the arrow, and loot the key off the body of one of your assailants. Do a dance of unbridled joy – you have 2/3 keys. This is what the key room should look like.

The little heart is there to celebrate both finding the room, and the fact that I managed to get Jaethal and Tristian to get along.
- Lantern on, leave the way you entered, except this time, in the flowery pocket, you should head south west. Turn your lantern off again, and you will end up in Map 2, Location 6. Be prepared for a fight, if you have not cleared the room previously.
- Turn your lantern on, and return to Map 2, Location 4, to go to the Second Floor, and show the Wriggling Man just who made him wriggly.
Second Floor Walkthrough, Part 2:
- Go to Map 4, Location 3 and confront the Wriggling Man with the shard. He will immediately get heart-worm and die, leaving you to loot the third and last key.
- If you are ready to confront Nyrissa, go to Map 4, Location 6, and enter the room. If you are not, and wish to roam about, solve the book puzzle and talk to Shyka, feel free to do so.

Be the first to comment