
This is a short after action report of a major sea battle I have just fought in my Ottoman Campaign.
Prelude to Battle
All credit goes to Didz!
The Battle of English Bay off the south-western tip of the island of Hispaniola was destined to be the largest sea battle to date in my Ottoman Campaign overshadowing the previous major battle against the Russian fleet off Copenhagen.
I had been blockading the main Spanish fleet in Cadiz for years, it was pretty badly damaged in an earlier battle and they had never been able to repair it. So, to be honest I had become pretty complacent, I had my largest fleet of a dozen 2nd and 3rd rates right outside the harbour and I figured they were going nowhere, and I was just gradually snapping up all their colonies in the America’s.
Then somehow (I suspect a glitch) their entire fleet slipped through my blockade and disappeared into the Atlantic. I still have no idea how they did that, but I distinctly saw a glimpse of their fleet leave port and sail into the fog of war to the west.
It didn’t even trigger an intercept option.
The Hunt Is On
Anyway, I immediately began a hunt for them sending sloops and small vessels in every direction to try and locate them, and mustering my main battle fleet centrally ready to run down and finish them off once they were found.

I wasn’t bothered that the AI had basically cheated, because i figured this was my chance to finish the main Spanish fleet off and once it was destroyed my blockade ships could be put to better use than blockading their harbour. But I couldn’t find them anywhere, my search line scoured the eastern Atlantic as far as the map edge and they were gone.
So, ships were sent through the portals to Coast of Brazil, South America, Central America and North America on the assumption that they must have escaped to another map zone. Sure enough a sloop sent through the Europe to the Azores portal eventually sighted the Spanish just north of the Leeward Islands and heading towards the Florida Peninsula.
Enemy In Sight!
My immediate thought was ‘Gottcha’, I had a newly built fleet in the Caribbean based at Guadeloupe consisting of nine 3rd rates and they could reach the Spanish easily.
Now, I’m pretty confident about naval battles. I know all the tactics and tricks and I can usually win even when I’m outnumbered on paper. So, rather than wait for my main fleet to arrive and risk the Spanish slipping through the net and escaping into port I sent my Caribbean fleet to intercept them.
Disaster in the America’s
I have no idea what went wrong, but I lost.
Ok! they had three damage 2nd rates, a couple of damage 3rd rates and a scattering of damaged 5th rates and smaller vessels. But what the heck I should had nine brand new 3rd rates. I should have destroyed them, but despite doing everything by the book they won. I lost eight 3rd rates, and the worst thing is that most of them were captured. Only my Admiral survived and he watched a full stack of 20 Spanish ships including their new prizes sail off towards the Florida coast, where no doubt they will all be repaired.

So, my main fleet will arrive in the Caribbean shortly, I am building replacement 3rd rates in virtually every naval dockyard i own, because unless I’m mistaken there is going to be one hell of a naval battle in a few more turns.
Resuming the Search

The search for the Spanish fleet has resumed. A brig sent to check the coast of Florida reports no sign of the Spanish in either of the Spanish harbours. My big concern at this point was that the Spanish may have doubled back and be heading for the North Atlantic.
It would make sense as with my main fleet in the Caribbean even a damaged Spanish fleet of twenty warship could play havoc with my French and Russian blockade. I’ve sent patrols to watch the western approaches just in case.
Enemy Sighted off Hispaniola

However, it turned out that my fears were groundless and the AI just wasn’t that clever.
Instead it appears that without even bothering to repair their ships the Spanish Armada had embarked a small colonial army and was sailing eastwards skirting the Greater Antilles to the south. Where is was bound was hard to say, but it seems the Spanish were planning to land troops.
Whether their aim was to return to Europe and to try and recover one of their recently lost colonies in North Africa like Morocco, or whether they were merely hoping to capture the Leeward Islands is impossible to say.
Whatever the armada’s goal was, I resolved that I must bring them to battle immediately. Unfortunately, for them my combined fleet under under my best Admiral ‘Cezayirli Gazi Hasan Pasha’ had been gathered centrally at Port-de-Paix on the north-western tip of the Island of Hispaniola and was within easy striking distance of their fleet as it entered Le Baie des Anglais (English Bay).
Battle Is Joined
The Battle of English Bay

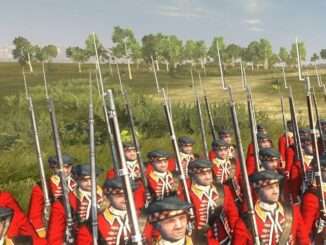
The Ottoman Fleet began to windward of the Spanish Armada and approach in my classic battle formation of two columns in line astern. ‘Cezayirli Gazi Hasan Pasha’ commands the leeward column of ten ships, whilst the hapless ‘Celebi Aali’ who lost his entire fleet to the Spanish in the earlier battle leads the windward column in his flagship ‘Dromus Reis’. No doubt he is hoping to regain his honour today by recapturing those ship he lost to the Spanish and are now in the enemy fleet commanded by ‘Alejo Gallas’
Maintaining the Wind Gauge

As the battle opens ‘Hasan Pasha’ orders the fleet to turn to windward crossing the enemies ‘T’ and maintaining the wind gauge. This will force the Spanish to approach the Ottoman line close hauled, which is the slowest point of sail and should enable us a few free broadsides as they try to get within range.

The enemy fleet can be seen clawing its way upwind to close with is in a single line astern. But adopting two columns of staggered ships one can virtually double the number of guns you can bring to bear on any point of the enemy line.
Holding Course Until Battle Is Joined

The enemy look like they will meet the centre of our line, which is fine as it means they will be received by the maximum number of guns we can bring to bear. I’m just holding my course until the first broadsides are fired to confirm the the enemy van is in range.
Now’s The Time

The first broadsides have been fired and the enemy are trying to form a line of battle opposite our own with the intention of trading volley’s with us. However, with a significant number of the ships in my van unable to bring their guns to bear I have ordered the entire line to wear ship and run down on their lead ships. This will sacrifice the wind gauge to the enemy. but will effectively envelop the enemies lead ships and increase the number of guns I can bring to bear on them even more than the existing two column battle line. Hopefully that lead ship is also their admiral and if I can destroy his ship it will create panic and disorder amongst their entire fleet.
It’s also a fact that a major change of direction like this tends to cause the enemy to try and react. Basically the AI always tries to steer for the rear of your line of battle, so a 180′ turn on your part can really throw them into chaos.
Sacrificing The Wind Gauge

As you can see because the turning circle on Empire ships is so unhistorically poor I am forced to sacrifice the wind gauge to make my turn. However, in this instance I’m using that to effectively surround the head of the enemy battle line and envelop what i hope is the enemies flagship with my fleet. In effect the enemy are now sailing into a pocket of gunfire from all sides.
The Enemy Van In Disorder

As stated earlier the AI like to conform to your fleets movements and the suddenly turn by my fleet creates disorder in their van as they try to change direction. But their lead ship is now surrounded and taking fire from all directions and the rest of their line is still following it into the trap.
The Nelson Touch

With the enemy van effectively destroyed its time to recover the wind gauge again and restore my fleets advantage. The rest of the enemy fleet is now trying to engage the ships in my rear division, so the plan is to literally break through their line just to the rear of their lead ships and then turn windward to recapture the wind gauge.
This can be a bit hairy as my lead ships are now in exactly the same position as their were earlier of having to sail straight ahead into their gunfire without being able to reply. However, at least I’m not hauling close to the wind so my ships are at a fast point of sail, and whilst they can’t return fire themselves the ships of my rear division are still able to pound the enemy as they close.

Adjusting the angle slightly, I’m aiming to pass through their line just behind their second ship in the line. Interestingly you can see in this shot that the enemy seems to be using the two column system which is quite unusual and probably because of the size of their fleet. It looks like the second ship in their line has panicked and is turning out line to avoid being raked by my flagship.
Breaking The Line

The enemies lead ship has already struck its colours having been abandoned by the rest of the fleet which is now following the second ship in trying to avoid being raked. However, my van will break through the enemies line and at least cross its ‘T’.

Ok! well didn’t quite break their line as they panicked and turned towards my approaching van. But we isolated their lead ship and caused it to surrender and we have regained the wind gauge.
Crossing their ‘T’ And Taking The Wind Gauge Again

I have allowed my van to continue upwind a bit further as they have effectively crossed the ‘T’ of the enemies rear division and so i allowed them the chance to pour a few free broadsides into the enemy before ordering them to turn to windward and regain their windward position. If I had turned too early there would have been a risk of being raked by the approaching enemy ships.
Close Action

The van of the Ottoman fleet is now shadowing the enemy fleet to windward, but my rear division is still pushing upwind and crossing the enemy ‘T’. However, as mentioned before the AI likes to conform to the players course changes and this has results in some very close action at the rear of my line where enemy ships are trying to turn into my line to change direction.
The Final Phase of the Battle
The Enemy Fleet Begins to Disband

This shot shows that my fleet are still very much under control. The battle line has been maintained quite nicely, which is not always the case. Sometimes ships will collide and wander off in random directions or simply lose their place in the line and become embroiled in a solitary battle of their own. But so far my fleet has religiously followed order and stayed in formation.
The enemy however, look like they are in complete disarray and it not easy to see exactly where their battle line is supposed to be formed.
Recapturing the Fathrie

Another run across the head of their fleet and a second turn downwind to close the range. However, by now all semblance of order in the enemy fleet is beginning to break down. The ‘Fathrie’, which was one of the 3rd rates from ‘Celebi Aali’s’ fleet that was captured in the last battle found itself isolated and quickly struck its colours to its former Admiral.
Breaking the Line Again

Steering back again with the intention of breaking the enemies line once more. Except that there is hardly any line to break and many of the enemy ships are now breaking off the engagement and trying to escape downwind.
Signal General Chase

The enemy are hardly putting up a fight now and I have ordered my fleet to break formation and give general chase. The least damage ships in my fleet are targeted at running down and capturing escaping enemy vessels. Making sure of course that they have sufficient crew to ensure victory. The other ships are divided between the various surviving enemy vessels and ordered to use dismantling shot to bring down their sails and slow their escape.
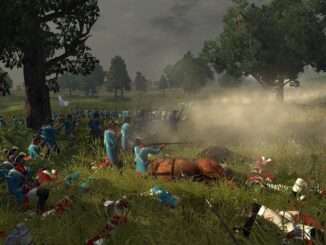
Strike Or We Will Board You

Those enemy ships that still show some fight are dis-masted and boarded. I usually try to mass two or three ships in support firing canister shot into their hulls at close range. They usually surrender before the boarders are away.
Victory!

The final victory screen showing eleven prizes including most of the 3rd rates I lost in the previous battle.

I decided to take back my own 3rd rates into my fleet, but to sell off the Spanish ships to pay for the repairs.
Consequences of the Battle
This battle should pretty much put an end to any serious challenge the Ottomans will face at sea. The Russian and French fleets were destroyed earlier and this was the only significant fleet the Spanish had.
As a consequence I immediately cancelled all the partially built third rates I had ordered to replace my losses in the earlier battles. This immediately restored over 24k to my treasury which i was able to spend on economic upgrades in my new colonies.
It also means that I can free up a lot of ships that were being dedicated to blockade duties to try and keep this fleet in harbour.
I suspect the next big threat in the campaign will arise if one of my Allies decides to betray me and declare war. The most powerful of these is probably the Maratha Confederacy, but at the moment they are having trouble suppressing a resurgence of the Mughal Empire, which has managed to seize a number of Indian territories including Calcutta. It’s doing really well at keeping the Maratha’s distracted helped in no small part to the fact the I’ve been secretly selling them the latest technology.

Be the first to comment