
This guide will show you how to really use all the stuff in your colony and make it so you don’t need anything from the outside. Just so you know, this guide is for the first version of the game, and it comes after the guides for the beginning and middle parts of the game.
More ONI Guides:
- Liquid / Gas Valve Guide.
- Ultimate Gas Weight Guide.
- Useful Construction Patterns.
- Advanced Pipe Mechanics.
Late-Game’s Start
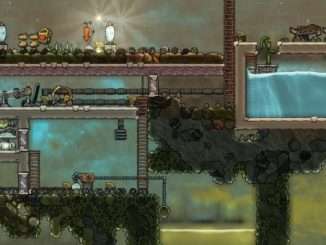
Let’s take a look at a base that is transitioning out of the middle stages of the game. If you’ve read my previous guides, this base will be from the same game session as before. Keep in mind that this specific playthrough is just an example; your base should work similarly as long as you have comparable sections built.

Geysers
Of course, when a colony has been running for 200 cycles, there’s a lot to cover. First, let’s focus on tamed geysers:

The three blue circles indicate the presence of Cool Steam Vents, while the orange circle marks the site of a Natural Gas Geyser and the light purple marks a Salt Water Geyser. All of them have been properly enclosed in a manner that will allow the colony to continuously utilize their resources.
Industry
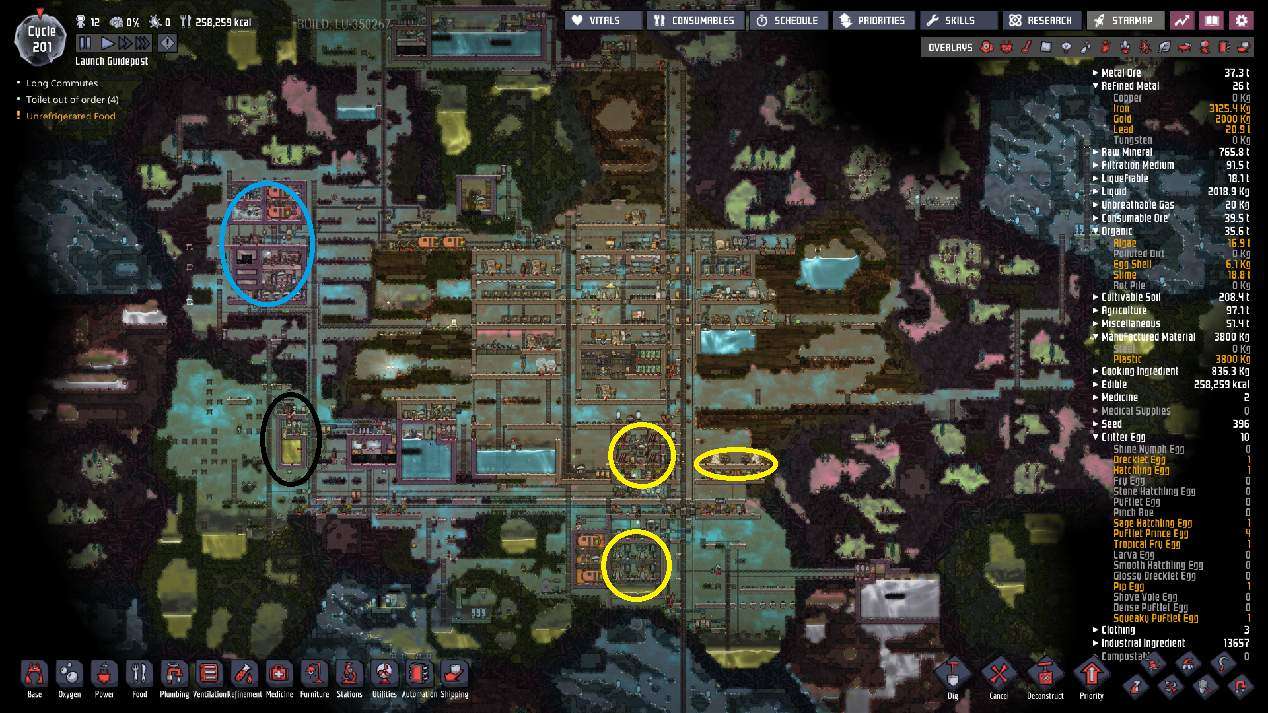
The colony also has a significant amount of industry up and running. The yellow ovals mark the locations of existing Power generation areas – Coal, Natural Gas, and Manual Generator sites. While these areas aren’t yet being directly cooled by Steam Turbine, there’s a little time before a Turbine is strongly needed here. Meanwhile, the blue circle marks the site of the colony’s Oxygen generation plant.
At present, the black circle’s site is small, but there’s a lot of empty room nearby – this is quite intentional. I’ll be referring to this as the “industrial zone.”
Our “industrial zone” currently doesn’t house very much – it’s just the site of a Metal Refinery that’s linked to a Steam Turbine cooling setup. That said, there’s plenty of room to add new industry to the same cooling loop as the Refinery. A lot of the new designs we’ll be building can generate a lot of heat, so it’s a very good idea to have an area like this base in your colony before proceeding far.
Cooling
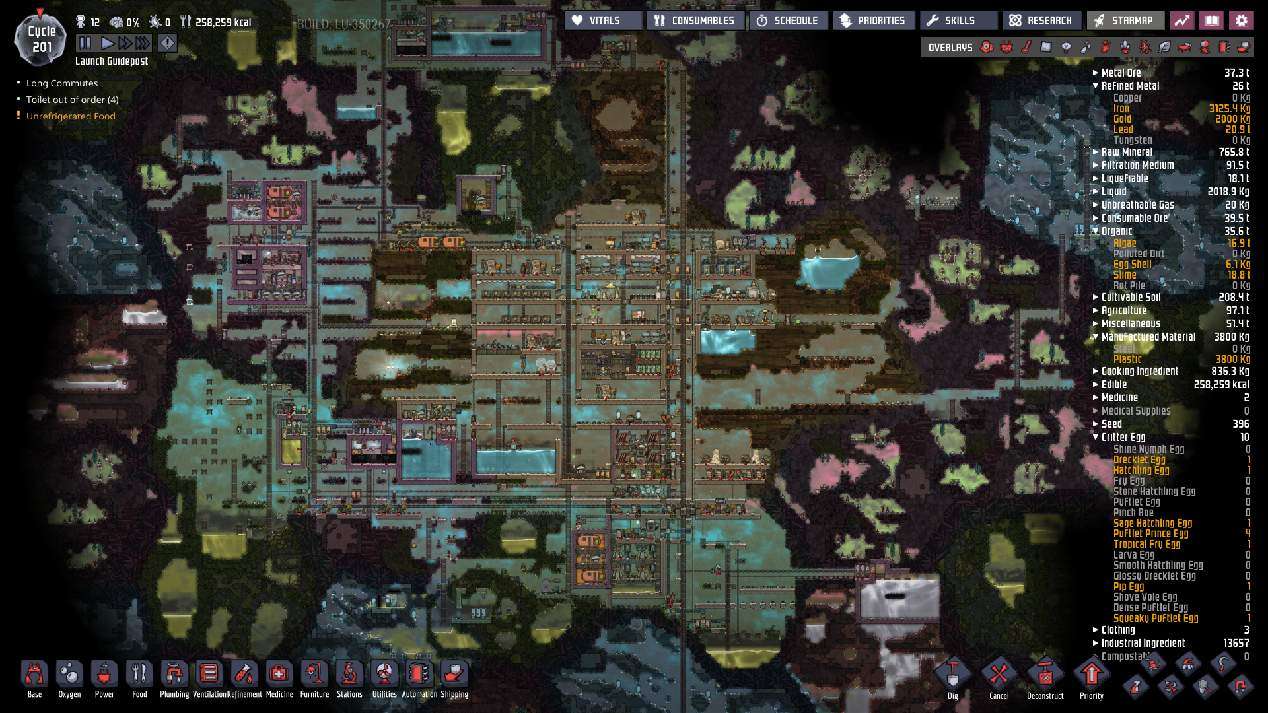
Finally, let’s examine the temperature overlay:

As expected, all the geyser locations are producing a lot of heat. However, you can see that the geyser sites closer to the main base aren’t releasing much heat outside of their contained areas. This is because of the setup done during the mid-game to manage their output. Right now, the area generating the most heat is the power production zone, which isn’t surprising since there isn’t any cooling system there yet. (The fact that the old Metal Refinery was also in that area makes it worse.)
Note the temperature at the industrial zone’s site – it’s actually gotten pretty cold there! Steam Turbine cooling is quite powerful and has started reversing a lot of the heat that the nearby Cool Water Vent bled into the environment during earlier stages of the game. The strongest spots of blue in that area mark the sites of exposed Radiant Pipe that are being actively maintained by the coolant tank beneath the Refinery and by the Steam Turbine setup to its right.
At the top of the view, there’s another Steam Turbine setup to the left of the paired Cool Steam Vents. There’s no coolant loop paired with the Turbine yet, as it’s pretty new and is focused solely on cooling the Vents. That said, I’ll eventually want to add to this area; since I have an industrial site already, I’m thinking this will make a great “farming” zone whenever I decide to move away from the mid-game’s Mushroom farm.
Infrastructure Planning
One last thing worth examining – the colony’s main corridors.

The horizontal corridor is 6 tiles high, while the vertical one is 6 tiles wide. This gives plenty of room to route important wires and pipes. For a decent example, let’s look at the core of my current base:

Observe that the left side of the hallway has enough room to install small Power Transformers and Gas Valves for sending Oxygen from the main pipeline. (Wider hallways can easily fit the larger Power Transformers since both types are two tiles high.) The right side is designed to allow Duplicates to move around easily, which is quite important in vertical hallways. Someone paying close attention might see some Insulated Gas Pipe behind the Fire Pole – that’s for Natural Gas. There’s even space to add another Gas Pipe line and some extra Liquid Pipe through these hallways, and that was planned.
While it’s not strictly necessary to heavily pre-plan where Pipe and Wire infrastructure will go, it’s extremely helpful if you want to avoid having a massive mess later in the game. I use these corridors to do the core, central routing necessary, adding branches where needed to supply structures. I typically try to avoid too much criss-crossing across the corridors, but it’s doable in small amounts when necessary.
Other Notes
At this stage, if you haven’t already done so, I advise discontinuing the Smooth Hatch ranch. There’s no need to directly kill them; just don’t let their eggs hatch.
As a replacement, note that you probably have an incredible amount of Raw Mineral stored up – breeding more Stone Hatches as a replacement is probably a good idea.
Base Planning (Round 1)
If you implemented the long-term Oxygen solution (the SPOM) from the mid-game guide, your colony should be producing enough cooled Oxygen for up to 16 Duplicants. That milestone was reached somewhat late in the guide, so at this stage, I’d say that your colony should probably have somewhere between 8 to 16 Duplicants. For every 8 normal (no Diver’s Lungs) Dupes, that Oxygen solution will need to consume 1 kg/s Water, so your colony’s permanent Water consumption should be under 2 kg/s at this point.
If you followed the advice to “explore” and find extra geysers from the end of the previous guide, your base should have a supply well above 2 kg/s. For my colony, I’m getting 4 kg/s Water from Cool Steam Vents plus an extra 3 kg/s Water from the Salt Water geyser – well above the 2 kg/s threshold. Our colony won’t be hurting for Water anytime soon.
A larger concern for our colony at this stage is likely Power. Keep in mind that our current Steam Turbine setups all cost Power to run. Since we’ve “solved” the Oxygen problem by linking its production to Water, the next big problem we must solve is heat. We’ve done this in the most critical locations, but our Power grid may not be able to handle too many Thermo Aquatuners running simultaneously.
The Plan
Now that we’re in the late-game and have lots of resources at our disposal, we’re in a safe place to consider the many uses of Oil. One of these uses is the Petroleum Generator – running just one of these produces 2 KW of Power, which becomes 3 KW after a Tune-Up buff! This will easily help improve the colony’s Power capacity.
All of that said, we do have a bit of time before the Power situation becomes too critical, especially if we have cooperative Natural Gas Geysers. Actively using Oil takes quite a bit of work as well; as a result, the first arc of this guide is all about boosting our industry to prepare for the future. We’ll start to use Oil as part of this, too.
Corridor Extension – Oil Biome Link
Since we’re talking about Oil, it’s worth investing some time to properly link our corridor infrastructure to the Oil biome. We could delay this a while longer if we want, but a very common late-game problem arises once we start to lay a lot of pipe infrastructure across the game world.
Keep in mind that until now, we’ve only run a pipe or two from the Oil biome when building a few projects that needed a limited supply of Oil. In the very near future, we’re going to commit to continuous, long-term use of Oil. You’ve probably noticed that moving long stretches of pipe can be long, tedious, and boring work, especially when the pipe is being actively used for resources. Since we’re not actually using Oil yet, now’s the time to lay a well-planned Oil pipeline that won’t get in the way of other things in the future.

On all Terra maps – and in most maps for other world types – the Oil Biome is reliably situated toward the bottom of the map. Now’s a great time to extend the central corridor and connect it more directly to the Oil biome. This will give us the space we need to lay a well-planned line of Liquid Pipe for continuous shipment of Crude Oil.
In my case, this means crossing a Frozen biome. Since doing so involves expanding the path from a single Tile of atmosphere exposure to 5 or 6 tiles of exposure, this means a lot more of the “cold” will easily be lost unless I take steps to prevent it – and losing too much “cold” means that the biome’s ice will melt, potentially flooding the Oil biome and making a mess.
For now, here’s what my corridor extension looks like:

Note that I’ve added Insulated Tile to the corridor’s exterior, leaving just a few points of entry into the Frozen biome. Honestly, I should probably seal up a few more of the points than this, but it’s enough to get the idea.
Note that at this stage, I’m now able to properly extend the Heavi-Watt wire and Oxygen supply lines down to the Oil biome’s entrance. This will help to simplify how their respective resources were previously routed here – we can now decommission the old supply lines and clean up any related tangled infrastructure.
Of course, I should also show off the goal of this operation – the Oil pipeline.

Note that there’s plenty of space to add more pipes on either side. This space will absolutely be utilized in the near future, so try to keep the area clean!
Carbon Dioxide Management
Until now, the base’s Carbon Dioxide has been managed by use of Carbon Skimmers. This converts some of our Water supply into Polluted Water, but it’s served us quite well for keeping a clean in-base environment for our Dupes. However, now that we’re connecting to the Oil biome, there’s a possibly better way to handle things – Slicksters!

If only these little marvels were a real-world creature… alas. At any rate, they’ll directly convert Carbon Dioxide (CO2) into more of that sweet, sweet Crude Oil. The issue is that they love their hot home down in the Oil Biome; we should leave them there for now. That said, now that we’ve got space to run extra pipes, there’s nothing stopping us from sending our unwanted CO2 to them.
Also, if you get offered Slicksters or their eggs from the Printing Pod, that’s a pretty great option to take. You’ll need to spend Plastic on a Critter Trap to catch them for transport to meet the others, but it’s worth it.
After a bit more work and cleanup, here’s my Ventilation overlay:

There’s not that much Carbon Dioxide on a regular basis, but it’ll help feed the Slicksters down there until we have a more steady supply. I’ve replaced my old Carbon Skimmer with a Gas Pump, following similar Automation logic to what I’d used before for the Skimmer – it’s a pretty simple and direct replacement.
Other Notes
If you’re following along my playthrough on the same seed, you might like to know that I did a little exploring during this section and found the second guaranteed Natural Gas Geyser – just dig directly beneath the Metal Refinery and you’ll find it soon enough.
Oil Refinement
Now that we’re ready to continuously ship Crude Oil out of the Oil Biome, it’s time to start work on an actual Refinery. This structure will convert Crude Oil into Petroleum at a 2:1 ratio. Later in the game, we can do better than this, but this will easily meet our needs for now.
Petroleum has a few interesting uses worth talking about at this stage of the game:
- It’s slightly better than Crude Oil for high-heat conductive applications and has a superior range of temperature before changing state.
- It can be used to manufacture Plastic.
- It fuels Jet Suits, which will be very useful when we start exploring Space.
- It’s also very useful for Power generation.
For now, the key is setting up an Oil Refinery. If you left space in your old industrial site, now’s the time to start adding onto it! Here’s my site; I’ve cleared out some new space since the old “Sustainable Refinery” section in the mid-game guide, but its otherwise mostly unchanged:

The ladder to the left of the coolant tank was always meant for eventual demolition; now’s a good time to tear down the area and start putting in some new structures. Since I do plan to upgrade the industrial site’s cooling capacity in the future, I’ll be leaving extra space for that eventual work.
Required Researches
- Transit Tubes (Tier 5)
Construction: Step 1
If you’ve inspected the stats on the Oil Refinery, you’ve probably noticed an interesting detail – it produces 90 g/s Natural Gas when operated. This is quite useful to pass along to our Natural Gas Power Plant, so it’d be wise to capture everything the Oil Refinery puts out. Accordingly, I like to start with the following design for my Refinery:

The goal of this design is to seal off the Oil Refinery entirely from the outside, allowing us to start with a perfect vacuum inside so that we can perfectly control its atmosphere. Once operational, the Refinery room will have a lot of Natural Gas – this is one of the most conductive in-game gasses, meaning that workers in there will need protection from the environment unless the temperature is ideal. Since the Refinery will emit Natural Gas at 75 C or higher… the temperature will likely not be ideal.
To allow us to seal the room completely… and because I hate Water-locks with a passion… I advise implementing your base’s first Transit Tubes. In my case, this has the extra benefit of allowing me to reuse the nearby Atmo Suit Docks – this is actually rather important, as the temperatures we’ll be working with nearby aren’t safe for long-term Dupe exposure when not suited up. It’s also worth noting that Water-locks don’t block temperatures as well as Insulated Tiles, in case that’s a concern.
Note that the minimum temperature for the Refinery’s outputs is 75 C – the usual threshold for overheating. This gets worse if your source Crude Oil is hotter. If you can keep your inputs below 75 C, a single Wheezewort actually does just enough to keep heat under control – I’ve left room on the left that allows inserting one.
Of course, not all maps have those available – but we also have our cooling loop nearby. Exposing a bit of it can allow us to extract heat from the room without overcooling the area, and we can always use extra Radiant Pipe if needed for stronger cooling. I’ll be using the cooling loop in my implementation so that the example is useful to players without Wheezeworts and so that I don’t have to worry about the Crude Oil input temperature.

Honestly, that’s probably a bit too much Radiant Pipe in the area; I’ll probably reduce it to three tiles of Radiant Pipe instead of five. Feel free to experiment and find what works for you. Note that I’ve also included yet another Liquid Bridge in the extension; I have plans for another industry build in the near future above the room, and this will help when connecting the next structure.
Now that I’ve gotten my cooling loop extension ready to connect and have built everything inside of both rooms, it’s time to seal off the Oil Refinery’s site, connect the loop, and then start pumping out the inner atmosphere. In the meantime, I’ll continue preparing the Petroleum Reservoir beneath the Refinery setup.
Construction: Step 2
The end goal is to build something like this:

This provides our colony with its first proper Petroleum Storage unit. Since Jet Suit synthesis requires Pitcher Pump delivery of Petroleum, we include a Pitcher Pump (Ceramic) as part of the tank.


I’ve left out the Power overlay and the Ventilation overlay, as they’re relatively simple at this point. You’ll need a few separate Conductive Wire lines, but that’s it.
As you can see, I’ve already got a Dupe actively refining Crude Oil into Petroleum! The reservoir setup below is set up kind of like the Advanced Gas Storage from late in the mid-game guide. The system first prioritizes filling up the lone Liquid Reservoir – any Petroleum inside will be automatically forwarded to the first consumer. After that, any excess will be dumped into the main pool. Finally, if the Petroleum line into the Reservoir isn’t full and there is free Petroleum in the tank, the Liquid Pump will refill the Reservoir.
For the Hydro Sensors:
- Top – Above 720 kg, preventing overflow. (The top tile of a Petroleum lake has a maximum pressure of 740 kg.)
- Middle – Below 500 kg, re-enables the Refinery. (We don’t want the Refinery to toggle on and off rapidly when near-full. This value’s very customizable.)
- Bottom – Above 50 kg, ensuring the Liquid Pump operates with maximum efficiency.
In regard to the Atmo Sensor in the Refinery chamber, I advise setting it to “Above 1 kg.” That leaves enough atmosphere to provide a decent cooling buffer for whatever cooling solution you decide to use.
If you decide to rework the layout of everything in the Petroleum tank, note that Petroleum is a very strong conductor and it will be quite hot. It might be wise to add an extra Transit Tube access and enclose the tank area – I’ve left space four-tiles high above the tank to ensure this will be possible, after which you can lock the area in Insulation Tiles in a manner similar to the Refinery.
Other Notes
Technically, we can supercool the room to the same temperature as the coolant – it will mean extra cooling work, but it won’t be enough to overwhelm the Steam Turbine setup. 90 g/s Natural Gas at 75 C will cool to 0 C with about 14.8 kDTU/s cooling, making this Refinery setup cost a total of just under 25 kDTU/s heat per second when in use.
Compare that to the 575 kDTU/s that the (Polluted Water) Thermo Aquatuner can feed to the Steam Turbine, which has an even higher capacity. It won’t overwhelm the system; it’ll just mean spending a bit of extra Power for cooling – about 31 W extra when active.
For the curious, fertilized Wheezeworts in at least 1 kg/tile of pure Natural Gas generate nearly 11 kDTU/s cooling.
Glass Synthesis
Now that we’re able to start producing Petroleum, it’s a good time to start working on yet another new resource – Glass. Glass is quite expensive to make in mass and generates a ton of heat, but it’s critical for a few things we’ll want to make when we reach space. There’s only one way to make it, so now’s as good a time as any to get started.
As this is yet another ‘industrial’ function for our colony, I’ll be implementing this near the industrial site. I’ve chosen to start construction just above the Steam Turbine setup:

While not the focus of this section, I will also be relocating my colony’s Rock Crusher next to the upcoming new Glass Forge. We never talked about it in the past, but the Rock Crusher generates a fair bit of heat itself – 16 kDTU/s. It’d be wise to move it away from our base’s core now if it hasn’t already been done.
Researches Required
- Solid Transport (Tier 5)
- Superheated Forging (Tier 5)
Construction: Step 1
To begin, I advise constructing the new parts you see below compared to the previous image:

Note that we can still get inside the lower area to finish anything that might remain. We’ll eventually add a second Insulated Tile wall to the left-hand side matching the one on the right. We are not ready to handle Glass yet, so hold off on actually using the Forge.
Now, for some overlays:


The entire setup can fit on a single Conductive Wire, so Power’s not at all tricky here.
For the Plumbing overlay, note that the Insulated Pipes connect directly to the Liquid Vent outlet from the Glass Forge. You want this pathway to be simple, short, and direct if at all possible – Molten Glass is extremely hot and must be handled with care. I’ve also modified the old cooling loop to accommodate the new build.
Note the new Conveyor overlay! This will make more sense once we finish construction, but the short of it is that we’ve implemented a “cooling” track for the Glass we will produce. Since Molten Glass is extremely hot, we’re going to drop it into a pool of Petroleum – that’s the plan for the lower tank. Petroleum’s high overheat temperature will easily allow enough range to cool any incoming Molten Glass as soon as it arrives to the pool. That said, it usually solidifies at very high temperatures – this conveyor will “force” the hot Glass to stay in the Petroleum pool long enough to cool down reasonably.
Once everything is connected, built, and swept free of any desired debris, add an Insulated Tile to the left-hand wall and start delivering Petroleum to the pool. You can connect a temporary line to the Glass Forge’s outlet via Liquid Bridge to deliver it. An important note – while delivering Petroleum, you’re likely to have a significant spike in your colony’s Power demands. It’s at least 75 C because of the Oil Refinery’s minimum output temperature, and your coolant loop will be working hard to catch up for a while.
Construction: Step 2
After a while, you should reach the following point:

The Petroleum tank is now about halfway full, so if you’d like to play around with the Glass Forge a bit, you should be safe to do so. Of course, continue pumping more Petroleum in for now.
You’ll also notice that I’ve added a couple of Weight Plates to the area. As odd as it is, the one under the Rock Crusher actually is correct – which unfortunately means any significant output from the Rock Crusher will trigger the Plate, so feel free to ignore that one. It’s generally worth illuminating the area when a Dupe is working – spending 10 W to speed up a Dupe’s work by 15% will save tons of Power on Glass Forge use and should even yield savings with the Rock Crusher. The small output heat is trivial to handle since the cooling loop is already right there.
Once the pool is completely full, even when not fully cooled by the coolant loop, you should see a remarkable drop in your output Glass’s temperature due to the conveyor loop – with a 41 C tank, my Glass comes out around 115 C instead of the 600+ C that would result without the conveyor cooling setup! Of course, that means our coolant loop must absorb a lot of heat, but that’s exactly why we’ve got this focused industrial area – to facilitate handling high-heat applications like these.
One more important detail – you should set the Conveyor Receptacle to “Allow Manual Use” so that your Dupes can retrieve any output Glass directly.
Plastic Manufacturing
After getting the Glass Forge done, you might be interested in synthesizing Plastic directly from Petroleum. We now have the tools to handle this; let’s take a look.
Required Researches
- Plastic Manufacturing (Tier 4)
The biggest concern when using Polymer Presses is the extreme amount of heat that they produce – 32.5 kDTU when active. It’s easily the biggest heat producer we’ve seen so far. That said, cooling loops are extremely potent; we can add it to our industrial site.
Remember that spot I reserved over the Refinery’s site?

I’ve made this Polymer Press out of Wolframite. It’s specific heat is low, to be sure, but the thermal conductivity is so high that this allows all of that 32.5 kDTU to be transferred without needing Tempshift Plates, which are kind of expensive. (My Polymer Press is stabilizing around 33 C in this image, while the local coolant is around 5 C due to the Glass Forge’s Petroleum at the moment.) If Wolframite isn’t available to you, Steel will easily do the job while also giving you much higher margins for error with overheating. 400 kg isn’t too expensive.
If you remember the Liquid Bridge I left in the loop for a future extension…

A small rework later, and the Polymer Press is on the loop. While it does produce small quantities of Water like this (hence the Liquid Pump), it will be a long while before I need to pump the bottom area dry. I can always connect the Pump’s output at a later point.
Other Notes
You’ll note that the room is designed to accept a second Polymer Press. I’ve also left enough room to add Conveyors and an Auto-Sweeper if desired. An automated setup delivering to a Smart Storage Bin can be useful – use the Bin’s Automation signal to disable the Presses once the Bin is full.
That said, your base’s demand for Plastic probably isn’t very high right now. It would be nice to replace our core Ladders with their Plastic Ladder variant, but we can still rely on our Glossy Drecko ranch for Plastic if desired. The choice is yours on whether to rush that or not… and even on whether or not to actually build this Plastic manufacturing site at all.
On the other hand, this does allow us to turn Plastic from a limited, rare resource into an easily-available commodity, which is a nice reward for making it to this point in the game. Comfy Beds can be useful for shortening your Dupes’ needed sleep time, Plastic Tiles can increase Dupe run speed, and Plastic Ladders can increase Dupes’ climbing speed. All three of those properties can be useful for making your base run even more efficiently than it already is.
Petroleum Power
Now that we’ve added a few high-Power consumption machines to the colony, it’s probably wise to add another Power Plant. This time, we’ll be adding a Petroleum-based one.
Petroleum Generators have a lot of benefits over Coal and Natural Gas use, though we do need to prepare well to use them properly. They generate less Heat per Watt and produce more output resources – Polluted Water and Carbon Dioxide. In fact, their Carbon Dioxide output is so strong that they can fully utilize a Gas Pump!
Of particular note is that like the other Generators, their output temperature varies depending upon the Generator’s temperature. We want to maximize our gains from this.
- All output Polluted Water will be at least 40 C (or hotter if the machine is hotter)
- All Carbon Dioxide output will be at least 110 C (again, hotter if the machine is hotter)
Where there are benefits to getting hot Carbon Dioxide, those benefits are significantly lower than the benefits we get from 40 C Polluted Water, which has a very high heat capacity compared to most other materials. We’ll want to keep the Power Plant under 40 C if at all possible. Likewise for the others – we just didn’t bother before because their resource output rates are comparatively quite low.

Here’s a “before” picture around the site I’ll be constructing the Petroleum Power Plant. I’ll also be adding in a Steam Turbine setup at this time nearby, which will be dedicated to the colony’s Power Plants. I technically could reuse the existing cooling loop from the industry area, but I advise against it for the following reasons:
- I advise that learners use more but smaller cooling loops. If something goes wrong, it’s easier to fix this way… and it results in less cross-map Pipe clutter. Working around severe pipe clutter is no fun and can be quite demotivating; we want the game to stay fun.
- We recently added a lot of high-heat producing machines to the cooling loop. In particular, running the Metal Refinery and Glass Forge at the same time will considerably warm the cooling loop, possibly past what the Thermo Aquatuner can handle in the long-term. (Short bursts are fine, though.)
- A 0 Tinkering Dupe refining Steel dumps over 2339 kTDU/s into the Refinery’s coolant during operation.
- Assuming the run time is the same, a Glass Forge will require about 600 kDTU/s of cooling on its output.
- We don’t want to “waste” cooling on the Generators beyond what’s needed; this lets us run the new loop at its own temperature setting.
- Two Petroleum Generators will max out a single line of Gas Pipes, leaving no room for Carbon Dioxide from other sources to be shipped unless an extra pipeline is built.
Since I covered Steam Turbine cooling already in the mid-game guide, please refer back to it as necessary if you also need to make a new cooling loop. You should probably pause other industry tasks and focus on refining more metal (like Gold) as needed.
A significant amount of time later, since Steam Turbines and cooling loops do take a while to make…

Since Petrol Plants with the Tune-Up buff generate 3 kW, each one will need its own Large Power Transformer. A dual chamber would be possible – just make it double-wide, mirrored around the Power Control Station (aside from the Liquid Pump).
That said, I advise only using one Petroleum Generator for now, anyway. For starters, we don’t yet have an Oil Well, which is necessary if we want a continuous stream of Oil. We’ll also want some Petroleum for other uses, especially later once we get to space. Let’s not burn all the Crude Oil we can get our hands on… and we can always add an extra copy of this room later if needed.
Not seen here: a Tempshift Plate behind the Petroleum Generator, dead-center at the Generator’s bottom. Carbon Dioxide’s a terrible Heat conductor, so we need a little help to facilitate efficient heat transfer.

The basics of each overlay shouldn’t be troublesome for you to work out at this point, though of course I should probably discuss the Automation settings a bit.
- Atmo Sensor: Above 2000 g, which maintains enough pressure to keep new Oxygen out of the room and to prevent the Polluted Water output from off-gassing.
- Aqua Sensor: Above 50 kg (or similar) – ensures that the Liquid Pump always has a full load when operating.
Power Plant Cooling Loop
Now for a bigger-picture look at the new builds:

I’m honestly a bit surprised at how close the new Turbine ended up to the old one. That said, the new site will have a much easier time reaching the Power Plant, as it’s not tangled up with the Cool Steam Vent nearby or the tangled piping that manages the temperature of the industrial site’s coolant. Of course, this will be much clearer with a look at the Plumbing overlay.

Note how the Polluted Water line moves across each Power Plant in sequence, then back to the Steam Turbine before re-entering the coolant tank. I’ve left a few Liquid Bridges in place at a few locations to facilitate loop extension for extra Power Plants in the future.
I advise setting this cooling loop’s Liquid Pipe Thermo Sensor to send coolant to its Thermo Aquatuner once coolant is “above 28 C”. This is around the point where the loop will be able to keep the Petroleum Generator at or below 40 C when running full-time. Of course, experiment to find what setting works best for you and your colony.
Base Planning (Round 2)
After all that work, we’re finally starting to truly utilize Crude Oil and Petroleum; it’s been a long time coming. There is still more work to do in this regard, but now’s a good time to stop for a moment and review our progress.
Here’s a before and after since the last “Base Planning” round for my example playthrough:
Note the significant expansion in the lower-left parts of the image; now we have a real industry area.
As the base grows, it can become tricky to route important resources everywhere. That’s part of why I like to focus on the central corridor design for the most important ones. Here’s a good example of how that’s working in the current colony:

The design’s benefits will be most prominent in the horizontal version and to the part of the vertical corridor leading down to the Oil Biome. The most key gaseous elements to route are Oxygen, Carbon Dioxide, and Natural Gas; we’ll want to ship the first two down to the Oil Biome. In the next arc of this guide, we’ll be shipping up Natural Gas from the Oil Biome, so the routing pattern will stick pretty well.

On the other hand, the Plumbing overlay shows that we aren’t using the central corridor for liquids very much. This is no accident on my part – the next arc of this guide will see this change dramatically. Note how we’ve kept the various loops largely outside of the main corridors; outside of a few stray Liquid Pipes in the vertical section from the early game, we have plenty of room to make bridges to cross any cross-sectional lines. (Those lines can be safely deconstructed; I’ve just been lazy about that.)
Since we’ve avoided making a tangled mess until this point, we can now start doing some serious liquid transportation work without much issue.
General Notes
You may note that I’ve played a few extra cycles since the end of the last section. Now that my Power Plants have cooling, I’ve linked in the second Natural Gas Geyser to the system. Those generators had been running a bit too hot for my tastes before, but now I won’t have to worry about excess heat from running them more frequently.
Also, depending on the pace you’ve been keeping, you may want to check your Hydrogen storage. My tanks are around 15 kg/tile at this point, so I took some time to add a Hydrogen Generator to the grid. It’ll run only when the storage area reaches over 19 kg/tile, preventing the storage from fully backing up.
The Goal
Now that we’re able to produce even more types of resources than before and have started working with Petroleum, we should take some time to stabilize the base – Crude Oil won’t be free forever. Most of our work will be in the Oil Biome for this arc of the guide, and we’ll be sending a lot of resources down that direction.
One of our big tasks will be to “tame” at least one Oil Well. For the cost of 1 kg/s of Water, we’ll get 3.333 kg/s of Crude Oil – nearly enough to run a Petroleum Generator full-time. Unlike the real world, these never run out of Oil, giving us a renewable supply. Each world has at least three of these, meaning you can always reach a supply rate of 10 kg/s for the cost of 3 kg/s Water.
This is why I highly advised taming renewable sources of Water before starting the guide – we’re about to start consuming a lot more than our colony did before. That said, Petroleum Generators do give a good return on Polluted Water, and that’s something we can make use of.
While the Oil Biome is hot, even that is something we can make use of; there are certain plant types that love a little heat. We’ll be adding support for some new ranches and farms that work well here.
In short, this arc is all about digging deep and giving our colony even more long-term staying power than it already has. After that, with considerable work we can stretch to even greater heights than before – literally.
The Plan
Before proceeding, it’s probably wise to examine the layout of your Oil Biome. Find all of the Oil Reservoirs you can within the area that will be most convenient to work within.

I’ve marked the site of all three of my world’s Oil Reservoirs with small black circles. As you can see, the Oil Reservoirs are a bit scattered here, with the middle one being probably the most accessible. It’s relatively close to the one on the left, so focusing work in that area may be best. Of course, I do have a lot of partially pre-mined space at the current entry to the biome, and that space is out of the way of the Oil Reservoirs – that’s not a bad place to start building ranches.
The magenta rectangles, as usual, mark my existing plans for future corridor extension. Well, my original plans. Turns out that I have a few “features” that are non-deconstructable in the way in both directions if I build far enough. Oh well, we’ll cross that bridge when we come to it.
With the ranches on the right and the first two planned Oil Reservoirs on the left, our Oil Biome cooling solution would best be placed somewhere in between. For my playthrough, I’ll mostly be working in the nearby, upper half of the Oil Biome and the part of the Tide Pool Biome between its peaks.
Ranches will require considerable open space that we’ll want to keep relatively close to an upcoming cooling loop within the Oil Biome, so keep that in mind as you think ahead for your layout in the coming sections.
Other Notes
Partway through the next section, I took some time to extend my industrial cooling tank. This is just a short bit not worthy of its own space, and it fits thematically with what came before:

Since the cooling loop is became much busier after we added more cooling tasks, the Metal Refinery’s output will often be blocked. This modification provides space to add an extra Liquid Pump dedicated to the Metal Refinery. Of course, that means the coolant may become significantly warmer when performing a lot of refining tasks, but we can address that a little further down the line. If you do this, just keep an eye on the tank’s heat levels.
While I could show the Plumbing overlay here, this area is a real mess – remember that this is the core of the industrial area, so there’s tons of piping running around the area. Just make a simple and clean line for the Metal Refinery’s new output path – the input is the same, just connected to a different source Pump.
This should improve our industrial abilities quite a bit, though we should exercise a bit of restraint, just in case. It will take a while to fill the tank completely, so forgive me for skipping that picture. A full tank means no offgassing coolant, which is always a plus.
Sporechid Handling
Unfortunately, very close to my Oil Biome entry there’s been this annoying Sporechid spewing Zombie Spore germs. The associated disease is no joke – it provides a -10 debuff to most of a Dupe’s stats!
Simply removing the plant isn’t enough – the germs will remain in Carbon Dioxide and Crude Oil with no loss, easily infecting Dupes that aren’t wearing protection. While we do have an Atmo Suit access point at the biome’s entry, can we be sure the germs won’t spread past that point?

With germ counts that high, the germs are very likely to spread through the atmosphere. It would be best to not let them spread. Fortunately, there is a solution that can help prevent them from spreading – Slicksters love eating Carbon Dioxide, which will convert the germy CO2 into Crude Oil. Since Dupes don’t breathe Oil, this shouldn’t be an issue – especially since the germs don’t appear to transfer to the Oil anyway.
Note how I’ve set up a lockable chamber with a Critter Drop-Off (Gold, for the overheat bonus). By placing a Slickster here, mining the tile underneath the Sporechid, and running away very quickly, the germs will have no time to spread outside the chamber.
Now, a problem with that – Critter Traps overheat at 75 C, and temperatures in the Oil Biome are usually far above that. However, it does take a bit of time before trap overheats – if you place it, catch a Slickster, and relocate it quickly enough, the overheat bonus won’t be a problem. Note that Traps cost 200 Plastic and break after one use; fortunately, we can easily make more.

As you might guess from this image, the game has been extremely friendly to me with Slicksters and their Eggs. I placed them all together here, so I captured one in no time at all. That said, I can watch the temperature ramp up quite quickly on the default speed – probably about 1 C every two seconds. Feel free to abuse the Yellow Alert priority here if things start getting too close for comfort. It was 40 C by the time my Dupe got to the sprung trap!

As soon as I mined out the tlie beneath the Sporechid, I had the Dupe run for the hills and disabled access permissions to the area. It’s now up to our little buddy to clean out the Carbon Dioxide and make the area safe.
Domesticated Slicksters will eat 20 kg CO2 per cycle, as seen by the critter tooltips, but wild critters usually eat only 1/5 that amount, meaning we can expect 4 kg/cycle. Fortunately, it’s a pretty small pocket down there – it should be safe in around four cycles. (There’s about 15 kg CO2 total in the pocket.)
A little while later:

The germ count will rapidly fall as the pressure nears zero. From this point, it takes about one more cycle for the Slickster to make a complete vacuum. If you’re dealing with a larger pocket, don’t worry – a couple thousand germs per tile will probably be safe, especially if the pocket’s deep in the Oil Biome. Unlike Slimelung, these germs don’t multiply in their preferred gasses, so there’s no cause for alarm if low amounts are left in the open – it’s the high count we saw before that’s dangerous.
Other Notes
Just in case you’ve had a Printing Pod give you Pips, make absolutely sure to store any Sporechid Seeds you get somewhere that they cannot reach. Pips will plant them randomly otherwise, and while the germs die off in Oxygen, they do so quite slowly. Don’t give Pips the chance.
Oil Biome – Enhanced Access
We’re going to be building a lot of things in the Oil Biome that work best when significantly temperature-controlled, atmosphere-controlled, or both:
- Oil Wells will need atmosphere control and specialized cooling.
- Slickster breeding is best done with lots of hot Carbon Dioxide.
- Ranching normal Dreckos is most efficiently done with a stable and warm Chlorine atmosphere.
Making use of Transit Tube Accesses to get around will help maintain the ideal condition for each area we’ll be making down here. Since we haven’t really built anything within the Oil Biome until now, we’ve got a clean slate to start really playing with this advanced transportation system – so let’s make it really convenient for our Dupes to use.
Also worth noting – this is one of the far edges of the game world, so Dupes will often face high travel times when entering downtime. Transit Tubes, if planned well, should help them return a little bit more quickly from here than otherwise. Make sure to place it close by your Atmo Suit Dock.

We’ll be using a lot of Plastic in the near future, so keep on top of production for these resources! Fortunately, Transit Tube Accesses don’t overheat, so we can make them from Lead for now with little issue. Plastic melts way earlier than Lead, so there’s little reason at this stage to not use Lead.
Now, a little something important about Transit Tubes – there’s a limitation on how they turn. Compare the following two pictures:


Transit Tubes require one straight tile before turning when coming out of a Transit Tube Crossing, which functions as a wall. You also can’t do a full 180 without having straightening the path for a tile after a 90 degree bend, so plan accordingly. Finally, you must have at least two Tubes in a line above the Transit Tube Access for it to connect properly. Fortunately, the second tile above can turn as seen here without issue.
Examine the right-hand image again. Note how I have a three tile wide corridor, with a Tube beside the Ladder in the corridor’s central tile. This gives it the turning radius needed to enter rooms on either side. Also note that I’ve removed the Ladder where the Transit Tube crosses – Tubes don’t share spaces with buildings.
Expanded Atmo Suit Docks
Note how I’ve also started expanding the corridor’s end point near the Oil Biome’s entry – since we’ll be starting to build here in the near future, investing in infrastructure here is a good idea. I’ve been particularly wanting to build Power Transformers down here, and this gives me the space to do so.

Finally, since there’s going to be a lot of work down here soon, it’s probably a good idea to upgrade our Atmo Suit entry point:


The layout of the Gas Pipes shows a way to ensure each of the six Atmo Suit Docks receive Oxygen at the same rate.
Other Notes
Of course, to build the pipes there, I had to mine out the last layer of Abyssalite from the Frozen Biome’s barrier. Be careful when doing this, as the hot air from below can cause Ice to start melting! That’s the source of the Water seen below:

Note how I’ve used raised Tiles to ‘catch’ the melting Water and prevent it from dropping into the biome and its Crude Oil. It’s a simple trick, and it saves us the trouble of having to use a Liquid Filter down below later.
I’m also starting to clear out the Tide Pool Biome nearby, which will make it easier to access the upper-most Oil Reservoir and clear out space we’ll want in the near future. (I’m dumping the Water in the flooded area near my exposed Salt Water Geyser; I won’t be getting through there in a long time as it is.) I’ve already cleared out space to the right; that’s where we’ll we working next.
Slickster Ranching
Whenever we use that shiny new Petroleum Generator, it generates a lot of Carbon Dioxide. We can handle this with Carbon Skimmers as before, but there are some serious benefits to handling it with Slicksters instead. We’ve also advanced quite far in the game compared to the last ranches we built, so this is a great chance to see how we can upgrade our colony’s ranches.
Here’s where I decided to build a pair of Slickster ranches:

I advise building everything in this room that can overheat out of Steel. That includes the Critter Drop-offs, Auto-Sweepers, Conveyor Loaders, etc. Even Pneumatic Doors can overheat – consider replacing them with the Manual variant if you want to save on Steel. Later on, we’ll be heating up the CO2 we send here. While we could keep things within 125 C, it’s helpful to the Molten Slickster breeding process if we can run at higher temps. We can approach 160 C instead this way, the melting point of Plastic.
Both main rooms have 74 tiles, allowing them to hold 6 active Slicksters each. As surprising at it may sound, though… that’s actually not quite enough to handle a full-time Petroleum Generator! As a result, once we really start utilizing the lone Petroleum Generator that we’ve built, it will easily be able to supply this ranch with all the Carbon Dioxide it needs. In fact, use of the High Pressure Gas Vents allows 20 kg/tile CO2 storage, so we can build up quite a buffer before the room overpressurizes.
Don’t be distracted by the Gas Pump in the image above – I’m just doing my usual vacuuming routine before I route the CO2 in.
If you’re curious about the math, it goes like this:
- Petroleum Generators produce 500 g/s CO2. That’s 300 kg/cycle.
- Slicksters eat 20 kg/cycle CO2 when domesticated.
- Therefore, a Petroleum Generator at 100% uptime can feed 15 domesticated Slicksters.
For comparison, two Carbon Skimmers would run with 83% uptime and a Water Sieve dedicated solely to the two Skimmers would require 33% uptime. That’s a lot of looping Water and a significant constant Power draw. We don’t yet have near-infinite Power, so we save a lot of Power on CO2 processing when we use Slicksters instead.
Now, back to the build. The room’s design is motivated mostly by a wonderful tool we have – the Auto-Sweeper.

No matter where a Slickster may go within this room, the Auto-Sweeper will be able to pick up its Eggs and deliver them to the dedicated hatchery toward the right. (If the rooms were any larger, an extra Auto-Sweeper would be required in each chamber, which is inefficient.) While not yet built in this image, we can use Automation logic to control when the Incubator operates and resupply it with more eggs to hatch.
I advise against the “Allow Manual Use” option on the Conveyor Receptacle, as it’s largely unnecessary – any eggs left within for over 10 cycles will automatically break, as if used in an Egg Cracker. This will automatically produce the Egg Shell and Raw Egg products that usually result, automatically dropping them from the Receptacle.
For those interested in a little Decor boost, I’ve left three spots where Ceiling Lights may be added. Light will reach the primary work locations from each relevant position. It won’t speed up the grooming process, but a +15 Decor from light is a nice buff in itself.
Speaking of Decor, if you change the Mesh Tile into Window Tile on the upper floor, you can build artworks that will affect the work floor, giving your Ranchers a great Decor boost that should positively affect their Morale.
With a few more buildings in place, the Power grid will look like this:

Once a Liquid Pump is placed on the circuit, it will show a maximum demand of over 2 kW. To handle this, we can use a little Automation Logic to ensure this is never an issue.

Set the lower Critter Sensors to 7 critters and the Critter Drop-Offs to 6 critters. This way, we’ll only reach 7 critters when a critter lays an egg. At this stage, we need the Auto-Sweepers in the room with the Slicksters to remove the egg as quickly as possible, maximizing their egg-laying uptime. (We want to remove “Cramped” as quickly as possible.) When there are no eggs in the chamber, it’s safe to activate the hatchery’s Auto-Sweeper instead. So, at any one time, we’ll only be using 1920 W at most, which is within the circuit’s limit.
There’s another set of Critter Sensors here worth talking about. Set the upper Critter Sensors to 5 critters. With the connected Not Gate, this will trigger the Incubator to activate when either room is missing a critter – that is, when a Slickster has died. (Aside from when we’re starting the ranch.) Auto-Sweepers will automatically place an egg in a Incubator deactivated by Automation, but it will still slowly incubate. We’ll only want to rush incubation when we’re short on Slicksters.

If you’ve noticed the Slicksters in the lower chamber… they managed to get themselves trapped in there. They’re wild, so I don’t mind whatever happens to them down there – I’ll just pull their eggs out at some later time.
Other Notes
If you want to go crazy, lots of veteran players like to find ways to take extra eggs and send them into an auto-kill chamber instead of letting them auto-crack. Barbeque is superior to Omelettes, so it can be a worthwhile endeavor… but those setups can usually get pretty complex and may require manual interaction at points.
Slicksters don’t drown easily, and drowning’s the usual critter-killing tool. (Very cold temperatures work well for standard Slicksters too, so that’s an alternate viable option.) Feel free to look something up if that interests you, but I figure this ranch setup is already involved enough without going on a deep dive on critter drowning mechanics.
The easiest critter to drown? Hatches have a fairly simple yet reliable auto-kill setup with Automation. We’re not going to cover that quite yet, as we have a few higher-priority items to cover first down here in the Oil Biome.


images way too small, you cant see shit.