
This is a list of helpful buildings for your bases in the game, updated for the Ranching Upgrade Mark I. For each building, I’ll explain what it does, why it’s good, and some ideas for how to set it up.
More ONI Guides:
Chlorine Room
Goal
This room is all about using pesky Chlorine to solve our issues with the peskier Slimelung germs found in the Swamp biome.
Approximate Timing
This building is really useful when you’re moving from the beginning to the middle part of the game. It doesn’t need very advanced technology or materials, and you don’t need much processed metal to build it. But, it’s not perfect at stopping Chlorine gas from escaping, so later on, you’ll probably want to build a better one.

Design Basics
A Chlorine atmosphere will rapidly and passively disinfect any contaminated resources stored within it; this room is designed to take early-game advantage of that fact while attempting to minimize the spread of Chlorine. While this could be enhanced further with water-lock techniques, I personally prefer to avoid water-locks due to their effects on stress, as this room will be frequently used for sustained periods of time when pioneering within a Swamp biome.
Keep in mind that you need to go into this Chlorine room from the top. Because Chlorine is a very heavy gas in the game (only one natural gas is heavier than it, and it’s heavier than Oxygen), this top entry helps keep the Chlorine inside as long as the pressure inside the room is about the same as outside.
Making the room one tile deeper where you enter from the hallway will give you even more protection against Chlorine getting out. But even with the design shown, the room should work for about 50 cycles with the Chlorine it starts with.
Researches Required
- Decontamination (Tier 3) – unlocks the Ore Scrubber and Deodorizer
- Distillation (Tier 3) – unlocks the Algae Distiller
- Improved Ventillation (Tier 3) – unlocks the Gas Shutoff
- Automatic Control (Tier 2) – unlocks the Signal Switch and basic Automation Wire
Additional Recommendations
- Healthcare (Tier 3) – allows use of the Hand Sanitizer over Sinks.
Other Requirements
Use of Hand Sanitizers will require over 50 Bleach Stone – aim to have 65kg of it available for your construction efforts, as the first 50kg will be fully consumed by the initial construction of a Hand Sanitizer.
You’ll need a minimal amount of Refined Metal – even a single batch should be enough to supply this room’s needs.
This concludes the build’s overview. I only advise continuing in this section whenever you have decided to actually build this construction pattern in-game.
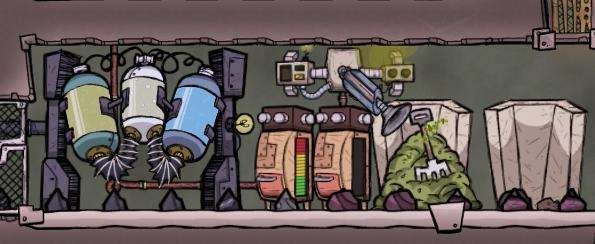
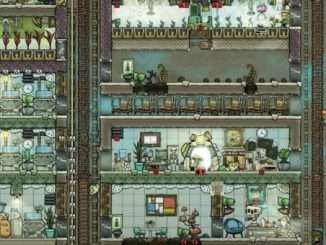
Design Details
The Storage Compactors you see are set to hold exactly two materials and are set to a high sub-priority to ensure rapid containment of said materials and their side-effects:
- Slime
- Bleach Stone – because it (slowly) emits more Chlorine
Storing Bleach Stone in the same compactor as Slime helps to ensure that the stored Slime sits in emitted Polluted Oxygen bubbles as little as possible.
Note that the Chlorine chamber also contains an Algae Distiller. Building this refinement building within a Chlorine atmosphere allows direct decontamination of distillation products before they’re even expelled from the structure!
The three doors in this construction are designed to restrict access in a manner advantageous for use in germ containment:
- The hallway door should be set to allow a specific set of Dupes access through to the infected areas beyond your base, which in this image means right-to-left passage only. Try to keep this number low to prevent overwhelming the room’s germ-containment measures.
- The right-most door should be set to allow only bottom-to-top passage, which allows Dupes to return from the field while preventing random Dupes from bypassing the top door entirely.
As a result, Dupes journeying to the Swamp biome will utilize the upper hall. When they return with Slime or other contaminated materials, they will pass through the Chlorine chamber from left-to-right, ensuring containment of unwanted germs so long as the Ore Scrubbers and Hand Sanitizer are not overwhelmed.
As Slime has a tendency to emit Polluted Oxygen over time, you’ll need some way to handle those emissions and prevent their spread. Toward this end, note the Gas Pump, Gas Filter, and Gas Shutoff. The Gas Shutoff should usually be set to “off” in order to minimize Power consumption – the Gas Pump will not consume Power if blocked.
Whenever the room contains high amounts of Polluted Oxygen, you should instead activate it through the Signal Switch; this will enable circulation within the room. The Gas Filter should be set to “Chlorine” to ensure that any other gases are removed from the room, preferably directly onto a Deodorizer or few.
In order to establish a Chlorine atmosphere within the room, we must have some way of supplying it with its initial Chlorine. Toward this end, note the room’s Gas Valve. It’s set to prioritize any incoming gases over any being actively circulated within the room and comes after the Gas Shutoff so that the room can be filled regardless of whether or not the room is in “circulation” mode.
Natural Gas Plant
Goal
To utilize our colony’s available Natural Gas resources for long-term Power generation.
Approximate Timing
This construction pattern is best utilized whenever you first discover a high-output Natural Gas Geyser. Barring that, consider implementing it along with a Fertilizer Room whenever your base has a high amount of contaminated Polluted Water.
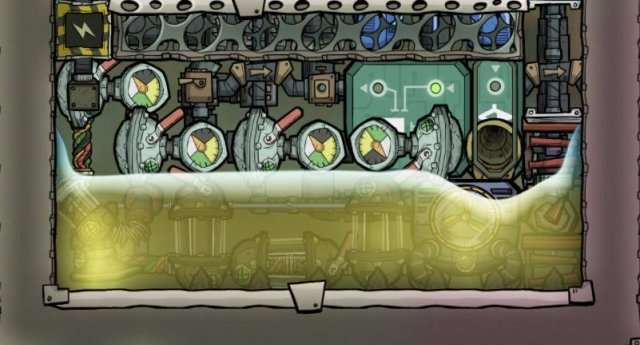
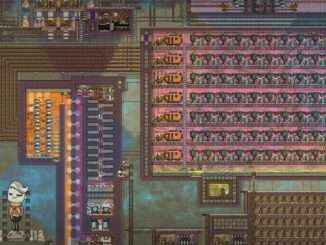
Design Basics
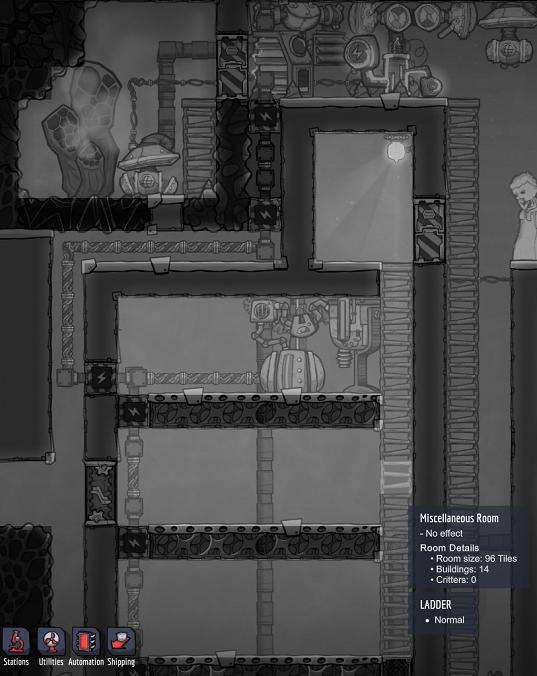
This room has 96 tiles, which is the biggest a Power Plant room can be in the game. So, this design is made to fit as many power generators as possible, which will help you deal with other problems later on. If you set up the pipes carefully, you can eventually put six Natural Gas Generators in here as your base gets bigger.
Here’s what the room looks like later in the game. These pictures are from Cycle 256 of my game, and it can produce up to 7.2 kW of power when you have room bonuses!
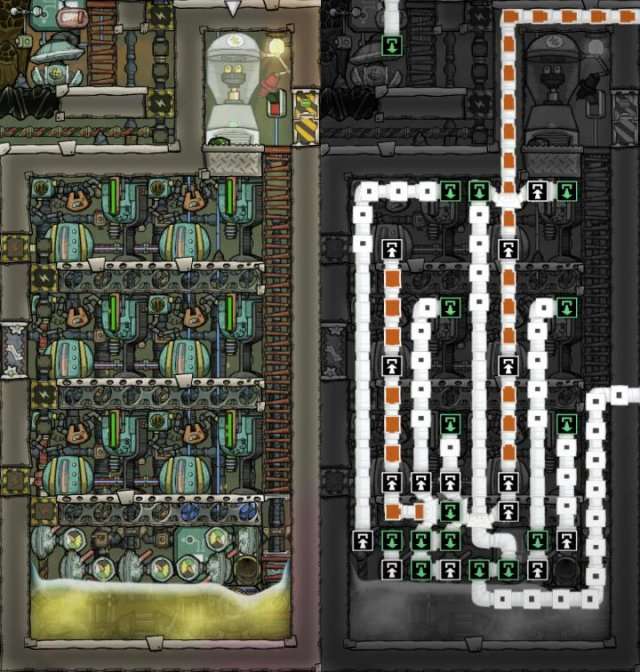
Directly beneath the room is a four-tile-high tank for Polluted Water emissions, accessible through the bottom-right Pneumatic Door directly beneath the room’s Ladder. We use Mesh Tiles throughout the room to ensure all Polluted Water lands within this tank. The top two rows of said tank should be utilized to ensure the Carbon Dioxide emissions of the room’s Generators can safely merge for export into a single Gas Pipe.
For details on future extensions to the Polluted Water tank, be sure to check the Polluted Water Purification and Cooling part of this guide’s collection of construction patterns!
Finally, note the Smart Battery just above the Power Plant room – by utilizing its Automation output, we can turn on the Generators only when necessary in order to conserve resources when possible! Note that it should be connected via Automation Wire to each Natural Gas Generator in the room.
Researches Required
- Fossil Fuels (Tier 3) – unlocks Natural Gas Generators
- Advanced Power Regulation (Tier 3) – unlocks Heavi-Watt Wire and the Power Transformer, necessary to handle the room’s Power output
- Generic Sensors (Tier 3) – unlocks the Smart Battery
- Filtration (Tier 2) – unlocks the Gas Valve, which you’ll need to ensure only Natural Gas enters the room’s input Gas Pipe.
Additional Recommendations
- Advanced Automation (Tier 4) – allows automation logic.
- HVAC (Tier 4) – provides the Thermo Sensor.
- Improved Ventilation (Tier 3) – provides the Atmo Sensor.
Researching these will allow for safe control of a Gas Pump in a Natural Gas Vent’s chamber, which I advise building at the same time as your initial Gas Pump.
Other Requirements
You’ll want around 300 Refined Metal on hand for the required Automation-related buildings and another 100 or so if implementing the additional recommendations.
Potential Issues
As the room is rather packed, note that there is no space to insert a cooling solution within the room, which will eventually become necessary. Fortunately, there are no Liquid Pipes required within the Power Plant room itself, so liquid-based cooling will be extremely possible later in the game once it becomes necessary.
Fertilizer Plant
Goal
To convert infected Polluted Water resources into safe Fertilizer and Power-friendly Natural Gas.
Approximate Timing
During or after implementation of a Natural Gas Plant.

Design Basics
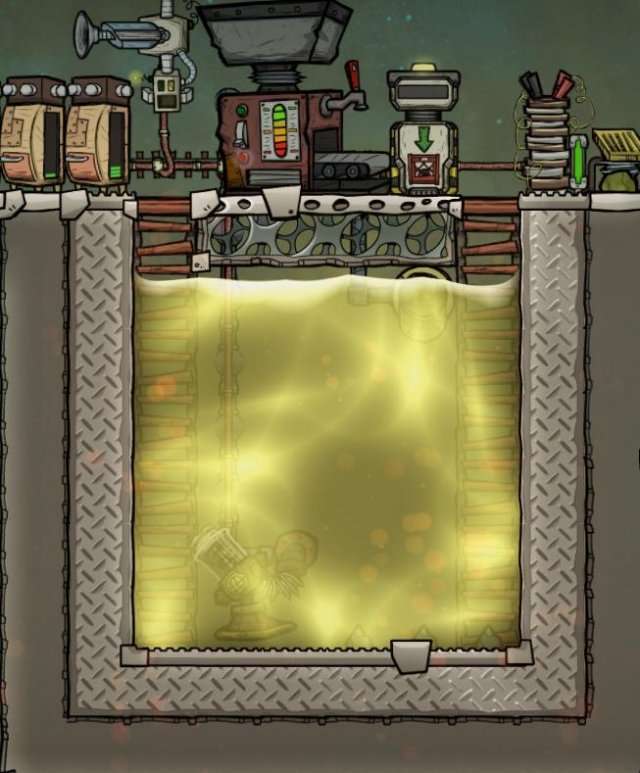
This room is designed to take surplus unwanted Polluted Water (especially contaminated sources!) and convert it into useful resources. Fertilizer is useful for operating Farm Stations and feeding Hatch ranches, while Natural Gas provides resources extremely useful for Power Generation.
Since we don’t want Natural Gas to escape our Fertilizer Plant, I recommend utilizing Conveyor systems to automatically deliver produced Fertilizer outside the room, where Dupes can pick it up for general use as needed.
In the image above, I combined the room with a low-output Natural Gas Geyser, which isn’t at all necessary for utilizing this construction pattern.
Researches Required
- Agriculture (Tier 3) – unlocks Fertilizer Synthesizers
- Ventilation (Tier 1) – unlocks Gas Pumps and Gas Pipes
Additional Recommendations
- Solid Transport (Tier 5) – allows full use of Conveyors. Its pre-requisite includes the Auto-Sweeper.
- Low-Resistance Conductors (Tier 4) – for Conductive Wires.
- The room’s circuits will likely draw over 1 KW total.
- Conductive Wires use far less resources than Heavi-Watt wires and can pass through Tiles like regular Wire.
- Generic Sensors (Tier 3) – for the Clock Sensor.
- Decontamination (Tier 3) – for the Mechanized Airlock.
Other Requirements
You’ll want to have very significant stores of Refined Metal for this one due to the use of Conductive Wires and Conveyors.
This concludes the build’s overview. I only advise continuing in this section whenever you have decided to actually build this construction pattern in-game.
Design Details
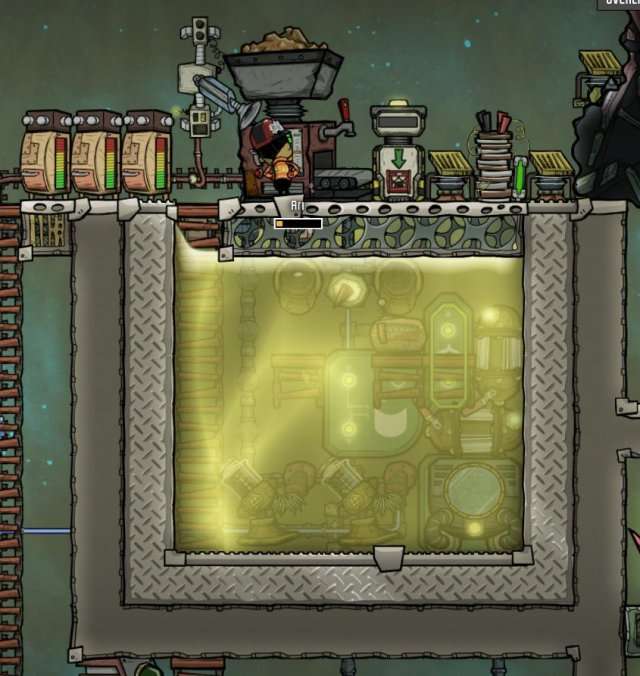
As Auto-Sweepers cannot “sweep” through Tiles of any kind, the top row of Fertilizer Synthesizers has been built on top of Mechanized Airlocks. (Neither Pneumatic Doors nor Manual Airlocks will work.) These are connected via Automation Wire to one of the Clock Sensors, which emits a very brief Active pulse once per cycle.
This pulse allows any produced Fertilizer to drop where the Auto-Sweeper can reach it at the cost of briefly deactivating the Synthesizers themselves – I advise aiming for an approximately 0.5 second duration on that Clock Sensor at some point during your colony’s Night.
Speaking of Clock Sensors, I strongly advise linking one directly to your Auto-Sweeper. If you lock the Fertilizer room, activating it for only 6% of a cycle is long enough to retrieve all Fertilizer generated by the Synthesizers during a cycle, so turning it off (via automation) outside of that interval will save you significant Power. I advise also having this active period during the Night, as your Dupes will not be operating Power-consuming machinery then.
Another tip when working with Conveyor systems – set your output Conveyor Receptacles to extremely low priority. (I’ve placed mine just outside the room to allow access to most of the generated Fertilizer without letting Natural Gas through.) If any storage container (like a Conveyor Receptacle) is lower priority than another, Dupes and Auto-Sweepers will automatically move resources to higher-priority storage over time. If the priority is too high, on the other hand, Dupes might never clear your Conveyor systems’ output resources!
This room can be extended for great distances vertically upward by use of the Mechanized Airlock trick. Don’t bother extending the brief pulse; all that matters is that the output Fertilizer will drop down to a level that the Auto-Sweepers can reach over time.
Steam Vent Enclosure
Goal
By utilizing Wheezeworts and Tempshift Plates, the primary goal is to provide enough cooling to the Steam Vent’s enclosure that all emitted Steam condenses rapidly.
Approximate Timing
Discovery and dormancy of a useful Steam Vent before sustainable liquid cooling solutions are available.

Design Basics
Hydrogen is the most conductive naturally-occuring gas in the game and is the most effective gas to pair with Wheezeworts. As a result, when the upper chamber is filled with Hydrogen, the top chamber provides a consistent source of cooling to the enclosure.
The Pitcher Pumps are present to allow Dupes to draw from the renewable resource pool that a Steam Vent provides. Note that most uses of Water requiring hand delivery can use hot Water that would ruin a farm; use of Steam Vent Water helps to preserve your cooled Water supplies instead when possible. In particular, research tends to be very costly in Water.
Researches Required
- Smelting (Tier 4) – unlocks Metal Tile. The prerequisite also unlocks Tempshift Plates.
Additional Recommendations
- Improved Plumbing (Tier 3) – for the Hydro Sensor
- Generic Sensors (Tier 3) – for the Clock Sensor
Other Requirements
You’ll need to pump a pocket or two of Hydrogen into the top chamber for effective cooling to take place. Furthermore, significant Refined Metal is strongly advised for the Hydrogen chamber’s floor.
Potential Issues
Avoid dumping heated sources of Water from outside the enclosure into it; until you are able to implement liquid cooling in the enclosure’s upper half, you’ll need all the cooling you can get to prepare for the Vent’s active phases.
This concludes the build’s overview. I only advise continuing in this section whenever you have decided to actually build this construction pattern in-game.
Design Details
Construction materials used:
- The walls, aside from the two access doors, are Abyssalite. We want to limit the spread of Heat from this enclosure as much as possible.
- The Tempshift Plates are all Granite.
- Granite is the most conductive Raw Mineral; its conductivity beats out both Water and Steam, so Metals wouldn’t provide much cooling gain.
- At the point you’d be worrying about tapping a Steam Vent, you’ll have tons of the stuff, and it’s much easier to use en masse than Refined Metal.
- As Granite isn’t too Conductive, and Tempshift Plates have high mass, this setup can also serve as a decent temperature buffer to prevent wild swings in Heat levels in the Steam Vent room and facilitate long-term rapid condensation of Steam.
Take care with your initial construction efforts for the enclosure; I advise building everything below the actual Steam Vent completely before mining out the Vent’s surrounding floor tiles, which would dump preexisting heated Water into your work area.
It’s possible to prepare much of the enclosure before actually accessing the Steam Vent itself, though you’ll definitely want to wait for Vent dormancy before constructing most of the Tempshift Plates.
While the use of Clock Sensors in the build may not be intuitive, there is one very significant detail that makes them extremely useful – you can directly adjust the settings without waiting on a Dupe to implement the changes. This allows you to activate and deactivate buildings in areas that are inaccessible to Dupes… like your Hydrogen chamber.
I advise ensuring a small amount of Water always remains in the reservoir at the enclosure’s bottom during your initial implementation; this will help balance out the temperature of newly-produced hot Water.
Later in the game, I advise attaching an Exosuit Checkpoint to one of the enclosure’s sides for easy access during activity. Furthermore, once your base has liquid cooling available, consider eliminating one of the Pitcher Pumps to allow dumping alternate sources of excess Water into the enclosure during times that your Steam Vent is dormant. You may wish to expand the enclosure horizontally to ensure Pitcher Pump access to Water when its reserves are low.
Metal Factory
Goal
To facilitate long-term, efficient Metal Refining efforts.
Approximate Timing
After accessing a pre-existing Polluted Water pool from the Swamp biome and after your base can regularly output a minimum of 2 kW Power.
Design Basics
The core idea of this construction pattern is that Polluted Water reservoirs make excellent Heat batteries due to Polluted Water’s high specific heat and boiling temperature. Thus, constantly cycling an isolated reservoir’s Polluted Water through a Metal Refinery allows significant amounts of Refined Metal to be produced before the resulting Heat must be addressed. You should easily be able to produce over 10 tons of Refined Iron (the worst Heat offender) before Heat becomes an issue!
Also worth noting is that when Polluted Water is put through a Water Sieve, the output Water is always 40 C. Once the reservoir becomes too heated, we can simply run it through a Sieve to eliminate vast amounts of unwanted Heat and resupply from an alternate reservoir if necessary. This construction pattern also synergizes ridiculously well with a Cool Slush Geyser, should one exist in your world.
Researches Required
- Smelting (Tier 4) – unlocks the Metal Refinery
Note that the recommendations below can easily be delayed without issue; they merely help to streamline the flow of resources.
Additional Recommendations
- Smart Storage (Tier 4) – allows automatic delivery of locally-stored Raw Metals.
- Solid Transport (Tier 5) – allows remote delivery of produced Refined Metals.
Other Requirements
Significant quantities of relatively cool Polluted Water.
Potential Issues
The Polluted Water reservoir will output very significant amounts of Heat when its heat capacity is nearly maxed out.
This concludes the build’s overview. I only advise continuing in this section whenever you have decided to actually build this construction pattern in-game.
Design Details
Why does this build include a Tiny Battery? Whenever a single building requires over 1 kW Power per second, it becomes necessary to attach some sort of Battery to said building’s circuit if its primary Power input is from a Power Transformer; otherwise, the building will rapidly cycle on and off, getting very little work done.
The Metal Tiles lining the reservoir serve to evenly distribute the contained Heat. Feel free to use plain Tiles during the initial round of construction and change them out for Metal Tiles (preferably, Gold) at a later point after you have done significant amounts of refinement.
The Metal Tiles also serve to synergize with a later extension to this construction pattern wherein a Thermo Aquatuner may be placed to perform limited liquid cooling, allowing the Aquatuner’s temperature to be managed properly.
An example implementation of the above-mentioned extension is shown below; my example world has a Cool Slush Geyser, so I used its output to cool the reservoir and convert overflow into Water through an unseen Water Sieve, which is then cooled within the reservoir itself without issue.
Polluted Water Purification and Cooling
Speaking of which, let’s take a further look at how such a cooling system might work.
Goal
To produce ideally-cooled Water from excess Polluted Water.
Approximate Timing
When your Natural Gas Plant’s output reservoir is over halfway full. This one’s a two-parter, which is a little different. First, the Purification zone:
Secondly, the Cooling zone. This example connects with the Natural Gas Plant’s Polluted Water pool:
Design Basics
The Purification section allows near-complete automation of Water filtration. One Storage Compactor is set for Sand and the other to Fertilizer + Polluted Dirt; this allows the Auto-Sweeper to manage the Water Sieve completely and reduce the Compost errand load for your Dupes dramatically. Sand and Fertilizer will still require manual deliveries, but those are simpler tasks that can be done in bulk, and are thus less costly to have Dupes manage.
The Cooling section relies on the fact that Water Sieves output 5kg Water at 40 C. The trick here is to double-back the output of the Sieve onto itself through a Thermo Aquatuner. Once the loop is up and running, doing this allows the Thermo Aquatuner to have a net effect of cooling 5 kg Water per second by 28 C – double the Thermo Aquatuner’s base cooling – without any additional Power draw! While this does emit considerable Heat into the Polluted Water pool, if that pool contains the Water we’re actively Purifying, we’ll be directly eliminating that Heat as part of the system without issue!
Overall, when the combined system is active, the resulting Water is output at 12 C, which provides an ideal resupply source for your colony’s central Water reservoir used for Bristle or Sleet Wheat farming.
Researches Required
- Liquid Tuning (Tier 4) – unlocks the Thermo Aquatuner
- Pressure Management (Tier 2) – unlocks the Liquid Valve
Additional Recommendations
- Advanced Automation (Tier 4) – unlocks the Filter Gate
Potential Issues
You might want to ensure that you can handle the output resources now that you can implement automated output to your main Water reservoir!
This concludes the build’s overview. I only advise continuing in this section whenever you have decided to actually build this construction pattern in-game.
Design Details
It’s a little tricky to get everything right with the piping in the Polluted Water reservoir, so let’s look at the piping structure. Note that the top-left pipe exports the resulting cooled Water through Abyssalite pipes and the top-right pipe supports import of alternative Polluted Water resources. (I use this pipe to dump output from my Carbon Skimmers and Algae Distillers.)
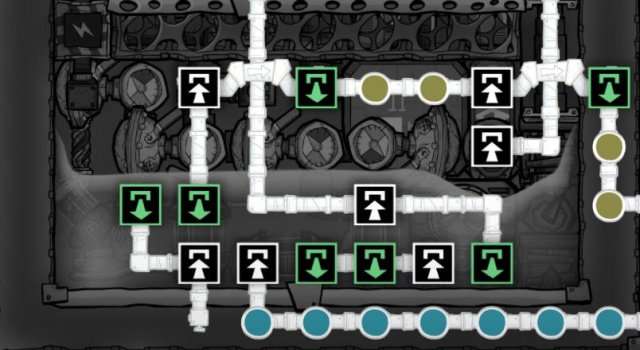
Both of the two valves nearest the Thermo Aquatuner are set to a rate of 5 kg, ensuring a rate of 5 kg input directly from the Water Sieve, even after the system is paused and unpaused via Automation.
Speaking of Automation, the most important thing is to ensure you have an adequate Filter gate in place – you want to make sure that the pipes between your Sieve and the Aquatuner are always full.
- Keeping the pipes full ensures that you have no accidental Liquid Pipe breakage.
- This also helps the Aquatuner to stay as efficient as possible, rather than wasting Power on half-batches frequently that never converge to 12 C Water.
- I like setting the Filter to its max delay – while this is obviously far more than enough to refill the pipes, it keeps the Aquatuner going for a longer stretch of time, helping it to optimally cool the output Water more consistently.
For the mathematically-oriented, note that our loop basically creates a geometric series with a ratio of 1/2, since the Sieve outputs half the possible throughput of an Aquatuner. The initial output from the Aquatuner is at 26 C (1x cooling), and once that loops back around, the Valve merges the two streams to give create a half-cooled stream (33 C) as the new Aquatuner input. This results in 1.5x cooling, then after another loop 1.75x, until the net cooling converges to 2x.
The Self-Powered Oxygen Module (SPOM)
Goal
To produce Oxygen at ideal temperatures (11.5 C!) from Electrolysis as Power-efficiently as possible.
Approximate Timing
Once a significant number of Wheezeworts are accessible, large amounts of Gold or Tungsten have been refined, and the base has 8 or so Dupes.
Design Basics
By use of careful construction and gas management, it is possible to passively separate an Electrolyzer’s Hydrogen output from its Oxygen. This allows the Oxygen module to produce a net positive amount of Power and Hydrogen. Furthermore, rather than utilize a powered Thermo Regulator, the room achieves identical cooling efficiency by utilizing a set of Wheezeworts to cool the SPOM’s Oxygen output. These two strategies combined allow the SPOM to be a zero-maintenance, heat-negative, and power-positive module that makes a fantastic addition to any colony.
You’ll want to use 4 Wheezeworts to get an output of 11.5 C, though if the output temperature isn’t very critical, you can safely reduce the number of Wheezeworts with little issue.
Researches Required
- Smelting (Tier 4) – unlocks the Metal Tile
- Improved Ventilation (Tier 3) – unlocks the Atmo Sensor
- Internal Combustion (Tier 2) – unlocks the Hydrogen Generator
- Pressure Management (Tier 2) – unlocks the Gas Valve
Additional Recommendations
- Generic Sensors (Tier 3) – unlocks the Clock Sensor and Smart Battery
Other Requirements
Large amounts of refined Metal for Tempshift Plates. Additionally, I advise having a large amount of initial Hydrogen available to help jump-start the SPOM’s atmosphere properly.
Potential Issues
Note that utilizing a SPOM directly ties your Oxygen supplies to your Water reserves, making Water management far more critical.
Additionally, the SPOM tends to generate more Hydrogen than it needs to self-power. You should either find a use for the extra Power or find a use for the excess Hydrogen; I advise the latter, as it can be used to power any Anti-Entropy Thermo Nullifiers you may find and will provide a source for Hydrogen for other future localized cooling solutions you may need.
This concludes the build’s overview. I only advise continuing in this section whenever you have decided to actually build this construction pattern in-game.
Design Details
Build Materials:
- Standard tiles and liquid pipes are made from Abyssalite. We could go with insulated, but that’s extreme overkill when working with Abyssalite.
- Gas pipes are made from Granite.
- Metal Tiles are made from Tungsten and Airflow Tiles are made from Wolframite.
- Tempshift Plates are made from (refined) Gold. Gold is near-equivalent to Tungsten aside from a slightly-lower specific heat. It’s not worth spending precious Tungsten when Gold does the same job and is far more plentiful; Oxygen’s not nearly conductive enough to warrant using large amounts of top-dollar materials.
- The top and left chambers are Hydrogen-filled.
- The internal Gas Valve is set to allow full throughput. This ensures that the Generator has a full reserve of Hydrogen for fuel before dumping excess Hydrogen outside the system.
Settings:
- The top chamber’s Atmo Sensor should be set to 800 g to ensure the pump maintains optimal pumping efficiency.
- The Oxygen chamber’s Atmo Sensor should be set to 600 g to ensure optimal throughput. Setting it higher will reduce the amount of Oxygen the SPOM produces and yield colder output.
- The top Smart Battery controls the system’s connection to external Power sources, allowing the system to start from zero initial Power. It’s connected to the Power Shutoff seen between the two Smart Batteries, which isolates the SPOM when disconnected through a “disabled” signal. Active: 0% Standby: 25% – we only want to draw enough Power to jump-start the SPOM.
- The bottom Smart Battery manages the Hydrogen Generator, maximizing our Hydrogen consumption efficiency. Active: 20% – this starts the Hydrogen Generator before allowing the SPOM to draw power from external sources (at 0%). Standby: 100%
- The Clock Sensor is only present to allow direct manipulation of the Electrolyzer’s active/disabled Automation state, with no need for Dupe interaction.
Construction:
This building requires great care during construction to ensure the gases line up properly during a live, non-debug game. My suggested build pattern:
- Get most of the core structure in place first, including its Pipes and Wires. Make sure you can approach the SPOM from the bottom and right easily. Do not block off the eventual cooling chamber from the pump chamber at the bottom.
- Prepare a vaccum: Use the Clock Sensor and top Atmo Sensor to deactivate the Electrolyzer and the Gas Pump connected to the Hydrogen Generator. Replace two of the Tiles beneath the Hydrogen Generator with Airflow Tiles. Connect the system to power, allowing the bottom two Gas Pumps to produce a near-vacuum.
- Once the top-left chamber’s pressure is around 200 g, deactivate the vacuuming pumps and fill the room with Hydrogen. Once the chamber is nearly full and the gases have settled, the top chamber should contain only Hydrogen. Make particularly sure this is true for the one-tile-wide path at the top-right! Once you have verified that this holds true, replace the temporary Airflow Tiles with Abyssalite again beneath the Hydrogen Generator. If this is stage has been done properly, we can be sure that the top chamber will only ever hold Hydrogen!
- Now it’s time to ensure the cooling chamber is properly prepared. Block off the cooling chamber from the pump chamber, but this time deconstruct all tiles beneath the Wheezeworts, making sure the plants have been placed first. (We won’t have another chance to install them without contaminating the chamber!) We can’t have the Wheezeworts active here because they will trap contaminants in the chamber’s top. After adding an extra tile beneath to help trap Hydrogen, pump Hydrogen into the cooling chamber until only Hydrogen remains in the cooling chamber’s space. Preferably, add an extra row full of Hydrogen to ensure zero contamination as well. You may find it useful to start the SPOM running and use its excess Hydrogen to help fill the cooling chamber, though its output will be hot during this phase. Once this is confirmed, then seal off the chamber again with Abyssalite.
The Math:
One Wheezewort cools 1 kg of gas by 5 C. Since Hydrogen’s specific heat is 2.4, relative to Oxygen’s 1.0, we note that with Hydrogen in the lefthand chamber we provide cooling equivalent to 14 C for 1 kg Oxygen. 14 * 4 = 56… and 70 C – 56 C = 14 C for the final output temperature. The SPOM goes further because it actually generates less than (though close to) 1 kg Oxygen per sec – the less Oxygen it outputs, the colder its output can become.
The Slime Containment and Algae Distillation System (SCAD)
Goal
To serve as a late-game solution for infected Slime containment and neutralization.
Approximate Timing
Once large amounts of Refined Metal is available and either of the following:
- The original Chlorine room has lost its effectiveness.
- Significant effort is needed to preserve your remaining, limited Chlorine resources.
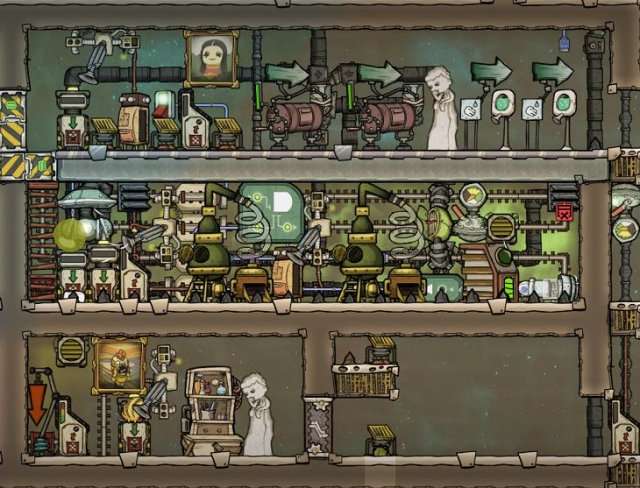
Design Basics
The SCAD system is designed to facilitate rapid automated sanitization and refinement of algae from infected Slime while reducing Slimelung spread as much as possible, giving your Dupes a place to near-instantly contain any Slime emitting the foul disease. It also aims to maximize the usefulness of any Chlorine sources you might find and minimize the need for any ongoing maintenance – once the room is properly built, the only reason to open it temporarily is to top off your Hand Sanitizers.
The SCAD system has three main modules:
- The access hall (top room) This is your Dupes’ main return from the wild Swamps, etc of the asteroid beyond your base, serving a role similar to that of a Sink in a lavatory. The Storage Compactors at the top accept, with high priority, mined Slime and Bleach Stone for containment.
- The Chlorine chamber (middle room)
Much like the old Chlorine room, this chamber passively disinfects all Slime it contains.
Unlike the old room, it can automatically manage its internal Slime without Dupe interaction.
The conveyors in the room act as a pre-distillation timer on incoming Slime to prevent any lasting transmission of Slimelung to distillation products. - The Puft ranch (bottom room, optional)
This room allows domestication of a Puft or two.
Any Pufts in the room will convert Polluted Oxygen back into Slime and send it back to the Chlorine Chamber.
If not utilizing the Puft ranch, either overpressurize the Chlorine chamber or forward output Polluted Oxygen onto Deodorizers.
Researches Required
- Solid Transport (Tier 5) – unlocks Conveyors
- Low-Resistance Conductors (Tier 4) – unlocks Conductive Wire, as regular Wire is insufficient for peak-use Power demands.
- Distillation (Tier 3) – unlocks Algae Distillers
- Improved Ventillation (Tier 3) – unlocks the High-Pressure Gas Vent
- Filtration (Tier 2) – unlocks the Gas Filter
Additional Recommendations
- Valve Miniaturization (Tier 5) – unlocks the Mini Gas Pump
- Advanced Automation (Tier 4) – unlocks logic Gates
- Ranching (Tier 3) – unlocks Ranching structures
Other Requirements
As the High-Pressure Gas Vent is needed to guarantee Chlorine chamber circulation, some access to Plastic is required.
This concludes the build’s overview. I only advise continuing in this section whenever you have decided to actually build this construction pattern in-game.
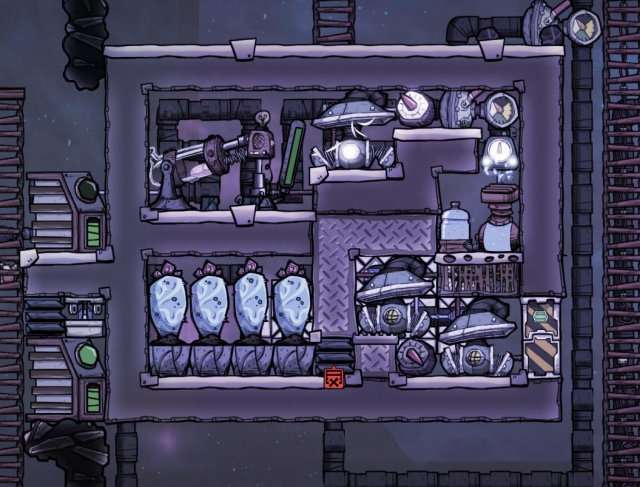
Design Details
Access Hall:
The access hall is designed to support approximately 4 Dupes – two explorers and two suppliers. Try not to overwhelm the hall’s sanitization structures; be sure to set permissions on the entry/exit door appropriately. It also contains a Signal Switch to allow direct deactivation of the Algae Distillers. With this and careful manipulation of structure priorities, it’s possible to temporarily deactivate SCAD’s refinement component and retrieve Slime and/or Bleach Stone if necessary.
Speaking of priorities: for standard use, I advise setting the input Storage Compactor’s Sub-Priority to 8 and the neighboring Loader’s priority to 9 to ensure rapid Slime containment.
For general use, be sure to set the horizontal Mechanized Airlock to block top-to-bottom access for every Dupe; when idle, Dupes will otherwise occasionally take tasks from your Auto-Sweepers.
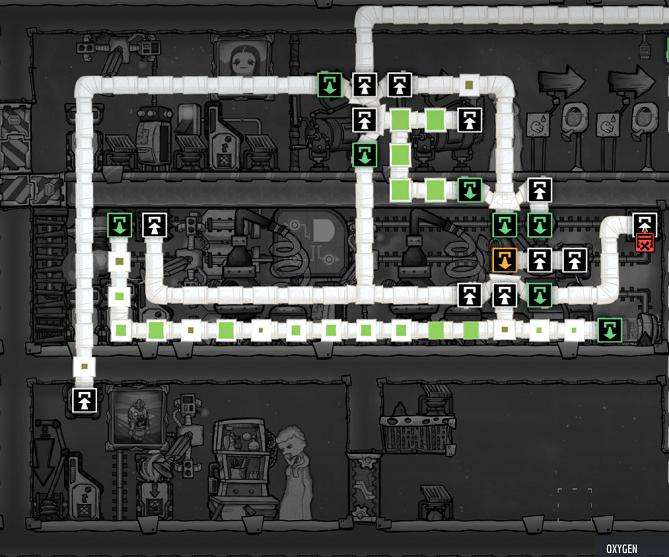
Chlorine Chamber:
This chamber is lined with a long, snaking Conveyor crossing nearly every tile in the room, which puts final Slime delivery on a time delay to ensure it receives a thorough dose of Chlorine before any attempts at refinement. This generally brings the germ count low enough to completely counter any transfer of germs during distillation afterward. Speaking of “distillation afterward”, by placing Algae Distillers within the Chlorine Chamber, Slimelung is actively killed during the refinement process, resulting in disinfected Algae that is automatically forwarded out of the Chlorine Chamber via Conveyors.
In this implementation, the Gas Pump and Mini Gas Pump maintain constant circulation within the room to ensure that only Chlorine remains in the room at any given time, since Slime likes to constantly emit Polluted Oxygen if the chamber is not overpressurized. Any Polluted Oxygen is dumped to the room below…
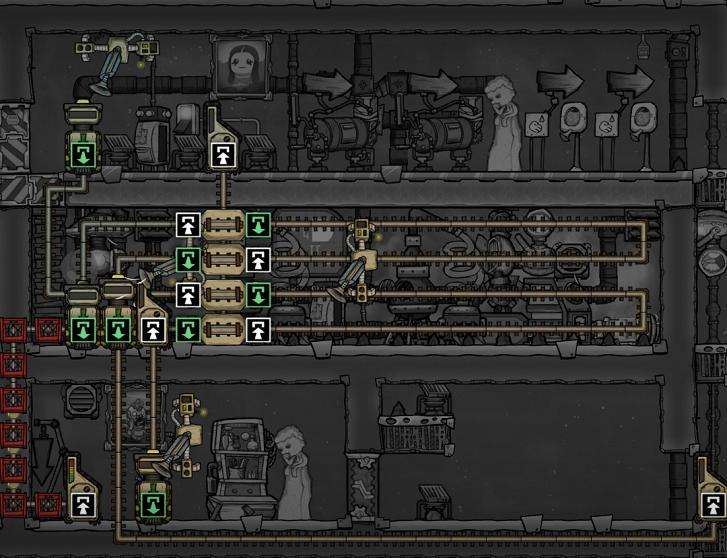
Puft Ranch:
Admittedly, this room is partly me experimenting with Puft ranching – if nothing else, this allows viable isolated domestication of Pufts and access to their eggs via reproduction. Either way, by forwarding Polluted Oxygen from the Chlorine Chambers to this room, we revert any emitted Polluted Oxygen back into Slime and can send it back to the Chlorine Chamber. Any discovered Morbs can also be placed here to contain their Polluted Oxygen and transform it slowly into Algae, allowing a (small) net positive from implementing the ranch.
In case your Pufts are near starvation, the bottom-left Conveyor Loader of the Chlorine room can be priority-tweaked to forward cleansed Slime to your ranch and maintain Calorie levels between rounds of Slime gathering.
Build References
Other Benefits
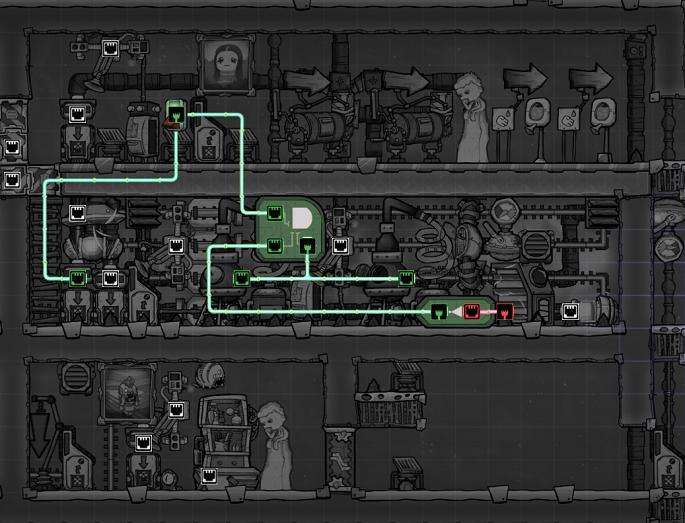
SCAD’s Automation systems temporarily deactivate Algae distillation (with potential for other components as well) when low overall power levels in your base are detected due to severe drop in its internal Smart Battery’s Power. This can be used to prioritize more critical areas of your base to maintain function during power shortages if and when they arise, restoring functionality automatically when full power is safely restored. First priority = containment, second priority = refinement.
The Chlorine Chamber’s Conveyor Bridges and Access Hall’s Conveyor Receptacle allow for remote, external sources of Slime to be imported to the SCAD system. This system is designed to be a one-off module to serve as the central Slime processing unit for your colony.
With the SCAD system, you’ll be safe to perform scads of mining within the Swamp biome and handle all the Slime that comes with it!

Be the first to comment