
The Legend of Zelda: Link’s Awakening Guides:
- Fishing Pond Guide (Minigames Tips and Rewards).
- How to Get the Ocarina and All Songs.
- Trading Sequence Guide.
Contents
- Key Cavern Dungeon Walkthrough
- Small Key 1 – Key Cavern
- Which Door to Open in Key Cavern
- Get the Stone Beak in Key Cavern
- Get the Key Cavern Map
- To the Key Cavern Mini Boss: Dodongo Snakes
- Key Cavern Mini Boss: Dodongo Snakes
- Key Cavern – How to Get the Pegasus Boots
- Key Cavern – Small Key 5
- Key Cavern – 300 Rupees Chest
- Key Cavern – Nightmare Key
- Key Cavern – Small Key 6
- Key Cavern – Small Key 7
- Key Cavern – Chest With 50 Rupees
- To the Key Cavern Boss Room
- Key Cavern Boss: Slime Eye
- Get the Sea Lily’s Bell
Key Cavern Dungeon Walkthrough
Tip: Come Prepared with Bombs Stock up with Bombs before heading into Key Cavern! You can buy Bombs from the shop in Mabe Village.
After collecting Richard’s Five Golden Leaves from Kanalet Castle, Link earned the Slime Key and made his way to Key Cavern.
Small Key 1 – Key Cavern
In the first room, Link promptly defeated the enemies that awaited him. A chest dropped to the floor. Inside, Link found the first small key.
Unable to progress through the left path, Link continued down the path on the right.
Tip: Come Back with the Pegasus Boots When you have the Pegasus Boots, you’ll be able to get pass the obstacle down the left path here.
In the next room, slimes immediately assaulted Link. With no where to go, he defeated them, unlocking the doors – and causing a chest to appear. However, Link did not open the chest – he could tell only an enemy was inside.
Tip: Don’t Open the Chest in the Second Room The Chest in the second room, which appears by defeating slimes, contains only an enemy inside. Don’t open it!
Eventually, Link made it to a dead end with a stairwell that lead downstairs.
Which Door to Open in Key Cavern
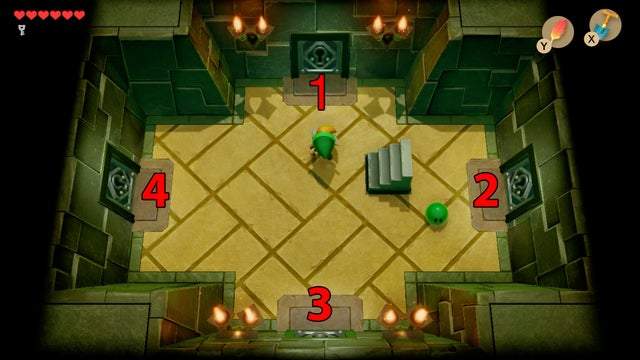
Tip: DO NOT Open Doors 3 and 4 These doors lead to nothing of importance. Ignore them, ESPECIALLY door four, which is a room of tedious pain and misery if you don’t have the Bow yet.
Link descended into a room of four locked doors. Undecided, he chose to open them in a clockwise pattern – a smart decision, he’d later find.
Small Key 2 – Behind Door 1
Behind the first door, Link defeated the enemies there. After picking up the small keythat fell, Link hit the switch so it turned orange, then left.
Get the Stone Beak in Key Cavern
Remembering the colored blocks on the floor above him, Link ascended the stairs to find his path to a chest unblocked! He opened the chest and found the Stone Beak.
Get the Key Cavern Map
Remaining upstairs, Link backtracked to the second room – the one with the false treasure chest. He went into the room to the right from here, and found his path unblocked! Link opened the chest and found the map.
New items in hand, Link went back downstairs to the room with multiple locked doors, and went through Door 2, the one on the right.
With one small key in hand, Link chose to skip Doors 3 and 4. If he did open them, he’d have to complete their trials only to earn a replacement key.
Tip: Door 3
Using the only small key to open this door, you must defeat the enemies here to get another one to get deeper into the dungeon. Throw the pot at the teleporting monster to make a key fall, and grab it before it falls down the pit.
Tip: Door 4
The room behind Door 4 is, like Door 3, totally unnecessary, and getting past it is a huge pain if you don’t already have the Bow. Having used a Small Key to get in, you’ll have to defeat the teleporting enemies here to gain another one. If you don’t have a long range weapon, you will have to take note of the enemy’s patterns. Leave a bomb in one of the teleportation spots, and quickly run to the enemy to make it teleport back to where the bomb is, so it will take damage from it. You will need to hit each with two bombs to defeat them!
To the Key Cavern Mini Boss: Dodongo Snakes
From Door 2, Link found himself in a room with conveyor belts. He ignored the single enemy here and went up the stairs.
In this room, Link defeated every enemy, opening the locked doors, and broke every jar, finding some useful bombs.
Tip: Get Bombs!
Make sure you have at least 10 Bombs before you enter the next room to be safe. You’ll need to land 6 of them sucessfully to defeat the mini boss!
Link then headed to the left of the room, and took the now open door north. Here, he found two Dodongo Snakes!
Key Cavern Mini Boss: Dodongo Snakes
The Dodongo Snakes took no damage from Link’s sword, so Link cleverly watched them for a moment. They opened their mouths with each movement! Bombs in hand, Link placed one in the path of a snake–and it exploded inside them, doing damage.
Key Cavern Mini-Boss Dodongo Snakes Tips
- Don’t bother trying to hurt the Dodongo Snakes with a sword.
- Place a Bomb right in front of their path – it will swallow it!
- Target the second one next. They’ll be invulnerable for a few moments after swallowing a bomb.
- You can tell they’re invulnerable if their mouths remain closed! Wait for them to start opening them again.
After defeating the Dodongo Snakes, Link took the door to the right.
Key Cavern – How to Get the Pegasus Boots
After Link defeated Key Cavern’s Mini-Boss, the Dodongo Snakes, he was able to enter the room to the right.
There, Link pushed the bottom left block to the left, and the block above it up.
This opened up the path to the treasure chest, which contained the Pegasus Boots!
Tip: How to Use Pegasus Boots
The Pegasus Boots are always equipped to Link now that you have them! Hold L or ZL to charge and run straight forward with your sword out. This will do a lot of damage to the enemies and obstacles in front of you. With the Pegasus Boots, you can now take out the teleporting enemies with ease, and you can get the Ocarina from the Dream Shrine.
With no where left to go, Link used his new-found Pegasus Boots to charge into the obstacles in the south-side of the room. Then, he was able to move the block out of the way and escape!
Key Cavern – Small Key 5
With the Pegasus Boots, Link thought of some previously impassable obstacles from earlier in the dungeon. He went back to the Dodongo Snakes room and used the portal there to teleport back to the first room of Key Cavern.
From here, he took the door to the right. Dashing (with L!), he was able to skewer the gravity-altering purple enemy at the far side of the room. With it out of the way, he opened the chest to find the fifth small key.
Key Cavern – 300 Rupees Chest
Link continued to the second room he entered in Key Cavern, the one with two passages. With the Pegasus Boots, he could now plow down the obstacles in the left hallway.
In the second screen of the hallway, Link killed the red slime, then made his way around to the room with the two skeleton-like enemies, the Stalfos. He defeated them – and a chest appeared! Inside, he found a Gold Rupee worth 300!
Tip: Why Did That Chest Appear?
A small hang up from the original Link’s Awakening, chests would often appear after defeating every enemy on the “screen.” Because the slime and skeletons share the “screen” here, even though they’re separated by a wall, defeating them all is the trigger!
Key Cavern – Nightmare Key
Link backtracked to the large room with the two blocks with keyholes. From there, he went north east, where he found a beakless owl statue. Using the Stone Beak on the statue, he gained a hint, then looked carefully at the floor.
It looked like an arrow! He went to the arrows point, and planted a bomb there. This revealed a secret opening, which he went through.
Link defeated the enemies here, then put another bomb by the cracked wall, creating enough space for an epic jump.
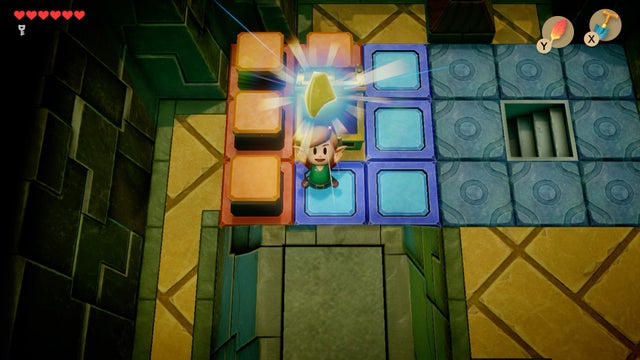
Tip: Roc’s Feather and Pegasus Boots Combo
Equip the Roc’s Feather! Together with the Pegasus Boots, you’ll be able to leap over long distances!
Backing a bit into the opening, Link activated his Pegasus Boots, then used the Roc’s Feather to clear the long gap ahead of him.
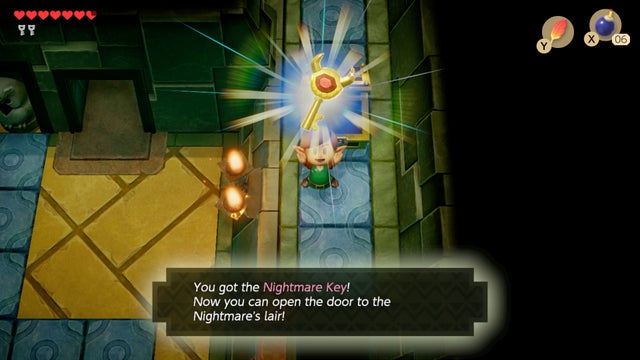
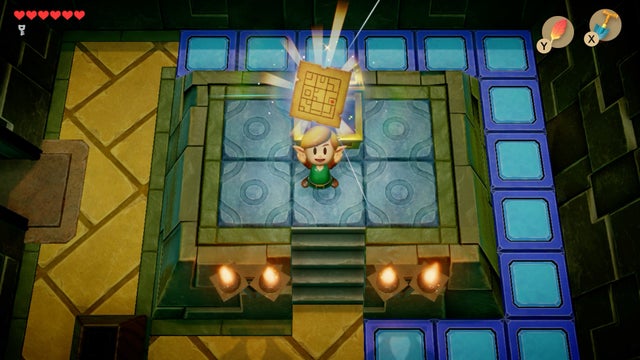
In the path ahead, Link used the same technique to clear another gap to the treasure chest, where he found the Nightmare Key!
Key Cavern – Small Key 6
Link fearlessly hopped off the ledge to the left, and continued north into the dungeon. In the next room, he encountered bombs that moved. After striking them, a count-down appeared on their “face”, and when it reached zero, it exploded.
Link simply ran from the bombs after striking them, moving on to the next room after defeating them. He encountered more, here, but cleverly threw the pots at the bombs to defeat them quickly.
He picked up the sixth small key that fell, then backtracked to the door to the left of the Dodongo Snakes room.
Key Cavern – Small Key 7
Through the door the left of the Dodongo Snakes room, Link once again found himself surrounded by enemies. With the Pegasus Boots, at least now he was able to easily defeat the teleporting nuisances by dashing into them.
When he defeated them all, the seventh small key appeared! Link continued south, pushing a block out of the way.
Key Cavern – Chest With 50 Rupees
Seventh Small Key in hand, Link traveled north, and made sure to defeat every enemy in the next room. When he did, a chest high up on a pathway appeared! Link continued north, then went up the stairs to the pathway. Knowing the chest was south of him, he went that way first to collect 50 rupees.
To the Key Cavern Boss Room
With plenty of small keys now in his possession, Link approached the odd block, and unlocked it. He used all the keys he needed to get to the stairwell, which he eagerly took.
Once below, Link saw an odd, angry red block that blocked his path. To get by, he used the Pegasus Boots to startle the creature, causing it to drop below.
Link scrambled to the other side of the room and ascended the ladder at the far end to the next room. There, he made quick work of the enemies and obstacles with the Pegasus Boots, and made sure to grab the floating hearts using Roc’s Feather.
In the last and final room, the only thing that accosted Link were a few bats. He swatted them away and went to the Nightmare Door.
The 8th and Final Key
If you defeat the Keese (bats) here, you’ll earn the eighth and final Small Key. However, if you’ve been following this guide, you shouldn’t need it!
Key Cavern Boss: Slime Eye
In the last and final room of Key Cavern, Link encountered a monstrous, metallic slime with a huge eye.
Touching Slime Eye’s body hurt Link, so he carefully maneuvered around it. He soon found that slashing the slime’s eyeball hurt it, and as he hit it, it began to split in two!
As Slime Eye separated, Link alternated between both eyes that emerged, hitting one after the other, until the two sides were on the verge on separating entirely.
Using the Pegasus Boots, Link charged into the small sliver of slime connecting the two parts, separating them.
Now, Link unfortunately had two slimes to deal with. Both leaped into the air, so high Link could barely see them. Luckily, the shadows they cast allowed Link to keep track of them. He ran from the shadows, and jumped with the Roc’s Feather as they landed to avoid the tremors. After attacking their eyes a few times, Link felled the foul slimes.
Slime Eye Boss Tips
- After the single eye begins splitting to two, stay on the outer edges of the eye you’re attacking.
- For example, if you’re attacking the right eye, stay on the right edge of it to land your attacks more easily.
- As soon as you see the slime connecting the two parts become very thin, use the Pegasus Boots to charge into it.
- If you want too long to do this, the Slime Eye will start to reform.
- Keep a sharp eye on the shadows when they start jumping. The bigger the shadows are, the closer they are to hitting the ground.
- Try to focus on one slime, so you can narrow down your attackers to one as soon as possible.
Get the Sea Lily’s Bell
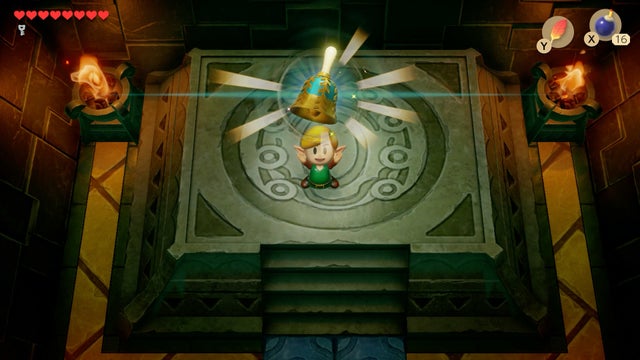
After defeating Slime Eye, Link ventured fourth and collected his final prize from the Key Cavern: the Sea Lily’s Bell, one of the Eight Instruments of the Sirens.
When Link emerged from the dungeon, he instinctively knew where the next instrument was hidden–behind the waterfall. But the owl clued him in where he must actually go next – to Yarna Desert.


Be the first to comment