
Elevate your game to the next level with this highly informative guide on Monster Train’s ultra secret unlockable clan, the Melting Remnant.
Contents
Guide to Melting Remnant Class
All credit goes to Pete, King of the Detectives!
Introduction
This clan is pretty interesting so I figured I’d write a little about how I’ve been playing them. I’m not really going to say how they compare to the other clans, this is a single player game and if you think it’s fun to play as Remnant then go ahead and play as them. Overall, they have access to some pretty unique cards and their cards have a lot of internal synergy, which can be a good and a bad thing. Thematically and flavorwise they’re pretty cool, which is why I like them enough to bother writing a guide.
General mechanics of Remnant
- Burnout – The unit is overstatted for its cost but dies after x turns. Can be mitigated or removed with other cards.
- Reform – Brings back a deceased unit and modifies it with 0 cost, +5/+5, and +1 burnout.
- Harvest – Something happens when a unit dies on the same floor (enemy or ally).
- Extinguish – Something happens when the unit in question dies.
Remnant also has two subthemes that aren’t keyworded:
- Benefit from units dying – Certain cards will scale with the number of allied units that have died this stage.
- Economy – Two units and one artifact will give you money, which is something the other clans don’t have access to.
Your starting card is Dreg
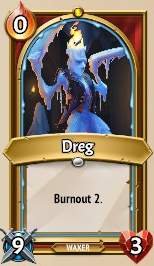
Dreg is one of the better starter cards in my opinion, but not for the reasons that Torch and Restore are (spot removal and high clan synergy). Since Dregs are 0 cost units that take up 1 room space, you can fit them into your train pretty easily and then they’re out of your deck for the rest of the stage (think of them as having consume). They even die after two turns, so the space they’re taking up is just temporary – compare this to the Train Stewards, which take up 2 space, cost 1 ember, and need to get hit a few times before they die. For this reason, I rarely find it necessary to try to remove all of them from your deck, meaning that you can focus on trashing other cards and end up with a really consistent deck by endgame.
How Do I Win?
Before I go into individual cards, I think I should explain what you actually need to do in order to win this game. There are essentially three types of enemies:
- Tanks (at the front of a row, usually one, have high health).
- Trash mobs (at the back of a row, usually two or more, have very low health).
- Bosses (have high health, high attack, but fight on a floor until one side gets wiped).
In order to win, you need to be able to deal with all three of these.
Tanks need to be dealt with by units or spells that do a large amount of damage in a single round. Units that can deal with bosses often help deal with tanks, but not always. For example, Umbra’s Crucible Collector is very strong against bosses but terrible against tanks. The Remnant champion’s burnout upgrade path gives you a very powerful answer to tanks, so this often isn’t as much of a problem for Remnant as it might be for the other clans.
Dealing with trash mobs is easy in theory – use an AoE spell like Glimmer, use a unit with sweep or multistrike, or use a few spot removal spells like Torch. Remnant sucks donkey balls at this, so you need to get an answer to trash mobs from your secondary clan.
Bosses have a lot more health and attack than tanks, but your units will get multiple combat rounds against them as long as they survive. Strategies that stack lifesteal, regen, or stealth on units are very strong against bosses because they greatly increase the amount of time your units survive and therefore deal damage. You can also create a giant floor full of meat shields with cards like Dripfall, although I don’t find myself doing this that often with Remnant.
So, my point here is that a card might be good at dealing with one type of threat, but useless against another. Therefore, when you’re putting your deck together, you need to consider A) which of the three enemy types your deck is currently weak against, and B) how any card you pick will help you deal with each enemy type. For example, if you get two Glimmers in your starting cards, you can put +10 magic power upgrades on them and you’re pretty much set on dealing with trash mobs. So, there isn’t much of a reason to continue taking spells that deal with trash mobs, and you should instead think about how you’re going to deal with tanks and bosses.
Champion – Rector Flicker
Rector Flicker, like every other champion, has three upgrade paths. One of them is among the best in the game, the other two are very underwhelming and make you wonder why you didn’t just pick Remnant as secondary if you wanted to use their cards.

- Burnout – This man is a straight up baller who will steal your girlfriend if given the chance. He’s a 0 cost 60/60 2-slot beater that doesn’t even care if he dies because he knows you’ve got his back with a reform card. The reason this guy is so good is because he gives you the only answer you need to tank units for most of the game, so you can really just focus on dealing with trash mobs and bosses (which he can also deal with for a while). Plop him down on round 1 and don’t invest any resources into him, just let him do his duty. If none of your starting cards add burnout or reform, make sure you grab one of those effects ASAP, and don’t play him on the first round until you do or else he’ll die before the boss shows up.
- Harvest – This one kind of stinks. This path will make your champion unkillable (maybe), but he won’t be able to take out tank units like the Burnout champion can. Let’s compare this to the Awoken champion. Spikes effectively gives her an AoE attack, while rejuvenate allows her to kill tank units with enough support. Harvest champion just sits there and takes hits. Wow.
- Reform – Has the biggest potential to be wacky, but I don’t think this is very good. The problem is that it just doesn’t do enough quickly enough to warrant your champion sitting around taking up space. You want the reform to trigger every round so that you don’t lose any value, but that means something needs to be dying every turn, which basically means you need to go full zerg rush and not have any tanks. But that means you have no defenses, which means the boss will destroy you. So what do you do? Have one floor for your champion and some backup, one floor with a tank and a backline unit, and one floor for suiciding units?
Unit Overview
Cards in bold, in my opinion, fill their role well and are always dependable. Cards in italics are worth considering but are more context-dependent. Cards with neither either have niche uses or just stink. Note that my love for Legion of Wax upgraded it to italics status even though it probably doesn’t deserve it.
Common
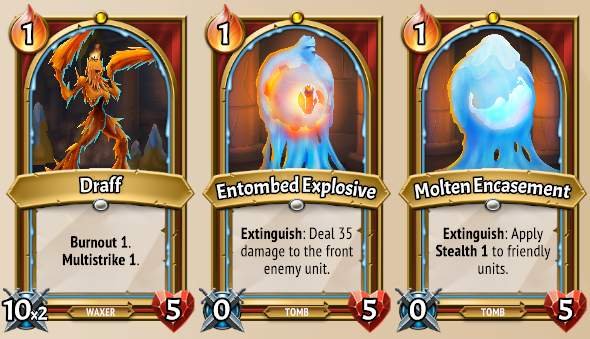
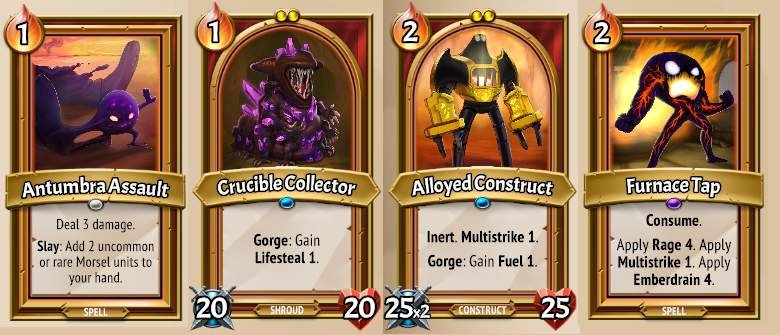
- Draff – This guy’s going to die the turn you play him unless you help him out somehow, due to burnout 1. Being a 1 cost 1 size multistriker means that he can be very helpful if you can get around his short lifespan. Putting him behind a Lady of the Reformed is the easiest way to do this and lets him help kill bosses. Taking one isn’t bad since, worst case scenario, he’ll do 20 damage and then die.
- Entombed Explosive – A good early chump blocker, especially if you can bring it back multiple times with reform effects. Can help finish off the early bosses, but falls off hard since its damage doesn’t scale. Can carry you through the first few floors if you get them in your starting deck, but I wouldn’t take one after Daedalus.
- Molten Encasement – Stealth is good, but I’ve never been impressed by this unit. If you’re trying to abuse extinguish trigger, this one might just be the worst of the bunch. Not the worst thing to get in your starting deck since they follow the Dreg philosophy, but you would much rather see an Entombed Explosive in your hand basically every time.
Uncommon
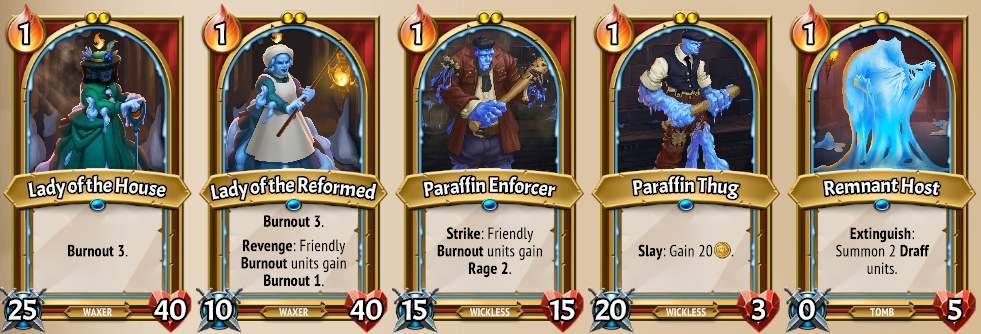
- Lady of the House – A weak impression of the burnout champion. The only thing she has on the other Lady is 15 attack, which doesn’t matter because the units doing the damage should be the ones behind her. I never take this, and I don’t know how she got a gold border.
- Lady of the Reformed – A very strong card in conjunction with other burnout units, because she essentially just turns off burnout as long as you put her on the first or second floor. You can do something like Draff – Burnout Champion – Lady and have a solid floor that you can just leave alone. Slap two +25 health upgrades on her and you’re good to go.
- Paraffin Enforcer – A cute card, but he needs friends to buff or he won’t accomplish much. Putting him behind a Lady of the Reformed will make sure the rage keeps stacking up, which is especially effective with Draffs around. If you give him burnout somehow, he’ll start getting the rage bonus too. Has a high ceiling, but try to think about what he’s realistically going to accomplish before you pick him.
- Paraffin Thug – One of your two economy units, and a solid early pick. Try to boost his health so he survives sweep and spike units. Multistrike can net you 40 gold per round if you put him behind something that can soften up/kill the frontline tank, like the Burnout champion. If you do that, keep in mind he needs to kill 6 units to recoup the gold you spent on the upgrade, plus 3 more if you rerolled.
- Remnant Host – For me, this has only been effective with some amount of support. On its own, it’s comparable to Entombed Explosives since the Draffs attack immediately after coming out (40 damage vs. 35) and then die to burnout. Intent on Death gives you the Draffs immediately so you can march out a line of little kamikaze pilots. You can also use this card to amp up the death count for things like Memento Mori.
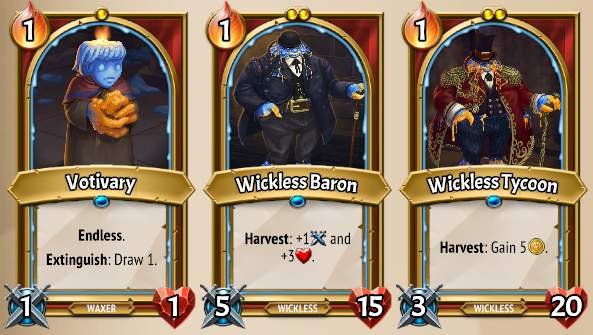
- Votivary – This is literally the only draw effect in Remnant. The problem is that this guy doesn’t really do anything except draw the (likely better) card you would have gotten had you not picked him when he dies. Intent on Death and the double extinguish artifact will draw you extra cards, but I rarely find myself needing card draw because of the way Remnant decks can filter themselves combined with the fact that I usually take double card draw on the boss artifacts.
- Wickless Baron – Budget gorge unit. Harvest triggers off of non-morsel allies and enemies dying, too, but +1 attack per unit death isn’t very impressive. Can be an okay tank if you give him a +health upgrade to start him off, but I don’t prioritize this guy too highly.
- Wickless Tycoon – Your other economy unit. More reliable than the thug because he just needs to be around to witness the death, but has no offensive or defensive presence. Good around morsels, imps, extinguish strats, and burnout units that you aren’t pumping up. If you’re already in a dodgy situation you probably don’t want to pick him, but if you can afford to put him behind your first or second-floor frontline, or shack him up on the third floor and feed him morsels and dregs, he can generate quite a bit of money in the long run.
Rare
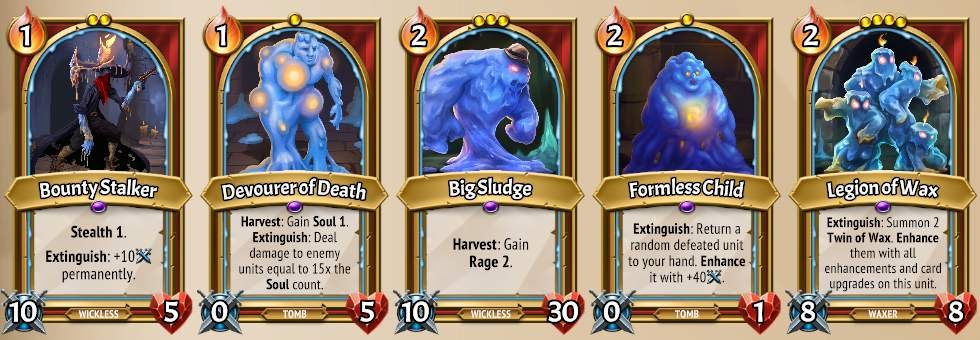
- Bounty Stalker – This guy can drag you over the finish line with the right support, so I always take him into consideration when I see him. Ideally you want to be able to reform him multiple times per stage, plus have some combination of multistrike, Intent on Death, and the artifact that doubles extinguish triggers. He also needs protection, either through a frontline tank or stacking Engulfed in Smoke. A good unit to copy towards the end of the game since your problem is probably going to be not doing enough damage.
- Devourer of Death – This guy is basically an Entombed Explosives that scales and hits the whole floor, which isn’t bad, but is it worth taking over other rares? Intent on Death will trigger the nuke without using up any souls, which can end up hitting for 150+ towards the end of the stage. Somehow fitting him into a floor with morsels can get that even higher. The soul count resets when he dies, so don’t think you can drop multiple nukes with reform effects. Honestly, I probably don’t take this guy as often as I should. By the time I see him, though, I usually already have some sort of AoE spell.
- Big Sludge – The chungus himself can become a pretty effective tank with some health upgrades, and his harvest ability lets him do quite a bit of damage, especially if you get multistrike or some way to boost rage damage. With that said, I would only take him if you were really hurting for a source of damage or had something like Furnace Tap to give him. His 3 size is a real bummer, and without some way to multiply his damage it’s hard for him to turn into a late game threat quickly enough.
- Formless Child – This card’s pretty fun. Note that the effect is NOT reform, so the revived unit keeps its original cost and doesn’t gain burnout. Doesn’t play well with morsels. Usually this guy will just bring back Dregs that you send in for kamikaze attacks. I’ve never felt like this unit was the reason I won a run, so maybe that’s a sign you shouldn’t be taking it. But hey, it only takes up one space and you can use Intent on Death and reform effects to revive more stuff.
- Legion of Wax – A fun card that unfortunately stinks. Cards that “enhance” carry over, but not cards that “apply” (no tomes, please). This guy needs a lot of support to be any good. In the image below I gave him multistrike, a largestone, and multiple applications of Razorsharp Edge, and I had Intent on Death to pop out the babies early. I think Intent is especially important since otherwise he doesn’t really do anything until the boss shows up. You could also Dripfall in your actual high-damage unit behind him, since health upgrades allow him to tank the boss for an eternity.
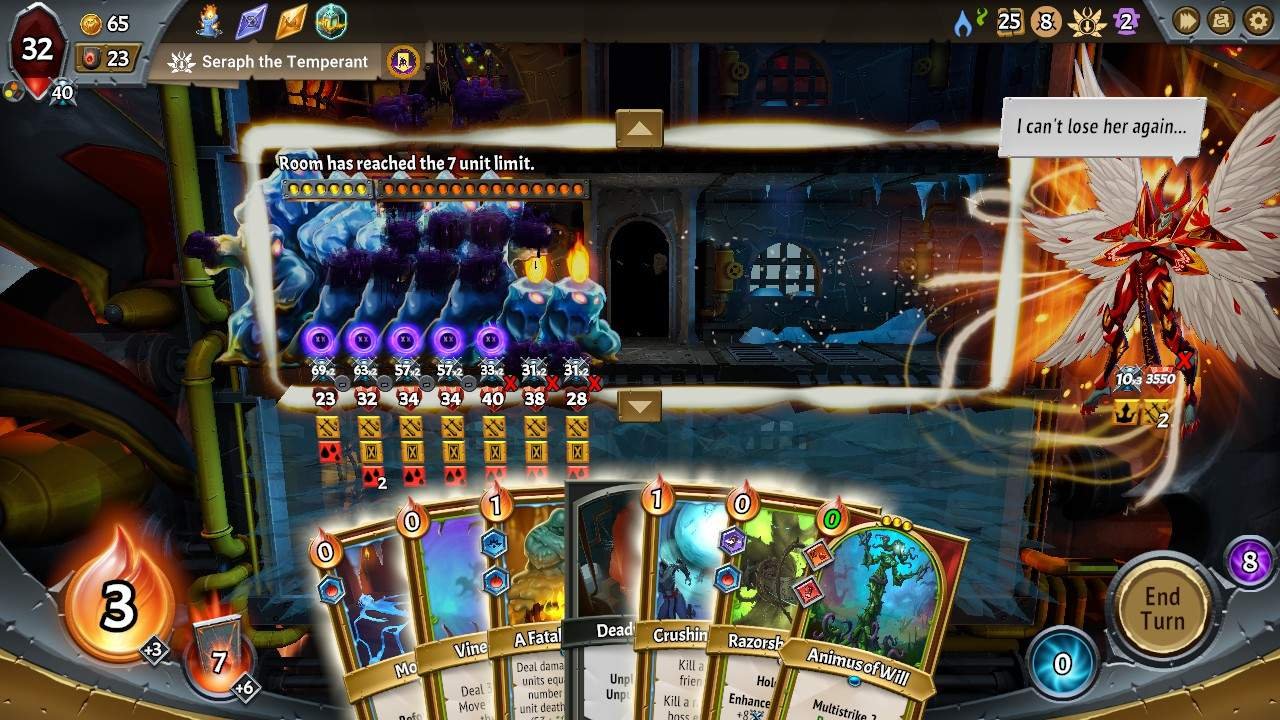
Rare footage of Legion doing anything useful.
Spell Overview
Like before, cards in bold fill their role well and are always dependable. Cards in italics are worth considering but context-dependent. Cards with neither are niche use or bad.
Common
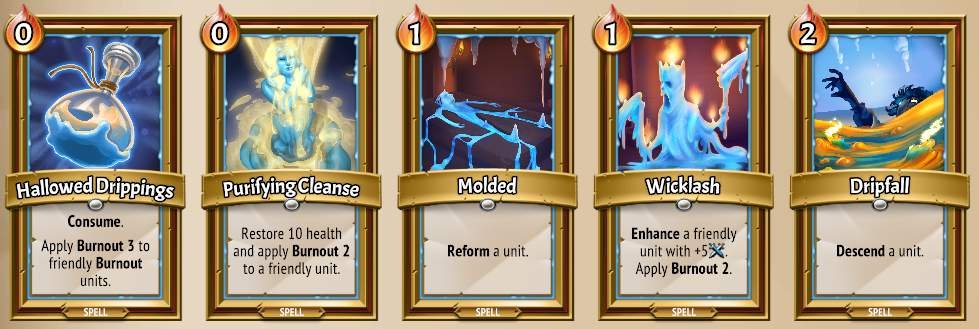
- Hallowed Drippings – I wouldn’t take this card normally, but if it’s in your starting deck it can be helpful in conjunction with the burnout champion. Giving him +6 burnout from the two copies will allow him and any burnout units behind him to survive for the entire stage
- Purifying Cleanse – Can be decent as a one-of or starting card. With this you can use the burnout champion as a frontline tank, and just constantly pump him for the heal + burnout lengthening effect.
- Molded – This is a pretty key card in conjunction with most of Remnant’s units. Major units to bring back are the burnout champion, Lady of the Reformed, Dregs and Draffs for chip damage, extinguish units, imps, and morsels. I’ll always take one and sometimes two, just because of how powerful the effect is.
- Wicklash – +5 attack ain’t bad, but as far as burnout-extending effects go I prefer Purifying Cleanse. Stacking this on a Draff can be good, but that’s about it since the burnout clause makes it awkward to use on non-burnout units.
- Dripfall – Moves a guy down, ally or enemy. You can use this to stack your first or second floor so that it has more guys than it’s supposed to. Keep in mind you won’t be able to replace your tank if they die because even if you reform them and Dripfall them back in, they get sent to the back of the line. So, if you’re floor stacking you probably want some defensive spells. I like to take one and give it a -1 ember upgrade. In general I think ascend effects are better since they can be used more offensively (they let you chase enemies up the train), but you take what you can get.
Uncommon

- Intent on Death – You’ll probably have at least one extinguish unit by the time you see this and it’s really good with almost all of them, so I usually pick up a copy unless I already feel like my deck can easily win the game. Note that this can be used on those golden cherubs that give you money when you kill them, but you need to get lucky with draws since they only stick around for one turn.
- Memories of the Melted – I don’t get this unless I already have a way to abuse it, which means I have an X spell that gives you a huge benefit for paying 10+ ember. Waxen Spike isn’t bad as a buff for a stacked burnout floor, but your secondary clan will probably give you a better target. Umbra’s Spike can be a good one.
- Sacred Wicks – Not a fan since the effect is random and you’ll probably just end up getting 2 Dregs out of it. Stick to Molded and Wicked Blaze.
- Crushing Demise – Very strong with the right setup. Ideally you want one of your upper floors to either be empty or full of expendable units. Trash mobs get cleared out on the first floor, then anything tanky that survives dies to this when they ascend. If you’re playing Hellhorned secondary, you can even ascend a unit to isolate it.
- Engulfed in Smoke – Remnant’s best solution to bosses. Doublestack and holdover lets you get 20+ stacks of stealth on a floor, which is enough time for anything decently strong to take out the boss. Burnout units obviously aren’t the best targets for this, but anything else is fair game. If you see this card, take it and figure out who’s going on your stealth floor.
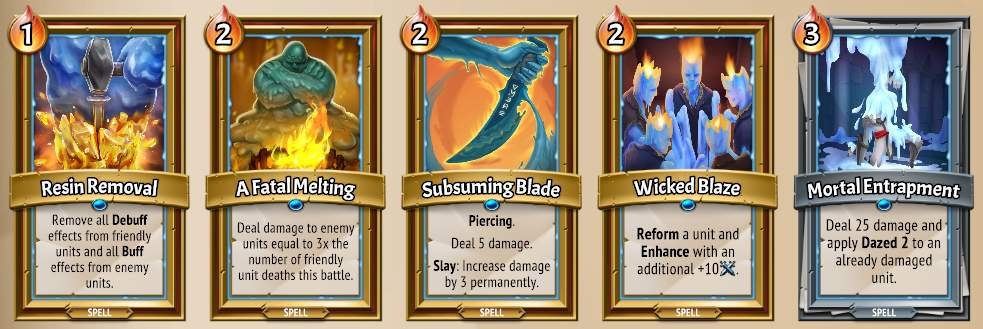
- Resin Removal – When this card is good, it’s insane. Here are some of the things this card removes: emberdrain (from Umbra cards), sap (from Seraph), dazed (from placing a unit on the third floor), rage, magic shield, stealth, and lifesteal. Removing those latter two completely invalidates two of the more annoying bosses, so that alone warrants always taking a copy.
- A Fatal Melting – Here’s your faction’s AoE spell, unfortunately it costs 2 ember and does nothing without magic power upgrades or a way to kill units quickly. Has a pretty high ceiling, though, if you’re running something like morsels. You’re better off grabbing something like Glimmer or Vent from your secondary clan. If Umbra’s your secondary, I’m sorry.
- Subsuming Blade – Your only form of targeted removal. Not bad with a cost reduction upgrade and holdover. Can be decent as a spell weakness payoff. Normally you can expect this to grow up to around 40 damage by the end of the game, but with holdover you can get it much higher and start sniping down tankier enemies that make it through.
- Wicked Blaze – I generally prefer Molded since it costs 1 less ember and, since Molded is common, by the time I see this I probably already have one or two copies of Molded and don’t need more reform effects. If you don’t have Molded, sure, go ahead and take one.
- Mortal Entrapment – This card is too expensive and it doesn’t do anything useful. 3 ember for 25 damage is a terrible deal. 2 dazed stinks too because Engulfed in Smoke effectively does the same thing for 1 ember, and for the whole floor, and without having a dumb “must already be damaged” caveat.
Rare
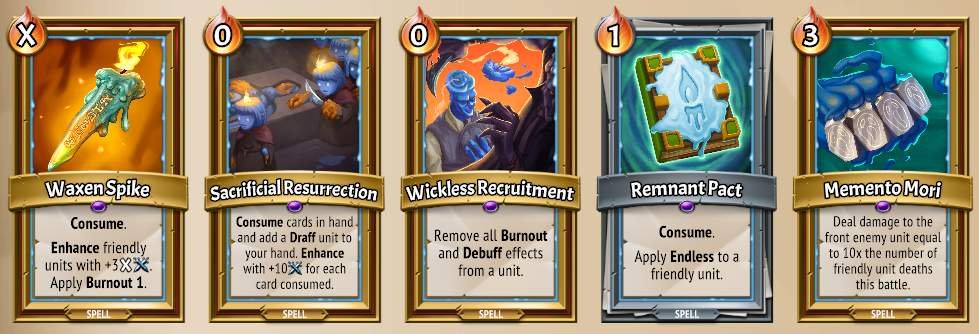
- Waxen Spike – Requires some way to generate a lot of energy, which isn’t usually something you’ll be doing with Remnant. Will turn every unit on the floor into a burnout unit, which could be good if combined with a Paraffin Enforcer and a Lady of the Reformed as frontline (I’ve never done this).
- Sacrificial Resurrection – Turns all the awful cards in your hand into a Draff, you put the Draff somewhere, the Draff dies at end of turn. As far as I know, this is the only way to temporarily remove blight cards from your deck. It also allows you to temporarily remove situational cards like Resin Removal. Once you’ve removed enough cards you’ll be able to draw your entire deck every turn. You should strongly consider taking this. The only downside is that you need to actually have good spells in your deck that you want to be drawing, so think of it as an enabler card. The Draffs can come in handy if you put them behind a Lady of the Reformed. Also the art for this card rules.
- Wickless Recruitment – You need to have a reason for taking this, otherwise it’ll just junk up your deck. With that said, I’m not sure when I would take it. You could reform non-burnout units and then remove the burnout penalty, or you could remove burnout from your champion so that you can stack Engulfed in Smoke on him. But, those don’t sound like winning lines to me.
- Remnant Pact – Endless is a bad keyword, especially for Remnants, so I never take this.
- Memento Mori – A big expensive nuke. For this to really pay off you want some way to amplify its damage, either through spell weakness or through sacrificing loads of units like morsels. Otherwise, you’re paying 3 mana for at most 100 damage on one unit, which is okay but not good enough to warrant taking it.
Secondary Clans
Remnants basically get a free pass through the first half of the game as long as you got the burnout champion, and if you didn’t get him you can still leverage cards like Dreg, Draff, and Entombed Explosive to push through. Thanks to your clan’s starting card being a 0-cost unit, you can make your deck really small after the first shuffle, allowing you to reliably draw key cards and enabling combo or buff stacking strategies without the need for things like Holdover. Most of your good cards also cost either 0 or 1 ember, so not being able to play out your hand is rarely a concern. Remnant has two major issues that need to be addressed:
- Removal for trash mobs – You get only one AoE and one target removal spell, both of which are at uncommon and cost 2 ember.
- Late game damage – This is especially an issue if you don’t get the burnout champion. Tank units in the final stages have up to 190 health, and sometimes you’ll get two spawning in a single wave. Few of the Remnant units can pump out enough damage to deal with this, and Seraph’s 4000 health is also a problem unless you have Engulfed in Smoke.
So, these are generally the things we’re looking for in our secondary clan.
Hellhorned
Torch solves your spot removal problems in the early game, especially if you get a +10 power upgrade on one. Imp tribal might be tempting, but rarely ends up being worth it. Rage stacking is a good way to pump your units over the edge damagewise. Even Ritual of Battle is usable since you’ll often have the ember to spare for it if you’ve reduced its cost.
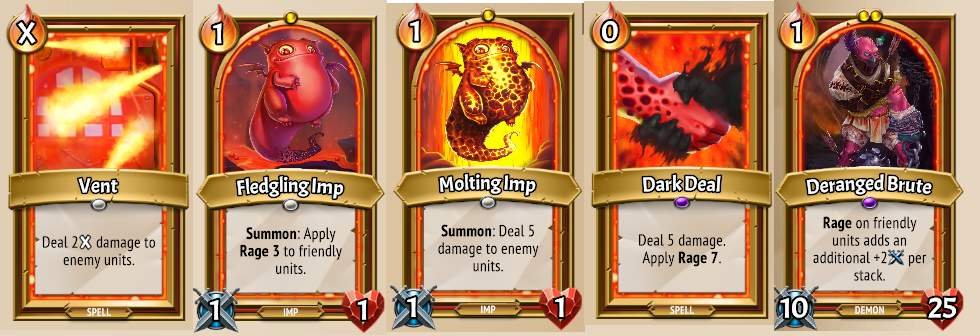
- Vent – Needs a +10 magic upgrade, but once it has one it’s 0 energy for a 10 damage AoE, which will take out trash mobs that don’t have armor buffs. I would always take one copy of this.
- Imps – You can reform them to get the effect multiple times per stage. The rage one and the one that does the 5 damage AoE are the best.
Awoken
Awoken has a lot of cards that involve healing and healing synergies, neither of which is very useful to Remnants. However, for some reason they also get access to some other silly cards that will fit into your deck very easily. Remove the starter card unless you get and plan on using the unit that gains spikes when he heals.
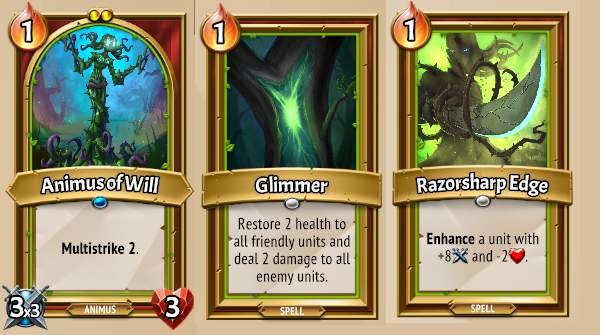
- Animus of Will – A very strong unit for taking out multiple enemy units per round AND bosses. Try to get a Largestone upgrade on it and put it behind your champion or some other tank. Get a copy of Razorsharp Edge and make it do a ridiculous amount of damage. Dregs make it unlikely that you hit this with Channelsong, so don’t count on that strategy.
- Glimmer – This is an instant pick, and at common you’re almost guaranteed to see it at some point. Give it a +10 magic power upgrade and never worry about trash mobs again.
- Razorsharp Edge – +8 attack is big, especially if you can cast this multiple times throughout a stage. The aforementioned Animus is a good target, but so are Legion of Wax and basically anything with multistrike.
Stygian

Although these two clans don’t have much obvious synergy, the low cost of the strong Remnant cards leaves you with extra energy to fit in payload Stygian spells. And, of course, Stygian is full of removal spells. Spell weakness can turn Subsuming Blade and Memento Mori into boss nukes, while frostbite can work with a combination of Coldcaelias, Titan Sentries, and Glacial Seals. I usually try to get rid of the Stygian starting card ASAP.
- Siren’s Song – Putting doublestack on this means you can leave your third floor completely clear and funnel resources into the other two.
- Lodestone Totem – I forgot to mention this one because I haven’t seen it in a while, pretend it’s in the picture. It’s the totem with the incant: sap ability. Putting this on the first floor and then using your cheap Remnant spells lets you neutralize basically everything in the game. Any enemies that get through will probably still have 0 attack and die to your pyre without doing anything. Copy it as many times as you can and nothing will ever touch you. I guess it’s balanced by being rare?
Umbra
Oh boy, this one’s rough. The Umbra starting card is terrible, so you need to prioritize getting rid of it before your deck can function properly. Neither clan has great AoE, either, so you might need to suck up your pride and take that Shadoweater the game always wants you to pick. Morsels provide the potential for really strong synergy, but it’s going to take some work to get off the ground.
- Morsels – Don’t go overboard on morsels. One floor dedicated to feeding a gorge unit is good, having two is questionable unless one of them is Alloyed Construct or Shadoweater. If you’re able to generate more morsels than you can actually play, your hand is just going to be full of dead cards. Molded and Wicked Blaze are good because they can function as morsel generators by bringing back dead ones, but they have other uses, too. They even let you pick the morsel you bring back, so you can just stack lifesteal on something. Feeding a Wickless Tycoon gives you a lot of money but means that floor is providing little to no damage and is using up resources that could go to other units. All your “unit deaths matter” spells are much stronger with morsels, but they still need time to ramp up. So, they still won’t help you stabilize early in a stage.
- Crucible Collector – The best gorge unit for drain tanking bosses. Put this guy on the top floor and funnel all your morsels to him, but keep in mind that he sucks at taking out regular enemies since if you give him multistrike, he’ll waste a lot of lifesteal stacks before the boss even gets to his floor.
- Shadoweater and Alloyed Construct – The two good gorge units for general use. Shadoweater clears out trash mobs on the first floor, while Construct with either a largestone or extra multistrike stacks can help deal with basically anything. Being able to max out Construct’s room every turn is especially important since you don’t want him running out of fuel right before the boss dies.
- Furnace Tap – This card on any unit with 80+ attack (cough cough your commander) can singlehandedly win you the game. Try to get Doublestack on it for that sweet sweet multistrike 2. Emberdrain might sound scary, but you can pretty easily get all your important Remnant cards to 0 cost so that they’re still playable after you tap.
Artifacts

- Combustible Wax – +3 to all your Burnout effects. This one’s pretty good because it applies to the starting values of Burnout units (so Draffs start at 4 instead of 1), and makes reform effects give +4 Burnout instead of +1. Essentially, it turns your Burnout units into regular units and makes it a bit less awful to reform non-Burnout units.
- Encased Ember – +5 energy when a tomb unit dies. A nice little bonus, but not one that’s going to make me pick up lots of tomb units.
- Exploding Candle – 5 damage to all enemies when a burnout unit dies. This is very good because it basically turns your Dregs into Molting Imps and gives you an easy way to clear trash mobs.
- Flicker’s Liquor – When you play a unit, a random card in your hand that doesn’t already cost 0 costs 0. Dregs, morsels, and reformed units costing 0 means you can leverage this into 0-cost hands very easily. With this, you can load your deck up with big spells and emberdrain effects and cruise through the game.
- Melting Spout – Tomb units get +30 health. Usually you want your tomb units to die, so making them not die is counterproductive. Avoid.
- Memorial Fund – +5 gold when a friendly unit dies. This one’s awesome, especially if you get it for free. Cycling through your Dregs is already 25 gold per battle. If you’re playing Umbra, you’re going to be rolling in cash. if it’s in the store, keep in mind you’re going to need over 40 units to die before you break even.
- Resin Block – When a friendly unit dies, enhance it with +10 attack. This one alone can enable a kamikaze strategy, since reforming a unit will give it +15 attack. Can carry you through the early game on its own, but make sure you have a plan for Seraph.
- Mold Braces – Friendly units gain extinguish: apply 5 armor to the front friendly unit. A nice bonus that’s even nicer if you’re playing Umbra. I have to assume Intent on Death and Snuffer (below) apply to this.
- Votive Key – Makes Waxer units endless. one of the advantages of Dregs compared to other starter cards is that they’re out of your deck once you play them. Making them endless removes this advantage. avoid.
- Waxer Snuffer – Makes extinguish effects proc twice. Chances are you’ll have at least one of the extinguish units in your deck, and this gives all of them a pretty substantial boost. The stealth one still stinks. Intent on Death will give you the effect twice as well, so consider grabbing one of those if you see it.
Non-Remnant artifacts that are especially good
- Hell’s Banners – +3 energy when you summon the second unit in a turn. Like Liquor, this enables big spell strategies. This one plays nicer with X spells, though.
- Jackstrips – Deals 2 damage to enemies when they change floors. Clears out trash mobs for you for the first half of the game. If this is how you’re killing trash mobs, don’t take the armor trial or you’re in trouble.
- Winged Steel – When you play your third card per turn, draw 2. Drawing cards is good, and you start with 5 0-cost cards in your deck so it’s pretty easy to proc this.
I’m not going to go through every non-Remnant artifact, but you should be able to judge for yourself which ones are good and when they’re good. I don’t usually take the pyre upgrades except for the one that applies dazed when units enter the pyre room. Don’t take Volatile Gauge unless you want to be paying 3 energy for Dregs.
General Tips
Boss Artifacts
Obviously this depends on your deck, but generally I take the card draw artifact unless I have a specific reason for taking one of the other two. -1 ember upgrades being cheap and plentiful means most of the cards in your deck will cost 1 or less ember by the end of the game. There’s no reason to take the ember upgrade if you aren’t going to be spending all of your ember every turn, whereas seeing more cards every turn lets you get all your units into play and improve your future draws. As far as the room capacity artifact goes, the most obvious cases where you want it are when you’re going heavy on morsels, imps, or reforming units, so you need the extra space to be able to place them.
The Art of Skipping Cards
If you’ve played Slay the Spire, you should know how important it is to know when to stop adding cards to your deck. This game rewards synergistic decks and payload spells even more than StS does, so you generally want to be extra prudent about not adding cards to your deck just because they’re good. The card upgrade system also stresses focusing on creating one powerful copy of a spell (and then potentially duplicating it) instead of multiple okay copies. Why take three Glimmers when you only need to draw one with a +10 power upgrade every few rounds to clear out trash mob floors? You can be a little more lenient with consume spells since they’ll only clog your deck up until you play them, but keep in mind that if you take too many you’ll still be making it harder to draw your really strong cards.
When to Let Go (Purge Cards)
Highly prioritize things that permanently remove cards from your deck. These include the purge option at stores, the location that lets you remove two cards from your deck, and certain events. There’s a reason why decks in TCGs are almost always at the minimum allowable size – if there are fewer cards in your deck, you’ll draw the good cards and the cards you need more often. I usually try to remove the starter cards from my secondary clan and my Train Stewards as soon as I can. If the first shop doesn’t have a good upgrade, I’ll purge once or twice. It can be worth keeping a copy or two of Torch, especially if it has a +10 power upgrade. After that, I’ll remove anything I don’t think I need out of my starter cards or cards that I picked but now regret. Dregs get low priority because, like I’ve said multiple times here, they’re basically consume cards that are less of a problem to draw than Stewards. If the magic store has a +20 power and consume upgrade, you can slap that on one of your starter cards and basically consider it purged. This is partly why Umbra is such a pain, because their starter card can’t have that upgrade applied to it.
Examples of Winning Decks
FYI: These are all using the burnout champion, except for the one where I specifically say otherwise.
I got Flicker’s Liquor as my starting artifact and Engulfed in Smoke in my starting deck, so there was basically no way I was going to lose this one. Big Sludge + Deranged Brute cleared out everything that got past my champion. I eventually got the multistrike tome and removed consume from it so that my sludge was attacking 4+ times per round.

Largestone on an Animus of Will plus Engulfed in Smoke and Razorsharp Edge provided everything I needed.

Rare win with the reform champion. Took the Animus early and planned to buff her up, but then I saw Legion and my hamster wheel brain led me to picking him. Thankfully I got basically every support piece I could have possibly gotten. My champion did essentially nothing except fill the first floor with Dregs and Draffs.
I got multistrike and Major Refraction on a Coldcaelia and copied her twice, which combined with the frostbite artifact was able to deal with Seraph.
Got Resurrection after Daedalus, used it plus the Prisms to make my first floor Lady – Champion – a bunch of gigantic Draffs. Morsels all got funneled to the Construct, who cleaned up anything that got through. I used Memories + Waxen Spike precisely one time.
TLDR
- To win this game, you need to be able to deal with high health tank units, low health trash mobs, and bosses. The burnout champion answers tank units, so if you pick him all you need is a way to deal with trash mobs (AoE spells/multistrike/sweep) and a way to deal with bosses.
- The other two champion paths suck dick.
- Lady of the Reformed is your best non-champion tank since she turns off burnout. Put some Draffs and your champion behind her.
- Bounty Stalker is, among Remnant’s units, probably your best bet at killing Seraph. Try to get multistrike on him and reform cards/Intent on Death to boost him several times per stage.
- A Doublestack Engulfed in Smoke plus basically anything will win you the game.
- Grab a copy of Resin Removal if you see it, use it to neutralize the stealth and lifesteal bosses.
- Sacrificial Resurrection thins your deck by removing useless cards and pumps out Draffs that you can potentially put behind a Lady of the Reformed. It basically helps speed your deck up so you can play your big spells more often.
- Legion of Wax is a trap.
- Remnant cards have fantastic synergy with themselves, so your secondary clan should mostly be used to get removal spells for trash mobs and units or spells that will allow you to kill Seraph.
- Trash the starting cards from your secondary clan and your Train Stewards ASAP, you can keep the Dregs in since they don’t take up much space and die after 2 turns.


Be the first to comment