
While the normal functions passed down through scripts can do most things, but since we can run javascript, we can use the document to do even more.
Basic Usage
“Document” is the javascript keyword for the entire webpage. The way Bitburner is written, the game is basically a webpage put inside a native application, so we can change things about it by using “document”. An example of placing something in the console would be like:
document.getElementById("terminal").insertAdjacentHTML("beforeend", "Hello world")
This won’t look correct however, as it’s missing styling and isn’t structured the same as other elements in the console. To make it look like it belongs there you need to wrap it in some other code like this:
document.getElementById("terminal").insertAdjacentHTML("beforeend", `<li class="jss44 MuiListItem-root MuiListItem-gutters MuiListItem-padding css-1578zj2">
<p class="jss92 MuiTypography-root MuiTypography-body1 css-cxl1tz">
Hello world.
</p></li>`);
And you don’t have to end with text, you can put any other HTML elements in there as well. The only thing you need to find out is the code of the element you want to change which you can find by going Debug->Activate and searching through with inspector mode.
Note: You’ll probably notice the large ram cost of using document, and while this is an exploit and therefore not recommended, a way to bypass that cost is by instead getting “document” using eval and storing it in a variable like so:
const doc = eval("document");
doc.getElementById("terminal").insertAdjacentHTML("beforeend", "Hello world")
Custom Stats
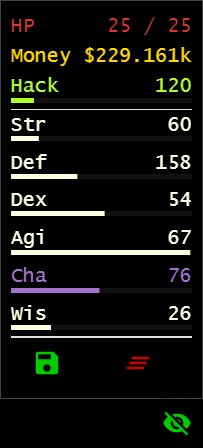
Overview
Stats have two parts in the HUD, the text and the bar. There’s a lot of code to both, but that’s all wrapping code so the process of it is fairly simple.
Code
const doc = eval("document");
export async function main(ns) {
const HUDElement = doc.getElementById("root").firstChild.firstChild.firstChild.firstChild
.firstChild.firstChild.firstChild;
const statName = "Wis";
var statValue = 0;
var percent = 50;
var text = htmlToElement(`
<tr class="MuiTableRow-root css-1dix92e" id="custom-stat">
<th class="jss7 MuiTableCell-root MuiTableCell-body MuiTableCell-sizeMedium css-hadb7u" scope="row">
<p class="jss12 MuiTypography-root MuiTypography-body1 css-cxl1tz">${statName} </p></th>
<td class="jss7 MuiTableCell-root MuiTableCell-body MuiTableCell-alignRight MuiTableCell-sizeMedium css-7v1cxh">
<p class="jss12 MuiTypography-root MuiTypography-body1 css-cxl1tz">${statValue}</p></td>
<td class="jss7 MuiTableCell-root MuiTableCell-body MuiTableCell-alignRight MuiTableCell-sizeMedium css-7v1cxh">
<p class="jss12 MuiTypography-root MuiTypography-body1 css-cxl1tz" id="overview-cha-hook"></p></td></tr>`);
var bar = htmlToElement(`
<tr class="MuiTableRow-root css-1dix92e">
<th class="jss7 MuiTableCell-root MuiTableCell-body MuiTableCell-sizeMedium css-hadb7u" scope="row" colspan="2" style="padding-bottom: 2px; position: relative; top: -3px;">
<span class="MuiLinearProgress-root MuiLinearProgress-colorPrimary MuiLinearProgress-determinate css-koo86v" role="progressbar" aria-valuenow="49" aria-valuemin="0" aria-valuemax="100">
<span class="MuiLinearProgress-bar MuiLinearProgress-barColorPrimary MuiLinearProgress-bar1Determinate css-14usnx9" style="transform: translateX(-${100-percent}%);"></span></span></th></tr>`);
HUDElement.children[14].after(text);
text.after(bar);
ns.atExit(() => { text.remove(); bar.remove(); }); // Removes stat on script kill
while(true){
statValue++;
// Updating elements
// Very inneficient
text.remove(); bar.remove();
text = htmlToElement(`
<tr class="MuiTableRow-root css-1dix92e" id="custom-stat">
<th class="jss7 MuiTableCell-root MuiTableCell-body MuiTableCell-sizeMedium css-hadb7u" scope="row">
<p class="jss12 MuiTypography-root MuiTypography-body1 css-cxl1tz">${statName} </p></th>
<td class="jss7 MuiTableCell-root MuiTableCell-body MuiTableCell-alignRight MuiTableCell-sizeMedium css-7v1cxh">
<p class="jss12 MuiTypography-root MuiTypography-body1 css-cxl1tz">${statValue}</p></td>
<td class="jss7 MuiTableCell-root MuiTableCell-body MuiTableCell-alignRight MuiTableCell-sizeMedium css-7v1cxh">
<p class="jss12 MuiTypography-root MuiTypography-body1 css-cxl1tz" id="overview-cha-hook"></p></td></tr>`
);
bar = htmlToElement(`
<tr class="MuiTableRow-root css-1dix92e">
<th class="jss7 MuiTableCell-root MuiTableCell-body MuiTableCell-sizeMedium css-hadb7u" scope="row" colspan="2" style="padding-bottom: 2px; position: relative; top: -3px;">
<span class="MuiLinearProgress-root MuiLinearProgress-colorPrimary MuiLinearProgress-determinate css-koo86v" role="progressbar" aria-valuenow="49" aria-valuemin="0" aria-valuemax="100">
<span class="MuiLinearProgress-bar MuiLinearProgress-barColorPrimary MuiLinearProgress-bar1Determinate css-14usnx9" style="transform: translateX(-${100-percent}%);"></span></span></th></tr>`
);
HUDElement.children[14].after(text);
text.after(bar);
await ns.sleep(1000);
}
}
// https://stackoverflow.com/a/35385518/11131159
function htmlToElement(html) {
var template = doc.createElement('template');
html = html.trim(); // Never return a text node of whitespace as the result
template.innerHTML = html;
return template.content.firstChild;
}Since that’s a lot of html, to make it simpler I put all the information you’d usually change in variables. Then to add functionality to the stat you’ll want to add things to the start of the while loop which refreshes it.
Traveling From a Script
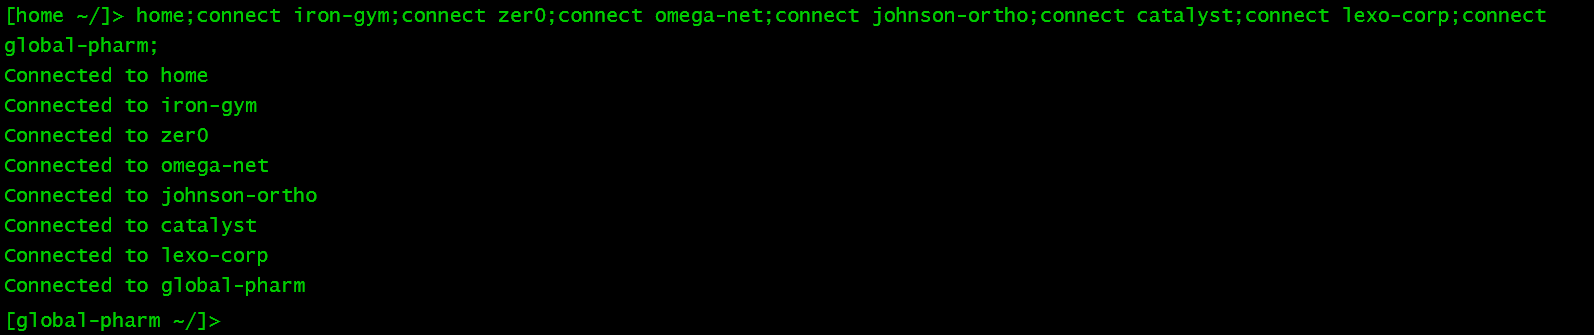
A way to change what server you’re connected to thru a script is by making a long list of connects, and then putting all in the console and artificially running it. There are a few other things to do so the terminal doesn’t act weird when running it, but it’s overall simple.
Code
const path = "connect hong-fang-tea; connect CSEC"

const terminalInput = document.getElementById("terminal-input");
terminalInput.value = "home;${path}";

const handler = Object.keys(terminalInput)[1];
terminalInput[handler].onChange({target:terminalInput});
terminalInput[handler].onKeyDown({keyCode:13,preventDefault:()=>null});
That was an example of some code that would bring you to the Cybersec server when ran, but putting any list of connects in the “path” variable will work (commands are separated by semicolons).
Since it’s normal javascript, you can also put this code inside the onclick property of an <a> element (or any other element for that matter) to make it so that you change servers when clicking it.


Be the first to comment