Dealing Damage
By ArosRising.
Flat Damage
- Flat Damage: Flat damage increases are Melee Damage, Ranged Damage, and Elemental Damage. (Engineering will be covered separately, but can also be considered a type of flat damage.
- Applied to the Base damage: Take a pistol. It deals 12 + 100% of your ranged damage. So if you have +5 Ranged damage it deals 17, if you have -5, it deals 7.
- Important Early: Flat damage increases are super powerful early. It takes 6 ranged damage to double the damage of a SMG. (Which is the same as 6 upgrades worth of Ranged Damage.) But it takes 100% Damage or Attack speed to double the damage using those stats. And that requires about 20 upgrades!
- Other Types don’t Matter: If you are using pistols as your weapon of choice, then you won’t be needing Melee damage, Elemental damage, and Engineering. So you can safely pick up items with downsides in those types.
- Hybrids: Some weapons rely on more than one damage type, such as Lightning shiv or Cacti Club, for these you generally want to increase both of the types that they use.
- Don’t Mix Damage Types: It is generally rarely worth it to mix damage types. So if you’re using pistols, adding a Wand (Elemental Damage) or a Fist (Melee damage) into the mix is generally not a good idea, since you then have to invest in more than one stat, without actually gaining something powerful to make up for it.
Some weapons have low base damage, like Knife or SMG. These weapons need a lot of Flat damage throughout the damage. Other weapons like Pistol or Stick have a high base damage, and don’t need a lot of flat damage in general.
In the early game, Flat damage typically offers a higher percentage increase to your DPS than other options.
Attack Speed
- DPS Increase: Attack speed provides a large increase to your DPS (Damage per Second). a Tier 3 attack speed upgrade gives +15% DPS, which beats out both the %Damage and Crit upgrades.
- Crowd Clearing: Attack speed is slightly more important for Ranged Weapons, since it allows you to deal with bigger crowds of enemies. Where melee weapons can just cleave that crowd.
- Protection: Attack speed also helps protect you from enemies. With faster attack speed, the odds of an enemy reaching you before a weapon can hit it is decreased. For melee weapons this is even more important, since the attack speed also increases the actual swing speed of the weapons. Knockback in this sense also scales with attack speed.
- Scales Life Steal: Life Steal is based on hit, and it doesn’t care about how much damage you actually deal with that hit. So getting more attack speed increases the healing you get from life stealing.
Attack Speed is a super powerful stat, and tends to be one of the things I can never get enough of. I’m looking for it early, mid, and late game.
Percentage Damage (%DMG)
- % Damage: Damage increases the damage of your Weapons, items and abilities. +100% Damage doubles the damage you deal.
- Applied after Flat damage: If you have a Pistol, which deals 12 damage on hit, and you get +5 Ranged Damage. It is the final 17 damage that will be multiplied by the % Damage.
- Affects Abilities and Items: % Damage increases the damage of Abilities like the ones Lucky, Lich, or Bull have. It also increases the damage done by items such as Alien eyes, Rip and Tear, and Cyberball.
- Increases Burn damage.
- Doesn’t Affect Structures: % Damage doesn’t increase the damage of Turrets or Landmines. (However the Explosive Damage Stat can do so)
% Damage is a solid Stat that most builds want to be invested in. For regular builds that rely on weapons, it isn’t your highest priority early, as both Flat damage and Attack Speed will give you more bang for your buck, but you want to look out for the good options. In the Mid-Late game you want to have a solid amount, or you’ll feel yourself falling a bit behind.
Builds that rely on abilities or item damage, such as elemental Burn builds, Luck based damage, Alien eyes, etc. will want to prioritize % Dmg a bit higher.
Critical Chance
Critical Chance/Hits like in most other games is a stat that gives your attacks a percent chance to crit for extra damage.
- Default Crit: Weapons have a Default 3% chance to do a critical hit for 2x damage.
- Precise Weapons: Some weapons have higher base critical chances, and higher damage multipliers. The Precise Weapon Class Weapons often have special abilities centered around critical hits.
- Bludgeoning shaped weapons like Fists or Hammer have a lower Critical Hit Multiplier. (Because a weapon needs to be sharp to really do a crit, you know)
- DPS Increase: Critical hits serve as a way to increase your Damage per seconds. If you have 100% chance to crit for 2x damage, that is a 100% increase to your DPS. Similarly each 1% of Critical Chance increases your DPS by 1% when using a Default 2x weapon.
Critical Chance is more expensive than other damage stats. Increasing your DPS by 10% is way harder than it is to do with %Damage, Attack Speed or Flat Damage increase.
For example, a tier 1 Upgrade gives 3% crit, but 5% Attack Speed or Damage. And at Tier 4 its 9% crit vs 20% attack speed or 16 Damage.
Critical hits often “overkill” enemies, meaning that the enemy you hit didn’t have as much HP as you just hit it for, so a lot of the damage is wasted. This further decreases the actual DPS increase of Crit.
So stacking Crit isn’t a super efficient way to increase your damage output. However if you’re using a weapon with a special benefit from critical hits, like Thief Dagger, Knife, Crossbow, Shuriken, or Sniper Gun, you want to get a 100% Crit chance. Remember that the weapons come with a high base crit chance and +15% from the precise set bonus.
There are also several items that give you additional value from critical hits: Hunting Trophy, Tentacle, Lucky Coin, and Giant Belt. So crit often becomes powerful due to the synergies it offers with weapons and items.
Engineering
When you’re going for an Engineering / Structure build, which means Screwdriver/Wrench, scaling your damage output is slightly different.
- Engineering: The Basic way to scale Turrets/Landmines is by stacking Engineering, which functions as the flat damage increases for your structures.
- %Damage/Crit: % Damage doesn’t Increase the damage of Turrets and Landmines. And Structures cannot crit. So you can just dump these stats without too much loss. Though it does lower the dps of your weapon attacks
- Attack Speed: Structures don’t initially scale with Attack speed, but if you have unlocked the Improved Tools by winning with Cyborg, you can get lucky and find the item. Improved Tools makes Structures Scales with 50% of your attack speed. Turrets fire faster, while landmines spawn faster.
- Buying additional Items: Unlike with weapons, you can find turrets and landmines in the shop and buy them to increase your damage output.
- Bounce/Pierce: Turrets benefit from gaining Piercing and Ricochet from the Bandana and Ricochet items. Sharp bullet is also quite powerful.
- Explosive: Both Landmines and the Tier 4 Turrets are explosive. This means they will benefit from % Explosive Damage and % Explosive Size. So look for Dynamite/Explosive Shells and Plastic Explosives.
Damage Multipliers
Enemies gain more HP with each wave, spawn in bigger numbers, and tougher enemies spawn on the later waves. The threat increases exponentially, so you have to do the same with your damage output.
There are several ways to multiply your damage output. The first and easiest one is to get up to 6 weapons. And then you can upgrade those weapons all the way to tier 4.
But your Stats are also going to be important for your damage output.
The damage of your weapon is:
- (Base damage + flat damage) • % Damage • Attacks per second • Critical increase.
Your damage output is bigger when you have a healthy mix of stats. For example, if you get +200% Damage, you would deal 100% + 200% = 300% damage. (3 times the damage output)
But if you instead got +100% damage and +100% attack speed it would give you 200% damage x double attack speed = 4 times the damage output.
And having the right amount of each of the 4 different multipliers gives you the greatest total damage output.
DPS Conclusions
Let’s Wrap all this information up.
- Attack Speed is very powerful because it helps you lifesteal, kill bigger crowds of enemies, and is given in big amounts by upgrades.
- DMG% is just generally good, and is extra important for characters that deal damage through abilities like Cyberball and Alien Eyes.
- Flat Damage Increases are important in the early game for tier 1 weapons.
- Some weapons scale very well with flat damage, and you should get a lot of flat damage to optimize your DPS (Knife, SMG, Taser), while others don’t need a lot of Flat damage (Stick, Pistol).
- Crit Chance is too expensive for the DPS it gives, so it is only good later in the game, or when you’re offered really good Crit Options.
- Unless you have a Weapon, (Thief Dagger, Shuriken, Crossbow, etc) and/or items like Tentacle or Hunting Trophies that gain a lot of benefits from Critical Chance. In that case you should try to max out your Crit Chance quite quickly.
Defenses
Let’s go over what keeps you alive in Brotato.
Effective Hit Points (EHP)
While Max HP is the amount of Damage you can take before dying, Effective Hit Points is the amount of Damage you can take before dying, when you account for damage reduction.
If you have 100 HP, and 15 Armor (50% Damage Reduction) your EHP is 200, and you have an EHP Factor of 200%. In Brotato you have two ways of mitigating damage. Armor and Dodge.
Armor
Each point of Armor increases your EHP factor by 6.66%. 3 Armor means you can take 20% more damage before dying. 15 Means you can take 100% more. The tooltip is rounded, but the game uses the precise values. Armor’s Effectiveness does not have diminishing returns.
Armor is one of the most useful defensive stats in the game. You basically want it in every game, unless you’re trying some crazy glass cannon build, or if you’re playing ghost.
Dodge
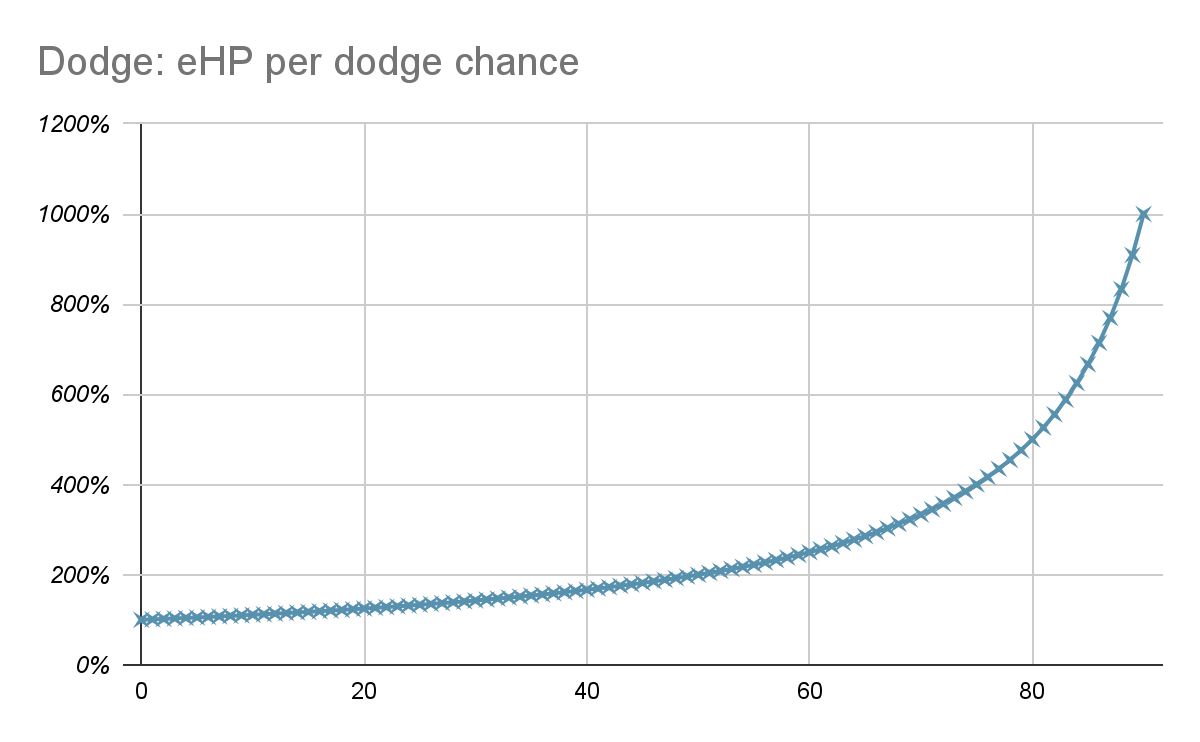
Dodge gives you x% chance to avoid an attack. The maximum dodge chance is 60%, or 90% if you’re playing ghost.
Dodge becomes more effective per point, the more you get of it. For example:
Going from 0% dodge to 10% dodge means you get hit 10% less. Going from 80% Dodge to 90% dodge means that you halve the amount of hits you take.
You can see here how much EHP 10 points of Dodge gives. Remember that each point of armor gives 6.66% for comparison.


Multiplicative Scaling
The EHP Factor you gain from Dodge and Armor is multiplicative. This means that when you combine Armor and Dodge, you become super tanky.
For example, if you have 100 Max HP and 15 Armor, it takes 200 Damage to kill you: 200 EHP.
And if you have 100 Max HP and 50% dodge, it also takes 200 Damage to kill you.
However if you both have 15 Armor and 50% Dodge, you have 100 HP • 2 • 2 = 400 EHP
Notice that before you got +100 HP from Armor and Dodge, but together they give +300!
So if you Max out Dodge and also get a bunch of armor, you become super hard to kill.
Max HP
During the early game, when you have 10-20 HP, the easiest way to increase your survivability is simply to increase your Max HP. So I like to pick up some Max HP so I’m not afraid of dying in two hits.
Note that you start with 10 HP, and gain +1 when leveling up, so you can expect around 32 HP at wave 20.
My target Max HP is the 60-90 range. But it depends on the character and build.
But remember not to overestimate Max HP. For example, you could have 100 Max HP and 0 Armor, or 50 Max HP and 15 Armor.
Both have 100 EHP, it takes the same amount of damage to kill both. But once Healing gets into the picture, the build with more Armor and Dodge wins out.
Healing
Max HP is what prevents you from getting KO’ed in two hits. Healing is what keeps you in the fight over the duration of a wave.
Once you get a bit into the midgame, enemies become more dangerous and you’ll take damage more often. To survive you need to pack some healing.
The three main ways of healing are Life Steal, HP Regeneration, and Consumables. Then there are several items that also can provide healing.
- Life Steal – Attacks have a chance to heal 1 HP on a hit. Best on fast attacking builds, typically ranged. Can only trigger once per 0.1 second, so a large % of Life Steal has diminishing returns.
- HP Regeneration – Reliable, but slow. Better on builds that use big slow weapons, and melee builds in general.
- Consumables – Increasing your Luck makes more Consumables drop, the healing amount can be increased with Weird Food and Lemonade. Healing can be saved up during the wave for when you need it. Super powerful.
Other methods
- Cute Monkey is a powerful and cheap additional healing method for any build that doesn’t use ranged damage. (Avoid it on Characters with -50% material drops).
- Tentacle is great on critical hit builds.
- Torture is insanely strong if you get it before you have invested in healing. It gives +15 Max HP and +4 Healing per second. That’s equal to about 44 HP Regen.
- Medical Turret is a powerful option on engineering builds and can even be used outside of engineering builds. (But remember that having to stay near the turret is a huge downside.)
On the current patch, HP Regen remains generally the strongest option along with Consumable Healing. I usually dump Life steal on most builds. I’m looking for really powerful items such as: Plant, Lemonade, Weird Food, Fairy, Lure. I see people skipping these items way too much. You can also go all three in some games, if the items you’re presented with, leads you that way.
EHP Strategy
So what is the conclusion?
- Max HP: Pick up some Max HP early so you don’t instantly die. Then you need to increase it further for the Elite and Boss battles later.
- Armor is generally speaking one of the strongest stats in the game. It is also super reliable. I sometimes ignore Dodge, but never armor.
- Dodge is super strong when maxed out, especially if you find items like Adrenaline or Retromation’s Hoodie. (Getting that last 10% from 50% to 60% is insanely powerful)
- But useless if you only have a little. But it doesn’t do much for you early. Having 10-15% chance to dodge an attack isn’t worth much when you die in 3-4 hits. It might not even trigger before you die.
- Healing: The Default strategy is to buy every Weird Food and Lemonade I see. And stack HP Regen. I dump Life Steal in most cases.
- Boosting Healing: It is better to increase your Armor and Dodge, than it is to get crazy high Max HP, since getting more EHP also increases the value of the HP you get from Healing. 15 Armor doubles the value of your healing.
- Don’t need it early: It is a good idea to skip out on defenses in the early game and invest in Economy and Offense. But find out how much you can get away with at your skill level. As you become better, you need less defense.
- Tank up for the Mid and late game: Once you reach wave 10, enemies spawn all around you. Elites and horde waves spawn at 11+. At this point it becomes hard not to take damage.
I sincerely hope this was helpful. Good luck to you!


Be the first to comment