
This guide will show you how to master.
The Master of Gravity Guide
Intro
It’s only natural that people will have difficulty adjusting to his floaty and calculated nature. I have no doubt that he will be adjusted to be easier to play as a result. Regardless, I would like to help those that may be struggling as I personally didn’t have much trouble adjusting to his controls. With 5 wins on (you asked for it) difficulty, I feel I have a good grasp on the character.
Mining Strategy
In my experience, reflect is superior to the other upgrade and should be the first thing you take every time. You almost never want to be rotational mining. You always want your orbs to be recharging so you first want to shoot where it will bounce a lot on it’s own then you want to focus on a good spot to start reflect mining for about 10 seconds (around when you have an orb and a half charged). Managing this is key to having no downtime. If you find yourself against hard rock on both sides, you can then fire both orbs and reflect both at the same time.
What you want to do is dig straight down from the dome. Once you start going sideways, you want to focus on one side first so you can quickly fire the orbs against the wall towards the center and then upwards directly into the dome. Once you want to mine the other side, there are two ways to set this up.
- You shoot horizontally one block under the horizontal line from the previous side. Make sure that it doesn’t break too far into the previous side.
- You go about 4-5 blocks in the other side, rotational mine one down then shoot horizontally. Again, make sure there are blocks towards the center that can catch. If you don’t want the materials to fall down in the center shaft, you can make sure to not break past it, but it’s not the end of the world if you do.
Here are some examples:
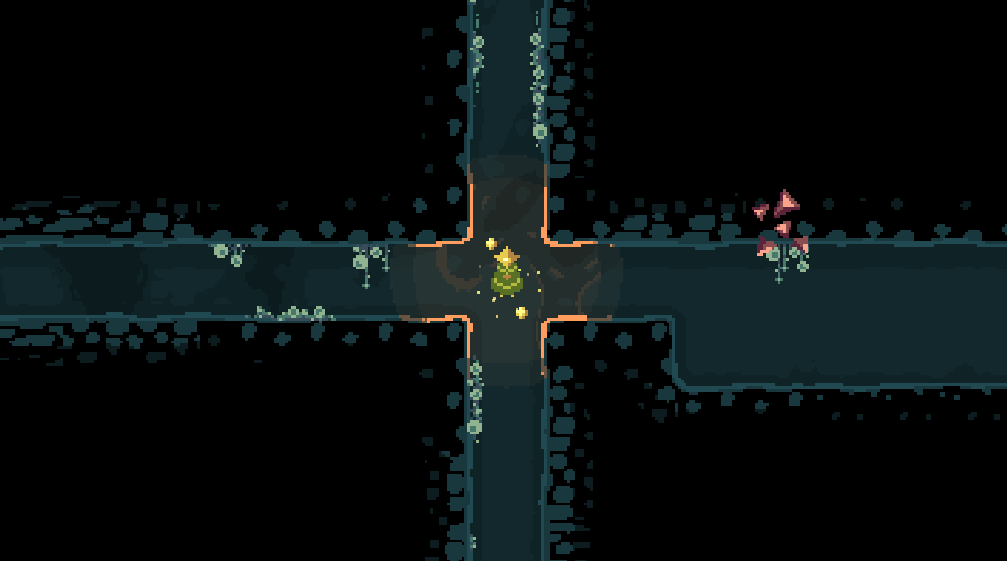
Don’t worry, the tunnels will not always look this good (it can get quite messy actually). The second method gives you more leeway on missing reflects. This doesn’t matter that much once you get the bundle upgrade, but you will save yourself from needing the bundle and increased bundle time upgrades until a bit later on you asked for it. You could probably get away with getting bundle early on brutal or below. In that case, you obviously don’t need the setup outside of maintaining easy access to the center. If you get the lift, it becomes much easier as it catches the materials for you and you will be able to send everything up with bundle. It doesn’t even need any upgrades either besides keeper speed.
Upgrade Order
This is just as important to your success as your mining efficiency. As I mentioned before, reflect is upgrade number one. You don’t need to invest anymore into the reflect tree until late game. Second upgrade will be orb damage. This will be good enough to allow you to get your dome capabilities up for a while. Somewhere in between, you can get bundle to make the collection process easier. Once your dome is suited up for mid game (laser power 2/fast stab 2), you then get the next level of orb damage which will be good enough until you set yourself up for the late game.
Around this time is where you finally upgrade your speed. He’s naturally fast so it will be all he needs until later. Once you’re around 2-3 layers deep and you notice your bundles not making it to the dome, that’s when you get the bundle lifetime upgrade. Your normal throw actually goes slightly further than the first level of bundle, at around the start of the third layer is it’s max range to the dome. The center of gravity upgrade is pretty much useless as long as you maintain the center.
Once you get your end game dome upgrades (Javelin/Double laser and laser power 3), you can then get orb damage and then the one that transcends rockhardness by 20%. Around here is where you get movement speed 2 which is fast enough for the rest of the game. You can then advance 2 upgrades in the reflect tree to get the 300% damage on reflect. At this point, you can just upgrade whatever else you want
Gadgets
Lift. Everything else is not needed. Stun laser is nice. Teleporter is nice, but he is fast enough to not need it. I would also only upgrade teleport speed. Drillbert can actually help a decent amount, but the character already has enough to manage. Resource converter is probably the next best followed by condenser. Probe can be useful as well, but not as much as on the engineer. Stay the hell away from blast mining
One thing for certain is that he is less gadget reliant than engineer. I made sure to do some runs without lift (or most gadgets for that matter) to make sure of that. With the right mining techniques he can also be more efficient. With enough practice, you too will be able to transcend rockhardness.

Thank you so much! I tried to play as the Assessor, but got so lost on how to even do anything, so this helps a lot.