
Efficiency Guide
This guide is going to take a few things for granted. We are going to assume that you know most of the basics of the game, and instead we are going to focus on players who are having issues with expanding their economies.
Rule 0
So first and foremost, I want to make this very clear; Distance matters. The exact level of how much it matters is unknown to me, but I do know this; it matters a ton. While your villagers are travelling from point A to point B (Usually from house to a market, job, or well) you are getting no use out of them.
They do not fulfill their needs while walking, and they sure as hell do not produce food or other resources for you. This is the basic principle throughout this guide.
Needs: I have suspicion that villagers will also leave work when certain needs exceed a certain level. With needs slowly rising over time, this means a wheat farmer that takes several minutes to get to his job is likely to plant one bushel of wheat before leaving work to go back home.
Market
")
Market sellers can sell items even when they’re away from their stall, which is helpful. However, customers still need to be close to markets to buy things. To fix this, build multiple markets across your city. While it takes some work, it’s worth it.
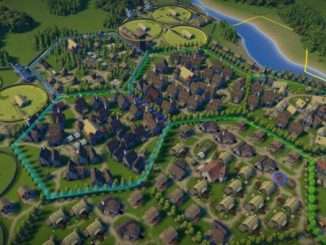
Looking at the pictures, I set up markets about one hex away from each other. This setup lets me place markets where they make sense in the city, while still being close enough for customers to use them effectively.
Since sellers can sell from anywhere, you don’t need to worry too much about how far they walk to get supplies from food buildings. Still, try to keep at least one food building somewhat close to your markets.
Job Placement
")
In its current state, the game is garbage at placing villagers into jobs. Note that if you click a job place it has an ellipses button in the top right hand corner of the job’s window. If you click that button, it will display the closest villagers to that job, as well as the villager’s current job. If you click a villager here, it instantly assigns them to that workplace.
While also not perfect, this will give you a very quick way to see if there are any unemployed villagers nearby. If not, I recommend prioritizing. Most people complain that food is impossible to maintain at a high level, so maybe you take some of those stonecutters or woodcutters off their jobs and turn them into foragers? Try to remember that the further away a villager lives from their job, the longer they spend doing nothing for themselves or your economy.
Building Placement
")
I have already touched a bit on houses being far away from jobs, but as you may guess it is a little more complex than just that. Housing districts need to be close to jobs, but jobs that require other jobs (Wheat farm – mill – baker) should ideally be close to each other as well. This is for the same reason as why houses should be close to jobs: The more your villagers walk, the less they get done. You can see examples of this in my screenshots.
Note how my farms are in the middle of a cluster of mills and bakeries and my sheep farms are next to weavers which are next to tailors. This allows your workers who are processing or finishing goods to walk 5 meters from their job to get the resources they need to do their own part of the process. Mind you, villagers also need to walk to their work site (Lumberjack-Trees) So try to place work buildings for primary resources as close to the gather point as possible.
You should also make every hex as self sufficient as possible. For some resources (like clothes and luxuries) it is not as important to have every single hex capable of making them, but as far as primary villager needs (like food) ALWAYS make sure that hex has some capability of providing that. On a water map, this means probably berries (if available) bread and fish. Of course not all resources are available in all hexes, but always minimize the amount of hexes between any given resource. This is especially true for food.
Warehouses
People often say you need lots of warehouses, but that’s not true. Warehouses should only be used for two things: trading with other cities and storing extra items. This is especially important when you have fewer than 300 villagers, since warehouses take up valuable space and workers.
When building warehouses for trade, don’t assign any workers to them. Foreign traders will deliver goods themselves, and your city’s workers will come pick up what they need. Keep in mind that transport workers only move items into storage – they don’t deliver materials to buildings for processing.
While you could place a warehouse for raw materials (like wheat) next to a production building (like a mill), it’s not recommended. I’ll explain why in the next part.
The key point is: Don’t build too many warehouses early in the game, and only use them for trade or storage.
How to Expand
When you decide to start expanding for whatever reason, keep some things in mind. Are there any houses in your previous area that have not upgraded in density? If so, disable density upgrades for it. The reason for this is new villagers will move into older houses if you do not, which means some of your immigrants will live very far away from the new jobs being created in your new area.
For this reason, I also recommend making sure every single villager has a job before expanding. This allows you to use the “assign available villager” button without worrying too much that your villagers are walking for minutes to get to work. I would also build a market and a housing district and wait for people to move in BEFORE assigning jobs in your new expanded area.
This means only people who have moved in to your new area will be working in your new area. Of course there may be some overlap, but try to minimize that. People should ideally live work and shop all in the same hex.
Builders
Rotate builders in your economy. It is kind of a pain, but how much good is the builder that needs to walk several minutes to pick up resources going to do when he also needs to walk another several minutes to drop off the materials? Rotating builders based on the zone you are currently expanding is a good way to get around this.
Late Game – Excess
Once you start breaking into larger numbers of villagers, it is a very good idea to start building excess wherever and whenever you can. You will find that once you have so many villagers (IF your layout is time/labor efficient) you will have more villagers than you need.
Use the villagers to stockpile resources starting with primary and working your way up. Buildings will be more efficient in the presence of excess. Excess allows your villagers to carry large quantities of primary or secondary resources instead of trying to pick up 1-2 at a time. I usually only worry about stupid amount of excess towards the 300+ villager mark.
This is because I build my towns to look at least somewhat realistic and due to this, inefficiencies are bound to add up by that point. Having excess helps cut back on that to a noticeable degree. Excess can also help make your economy more resilient towards fluctuations. (which will happen).
Basic Things to Never Forget
Make sure every housing district has a well. Also, bakeries should be built with a well next to them.
Make sure you assign your berry bushes as an extraction zone. I know it sounds stupid, but I forget to assign it all the time and then honestly wonder why nobody is gathering from the bushes.
On maps with rivers or small lakes, if you build on both sides of the water, build plenty of bridges. The pathing in this game is not too terrible, so give your villagers options so they can be more efficient.
Some buildings can be built to be taller. I actually had a viewer on my stream tell me this, it never occured to me that when I placed a building, the up and down arrows meant I could actually increase it’s height. In some cases doing this will increase a building’s splendor contribution, and in other cases it increases capacity. In ALL cases though, it does increase the upkeep cost.
Get at least one bailiff. You can have more than one, but I have not tested to see if the effects stack. Some effects are different from each other, so to be safe I usually get 2 bailiffs, a market and a happiness bailiff.
Build a tax office in every housing district. You do not have to actually build a proper manor to place a tax office (or most other “Lord’s Manor” add ons). Like any other job, try to make sure the tax collector lives close by.
General Tips
The best thing you can do is follow the initial quests to get your village up and running. A couple of pointers:
- When you unlock residential zoning, zone your residential areas near, but not on top of, your production buildings. People won’t walk more than 150m from home to work.
- Learn how to control immigration by turning it on and off as needed.
- Once you fulfill the quest to build a lord’s manor and assign a great hall, try to save money to upgrade your newcomers. Serfs have more needs than newcomers and thus spend a bit more money to help increase your treasury. But be sure you have enough residential zoning for them to build houses near their work. Otherwise, you’ll get “comfort” issues.
- Don’t upgrade serfs too much, too quickly. Commoners have more needs and will require different production lines to meet those needs. Just upgrade a few (1-4) at a time to unlock additional helpful things.
- Don’t build buildings too close to each other. The blue outline on the buildings as you are placing them is the collision indicator. If the blue lines are overlapping, you risk making the buildings inaccessible.
- Build more warehouses and granaries than you think you’ll need.
- Keep a good supply of builders’ huts (with 3 builders each) at various places around your village to cut down on the time it takes builders to walk to new build sites as you expand.
- Don’t put more than one type of food market in the same market monument unless you know what you’re doing. Villagers will buy from the first market of each type in each monument, so if you put all your different food types in one monument (like berries, fish, bread), you’ll sell out of the first type quickly, but the other two won’t be bought quite as much.
Be the first to comment