
How to Spend Everything
Ву Eroleice.
This is a guide for F2P, low-spender and mid-spender. Hope this helps you out!
Gems Earning
You can get gems once from:
- Playing through the main story.
- Completing achievements.
- Collecting perilous rewards.
You can get gems regularly from:
- Completing dragon bounties.
- Opening the free chest in the daily shop.
- Using the monthly pass.
You can also get gems during special events when they have roulette-style rewards. From my time playing, you can usually earn around 600-700 gems each day.
Paper Airplane Event
Paper Airplane is a weekly event that starts one week after a new server opens. You can earn points in two ways:
- Daily quests – these give you 700 points for free.
- Making pulls (gotchas) – every 10 gems or tickets spent gives you 1 point.
The maximum points you can earn per event is 9000. Important: You don’t need to reach cap. The rewards change weekly, so it’s better to save your resources for weeks with better rewards. Some rewards only appear once!
Week Priority:
| Not Really Worth to Do | 1 4 7 8 11 13 16 17 20 22 25 |
| One T5 Reward Is Worth to Get | 3 6 10 15 19 24 |
| Two T5 Rewards Are Worth to Get (Including Unique Artifacts) | 2 5 9 12 14 18 21 23 26 |
Tips for different players:
- Free-to-play players (F2P): Only participate in events from the last row. For other weeks, just do daily quests and save your resources.
- Spending players ($400-500 monthly): You can get all T5 rewards if you spend wisely.
Example F2P Strategy:
- Week 1: Skip (save resources, do daily quests only)
- Week 2: Participate fully
- Week 3: Skip
- Week 4: Skip
- Week 5: Participate fully
While Week 1 might be tough because you’re saving resources, this strategy helps you get better rewards in Week 2 without spending money.
If you’d invest a little more, you can get the melomon shards as T5 reward from week 3 pp event.
Notice: Without purchasing any $ pack, you can only exchange for ONE T5 reward even if you hit the 9000 points cap. $54 is required to purchase $ packs to get enough points exchanging the second T5 reward.
Overall PP Reward Table
It may be helpful knowing how long each content, such as skills and mounts, can last before being replaced. I’ll list the timeline of each content right here so you can allocate your resource and spending better:
| Week | Common Rewards | T5 Reward 1 | T5 Reward 2 | Unlocked |
| 0 | – | – | – | Server Opens |
| 1 | Star exp, CC1 skill tickets | CC1 skill selection box | Legendary EXP | CC1 |
| 2 | Treasure Hunting Energy, Volcano Artifact Fragment, Epilogue to Edda’s Poem (increase the time limit of AFK Earnings by x minutes) | Wind-Catching Bag (When gathering Treasure Hunting Energy, there is a x% chance to double the amount) | Emblem of the King of Kings (In Dragon Bounty, increase ATK by x%) | Volcano Area Artifact |
| 3 | Rune, pet move exp | Melomon Puzzle Selection Box | Combo Move Selection Box | – |
| 4 | Star exp, CC2 skill tickets | CC2 skill selection box | Legendary EXP | CC2, Cat Bun |
| 5 | Artifact energy, artifact shards | Artifact (chance receiving double rune from daily bubble) | Artifact (bonus attack% for dream realm) | Legendary move upgrade (when lv30) |
| 6 | Rune, pet move exp | Pet shard selection box | Pink move material (used to upgrade legendary move) | Gen2 mount |
| 7 | Mount shard, mount ticket | Gen2 mount shard | Gen2 mount ticket | |
| 8 | Cat bun exp | CC2 skill selection box | Cat bun selection box | |
| 9 | Artifact energy, artifact shards | Arficat (chace receiving double cat bun wood from daily bubble) | Artifact selection box (including artifacts from w2 and w5) | New area of artifact |
| 10 | Rune, pet move exp | Pet shard selection box | Pink move material | – |
| 11 | Gen2 mount ticket, cat bun exp | Gen2 mount shard | Gold seal (100% chance get UR cat bun from combining two T3 cat bun) | |
| 12 | Artifact energy, artifact shards | Arifact (chance receiving double mount ticket from daily bubble) | Arfitcat selection box (artifacts from w2 and w5, plus one gives atk% on main story stage, one gives atk% on rift) | |
| 13 | Skill exp, CC3 skill tickets | CC3 skill selection box | Legendary EXP | CC3 |
| 14 | Artifact energy, artifact shards | Same as w9 | Same as w12, plus an artifact gives ATK based on main story monster kills | New area of artifact |
| 15 | Rune, pet move exp | Pet shard selection box | Pink move material | – |
| 16 | Cat bun wood, cat bun exp | Cat bun selection box | Gold seal | |
| 17 | Mount shard, gen3 mount ticket | Gen3 mount shard | Gen3 mount ticket | Gen3 mount |
| 18 | Artifact energy, artifact shards | Same as w12 | Same as w14 | New area of artifact |
| 19 | Rune, pet move exp | Pet shard selection box | Pink move material | |
| 20 | Cat bun wood, cat bun exp | Cat bun selection box | Gen3 mount shard | Gen2 cat bun |
| 21 | Artifact energy, artifact shards | Artifact (reduce material cost for recasting) | Same as w14 | |
| 22 | Skill exp, CC4 skill ticket | CC4 skill selection box | Legendary EXP | CC4 |
| 23 | Artifact energy, artifact shards | Artifact (bonus dmg% and heal% for PT) | Same as w14 | New area of artifact |
| 24 | Pet exp, gen2 pet voucher | Gen1/2 pet selection box | Gen2 pet voucher | Gen2 pet |
For mid/high spenders, I recommend some of the rewards not because they are that good, but you eventually get pp points from activities you do daily and still need to spend these pp points, so aim for those rewards with slightly better value.
Daily Resource
Daily resources come from two main sources – daily resets and buying them with gems. The prices go up each time you buy something. You need to buy four different things each day: movement points, ride tickets, artifact chances, and cat bun tokens.
| Times | Rune | Mount Ticket | Artifact Energy | Cat Fruitwood |
| 1 | 20 | 30 | 30 | 30 |
| 2 | 50 | 60 | 80 | 80 |
| 3 | 100 | 110 | 160 | 160 |
| 4 | 180 | 190 | 280 | 280 |
| 5 | 280 | 310 | 430 | 430 |
| 6 | 380 | 460 | 580 | 630 |
| 7 | 480 | 660 | 730 | 880 |
| 8 | 630 | 910 | 950 | 1180 |
| 9 | 780 | 1210 | 1170 | 1480 |
| 10 | 930 | – | 1390 | – |
| 11 | 1080 | – | 1610 | – |
| 12 | 1280 | – | 1910 | – |
| 13 | 1480 | – | 2210 | – |
| 14 | 1680 | – | 2510 | – |
| 15 | 1880 | – | 2810 | – |
If you’re playing without spending money, you should buy three of each resource daily. This will cost you 530 gems per day, which leaves you some gems to spend on other things like melomon and skills. Players who spend money can buy more – for example, five movement points and ride tickets, plus four artifacts and cat buns daily.
For movement points, you’ll need around 1500 runes every day, but you only get 480 for free. Artifacts can sometimes double your runes, which helps. Even if you don’t spend money, you should buy at least three movement points daily, or five if you can afford it.
Ride tickets will increase your power level, but keep in mind that the damage boost isn’t as high as the power level might make you think. Artifacts are important because they give you bonus stats, and buying four or five daily is enough to unlock all the artifacts you need.
Cat buns are purely based on luck. You should buy a few each day, but don’t spend too much on them. There’s a separate guide available with more details about cat buns.
The most important thing is to plan your purchases based on how many gems you earn each day. This will help you manage your resources effectively.
Spending on PP Event
Each week during the paper plane event, you can get 2 packs from the event store that cost 2,800 gems total. These packs are a good value, so you should plan to spend this amount of gems every week.
Gotchas
Skills
When you upgrade skills to gold star rank 3, they give you a big damage increase. But be careful – many skills become less useful when you reach the next tier. It’s best to save your gems to buy skill tickets after you reach Tier 2 or Tier 3.
Pets (Melomons)
Pets are the most important thing to invest in. There are two groups of pets:
- Generation 1: Available from the start
- Generation 2: Unlocks when you reach Tier 4, level 44
Most Generation 1 pets become weak compared to Generation 2, except for Demon Hounds. Before Generation 2 unlocks, try to get either 15, 21, or 29 Demon Hounds, depending on how much you want to spend.
Ways to get specific pets:
- Special events where you can choose three pets you want. If you get a rare pet, there’s a 50% chance it will be one you picked. These events happen about every 1.5 months.
- Guild Wishing Wall: Takes 30 days to get one complete pet.
- Paper Airplane Event: Rewards at weeks 3, 6, 10, 15, 19, and 24 when you reach Tier 5.
- Special offers and event rewards.
Personal Experience: The player spent around $3,500 over 4.5 months. They used their three pet choices on healing spells instead of Demon Hounds, and just barely got 29 Demon Hounds in time.
About Wish List
You can set 3 melomons on a wish list (the same one or different ones), you have 50% chance of getting the one you choose when you draw a legendary melonon. If it’s not, it won’t count as “using” a wish list spot and you should be able to get the wish list one as guaranteed.
Whenever a wish list event comes, you should check its end date first, see which paper plane event it is within. Normally you can choose from 2 pp events, so use it on the worthy one! (The first wish list event comes on week one and you can’t take it into any pp event, sadly).
When is the Next Wish Event?
Unlike pp events, pet wish events do NOT follow a schedule except the very first one starts with server opening. When a pet wish event comes, all servers will have it, except the new servers. It’s generally 6 weeks for a new wish event but XD has denied it a few times. So we can’t tell when the wish event will come exactly, but it seems like XD never made it come earlier.
Since the time is not on a schedule, it may come with any pp weeks – it might be a good week that you’re just burning your gems for pp or it might be a worthless pp week you don’t even want a single draw on pets. Usually, the pet wish event is long enough to cover 2 pp weeks, so you can decide in which pp week you’re gonna draw.
Why DH and Why 15, 21 or 29?
When gen 2 melomons are unlocked, there will be a special event that gives away gen 2 melomon selection chest for “free”. The amount of that “free” chests giving is based on the highest number of shards you’ve got from ONE gen 1 melomons. (you receive 5 shards from every dupe draw)
Eg. If you have drawn 10 demon hounds and 5 blade hounds, that counts as 50 shards (10 * 5 = 50); if you have drawn 15 demon hounds with no others, that counts as 75 shards (15 * 5 = 75). That’s why we’d better focus on one specific melomon – to maximize the benefit of this special event.
As said before, DH’s passive skill is the only skill that is worth using when gen 2 melomon comes out, so DH should be the best choice.
Here we start explaining the rules and calculation: if you have more than 5 shards but no more than 75 shards, for every 5 shards you have you’ll be given 1 gen 2 melomon selection shard chest with 5 shards inside. Note the first 5 shards give you nothing. So if you drew 15 DH, you got 1 pet and 70 shards in your bag, that’s counted as 75 shards, and you will receive 14 gen 2 chest for free from the event, which is considered as 14 free selected gen 2 melomons.
If you have more than 75 shards, for every 10 extra gen 1 shards you own you can receive 1 gen 2 chest. So if you drew 19 DH which counts as 95 shards, you will receive 16 gen 2 chests from the event. That makes 75 the first threshold, since you really waste nothing for the first 75 shards as the ratio is 1:1.
The reason we have 21 and 29 as higher thresholds is that with that amount of DHs, you will have enough shards to upgrade DH’s passive skill to lv.11 or lv.12. Any DHs beyond that will be a complete loss after gen 2 melomon comes out.
How to Get There?
It’s not that hard to get so many DHs.
- We have a wish list event for like every 6 weeks. So we could expect 4 wishing list events before gen 2 melomon comes out.That could be 12 DHs if you set every single wish on it.
- You can earn 1 shard of selected melomon for every 6 days from guild’s wishing wall, which means 1 DH for 30 days. Should be able to get 4 DHs on time.
- There are 6 pp events that give you 5 selection gen 1 shards as T5 rewards, so that’s 6 DHs.
- You should be able to receive 2 gen 1 selection chest for free from a “treasure event” in the future.
- You can buy 2-3 gen 1 selection chest with $ from special offer.
If you’re a F2P player and only do the first 2 things, you still have 16 DHs. If you do all the things above, you will get 27 DHs and you may have to draw 2 extra DHs from the pool without a wish list event to hit the highest threshold.
Daily Shop Purchase
When spending gold coins, focus on getting star experience points and pet food. For your gems, grab snacks, promotion stones, and experience boosters, though you can stop getting those boosters once you have more than 100 saved up. There’s also a special gold chest that’s offered at 50% off – wait to buy this until you reach Tier 2. The reason is that this chest gives you gold based on how far you’ve gotten in the story, but its price never changes. This means you’ll get much more value from buying it later in the game rather than at the beginning.
Shop Reset Voucher
You can receive a couple reset vouchers from the login event every month. Unless you really have to reset it now, you should keep it for later. You can purchase more discount mats from the shop in later games.
About Spending Materials and Recovery
We can power up our characters through many things, pet level, pet move, artifact, skill, etc. Sometimes it’s hard to decide “should I invest it now or save for later?”. Here I’ll list all the things can be recover for free so you can freely use all you mats:
- Free return: skill level, pet level, pet star rank, pet passive level, pet move level (including 10 pink mats used to upgrade legendary move), cat bun flavor.
- Things can’t recover but really no need to: skill star rank, mount level.
- Things can’t recover so be careful: equipment enchant, artifact level, artifact star rank, cat bun level.
Garden Event
There might be a garden event on day 22 after server opening, as a sub-event from the Maltese series, if everything goes the same as TW and CN server.
I’m not gonna explain a lot, but in conclusion, to get top priority rewards (unique artifacts) and fully clear the shop you need to spend $250-300, which is not cheap. But in my opinion, it’s the most efficient way of spending real money in this game. In other words, if you decide to ever spend more than $300 on this game, this is where you should spend the money.
Note: This event comes every couple months but with different artifacts as reward. Some of them are good while others are not. In CN server the 1st and 3rd garden event is worth spending while the 2nd garden is worthless for F2P and mid-spender. I’m not sure if it goes the same in Global/SEA server. I’ll update the info here while the event is released on the global server.
Currently I find out there’s a new set of artifacts show up in game which is:
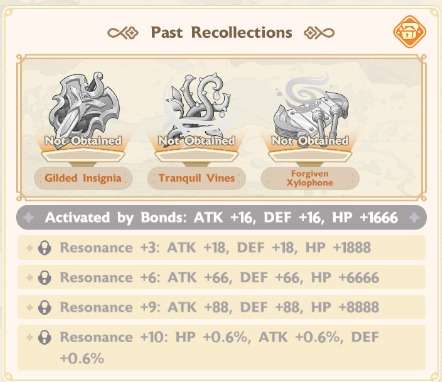
That’s the artifacts from 2nd garden event on CN server, which is not worth a lot to have, since the ATK bonus is too little and won’t scale with our leveling. If we have this set as reward for the 1st garden event on the global server, feel free to skip that event as f2p or low-spender.

Be the first to comment