
Contents
Intro
By PaperTronics
Before proceeding with the guide, it is recommended (but not necessary) for the reader to have a basic level knowledge of speedrunning Hades.
While most of the things in this guide are based upon factual information and testing, some statements might be my own opinion or my preferred playstyle for Beowulf. The “meta” for Beowulf is ever-evolving, so don’t be afraid to experiment and see what works for you.
Gameplay
Beowulf is one of the fastest and strongest aspects in the game. It is, however, a difficult aspect to master. This guide aims to change that. You’ll learn about what decisions to make and how to play it efficiently. Without any further ado, let’s begin.
Beowulf is a cast weapon. Meaning that, most of your damage will be coming from your cast boon. Hence, it is important to manage your casts to maximize damage output, and minimize time spent launching the casts and picking them up.
The gameplay mechanics described in the following paragraphs are extremely important to playing Beowulf well, and it is recommended that you practice these mechanics again and again until they become a habit for you. If you’re recording your runs (which you should do), you can watch your recordings to see where you are diverging from these mechanics, and how you can fix such mistakes.
The first thing to learn in the mechanics of this aspect is the basic Beowulf combo. Dash-strike → bullrush + cast → repeat. This combo allows you to always keep moving and also use your bullrush and cast quickly. A common mistake most new players make is that they overuse the standing attack on Beowulf, and they do a standing attack → bullrush + cast. This combo is slow and it locks you into your position for a long time. Try to not use it, and instead replace it with the dash-strike combo stated above.
Secondly, you should know damage breakpoints for enemies. That is, you should not use more casts than necessary to kill an enemy. This way, you’ll have enough casts to move onto another enemy without waiting for your previous casts to drop down, and you won’t be wasting any damage. To help with this, instead of loading your casts and then using your bullrush, you can cast at the end of your bullrush and the cast will still come out. Using this, you can save some time loading casts before your bullrush, and you can adjust for how many casts the enemy actually needs on the spot.
Sometimes, if you don’t have any casts, it is even faster to kill an enemy using your dash-strike and bullrush, rather than going across the room to grab your casts. Damage breakpoints are mostly something you learn with practice. Try to notice when you’re using too many casts on an enemy. Watching your own run recordings can be especially helpful for this part.
Next, grouping enemies is also vital. Casts usually have a lot of AoE (Area of Effect), so if you can get a few enemies close together and hit them with a single cast volley, you can kill them all at once.
When entering rooms, you can pause for a few seconds after seeing enemies to decide how you’re going to proceed through the room. Keep in mind that the more enemies you can kill with a single cast volley, the better.
When a new wave of enemies is spawning (i.e the orange circles start to appear), you can load some casts, position yourself so that you hit as many of them as possible, then charge up your bullrush so that as soon as the enemies spawn you can just release your bullrush and kill them instantly.
Speaking of, don’t overcharge your bullrush. This is a common trap that beginners fall into while trying to group enemies. While your shield does have a long range with the bullrush, it also takes a long time to charge it up, and during that time enemies often hit and interrupt you or they move away from where you were aiming. Hence, try to dash closer to enemies, then hit them with a short bullrush. If you have to charge your bullrush for more than a few seconds, you’re doing it wrong. Shorter bullrushes also have the added benefit of giving you more damage, since you can do them more often.
Sometimes, it can also be worth it to undercharge. If the enemy is far away, and has health low enough that it will die just with your cast, you can utilize the AoE of your cast and not charge your bullrush fully til the enemy, but let it go just below them so that your cast can kill them. This is more effective with some casts than others, but is still something to keep in mind.
Pick up your casts when enemies are spawning. Don’t go around the room to pick up a single cast stone when there’s 3 enemies still in the room that you can kill with your other casts. When enemies are spawning though, it’s safe to pick up your casts since you won’t be losing any time doing so. There’s rare cases where, say, if there’s an armoured enemy with a lot of health in front of you and you only have a single cast stone, it can be fine to pick up some cast stones, but usually waiting until there are no enemies alive in the room to pick up your casts is optimal.
Since Beowulf is a cast weapon, Poms are extremely important. The thing is, most boons in the game get little value from poms after lvl 8or so. Except for casts. Casts get a lot of additional damage from poms, even at higher levels, and the more poms you can get in your cast the better. If you have the money for it, buy poms from Charon’s shops. Also, try to avoid unnecessary boons that are pommable.
Generally, your room priority should be: Free Rooms (e.g story rooms, midshop etc) > Miniboss > Boons (that are necessary for your build) > Hammer > Poms > Gold > Nectar > Keys > Gems > Darkness.
Boons
Mirage Shot
Mirage Shot is a duo boon between Poseidon and Artemis. It is the single strongest boon for any cast on Beowulf, and it is a vital part of every build on Beowulf.
Why is mirage shot so powerful? Primarily, because of the Mirage Shot bug. Instead of providing 30% extra cast damage, as the boon tooltip says, it gives you 100% extra cast damage. Not only that, Mirage Shot also doubles your cast damage multiplicatively, meaning that any other damage buffs you have are also doubled. Essentially, with Mirage Shot, you’re casting twice as much. For example, if you have Mirage Shot, and a Chaos Cast Damage buff of say, 40%, then your actual cast damage goes up to 280% instead of 240%.
The prerequisites for Mirage Shot, i.e the boons you need to get the duo, are one core boon (attack, special, cast, dash, call) from Poseidon and one core boon from Artemis.
Most of the time you want Poseidon Special, and Artemis Attack as your pre-reqs. While Poseidon Special does next to nothing other than just being a way for you to get Mirage Shot, Artemis Attack actually improves your bullrush damage, and it is especially great if you have Charged Shot.
Never take Poseidon Attack as your pre-req, since it will push enemies back and make you miss your cast. Also don’t take Artemis Dash, since it doesn’t qualify as a pre-req for Mirage. Poseidon Dash is a fine pre-req if you have Charged Shot, but without it, it is just as terrible as Poseidon Attack. Poseidon Call and Artemis Call are last-resort options, if you fail to get either of the other pre-reqs.
Casts
At the time of writing this guide, there are 3 main cast boons that are the meta for Beowulf. Those are Flood Flare from Poseidon, Passion Flare from Aphrodite, and Trippy Flare from Dionysus. Each of them have their own strengths and weaknesses, and have a unique build and play style. The following paragraphs will cover them in detail.
Flood Flare
Flood Flare is, in my opinion, the strongest and at the same time, easiest to learn cast boon for Beowulf. I would recommend most beginners to start with it.
It’s strengths are:
- It has an incredibly large AoE that penetrates through walls, which makes grouping enemies really easy.
- It is a Mirage Shot pre-req by itself, so you can often get mirage shot very early.
- Due to its large AoE and wall penetration, it dominates in Styx. You can shoot the cast anywhere in the room and it will kill all the enemies.
- Poseidon has some great supporting boons for Flood Flare, like Razor Shoals and Wave Pounding.
It’s weaknesses are:
- It has the lowest base damage out of the three cast boons, though the early Mirage Shot and wave pounding do make up for it.
- Bosses can be a bit harder to deal with, since you won’t be instaphasing, i.e making them go from one phase to the other using a single cast volley, most of the time.
The build path for flood flare is to get Artemis attack as soon as possible, and then aiming for Mirage Shot. As for Poseidon supporting boons, Wave Pounding (Epic/Rare) > Razor Shoals > Breaking Wave > Wave Pounding (Common) > Typhoon’s Fury. Be wary when taking Breaking Wave or Typhoon’s Fury before getting Mirage Shot, as they can unlock Second Wave and lower your chances of getting Mirage Shot.
Flood Flare doesn’t have any notable exceptions from the basic Beowulf playstyle that is described in the Gameplay section of the guide. Just make sure that you’re taking advantage of its large AoE by grouping enemies together often. The large AoE also makes it easy to kill low health enemies without loading your bullrush all the way up to them.
Passion Flare
Strengths:
- It has high base damage
- It does not require the craziest of builds in order to have good damage.
- It can instaphase bosses most of the time.
- It has multiple scaling options, such as Smoldering Air, Snow Burst, etc.
Weaknesses:
- Harder to get Mirage Shot. Passion Flare unlocks Heart Rend from Artemis and Sweet Nectar from Poseidon by default, these duos can often get in your way when rolling for Mirage Shot.
- Smaller AoE makes grouping enemies harder, and Styx is also a bit painful. The AoE bug can make this even worse.
Due to its high damage, passion flare does not need mirage shot until late Elysium. As for the build path, the first priority is Mirage Shot of course. You can take Poseidon or Artemis keepsake into Elysium, if you don’t have Mirage Shot when entering Elysium. Other than that, you can also try taking Zeus Call for Smoldering Air, but beware that it can also open up Lightning Rod from Artemis (lowering your chance of getting Mirage Shot).
If you get Sweet Nectar or Heart Rend offered, my advice would be to just take it instead of rolling, especially in Tartarus/Asphodel. That way, the duo gets out of your pool and next time you see Artemis/Poseidon they have a higher chance of offering you Mirage Shot.
Lastly, keep in mind the Passion Flare AoE bug. If you sell/rarity upgrade your Attack boon, then the AoE of your Passion Flare will decrease in size to the AoE of the base Zagreus cast. Hence, it is not recommended to take Ambrosia from Eurydice, Rare Crop from Demeter, or to sell your Attack boon if you’re playing Passion Flare.
Trippy Flare
Strengths:
- It has the highest base damage out of the three casts mentioned here.
- It has a decently large AoE.
- If you get the right build, Trippy Flare can push out insane damage numbers, instaphasing even Phase 2 Hades fight.
- You don’t have to pick your cast stones up, since you’ll be regenerating them with Stygian Soul.
- It gets better pom scaling, due to the Trippy Flare Pom bug.
Weaknesses:
- It has a difficult and unique playstyle.
- It is more RNG-dependent, you will be resetting runs more often with Trippy Flare.
The most important thing for Trippy Flare is that you use Stygian Soul with it, instead of Infernal, so that you can regenerate your casts quickly. What this means is that extra cast stones from Chaos become extremely important. You atleast want +1 cast stone leaving Asphodel. If you’re pushing for faster times, sub 7’s and the like, resetting for +1 cast stone in Tartarus becomes necessary as well.
Trippy Flare does have a bit of leeway in terms of dash selection. You can take Ares/Athena/Demeter dash without opening up any duos that block Mirage Shot. If you don’t have a lot of rerolls left, you can also take Tidal Dash as a Mirage Shot pre-req.
If you get an early Poseidon core boon, try taking more Dionysus and Poseidon boons afterwards in order to get the Exclusive Access duo out of the way. If you ever have a choice between Artemis and Poseidon to get Mirage Shot from, take Artemis since the Splitting Headache duo does not unlock with Trippy Shot, hence you have higher chances of getting Mirage Shot when taking Artemis. Fully Loaded (Artemis Legendary) is also good for Trippy Flare.
Scintillating Feast (duo between Zeus and Dionysus) is also pretty decent if you can get it, but never take Ice Wine (duo between Dionysus and Demeter) on Beowulf. While on normal cast builds Ice Wine is great to speed up Trippy Shot’s timing, on Beowulf it actually slows it down, hence it is a bad take.
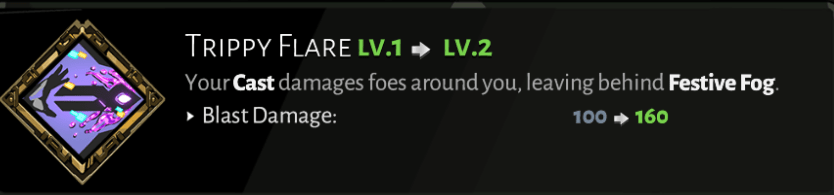
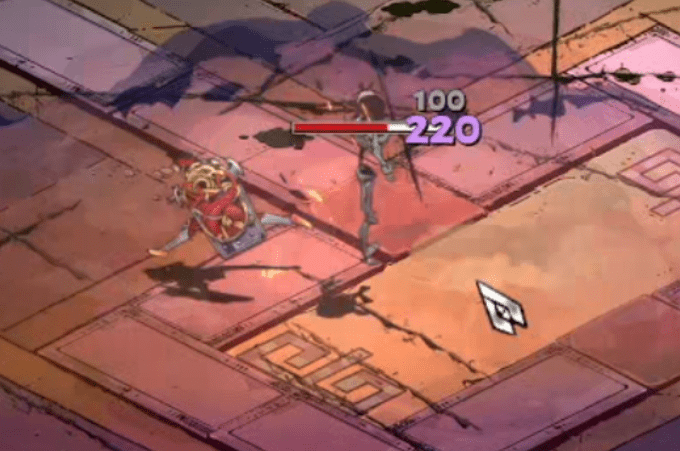
Next, the Trippy Flare pom bug makes it so that you actually get double the value from the pom than what it says on the text in the game. So for example, pomming a Level 1 Common Trippy Flare to Level 2, you would see this on the pom text (Pic 1), but your damage actually increases by twice that amount, as proved by (Pic 2).
Pic 1: Pomming Common Trippy Flare, text shows that the damage has increased to 160 (+60 dmg from 100 base dmg)
Pic 2: The damage has actually been increased to 220, +120 more than the base of 100, hence showing that we got double value from the pom.
Lastly, Hermes options slightly change for Trippy Flare, as you have Stygian Soul on and can get Bad News (Hermes Legendary). You can often just take Auto Reload (pre-req for Bad News) or Hyper Sprint, whichever is offered first.
Chaos
Chaos gates are very good for all casts on Beowulf. One, they’re a free room i.e they save you IGT time since they’re quicker than a normal combat room. Two, they give you more damage. More cast stones, and more cast damage are the best Chaos boons you can get on Beowulf. Attack damage, dash strike damage, and better boon rarity chance are also decent options.
If you have the choice to pick between Cast Damage and Extra Cast stones, it’s advisable to take cast stones until you have about 4 or 5 casts, however if the cast damage is particularly high (above 60%), then it can be better than a cast stone too. Extra cast stones provide more utility in rooms since you can spread your damage out further, while more cast damage is better for single-target damage like for Bosses.
This is something that will be based on preference, but I personally roll Tartarus Chaos boons once if there is no cast buff available on the first screen. In Asphodel, I try to conserve my rolls for Hermes or Mirage Shot. If you have spare rolls sitting around in Elysium, it can be alright to roll Chaos boons there as well.
Beware when taking curses that can make you slow or can kill you. Particular bad ones are Roiling (extra enemies in rooms), Enshrouded (you can’t see room rewards), and Slippery (you can’t pick up your cast for x seconds).
Hermes
Hermes, while not as important on Beowulf as he is on other aspects, is still a very good source of damage. This is because of Hyper Sprint and Rush Delivery. These two boons can single-handedly double your damage. Hyper Sprint provides you +100% move speed for a few milliseconds after dashing, and Rush Delivery gives you extra damage based on your current move speed buffs. At Common rarity, Rush Delivery (RD) gives you 50% of your move speed as damage, but at Epic rarity, you can get 100% of your move speed as extra damage. Since you will be dashing most of the time, you can effectively double your damage with Hyper Sprint and Epic RD.
Some other notable Hermes boons are Greatest Reflex, which gives you extra dashes. While this doesn’t affect your damage output in a meaningful way, this can give you extra mobility to move through rooms quicker. Auto Reload -> Bad News is also a great combo for Stygian Soul casts like Trippy Flare. Bad News gives your cast +50% damage when an enemy does not have a cast lodged in them already. However, due to a bug in the game, Bad News does not affect just your cast damage, but it buffs all your other damage output as well. The Infernal Soul Hermes Legendary boon, Greater Recall, is also pretty decent. It makes your casts return to you automatically, which is especially helpful for big rooms. On Beowulf, you can only get it with Lambent Plume keepsake equipped however, so it is pretty rare.
How many rolls should you spend on Hermes for Hyper Delivery or other combos? Well, it depends. If you already have Mirage Shot, and your build doesn’t need anything else, then you can safely spend all your rolls looking for Hyper Delivery. However, if you’re still looking for Mirage Shot, it’s advisable to keep at least 3 rolls saved for it.
Setup
Mirror
- Fiery Presence: With beowulf, you want to kill things in one shot, and fiery helps you do that. Backstabs are also hard to get.
- Chthonic Vitality: Consistent health regeneration as you enter rooms is good for keeping High Confidence up. Getting health just from darkness rewards is inconsistent, plus you don’t want to be seeing darkness rewards anyway.
- Death Defiance: Self-explanatory.
- Greater Reflex: More dashes means that you can travel through rooms faster.
- Boiling Blood: This doesn’t matter for Beowulf because your casts don’t lodge into enemies anyway.
- Infernal Soul/Stygian Soul: Stygian Soul if you’re running Trippy Flare, Infernal Soul for everything else.
- Deep Pockets: You want gold when starting out so that you can buy things from Tartarus Midshop. Gold becomes less relevant as you progress through the biomes, hence golden touch is bad.
- High Confidence/Thick Skin: Highly recommended to run high confidence, since it gives you damage and helps one shot things, but if you keep dying it’s fine to run thick skin until you feel confident enough with Beowulf.
- Family Favorites: You want consistent damage buffs. Privileged Status isn’t consistent, and can often make you take boons that you don’t need.
- Dark Foresight: More boons. poms, gold etc. means that you have better damage and can kill enemies faster.
- God’s Legacy: Mirage shot is a very important duo for all casts on Beowulf. Hence, you want to increase your chances of getting it with God’s Legacy.
- Fated Persuasion: You want to be able to roll boons to get the things you want like Mirage, Rush Delivery etc.
Keepsakes
- Tartarus: Keepsake of the god you want your cast boon from. e.g start with Poseidon’s keepsake if you’re playing Flood Flare.
- Asphodel: If you don’t have a Mirage Shot prerequisite, use the keepsake of the god that you want it from. e.g if you have flood flare, but no Artemis attack, force Artemis.
- If you already have both Mirage Shot prerequisites, but don’t have the duo itself, use Artemis keepsake.
- If you have Mirage Shot already and don’t need any more boons for your build, you can either take Plume to have better chances of getting Hyper Delivery and unlock Greater Recall, or you can take Charon’s keepsake if there’s anything cast-related in the well. If you’re playing Trippy Flare, you can also force Zeus for Scintillating Feast.
- Elysium: If you don’t need any more boons for your build, take Charon’s keepsake and check the well for any items you may want. If you’re low on health and have no DDs, you can also take Lucky Tooth for safety. If you have no gold and there’s a Light of Ixion or other good items in the well, you can take Coin Purse.
- Styx: Before unequipping the Charon Keepsake that you took in Elysium, check the well and buy the things you want. Then, if you don’t have a call already, take Hades Call. If you do have a call, you can either keep using Charon’s Keepsake, or take Evergreen Acorn. Evergreen Acorn helps you to not get interrupted during the Hades fight, while Charon’s keepsake assures that any Charon Well Items that you buy early in Styx will last till the Hades fight. It’s a matter of personal preference, but I usually go for the Acorn in such a situation.
- Always keep Battie (Megaera) as your companion, since it provides decent damage and triggers quick enough.
Pact of Punishment
Use Extreme Measures 2, so that the little lernie heads are closer together and you can group them up easily.
Use Forced Overtime 1 if you’re playing unmodded. This is so that enemies spawn quicker. It’s not recommended to use FO2 on unmodded because enemies often jump away from you on FO2. especially in Asphodel, and since the bullrush charges so slowly, it’s harder to catch them. However, if you have the Charged Shot hammer, as you are guaranteed to get when playing Modded, your bullrush charges up quicker and it’s easier to chase enemies even if they jump to the other side of the room. This is why it is recommended to use FO2 when playing Modded, and FO1 when playing Unmodded.
Hammers
Charged Shot
This is the holy grail of Beowulf Hammers. It is the single best hammer for Beowulf, because of its amazing damage output, quick charge up and mobility. This hammer is also partly the reason why Beowulf is so prevalent in Modded Any Heat, as you can get Charged Shot on every run in Modded,
Normally, the bullrush on Beowulf deals 50 base damage. Charged Shot instantly buffs that up to 80 base damage. This 30 damage change might not seem like much, but when this gets affected by damage modifiers like Family Favorites, Rush Delivery, Attack boons, etc it can quickly make a huge difference.
Charged Shot charges up faster than the normal bullrush, and it has more range than the normal bullrush. It also allows you to move around more freely since you no longer move to where your bullrush ends.
When you have Charged Shot, you can kill most enemies in Tartarus with just the bullrush itself, so if you don’t have cast stones you can kill your enemy with the bullrush instead of going to pick up your cast stones.
Lastly, Charged Shot also pierces enemy shields, so enemies like Greatshields in Elysium and Theseus at the Heroes boss fight, are easier to kill.
Here’s a video comparison between the normal bullrush and Charged Shot.
Other Hammers
However good it may be, Charged Shot is certainly not necessary for decent times on Beowulf. There are plenty of other good hammers, listed below in descending order of their value.
Sudden Rush: This hammer greatly speeds up the charge-up time of your bullrush. It increases your mobility as well, since you can be bullrush-ing much more often. In a way, it also increases your practical range, since you can charge up to the maximum range quicker with Sudden Rush and hence it is more practical to do so.
Ferocious Guard: This hammer gives you 20% global damage and move speed for 10 secs after blocking an enemy. While it may not seem like much, the 20% global damage is a pretty decent buff, and the move speed bonus can be great if you have Rush Delivery from Hermes. The Ferocious Guard buff is also up most of the time since you’re bullrushing so much and hence blocking enemies often, even though you may not notice it.
Breaching Rush: This hammer makes your bullrush do +400% damage to Armor. This makes it so that most of the time your bullrush will be stripping the armor off of enemies, and then a single cast can kill them. This helps in normal rooms a lot, but it also helps in the Lernie fight, as the small heads that Lernie spawns have armor.
Dashing Wallop: This hammer makes your Dash Strike deal 50% more damage, and it also increases the AoE of the dash strike. This is a pretty helpful hammer in Tartarus, as it allows you to one-shot a lot of enemies with just your dash strike. It’s a pretty minor change in other biomes though, hence it is lower on this list.
Unyielding Defense: This hammer makes you Sturdy for 3 seconds after loading your cast. This makes it so that while charging your bullrush, even if an enemy hits you, you won’t be interrupted. This hammer is basically useless if you have Hyper Sprint from Hermes though, as that also gives you the Sturdy effect. This hammer can be fine if you find that you’re often getting interrupted by enemies, but realistically if you’re not overcharging your bullrush, getting interrupted by enemies is rare.
Special-buffing Hammers: Hammers that affect your Special are basically useless, since you won’t be using your special often.
Notes:
- Don’t ever take Minotaur Rush. It slows down your bullrush by a considerable amount for little benefit.
- Sudden Rush + Charged Shot is hard to handle, and I would not recommend you to take Sudden Rush if you already have Charged Shot (unless you know that you can handle it)
- If you already have Charged Shot, 2nd Hammer in Elysium isn’t really that valuable. You can take pom or boons over the 2nd hammer.
Charon Well Items
Main Items
Charon’s Well is important for cast weapons, as it can increase your cast damage by a lot. The most important Well items for Beowulf are Braid of Atlas, Prometheus Stone and Light of Ixion. It’s recommended to almost always buy these if you can afford them.
Braids increase your cast damage by 50%. They cost 20 gold, and at base last for 6 encounters (an encounter is any room where you fight with enemies, including bosses and minibosses).
Stones give you an extra cast stone. They cost 50 gold, and at base last for 6 encounters.
Light of Ixions give you a Chaos gate in the next chamber. They cost 55 gold, and while they don’t buff your damage directly, Ixions can give you a free room to save time. Especially great in Elysium, where a free room can save you more than 30-40 seconds.
These items are also the reason why Charon’s keepsake is so good for Beowulf. Charon’s keepsake increases the duration of all the items in the Well by +8 if you have it equipped when buying the item. This can make Well items bought in Elysium last for the entire run, instead of just ending 6 encounters later.
If you ever can’t afford any one of the items listed above, check the Purging Well (if you’re in the place between biomes), and see if there’s a boon that you don’t need and can sell without any major downsides. If not, and you don’t have any other keepsake you want to equip, you can use the Coin Purse keepsake to get some gold.
Other Items
These are some other notable Charon Well Items. Only buy them if you have excess gold or you don’t need any more boons for your build.
Cyclops Jerky: +30% attack damage
Nail of Talos: +50% damage towards Armour (this can be especially good in Asphodel, since Lernie mini-heads have Armour)
Stygian Shard: +300% damage to your enemies.
Ignited Ichor: +20% move speed, great if you have Rush Delivery.
Aether Net: Start encounters with 15% of your call gauge charged, great for Hades Call, since combined with the already 30% gauge charge of Hades call, this gives you a half-gauge Hades call upon entering any chamber.
Eris Bangle: +50% damage striking undamaged enemies.
Life Essence: Gives a bit of health. Can be great for getting High Confidence back on.
Fateful Twist: Gives you a random well item. This depends on your preference, but I usually only buy this in Elysium to see if I can get a Light of Ixion from it.
Yarn of Ariadne: Upgrades the rarity of the next boon you get. Only really useful in Asphodel, for better rarity on Hermes boons, or if you know the next god you’re going to get (if you have the keepsake of that god equipped, for example).
Kiss of Styx: Replenish 1 Death Defiance. Only buy this if you have no DDs entering Elysium/Styx, and can afford to lose the 200 gold that it costs.
Boss Fights
Furies
When starting the fight out, right after the dialogue you want to do dash → dash → dash-strike → bullrush + load casts → shoot. Then, while you wait for your casts to drop down from the air (or regenerate, in the case of trippy flare), you can use your bullrush and dash strike to damage the boss.
If you don’t have amazing damage yet to instaphase furies, instead of loading and shooting all of your casts at once, you can load and shoot 2 casts, and then load and shoot 1 cast afterwards (on Flood/Passion flare). This way, you can use your bullrush more often on the Fury and do more damage. This combo also helps you to get your casts back quicker, since by the time that you’re done shooting one cast, the previous two will have fallen down and you can pick them up.
If the Fury dashes away from you, instead of charging your bullrush all the way up to it, you can dash closer to it and then charge your bullrush.
As for the common question of which of the three Fury sisters is the fastest: Tisiphone is usually bad because she has more health than the other sisters and her attacks also often interrupt you. Between Meg and Alecto, it’s a matter of preference. I personally like Meg more than Alecto because Alecto dashes away more often and has an attack that keeps going even when she’s phasing, which is annoying.
Lernie
Beowulf is one of the best aspects for a fast Lernie fight. It has the AoE to take out multiple heads, and has the damage to do so in just one go. This is also why it benefits so much from Extreme Measures 2, the heads are closer together and you can kill them quicker.
When the fight starts, you want to dash to the left or right side of Lernie, load and then shoot all your casts. If you don’t phase him instantly, you can use your bullrush to damage him.
When Lernie spawns the 3 mini-heads, you want to grab your casts, move to where the little lava bubbles start to appear, and then begin charging your bullrush towards them after a few seconds. This way, you will hit the mini-head right as it spawns. You can use 1-2 casts on one mini-head, then move onto the next. Don’t stand in the same spot waiting for your casts to drop down. Just kill some other mini-head, then go back to grab your casts for the third head. Usually in this phase the mini-heads spawn far apart from each other, but if you do see two of them spawning close to each other, you can wait for both of them to spawn, then use a single cast volley to kill both of them.
In the second phase, when lernie spawns the 6 mini-heads, you want to group them up. Most of the time these heads will spawn close together, so you can easily kill 2 or 3 of them in one cast volley. Make sure you’re not standing in lava for too long, as it can kill you very quickly if you’re not careful. Try to move to land every few seconds to stop the lava damage from ramping up too high.
If you’re playing Flood Flare, you can kill 4 of the 6 heads in just one cast volley. You can stand at the right side of the Main head and wait for 4 of the mini-heads to spawn there. Then, when all of them have spawned, you can dash to the bottom and load up your bullrush just to the center so that your cast hits all of them and kills them at once. (Example) Note that this does not work as well on Pink mini-heads, as they take a long time to come out of the lava, even after spawning.
During the Lernie fight, try not to get interrupted by things. If there are blue heads, you should dash a safe distance away from them so that they don’t keep stomping on you. If there are Pink heads, dash away from their projectiles and try to be on their sides. If there are Green heads and their eggs start hatching to spawn enemies, try to stay away from them. These things are much easier said than done, but if you get in the practice of doing them then you’ll notice significantly faster Lernie fights.
Heroes
Heroes fight is fairly straightforward for Beowulf. After the dialogue ends, walk straight up (as if you’re walking towards the Red Shade), and summon Meg, then load all your casts and shoot between Theseus and the Bull, so that it hits them both.
During the fight, try to group them together so you can hit both of them with your casts. To do this, stick near Theseus. Asterius will follow you around anyway, but Theseus will keep moving away from you.
Also, try to avoid the circles when Theseus summons a God in the 2nd phase. Load and shoot your casts quickly to avoid being interrupted by the circles.
Hades
Beowulf is, again, one of the best aspects for the Hades fight. You can very quickly kill him without needing insane builds. Sub-40 second Hades fights are common for decent runs.
First thing you need to know is that Hades has 2 Phases. Phase 1 is right when you enter the fight, and Phase 2 is when he regains his entire health bar. Phase 1 has 3 Parts, as in, the health bar is divided into 3 parts in Phase 1. Phase 2 only has 2 parts.
After dialogue ends, you want to summon Meg instantly, then dash towards him and load and shoot your casts. Most of the time, this should phase Hades, but if it doesn’t, utilize your bullrush to quickly phase him to avoid a Darkness. Then, while he has the blue invincibility bubble on and is spawning enemies, you can go pick up your casts and load them. It’s not recommended to focus on attacking the spawned enemies, unless it’s a voidstone (blue crystal-like things that can make Hades invincible for a short time).
Hades has a lot of moves he can do, but the worst one for speedrunning is “Darkness”. This is the move where he disappears for about 2-3 seconds. Ofcourse, this means you can’t damage him and just lose 2-3 seconds every time he does it. He can only do this move in Phase 1, which is also why we use our Meg summon in this phase. There are two types of “Darkness” moves that Hades does, one is the “insta-darkness”, that he does right after coming out of the blue invincibility bubble. You cannot prevent this type of Darkness, no matter what. However, the 2nd type of Darkness, that he does normally, can be prevented by either phasing him, or making him repeat his previous move using the Hades call (if you have the keepsake equipped). If you don’t have enough damage to insta-phase Hades, you can use your Hades call after Spins, since they’re his longest move, and make him repeat the Spin. This buys you some time to damage him and phase him.
Something to note for the entire Hades fight is that if you have more than 4 cast stones on Flood Flare or Passion Flare, instead of unleashing them all at once, you can shoot half and half, similar to how you would with Furies. This is because these casts take time to actually damage the enemy even after you’ve launched them, and this can be a problem when you have over 4 cast stones because Hades can move out of the area of your casts while they’re still launching. Hence, by shooting only half of them at a time, you can avoid this.
When in Phase 2 Part 2, Hades does the laser attack that goes in all directions, you can stay really close to Hades, basically hugging him, to avoid being damaged and interrupted by the lasers. While hugging him, don’t dash around since that can put you in the area of the lasers. If you can’t go close enough to hug Dad for whatever reason, you can also use your shield’s block to avoid being damaged by the lasers.


Be the first to comment