

Village Economy in IWO
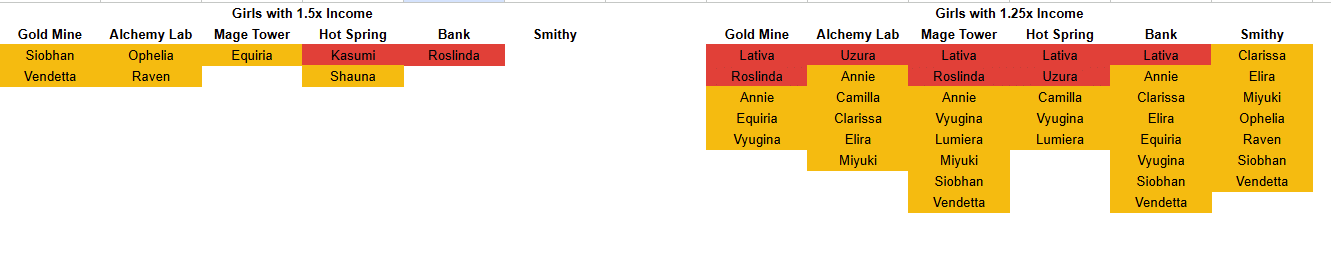
This guide explains how to increase your income as quickly as possible by prioritizing the right buildings and upgrades. Bookmark the chart provided with the guide, as it can help determine which building is usually the best one to upgrade.
Part 1: Reaching the Gold Mine
In the very early game, your focus should be reaching the Gold Mine, as it is considered the best building in the game.
From the Farm to the Gold Mine, each building generally becomes better than the previous one. However, this progression does not continue after the Gold Mine.
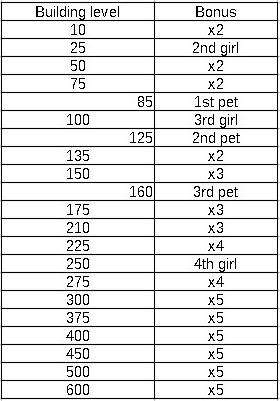
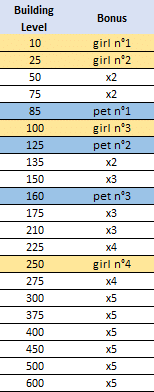
You can unlock the next building faster by leveling your available buildings efficiently. A useful rule of thumb is to check which building you can tier up the fastest by filling the yellow progress bar beneath its level.
Usually, you can simply check which bar you can fill the most with a single click and upgrade that building.
However, tier requirements are not evenly distributed. Some tiers require 15 levels, while others require 25 levels or even more. Girl slot unlocks are also less desirable than actual multipliers. These factors can make the simple rule of prioritizing the fastest progress bar suboptimal.
If you do not want to think too much about each upgrade, however, this rule of thumb is still useful.
When unlocking the next building requires only a few hours of saving, approximately 2 to 3 hours at most, consider saving your resources instead of continuing to upgrade.
Part 2: The Gold Mine Meta
Buildings are not equal in value, and the newest building is not always the best one. This is only true up to the Gold Mine.
The building tier list is:
| Tier | Buildings |
|---|---|
| S Tier | Gold Mine, Lab, Mage Tower |
| A Tier | HotSpring, Bank, Smithy |
| B Tier | Everything else |
Upgrade Priority
The general strategy is to tier up the A and S tier buildings in unlock order:
Smithy → Bank → HotSpring → Mage Tower → Lab → Gold Mine
Then repeat the sequence.
The earliest building will always be one tier above the next one, and will be two tiers ahead immediately after you tier it up.
The latest building you tiered up will be the best one to place your best girls and pet in 99% of cases.
Matching girl and pet types is only a secondary factor when assigning girls and pets.
Part 3: The Level 300 Wall
According to the progression chart, tiers beyond level 300 are very difficult to reach. There are 75 additional levels to reach level 375.
Because leveling costs increase exponentially, reaching level 375 is extremely expensive, even though the first approximately 30 levels may initially seem affordable.
Until the Gold Mine itself reaches level 300, consider level 300 the maximum level for other buildings.
Once buildings such as the Smithy and Bank reach level 300, remove them from the list of good investments described in Part 2.
Update for Version 2.24
The Gold Mine has reached level 300, but there is no further information about the Gold Mine beyond that point.
The Anvil cost was reportedly increased significantly in version 2.24. As a result, it is no longer necessarily possible to have a maxed Anvil by the time the Gold Mine reaches level 300.
Seals of Mastery and Affection Items
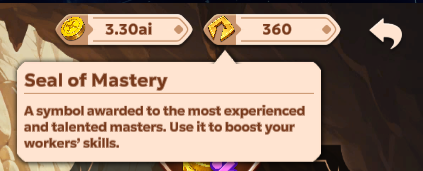
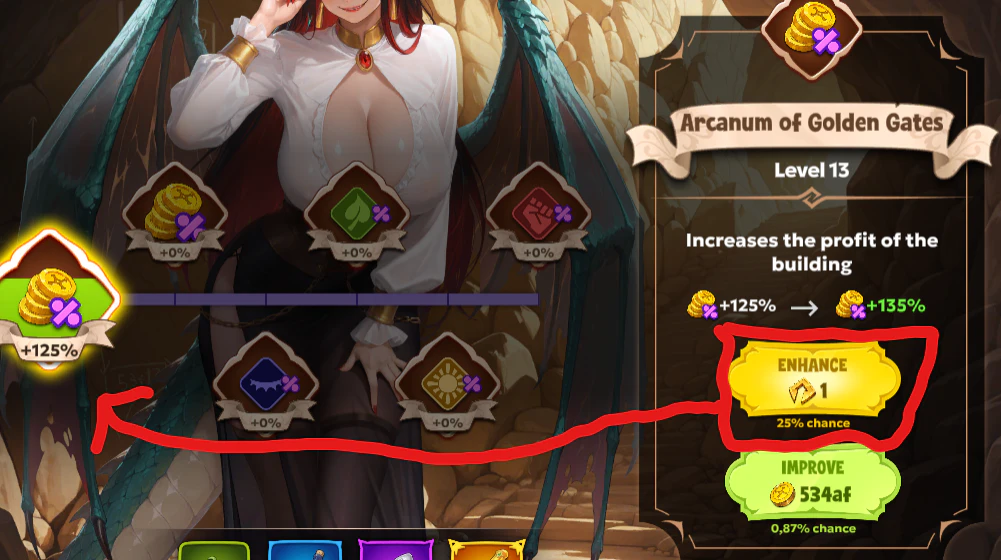
Seals of Mastery are a way to upgrade your best income nodes after spending your Gold. They have significantly higher chances of granting a level than the standard Gold upgrade method, ranging from:
- 100% at level 0
- 20% at levels 15 to 20
Always spend your Gold before beginning to use Seals of Mastery. Do not waste them while you still have Gold available for upgrading the node.
Seals of Mastery are not particularly difficult to obtain, but they should only be used on Legendary or higher rarity girls, meaning Mythic girls as well.
Use the same principle with Affection Items: prioritize your best girls and avoid spending too many on lower-rarity girls. For girls below Legendary rarity, do not go further than 2 nodes unless you actively buy additional Affection Items.
Arcanum of Golden Gates
The Arcanum of Golden Gates node exists for each girl rarity, but its maximum value at level 20/20 becomes lower with lower rarities.
The maximum bonus per node is:
| Girl rarity | Maximum bonus per node |
|---|---|
| Mythic | 500% |
| Legendary | 200% |
| Epic | 165% |
| Rare | TBD |
The total bonus is multiplied by 1.25 for each fitting type of the building, with the bonuses being additive.
For example, a maxed-out node on Siobhan provides a 200% bonus. If she is placed in the Gold Mine, which has 2 fitting elements, the bonus becomes:
200% × 1.5 = 300%
If all 3 nodes are maxed out:
600% × 1.5 = 900%
What Should You Do?
Your priorities depend on how far you are into the game.
New Players
As a new player, it is recommended to save your Seals of Mastery until you have a girl who is a good fit for the Gold Mine, which is the best building in the game past the mid-game.
Examples of suitable Legendary girls include:
- Siobhan
- Annie
- Equiria
Any Mythic girl who is a good fit can also be used.
In all cases, use your Gold first to level the spell before using Seals of Mastery, so that you do not waste them.
The further you progress into the game, the higher the odds of having a high-level spell, and the less it costs to max one out.
Advanced Players
The same basic strategy applies:
- Use Gold before Seals of Mastery.
- Prioritize your best girls.
- Use Seals of Mastery on Legendary or Mythic girls.
- Avoid investing heavily in lower-rarity girls.
Whales
Seals of Mastery can be used on girls of at least Legendary tier.
This chart shows the best “fit” for Legendary+ girls. Keep in mind that the best girl for you is the one with the highest % for your best income-building location. This chart only shows girl synergy and where they fit best.



Be the first to comment