
For new adventurers, those who feel they missed something, or generally those who need to be reminded that the pointy end goes into the goblin.
Guide to Basics
Introduction
Legendary Tales is an ambitious game, and consequently is fairly feature-dense. The playable tutorial does a good job of going over most essentials, but some players may decide to skip it either out of impatience, or hubris, or more likely because they’re eager to get into it with their friends. Even if you didn’t skip it, some of the details might slip through the cracks just because of how much there is to learn.
Story/Plot
Legendary Tales features an intentionally vague story with the idea of giving players the freedom to come up with their own characters and stories for themselves. This is an experience that does expect a bit of role-playing from the player as part of the RPG, but there are still some starter details.
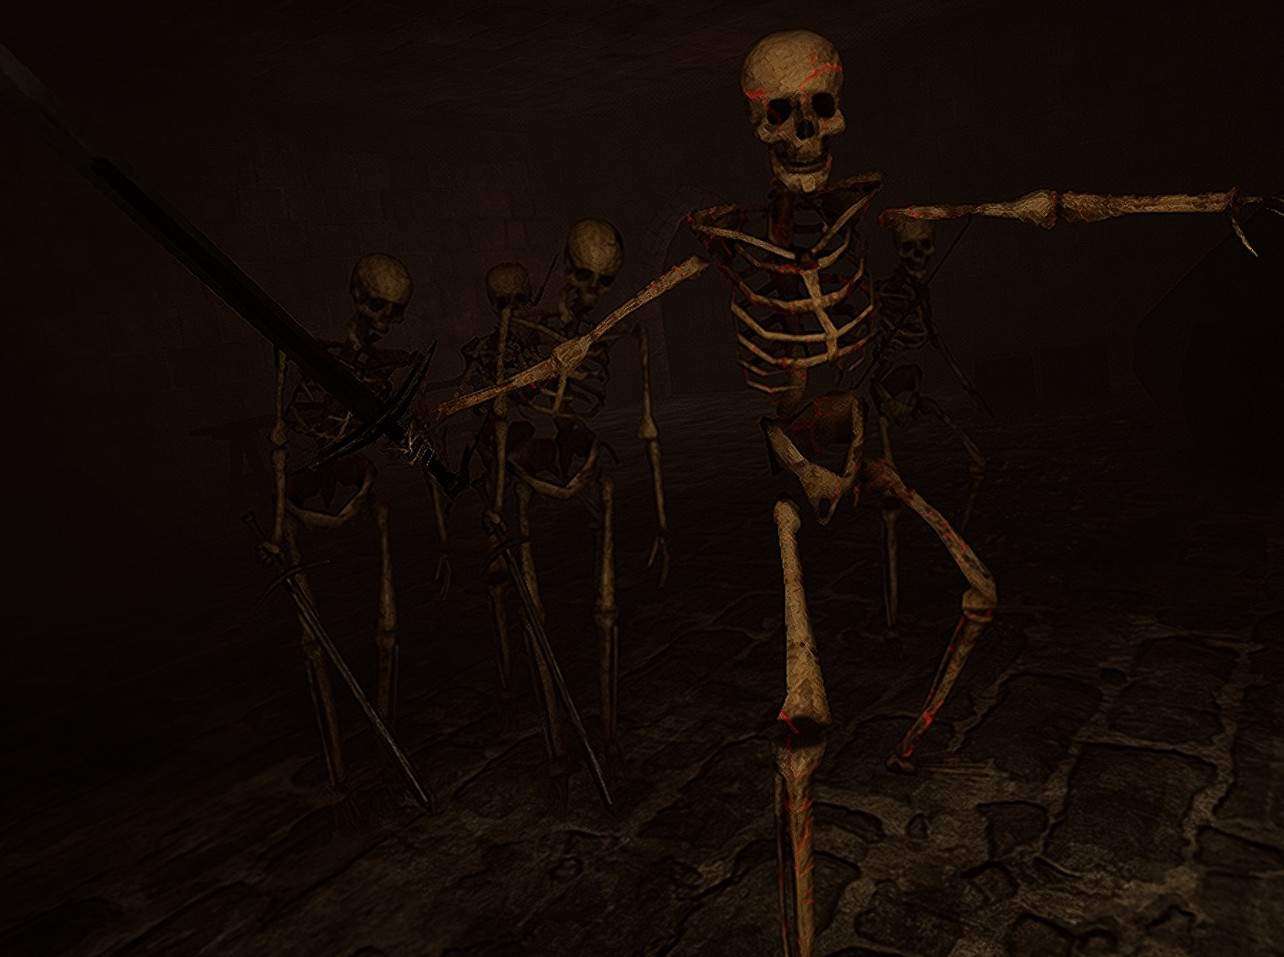
You are a hero from another dimension, answering a call for help that has gone out from a town that is under siege by the forces of evil. A necromancer has kidnapped the king’s daughter. The church basement is filled to the brim with skeletons and goblins. And there’s endless amounts of sweet, magical loot to be found in those catacombs.
What summoned you? What interest do they really have in saving the town?
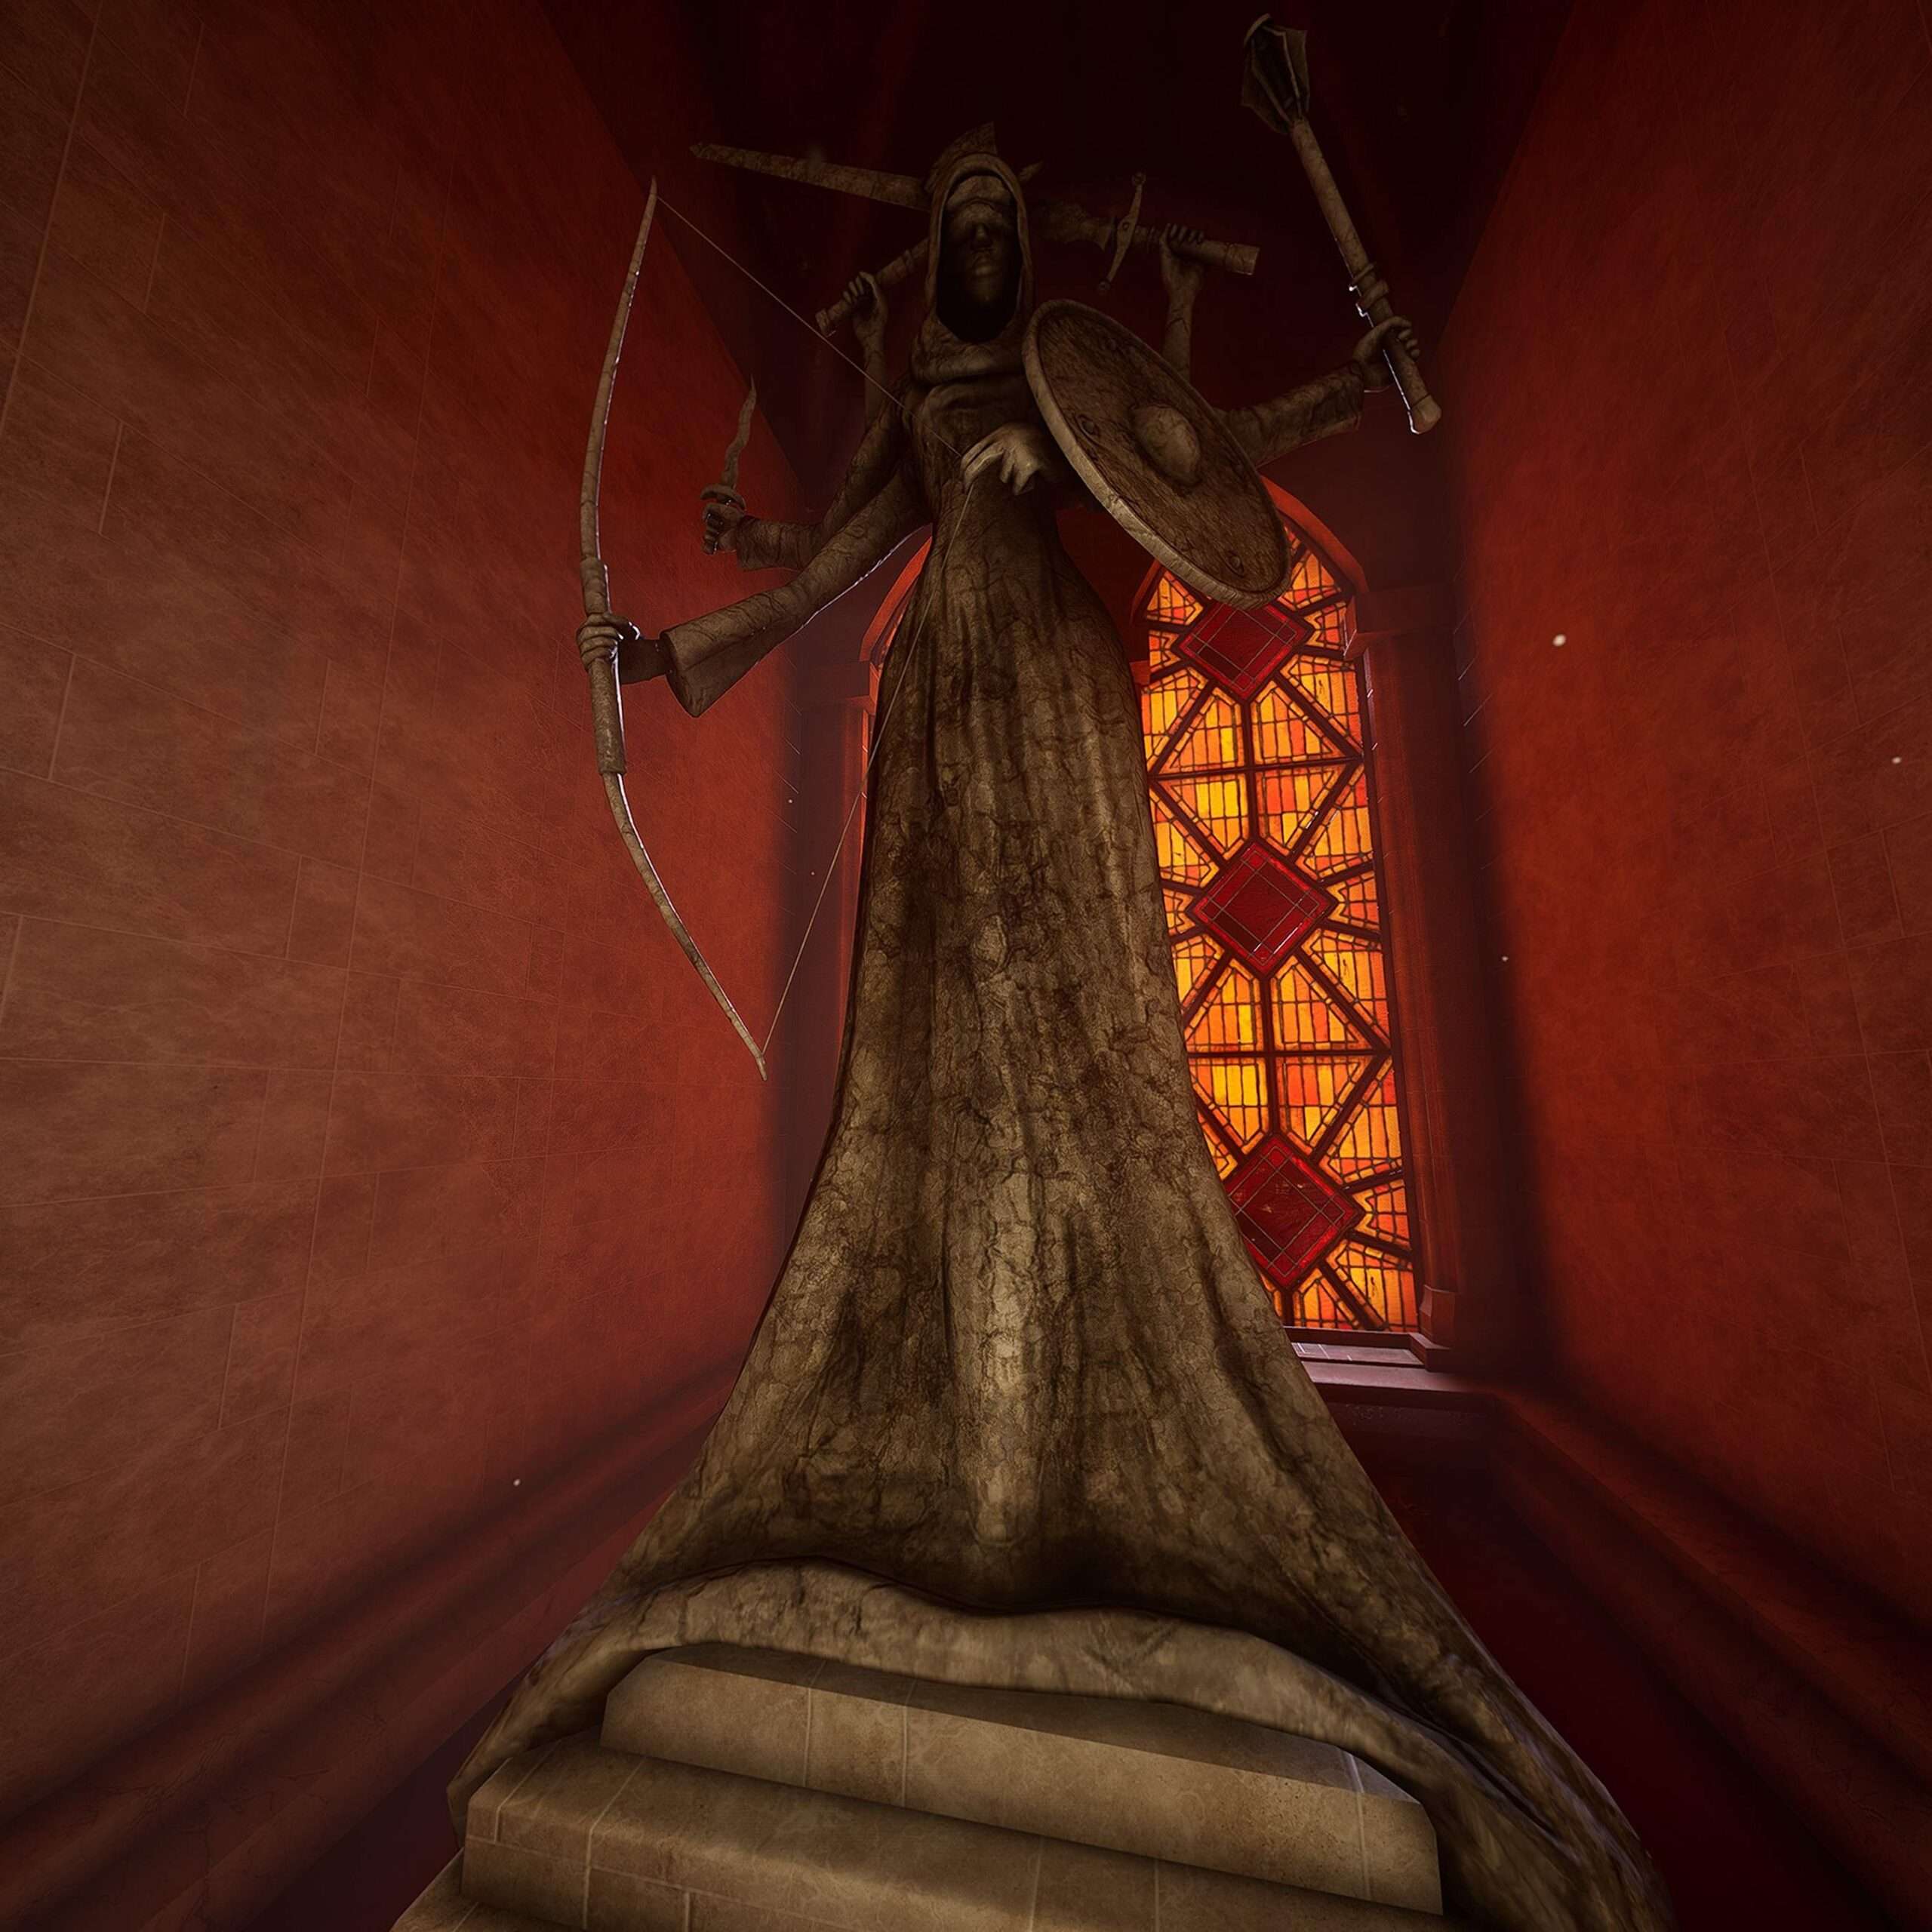
Maybe it’s the local priesthood. Maybe that many-armed statue you keep seeing has a patron behind it. Maybe there are other dark forces vying for control over the town trying to use the heroes against their rivals. The story is what you make of it! Let your imagination stretch.
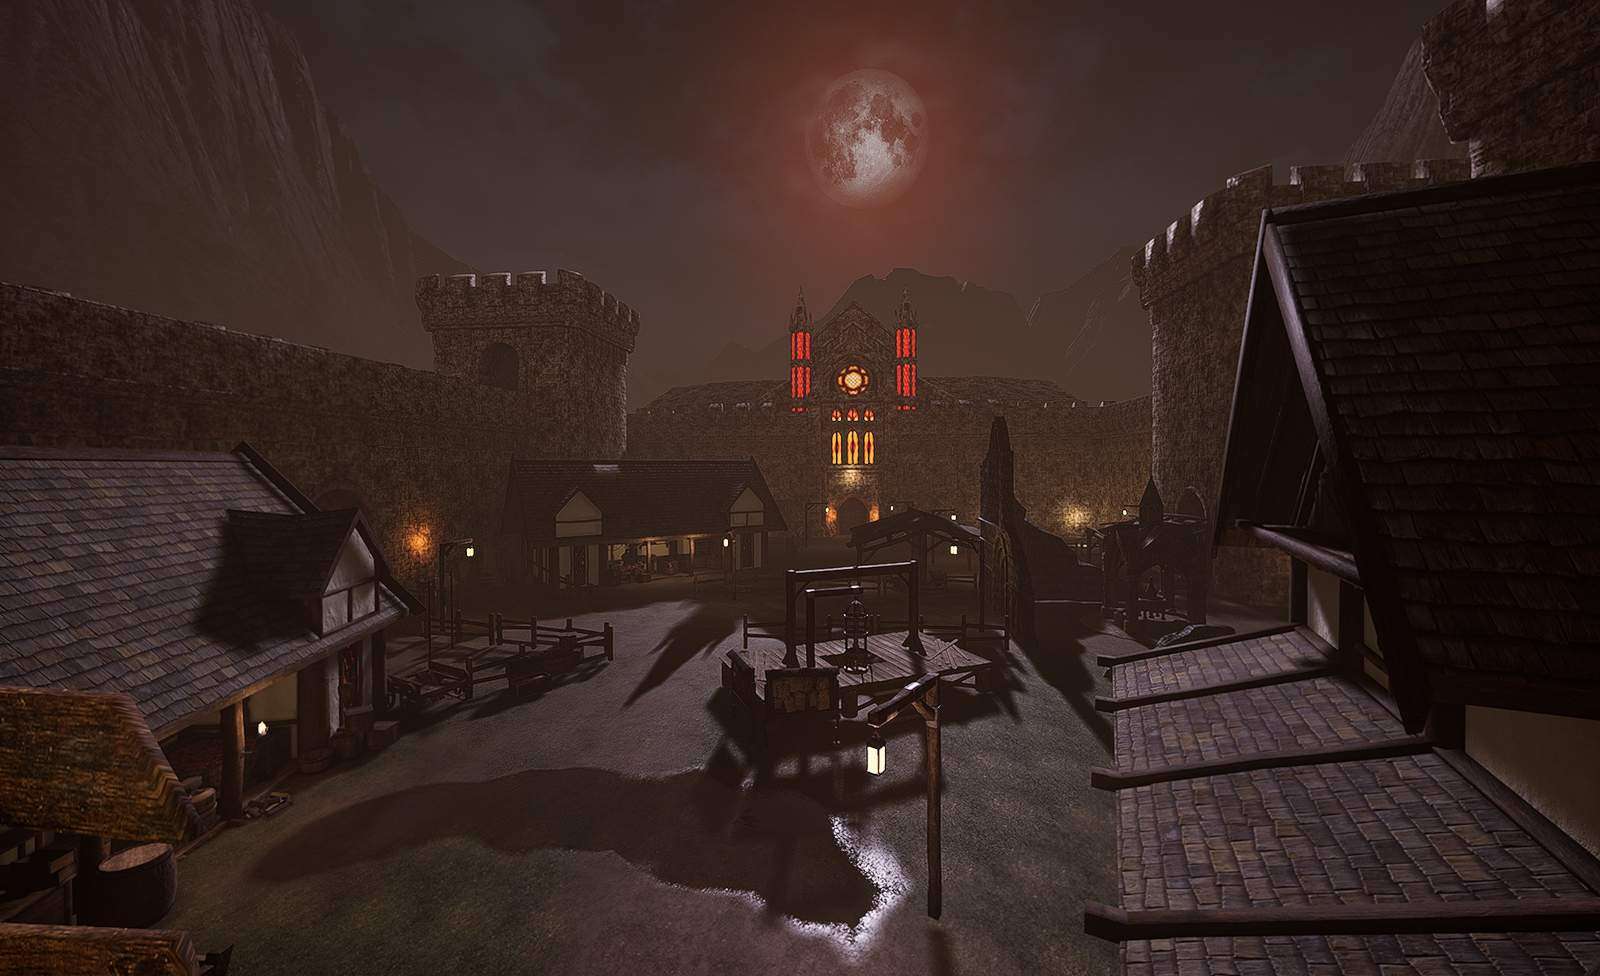
Getting Started In Town
So, welcome to town. There are a few points of interest that you should get familiar with in order to get the most out of the looting part of this Diablo-like.
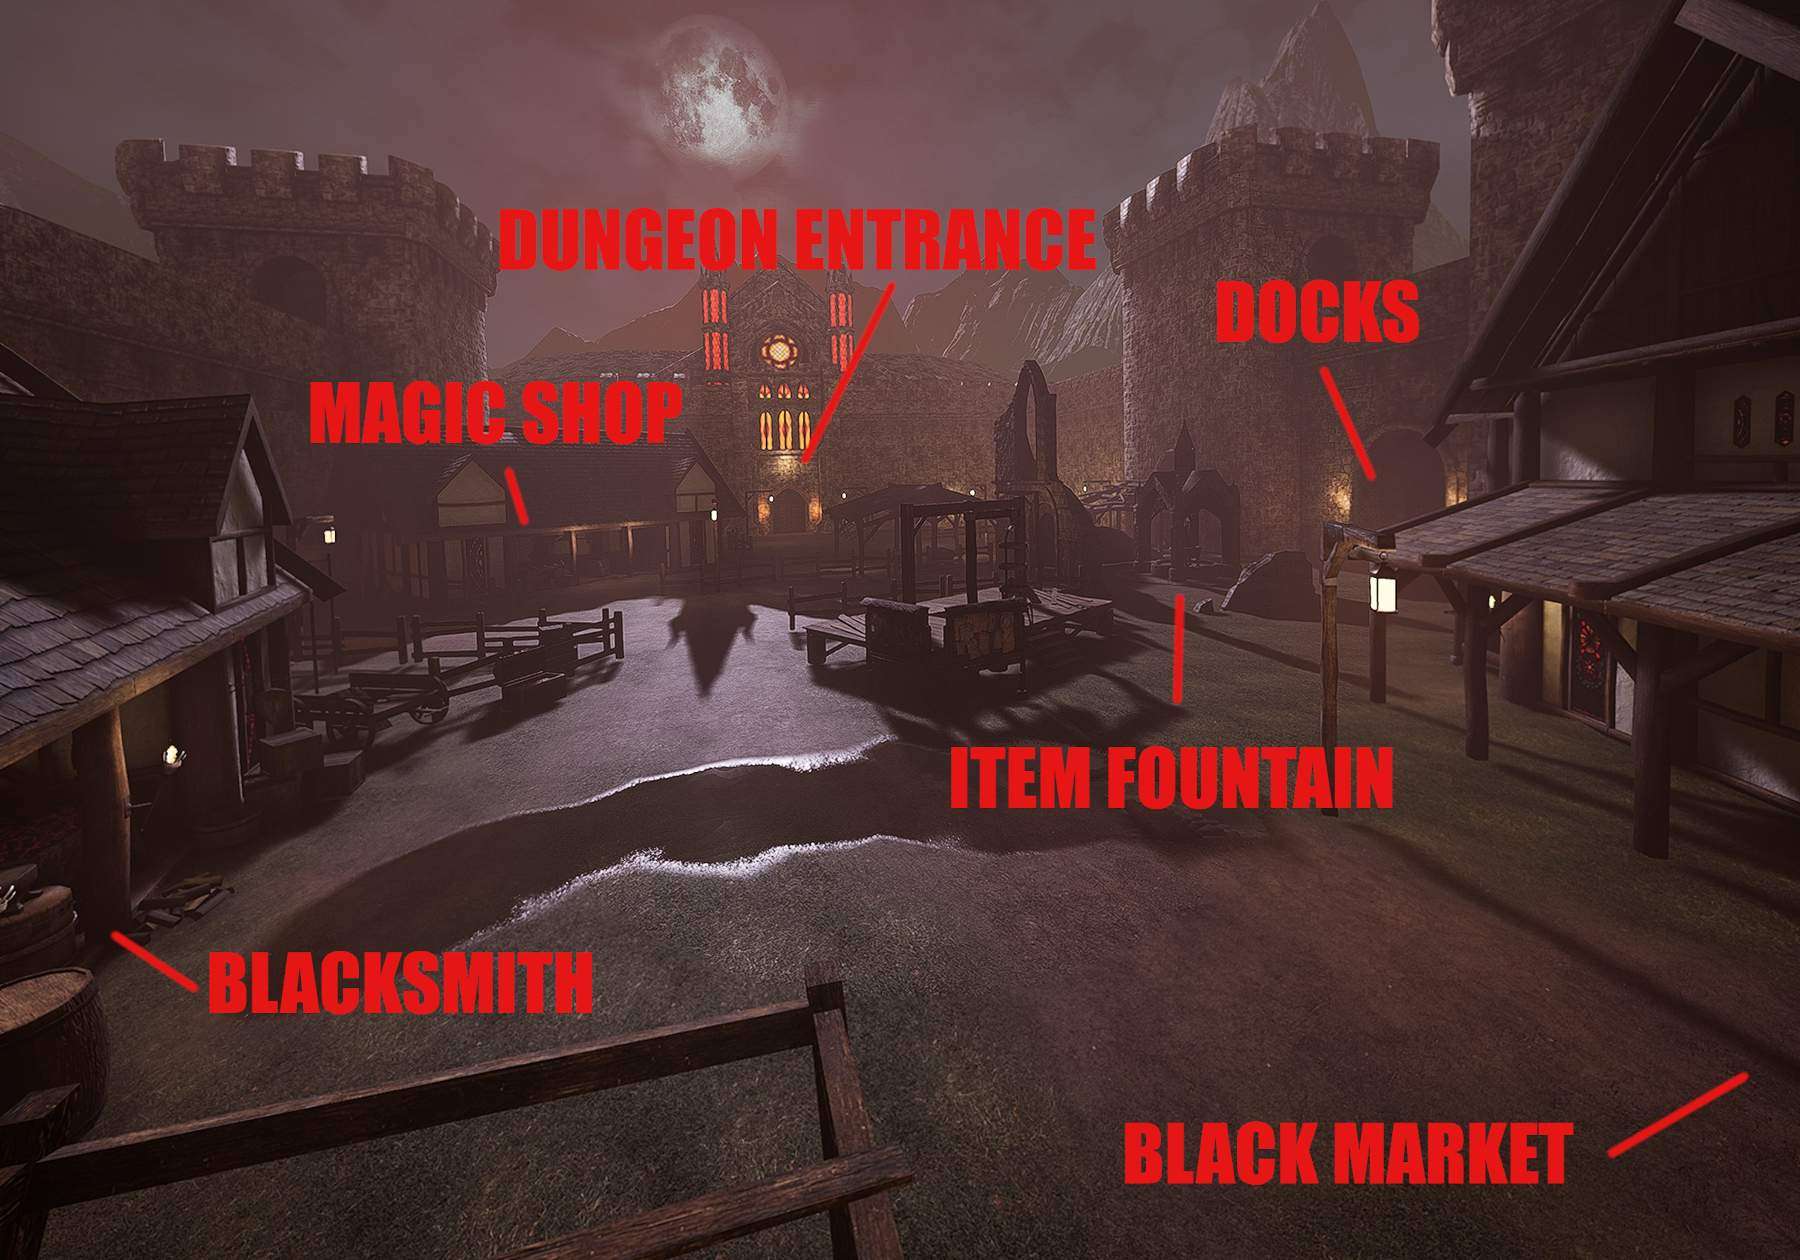
Blacksmith
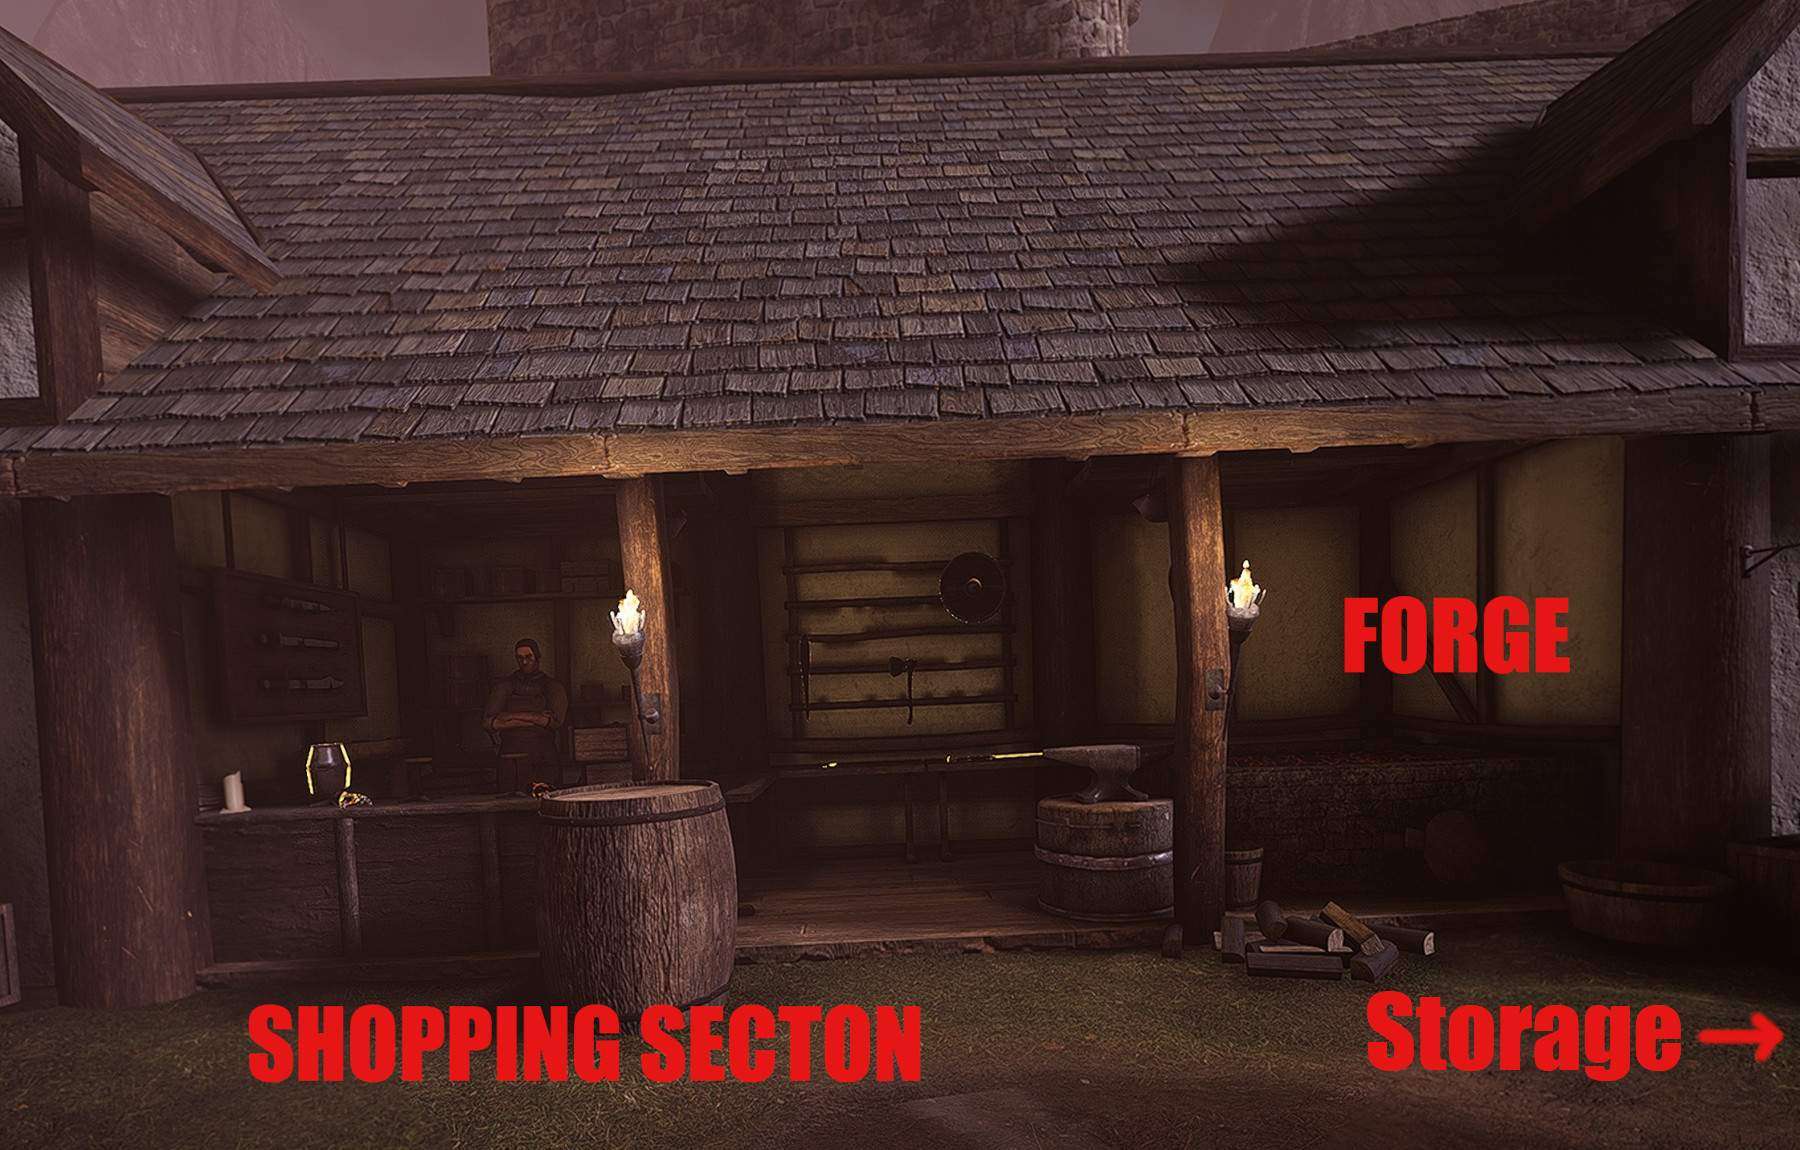
The Blacksmith’s Shop will sell armor and weapons, scaled to the player. Most of the time they’ll be normal stuff, but keep an eye open, as it IS possible for his stock to generate Legendary items.
The shop also includes a forge for selling items. Items can be tossed in, or players can walk up to the forge to open a shop menu that will allow them to sell gear out of their inventory.
To the right of the pictured scene is also your storage chest, which will let you store things in your inventory as well as collect “lost” dungeon items. Look here first if you lose gear.
Black Market

Also known as the Gambling Corner, this is the place to really spend your hard-earned gold. Crystals are on display with their item category and their sale price listed, but nothing else; players have to judge for themselves based on that information whether the item is worth buying.
Items here will always have some kind of enchantment on them, and the possibility of buying Legendary items is far greater here than at the Blacksmith’s shop.
Item Fountain & Portal to the Docks

This fountain isn’t just decorative: drop an item into the water and it will be turned back into an item crystal for free! Since items you pick up in the dungeon become locked to your inventory, doing this will turn it back into an unclaimed item. This is how you can trade with other players!
The purple portal nearby leads to the Docks, which is currently only a social area with some cool props and nice sounds to hang out in.
Important: the Docks are a separate world area, so going through the portal will reset the current floor. Of course, this might be something you want to do, depending on the situation.
Magic & Potion Shop

On the left, HP and MP potions are for sale. Point to the potion and click to buy one potion for the listed price. Potions fill your current HP/MP bars first, and then fill into the HP/MP pots in your inventory.
On the right are lecterns where spell tablets were once on offer, however the magic system as it exists at time of writing allows the player to purchase spells directly from the skill trees tab in the menu (More on that later.).
Important to note is the small Graveyard that is off to the left of the potion shop.

This is where a player’s grave will spawn if the world is un-loaded before they can get to it for any reason (such as game crash, player disconnect, or floor reset by level transition). Remember, this is only where your grave will spawn. For any loose items, check your storage chest.
Dungeon Entrance / Abbey
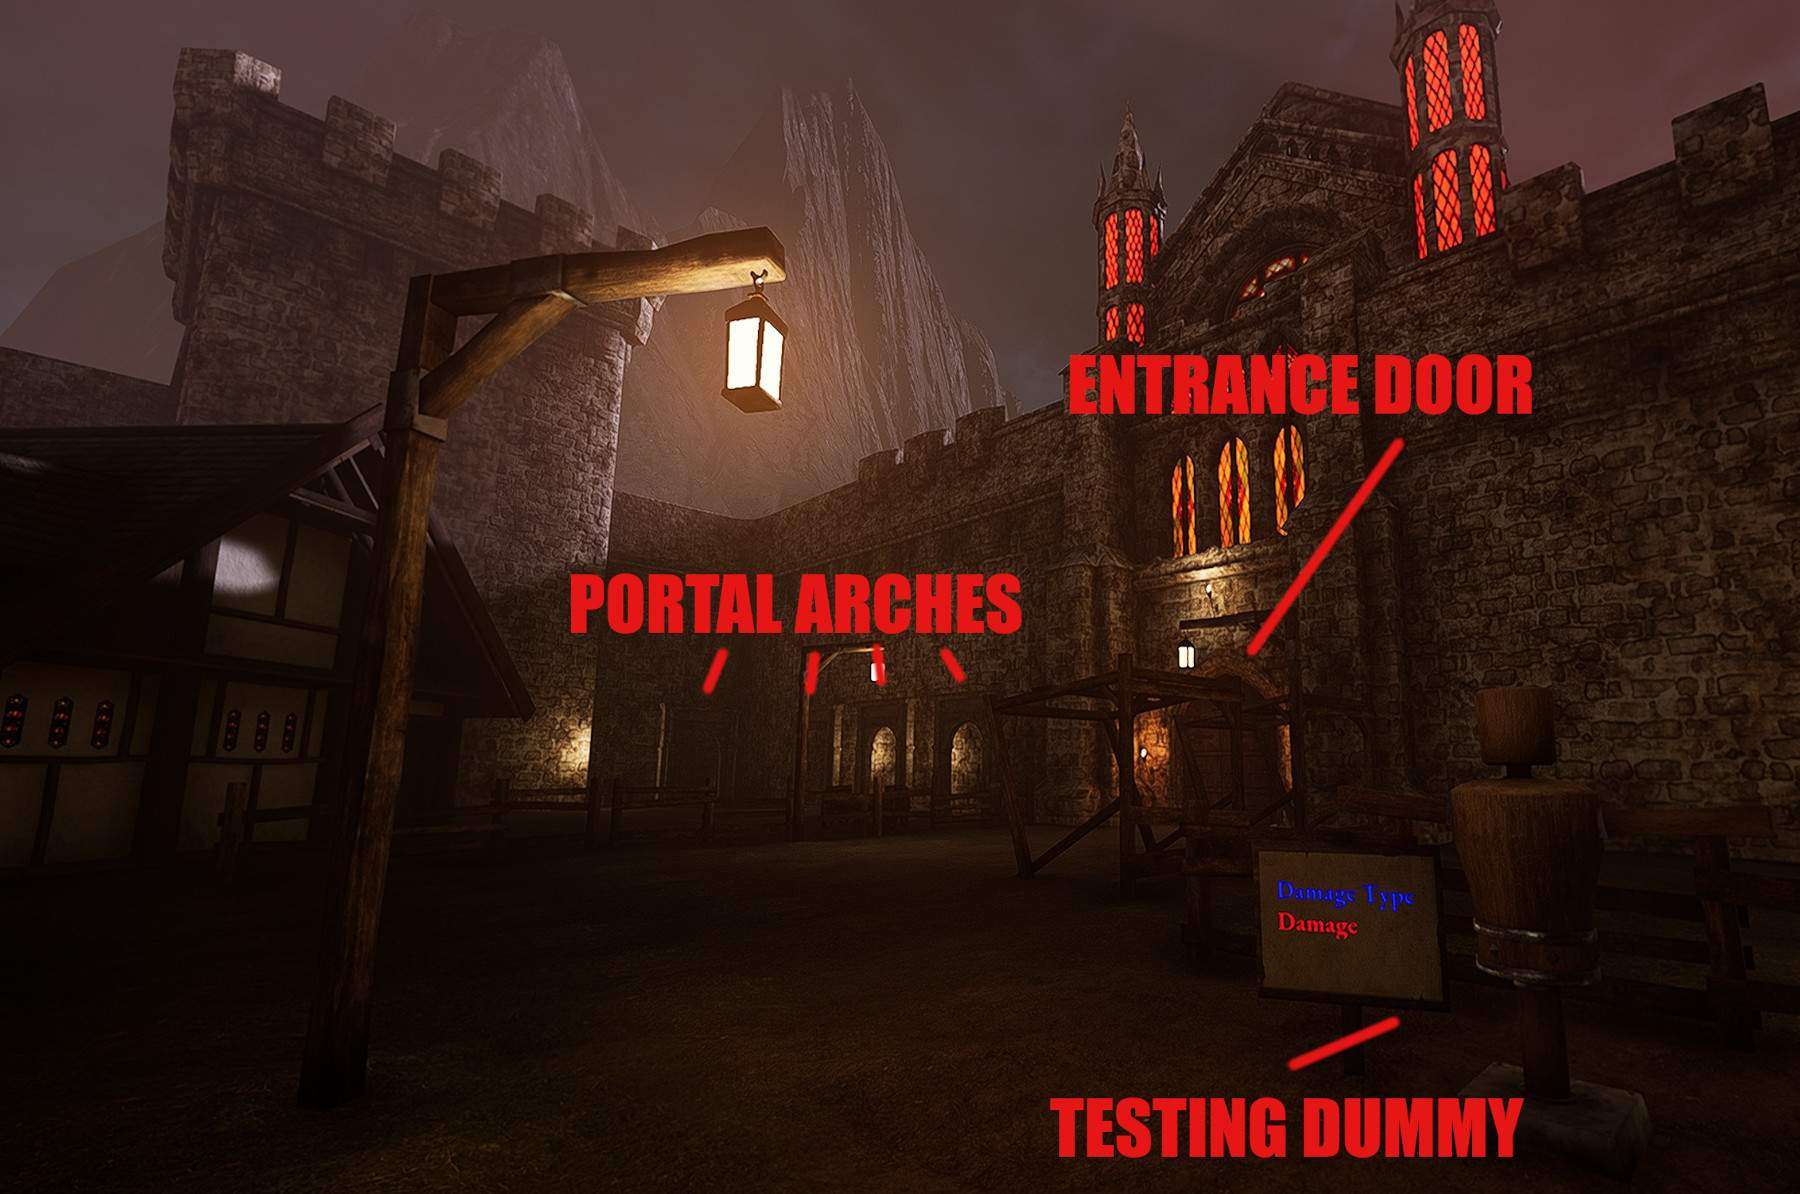
At the far side of town from where you enter is the Abbey, where the real dungeon-crawling happens. The large door itself is the entrance; walk up to it and it will open automatically. Step through the light to enter the current floor of the dungeon.
To the right of the door is a training dummy that will show you the base damage you’re doing, great for picking out equipmet.
To the left of the door are stone portal arches. This is where any Portal spells cast by players will come out, with the player’s name displayed above the arch. Keep in mind that your portal will close if you enter it from this side, but it won’t close if your friend goes through. Chain portals together to keep them open!
Player Stats & Inventory
This is the player’s main menu, opened by pressing UP on your Right Touchpad/Joystick.
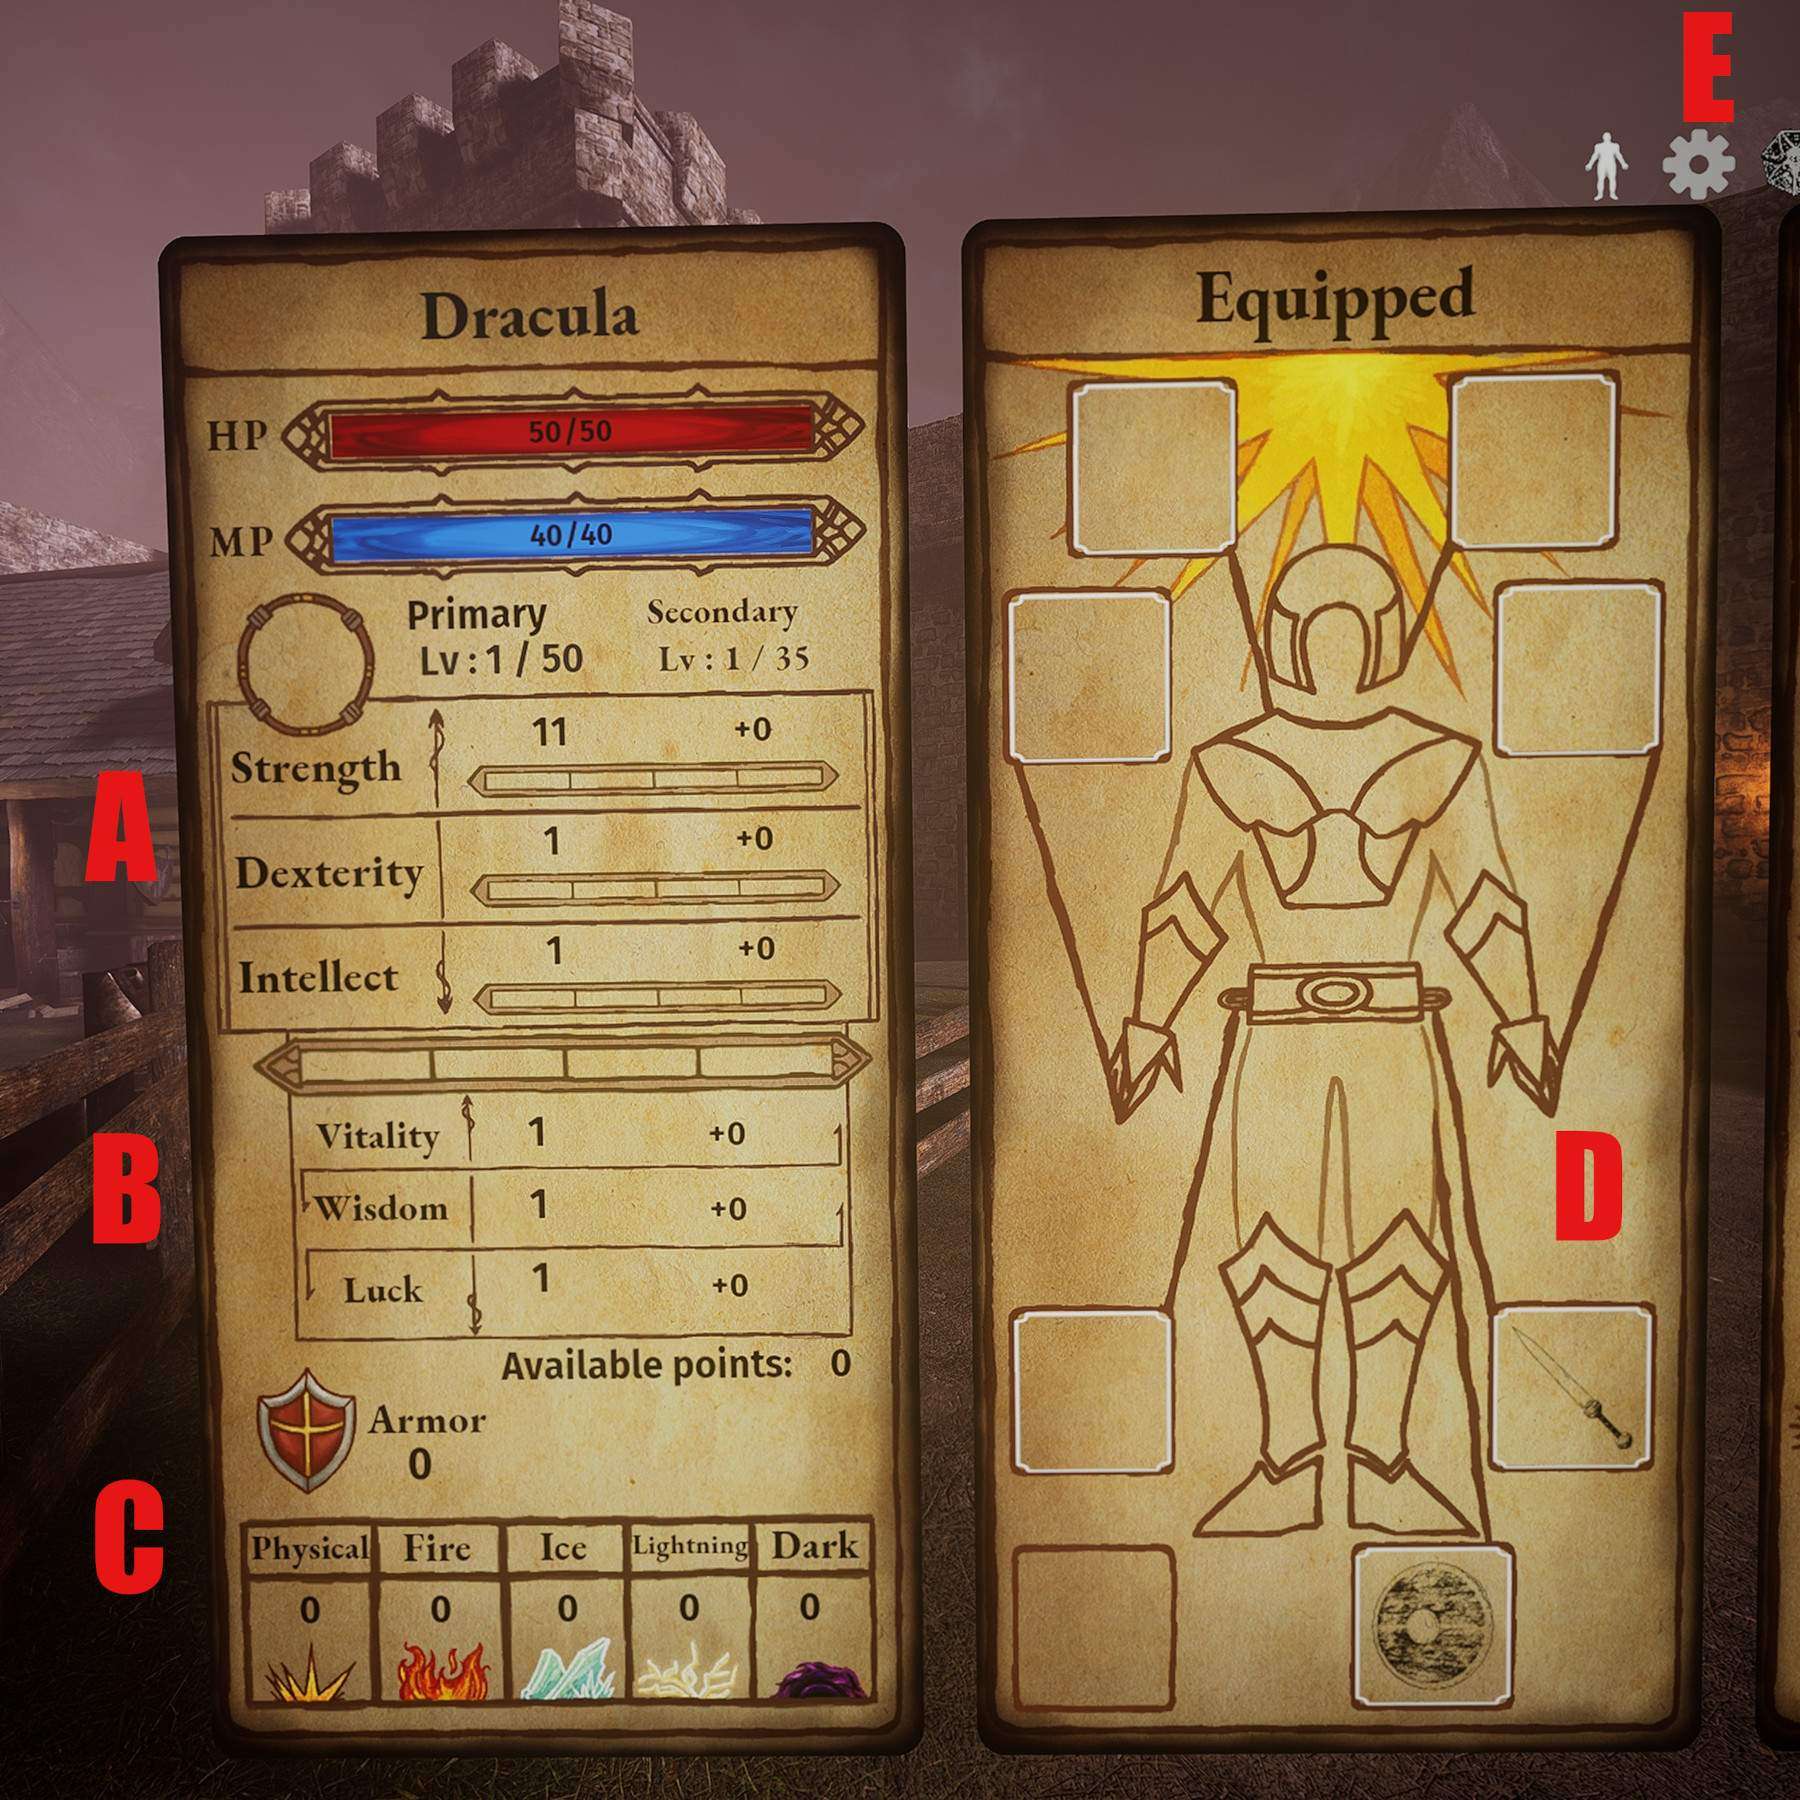
A: Primary Stats
Strength (STR), Dexterity (DEX), and Intellect (INT) are the three primary stats in Legendary Tales. They are the stats you put points into at charactercreation, and you level them up by using weapons associated with that skill. The meter next to each stat shows its progress to the next primary stat level.
There is currently no way to respec characters, so do put some thought into how you’re levelling up!
- Strength Weapons include swords, axes, maces, and large shields.
- Dexterity Weapons include daggers, bows, spears, and bucklers.
- Intellect is levelled up by both using spells and by doing any physical damage with a wand.
When you level up a primary stat, you’ll hear a gong-like sound, and a wave of golden light will spread out from your feet. You’ll also gain a point to spend in your skill trees.
B: Secondary Stats
Vitality (VIT), Wisdom (WIS), and Luck (LCK) are the three secondary stats. Unlike primary stats, these all share a single meter that is filled up any time the player gains XP, regardless of how. Once it fills up, the player will put out a wave of SILVER light accompanied by the gong sound, and will have one point to put into any of these three stats.
- Vitality increases your max HP. Pump this if you want to be meatier.
- Wisdom increases your max MP. Level this if you use a lot of magic or use a lot of weapon skills.
- Luck affects many things throughout the game, including but not limited to the quality/rarity of loot drops. Its exact mechanics are still not properly understood, and community testing is still ongoing.
C: Defenses
Here you can see the player’s current AC, as well as various elemental resistances. At time of writing this guide, much of the elemental system has not yet been implemented, so for the most part this is just where you look to find your AC.
D: Equipped Items
- Here you can see all of the items that you are currently wearing; helmet, armor, gauntlets, holsters, and your hands. Click on the item’s icon to display its details on the item card.
- A note on holsters: Large shields, bows, and two-handed swords can only be equipped in your back holster, which is shown at the bottom of the Equipment card.
- At time of writing, the box in the lower-left corner is not used for anything.
E: Tabs
These navigate to other tabs of the menu. From left to right:
- Inventory: Displays this menu.
- Game Options: Graphics, Sound, and Gameplay settings, as well as the option to exit to menu or to desktop.
- Multiplayer: Displays a list of friends on your Steam friends list, as well as incoming & outgoing game invites.
- Skills: Displays the skill and magic tree, where you spend points from levelling up your primary stats.
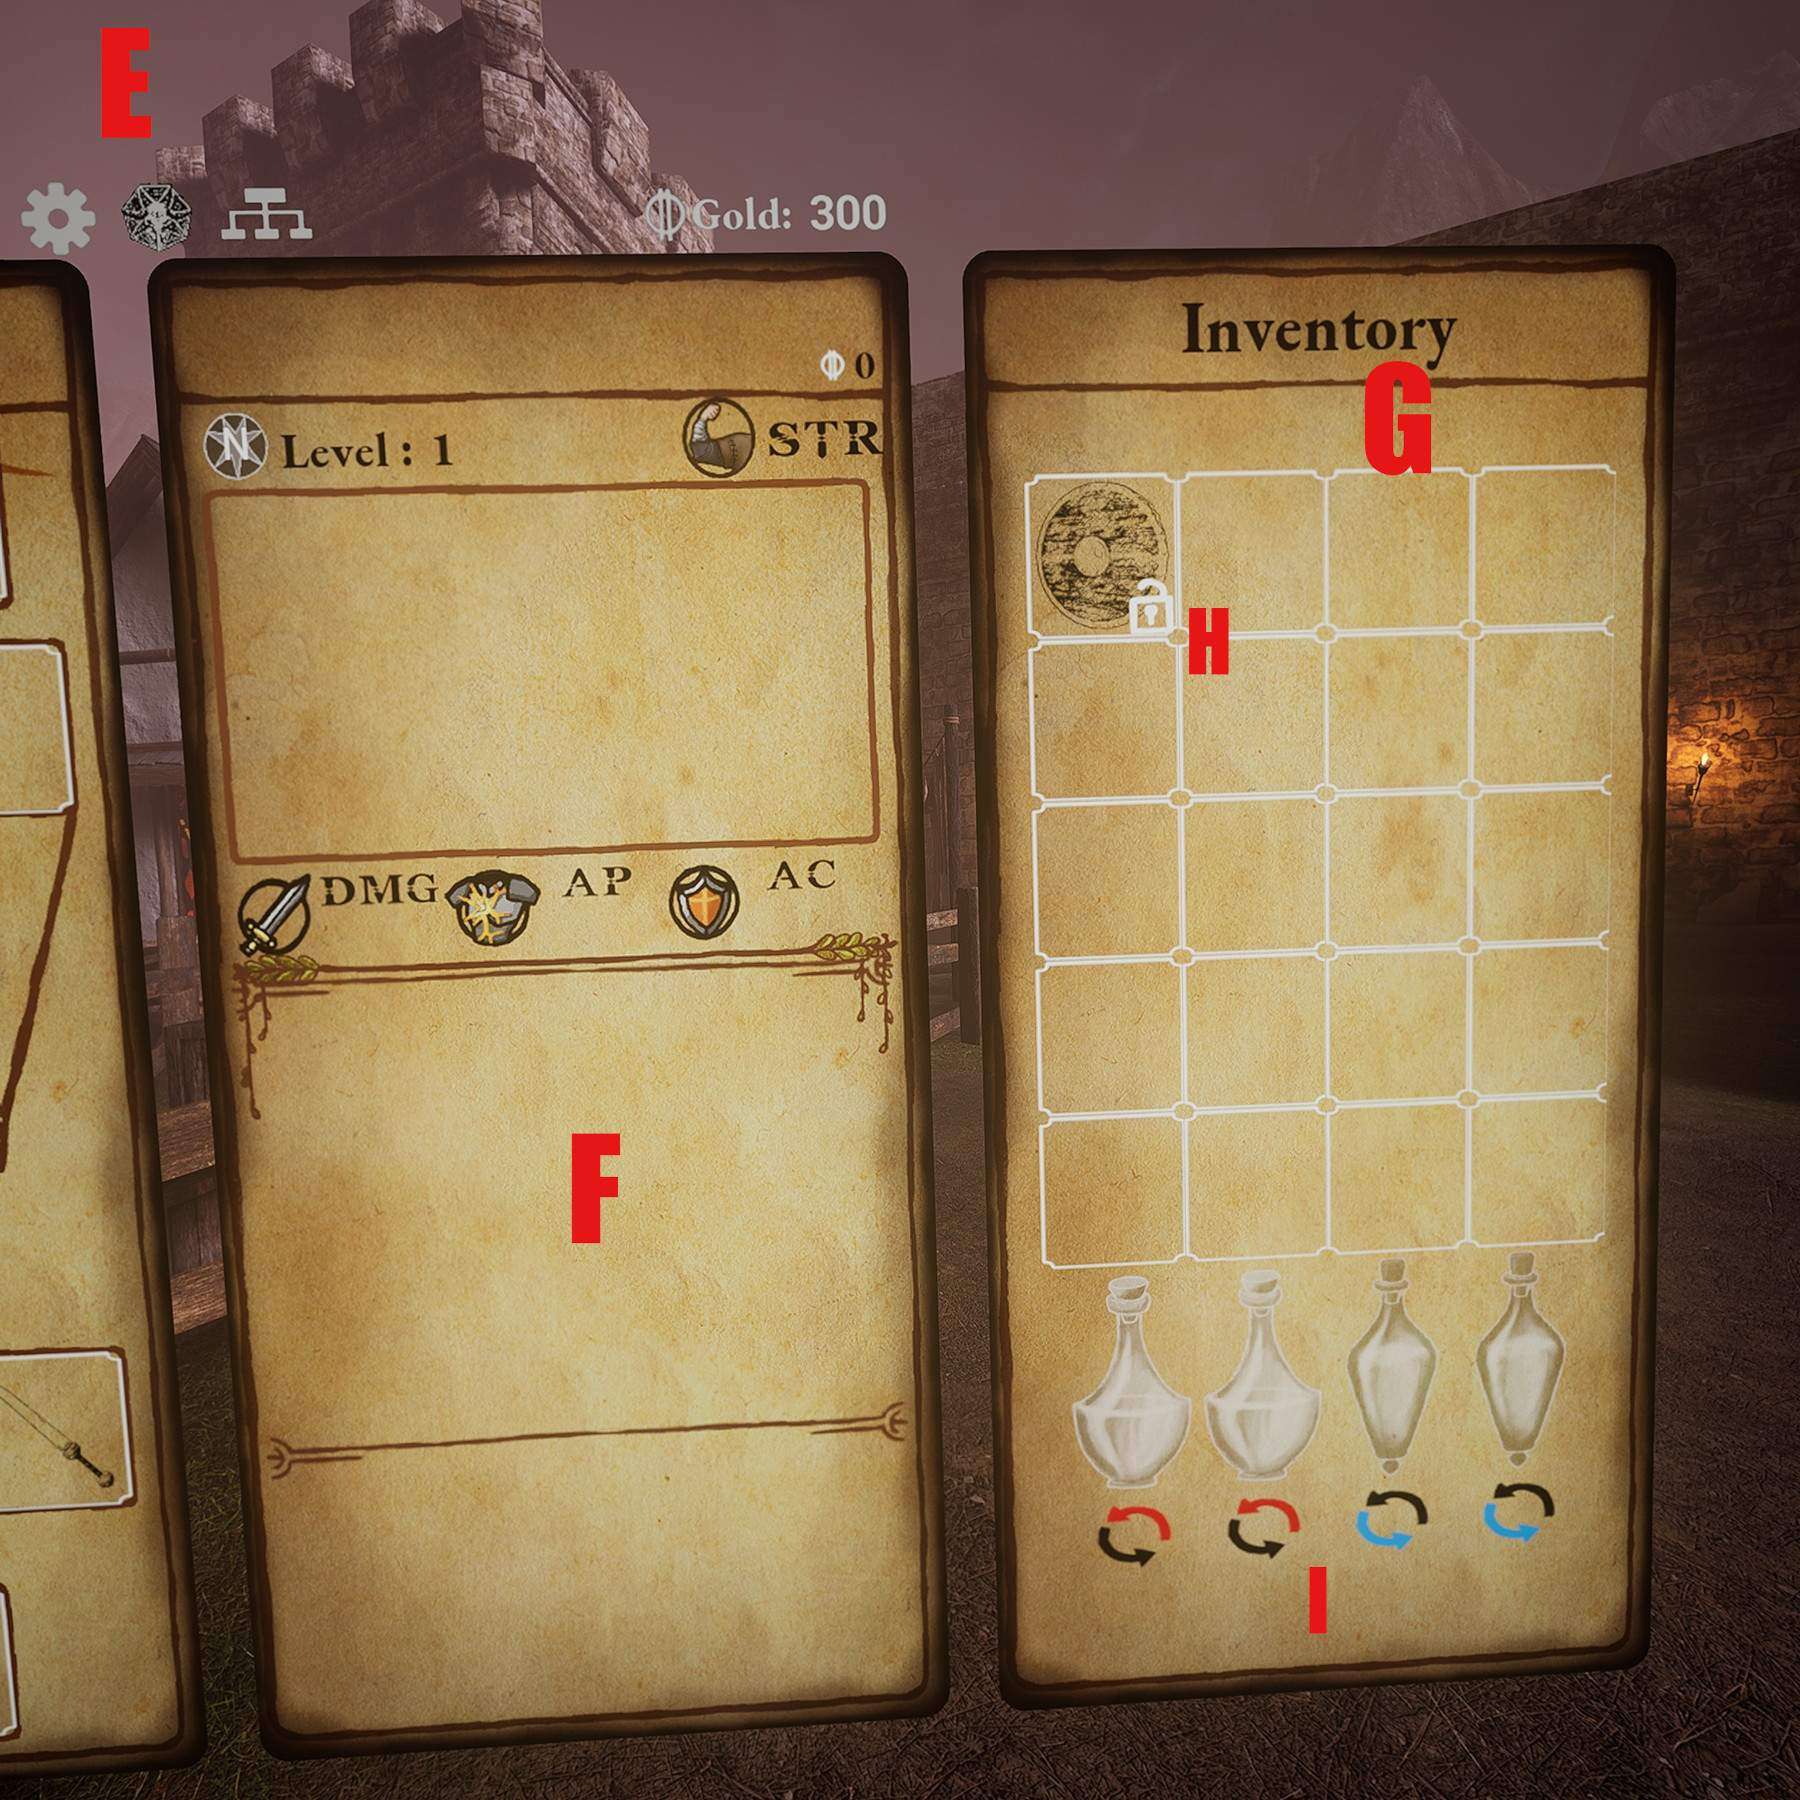
F: Item Card
This card will display the details of the item you currently have selected. For organization’s sake, I’ll go over this in the next section dedicated to items.
G: Inventory
Each item you pick up will be listed here. Click on the item to see its details on the Item Card. There are no additional pages, so make sure you’re selling or storing your loot as you go!
H: Inventory Lock
Items can be locked to prevent them from being sold from your inventory while you’re at the blacksmith’s forge. Legendary items will come with this lock pre-enabled.
I: Potions
Players can hold four potions in their inventory, and by default are carrying two HP pots and two MP pots. These can be filled either from orbs in the world or from the potion shop. Clicking on the icon below the potion will swap it between HP and MP; you can do this whenever you want, but it does empty the pot.
- To use potions, click the upper face button (for example, Y and B for Oculus users).
- The button on the Right controller will restore your HP.
- The button on your Left controller will restore your MP.
Skills
Upgrading skills and learning new spells is very important if you plan on going into deeper levels. Make sure you think about what your playstyle would benefit the most from!
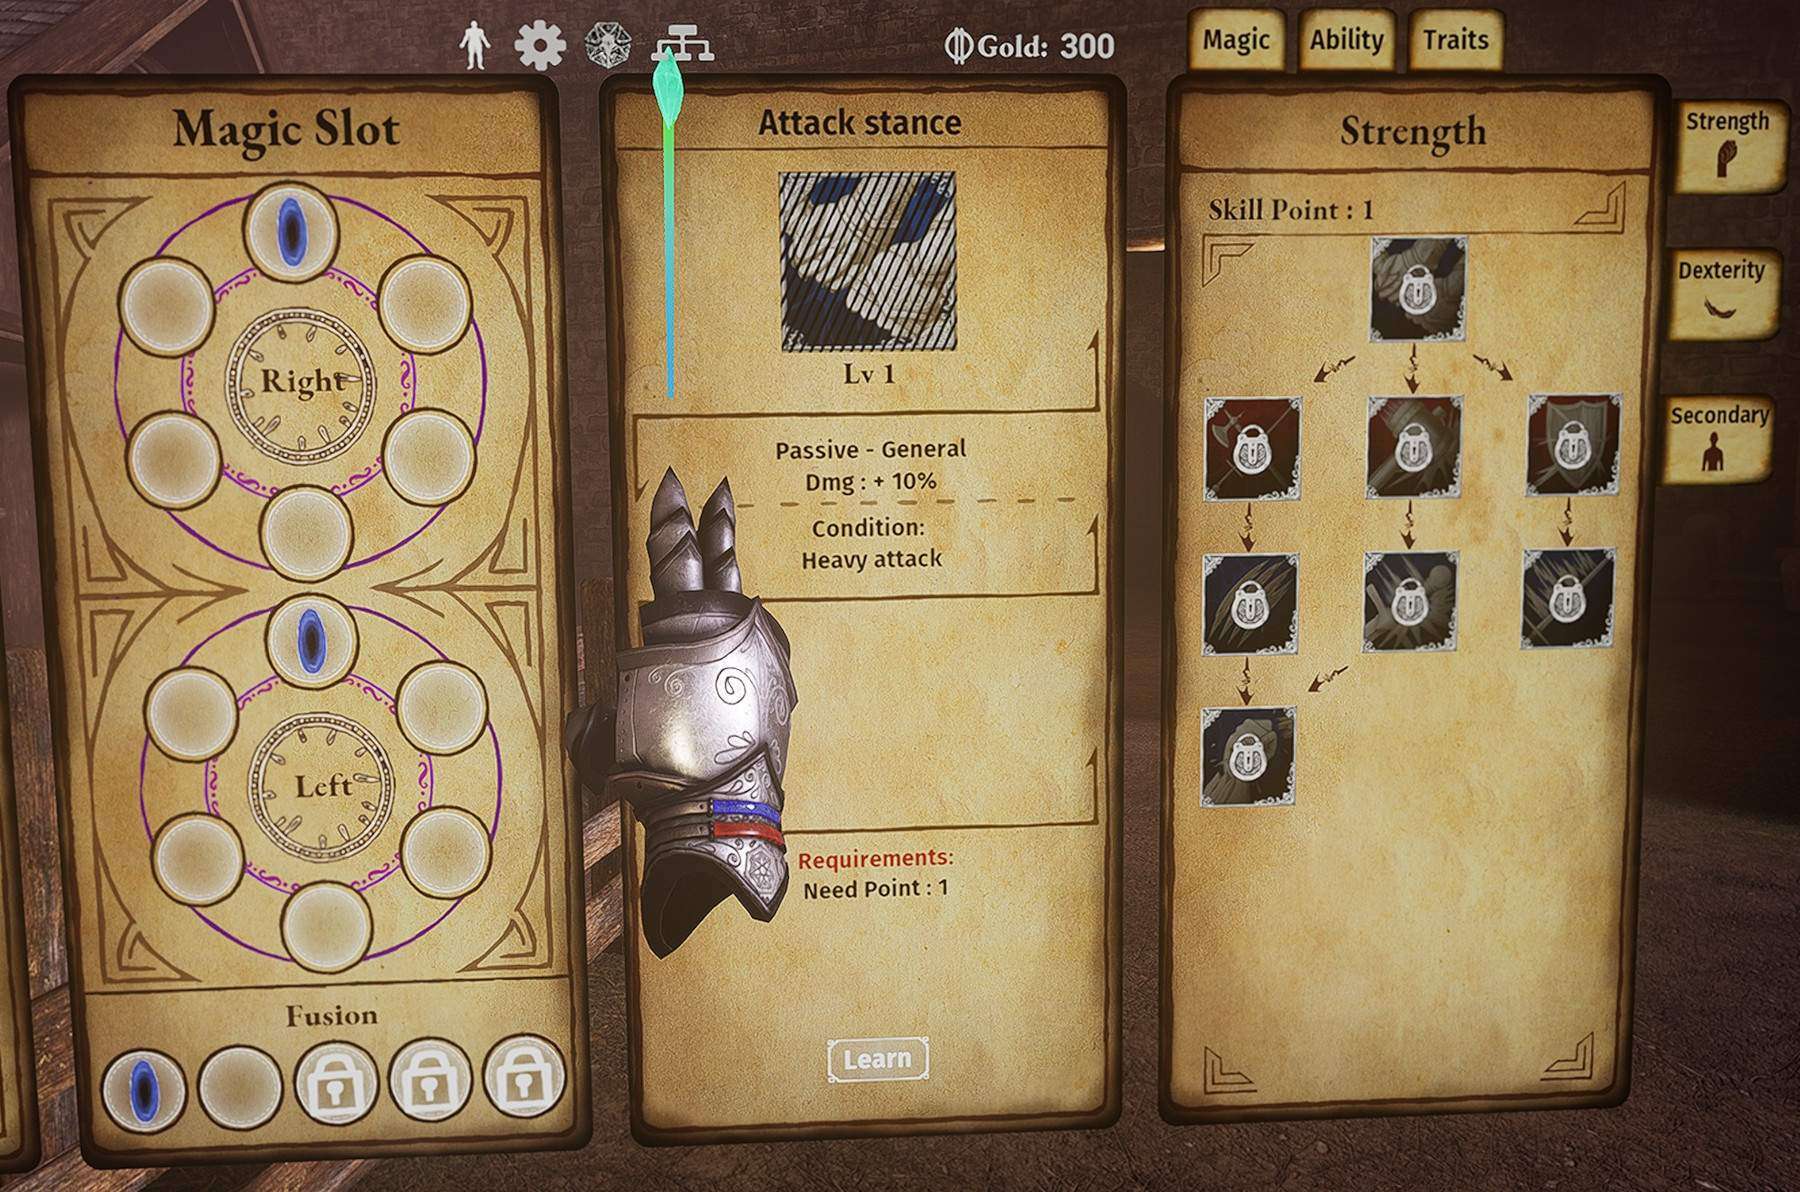
- Clicking on the Skills tab above the menu cards will open the Skill trees, where you can both upgrade your abilities and learn new spells. Click on the Magic/Ability/Traits tabs to select a type of upgrade, then pick a tree from the options on the right side of the page.
- Click on a skill or spell to show its description, as well as how many points it will cost to unlock. Click the button to spend your skill points. If it’s a spell, make sure to equip it to the spell wheel as well!
Items & Their Stats
It wouldn’t be a Diablo-like without oodles of loot to collect, would it? Items will spawn after defeating enemies or breaking containers, and will at first be small, floating crystals. You can pick them up and toss them, crush them in your hands, or simply strike them with a weapon or physics object.
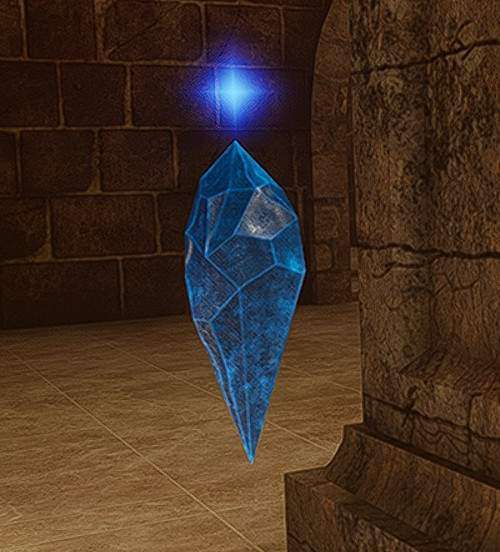
These are colored according to their rarity.

White is a Normal item, blue is a Magic item, yellow is a Rare item, purple is a Unique item, and orange is a Legendary item.
Magic, Rare, and Unique items will have increasing amounts of magical bonuses attached to them that will be applied to your stats if you have them equipped. Keep in mind that while you’ll always get the bonus from armor, enchanted weapons and shields have to be in your hands for their effects to apply.
Legendary items will not only have a whole boatload of magic bonuses, but will also have special weapon abilities for you to use in combat.
To see an item’s stats, either click on its icon in your inventory or point at it in the world. This will show you its item card.
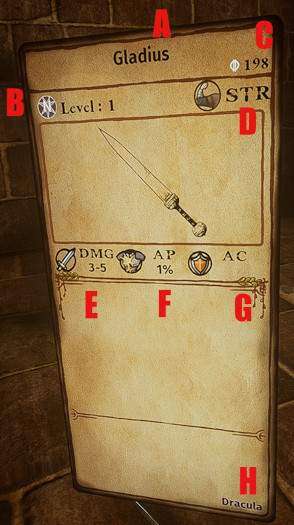
- A: Item name
- B: Item Rarity & Level
Items that are listed at a level higher than the player’s primary level can only be stowed in your backpack. You can hold them in town, but only to test them on the dummy or sell them.
- C: Item Value
Keep in mind this is the base value; selling to the blacksmith will give you only a portion of this.
- D: Primary Stat
Displays the primary stat that will gain XP when you use this item.
- E: Base Damage
Better swings will give you numbers closer to the top of the damage range, but some weapons may specifically have a better minimum damage.
- F: Armor Penetration
- G: Armor Class bonus
- H: Owner’s Name
If this is blank, the item has not been claimed yet.
To put an item into your inventory, point at it and press DOWN on your Right Thumbstick/Touchpad. You can also do this to pick up orbs and gold while your hands are full.
Engaging in Combat
Swordplay advice
Swordfighting is the core of what a lot of us are here for, right? Here’s the absolute core of how not to get killed. Remember, the pointy end goes in the skelly.
Keep your guard up.
Don’t just wander around with your hands at your sides. Present a thread to your enemy, and make sure that your resting guard closes off some avenue of attack.
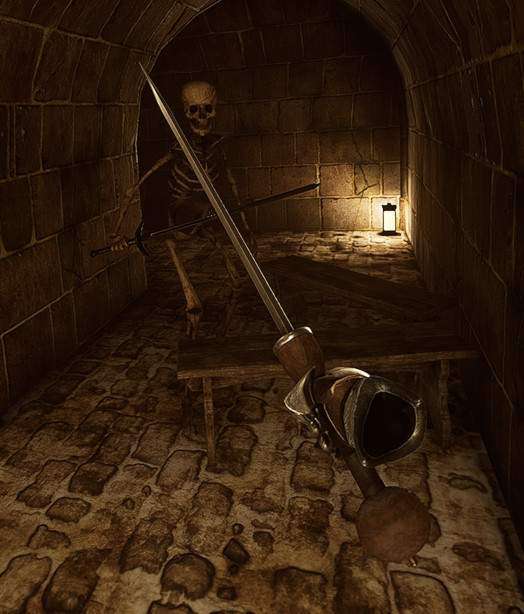
Here, I have my guard up, presented diagonally so that if the skeleton were to perform the quickest move he could, attacking me from where his blade rests, I would have the time to respond.
Cut from Guard to Guard
After you’ve launched an attack, don’t just let it hang there. Make sure you withdraw back to a guard so that you’re immediately ready for the next attack, and if that means swapping to a different guard, then so be it! Let the combat flow.
Remember Heavy and Light attacks
Legendary Tales uses Heavy and Light attacks as a way to keep players from wave-spamming everything to death like they have deadly feather dusters. When you first strike an enemy, you’ll automatically do a Heavy Attack, dealing full damage. After that, you must wait a full 1.2 seconds to deal another full-damage attack. If you attack before that timer is up, you’ll instead perform a Light Attack, dealing reduced damage.
Important tip: Each hand has its own timer, so you can alternate hands for more damage!
Two-handed weapons also gain an edge in this regard, as the Heavy Attack cooldown for two-handed weapons is only 0.8 seconds.
Punish their mistakes!
Enemies in Legendary Tales have a vague ability to respond to battlefield pressure. This means that if they aren’t properly threatened in combat, they will move and position freely, and won’t hesitate to advance. However, punishing them for attempting to move into your space may get them to back off, or stop advancing and respect your space a bit more.
Use Weapon Abilities!
Make sure you’re buying weapon abilities for the weapons you use, and keep in mind they can be used to help you out of a jam in combat. While holding a weapon, press the Lower Face Button, such as A/X on Oculus, to use your combat ability.
Two-Handed Swords
Two-handed swords require some technique to use properly, as they’ve been tuned for use with real-life sword techniques that use both hands to act on the sword as a lever. Using your dominant hand as a fulcrum, you can put the sword quickly into many different positions and attack much quicker.
Magic
I’ll actually only touch on this briefly, as I’ve heard little confusion about how to actually use spells and I don’t actually use magic much myself.
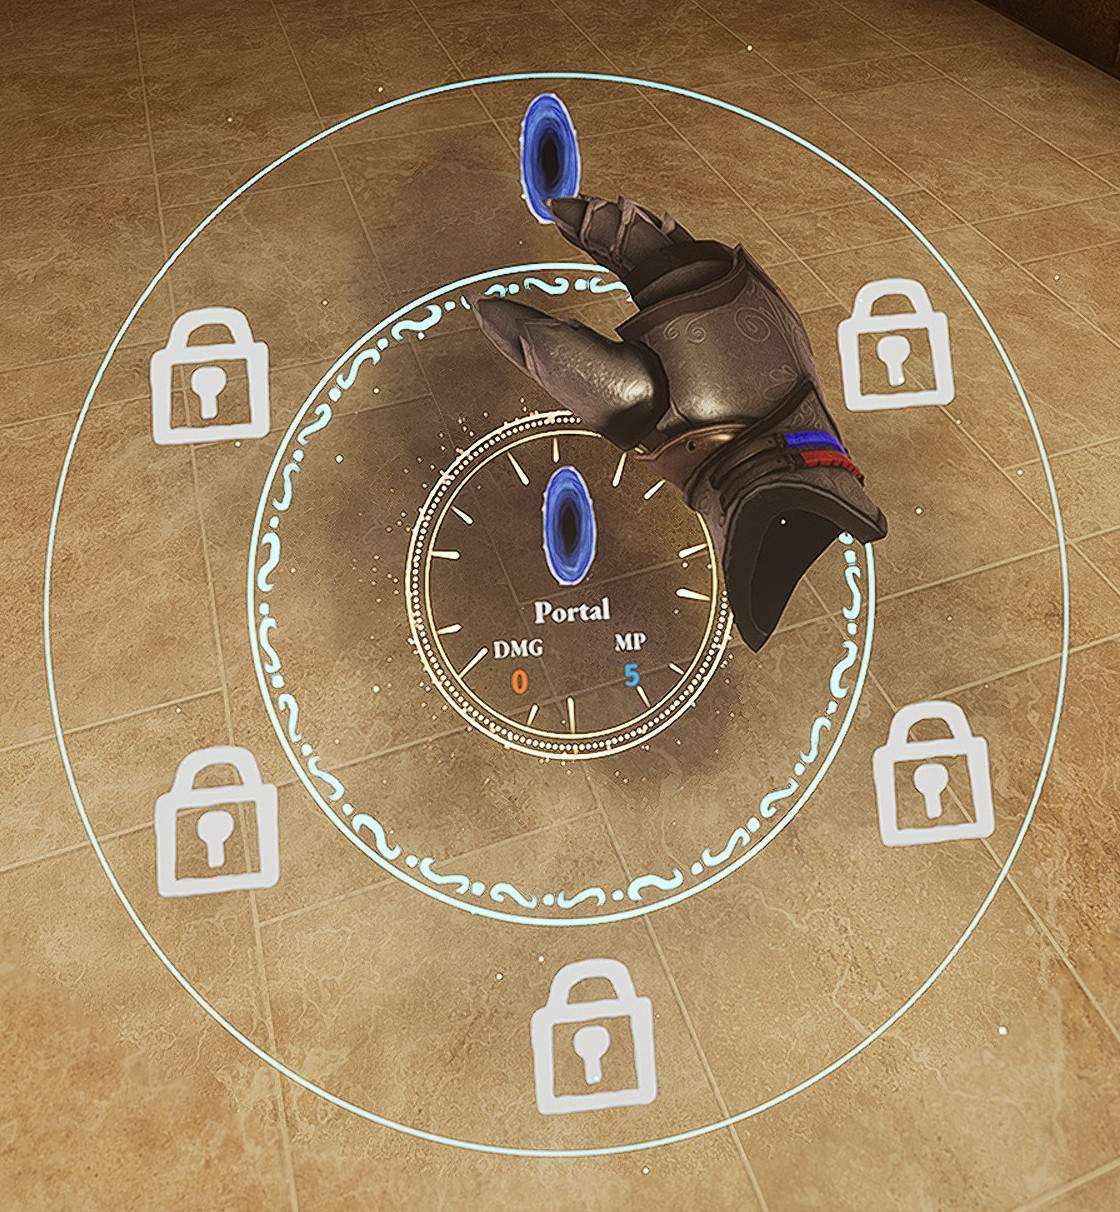
However, as a basic note, press the same button as above with your hand empty or holding a want to open your spell wheel. With it open, click on the spell you want to cast. Remember to equip the spells you buy to your spell wheel! Everyone knows Portal for free.
Progressing Through The Dungeon
Your objective in each floor is to reach the end. You’ll start from a spawn point, and from there must explore until you find the end portal. Thankfully, you’re not entirely directionless. Look around for archways with blue and green handprints on them.
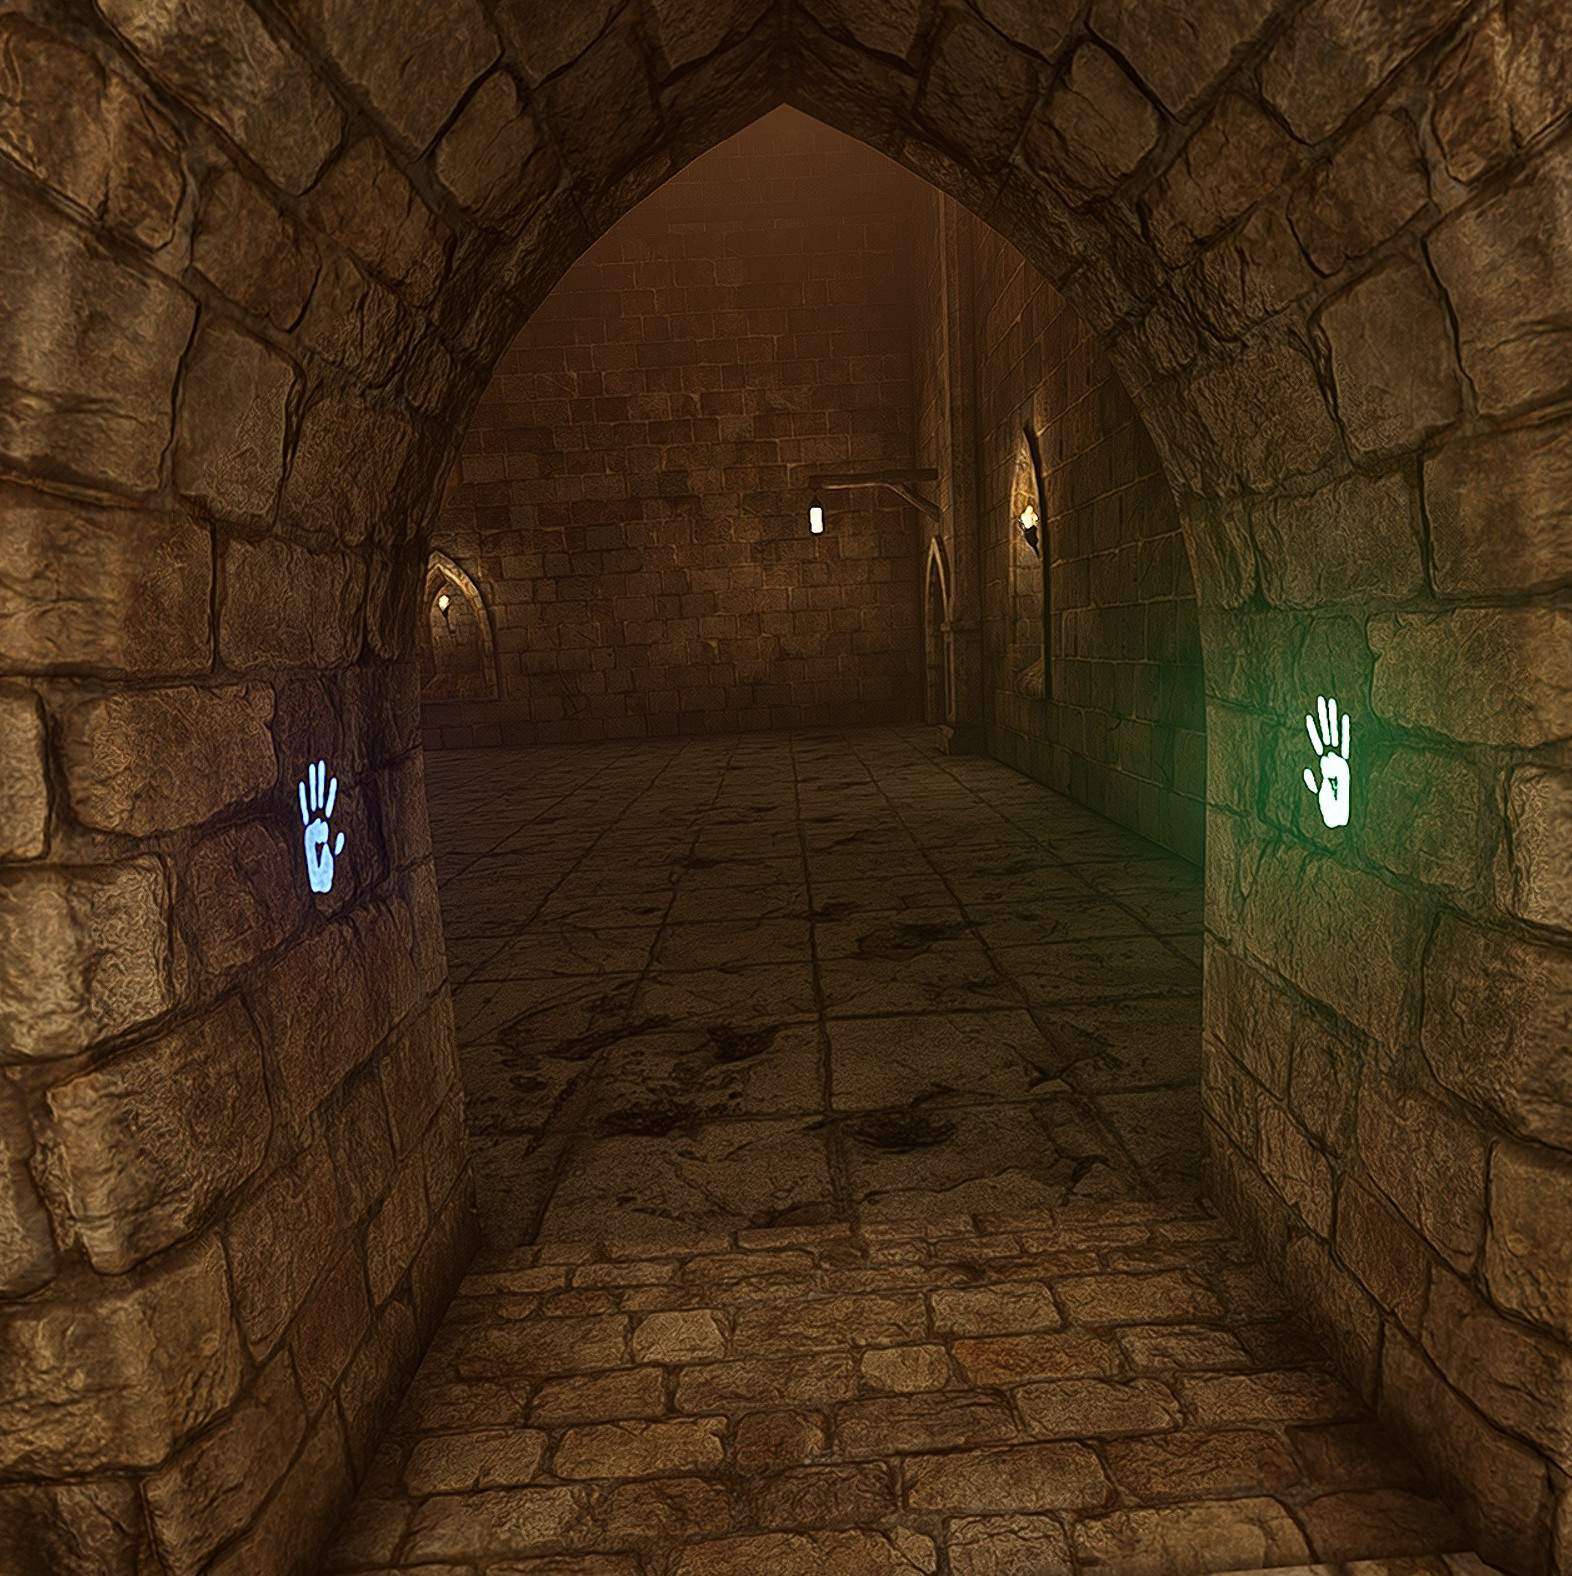
- Holding your hand against these handprints will exchange a small portion of your HP for navigational help.
- Using the green handprint will light the doorway with green light, so that you can see that you’ve been here before.
- Using the blue handprint will spawn a floating wisp of blue fire that will immediately start floating in the direction of the floor’s end portal. Follow the wisp if you’re trying to progress!
Climbing Tips
Some climbing challenges in the game will give the player beams that are covered in ropes or tapestry, and those are easy to climb because of how firmly you can grip them. However, being able to fall onto and then hoist yourself up onto ledges is something that is tricky, but sometimes necessary.
First, approach the ledge and extend both of your hands.
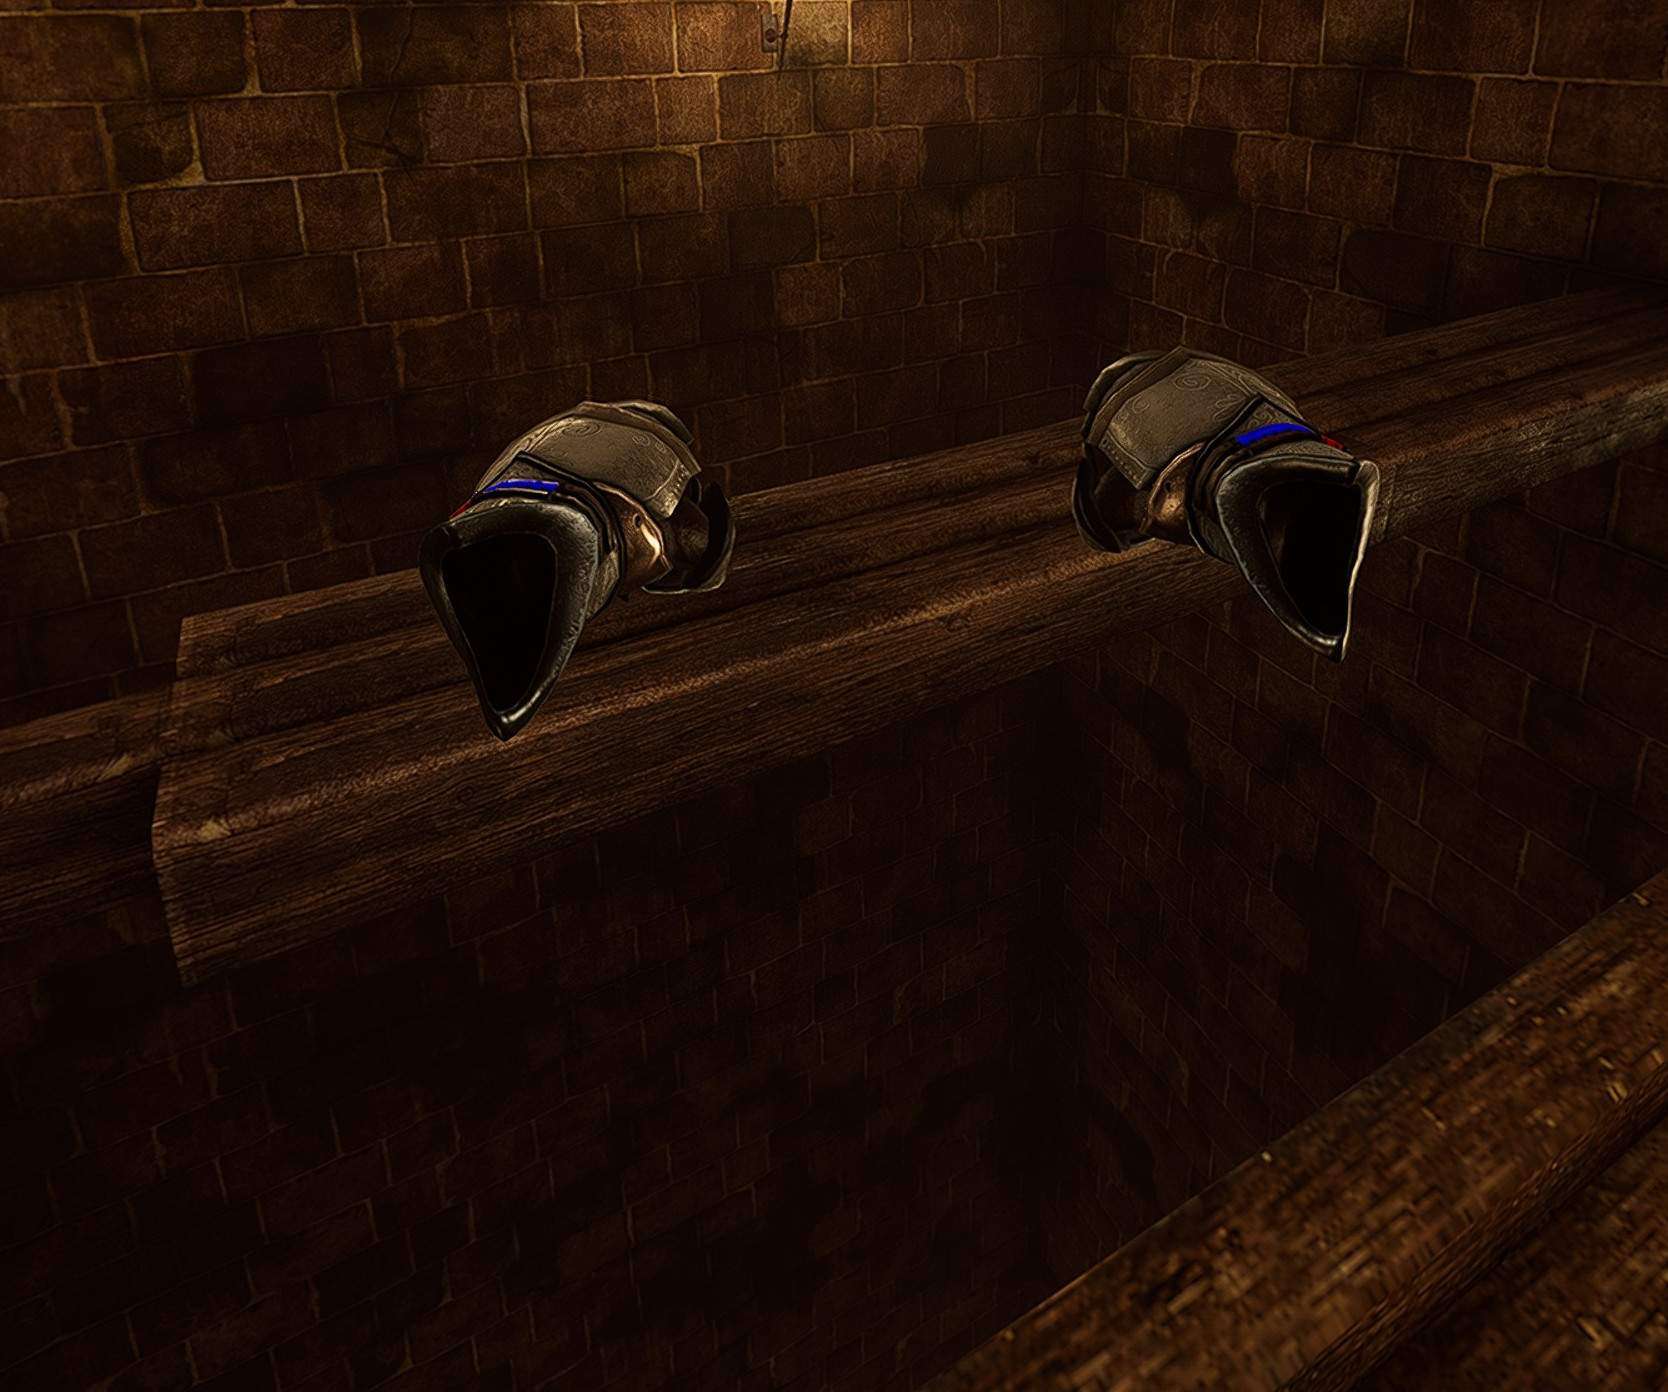
Make sure you’re aimed right, and then walk straight off, aiming so that both of your hands will fall straight down on top of the ledge.
Remember, you don’t have wrists or elbows! Only your hands will collide with the ledge!
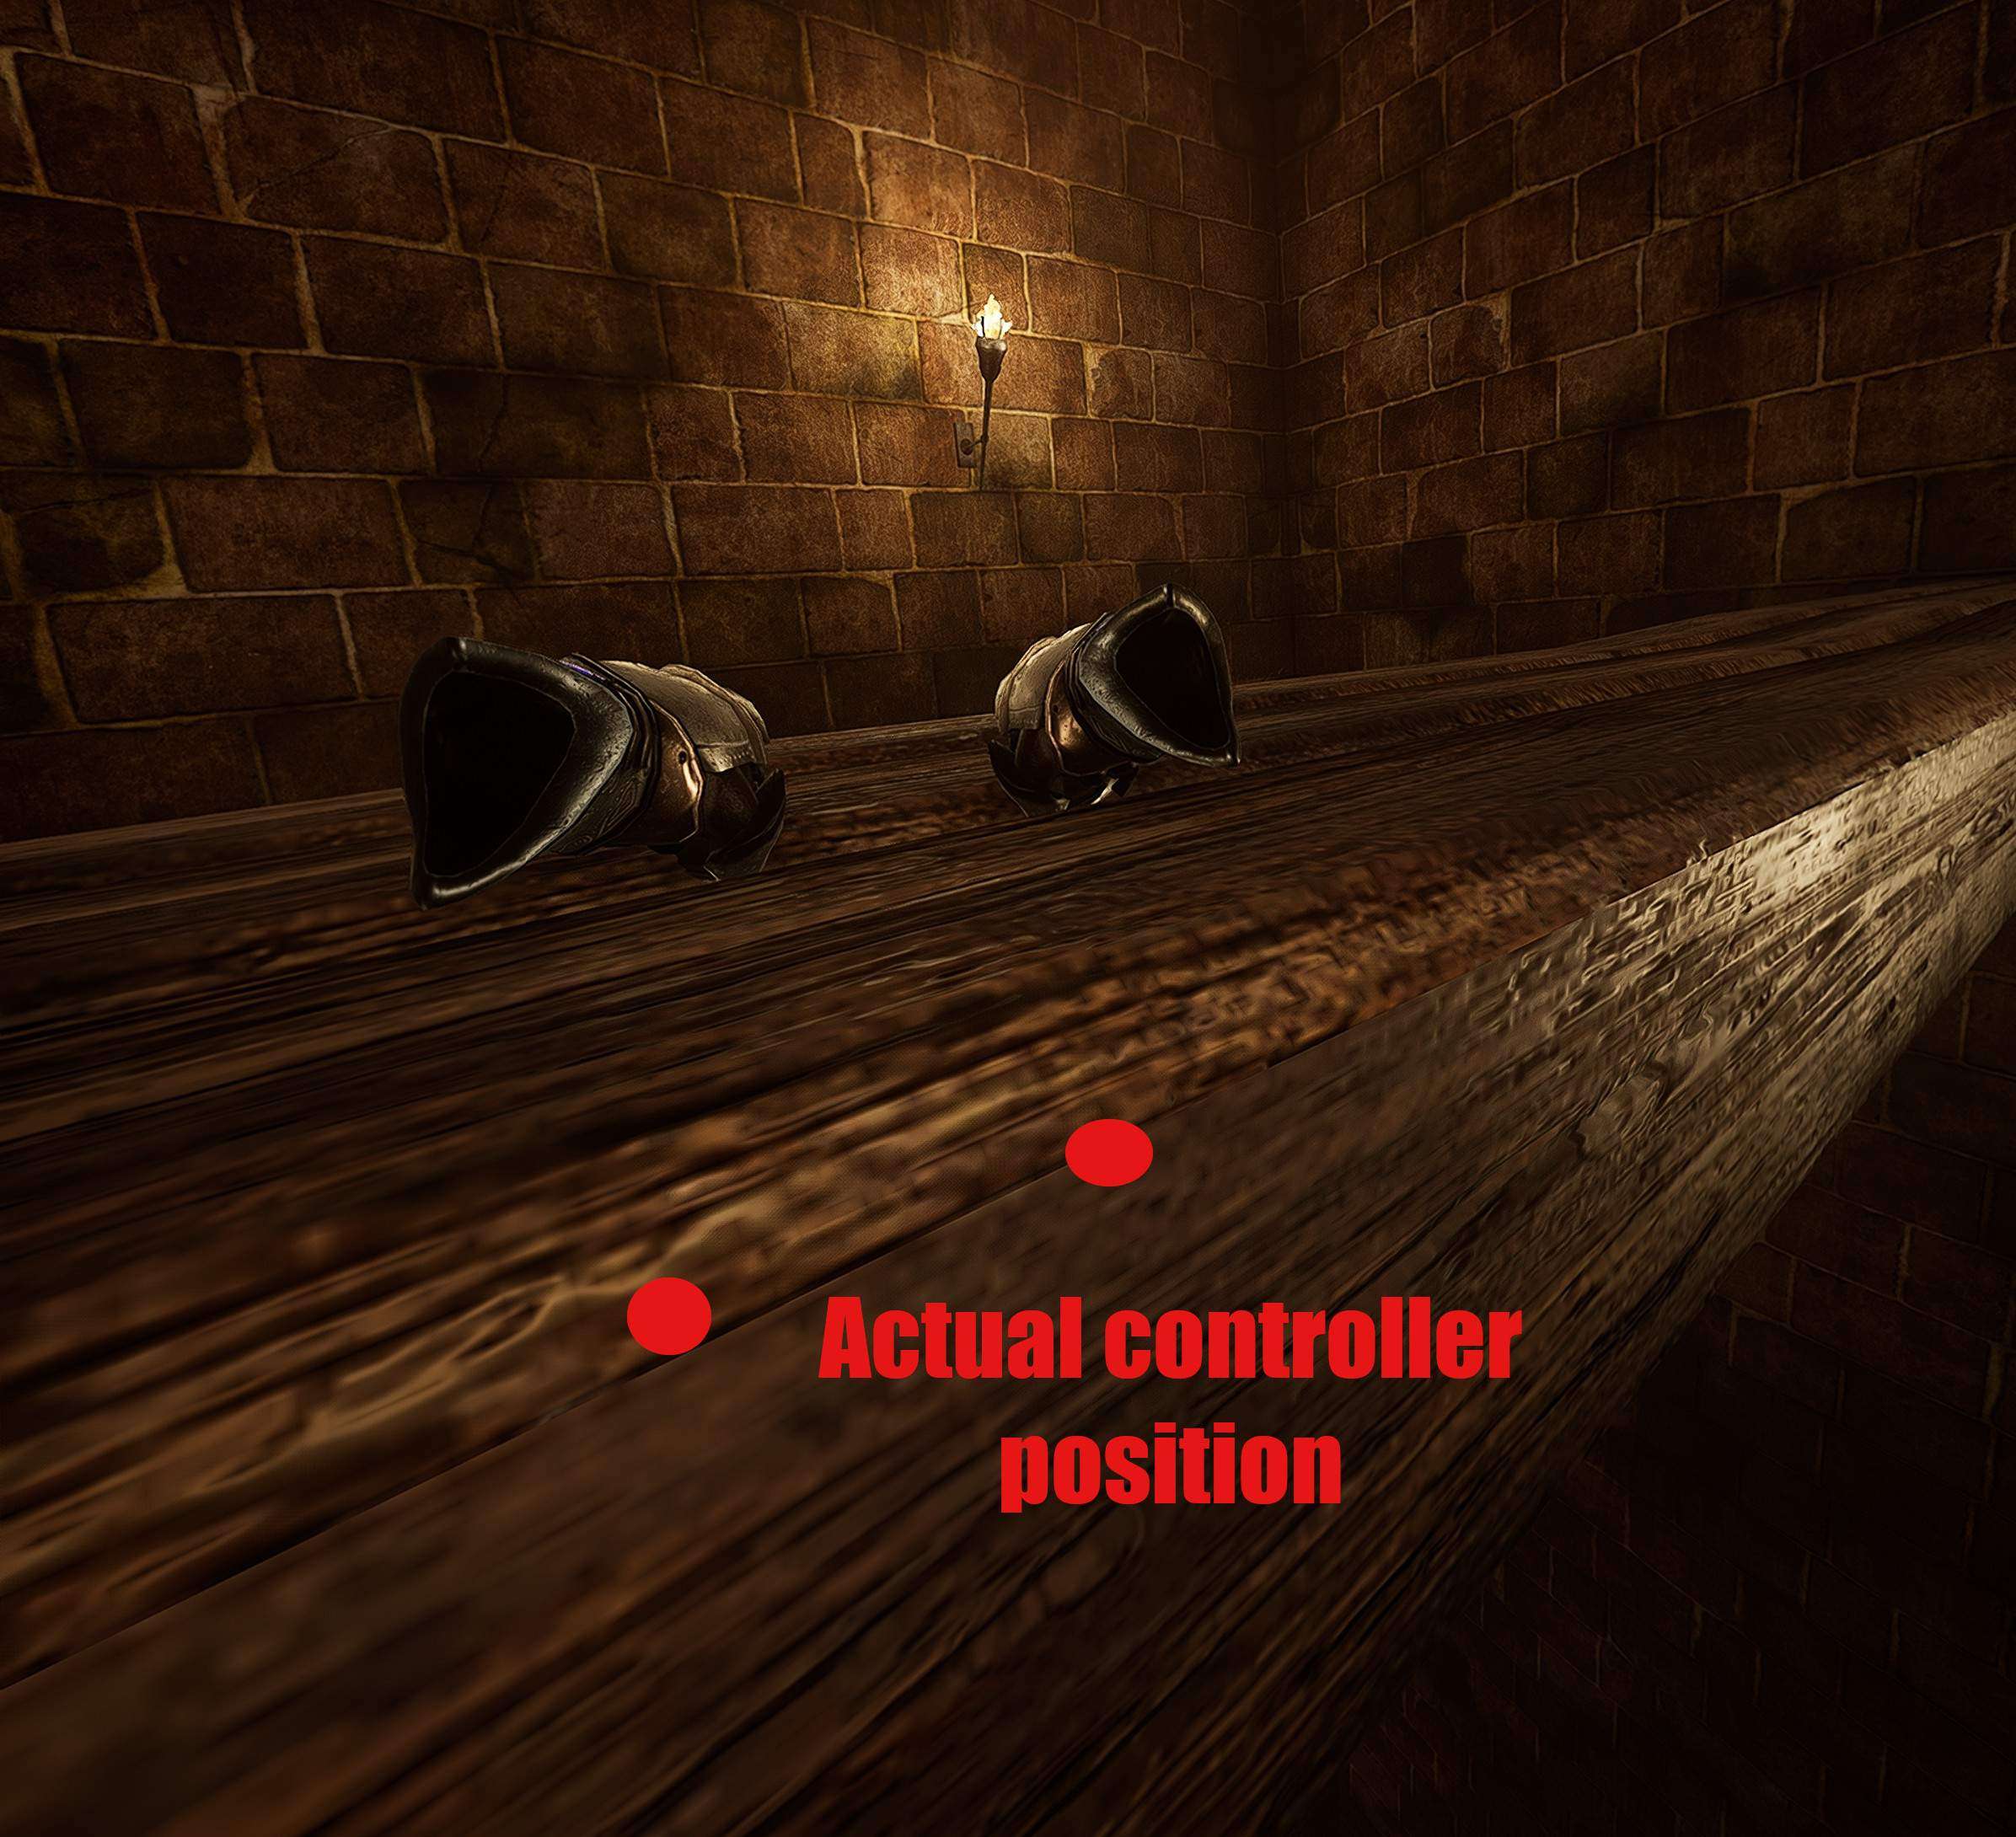
If you caught the ledge, you should now be hanging next to it, but it’s very likely that your controllers may be slightly disconnected from your hands. Don’t panic, this is normal. Just keep your eye on your in-game hands and don’t flail trying to readjust them. Trust that they’re where you want them to be.

Gently push your hands straight down to lift your head higher, and keep going until your headset is above and over your hands. At this point, the game will register that you have successfully parkoured onto the ledge, and will fade in and out to teleport you up.
Look out, a Champion!
Champions are regular enemies that are empowered with dark magic, and surrounded by a small handful of loyal minions. You’ll be able to pick them out of the crowd as the big one with pulsing veins of red energy. Be careful – They’ll have a special ability like buffing their minions or increasing their attack speed!
At last!
You’ll know you’re there when you reach a marble hallway that leads to a treasure chest.

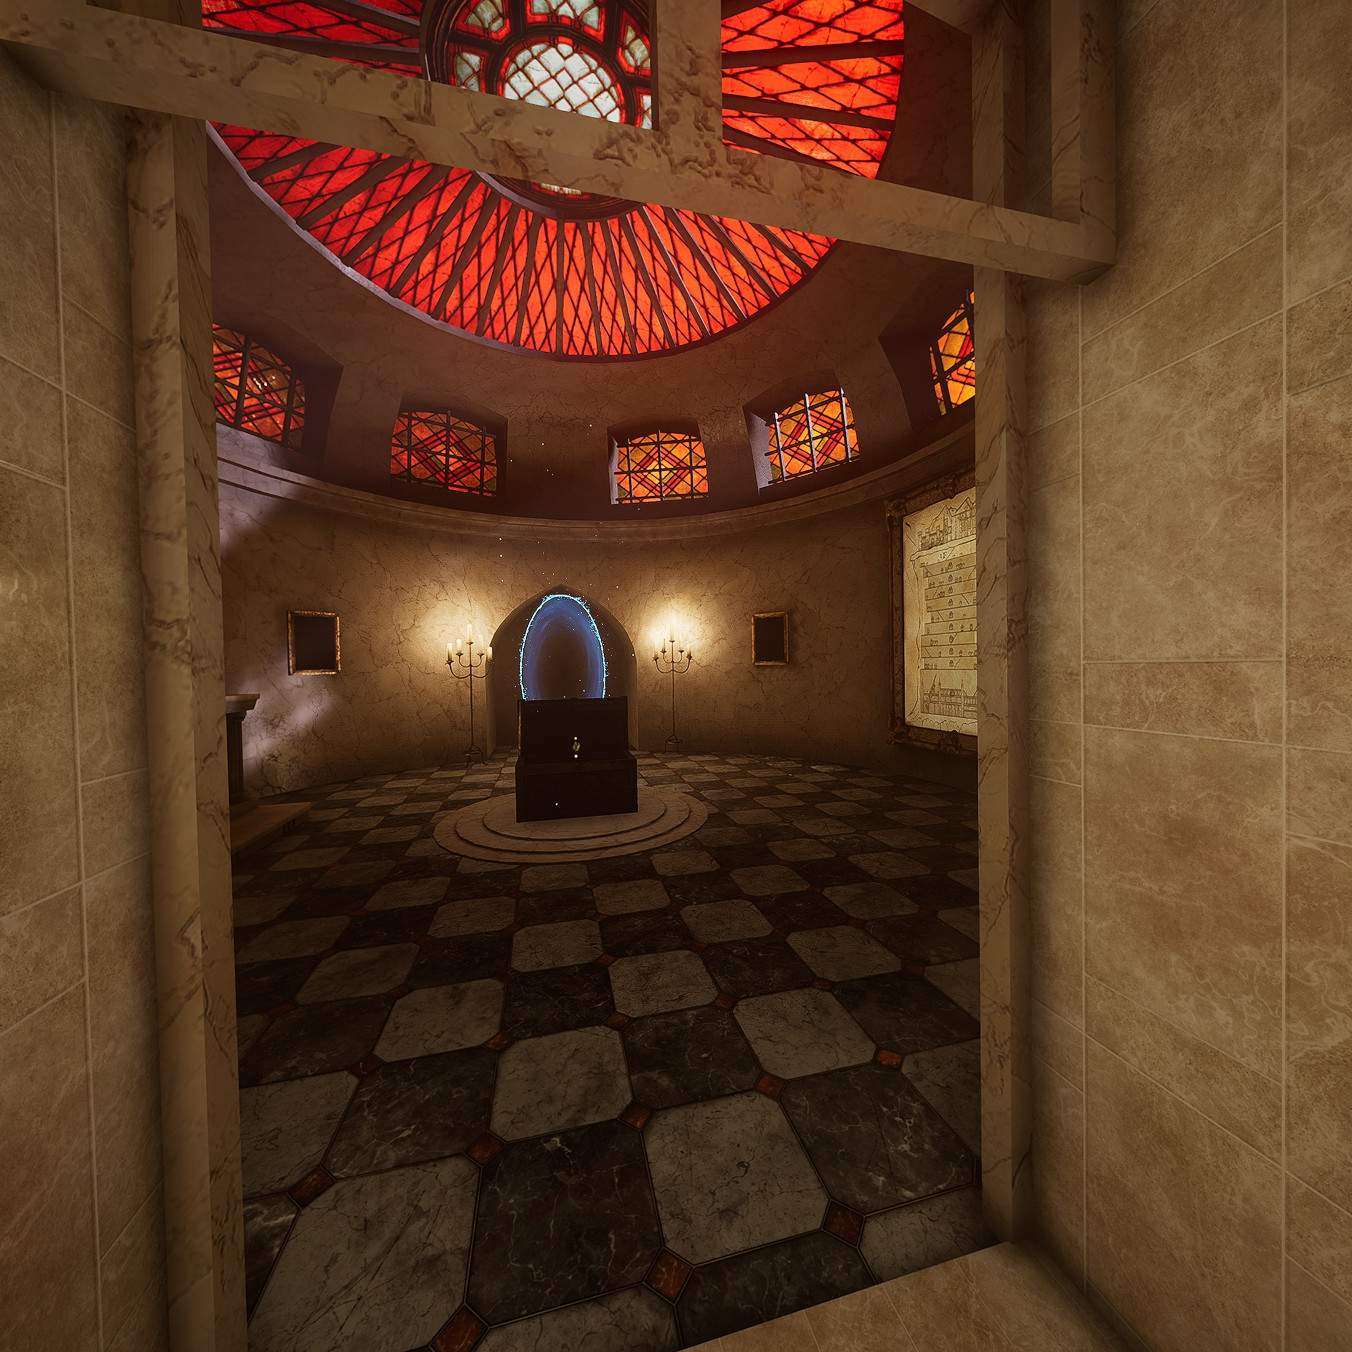
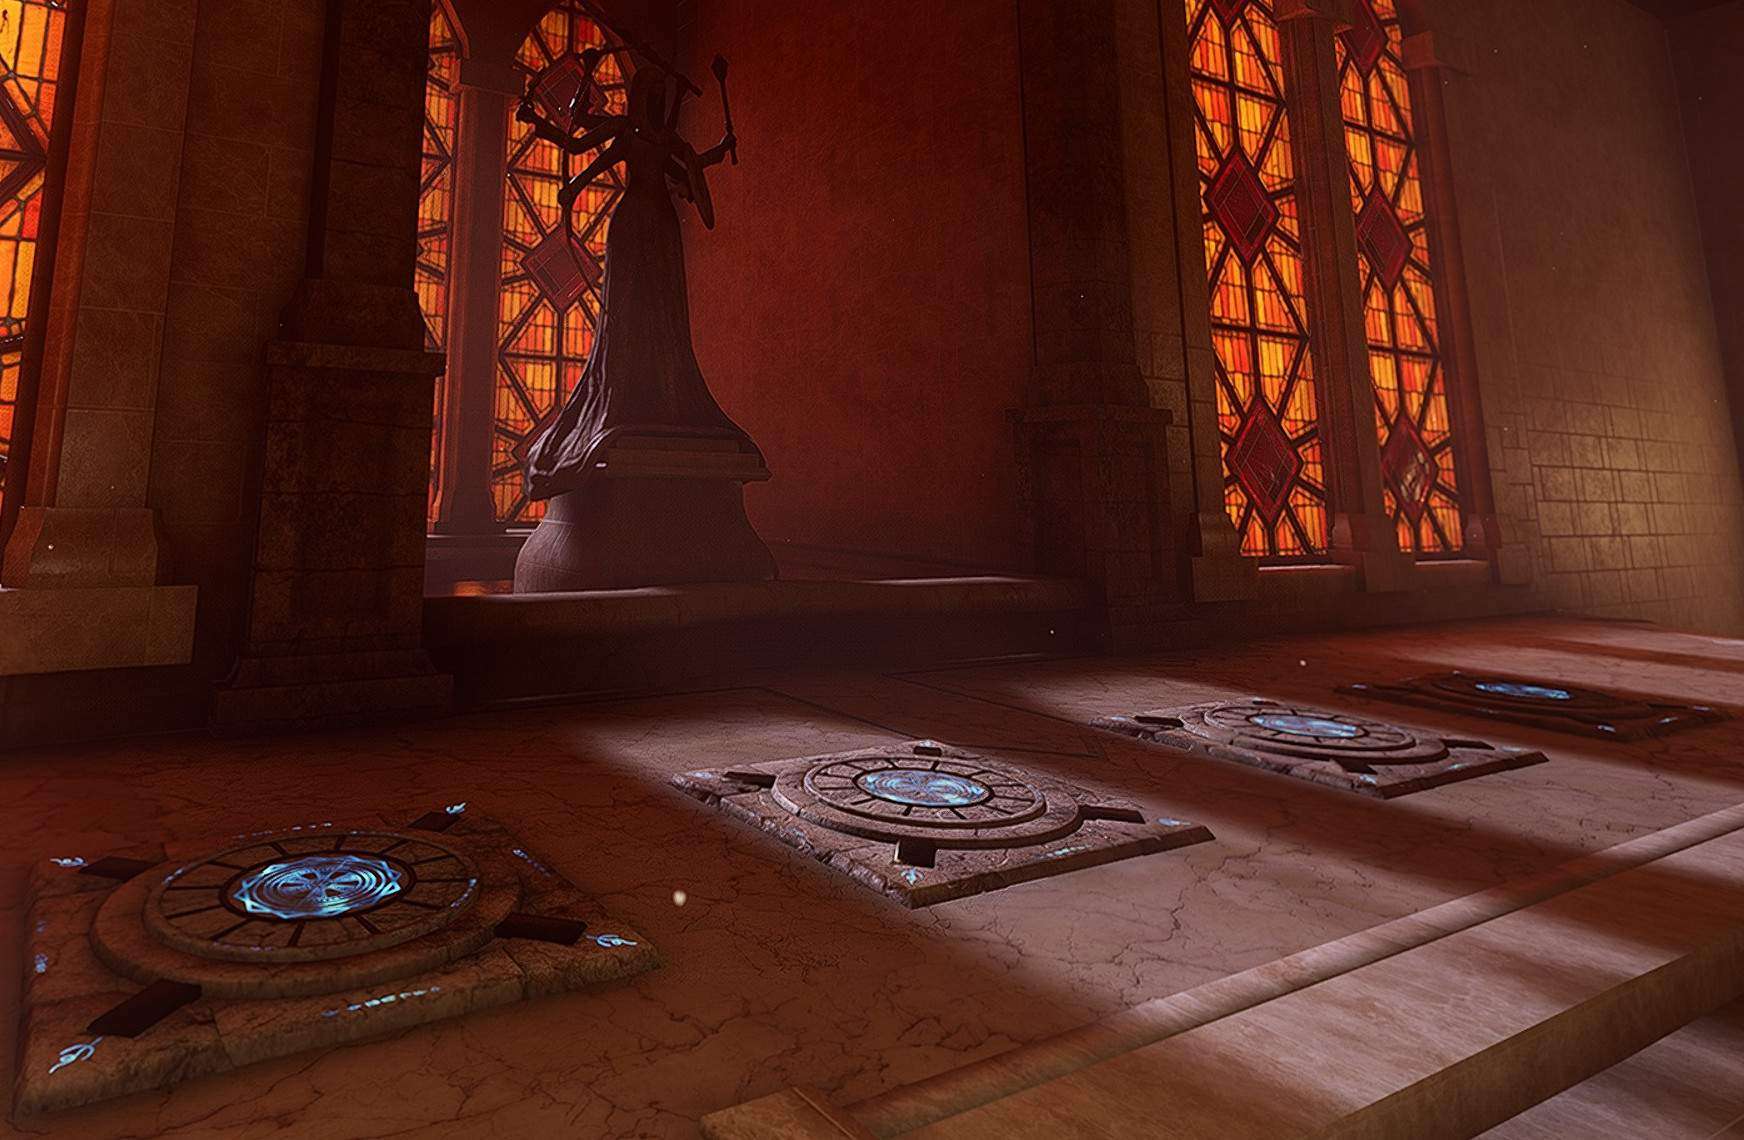
Step through the portal, and then you’ll be taken to an altar with runes on the floor. Once you and your friends all step on the runes, you’ll officially have cleared the floor, and you’ll be teleported to the next one. Congratulations!
Closing
Hopefully, this guide should prove to be detailed enough to answer the basic questions, but is still light and brief enough to be casually glanced at if you just have a few minutes. Legendary Tales is a deep and rewarding game, and I hope this gives you what you need to get the kind of ARPG fun it’s offering.

yo thanks man i did the tutorial and didn’t figure out half this stuff. My time playing was already awesome, but the tips you gave here really helped me enjoy this game to its fullest potential.