
Ultimate Elixir System Guide
By Sekwah.
Elixirs are items that make your character stronger. They work like stones that you cut to get effects and stats, similar to bracelets. They are meant to be a way to spend your gold, just like stones and bracelets.
Unlike stones and bracelets, you have some control over the effects you get when cutting elixirs. You choose the effects you want to upgrade from a small list. Even if you get a bad elixir, it can still be useful for unlocking set effects. And since you need an elixir for each piece of armor, even “bad” elixirs can be used to upgrade the ones you have equipped.
How to Get Them?
You can get “Elixir of Wisdom” and “Energy of Wisdom” (a crafting material) from the Ivory Tower, which is Voldis’ Abyss Dungeon.
Energy of Wisdom

Elixir of Wisdom
Essence of Wisdom

Stabilized Ductility Catalyst

There’s two rarities of Elixir:
- Clear Elixir of Wisdom which comes from Normal Ivory Tower (1600 ilvl).
- Splendid Elixir of Wisdom which comes from Hard Ivory Tower (1620 ilvl).
The same applies for Energy of Wisdom.
| Ivory Tower Rewards Elixir reward amounts are the same in Normal and Hard – Only rarity changes | ||||
| Gate 1 | Gate 2 | Gate 3 | Gate 4 | |
| Gate Reward | 2 Energy of Wisdom | 2 Energy of Wisdom | 3 Energy of Wisdom | 1 Energy of Wisdom 1 Elixir of Wisdom |
| Bonus Chest | 2 Energy of Wisdom | 2 Energy of Wisdom | 3 Energy of Wisdom | 1 Energy of Wisdom 1 Elixir of Wisdom |
| Auction Chest | – | 1 Elixir of Wisdom | – | 1 Elixir of Wisdom |
You can also dismantle elixirs for Essence (similar to Ability Stones or Bracelets). You can then use the Essence to craft new elixirs. Essence is tradeable, meaning you can buy them from the Auction House (or sell it).
| Dismantling Elixir The further you progress in an elixir, the more Essence of Wisdom you receive from dismantling it. | |||
| Clear Elixir of Wisdom | Splendid Elixir of Wisdom | ||
| Progress | Essence | Progress | Essence |
| Remaining Selection – 5 | 6 | Remaining Selection – 5 | 6 |
| Remaining Selection – 4 | 7 | Remaining Selection – 4 | 7 |
| Remaining Selection – 3 | 8 | Remaining Selection – 3 | 8 |
| Remaining Selection – 2 | 9 | Remaining Selection – 2 | 9 |
| Remaining Selection – 1 | 10 | Remaining Selection – 1 | 10 |
| Remaining Taps – 12 | 11 | Remaining Taps – 14 | 11 |
| Remaining Taps – 11 | 12 | Remaining Taps – 13 | 12 |
| Remaining Taps – 10 | 13 | Remaining Taps – 12 | 13 |
| Remaining Taps – 9 | 14 | Remaining Taps – 11 | 14 |
| Remaining Taps – 8 | 15 | Remaining Taps – 10 | 15 |
| Remaining Taps – 7 | 16 | Remaining Taps – 9 | 16 |
| Remaining Taps – 6 | 17 | Remaining Taps – 8 | 17 |
| Remaining Taps – 5 | 18 | Remaining Taps – 7 | 18 |
| Remaining Taps – 4 | 19 | Remaining Taps – 6 | 19 |
| Remaining Taps – 3 | 20 | Remaining Taps – 5 | 20 |
| Remaining Taps – 2 | 21 | Remaining Taps – 4 | 21 |
| Remaining Taps – 1 | 22 | Remaining Taps – 3 | 22 |
| Remaining Taps – 0 | 23 | Remaining Taps – 2 | 23 |
| – | – | Remaining Taps – 1 | 24 |
| – | – | Remaining Taps – 0 | 25 |
| Crafting You can only craft elixirs with Essence 10 times per week | ||
| Rarity | Requires | Cost |
| Clear Elixir of Wisdom | 4x Clear Energy of Wisdom or | 100 Gold |
| 65x Essence of Wisdom | ||
| Splendid Elixir of Wisdom | 4x Splendid Energy of Wisdom or | 250 Gold |
| 75x Splendid Essence of Wisdom | ||
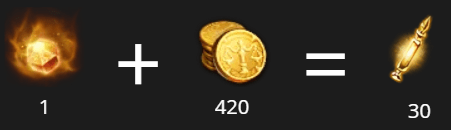
Stabilized Ductility Catalyst, which is required to “tap” on the elixirs, is crafted using Chaos Stones:
You can also buy 50 of them from Voldis’ wandering merchant Gudis with Silver everytime he visits Great Rainforest.
How Do They Work?
You start with an empty elixir and go to the 3 Sages. Each Sage will give you “Advice”. Each advice represents some effect that can be Armor-specific bonuses (damage reduction, boss damage, crit damage, etc), Base Stats (HP, Dexterity, etc) or Elixir “Sets” (more on this later).
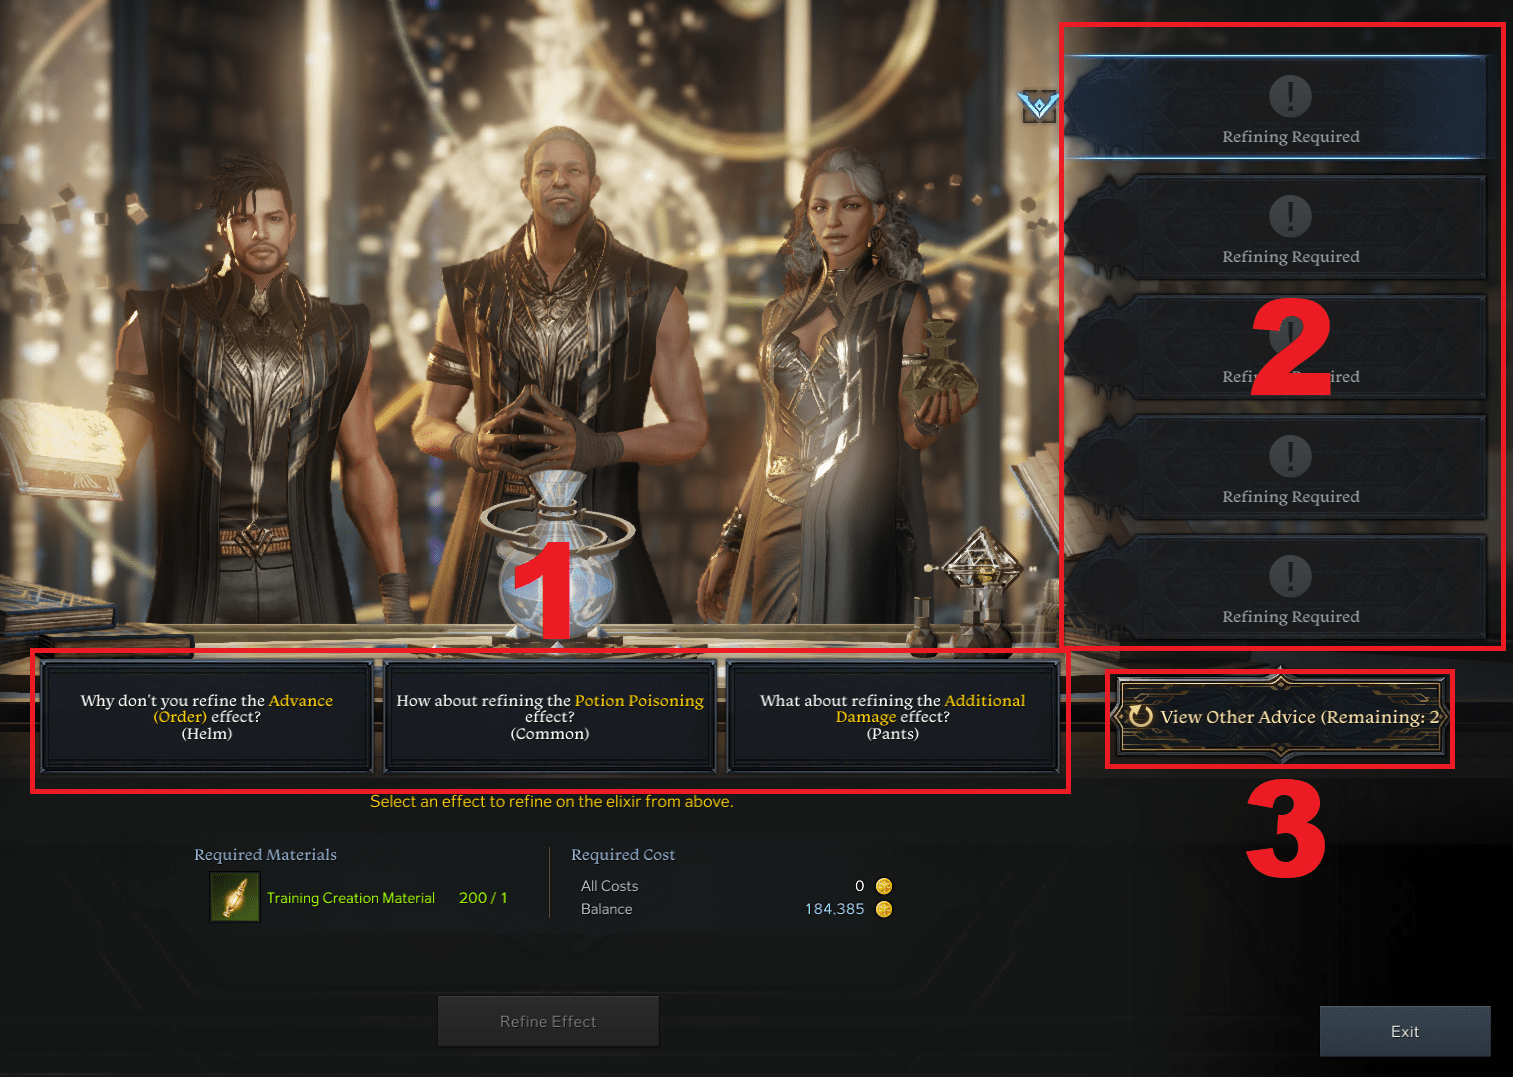
- Advices given by the Sages.
- Slots into which you put the effects selected from each turn of advice.
- Option to reroll the given advices.
Elixir Effects
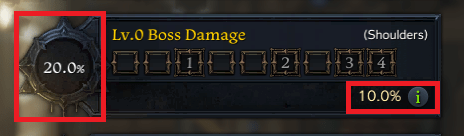
Each selected effect will have 10 “nodes” (9 in the case of epic elixirs) that you need to “fill” to gain different levels of the bonus. As you can see in the picture below:
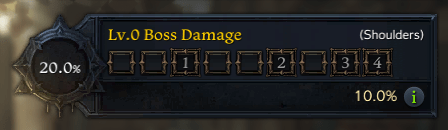
- Level 1 requires 3 nodes.
- Level 2 requires 6 nodes.
- Level 3 requires 8 nodes.
- Level 4 requires 9 nodes.
- Level 5 requires 10 nodes.
The effects that you can pick are divided into 6 “types”: Common, Helmet, Gloves, Shoulder, Chest and Pants. The armor-specific ones only work if they’re equipped in the correct armor slot (eg: a “Helmet” effect won’t work if it’s equipped in your Gloves).
The list of effects for each piece are:
| Type | Name | Bonus (Lv.1 to Lv.5) |
| Common | Atk. Power | +122 / 253 / 383 / 575 / 767 |
| Blessing of Life (Combat HP Recovery) | +6 / 12 / 19 / 29 / 39 | |
| Escape Expert(Stand Up CDR) | +0.38% / 0.79% / 1.2% / 1.8% / 2.4% | |
| Explosives Expert(Battle Item damage) | +1.6% / 3.3% / 5% / 7.5% / 10% | |
| Master of Evasion(Movement Skill CDR) | +0.38% / 0.79% / 1.2% / 1.8% / 2.4% | |
| MP | +15 / 32 / 49 / 73 / 98 | |
| Potion Poisoning (Recovery Battle Item CDR) | +1.13% / 2.34% / 3.55% / 5.32% / 7.1% | |
| Resource Blessing (Combat Resource natural Recovery) | +0.46% / 0.95% / 1.45% / 2.17% / 2.9% | |
| Stagger | +0.38% / 0.79% / 1.2% / 1.8% / 2.4% | |
| Strength/Dexterity/Intellect | +720 / 1782 / 2700 / 4050 / 5400 | |
| Vagabond (Damage when Solo) | +0.8% / 1.65% / 2.5% / 3.75% / 5% | |
| Weapon Power | +236 / 488 / 740 / 1110/ 1480 | |
| Helmet | Advance / Luminary / Faith | → Party Atk. Power Buff based on own Atk. Power +0.64% / 1.32% / 2% / 3% / 4%→ Max HP +800 / 1650 / 2500 / 3750 / 5000 |
| Bladed Shield / Critical / Fierce Strength / Luck / Master / Vanguard | → Atk. Power +0.23% / 0.47% / 0.72% / 1.08% / 1.44%→ Phy. Defense +480 / 990 / 1500 / 2250 / 3000 | |
| Gloves | Advance / Luminary / Faith | → Recovery and Shielding for Party Members +0.23% / 0.47% / 0.72% / 1.08% / 1.44%→ Combat HP Recovery +9 / 19 / 29 / 43 / 58 |
| Bladed Shield / Critical / Fierce Strength / Luck / Master / Vanguard | → Damage to foes +0.23% / 0.47% / 0.72% / 1.08% / 1.44%→ Mag. Defense +480 / 990 / 1500 / 2250 / 3000 | |
| Shoulder | Awakening Skill Damage | +1.2% / 2.47% / 3.75% / 5.62% / 7.5% |
| Boss Damage | +0.38% / 0.79% / 1.2% / 1.8% / 2.4% | |
| Healing Enhancement | +0.67% / 1.38% / 2.1% / 3.15% / 4.2% | |
| Shield Enhancement | +0.67% / 1.38% / 2.1% / 3.15% / 4.2% | |
| Chest | Incoming Damage Reduction | +1.6 / 3.3% / 5% / 7.5% / 10% |
| Mag. Defense | +960 / 1980 / 3000 / 4500 / 6000 | |
| Max HP | +2720 / 5610 / 8500 / 12750 / 17000 | |
| Phy. Defense | +960 / 1980 / 3000 / 4500 / 6000 | |
| Pants | Additional Damage | +0.49% / 1.02% / 1.55% / 2.32% / 3.1% |
| Ally Enhancement(Party Atk. Power Buff based on own Atk. Power) | +0.96% / 1.98% / 3% / 4.5% / 6% | |
| Crit Damage | +1.12% / 2.31% / 3.5% / 5.25% / 7% | |
| Speciality Gain(Identity Meter gain on Hit) | +0.64% / 1.32% / 2% / 3% / 4% |
Transmuting
Transmutation is divided into 2 steps: Selecting specific Sage advice and Transmuting the elixir itself.
After picking your 5 effects, you have 14 “transmutes” (12 for Epic elixirs) that you can use to increase / decrease / ”seal” (lock) the effects you’ve picked. Each transmutation costs 5 Soft Catalyst and 280 gold (1 Catalyst and 40 Gold for Epic) .
Every “turn” you will be given 3 Advices that affect the effects you selected (or the transmutation process) in some form:
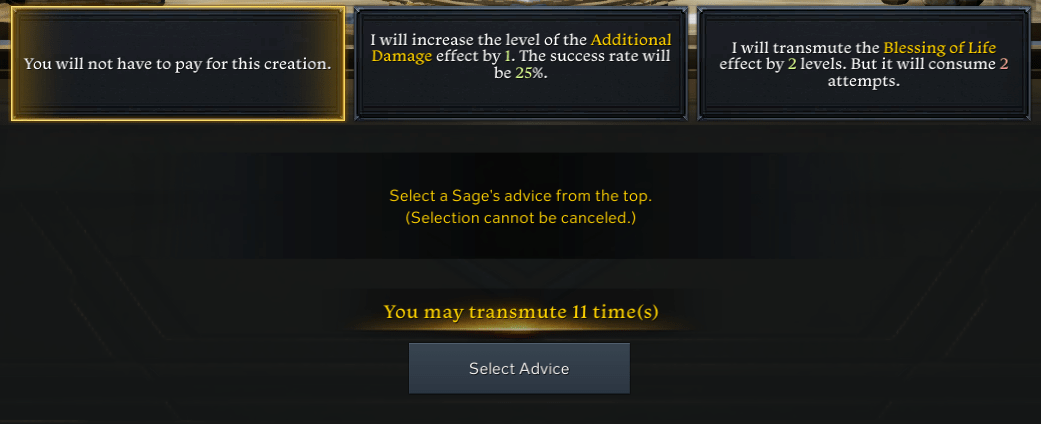
There’s a lot of advice the Sages can provide. You basically have an equal chance to increase any of the nodes (20% per category), but there’s sage choices that let you pick a specific effect and make it 100%, or to seal another (set it to 0 and prevent transmutation on it), or to gamble increasing or decreasing nodes, etc.
After selecting any advice, you will be able to do 1 transmutation:
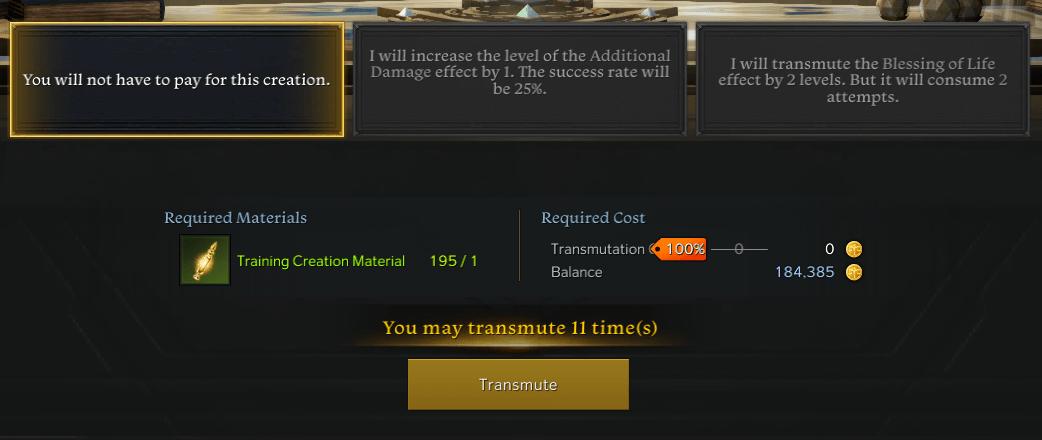
The transmutation increases 1 random node from any of the effects in the elixir, based on the chances that each effect has, and the “great success” (increase 2 nodes instead of 1) chance:
20% Transmutation chance and 10% Great Success chance
Order / Chaos and Enhancement
Selecting (or not) one specific Sage’s advice several times in a row, will increase their Order/Chaos stacks:
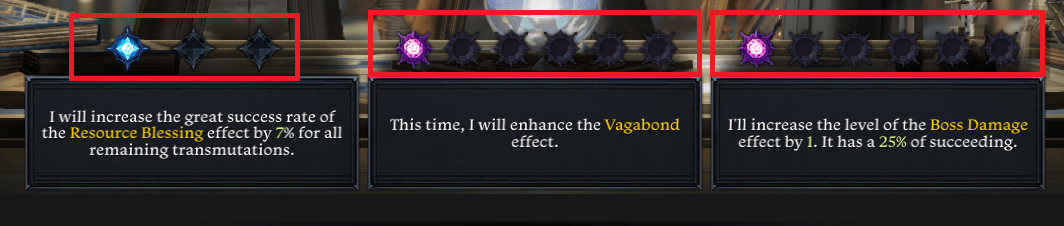
Picking any specific Sage’s advice converts it to “Order” and the other 2 to “Chaos”.
- Selecting Order 3 times enhances it.
- Not selecting Chaos 6 times enhances it.

“Enhanced” Advices
Enhanced Order advices are usually “good”; they’re low-risk low-reward type of picks.
Enhanced Chaos advices are often “gamble” or “evil” choices; for example: +4 to a specific effect but the Sage leaves, leaving you with only 2 Sages to pick from.
There’s “global” enhanced advices (any sage can offer them), and there’s Sage-specific enhanced advices (more on this in the “Cutting Strategy” section).
Equipped Elixir “Points”
Once you finish your elixir and “Imbue” it to any armor piece, it will provide “Elixir Points” which are the sum of “effect levels” the elixir has. For example, an Elixir with one Lv5 Effect and one Lv2 Effect will count as 7 Elixir Points.
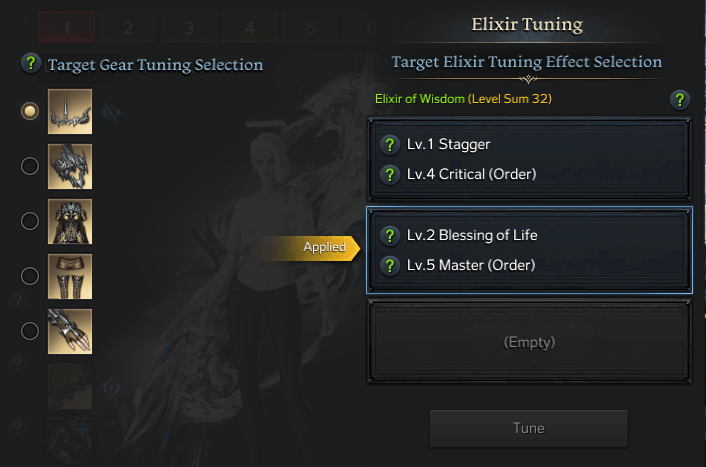
You can also save up to 3 different elixirs to the same armor piece (only the selected one provides any bonus and elixir points). Bear in mind that you can’t take an elixir out of the armor piece. You can only overwrite them.

Set Effects
The Set effects provided by Helmet and Gloves are activated by having more than 35 Elixir Points for Level 1 set, and 40 Elixir Points for Level 2.
Important: Both pieces (Helmet/Gloves) must have the same set effect to activate the bonus (much like relic sets).
| Set Effect Name | Lv.1 (35 Elixir Points) | Lv.2 (40 Elixir Points) |
| Critical회심(DPS Set) | Damage on Crit +6%* | (Replaces previous bonus) Damage on Crit +12%* |
| Master달인(DPS Set) | When using any skill, Crit Chance +1.4% for 10 seconds. Stacks 5 times. Stacks decrease by 1 when receiving damage. | (Replaces previous bonus) When using any skill, Crit Chance +1.4% for 10 seconds and Additional Damage +1.7%. Stacks 5 times.Stacks decrease by 1 when receiving damage. |
| Fierce Strength강맹(DPS Set) | When HP is above 50%, Damage +4% and Damage Taken -4% When HP is below 50%, Damage +3% and Damage Taken -6% | (Replaces previous bonus) When HP is above 50%, Damage +8% and Damage Taken -8% When HP is below 50%, Damage +6% and Damage Taken -12% |
| Vanguard선봉대(DPS Set) | When using Spacebar, damage increases by 3% for 20 seconds (“Charge” buff). On skill hit, Attack Power increases by 3% for 6 seconds (“Valiance” buff). | It also provides: When both Charge and Valiance are active, Damage +5% (“Vanguard” buff) |
| Bladed Shield칼날방패(DPS Set) | Gain a shield on skill hit (6% of maxHP for 15 seconds). Internal cooldown of 12 seconds. While protected by Bladed Shield, damage +4% | (Replaces previous bonus?) While protected by Bladed Shield, damage +8% |
| Luck행운(DPS Set) | 5% chance to reset skill cds after using a skill. Excludes spacebar/stand up/awakening. | (Replaces previous bonus) 10% chance to reset skill cds after using a skill. Excludes spacebar/stand up/awakening. |
| Luminary선각자(Support Set) | Grants a stack of Insight on skill use. Insight lasts 8s and does not trigger with Movement or Stand Up Skills. Insight: Party Atk. Power Buff based on own Atk. Power +1.6% (Stacks up to 5 times) | It also provides: When Insight is fully stacked, Party Atk. Power Buff based on own Atk. Power +6%. Skill cooldown -5%. (Excluding Movement, Stand Up, and Awakening Skills) |
| Faith신념(Support Set) | When using Awakening, ATK Buff effectiveness +8% for 3 minutes. | (Replaces previous bonus) When using Awakening, ATK Buff effectiveness +14% and Identity Gain +5% for 3 minutes. |
| Advance진군(Support Set) | Creates an ether orb when using a protective spell (shields, damage reduction). Ether provides 2230 Weapon Power for 15 seconds, internal cooldown of 10 seconds. | It also provides: 8% Movement Speed for 15 seconds when Ether orb is created. 6% ATK Buff effectiveness |
Cutting Strategy and Tips
Useful Tips:
- Since “Common” effects are less impactful than Armor-specific effects, you usually want to get Armor-specific effects to Level 5 and Common effects to whatever RNG decides to give you.
- Even if you don’t meet the Elixir Points required for set effects, you still get all the passive stats from cutting and it’s still a good bit of damage per piece.
- Chest Effects only provide defensive bonuses (HP/Defense/Damage Reduction), you can pick 2 “General” effects instead for more damage.
- You can reroll whatever choices are given to you up to 2 times. There’s one “Chaos” max-stacks effect that allows you to reset the elixir (starting again to pick effects). This can be helpful if your elixir is going wrong, and saving rerolls for that point is a good strategy.
- Finish cutting all your elixirs before imbuing them into your armor, since you may cut a better one for the same piece (and you can dismantle the old one for essence).
Cutting Strategies:
There’s multiple strategies that you can employ to increase your chances at cutting a good elixir. There’s RNG in all of them since most are based on obtaining the Enhanced Chaos/Order choices that give extra points or don’t consume turns.
There’s no “god strat”, none of them are failproof and none of them guarantee you a good elixir. They’re good to know and you need to identify when to employ them and if it’s worth taking the risk.
Enhanced Gamba:
As mentioned previously, each Sage has a specific Enhanced Chaos Advice:
- Killmonger (left guy) exclusive advice is “Exhaust all power (leave) to increase the selected effect by a random value between 0 and +4”
- Denzel (middle guy) exclusive advice is “Exhaust all power (leave) to increase the selected effect by a random value between +2 and +3”
- Grandma (right lady) exclusive advice is “Exhaust all power (leave) to increase the selected effect by a random value between -4 and +5”
These advices can be very powerful to increase the desired effect to max level, with grandma being the evil gamba one. A common strategy is to avoid having Grandma as your Enhanced Chaos advice because of the risk of losing nodes.
This also means you ideally want to “stagger” chaos advice (by doing a “sage switch” at the start) so you don’t get both enhanced choices at the same time.
Extra Attempts:
There’s a few Enhanced Order advices that allow you to transmute or to seal an effect without consuming an attempt, meaning you can get a few extra nodes that normally you would not have.
The idea is getting a “fresh” Order advice by picking a Chaos advice first with 6 turns left (this means you are at 1 Order stack at turn 5), then empowering it by picking it up two additional times (should have the Order advice at 3 stacks by turn 3). You try to get the option that doesn’t consume an attempt this turn (you still have 3 turns left with this, but now with 1 Order stack) so you get an extra enhanced Order advice at 1 turn left.
Elixir Reset:
If your elixir is going wrong or if you got bad effects, you can try to reset your elixir (start from scratch) by gambling an enhanced Chaos advice. For this, you ideally want to select the Order advice 6 times in a row (enhancing 2 Chaos advice at the same time), and use your “View Other Advice” charges to try and get any of the reset options.


Be the first to comment