
This guide is for those who’ve made it to Tier 3 and wish to progress their gear.
Comprehensive Guide to Gear Progression
By Icy058.
Information here will cover gear progression, daily content, and weekly content. Included in gear progression will be an overview of game systems such as cards and Skill Tree (tripods).
Honing
Honing (upgrading) your gear is the core vertical progression system in Lost Ark. Through this system, you’ll use various materials to attempt a gear hone. When honing gear, you want to hone all your gear evenly. Don’t focus on only one piece as the higher you go, the higher the cost becomes. Thus, it’s less efficient to only focus on one piece. Make sure to hone your gear evenly. The following are the steps to hone your gear:
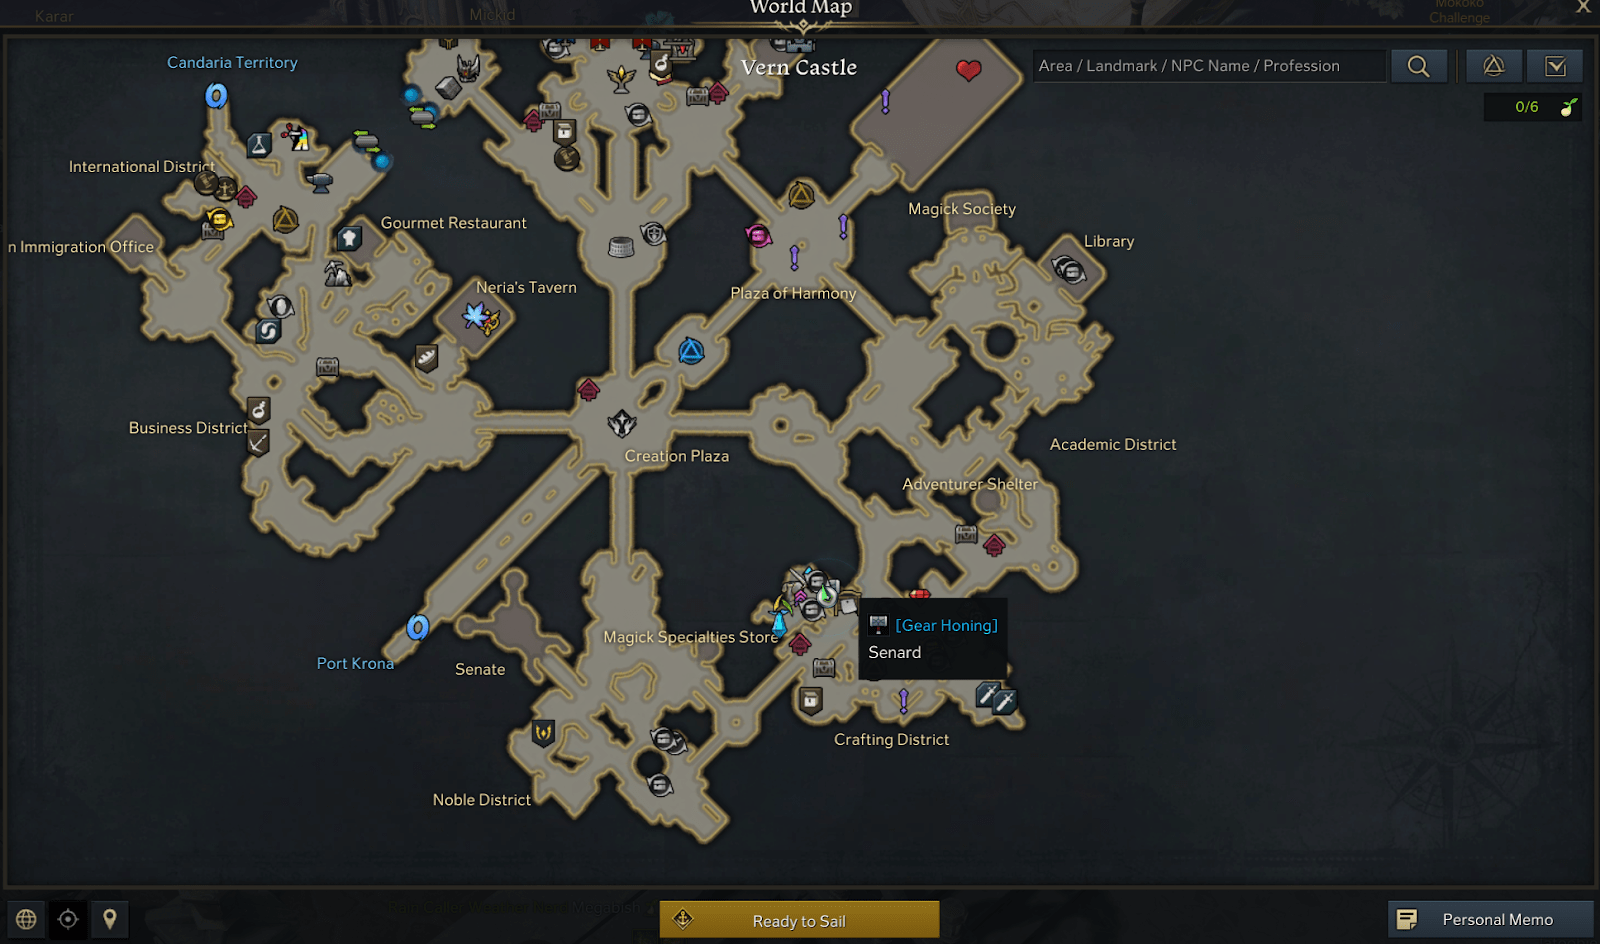
- Find a honing NPC in a major city such as Vern Castle, North Vern. Honing NPCs will be marked with a hammer icon on the map.
- Fill the Gear XP bar with shards and silver. Only when completely filled can you hone your gear. You only need to fill the Gear XP bar once per honing level.
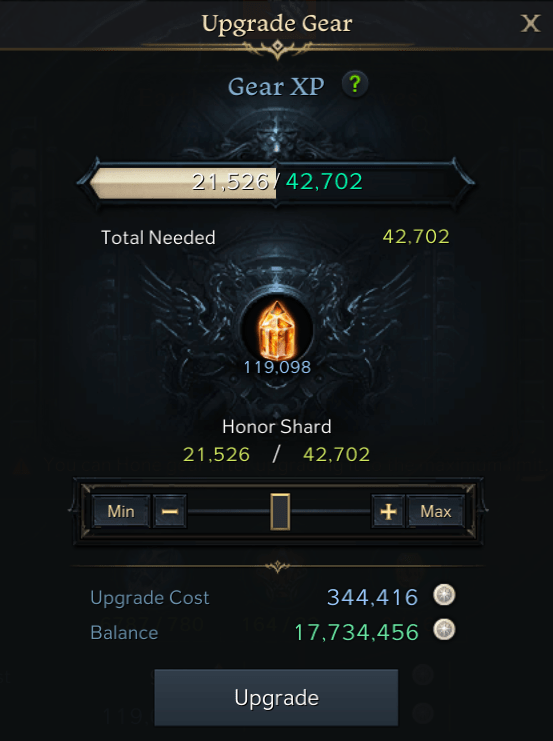
- Hone your gear by pressing the Gear Honing button. Each time you attempt a hone, it’ll consume a fixed amount of materials. You’ll see options to add Solar items that’ll increase the chance at which the hone will succeed. Don’t use those. You want to save them for much later when you’re honing at very low rates (5% or less). Each time you attempt a hone, your Artisan’s Energy will increase until you succeed. Then, the Gear XP bar will reset for you to fill it again.
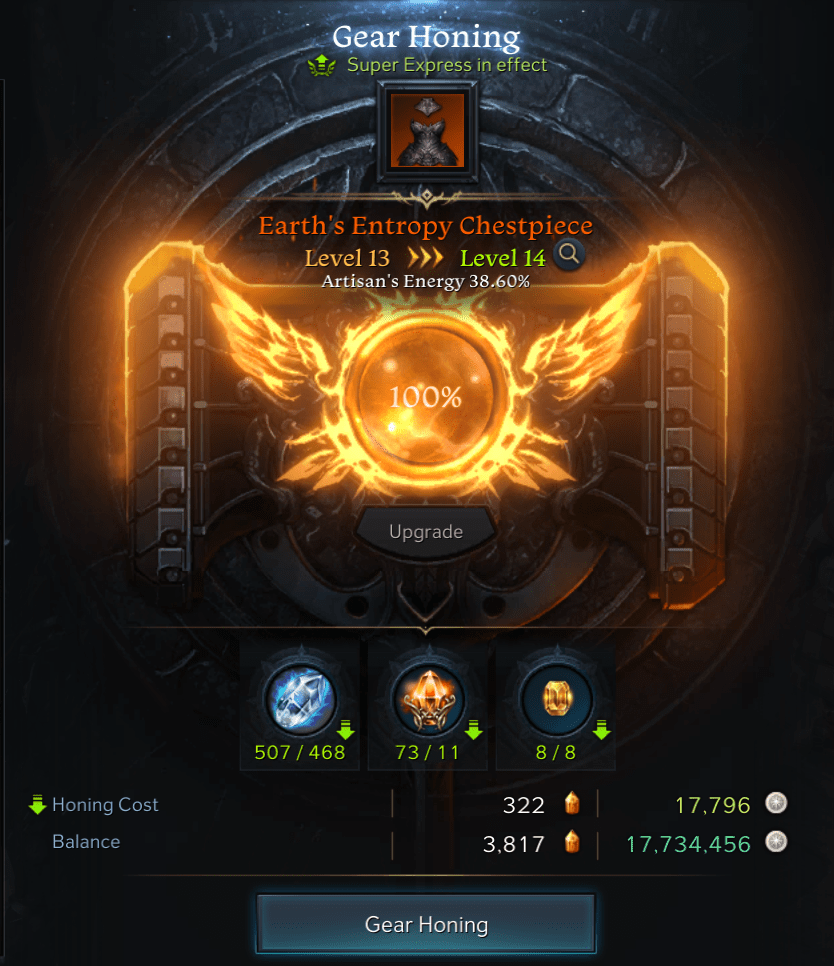
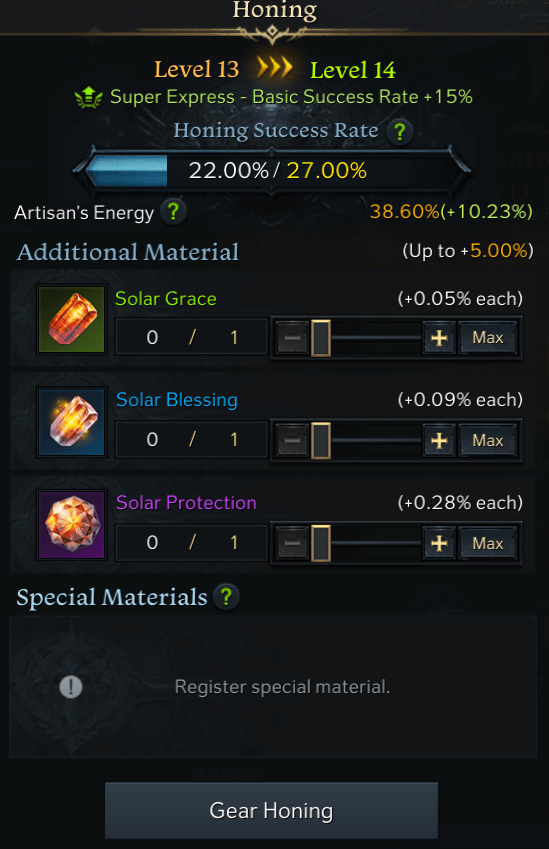
- Artisan’s Energy displayed in orange text below will increase each time you attempt a hone. This is Lost Ark’s “pity system” for upgrading gear. It’ll slowly increase until it reaches 100%. Once it does, your gear will have a 100% chance of honing no matter the odds it showed before. You are guaranteed to eventually hit a hone. The amount of Artisan’s Energy will increase per attempt with the use of Solar items, but as stated before you should save those for later.

- Upgrade priority is also something to note. Different gear pieces give more of different stats. DPS classes want to focus on gloves, shoulders, helm, pants, then chest. Support classes want to focus on the chest, pants, helm shoulders, then gloves. Somewhat obviously, the weapon gives attack power which influences your damage the most, but it’s very expensive to upgrade. Many players opt to hone other armors higher if they’re trying to reach a certain item level breakpoint for a new activity, generally a later Legion Raid.
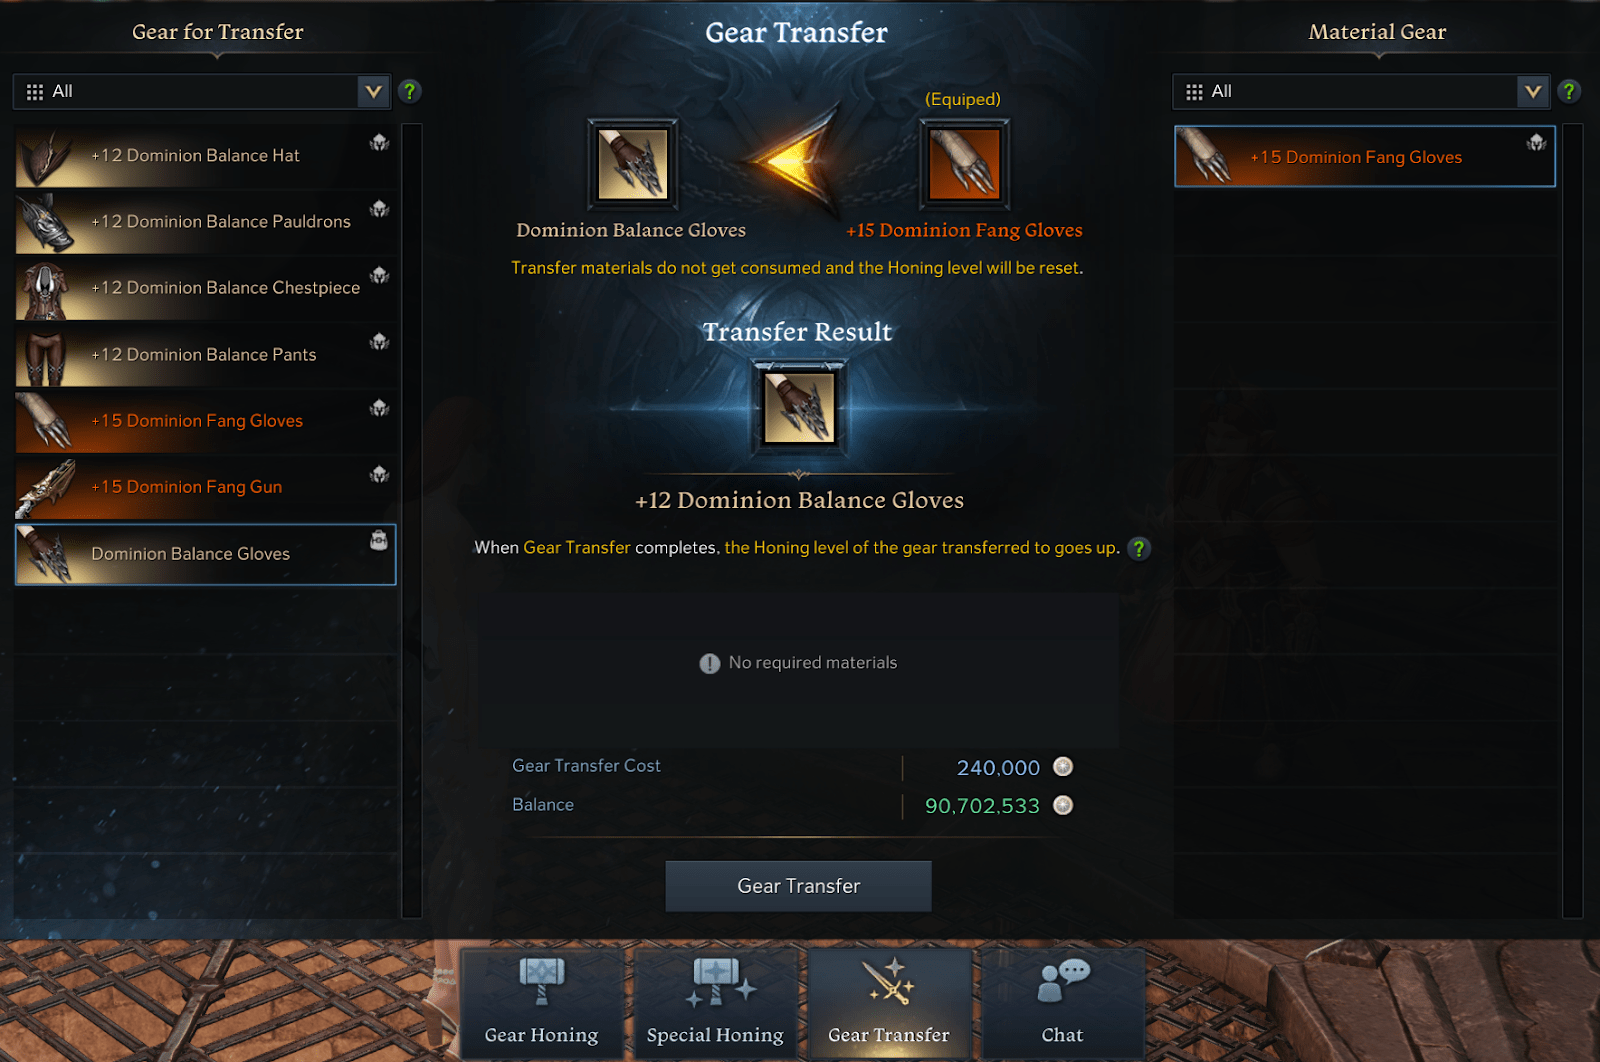
- Gear Transfer is used when you craft a new and better piece of gear. As explained later in this guide, you’ll be crafting new pieces of gear from Legion Raids. The Gear Transfer system allows you to transfer your hones into a new piece of gear. Simply select the Gear Transfer button in the bottom of the honing menu, select the newly crafted gear on the left, select your old gear you want to transfer into the new one on the right, then press the Gear Transfer button. It’ll cost some silver, but it’s a rather trivial amount.
How Gear Progression Works
Lost Ark is a heavily vertical progression oriented game. Vertical meaning honing your gear to a higher item level to do bigger and better things. Rinse and repeat. Of course, there are other things such as collectibles that will impact your characters’ “power level,” but the main focus of the game is increasing item level.
Unlike some other popular games such as World of Warcraft, your tier set or gear is gained from Legion Raids in the form of crafting materials. With those crafting materials, you can craft your class’ preferred Relic gear at the Legion Commander Gear Crafting NPC.
Gear Progression Route
- Once you’ve gained your full set of Epic rarity gear from the Punika Chaos Dungeon, you must hone that gear to 1445 item level to do the Legion Raid Valtan Hard Mode to obtain Demon Beast Bones used to craft your Relic gear set.
- Keep on honing your gear until you reach 1460 item level to challenge the Legion Raid Vykas Hard Mode to obtain Covetous Wings so you can complete your Relic gear set.
- You will need to complete all of these raids more than once to gain enough crafting materials to complete your Relic gear set with few exceptions.
- Once completed with your Relic gear set, hone it until you reach item level 1475 to challenge the Legion Raid Kakul Saydon. This Legion Raid will give you the Mayhem Horn to not craft new gear, but to upgrade your Set Bonus to level 2.
- Keep honing your gear to item level 1490 then STOP honing. Do not hone Relic gear over 1490 as it’s very inefficient. You want to Gear Transfer into your next gear set of Ancient rarity gained from the Legion Raid Brelshaza Normal Mode. You’ll gain crafting materials called Phantom Intentions.
- At 1540, you can start challenging the Kayangel Abyssal Dungeon to upgrade your gear set to level 3 with Empyrean of Contemplation. It’s the same thing you did with Kakul Saydon. Once again, you can technically skip this as it’s not tied to your raw item level progression.
- Hone your Ancient gear set to 1580 which will allow you to challenge the Akkan Normal Mode Legion Raid. You’ll gain crafting materials to craft your new set of Akkan Ancient gear using the Eyes of Decay.
- The Ancient set you got from Akkan is the last gear set in the game. Keep on honing your gear until you reach 1600 to attempt the Abyssal Dungeon Ivory Tower. This will unlock the Elixir system.
- Once again, keep honing your current gear set to 1610 for the last Legion Raid in the game, Thaemine. This raid will unlock the transcendence system.
Additional things to note:
- You must obtain Valtan and Vykas Relic gear, you cannot skip straight to Ancient even if you hone your Epic/Legendary gear to 1490.
- Kakul Saydon and Kayangel, as previously stated, may be skipped for now as the Set Bonus is a system separate from honing to increase item level.
- Honing past +15 (1490) on Relic and +19 (1580) on Ancient is possible, but not advised due to terrible inefficiency. You will gain item level when you transfer into your next set. Honing past those levels mentioned above will diminishing return when you gain item level from gear transferring. It’s intended that you gear transfer into the next gear set and hone that instead.
- On a similar note above, you can hone your gear past 1620 if you wish to attempt higher raids such as hard mode Thaemine. The raid featuring Ladon (Echidna in KR version) will introduce advanced honing which will make pushing 1620+ cheaper.
- Those of you with keen eyes may have noticed that I skipped over Normal Mode Valtan and Vykas. While those are still raids you can do, virtually no one does them as it’s so easy to reach hard mode item level.
Finishing this gear progression guide will take a while, so be sure to check out other guides on horizontal progression such as collectibles. Collectibles are a very important aspect to your roster (account on a server).
How to Obtain Honing Materials
To start honing your gear, you’ll first need to obtain honing materials. There are many sources in the game for these items ranging from dailies, weeklies, and one time rewards. This section will list the various methods of acquiring honing materials.
Daily Content
- Chaos Dungeons are done twice per day per character as simple AOE (area of effect) solo content. Chaos Dungeons will also reward items other than honing materials such as accessories, amulets, and cards. Make sure to keep an eye out for accessories that your class or others use since you can sell them. For amulets, you want to use specific ones that fit your class.
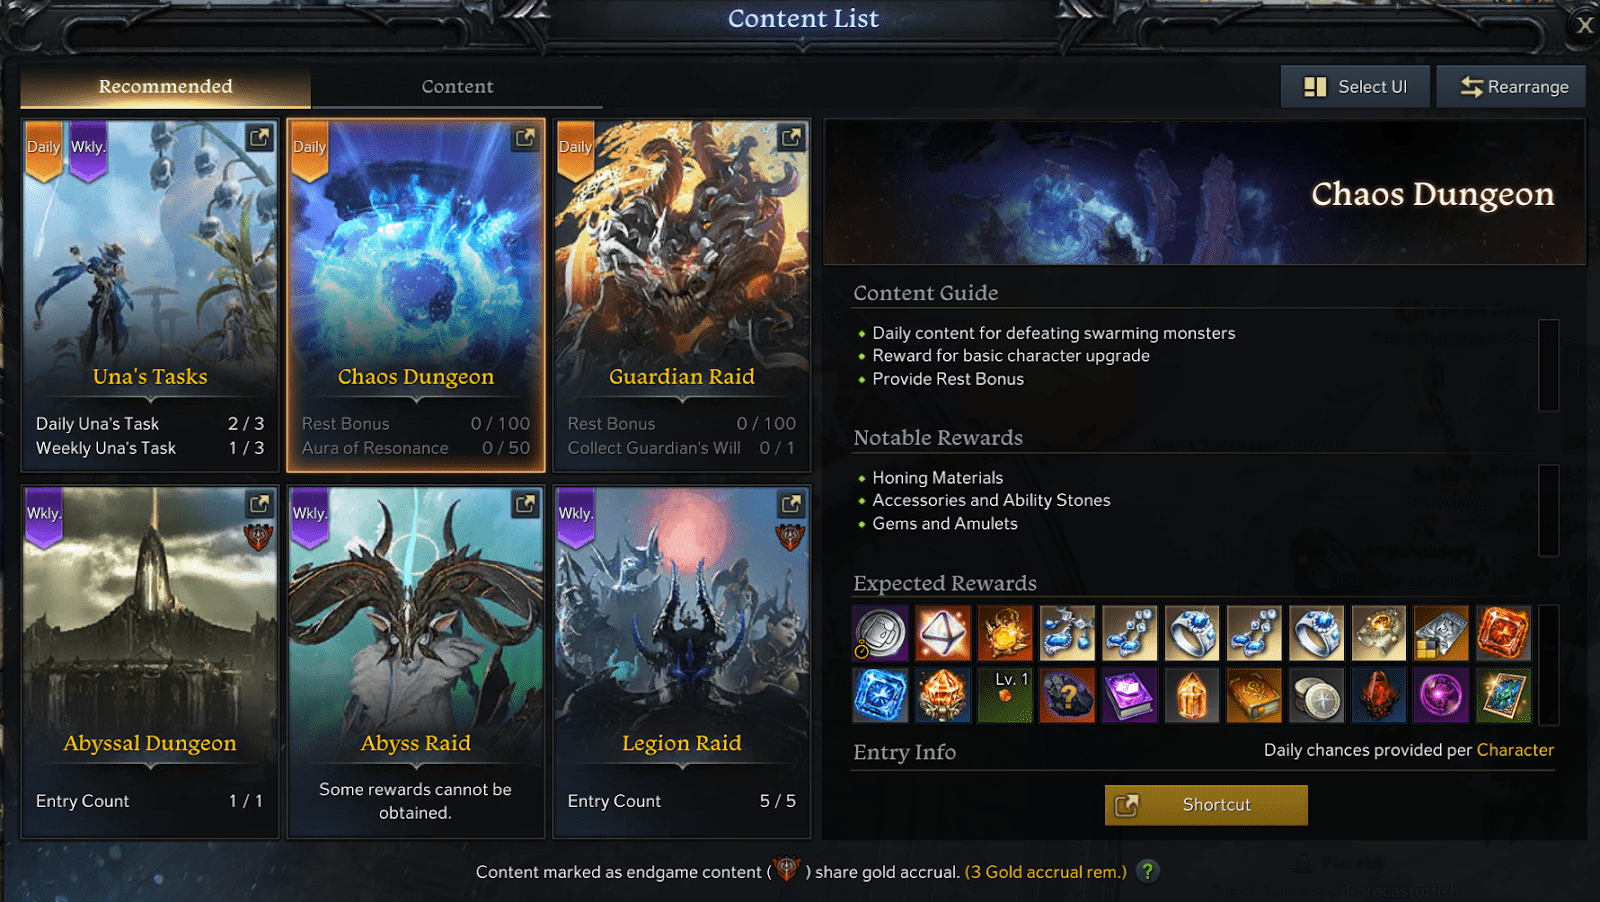
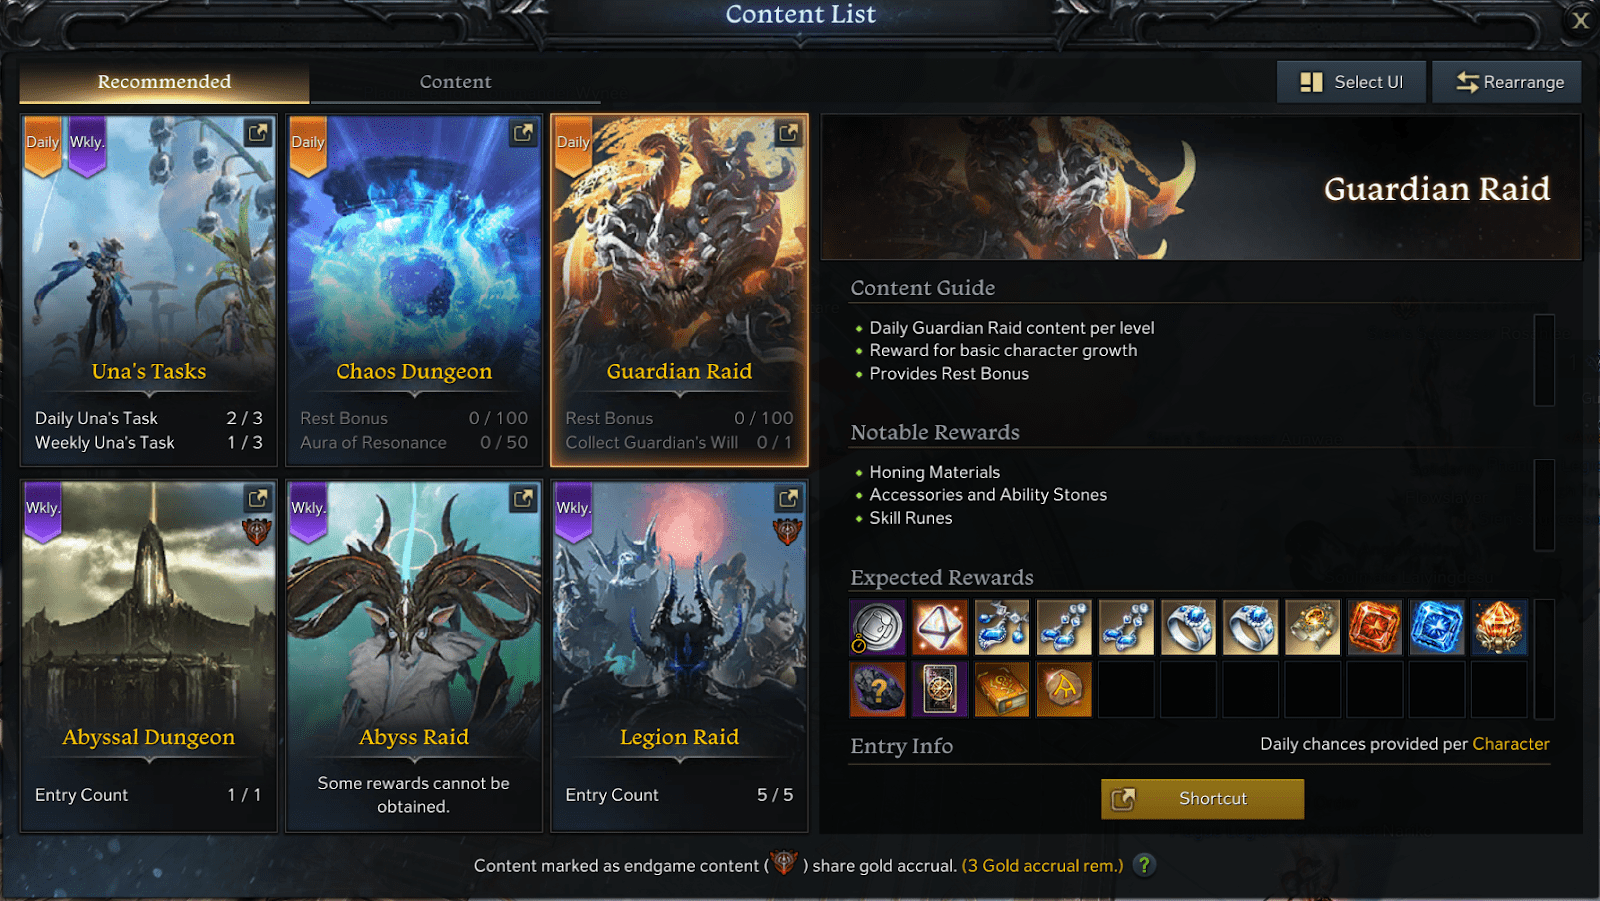
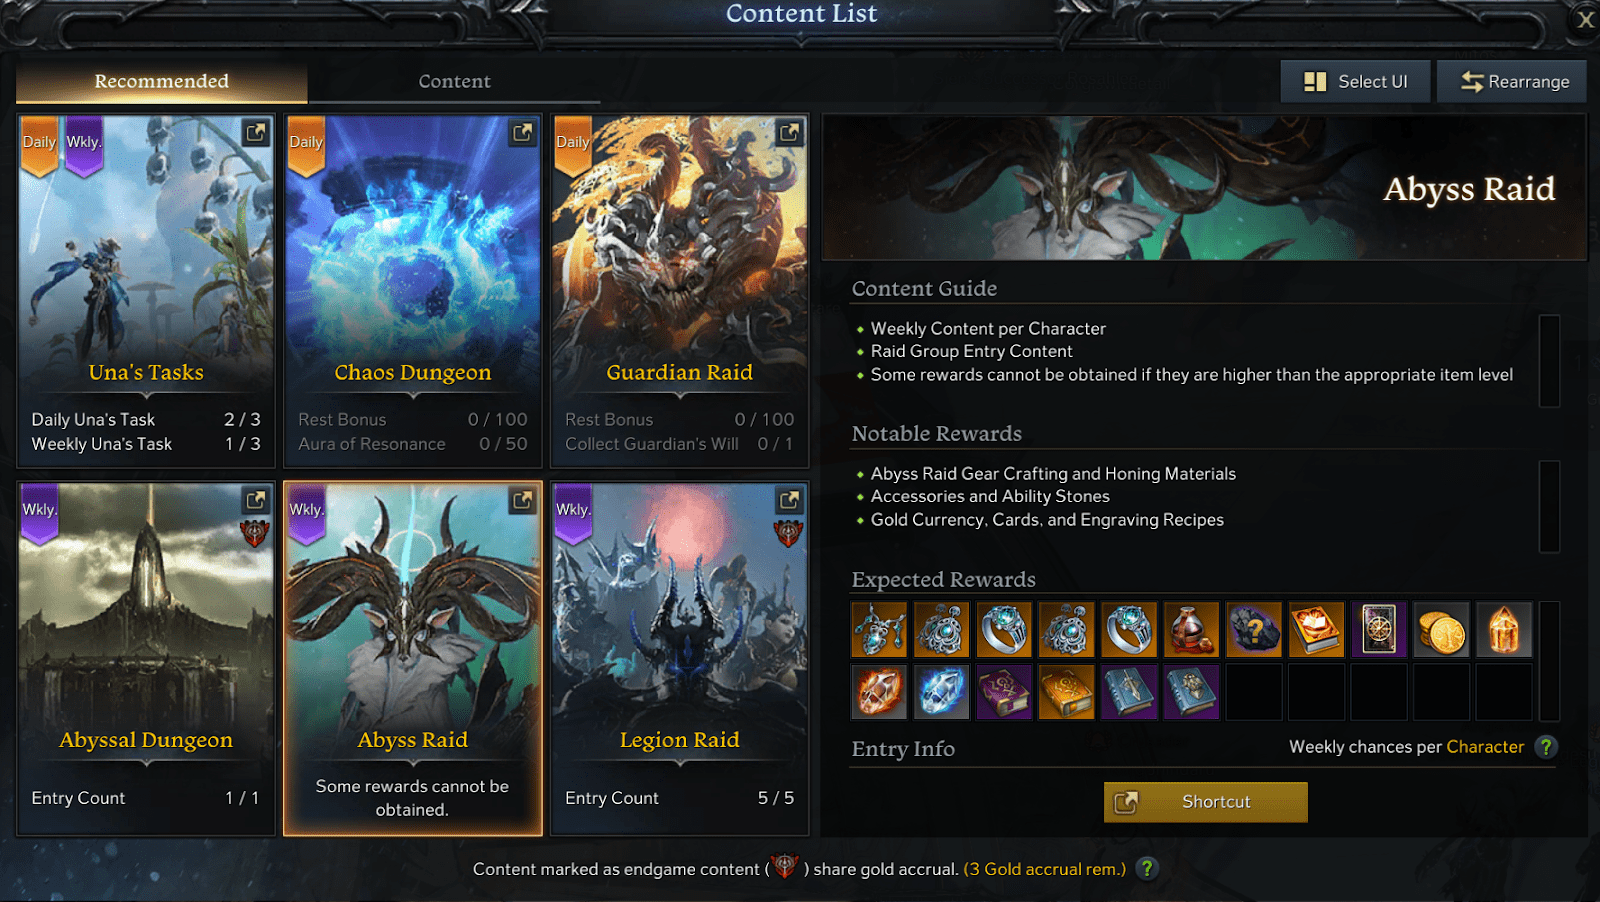
- Guardian Raids are done once per day per character. These are meant to be taken on in four person groups where you’ll be fighting a single boss. You can either use match making or party finder to get a group going. Each guardian raid has specific mechanics you should be familiar with. You may see groups in the party finder titled something like “FPP4D.” This is referring to the order of battle item usage based upon your party number. Common battle items are Flare, Pheromone Essence, Destruction Bomb, Whirlwind Bomb, and Corrosive Bomb. Those lobby titles are acronyms for the type of battle item used in what order. If you match make into a guardian raid, people may call out “1” or “p1” for pheromones. This is the same concept, but instead of using battle items based on party number, they just use whatever they call out.
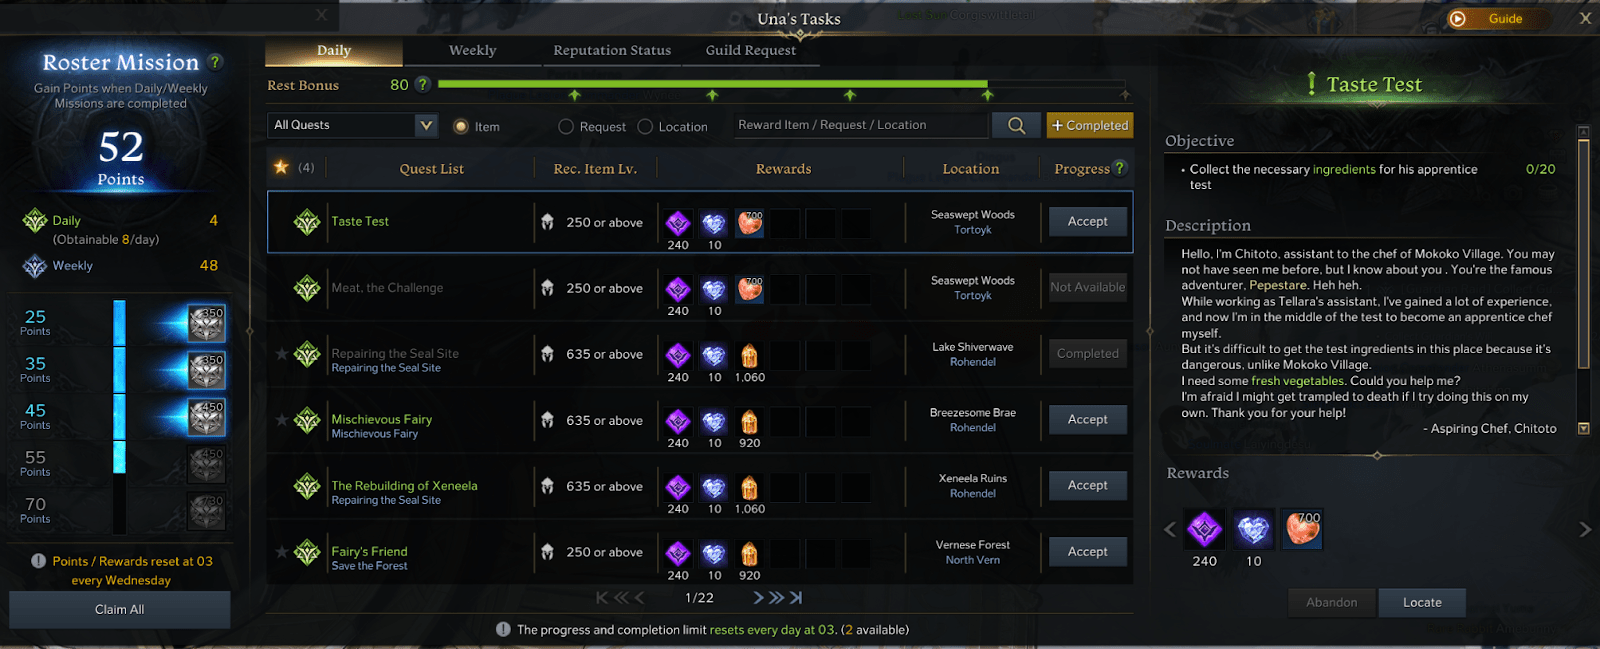
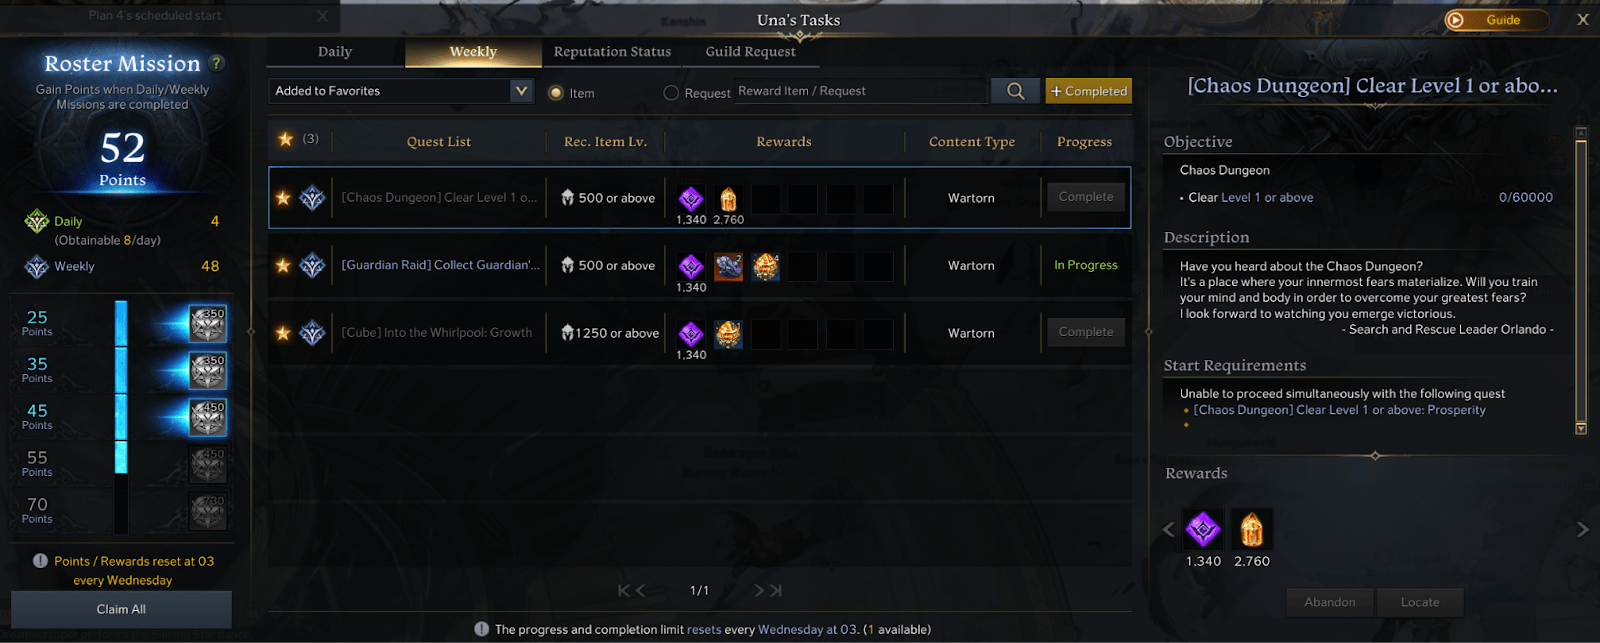
- Una Daily Tasks are simple tasks you can complete three times per character per day. The Una Task menu is accessed by pressing [alt+j] to see and select which Una Tasks you’d like to complete. Una Tasks are also linked to Reputation which many collectables are linked to.
Weekly Content
- Legion Raids give large amounts of honing materials, accessories, and gold when completed. Legion Raids are challenging endgame content that’s either four or eight person.You can complete up to three Legion Raids per week on up to six characters per week for material and (mainly) gold rewards. You can clear more per character if you wish, but you won’t receive gold and some other rewards. Each Legion Raid will have certain mechanics and patterns that must be completed to clear. You want to use Party Finder for this content as it’s more difficult than the other daily tasks you’ve been doing. It’s very important that you learn about Legion Raids by joining a learning party before you start joining random groups in Party Finder.
Note: Certain Legion Raids and Abyssal Dungeons will be altered on September 13th, 2023. The related guides to this content may be outdated until they can be updated by their authors. Beware when finding YouTube videos on these as they might have been made before this change.
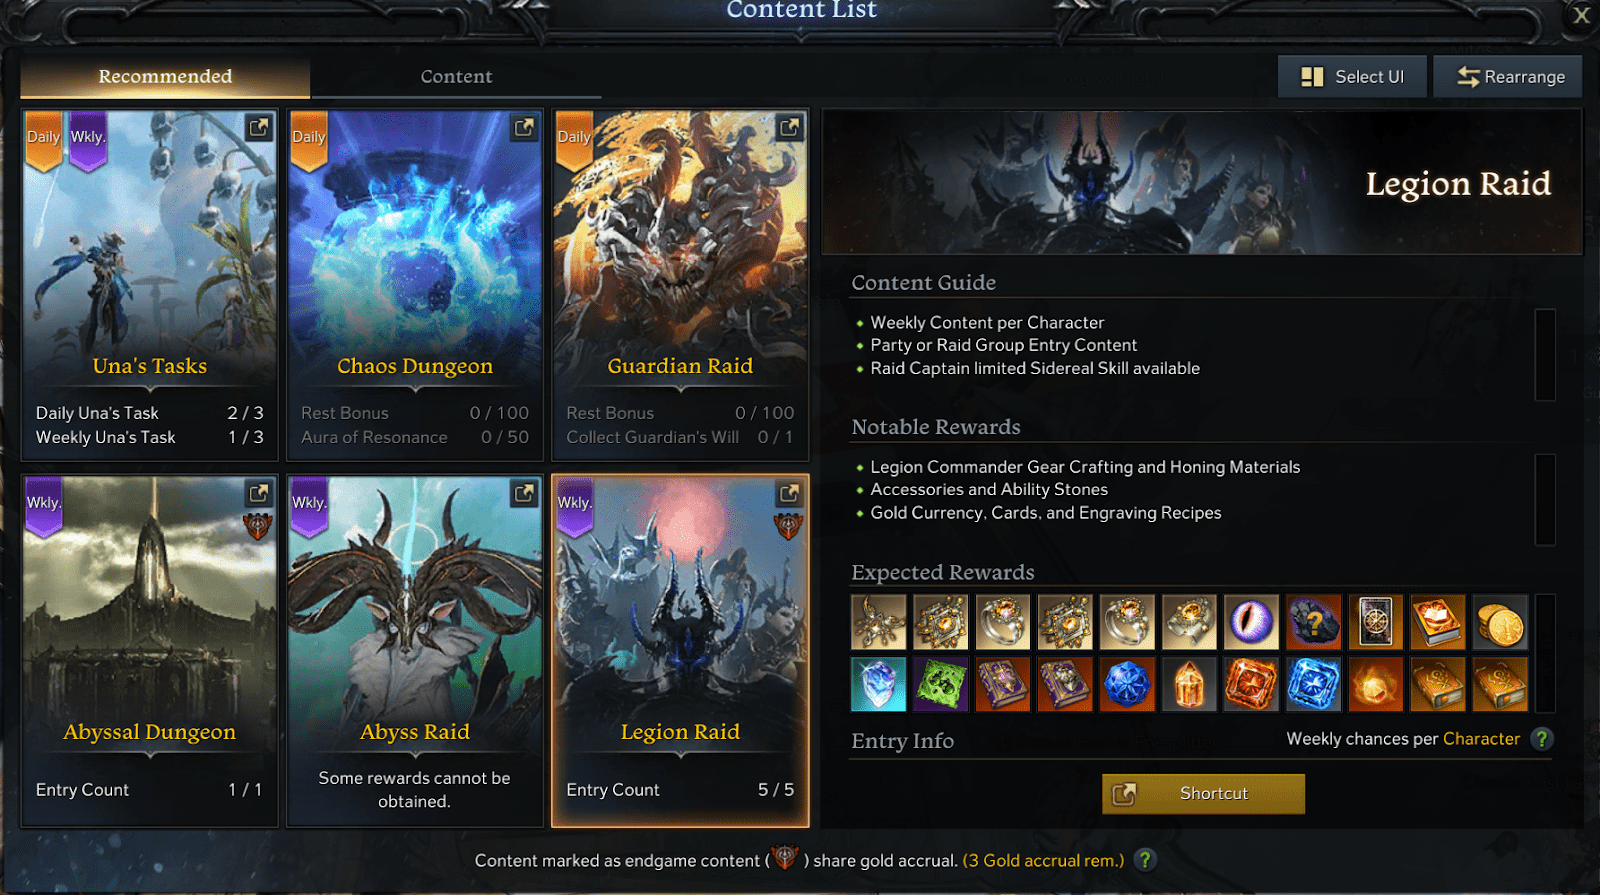
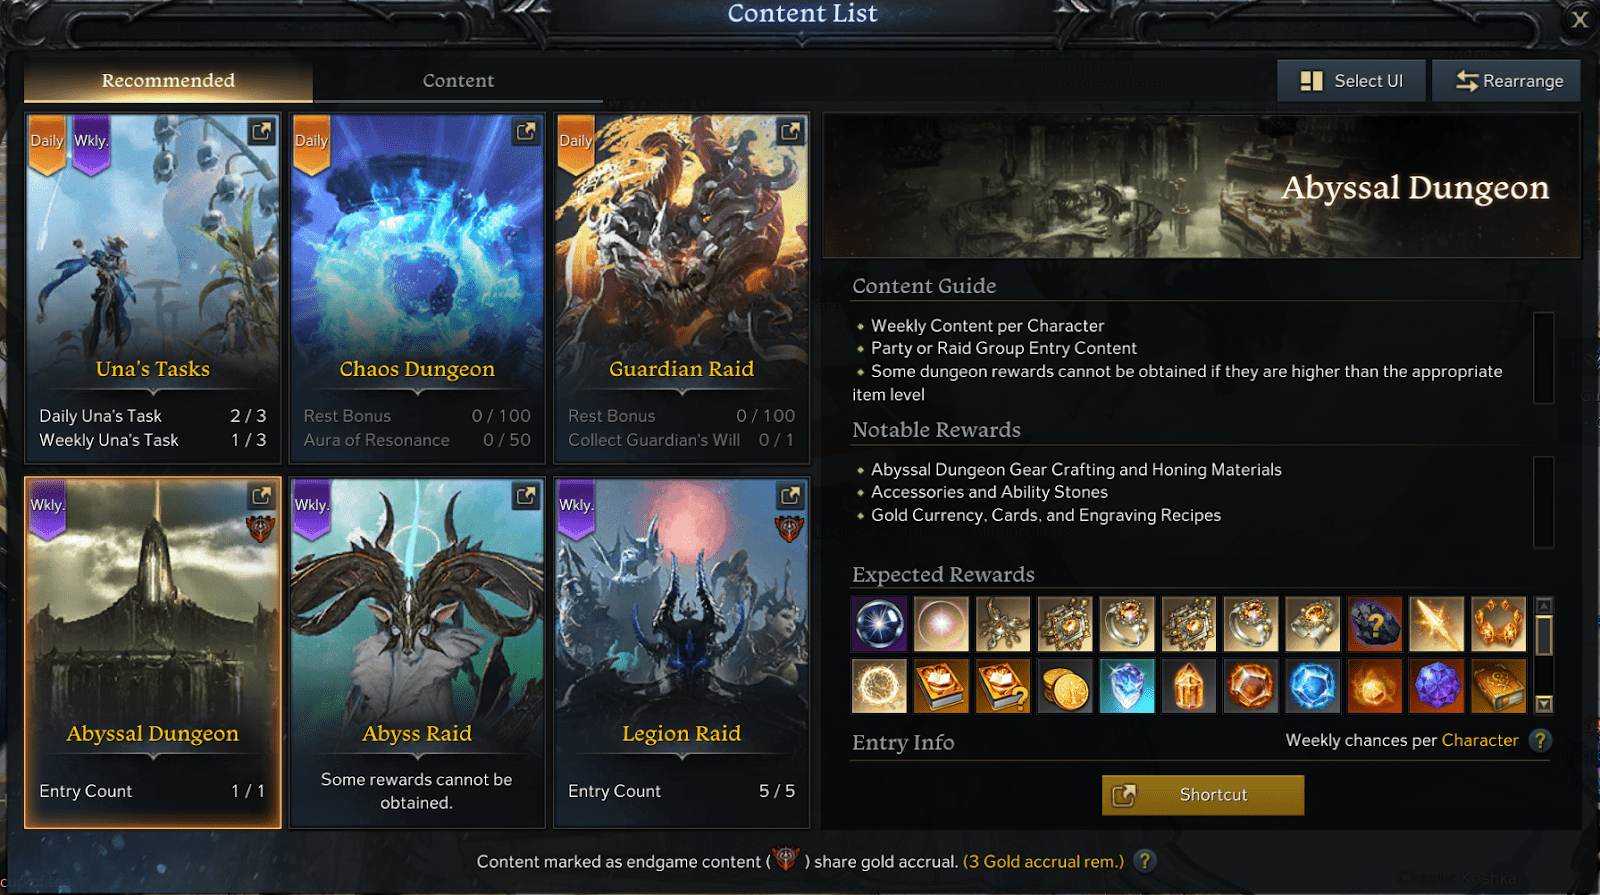
- Abyssal Dungeons are similar to Legion Raids, but are four person content (for relevant ones) and generally mechanically more forgiving. People will still use party finder for this content as it’s still challenging and requires knowledge of mechanics.
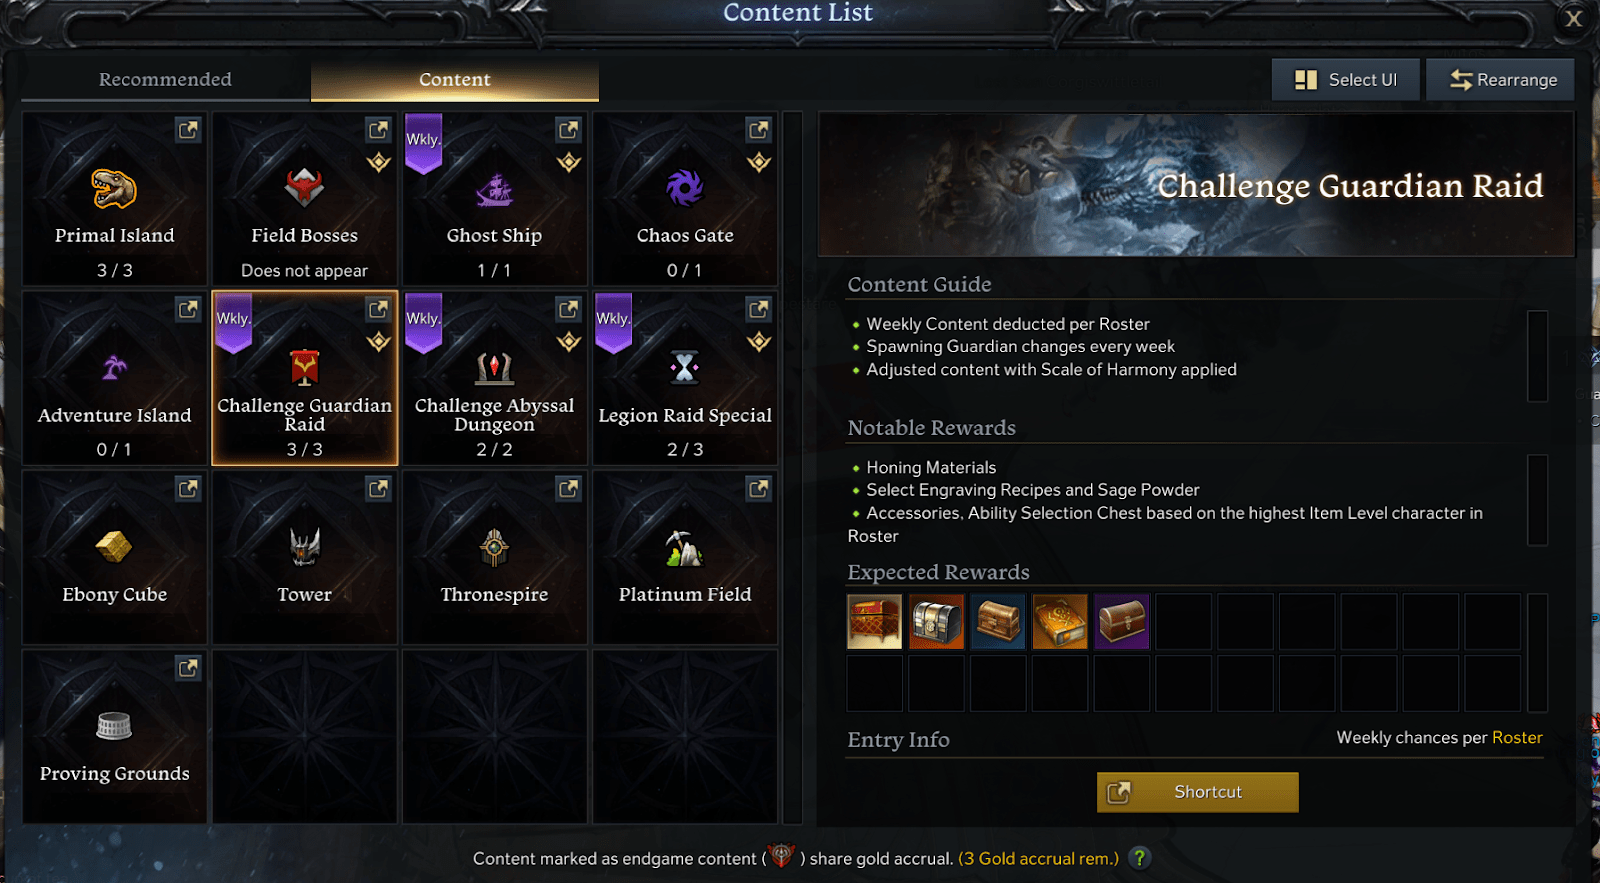
- Challenge Guardian Raids are similar to normal guardian raids you do daily, but they rotate between different earlier ones and are gear equalized. Even though they’re gear equalized, it’s rather easy content to do if you’re familiar with the original guardian raid. You’ll have three to do each week, and just match make them.
- Challenge Abyssal Dungeons once again are similar to their normal ones, but they’re also gear equalized. Same thing as the challenge guardian raids, you want to do both of the challenge abyssal dungeons for the week. Make sure to take a quick glance at the above link regarding abyssal dungeons before you enter. You can either use party finder or match make them as the abyssal dungeons that it rotates between aren’t that challenging.
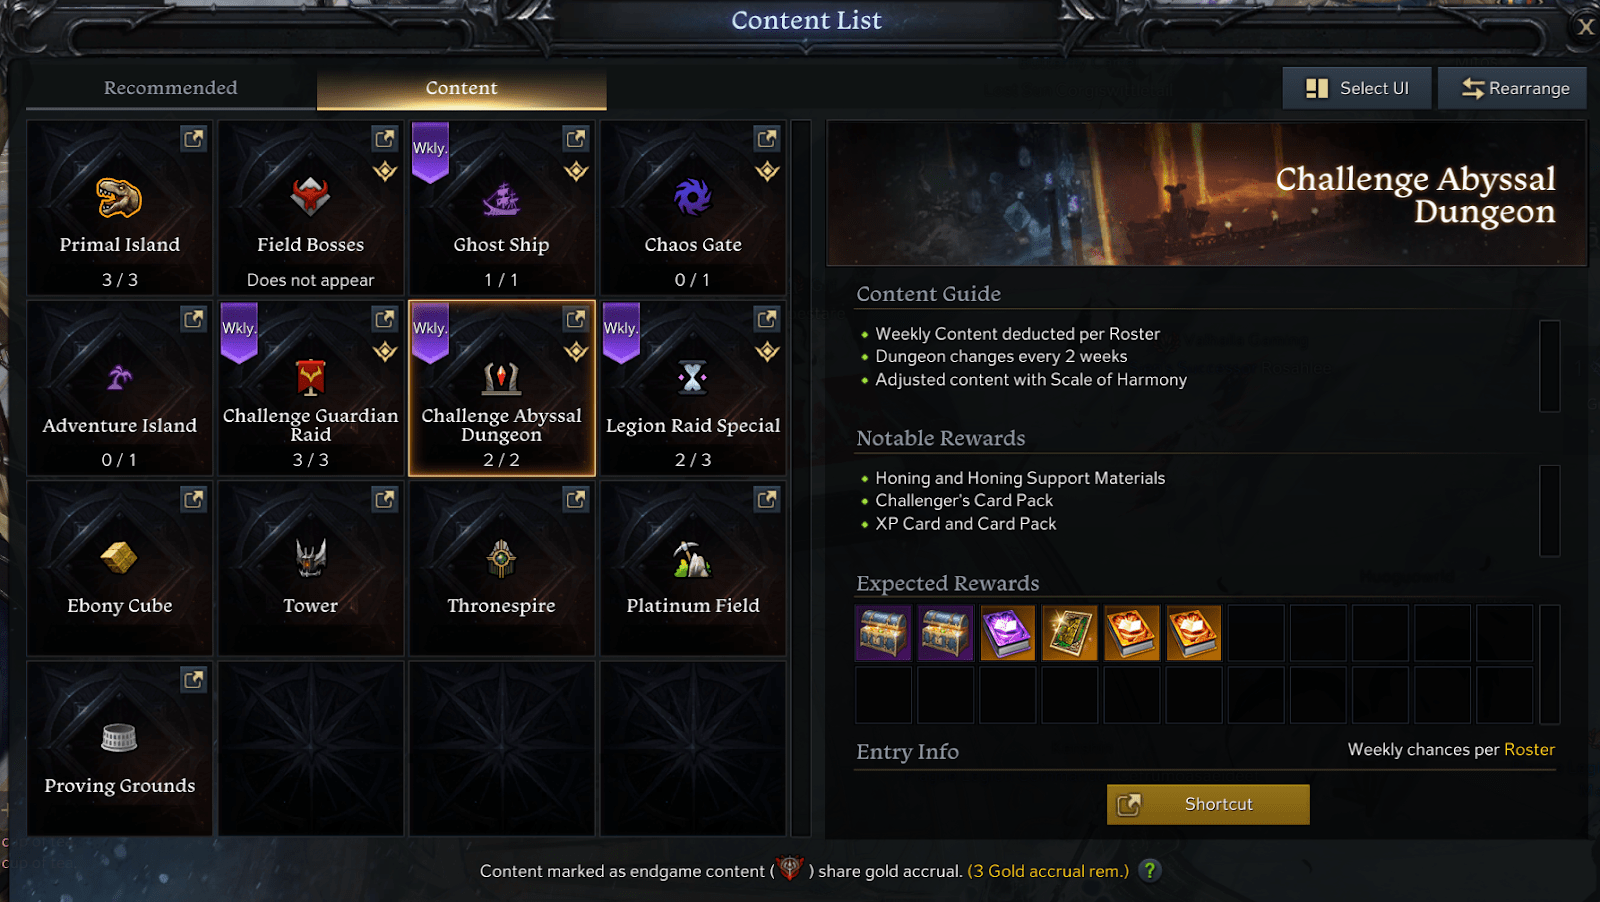
- Weekly Una Tasks are very similar to daily una tasks, just that they’re on a weekly reset rather than daily. It doesn’t really matter which ones you choose since they don’t have a reputation linked to them. Simply choose whatever one gives you the honing materials you need such as Leapstones or Shards.
- Abyssal Raid Argos is finally something that you can do for some extra honing materials and gold. Argos is old content that’s since been replaced by the Legion Raids, but it still is a decent source of materials. Argos does have mechanics which must be cleared, but you likely won’t see most of them as many people are vastly over-leveled for Argos.
Additional Sources
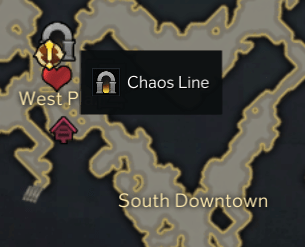
- Chaos Line located in Bellion Ruins, South Vern is a weekly activity you can do to obtain a currency used in the nearby “Blood Magick Stone Exchange” NPC. This NPC will have various honing materials and other items you can buy once per roster. Keep in mind that the boxes containing honing materials will say “Roster Bound” in the top left corner. Only buy and open as many as you need so you can use the rest on alts.
How to Unlock Chaos Line
To open up the Chaos Line, you must do a guide quest first. You’ll find Magick Scholar Jeneca in Vern Castle, North Vern who’ll give you the guide quest needed. Now, speak with Professor Farhat once per week to complete the weekly quest “I Must Protect” to obtain item needed to enter Chaos Line, the Token of Protection.
How to Complete Chaos Line
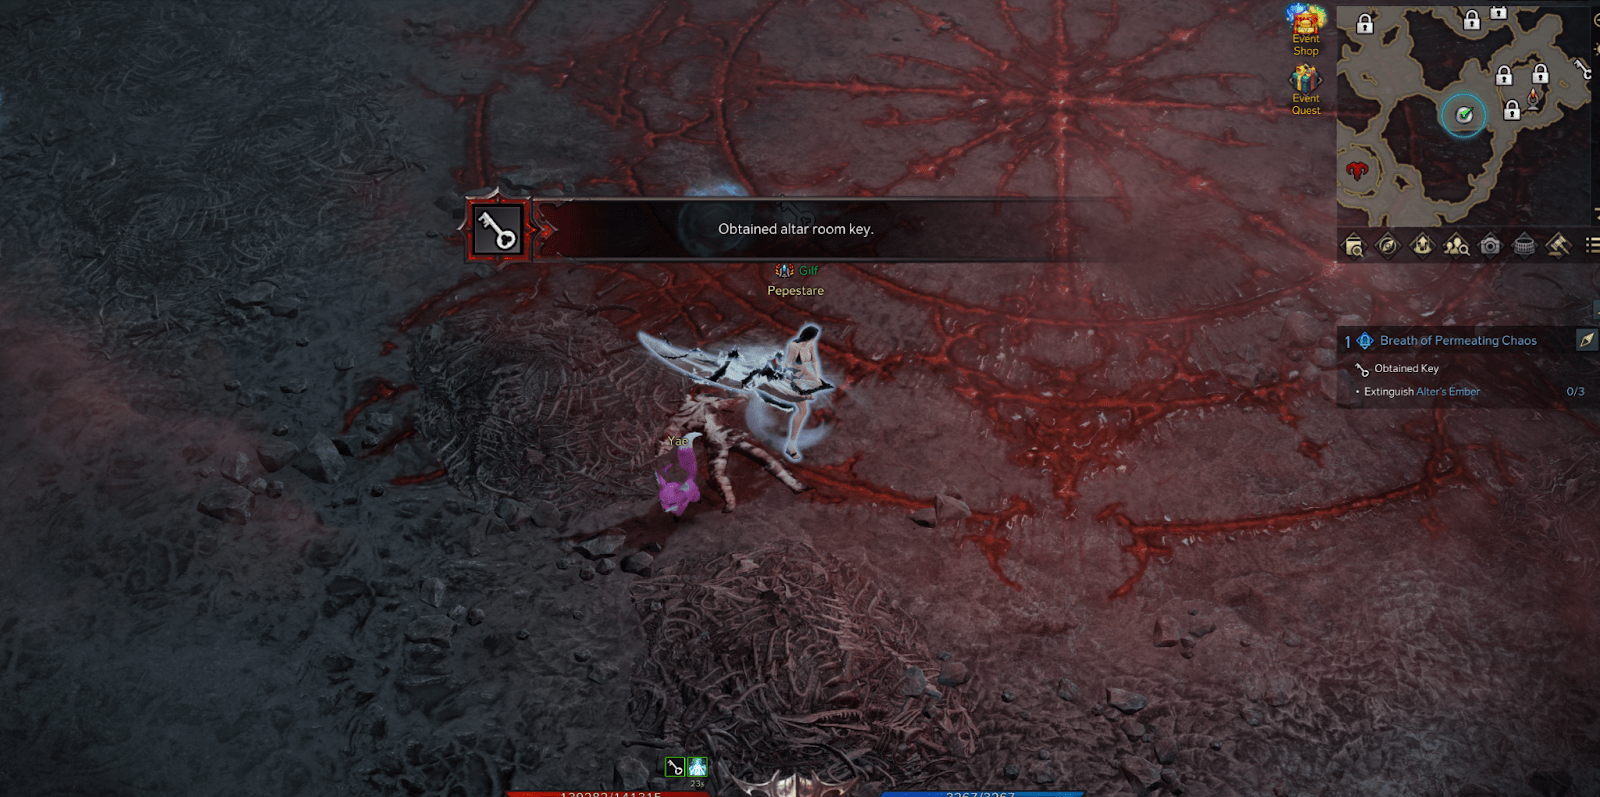
Chaos Line is basically just a Chaos Dungeon with extra steps. It’s very easy AOE content that can be taken on solo. Simply obtain keys scattered around the map by killing a yellow-bordered enemy. Then take those to the locked gate icons on your map. This will unlock the door to fight a larger enemy. Rinse and repeat until all keys are taken and larger enemies behind the gates are killed. This will open up the main boss room.
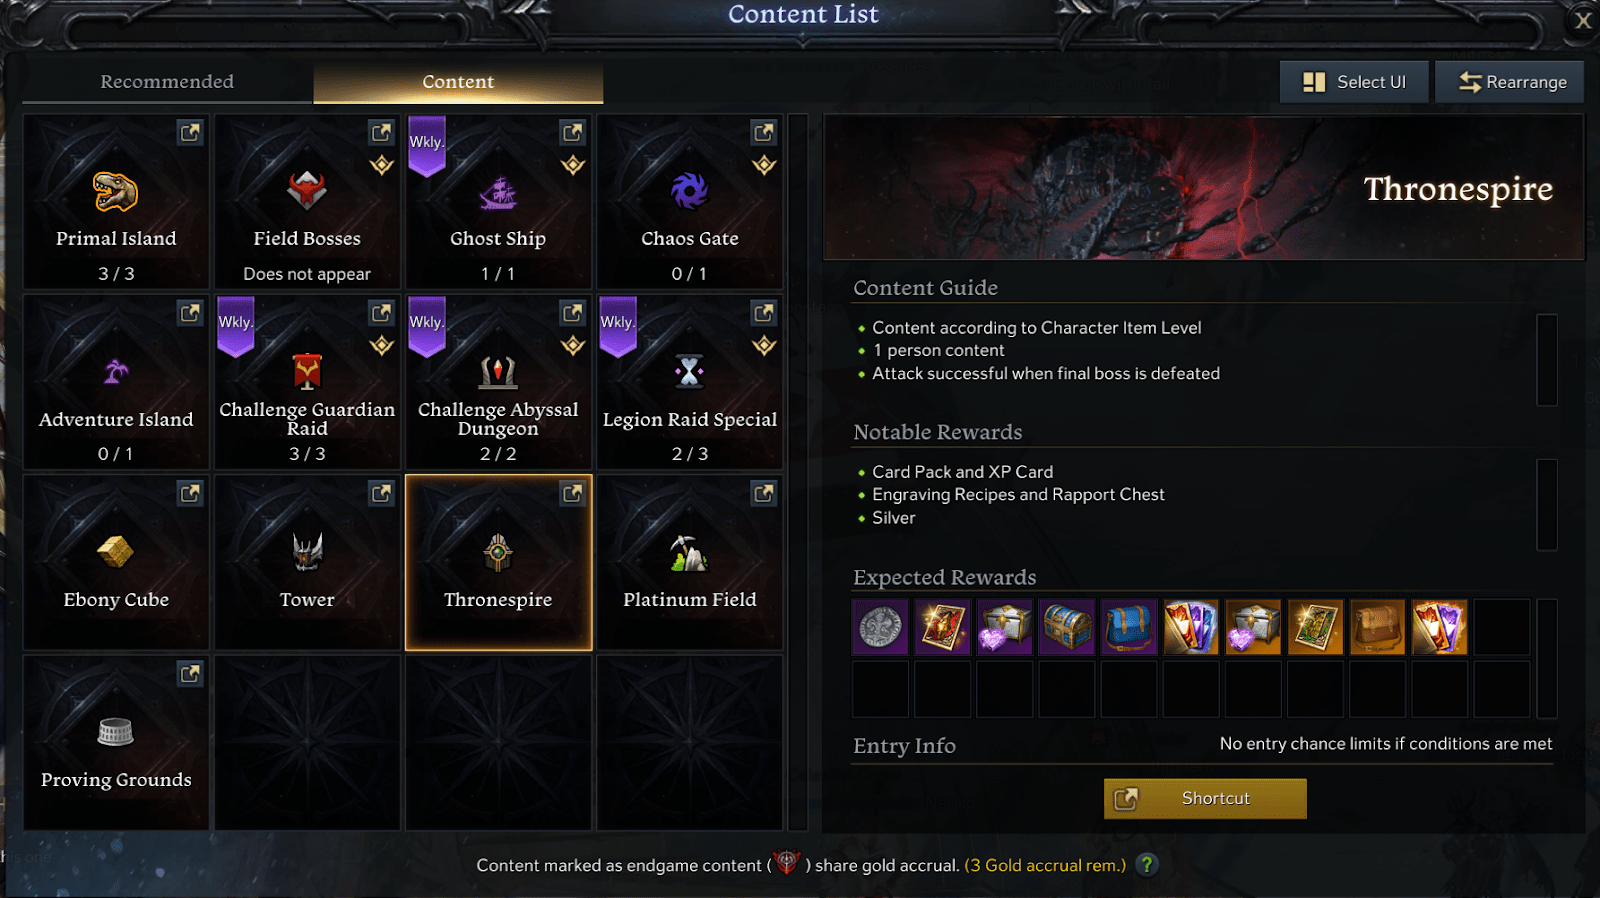
- Thronespire is a generic tower climb that gives rewards for each floor cleared. A unique thing about Thronespire is that you don’t have to clear each floor. You can simply clear the highest floor that gives rewards (floor 25), then obtain all lower rewards as well.
- The Tower is another source of honing materials along with other collectibles. Your first clear of each Tower (Shadespire, Fatespire, and Fortunespire) will award you with some honing materials but mostly collectibles and other items. Each subsequent clear on other characters will award you with honing materials only. Unfortunately, this tower must be completed one floor at a time for rewards.

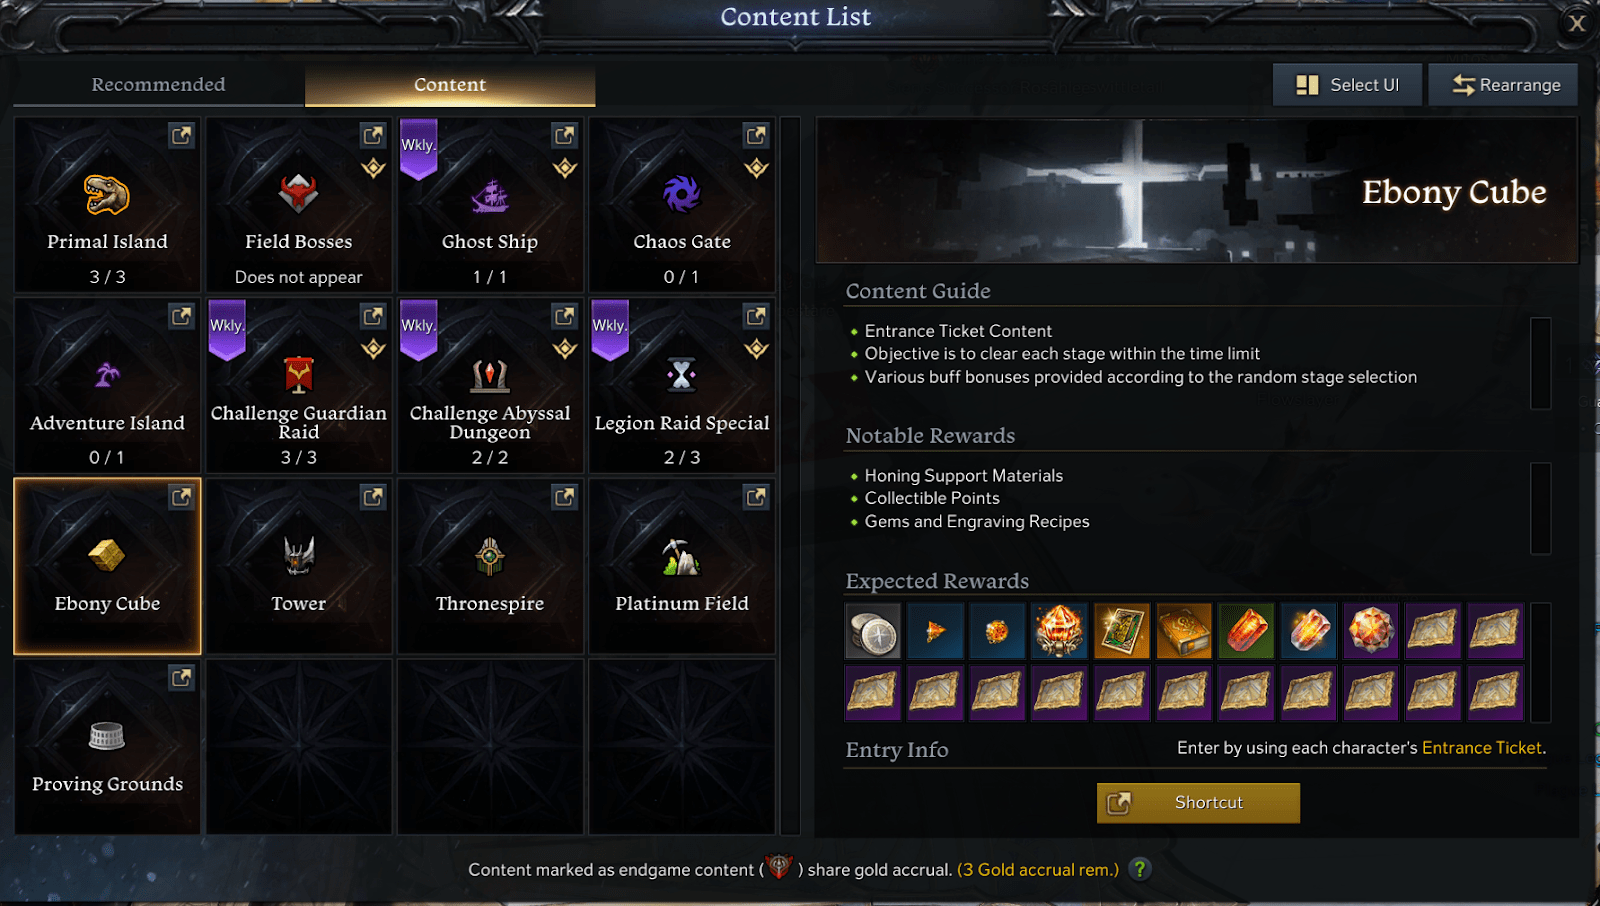
- Ebony Cube is a unique activity that awards gems, leapstones, honing support materials, silver, and more. Ebony Cube can only be entered when you obtain a ticket from the boss in the second room in a chaos dungeon. It’s simply four stages of monsters to fight. Make sure to use your raid class build and match make it. Another thing to note is to grab the Una Weekly Task that awards either Leapstones or Shards before you go in.
Oreha Fusion Materials
You will need a material called a fusion material. These are used in honing tier 3 gear. Events such as a Mokoko Express or Hyper Express will give you some, but not nearly enough. The only way to get these materials is to either craft them in your Stronghold or buy them off the Market [Alt+Y]. Either way of obtaining them, outside of various one-time events, it’ll cost gold. So make sure you have at least 14 gold before you start this section.
Stronghold CraftingVery quickly, let’s go over how to craft them in your Stronghold. You’ll need to first unlock your Stronghold. A song named Song of Hearth and Home will be given to you after you help Thirain in Luterra. You can access this song to teleport to your Stronghold by pressing [F2]. If you don’t have the song (normally after using a power pass), travel to Luterra Castle and look for the purple guide quest “Clark Theo’s Invitation” in your quest journal [J]. You’ll need to complete a series of stronghold guide quests until you complete the quest “Happy Harvesting.” After that, you’re able to craft fusion materials. Inside of your stronghold, you’ll need to research Oreha Fusion materials in your Lab.
There are many different researches, each one giving a recipe that utilizes different Trade Skill [L] materials. Go ahead and research “Oreha Fusion Material (Excavating)” and “Oreha Fusion Materials (Fishing) in your Lab [Ctrl+1] since those use the most common trade skill materials. Now, you’ll need to actually get trade skill materials to craft the fusions.


Be the first to comment