
This guide will go over basic speedrun strategy and the most optimal setups for speedrunning.
Speedrunning Guide to Exhaustive Setup and Basic Strategy
VAR% – Basic Meta
I will begin by discussing indisputable parts of the setup:
- ALL% – The character used for level mode is always Rogue, using the second ability Iaido. The dash is used to move quickly through each level, but is ineffective in combat due to its fixed range and automatic targeting.
- ALL% – There are two usable weapons- FD (Flying Dagger Miss No Doubter) and ENS (Electric Ninja Stars). Flying Daggers were only obtainable in 5.X versions of the game, and holds an advantage over ENS in every aspect except boss killing.
- ANY% – If you choose to use ENS, Weapon Attachment vouchers greatly enhance them. The best attachment to use is the Ammo Clip, but you can opt to use an energy stone for one of them to help with cost.
- ALL% – The best pet to use is Pudding, giving a movement boost every 8 seconds at max affinity.
- ALL% – The Magic Well helps with energy restoration with no drawbacks and is not banned.
- ANY% – The Holy Statue gives you a random statue buff. The best one for level mode is the Thief buff, which pulls enemies in and gives a movement boost.
- ANY% – The best jewelery to use is the Fluorite Ring if you use FD, and Balrog Bones if you use ENS.
- ANY% – The Fish Tank can be used to feed the garden pet. This may unreliably land a finishing blow on an enemy on the other side of the room, and drags enemy attention away from the runner. This can have a mixed effect depending on your challenge modifiers and clearing ability, and it is best not to use it unless you can die easily during your runs. Overall, the garden pet and fish tank have a minimal impact on the run.
A couple other points require further discussion and are discussed later in this guide:
- ANY% – Daily Challenges from the Officer as well as Challenge Vouchers and event exclusive Gashapons can have a massive impact on your run. The tier list and explanation can be found in the challenge modifier section of this guide.
- ANY% – The Vending Machine gives you a random drink. The tier list and explanation can be found in the drink section of this guide.
- ALL% – The Garden is the most important part of the speedrun apart from character and weapon selection. The various setups and explanation can be found in the buff and garden section of this guide.
VAR% – Obtaining the Setup
- ALL% – Rogue can be purchased and upgrade for gems. The ability we use, Iaido, must be purchased for real money or can be temporarily unlocked with Free Trial Vouchers.
- ALL% – ENS are unlocked at the forge table with its blueprint. FD was only obtainable from Mythical Weapon Crates for Season Coins during 5.X versions of the game. The only way to use FD if you do not already have it is by downloading an APK and emulating, which will be discussed later in this guide in the version strategy section.
- ANY% – The Daily Challenge comes from the Officer. To lock a daily challenge forever, complete it and upload your save to cloud without claiming the rewards. If you wish to do this, be aware that you will not be able to complete new ones for rewards while having it locked.
- ANY% – The Holy Statue, Magic Well and Vending Machine can be crafted from their blueprints found in game.
- ALL% – Pudding can be purchased with gems.
- ANY% – Weapon attachment vouchers can be found in game or purchased with gems.
- ANY% – Challenge vouchers can be found by playing Matrix mode.
- ANY% – Jewelery can be crafted with materials found in Origin mode.
- VAR% – You can only use the 5 F2P garden slots for restricted runs. The rest are purchasable for real money. Seeds can be found in game, purchased for gems, or dropped by specific bosses. Check the wiki for specific seeds. Seeds from Travelogue of Rosemary Island were only obtainable in 5.X versions, and are now non-renewable.
- ALL% – Due to the extremely expensive and time consuming nature of speedrun setups, cloud save is heavily abused before and after runs. Dedicated speedrunners often upload the speedrun setup garden to cloud.
- ANY% – The Holy Statue does not reset its buff until you finish a run by beating the game, dying, or ending and calculating a run from the main menu.
ALL% – Introduction to Movement
If you are not engaged in combat, you should almost always be moving with Iaido. When you first spawn into a new floor, dash once to the hallway, and then twice through the hallway. Be aware that you cannot dash through a gate. Similarly, all other hallways only take two dashes to move through. Do not dash to the portal because the dash is too long.
Check the map on the top left when you enter a room. Make your way to the exit you choose as you clear the room to avoid wasting dashes. However, if the room is bigger, it may be best to stay until the middle of the room as you clear and then dash to the exit you choose after the room is finished.
Some rooms in the dungeon are optional. However, it is not immediately obvious which room leads to the portal when you are faced with multiple choices. If you look closely at the map border, you will notice that the map does not have even padding and there is a bigger gap between certain rooms and the map border. The room that leads to the portal or boss always has a bigger gap between it and the border of the map.
When you begin speedrunning, you will find it very hard to move both accurately and quickly. This improves over time, but if you continue having difficulty with movement, you can switch to 4D or 8D movement instead of omni-directional. This is controversial among top runners and should be chosen by preference.
Certain rooms have large amounts of boxes or unbreakable walls that take up important spaces in the room. In such cases, it is best to play closer to the exit you choose and use dashes inbetween waves to help you move through the room, or if you run IGT you can reroll the floor entirely.
Boss rooms are more difficult to get used to in the later versions. Dash straight to the boss to get into melee range. After you finish killing a boss, the portal is inbetween the center and left wall on glacier (sometimes), on the top for any 3-5 level, and in the center of the room everywhere else.
You may find that it is easy to take damage or even die to explosive barrels in a speedrun. Firing your weapon while you are dashing through a hallway should detonate any of the elemental barrels before you enter the room.
In 2-5, the spawn room is bigger and the top and bottom are not visible. If the hallway is not on either the right or left side, walk a little bit either up or down to see where the hallway is and then dash once you have determined the correct direction.
Try not to be directly against the wall inside of a room, because there are sometimes torches or other unbreakable blocks beside each door that you will get stuck on.
Walking through a door is better than dashing when you are extremely close to it. Having the Dwarfism challenge condition or Pudding extends the range at which you should do this.
If you are submitting a multiplayer speedrun, do not move until the host has loaded in.
ALL% – Introduction to Clearing
Thrown weapons have a firing rate that is only capped by their reload speed, giving them the second highest DPS ceiling in the game to barehanded attacks and making weapons like FD and ENS the best AOE weapons in the game. ENS also naturally bypasses walls and FD does as well with the Bullets can Bounce buff, allowing for almost instant wave clears.
When there is a living target, simply tapping the switch button will fire your weapons. However, if there isn’t, such as inbetween a wave or in a hallway, you can prefire a room by hitting the regular fire button.
Prioritize and prefire enemies that are the furthest away from your chosen exit, and clear as you move towards the exit.
Prioritize and prefire enemies that have shields or iframes. Some biomes are avoided entirely because they spawn too many of these enemies.
When you fight a boss, get into melee range and spam both the fire and switch buttons. This does both the barehanded attack and fires the weapon, and is the fastest way to kill a boss.
Change your controls in a way that will optimize your CPS/TPS for simultaneously switching and firing, or in a way that makes it comfortable for you to tap them nonstop for 3-6 minutes.
If you have a bad CPS/TPS like me, you can use both hands to kill a slowly moving boss
(one for firing and one for . However, faster bosses like any of the knights may move away from you before you kill them, so this is situational. Using a claw grip to switch and fire is ideal, as it frees up your movement hand.
If you lose all your shield, take advantage of the fact that you can ignore walls and sit behind hard cover for the remainder of the room if you feel that you are at risk of dying.
Breakable box art rooms are difficult to clear with ENS. These are rerolled entirely by most prominent IGT players, but if you run RTA or already used the reroll then you can use dashes to break them. Properly buffed FD has no problem clearing box art rooms on its own.
ENS has a shorter range and slower projectile speed, so it is best to play around the middle of larger rooms if you have enough dashes to do so.
In larger rooms, your character might not target an enemy on the opposite end of the room if both you and the enemy are on an edge of the room. This is especially a problem for ENS. Try to play in the middle of big rooms or reroll them entirely if you play IGT.
If you know a room will have multiple waves (bigger rooms always do), you can use a dash to trigger the thief statue ability to help you clear faster. It isn’t recommended to use Iaido as a combat ability in any other case, unless you are in a bullet hell and on low HP.
Be careful when spamming the regular fire button on forest, as it could result in sacrificing your weapon if you stand near an offering totem after finishing a room.
VAR% – Rerolling
- ALL% – You can reroll a floor by pausing, exiting to the main menu and continuing the run.
- ANY% – If there is no point in pursuing a run, you should abandon it by double rerolling so that you still get the Thief Statue buff from the Holy Statue on your next setup.
- RTA% – You should never reroll unless you get an unplayable biome, you are only running to submit Individual Levels, or you are at 3-5 on a vampire run with an elapsed time that is too close to your PB to actually finish the floor. You should never reroll during a multiplayer run.
- IGT% – You can reroll almost any play that you don’t like. Here are a couple reasons to reroll:
- Unplayable biome
- Accidentally entered an optional room
- Bosses with too many iframes (sandworm, varkolyn leader)
- Boss started healing (either of the crystal crabs)
- Breakable box art room
- Floor other than X-1 had too many rooms with 2 or more waves
- You want to try to roll a vampire, this is most commonly done at the portal
- You sacrifice a weapon in forest
- You get an unplayable challenge condition from Officer NPC, this is discussed later
- You are only continuing the speedrun for Individual Level submissions, and the floor had rooms with more than 1 wave
- ALL% – Be in mind that you only get one reroll per floor, and abusing bugs to get another reroll in any category is not allowed. Rerolling your death is also not allowed in any category.
- IGT% – Even if you plan to reroll after reviving, let the animation play first and revive before doing so to avoid disqualification.
RTA% ANY% – Version Strategy
The best version to run ENS is 3.1.12, which offers the most bug fixes and parts of the setup checklist before Neo Isle is added into the game.
The best version to run FD is 5.0.3, which is after the optimization and before the nerf of the weapon. Running earlier 5.X versions caused the game to drop below 1fps with a good FD build, allowing Griff to get his record runs, and this strategy is now banned for IGT, causing a leaderboard reset.
Latest versions sometimes offer helpful content- in some versions, such as this one (6.0.0.10) have a event that allows challenge conditions to drop from the gashapon machine.
ALL% – Biomes
See the tier list below:

Glacier is the best first world simply because the others are worse. The only drawback is the possibility of getting frozen, which is easily prevented by basic dodging and fast clearing.
The drawbacks of Mechanical Ruins are the enemies with shields and the cutscene on the 1-5 boss. This results in a guaranteed time loss for both IGT and RTA players.
Forest has the most multi wave rooms compared to any other first world, and you can sometimes accidentally sacrifice your weapon. Forest should be avoided for RTA.
Relics is unplayable because of the amount of enemies with iframes and the statue enemy that only spawns when you go within a certain range of it. It is also immune while it falls off the statue for about 3 seconds and does not take damage like a normal enemy.
- Knight Kingdom is the best second world and has no drawbacks.
- Dungeon enemies have slightly more HP.
- Chisletown is unplayable because all enemies and bosses have more HP and the rooms are significantly bigger.
- Halloween is unplayable because of Phantom King and the amount of enemies with iframes.
- Spaceship is the best third world, and the only drawback is Varkolyn Leader.
- Volcano enemies have slightly more HP, and Sandworm is almost unplayable.
Neo Isle is absolutely unplayable because of the amount of unbreakable walls, freeze AOE, and bosses that do not take damage normally. Swamp, Grave, Cave, and Monolithic Range Ruins are optional and should not be played in a speedrun. There are currently no categories that require Monolothic Range Ruins.
ANY% – Drinks
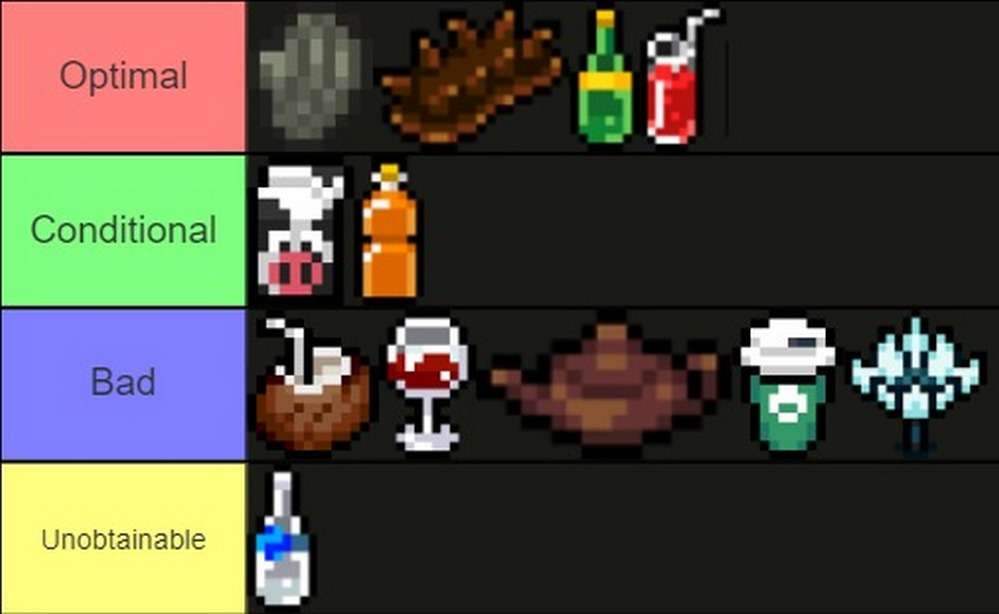
For FD, the tier list is as follows:
For ENS, it is slightly different:
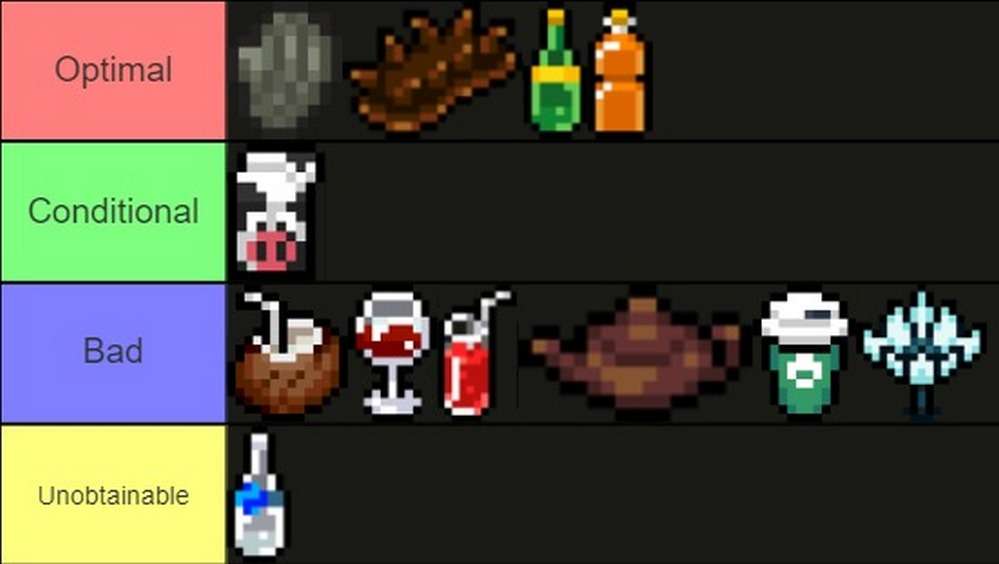
Clams are obtained through fishing in the magic well and provide a 20% speed boost. Yummy Sea Cucumbers are obtained the same way and increase projectile velocity by 20% while decreasing accuracy. However, neither ENS nor FD are affected by accuracy.
Soda provides 25 CD reduction (points, not percent, check the wiki for details) and drops from the vending machine. Bloody Mary provides 8 crit chance and drops from the vending machine. Crit hits are only important for FD, as almost all of ENS damage comes from its electric burst.
Orange Juice increases the energy cap by 40 and drops from the vending machine. FD does not have an energy problem, but Cold opted to use an Orange Juice for his record run.
- Milk increases the defence by 1 and drops from the vending machine.
- Snow Lotus, Coconut Milk and Wine are obsolete because of milk.
- Buff picking time is counted for all categories, so Tea is often a time loss.
- Coffee provides a firing rate bonus, which is useless for both FD and ENS.
- The Amnesia Potion is unobtainable in the lobby.
There is a very low chance of obtaining Clams and Yummy Sea Cucumbers, so do not abandon a setup if you don’t get them. You should not go to optional rooms to buy drinks, drinks have a very small impact on the run.
VAR% – Buffs and Garden
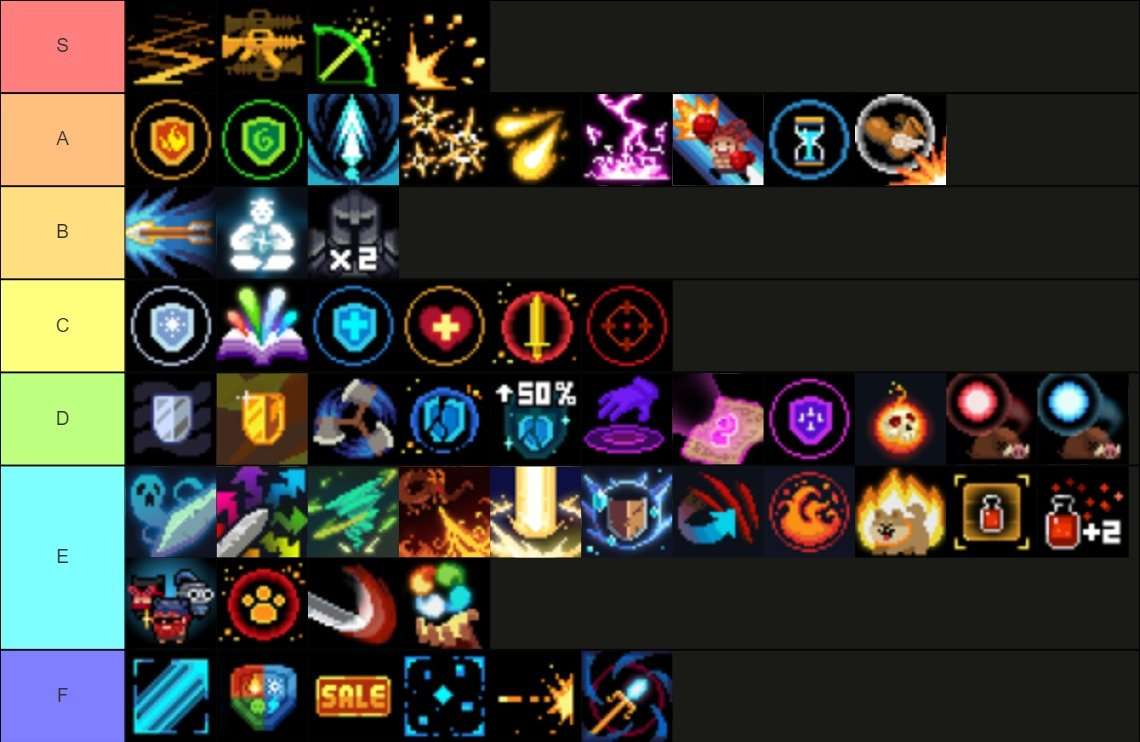
ALL% – For FD, the buff tier list is as follows:
ALL% – For ENS, the buff tier list has some major changes:
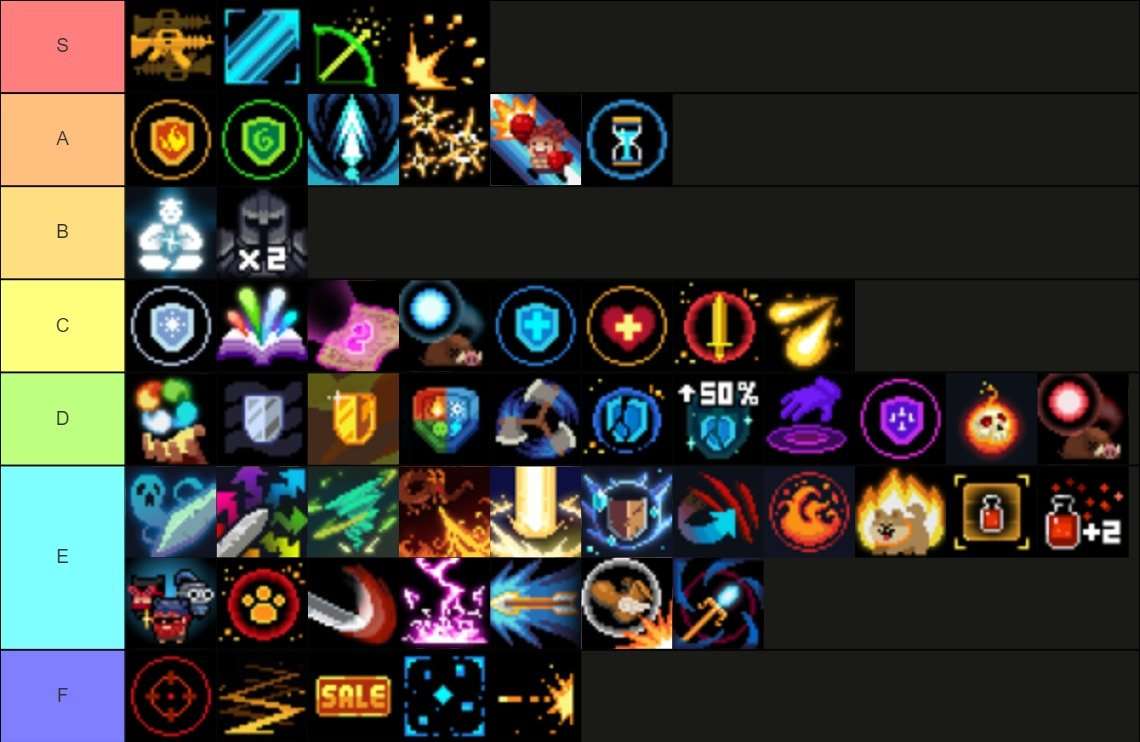
ALL% – Buffs were placed based on their benefit and the amount of times the buff is used. The use for every buff and its value is explained below.
- Bullets can bounce allows FD to bypass walls, but is useless for ENS which does naturally.
- The third weapon buff is the strongest buff for both weapons because it greatly increases the DPS ceiling.
- The laser buff greatly increases the damage of ENS, but is useless for FD.
- The charge rate buff greatly increases the reload speed of both weapons.
- The shotgun buff increases the projectile count for both weapons.
Fire and poison immunity make volcano and spaceship playable, as well as reducing your chances of dying to almost zero unless you have the Max HP = 1 challenge condition.
The each skill use increases damage by 10% buff is great because of how often you will use Iaido and is a massive increase to a good setup.
- The increased combo hit buff gives you an extra charge of Iaido.
- Kinetics is a great buff for both weapons because of how quickly and often you move.
50% of firing another projectile on ranged hit but not ENS because ENS rarely comes into contact with an enemy before killing it except during boss fights.
Crit rate buff and crit hits summon lightning, accuracy and crit rate buff, guaranteed crit if enemy is full HP, and movement boost on crit hit are good for FD, but not ENS which almost never crits because it rarely even comes into contact with enemies.
- Skill CD down helps you get dashes back faster.
- Qi-gong is extremely good for boss killing.
- The statue triggers twice buff is good because it triggers the thief statue effect twice.
Freeze immunity and block one elemental effect every 8 seconds are only good for glacier runs, but allows you to be less careful during them.
No extra damage taken when shield is broken, increase max HP, steal HP on kill, +1 armour, gold shield, radial blast when armour broken, and regen shield when you lose half of it are good defensive buffs overall, but are almost obsolete with immunities unless you have several defensively nerfing challenge effects.
- Chance to restore armour on debuff is a defensive buff only useful for ENS.
- Melee bounces bullets and whirlwind attack every 4 melees are only used for boss fights.
- Energy drops from kills and max energy +100 solve the energy problem for ENS.
- The cycled elemental buff provides a nice bonus to ENS sometimes.
Pickup radius and slowing enemy projectiles makes it easier to dodge and stacks well with the other less useful buffs.
Trap and collision immunity only is useful for specific enemies, or for not dying to traps if you are significantly defensively nerfed because of challenge conditions.
- Enemies explode on death might be a nice bonus for dense rooms.
- The Travelogue of Rosemary Island plant buffs are bad because they take up garden slots.
Critical hit on HP loss, fire rate buff, either follower buff, potions from boxes, and potion effectiveness buff are almost entirely useless because of how little they are triggered.
Elemental bullets deal double damage on crit is completely useless for FD and almost never triggered on ENS.
- Extended melee range is more counterproductive than helpful.
- Trader sale, more gems, and crit bullets pierce enemies are completely useless.
- Based on the tier list and reasoning above, the optimal garden setups are:
FD ANY% – Watermelon (Charge Buff), Binary Tree (Shotgun Buff), Mirror Flower (Bullets can Bounce), Mandrake (Poison Immunity), Dragon Fruit Tree (Fire Immunity), and 3 Fantastic Flowers (chance to get Extra Weapon Buff and A tier buffs)
ENS ANY% – Watermelon (Charge Buff), Binary Tree (Shotgun Buff), Radar Flower (Laser Buff), Mandrake (Poison Immunity), Dragon Fruit Tree (Fire Immunity), and 3 Fantastic Flowers (chance to get Extra Weapon Buff and A tier buffs)
FD RES% – Watermelon (Charge Buff), Binary Tree (Shotgun Buff), Mirror Flower (Bullets can Bounce), and 2 Fantastic Flowers (chance to get Extra Weapon Buff and another A tier buff)
ENS RES% – Watermelon (Charge Buff), Binary Tree (Shotgun Buff), Radar Flower (Laser Buff), and 2 Fantastic Flowers (chance to get Extra Weapon Buff and another A tier buff)
ALL% – It is best not to pick buffs mid run because it is a time loss for all categories, but if you choose to you can use this tier list for reference. Buffs are also sorted in each rank against each other, the leftmost side being the best and the rightmost side being the worst.
VAR% – Challenge Conditions
ALL% – The tier list for FD is shown below:

ALL% – The tier list for ENS has some major changes:

Dwarfism/Shrinkage provides a great movement boost and is used by virtually every top runner that had challenge conditions.
- Dagger Frenzy greatly increases the damage of FD and is almost useless for ENS.
Muscle Booster is great for FD, which receives a damage buff that greatly overpowers the charge loss, but is a complete nerf to ENS because the damage buff is only on contact.
Similarly, Speed Booster has the reverse effect. ENS receives a great charge buff with almost no drawback, and FD just gets its damage halved.
- Halved cooldown halves the cooldown. It’s very hard to explain the benefit, so I won’t.
- Killing Spree provides a pretty great damage boost that is almost always at max stacks.
Meridian Patency is great for ENS and better for FD- it provides crit buffs, attack speed, movement speed and health. This challenge is banned in RES%.
- Crate Mutation can get rid of normally unbreakable blocks and drops some nice things.
- Feral and Sprinting Enemies basically baits the enemies towards you to get killed faster.
- Infinite Energy solves the energy problem for ENS.
- Extra Choice reduces the amount of buffs you get, which is a time save.
Genie Lamp and Sales Day create chest and special rooms which help prevent you from going to the wrong room as they are shown as optional on the map.
- Regeneration and Revive Me are great for run safety.
- Gigantic Pet will most likely never be useful, but it definitely doesn’t hurt.
You should be moving way too fast to get hit by the tracking laser. You’ll probably clear too fast for it to hit anything too, but there’s a better chance of it hitting an enemy than you.
Attachment Master, Beastmaster. Mythical Artifact, Good and Bad Luck, Buff Bullet, Exorbiant Price, Multiple Statues, Inferior Medicatement, Wild and Vigorous Enemies, and Bomb Chest have no effect or are almost never triggered.
Time Fluctuation, Deja Vu and Config Error are good or bad depending on the result that you get from them. Time Fluctuation and Config Error are better for IGT% as you can reroll anything bad, and Deja Vu is better for RTA% as it lets you run the same floor over and over.
- Shell Protection really depends on how often and hard you get hit.
- Precision Booster severely decreases the damage of FD and has almost no effect on ENS.
- Energy Decay almost completely stops you from prefiring ENS but almost never effects FD.
- Imperception and Nearsighted hide info from you (the runner), which is bad.
- Weapon overheating doesn’t really happen, but isn’t a good thing if it does.
- Extra buff and Exceptionally Tanlented are time losses most of the time.
- Black Fog basically creates poison everywhere that you can’t gain immunity from.
- Full Alert spawns more Champions and Champion Bosses, which really sucks.
- Lone Wolf takes Pudding away from you.
- Fragility is really annoying unless you run Gameover%.
- Elemental Anomaly can result in you getting frozen, which is a big time loss.
- I don’t care how fast you can kill bosses, Boss Duo is a time loss. Stop arguing about this.
You should only accept a daily challenge with Tough Enemies if it has many great buffing challenges and no other drawbacks. Tough Enemies increases enemy defence.
- Double Cooldown and Gigantism severely slow you down.
- Cell Division, Double Joy (to who???), One Hand, and Blinking Enemies make it unnecessarily hard to clear.
- Dungeon Expansion is bad because it expands the dungeon (absolutely crazy).
- Strength in Numbers increased wave and large room count when I tested it.
- Reforge Weapon, Melee Only and Multiple Personalities destroy your setup immediately.
- Meridian Disorder makes you one hit to almost everything. This is banned in RES%.
- Sleepwalk has it’s own category on speedrun.com.
ANY% – Lock a daily challenge with at least one S tier and no F tiers. Get a challenger voucher for as many S tiers as you can. You can interact with Officer and Airbender mid run for challenge conditions, but it may end your run so don’t do it after a reroll.
RES% – You can only get challenge conditions during events that drop them from the Gashapon Machine. Follow the tier list and only take B tiers or above.
ANY% – Ghostt’s Checklist
- Equip Jewelry
- Upload to cloud
- Roll your statue by ending runs until you have the Thief statue buff
- Get a good drink
- Roll your garden until you get the extra weapon buff
- Get the Magic Well buff
- Get your Daily Challenge if you’ve locked a good one
- (Event Only) Roll the Gashapon for challenges and take B tiers or above
- (Optional) Feed the Garden Pet
- Craft your weapons
- Redeem a Challenge Voucher
- (ENS Only) Redeem Weapon Attachment Vouchers until you get either setup
- Get the Thief Buff
- Start recording and begin the run
RES% – Ghost’s Checklist
- Unequip Jewelery
- Upload to cloud
- Get the Magic Well buff and reroll if you get a Froggy NPC
- Roll your garden until you get the extra weapon buff
- (Event Only) Roll the Gashapon for challenges and take B tiers or above
- Craft your weapons
- Start recording and begin the run
That’s all! I really appreciate it if you’ve made it this far. See you in the game!





Be the first to comment