
A mechanical guide for The Mortuary Assistant. It will cover topics such as identifying marks, embalming, demonic mechanics, as well as the endings.
Guide to Basics
Identifying Marks
You’ll be identifying any distinguishable marks on the bodies prior to embalming them. You can investigate the head, arms, legs, shoulders, and back of the body, even turning certain parts around to get a better look.
Identifiable Parts:
- Head
- Left Shoulder
- Right Shoulder
- Right Arm
- Left Arm
- Right Leg
- Left Leg
Potential Markings:
- Rash
- Contusion
- Mole
- Mild Abrasion
- Hemangioma
- Blemishes
- Keratolysis
You’ll know you’re finished in the main game when Rebecca voices a line. There’s also a counter for the number of marks on the top-right of your clipboard (Marks you’ve discovered/Marks total). After you’re done identifying marks, you’ll go to the computer near the body and open the RECORD SYSTEM. From there, you’ll match the name, age, and discovered marks with the corresponding sections on the computer. Once you’re finished inputting them all, just click submit and grab the printed record on the printer to your side!
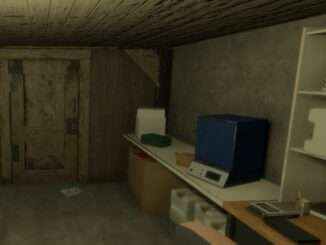
Embalming Process
The in-game tutorial does a great job of explaining the mechanics in a straightforward manner, so this section will focus on any deviations to the process you’ll encounter during the main section of the game.
Retrieve body from cold storage
- Grab one of the three bodies in cold storage (Do note that the position can be prone to change from shift to shift).
Inspect Body for identifying marks
- Same process as the tutorial. The only difference is changing the entry on the top for every subsequent body you investigate.
Wire jaw shut with [Needle Injector] and [Settings Needles]
- Items you’ll need are in the cabinet next to the desk, instead of being laid out.
Insert [Eye Caps] to keep eyes shut
- Same cabinet as the previous step.
Mix embalming fluid in pump (Glutaraldehyde, Methanol, Humectant, Formaldehyde, Reagent)
- These will be spread out in the closets and shelves around the embalming room. The Baleful Reagent in particular will be in the old cabinet that uses the old key to open.
Make an incision in the carotid artery and jugular vein with [Scalpel]
- Item needed will be in the same cabinet as the eye caps.
Use [Forceps] to clamp [Tubing] to both veins and connect to embalming pump
- The forceps will be in the same cabinet as the eye caps, and the tubing will be in the closet underneath the moisturizing wipes.
Engage pump and let the body drain
- Same as the tutorial.
Turn off pump, remove tubes, and close incision
- Same as the tutorial.
Fill an [Empty IV Reservoir Bag] with [Cavity Fluid] then insert [Trocar] into the abdominal cavity
- The empty IV reservoir bag will be in the same cabinet as the glutaraldehyde, and the cavity fluid is in the same place as the tutorial. The trocar is in the same cabinet as the eye caps.
Mix cleaners in bathroom closet to create [Tank Cleaner], then pour into the embalming pump
- Same as the tutorial.
Apply [Moisturizer] to facial features
- They’re on the same counter as the humectant.
Return body to cold storage
- Same as the tutorial.
Demonic Mechanics
- The Night Shift Database: Your one-stop shop for all information demonic-related. It’s a great source of demon-related information, including the things mentioned here. If you haven’t read through the database yet and you’re looking through here, I definitely recommend giving it a looksie.
- Lettering Strips: Used to identify sigils around the mortuary. Take them out using your sub-menu or their respective hotkey and walk around the facility. If it starts smoldering/burning, you’re getting close to the sigil. When the parchment fully burns out, the sigil will be uncovered and close to where you’re currently standing.
- Sigils: The symbols you’ll be using to identify which demon is currently inhabiting one of the bodies you’re working on. There’ll be four total, each once uncovered using a lettering strip.
- Possessed Body Tells: The bodies you’re working on may do certain things that’ll tip you off on which one the demon is currently possessing. It can range from new markings on the body to subtle facial movements. Be careful though, the demon can and will use these tells to throw you off the correct body from time to time.
- The Mark: When you’ve discovered all the sigils and figured out which demon you’re tangling with, you’ll place the symbols onto the mark, then place the mark on the body.
- Baleful Reagent: A special concoction that you’ll add to the pump mixture.
- Possession: If you take too long to complete your tasks or prematurely burn a body without a mark attached, you’ll fall under demonic possession. This is essentially a game over!
- Paper and Notes: You can collect these at the front desk of the mortuary after getting eased into the main game, narratively. You’ll use them in your inventory menu to track your current possession level, with the markings getting more and more erratic as the counter goes up.
- Match & Ashes: If you’re walked around River Fields mortuary, you may have noticed a box of matches and bags for collecting ashes in the retort. Using these objects on one of the three bodies may help you narrow down which body is possessed…
Endings
- Correct body ending: Burn the correct body and use the correct sigils on the mark.
- Incorrect body ending: After completing two bodies, burn the wrong body, forget to add reagent, or have the incorrect sigils on the mark.
- Standard ending: Complete a subsequent shift correctly after your first one.
- Basement ending: Collect the key in the bottom belonging drawer in the embalming room. During a certain scene, find what you need to get the key to the basement. Open the door in the basement and finish out your shift.
- Closure ending: Collect the sobriety coins from Rebecca’s apartment, then again in the set of cabinets where the ID cards are. When you’re presented with a Rebecca hanging from a noose, place the coins on her open palms. After that, go along with the game and burn the correct body with the correct sigils on the mark.
- Game over “ending”: Allow your possession to fill completely or prematurely burn a body. You can continue this shift when you’re brought to the main-menu, as it acts as a ‘Game Over’ for the player.

I’m sure I chose the right rune stones and body, with symbols wtritten on his belly. But I always get the same bad ending. After so many frustrationsm I decided to refund the game.
The ash and match is a sure fire way to know which body is correct. I usually do this at the end — the sigil has to match the house where the demon belongs to.
I’ve been fooled once when a body had gotten cut marks, but when I burned the ashes, the sigil was of the wrong house. I burned the body anyway and got possessed in the end.
Some endings aren’t listed in the same order as in-game. Number 2 and 3 are switched.
I am having a hard time getting the body cart to move left and right to get the body into the cooler and back out again. Can someone explain how to smoothly move the cart and body around smoothly? Thanks
Try lowering Look Sensitivity in the Settings.
If you haven’t yet, note that you can strafe with the body cart too.
The ashes are a way to double check yourself, not a guarantee of the right body. When you put the ashes on a body and burn them with the match, a symbol of one of the houses will show up. If you have the right body, the symbol will be for the correct house for the demon you’re dealing with. If you have the wrong body, it will choose one at random (and I believe it can randomly choose the right house). So, if you think you have the right body and you burn the ashes and it comes up with the wrong house, you’re wrong. If it’s the right house, you’re *probably* right, but you could still be wrong and just got unlucky with the roll. Save the ashes for the end when you’re trying to make sure of your guess, they’re far less useful in the early game.
After you have worked over the 3 bodies you got to re-examine them for new marks like a cross or some other new marks there weren’t before. That is for sure the possessed body. Also twitching is a hint.
You can pick up a matchbox and ashes. Use those on a body. But agree, it’s confusing, never got it right so far. I love the game and the mechanics but they should re-think some aspects of it. There is potential, this game is pure nightmare fuel (in a good way).
Okey so what works for me is just choosing the body that does the weird stuff the most or shows up the most. There were no marks or anything as of yet for me.
after about 3-4 attempts I finally chose the correct body. for me the clues didn’t really help. I used the ashes and match on 1 body and got a mark on the stomach of a symbol. That same body also moved slightly and had a mark that wasn’t on the clipboard. That body however wasn’t the correct body. The correct body had no movement as far as I saw, but what made me choose it was that it had a huge mark of cuts appear on the torso, and that when I used the clay mark stone on it, the line that says “are you sure that this is the correct one” happened, it came from that body, so I burned it. not sure if that meant it was the correct hint that led me to the correct body, or if it was just luck and chance. the hints don’t really help at all as they are so rare or so subtle that you don’t see it.