
Congratulations on making it to the campaign and just like everyone else wondered what in the love of god you are supposed to do here. Fret not as this guide will tell you everything. You shall become a master of campaign mode!
Campaign Mode Guide
A New Campaign – Initial Setup
For the first campaign, it is highly recommended if not crucial to take the Empire of Japan at the 1930 start date with a create own fleet.
The empire of Japan at this start date has undeniable advantages over all other nations that allows a first time player to experiment without loosing the entire game.
The empire starts with 1.2 million men in its land army. While we do not get to control it in any way, shape or form. The volume of men will enable to AI to take or give a punch for a while even if the player is loosing an absurd amount of transport ships.
A 3.5 billion naval budget. Allowing the player to have a powerful fleet while not being so large as to become annoying to manage. This game mode can become very micro intensive and any choice the player can take to lessen this burden is important.
A golden starting location. Your first rival (food) is china and is the only major power that has easy access to your home waters. The others being the Russians, English and French but they are stretched across the entire world and will have considerable issues sending forces your way. Conquering China at the start will provide a massive amount of money, manpower and prestige.
By 1930, most technologies are unlocked. This enable you to make a fleet far superior to the AI while still leaving enough locked technologies to require a refit of your fleet later. So you get the full experience without most of the pain. The refit of your fleet is incredibly annoying due to the obtuse menu navigation.
AI opponent can be set to historical or random. It won’t make a difference.
Fleet must be set on create own. Otherwise you will have a bad fleet that will have a hard time dealing with your opponents.
AI shared design. This is an option for experienced players that spent time creating shared designs from the main menu. It is possible to designs ships for all nations and all years before starting campaigns or custom battles and force the AI to use them with the “Always option”. This provides a better challenge for them since the AI will have better fleets. If you never created a shared design for 1930 or later, all options won’t make a difference.
Click “Start campaign” to begin the loading screen. The game will be simulating 1926 to 1930 to provide slight variations to the starting technologies and funds but it takes a while to do it. It is not a bug that the loading page will be stuck on January 1926 for a long time. It gets better as months passes. Typically, it will take more time generating January 1926 to September 1926 than October 1926 to January 1930.
Campaign Generated – The First Few Moves and Creating Your Own Fleet
With the campaign generated you now have access to all in campaign menus. Be careful to not take a political action at this stage. It can cause bugs since those actions will not happen when the player starts the campaign. Just the same, do not load a save taken after an unresolved political action to avoid bugs. Political actions taken are resolved when the player clicks the “next turn” button.
The game autosaves very often and it will overwrite the in use save slot. Use two save slots to have a static save point.
Before anything, head to the “Finances” tab at the top and start building the biggest shipyard possible. It is the main way to augment your shipbuilding capacity and the about 350 000 t you start with is not enough to repair your fleet while building new ships. So always be building shipyards.
Now max out your naval budget expenses: Crew training, Transport capacity and Tech budget.
Transport capacity must always be maxed out. Its highest value is 200%, and it takes decades to reach it if not at constant peace. A transport capacity under 100% will hurt your nation badly and it can drop rapidly in war when your transport ships get destroyed.
Crew training should always be maxed out because untrained crews perform really bad in a fight. The difference between a green and a seasoned crew is like night and day. It also generates manpower to crew your ships as a passive. If investment is under a quarter of the max possible, crews will start loosing experience, reverting back to green.
Tech budget doesn’t have to be maxed out but having it maxed out will give you an undeniable technological advantage over the AI. Cut back on this expense when money is needed.
Now onto the ship design tab to create our blueprints for our fleet.
A note before we begin. The following ship designs were based in 1.1.6 and torpedoes are terrible in this version. It may still be true in later versions or not.
Currently, torpedoes are too micro intensive to be used comfortably. Your torpedoes are even harder to see than the enemies’ and if not hyper vigilant and careful it will hit your own ships. Torpedo mounts have limited ammo and take ages to reload. The AI is very adept at avoiding them since it has full vision of all torpedoes while you have a limited one of his and yours. Torpedoes hit best against a blob of 10 or more ships since it gives the AI a hard time manoeuvring. But most fights will be your DDs taking on 1 to 3 warships in generated random engagements called missions.
But the real nail in the coffin of torpedoes is that they don’t kill ships. Fires kill ships efficiently, safely and accurately. All hail super heavy HE incendiary shells.
Important note before I show some designs. Each run is slightly different since the technologies available will be different so your designs will have to be slightly different as well. I will explain the methodology used in making the designs.
The design system is capricious, prone to freezes and bugs. Sometimes moving a piece to adjust weight offsets just added 500 t to your design. But also removing and adding the same piece again and again just made it lighter. For the love of all that is, do not ask it questions.
So to make it less prone to failures, I always follow these steps when designing a ship. It gives a higher rate of success and avoids as much bugs being generated as possible.
- Choose the Hull based on the mission you want it to accomplish. Destroyers take care of all strategic needs.
- Set the basic options currently available on the left side before placing anything on the hull.
- Choose and place the main tower / funnels / secondary tower trio. Somewhat in the middle
- Choose the main guns for the ship. Place one at each furthest ends first to see how many more you can put around. Add the remaining main guns and barbettes you want to fit.
- New options are available on the left menu, set them. Now most of the weight is on the ship and if the offset is bad (over 10%) balancing must be done.
- Put the secondary guns on the tower mounts and other convenient places while minding weight offset.
- Set the options on the left for the added secondary guns.
- Final balancing and compromises if needed. If too heavy, reduce on armour and options that increase weight. If not heavy enough add cool stuff like max bulkhead, crew space and triple hull.
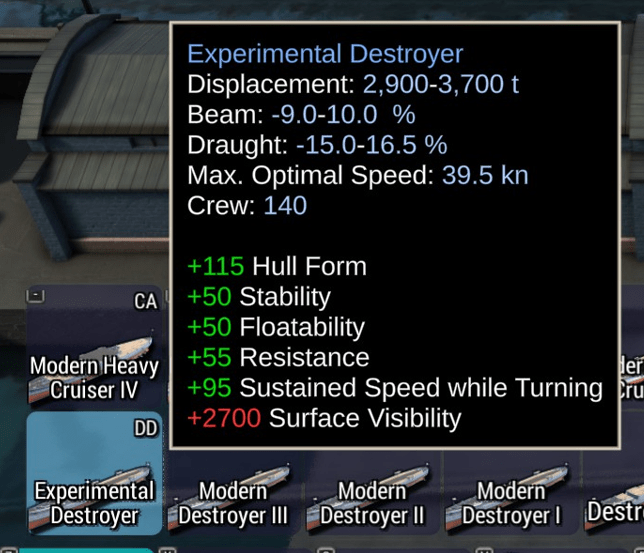
At the moment, Destroyers and Battlecruisers are very important. Cruisers armoured or light are not needed. I am experimenting to see if battleships can also be avoided.
And without further rambling, ladies and gents, please welcome our guests for this guide!
Ship Designs Needed for the Campaign
Name is Kuzu. DD Kuzu.
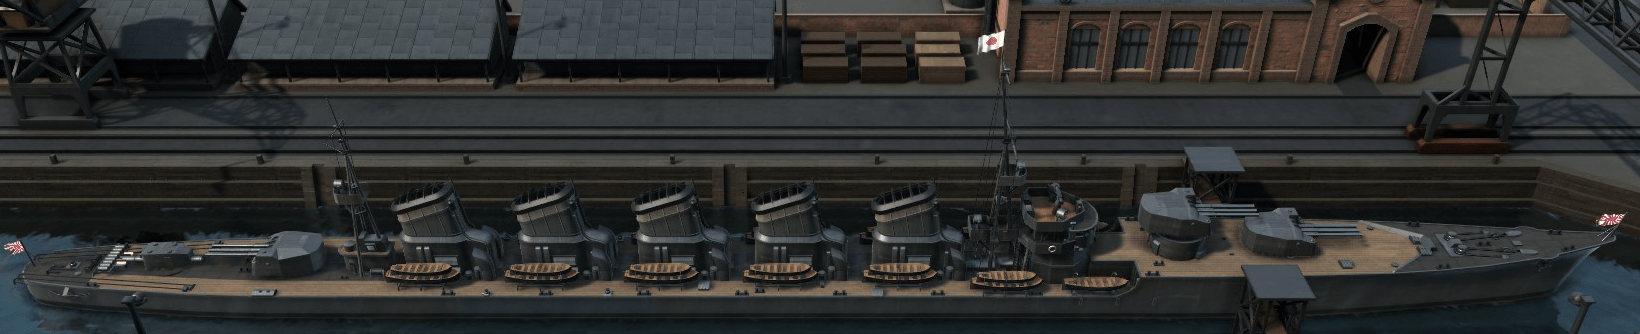
“I can do 51 knot and I promise you no one will ever hit on me. I’m also cheap, the perfect at home husband or on trips and I can kill everything for you.”
It is the backbone of the fleet. One will sit in every port in contested sea zones to defend your transport ships while preying on the opponents’. Your BC and BB need one destroyer each to keep them safe from mines and subs.
The real cake is that the system will generate random generous ambush and convoy missions where they will be allowed to gang up and kill small fleets including battleships.
Later technologies will enable having less funnels on the hull and thus free up place for a 4th 5 inch gun mount.
Tactically, this ship like to stay at a 5 km range from its preys. Its protection is speed and sharp turns and it has a smoke generator to boot. Its 5 inch guns HE super heavy shells can pen up to light cruisers but can efficiently kill bigger anyway thank to the fires mechanic.
AI destroyers and light cruisers also count on their speed and smoke generators to stay alive however they are usually designed to do 32 to 38.5 knots and damages will slow them down enough to enable the kill.
The torpedo is only there because it is a requirement in this version for the design to be accepted by the system.
Here is the detailed specs with the methodology:
Equipment place on the hull: The cheapest and lightest main + secondary towers available.
Five of the lightest and cheapest funnels in order to go above 100% engine efficiency. The higher level funnels I had access to needed more place than those chosen to go above 100% engine efficiency.
Three 3 barrel 5″ guns. One on a very small barbette to let it shoot over the front guns.
One torpedo tube at the end.
- Destroyer Hull: The one with the highest max. optimal speed.
- Characteristics
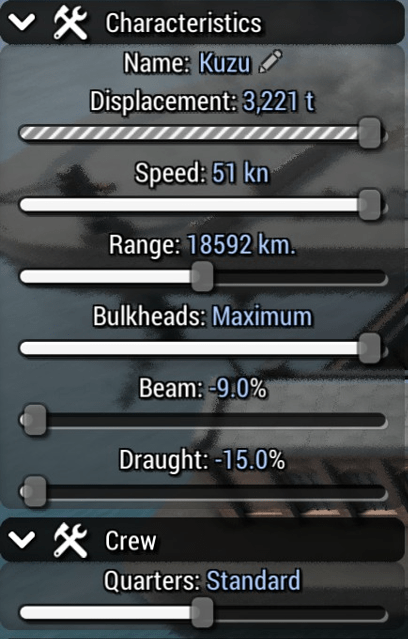
Destroyers are already very small and size doesn’t affect the speed, it affects affordability. So we will take the max displacement available.
Speed is also the max available unless this makes the ship explode in cost and weight. Most ship have a hard limit one shouldn’t go over. This hull doesn’t.
Bulkheads at maximum helps the DD survive a few hits except the big guns. In can be compromised to standard if too heavy.
Beam and Draught to the minimum to make the ship a smaller target and very much cheaper.
Crew at standard is a compromise on weight. If possible, have the max.
- Components
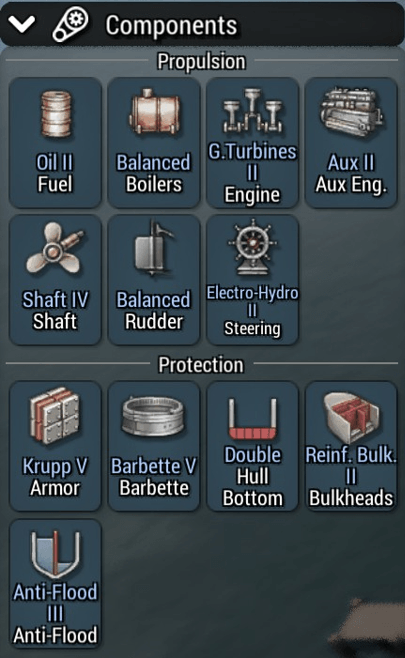
The best fuel available. Better fuel are a straight upgrade.
Balanced boilers because natural would need too many funnels and induced is heavier. Forced has more downside and should only be used if you cannot fit enough funnels for balanced.
The best engine available for horsepower per ton to have more weight to spare.
Aux II engine because a slow DD is a dead DD. higher models get expensive and heavy.
The best Shaft and steering in order to make sharp turns.
Balanced rudder for the sharp turn capabilities.
Krupp V because it is the lightest armor available.
Barbette V since it is the best available. Can be downgraded since it is only a safety against ammo detonations and flash fires.
Double hull because I couldn’t fit the better but heavier triple hull.
Reinf. Bulk. II for the best protection against fires while not being that heavy.
Anti-flood III since I have no better.
- Special and equipment
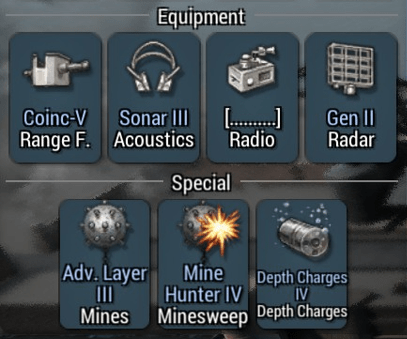
Equip the best of all specials. An argument could be made to create a separate design with only the minelayer but that dies as soon as I tell you that this 1% money efficiency gain will cost you 1000% more micro needed in the campaign.
The equipment is available once you’ve placed the main tower. Use the coinc type range finder, it has less drawbacks than the stereosc and its bonuses apply at all times compared to the limited long range bonus.
Have the best radar and accoustics in order to shoot better, spot torpedoes and defend against submarines in the campaign map.
- Armor
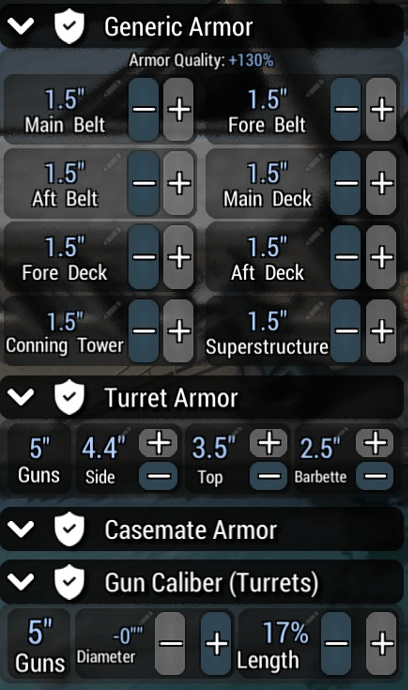
1.5″ is the limit. It’s small but will let your DD survive small gun fire long enough for a sharp turn.
Gun armour is maxed out so that they don’t get knocked out in battle with a lucky small gun shell.
Guns length maxed out at 17% for a 50% range bonus. I always max out Guns length on anything 5″ or smaller. They’re not accurate but the sheer volume of shell can damage up to battleships with dead crews and rampaging fires. Might as well shoot from as far away as possible.
- Armament
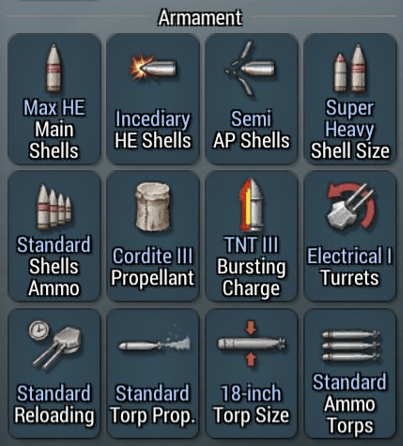
Since the biggest gun is 5″, we will go with max HE for the main shells. AP wouldn’t penetrate the big ships anyway but fires can kill them and HE is good at that.
Take incendiary HE shells as it lights fires more often. The ship won’t fire AP so leave it on the base semi option.
Super-heavy shells because they start fires better.
Standard Shells ammo because battles won’t take more than that.
Cordite 3 over Tube Powder 2 here for the weight and cost savings. The DD doesn’t need the added pen and very small accuracy bonus of tube powder 2. And since the structure won’t survive big hits anyway, the explosion safety bonus is not needed.
TNT III because I didn’t have better.
Electrical I turrets and standard reloading because Guns smaller than 14″ don’t need better. It would be a lot of extra cost and weight for a meagre 5% gain in reloading and turning efficiency.
Smallest torpedo available to save on weight and cost for this useless gear.
First Turn and Beyond
With the fleet designs built, it is time to actually built the fleet. From the Ship design tab, choose a design and click build.
As Japan, you’ll want 4 to 6 BB, 2 to 4 BC and 20 DD to begin the campaign with. Don’t go above budget as bad things happen. Make sure there is enough money left in the naval budget to cover a few months of expenditure.
The first goal is to provoke a war with china while keeping other powers uninvolved.
You can only increase tensions with China every 2 turns, use the downturn to increase relations with the nation that hates you most at that time. Once at war, keep improving relations as events will make some AI nations hate you. Once two nations reach -100 relations, they are at war. If they have +100 relations they are allied. Allied nations will always join the other’s wars. The player can choose not to, but it’s better not to be allied in the first place.
In preparation for the war, have a DD in each port of the Yellow sea and East Asia sea zones. Pepper your BC there as well. Assemble your BB and remaining DD (at least one DD per BB) in port Arthur or other ports in the Yellow sea.
During war, your fleet should stay in ports unless a naval invasion was initiated by the player. In such a case, the fleet should sit in the naval mission area if the player has enough tonnage.
In order to provoke China faster every ship in the Yellow Sea and East Asia sea zones will be set to from “In being” to “Sea control” in the “Fleet” tab at the top.
Ships in the Yellow Sea will also piss off the English since they have a port there. If the English hates you too much, leave these ships as “In being”. The China war must be kept a mano y mano affair.
Once war has started, the system has a chance to generate missions every turn. Those missions are randomly generated and the player cannot influence it in any way. You’ll have ships fighting in sea zones they are not in.
The player can influence the creation of the “battle” type mission. All this need is for two fleet to be out of port and in the same sea zone. However, the player cannot guarantee its creation even if an opposing fleet is in the same sea zone.
The AI will be highly motivated to send its fleet out of port in the sea zone of a naval invasion.
Once the war has started, the Japanese land army will soon stat an invasion of Manchuria which will be won easily if the player gets rid of the Chinese surface fleet and transport ships.
A number of transport ships will be destroyed at the beginning of every turn in the sea zones were a nation has ports and its opponents enough ships. They can also be destroyed or protected in the “convoy” mission type.
On the first turn of the war, go into the “Politics” tab and choose the “naval invasion” action on China. If your fleet is in the Yellow sea, the system will propose the regions of Northeast China or Kiautschou Bay as possible invasion points. Northeast China has oil and more ports. This action will create a “naval invasion” type mission at the end of the turn around a port in the region. All the player has to do is station enough ship in the circle for the required amount of turns.
Very important. If the player guessed right where the circle will appear and by chance had enough tonnage in it before it appears, than the naval invasion will only require 4 turns to complete. If the player did not have enough ships in the circle before it appeared, than the naval invasion will take 6 turns to complete. And every turn without enough ships in the circle will one more turn to the timer as well. In which case, if the player cannot put enough ship in the first 3 turns, it is probably better to let it time out and start over again or start a naval invasion in a different region.
Eastern China is a region that tends to be impossible to naval invade early game since it generates naval missions with tonnage requirements above 600 000.
The last piece of advice for the war is do not accept peace. Conquer as many regions as possible before China implodes. Oil regions especially will boost your GDP allowing for a bigger navy and army down the line.
All nations can implode under the weight of territorial loss or financial strain. Once it happens their currently controlled regions will become ungoverned and virtually unobtainable by anyone in essence being lost to the world.
At a strategic level, keep unrest low thanks to random events at the beginning of a turn. High unrest nations will experience internal wars where a lot can be lost and nothing is to be gained.
The war with China will make you rich in money and prestige. After, it is up to you if you take on the Soviet Union, English or French. Preferably one at a time while they are embroiled in European wars.
Special Notes
Submarines. What are they?
- Answer: A bad return on investment along with a lot of micro. Can be dabbled in if one has the energy and excess money.
Minor Nations. What are they?
An annoyance unless they have oil. The Major Powers cannot interact with them. Minors will randomly create alliances with nations around the world and immediately start demanding they build ships for them. They’ll pay a mark up on the ships but it isn’t worth the clogging of your shipyards. You need your ship building capacity entirely for yourself.
However, the player can refuse to build the ships, it’s just that they will ask ships ever turn. They’ll share their oil with their allies and follow them in wars.
Additionally, the player can decide to cancel the sale of the ship before it is fully build, keeping the ship and the 25% deposit. But most importantly, the minor will break the alliance.
Radios are a strange specimen. Has many downsides and nebulous upsides. But has never felt needed.
Speed is better than accuracy. Speed is a bonus that grows exponentially, being slow means taking hits, a lot of hits. And only battleships can take those hits for a bit, gradually loosing crew and getting worse performances which in turns makes it take more hits. It’s a vicious circle. Slowing down your ships to squeeze out a small accuracy bonus ends up providing a bigger accuracy gain for your opponent.
Naval missions can still fail to succeed even if the player had enough tonnage in the circle for the required amount of turns while having no naval opposition. This where one remembers the golden rule: do not ask questions.
Dude, where’s my ships? The System has an habit of sending your ships around your ports without asking your permission. It can happen anytime, anywhere and all you can do is open the fleet tab to look for your ships.
“My boss is a pyromaniac and it keeps me safe”. Anyone can build an heavily armored ship, even the AI, but all heavy guns can’t hit an elephant in a corridor and take years to reload. It is far better to rely on setting ships ablaze as all ships are vulnerable to fires even from small 2″ guns at long range. BC and BB should be designed around mid-weight high accuracy guns at 7.5 km.
Horrible guide. This is essentially a how I like to play and doesnt get into mechanics or anything actually helpful.