
In Unrailed, efficiency is a vital part to gameplay. This guide can show you how you can push this factor to the max, and to get to farther distances with ease.
Guide to Efficient Strategies
Roles
Always dedicate one person to one role.
This is a co-op game. As such, everyone is contributing for the same goal. To work together efficiently, leave everyone to their dedicated roles to their desire. This approach can help avoid the potential absence of a role and to especially help distribute gameplay across all of the factors needed in play. It is best to leave everyone to these roles:
- 1 player being the track layer (the player who will place the tracks).
- 1 player being the train manager (the player who will manage the train).
- 2 players on tools (clearing the path and harvesting resources with both pickaxe/axe).⠀⠀⠀⠀⠀⠀⠀⠀⠀⠀⠀⠀⠀⠀⠀⠀⠀⠀⠀⠀⠀⠀⠀⠀⠀⠀⠀⠀⠀⠀⠀⠀⠀⠀⠀⠀⠀⠀⠀⠀⠀⠀⠀⠀⠀⠀⠀⠀⠀⠀⠀⠀⠀
If you are idle (unable to do your role), take another role.
Some players may stay idle if their role is already taken. In this case, allow them to take on unoccupied roles or roles that can allow more than one player to help distribute gameplay even further and speed up the efficiency needed for your game.
An example of this is if a player is idle, then the player can help fill up the storage wagon, making it more efficient for the train manager to take on smaller roles in that role such as taking dynamite, filling other wagons, etc.
Tracks
Faster track laying
Obviously, you need tracks in order to not make your train crash, especially if your train is living on the edge at higher speeds. As such, it is ideal to mash the spacebar or Pick/Place button when you are placing tracks, making it more efficient for track laying and for faster trains. Most of the time, precision on tracks is not necessary, so there’s no need to waste seconds of finding out good positions for the tracks. You just need to move in the direction the tracks need to go while you are doing this if you want to place tracks in an unusual fashion (ex. wiggling the tracks up and down).
Faster headstart on tracks after the next section starts
Another trick to efficient track laying is to place a stack of 3 tracks that are 3 to the right of the station before you enter the shop. This method can help you make a faster head start on track preparation, so you can place up to a total of 6 tracks at the start without any interruption!
Track placements
It’s best to keep a direct path with the train in order to save resources at high speeds. If you have to clear a path at high speeds, then try to loop a bit to buy time for that path to be cleared. Refer to [Tools > Resource collecting] for more info on how to create a path faster.
Using the same strategy for resources, try to get your tracks closer to any deposits of resources, such as stone/wood that has not been harvested yet. This will make it easier for train managers to fill up wagons, as the train is closer to them and they will save time from moving as much. This will also make it easier for the auto-collector to collect far resources.
Tools
Faster headstart on tools at the start of a section
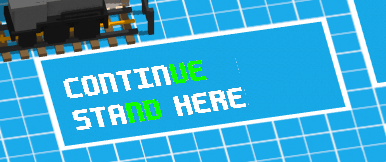
Getting the tools at the start of a section is a little time-consuming, and can potentially crowd up the place from trying to get it. To help avoid this approach, the tools are at a set location, and they are determined on the letters in the “CONTINUE STAND HERE” button at the shop.
- Stand on the UE in the word CONTINUE to get the axe.
- Stand on the ND in the word STAND to get the pickaxe.
Path clearing
During some scenarios where there needs to be a path cleared and the train is at a high speed, the cutters need to do their job efficiently. To achieve this, it is best for cutters to dash right after mining/chopping a resource to save up seconds for path clearing, and to give more space for the train.
It is also recommended to clear the train path first and then widen it after, instead of chopping a 2 by x path to give more space for the train.
Resource collecting
Using the “dash right after mining/chopping a resource” strategy, you can also collect resources faster by this method, if you are in urgent need of resources.
Also, if you have dynamite, there is a special strategy for clearing its hole faster and to help players escape faster. Dig the hole as deep as the dynamite’s level #, then diagonally cut after that point. After you do that, pickup the resource in the diagonal to make space for the dynamite, then place a dynamite in the hole by diagonally looking in that far hole. It may not be efficient, but it is better worth than dying more easily. Do note that this strategy may not work on controller as it is difficult to be precise on looking diagonally, so let someone else with a keyboard try out this strategy.
Wagons
Useful wagons
The dynamite wagon is the most overpowered wagon in the game, as it serves a large variety of purpose such as efficient path clearing or for collecting deposits of resources, which are mandatory at high speeds where these issues for path clearing and resource collection arise fast. If you want to clear a path to its full effectiveness with dynamite, refer to Other Tips > How to determine how deep you need to dig a dynamite hole.
The brake wagon is mostly preferred for the last biome, which supports up to 10 wagons. While you are at the last biome, this is your best opportunity to gain massive amounts of speed (around .7+ m/s), and the brake can help you slow down the train without costing any resources in the process, and is also useful for stalling the train in tight places.
Other Tips
Moving big stacks of commodity piles quickly
During the event on where commodity piles get in your way, you need to move them aside.
An efficient way to move these piles for the purposes of moving them from point A to B is to stand inside the stack and face the tile you will move them to. After you have done that, mash the Pick/Place button (Spacebar or A by default) to pick up and place the stack aside, then repeat until you get the stack to your desired location.
How to determine how deep you need to dig a dynamite hole
Always remember to use this formula for determining how deep the hole should be for taking full effectiveness of the dynamite: l + 1 = d
Variables: l is the dynamite level and d is the deepness of the hole (how many tiles you need to dig).
Respawning
If you are stuck behind a pinch or need to get out of an inescapable area ASAP, you can use the Respawn feature by opening up the main menu and selecting “Respawn”, or by using the Respawn key/button which can be remapped in the settings in the main menu.
By doing so, you’ll die for a short amount of time and get teleported to a position relative to the train engine’s position or any tool excluding the bucket. It is recommended to set a keybind for respawning, if you want to save seconds from opening up the menu.
Widescreen
Some world record holders have taken advantage of using widescreen, if they want to see a lot more of the map, making it better for map planning ahead of time.
Entity killing
There will be animals you will encounter that will get in your way, and they will become a real problem without dynamite.
Luckily, by the use of entity cramming, you can use 1 wide holes in order to cram 2 entities on one tile, and by chance, you may kill 1-2 animals by this method.
Leaving mid-game
If players are deemed as “unhelpful” at high speeds, they should temporarily leave the lobby in order to slow the train down by a little, to help aid the time needed for a given scenario such as waiting for last track, track shortages, etc.
Ending rounds early
A large population of the game has this strategy to go further by resource stockpiling at the end early game. But, it has been proven that this is a major waste of time and can slow you down if you want to go really far. You’ll have the resources needed already, and most of your tracks will go to waste if you stockpile a lot. You shouldn’t do this at high speeds though, as you’ll use up your stacks more proficiently.


Be the first to comment