
Additional Strategy (Guide to LRE Success)
Exploiting the Environment
There are a few things you can do to tip the odds in your favour when it comes to where you position yourself on an LRE map.
Barbed Wire
Barbed wire impedes enemy movement whilst making them more vulnerable as they’re stuck in it. A perfect map in which to exploit barbed wire is the following:
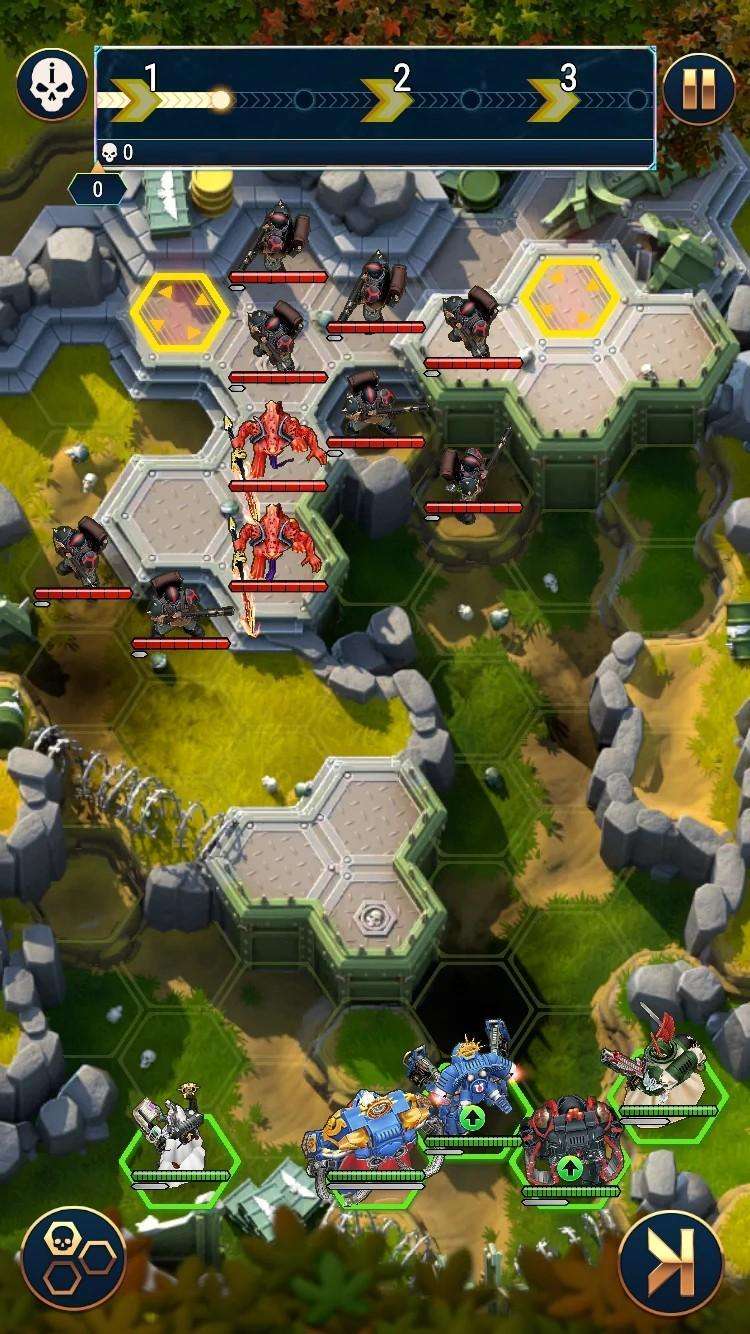
By setting up your team in the Southwest corner of the map, enemies will naturally be drawn by their AI onto the barbed wire as the shortest route to get to your team (as well as one that provides them high ground), where they can be handily dispatched by ranged attackers, ready for the next batch of fools to entangle themselves and meet the same fate.
Only if the left hand side of the map starts overflowing with enemies might they even consider coming down the right hand passage in easily manageable groups, making this map a breeze.
Exploit barbed wire and brain-dead AI wherever you can.
Tall Grass
Tall grass reduces the number of hits taken per ranged attack by 2 for any non-flying, non-big-target character standing in it.
In practical terms, in battles against Orks for example, this means a damage reduction of ½ against Ork Boyz and ⅔ against Grot tanks.
All other things being equal, standing on tall grass can put a real damper on your enemies’ damage output and is good to exploit where appropriate.
Nooks and Crannies
More than any fancy character or status effect, sometimes the best method of enduring an onslaught is to just position your characters where very few enemies will actually be able to attack them per turn.
Another example from Ragnar’s LRE:
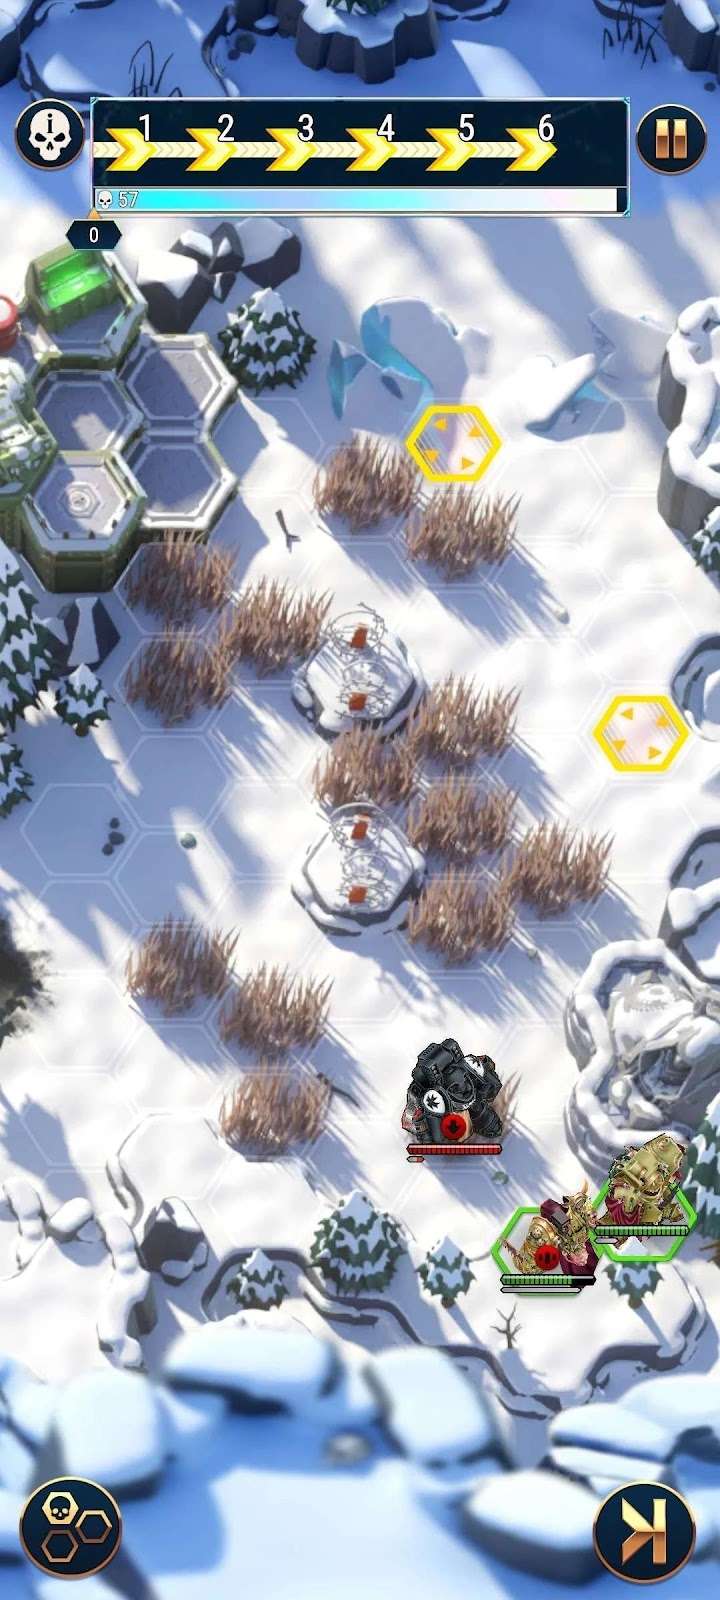
When fighting against the Black Templars, the max range of any unit you will encounter is 2.
On this particular map, the character placed where Maladus is standing will take a maximum of five attacks per turn, regardless of how many enemies there are on the map.
Stick a healer like Rotbone or Aleph here, make sure that a ranged enemy unit is occupying the high ground space next to them (and so is unable to do significant damage with their weak melee) and you’ll be able to win as long as you can outheal the damage taken from up to four attacks per round.
Pretty simple, and a good demonstration of the value of both healers and a convenient nook to hide in.
Elevation
Nice and simple general rule, this one:
- Low ground for you – bad.
- Low ground for your enemies – good.
That being said, sometimes a good nook surrounded by high ground will be worth more to set up a defence in than a flat area that has far more empty hexes around it for enemies to attack from.
In my pictured example regarding exploiting barbed wire, the team will be vulnerable to las/bolter fire from the high ground, but this beats being bum rushed by angry bloodletters and their nasty piercing damage.
Every case has its own individual quirks, and finding the best position to defend will be up to you and the composition of the team you choose. Apply the general principles of environmental exploitation, assess which types of enemies are likely to cause you the most trouble and what will be the most effective means of countering them to give yourself the best chance you can.
Healing Hexes
Appearing on maps cribbed from the Saim-Hann campaign, healing hexes replenish 35% of the health of any non-mechanical unit standing on them per turn.
Because this healing is percentage-based, you’ll get the most healing from them out of a tanky character with both a lot of health and the ability to resist incoming damage whether that may be through having high armour, making use of a nearby Big Target’s hit reduction or what have you.
Sometimes these hexes can be located quite far over to the enemy side of the map or in locations that aren’t greatly conducive to turtling, but the benefit they provide can more than make up for this.
Make sure to get to healing hexes before the enemy horde blocks them off if you do decide to use them.
Avoiding the “Azrael Trap”
Azrael is a character who can meet a good deal of LRE restrictions.
He deals both bolter and power damage, two common restrictions, and deals a maximum of one hit with his ranged attack whilst dealing three melee hits.
Such versatility! There’s just one problem; Azrael is kinda bad.
Not just in a sense that he doesn’t meet a lot of criteria for what makes characters good in an LRE, he also doesn’t do anything particularly well in any other area of the game either.
There is no point in being able to clear a lot of requirements at once with a single character if you need to massively overlevel that character for them to be viable, especially if your resources are limited.
Often, as well, you will still need a team of less versatile but stronger characters to go along with them, which limits the amount of battle restrictions you can complete at once anyway.
So do yourself a favour and just level up those strong characters instead. This is because…
Efficiency Isn’t Everything
A very bad mistake to make when preparing for an LRE is getting too worked up about completing each set of requirements for a track in as few attempts as possible per battle.
This attitude can lead to upgrading niche characters you’ll never use again, and spreading your resources too thin between too many characters.
I know that people like to get as many characters as possible to silver 1 as a sort of milestone, but this is a good way to ensure that you never unlock a legendary character through a release event.
You can have all the silver 1s in the world and have the perfect niche units to beat all event requirements in the early battles in two attempts, but all this efficiency results in is you being left with a mountain of useless battle tokens to spend after a few days of the event because none of your characters are powerful enough to put a dent in any of the enemies past battle 5.
This isn’t to say that you shouldn’t be trying to clear all battle restrictions in 2 or 3 attempts, but this should be done with characters that are chosen based on the criteria laid out in the first guide.
The bare minimum rank for your characters should be around silver 2 for the less important ones, and around gold 1 for your key characters like Aleph or Re’vas if you want to stand a chance at success in getting the legendary unlock.
If a character is particularly good in LREs in general and happens to score highly in one event, it is actually possible to beat the entire event just by levelling that character as high as possible.
One player, for example, managed to unlock Ragnar mostly off the back of having a Diamond II Aleph. You are better served by having a limited roster of powerful characters than a wide roster of mediocre ones.
Another advantage of a smaller roster is that you may not have to do…
The Equipment Shuffle
This isn’t going to be a huge topic to cover, but who ever has enough salvage?
Due to the large number of characters required to unlock a legendary character in an LRE, it’s unlikely you’ll have enough high-level crit items, defensive items, shields, etc to go around.
If you’re so limited, it may be a good idea to pour what little salvage you have into items that can be used across multiple factions, such as combat knives or greaves so that each team of five you put out to fight will be as well-equipped as possible.
This is quite tedious and it’s very easy to forget to change items between characters, so always double check that you’ve done it correctly before you commence an LRE battle.
When Turtling Fails
It would be easy to blanket recommend turtling as the primary strategy to be used everywhere, because it will be the best bet almost every time.
There are some enemy factions, however, that defy this one-size-fits-all approach.
Don’t take this as a warning to completely disregard turtling against these enemies, however, as even against factions that can disrupt a defensive formation turtling is still viable.
You’ll have to be prepared to move out of optimal positions and lean harder on tactics that involve taking the fight to the enemy, but healing, good use of the environment and enemy damage reduction will always be vital.
Imperial Guard
Chief among them is the Imperial Guard. The Guard makes use of lascannons and mortars with ranges of 4 and 5 respectively.
Further to this, if they have not moved during the turn where they take a shot, their Emplacement Trait grants them a bonus +50% damage.
These emplacements can and will hit you from almost anywhere on the battlefield with high pierce ratio (lascannons) and debilitating suppression (mortars).
Unless your characters heavily outmatch them in rank, turtling against them will quickly turn into a massacre of your troops.
There is a saving grace, however; vox-casters. The vox-casters in LREs spawn Guardsmen far weaker than the Guardsmen that spawn from spawn points, and far weaker still than lascannons and mortars.
A viable strategy against the Guard is to strike hard against them early on, attempting to take down as many lascannons, mortars and mean Guardsmen as possible whilst leaving vox-casters and their summons alive (watch out for battle fatigue making them flee).
The weak vox-casters and their weaker summons will quickly clog up the map, at which point it is a case of parking your surviving units next to a spawn point so that each new field artillery piece that emerges can only weakly attack in melee and be quickly dispatched.
Their lack of mobility means it is very easy for them to be blocked inside their spawn point by friendlies, and this is the most foolproof way I have found for dealing with them.
Ultramarines
When fighting against the Ultramarines, Eliminators with their range of 3 and heavy weapon trait provide a challenge similar to that provided by Guard artillery.
Unfortunately, vox-casters don’t feature in their battles and so having the map filled with weak enemy summons won’t be an option.
Your best bet against them may be to aggressively kill as many Eliminators as possible before falling back to a defensive position – your mileage may vary, there is no doubt that they are a massive pain.
Heavy Intercessors are also extremely nasty. Sporting a range of three, the heavy weapon and suppression traits and the ability to perform two attacks if they have not moved in their turn, a group of Intercessors can deal huge amounts of damage once they have settled down, which can easily catch you off guard.
Against Intercessors, I like to use a “mobile turtle” that keeps them moving around to keep up with the movement of my troops – anything to stop them from firing without moving and dealing at least 150% extra damage.
Tyranids
Another enemy faction that can spell trouble for turtle formations is the Tyranids, mainly because of their trait that allows Termagants to deal an additional hit for each friendly Termagant that is adjacent to them.
Because their bio damage type has a 30% pierce ratio, no amount of armour can stop them from quickly wearing down your troops and their damage output may stack up to crazily high levels.
Hormagaunts have a similar hit-increasing mechanic, but because they deal 1% pierce physical damage, they are neutered by anything with armour higher than their damage stat.
For these reasons, try and kill Termagants whilst sparing Hormagaunts if you are turtling against the nids, unless a Termagant has moved into melee range where its melee attack is practically useless.
Even then, it can still boost the ranged hit count of other Termagants adjacent to it, so it might be the best course of action to kill it regardless.
Range 3 characters can come in handy here to snipe Termagants from the backline, but this can be inconsistent as Tyranids have battle fatigue and you may make your situation worse by causing a bunch of harmless Hormagaunts to flee and be replaced by Termagants.
Because of this, it can actually be beneficial to keep Tyranid Warriors alive as they negate Tyranid battle fatigue in a 2-hex radius around themselves.
Their presence near Termagants and Hormagaunts will allow you to selectively kill off one Termagant at a time with a sniper.
Tyranid warriors also do not have the hit-increasing mechanic that Termagants do, so it may even end up being better having one shooting at your tank units as opposed to a hit-boosted Termagant.
Kharn’s LRE introduced Barbgaunts as a basic enemy type in later levels, and these act like Termagants on steroids. Not only do they add an additional layer of incoming damage to any defensive formation by firing from range 3 (something no other basic Tyranid did previously) but they also hit like a truck and debilitate your units with suppression.
Barbgaunts are, however, non-threatening in melee and very fragile. Going on the offensive and meeting the enemy at their spawn points to take out key targets is almost always a viable tactic, but very rarely as much so as with Barbgaunts. Sallying out early to kill as many Barbgaunts as possible before falling back to a defensive position to avoid being overwhelmed will do wonders for your ability to survive their lethal long-range barrages.
Necrons
Necrons have two nasty ways of ruining the fun of a turtle formation.
The first is sending in Ophydian Destroyers. If you have set up a turtle formation far enough from where Destroyers spawn in that they can’t reach you with their normal movement, they will instead burrow underground and emerge at a hex of their choosing to attack any of your units that are adjacent to it in the next turn.
Due to their movement of 4, you will have to be wary of not leaving any vulnerable characters too close to a spawn point, as if a Destroyer is able to emerge and hit them, they stand a good chance of being killed as destroyers have both high pierce and damage.
In LREs to date, there have been as many as 4 Destroyers spawned in a single round, which were able to deal an extraordinary amount of damage at the drop of a hat.
The best way to safeguard against them is to check on the wave counter at the top of the screen what is coming in the next wave by tapping on the arrow icon and prepare accordingly.
You’ll want to make sure they can’t take anyone down before you can react, and if you are far enough away from spawn points that they might burrow, give yourself room to retreat if you can so that as few of your characters as possible will be adjacent to them when they emerge from the ground.
They like going for weak summons, which serves as another means of distracting them if available – just make sure that that weakness doesn’t get them killed off before the Destroyers arrive.
The other ace Necrons have up their sleeve is the scarab swarm. Much like the Ophydian Destroyer, they punish turtling far away from spawn points.
Scarabs will replicate deep inside Necrons territory if there are no enemies nearby, with the swarm that has used up its replication then heading out to attack your units in the next turn.
Once they have achieved this initial setup, you will have as many swarms coming at you each turn as there are swarms that haven’t yet used their active on the map.
Given the difficulty of killing swarm units, especially if you’re trying to meet a Max 1 Hit restriction or something similar, this can rapidly lead to the map being filled up with scarabs.
In some ways this can be a blessing, as killing 4 out of 5 scarabs in a swarm will reduce their damage output by 80% and can actually give you some respite from taking damage.
On the other hand, scarabs throttling your formation can leave it vulnerable to ranged fire from Necron warriors and Deathmarks.
What you’ll have to do is “The Dance”, which involves killing a swarm and moving one of your characters into the vacated hex before it can be filled in again.
By this method, you can slowly shift your team across the map one hex at a time until you reach the glowing green scarabs to kill them off.
Because defeated scarab swarms are immediately replaced once the map is full, you are better off carving a path through any remaining Necron units with ranged attacks, as they will not be replaced and present more of a threat to your team at range than scarab swarms, which are melee-only units.
Whatever you do in this situation, it will probably take a while, so stay patient and make sure you don’t leave any gaps between your characters that could lead to them getting isolated when moving across the map. If you can’t link back up with them again, they’re dead or useless in the case of characters that can self-heal.
The No Healer Situation
There are also cases where turtling isn’t as viable simply because there are no healers available to use and attrition will finish off your characters too quickly to let them clear through a wave.
This does not mean you should give up on turtling the moment you a going into battle without a healer; a bunch of characters formed up around the Tyrant Guard can still take a brutal level of punishment, for example.
You will just have to be more proactive in using tactics like obstructing enemy movement, AoE damage and summon spam to overpower early enemy waves in the hope that they won’t be able to mass enough troops to cut through your characters’ limited health pool.
Do whatever you can to give yourself a numerical advantage, and don’t be put off by a tough battle.
In fact…
Never Give In!
Beating a battle whilst meeting restrictions isn’t the only way to earn points in an LRE.
Each battle has a set number of enemies you will have to face – let’s say 45 for the sake of example.
You can earn up to 45 LRE points by killing the enemies, 1 per kill. Note that this does not even have to be done in the course of a single battle, and once you reach a cumulative total of 45 kills, you will unlock the next battle in the track regardless of whether you beat the previous battle in one go or not.
You will also receive bonus points equivalent to the highest number of enemies you were able to kill in a single battle attempt, up to 45 points for killing every enemy without meeting any restrictions in this hypothetical scenario.
It is not, therefore, the end of the world if you are only able to beat a battle whilst meeting none of the restrictions.
At that point you can just go balls to the wall, throw in the toughest, meanest characters you have and see how far they go.
What points you are able to scrounge from doing this across all three tracks can easily make the difference between unlocking and not unlocking the legendary character.
In some rare cases, later battles are actually easier than earlier ones due to varying map layout and enemy types and allow the player to beat a few extra battle restrictions they might not have gotten had they not kept ploughing on through.
Don’t be disheartened; kill, Kill, KILL! Blood for the Blood God!
Levelling Abilities
How Far to Level Abilities?
The quality of abilities can make or break a character, but even the good ones will have to be left somewhere, as anyone who can invest into getting an ability up to level 50 probably doesn’t need to read this guide! Some, on the other hand, aren’t even worth a second look.
Where should they be left?
There is no cut-and-dry answer to this as you can likely imagine due to all the factors involved: gold, XP books, badges, how much you want to power up a character, etc.
There are some pretty good tells as to what abilities don’t deserve any investment and also where you can leave the good ones.
The easiest abilities to disregard are the ones that provide a useful function without needing to be levelled up or are universally pretty awful; this includes ones like Corrodius’ and Maladus’ passives in the former case or Thaumachus’ active in the latter.
Other abilities are good in modes like arena or tournament arena where matches are against small teams and can be decided in a single round of play but don’t help much in long-haul battles against lots of individually weak enemies.
This includes abilities like the actives of the Tyrant Guard, Maladus, and Angrax to name a few.
That being said, sometimes breaking through the enemy line to get to a strong defensive position cannot be achieved using a character’s normal attacks, and having a hard-hitting active like those of Khârn, Macer or Maladus levelled up sufficiently can absolutely make the difference between getting there or getting bogged down by spawning enemies.
In Ragnar’s final event, I did this more than once, sometimes using characters that were solely there to use their active and then die just to clear a path for the characters who will actually carry the battle. If you have the space in your team, it’s better than nothing, but still only level these abilities up as far as you need.
This tactic has the added bonus of being useful for attacking with an underpowered roster in Guild Wars, but that’s a topic for another time.
What about good abilities?
For characters with good abilities, you’ll probably want to level them up as far as is practicable, which is generally limited by character shards for anything at epic rarity or below and XP books for anything at legendary rarity.
Shard farming is energy intensive and takes a long time to show results, so you should seriously consider whether a character is worth ascending before committing to the farm, especially if you are going from epic to legendary.
Some characters have very clearly defined “breakpoints” where an ability increases in power incrementally but gets significantly better at a certain level.
Yarrick becomes able to summon an extra Guardsman when his active ticks over to level 36, same for Tan with his passive Skitarii summons.
The damage reduction percentage of the Tyrant Guard goes from 29% at level 26 to 31% at level 27.
I could go on; if you want to see whether such breakpoints exist for a character’s abilities before you level them up, check the Tacticus wiki or ask around. A breakpoint is usually a convenient place to leave an ability due to the jump in power it represents.
You can also level up a character just to put a bunch of levels into a good ability they have – my Tan Gi’da is at the rock bottom end of gold 2, but has level 41 Skitarii summons, for example.
This could be considered somewhat wasteful of XP tomes as you are not making full use of the benefits they provide, so you will have to judge whether the ability is worth it to potentially miss out on ranking up characters whose base stats are more important.
Maybe you just don’t have the time to farm any more upgrade materials and this is the only way you can boost your power before an event starts. If it works, it works.
As previously mentioned with healers, there are characters that work perfectly well even without being ranked up and so keeping pace between rank and ability level doesn’t need to be a priority.
One final thing to say on how far to take abilities is badge cost. A reason I end up leaving a lot of characters at silver 3 is because levelling up abilities from 32 to 35 takes 12 epic badges in total, as opposed to 9 going all the way from 26 to 32.
Sometimes the most pertinent concern when it comes to levelling abilities is the eternal badge shortage – am I really going to get as much from taking one character’s ability from level 34 to 35 as I would from taking another’s from level 26 to 30?
Order of Priority for Levelling
One annoying thing about LREs is the fuzziness of knowing that they are coming, but not exactly when.
As far as you may know, you may end up with a month longer to level up your troops in preparation for an event, or maybe one month less.
You may want to level your abilities in an order of priority based on the general principles outlined in the first part of this guide, but when there is the possibility that you may not be able to get everything you want levelled up in time, you will have to consider powering up your best all-round choices first as opposed to more niche characters that may have better abilities.
If there is a serious possibility that an event coming earlier than expected may prevent you from getting an unlock, it may also be more prudent to level characters up with further LREs in mind.
Then, even if you don’t succeed in the LRE you are currently preparing for, you will be in a better position for others further down the line.
All of this really boils down to: Under serious time pressure niche comes last, whilst all-stars get the treatment they deserve.
Damage Spike Mitigation
In LREs, you face the phenomenon that I dub the “Damage Spike”. This is a danger that enemies that are able to unload a significant level of damage under specific conditions can pose.
Good examples of this can be found within the mob units of the Black Templar faction, specifically the Neophyte and Initiate units.
The Neophyte’s active ability deals a hefty amount of damage and is balanced by the fact that it can only be used a single time.
This, however, isn’t much of a factor to consider if five of them spawn and move to points where a single one of your characters is within range and all unload on them in a single turn.
The sheer massive level of damage output in a single turn can do what a higher but less concentrated level of damage cannot – kill a character without recourse and ultimately break down your formation.
In a similar vein, Initiates can use their Devout Push active ability to attack a character in melee and then clear out of the way to make space for yet another Initiate and so on, subjecting the target to a lot of punishment that can also lead to their death.
There are other enemies that can subject you to damage spikes, such as bloodletters gaining an initial hit when charging.
What can be done about this?
My method for dealing with the Templars and their spiking damage is what I call the “Grinding Method”, and is reliant on having a good healer on hand.
In this method, you allow yourself to be surrounded by Templars and slowly kill them a few at a time, which prevents too many from being able to rush you and deal huge damage in a single turn.
The downside of this method is that the overall as well as the average per-turn damage you take over the course of a battle will be significantly more than you take when simply mowing through them as fast as possible, and you will need a healer to keep you going long enough to get to the point where you no longer have to worry about damage spikes.
You will need some experience to be able to tell when to use the grinding method and when to go all out and try and kill everything as fast as possible. Terrain factors and consequently what positions you’re able to defend will be an important consideration as well as enemy type and rank.




Be the first to comment