Active and Passive Abilities: What to Look For?
By Unappreciator.
No two characters are created equal, and there are some aspects of characters that allow them to stand head and shoulders above others.
Healing
The most obvious, because it’s damn important.
Even the strongest characters can get whittled down by many weak incoming attacks due to the nature of armour penetration, and without any way to replenish lost health, forming up your team in a defensive position and trying to slowly work through enemies (“turtling”) can become a death sentence.
The alternative is to move up and kill enemies emerging from spawn points as fast as possible, but this often gives up the advantage of team cohesion and optimal defensive positioning as well as being difficult to pull off before enemies start spawning in overwhelming numbers.
This is because you may have a lot of ground to cover to even get there, let alone start killing things, and if you have some characters that are considerably slower than others, you run the risk of them becoming isolated and being picked off.
In the hardest battles where you’ll be stretching to win, this tactic is almost entirely unviable and doesn’t fit with the theme of overcoming tougher opponents.
Turtling with healers will allow you to push further with weak units than any other strategy I’m aware of and so should be used as much as possible by those who wish to punch above their weight.
For every “track” (alpha, beta, gamma) in an LRE, your first thought should be “How can I fit a healer into a team here?”, preferably whilst meeting a few of the track restrictions.
Out of all healers, Isabella is most prominent for being able to heal her allies during the enemy turn, making it harder for them to be taken down before she can turn her attention to them as can happen with Incisus or Nauseous Rotbone.
As well as healers, don’t forget mechanics, who serve the same function but for mechanical units.
Whether you should use a fleshy or metallic team will depend on the restrictions present in a track.
Healers/mechanics work in a very simple fashion and so don’t require too much explanation, but there are a couple of things about them deserving of a closer look.
First of all, the physical damage restriction in LREs is a common, high points-scoring one.
Of all characters, the only ones that deal physical damage whilst being able to heal are Gibbascrapz and Makhotep via his passive aura.
There are a few mechanical characters able to deal physical damage, most notable being Tan Gi’da, and so this trio can be a solid core for a physical damage team.
Necrons and Orks also quite commonly are able to meet a lot of restrictions in LREs – I’ll be coming back to this consideration later.
Secondly, buffers that boost characters’ base damage (Calgar, Abaddon, Aethana) will boost heals for the same amount.
For example, Aleph-null with a base damage of 200 will heal 5*200 health, for a total of 1000 health.
Next to Calgar, boosting her base damage by 400, Aleph will heal for 5*600 health, for a total of 3000 health.
If you are lucky or dedicated enough to have one of these buffers, they can seriously boost the effectiveness of healers, even ones that are under-levelled.
Personally, I have had Calgar more than double the value of Incisus’ heal in an LRE, which was invaluable.
A third point is that healers will often be in the backline, with tanky characters out front taking hits.
If you’re strapped for resources, you can generally afford to not rank up a healer as much as the characters they’re supporting, especially if the healer is Isabella and the bulk of her healing is contingent on her passive ability rather than her manual heal.
Just watch out for enemies that have attacks of range 3 or splash damage (Ork Boyz, Pink Horrors, Pyreblaster Initiates, Aggressors, enemies with Let the Galaxy Burn) that are able to hit past your frontline defences.
The biggest issue healers face is not being able to outheal the damage enemies deal, which leads to a slow but inevitable death of a team that cannot kill fast enough, or not being able to heal a teammate before they are taken all the way from 100% to 0% health.
How, then, can incoming damage be mitigated in a turtle formation to prevent this?
Damage Reduction
Damage reduction comes in a few forms in Tacticus: passive additional block chance + improved block power (Azrael, Varro), passive absolute reduction in the damage and/or number of enemy hits (Jain Zar, Sibyll, Tjark, Terminator Armour Trait, Big Target Trait, Parry Trait, Camouflage Trait), passive percentage reduction in incoming damage (Aun’shi, Tyrant Guard, Blessings of Khorne Trait, Terrifying Trait), conjuring protective shields (Wrask, Thaumachus) and doubling up of armour through the Mk. X Gravis Trait.
Quite a few of these are only incidentally useful and not something you’d necessarily seek out in particular.
If you have a decently levelled Jain Zar to use in a Piercing Damage only battle and her passive comes in handy, great, but it’s probably not going to be a silver bullet and you probably wouldn’t specifically upgrade it just for the sake of LREs.
If anything should take priority, it is these:
- Mk. X Gravis characters
- Big Targets
- Percentage Reduction
I’ll go through each one in turn to explain why.
Mk. X Gravis
An extremely powerful trait limited only by the fact that it applies to a mere three characters, one of whom is a natural legendary.
Damage from enemy attacks has to pass through armour twice, so a las bolt fired at a Gravis user at 10% pierce ratio will do 1% of its nominal damage if it does not significantly exceed the damage threshold of the armour.
When using Gravis characters, you will notice a significant increase in their ability to avoid a death by a thousand cuts in comparison to any other non-Gravis character as a result of this, with the only major exceptions being against enemies that can deal piercing or psychic damage.
Of course, the trait is negated if a crit is scored against a Gravis user, but most of the enemies you face in LREs are nameless cannon fodder who cannot crit (Deathmarks being a notable exception) and so this caveat is largely inconsequential.
A final positive regarding this trait is nothing to do with the trait in itself, but that Brother Burchard, Bellator and Marneus Calgar are all excellent LRE characters for more reasons than just their armour.
Big Targets
In Tacticus, a few characters are able to provide damage reduction via their passive abilities.
Big target characters reduce the number of hits dealt by ranged attacks to adjacent friendlies by one.
Against enemies such as the Rubric Marine, Pink Horror, Cadian Guardsman, Traitor Guardsman (assuming Let the Galaxy Burn does not proc) Necron Warrior or Ork Boy who all deal two hits with their ranged attacks, this equates to a 50% damage reduction against said attack, which makes a huge difference in survivability of your characters.
Big targets aren’t of any use against melee units or single-shot ranged units, but they provide some very welcome respite against a wide range of common LRE enemies.
Re’vas and Aleph are a popular LRE duo for this reason, with Aleph healing Re’vas and herself and Re’vas cutting down incoming damage.
In LREs that include the Thousand Sons as enemies, the only major threats against this pair are the named characters and Screamers of Tzeentch – A gold 1 Aleph and gold 3 Re’vas enabled me to beat the 11th battle in a Thousand Sons LRE track by themselves, to give some idea of their power.
The really great thing about Big Targets is that because the damage reduction they provide is via a trait rather than an ability, it does not require investment of badges and gold or the levelling up of a character, making it a cost-effective option.
Percentage Reduction (Tyrant Guard)
Yes, a character so powerful it gets a section of its own. Well, not quite – although the Guard is a top tier LRE character, it just functions in a way that may require a little more explanation than other strong characters.
As well as being an indomitable wall of chitin with a large health pool and impressive armour that can be artificially inflated even if under-levelled by equipping two defensive items, the Tyrant Guard provides a Big Target bonus as well as (once it has hunkered down) a percentage reduction to damage taken to all surrounding friendlies.
This percentage reduction applies to incoming damage before it goes through armour, and I will give an example as to why this is great:
A traitor Guardsman fires an 870 damage las bolt at Snappawrecka.
This is the future where Snappawrecka has been pumped up to diamond 5 and thus has an armour stat of 600, so the bolt does 270 damage to him.
Now, the Tyrant Guard with a level 27 passive is placed next to Snappa, reducing incoming damage by 31%.
The las bolt’s damage is reduced to 600, dealing a paltry 60 damage to Snappa through armour penetration.
This is all theoretical, but it should be obvious how much difference the Tyrant Guard can make to the survivability of its allies, especially when attacks are flipped from greatly exceeding damage threshold to needing to rely on their armour penetration value.
Don’t read the percentage damage reduction the Tyrant Guard’s passive provides as a set number, but rather a minimum – it can get much, much higher than the nominal value.
The main drawback to the use of the Guard is that without any other synapse Tyranids around, you cannot move it without losing its defensive bonus for a round, which can quickly spell doom for your team if you’re relying on it.
Get the Guard to a good defensive position and set up for the long haul before the enemies really start turning up the heat on you. You can still move your other characters around the Guard and not lose the bonus as long as they remain adjacent to it, which can be useful when healing up.
If any future characters are released that provide a consistent percentage damage reduction similar to the Tyrant Guard, unlocking them for LREs will likely be a good idea.
Now, I mentioned a bunch of characters that provide damage reduction in one way or the other, so why have I focused so hard on just the Tyrant Guard here?
Well, that’s because it’s complicated and also because of…
The Bigger Picture
Nothing in Tacticus, a game with inherently limited resources, is done in a vacuum.
Very few of us have the luxury of levelling a character that’s only good for one LRE out of many, in a game mode that is one out of many.
This, alongside the actual efficacy of a character, must be a consideration taken into account before pumping any upgrades into them.
Some characters, like Aleph, Re’vas, the Tyrant Guard, Rotbone, or Isabella are so powerful and/or meet so many LRE restrictions that upgrading them really is a no-brainer if you care about LREs.
Further to that, Re’vas and Aleph are also really strong in other game modes besides LREs, making them all the more desirable.
The flip side to this is that you may have already built up characters for use in other modes and bringing them in may be a better choice than building up a character that fills a similar role slightly better.
Ulf may be better than Aethana as a fifth character in a piercing damage only battle, but if you already have Aethana built to gold 1 to fight the Rogal Dorn tank and Ulf’s sitting at silver 1, you’re probably better off just chucking Aethana in and using the energy you’d spend getting Ulf up to scratch on something else entirely.
With some exceptions, the difficulty of LRE battles increases exponentially as you progress further through a track and you’ll have to ask yourself whether powering up a character will give enough of a decent return in LRE points to be worth it.
Will Macer make enough of a difference in concert with Maladus and Rotbone to be worth levelling up high for a resilient-only battle?
Considering the power of Maladus and Rotbone by themselves, probably not unless you level him crazily high.
You could just level Maladus and Rotbone more instead and this will likely give better returns both in the short and long run.
A good way to check the viability of characters in currently running LREs is to check their holistic point score (based on how many restrictions they qualify for) in the Tacticus Planner.
The YouTuber DBPreacher has informative videos and materials on this subject.
Ultimately, I can’t tell you what exactly to upgrade because this is general advice and what you may find is important will be different to what someone else finds is important.
In general though, be wary about levelling up anything too niche unless you really like it, especially if it doesn’t meet the criteria that make a character good for LREs.
I’m not done listing those, so let’s continue.
Obstructing Enemy Movement
Some of the maps in LREs, such as the one pictured below, have convenient choke points.
(If you want to see LRE maps before attempting them, you can look up the specific LRE on the Tacticus wiki to plan ahead).
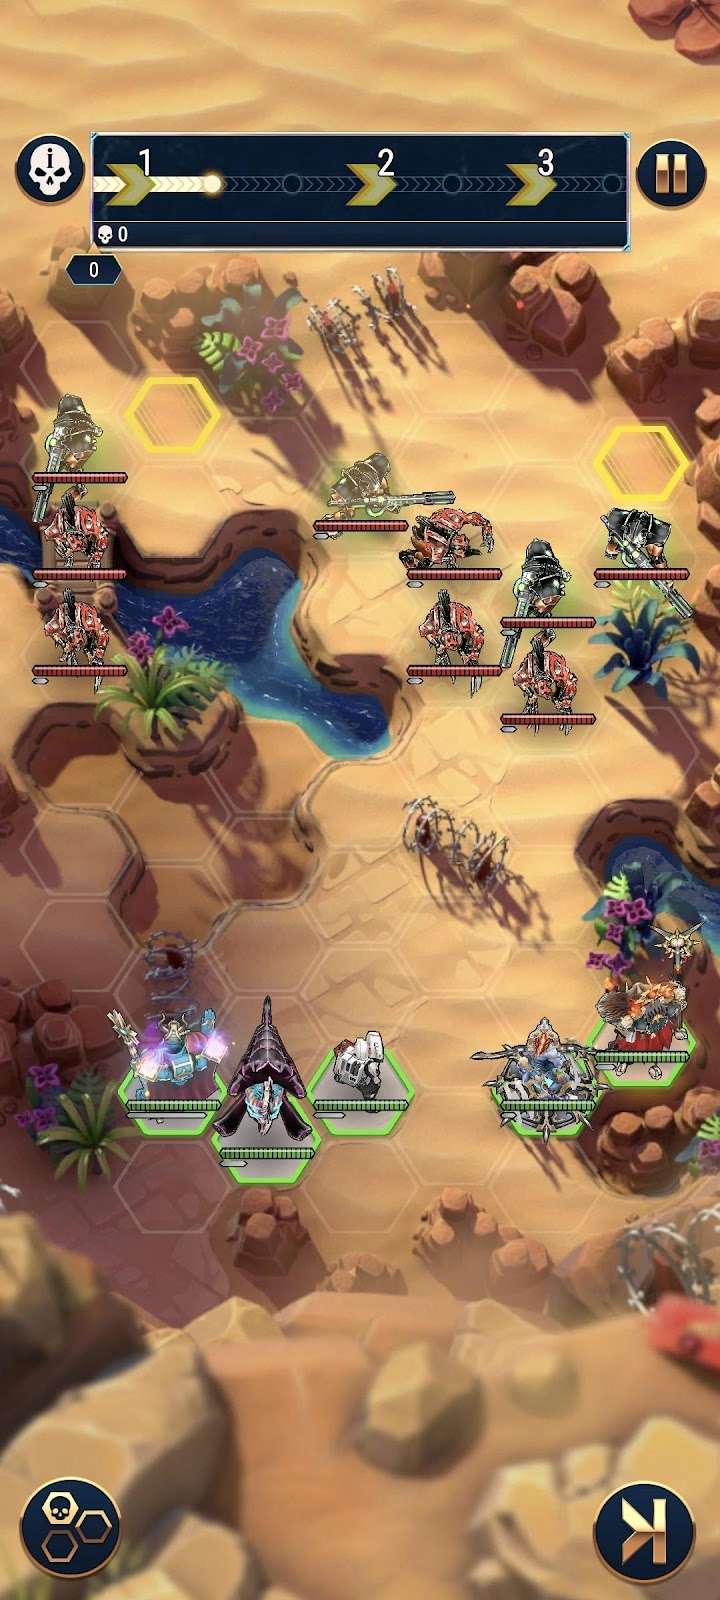
When fighting on maps like this, you can use the terrain in combination with characters that can fill the choke points to stem the flow of enemies spawning in and make fights much easier.
Obstructing these points by simple body blocking can be done with tanky units and a healer, but another thing to consider is using characters with flame attacks.
Flame attacks make the hexes of their targets catch light and block movement across them, and can be done from range in the cases of Vindicta, Toth and Ahriman to limit their exposure to return fire.
Vindicta’s passive has the chance to spread fire to hexes adjacent to her primary target, making the map even more of a mire for the enemy to wade through and also can damage multiple enemies at once, which brings us on to the next desirable trait:
Passive Splash Damage
LREs are made difficult by overwhelming the player with rapidly spawning waves of enemies.
Many characters are limited by only being able to eliminate a single enemy per turn, which makes it hard to keep the number of attacking enemies low and leaves you open to having your defences overrun.
Some characters, such as Kut Skoden, are able to deal area of effect (AoE) damage with active abilities, but the limited nature of actives often means this is not enough to change the tide of a battle.
Exceptions to this include Burchard’s active, which is especially powerful against swarm units, Ahriman/Baraquiel’s rechargeable active, and Calgar’s active, which can clear out more than a dozen enemies if used well.
Over a long battle like an LRE, however, you can get a lot of mileage out of passive AoE damage.
Examples of this include the passive abilities of Vindicta, Maladus, Morvenn Vahl and Burchard as well as the Smite Trait of any psyker.
This is not the only way to deal out damage to a multitude of enemies per turn; the passives of Ulf, Jaeger, Bellator, Exitor and Angrax can kill an admirable number under the right conditions too, though not in as directly targeted a manner.
Out of all of these, Bellator and Angrax deserve special mention as being easily accessible, with Bellator especially being worth investment if you’re early in your LRE career and are lacking powerful characters locked behind requisitions.
Passive AoE damage isn’t the only way to be able to kill more than 5 enemies per turn, however.
Summon Spam!
Summons are excellent in LREs, because their presence means not only are there more guns pointing at the enemy, they are also able to absorb attacks that would otherwise be directed at your characters.
Just like the summoners that spawn them in, not all summons are created equal. Important things to look out for in summons are:
- Tankiness
- Infinite spawns
- Long range
- Ease of summoning
- Hit count
Tankiness is self explanatory, you want your summons to not fold under the first bit of pressure. Aleph’s scarabs are a prime example of this, and are pretty much only good against enemies you outmatch.
Any enemy with multiple hits will prioritise hitting the unarmoured scarabs and quickly take them down once they strand themselves in enemy territory.
Against enemy factions that are particularly weak in melee (this applies mostly to the Thousand Sons), they can actually be quite easily overwhelmed by multiplying scarabs if you push hard at their spawn points – the swarm trait works well in their favour in this instance.
Summons like Bellator’s Inceptors and Tan Gi’da’s Skitarii, on the other hand, can take a great deal of punishment and allow the player to play more aggressively and take out high-value targets whilst they soak up damage, even from multi-hitters.
Infinite spawns applies to Tan’s Skitarii, Snotflogga’s grots, Mataneo’s Intercessors and the Winged Prime’s Hormagaunts. Being able to summon infinitely can be thought of as pseudo-healing, because each turn you are able to summon in a new health pool that the enemy has to work through – and that can fight back (Mataneo’s minions excluded)
Scarabs and poxwalkers replicating can also count as potentially infinite, but their lack of armour makes them unreliable in practical terms.
Long range summons like the Grot Tank or Sho’syl’s drones are prone to staying out of harm’s way and using their long range to pick away at enemies from safety, which is good as you won’t need to try very hard to keep them alive unless the enemy is really pressing you.
Melee range summons, on the other hand, often fall foul of running out of a defensive formation and getting mobbed, so you may not be able to rely on them.
Ease of summoning means not having to wait too long to build up to an active summon or have friendly units die in order to power a summon up (looking at you, Bellator, Anuphet and Yarrick), as being able to get out lots of summons early can make overwhelming the enemy, or at least building up a strong buffer against them, possible.
In the case of summons that need to build up to their full power, you need to be wary of how much space is available on the map.
There is no point in waiting four turns to be able to summon five Inceptors with Bellator if the map is so packed with enemies by that point that none of them have any space to deploy summons around them.
Be aware of how packed the enemies are, how many more will be flooding the map in upcoming waves and if you are using a summoner like Bellator, try and isolate an enemy either by luring them out or killing their surrounding allies before summoning on them.
The conditions for summoning in a unit also vary in difficulty, with the hoops you have to jump through to summon with the Winged Prime being more difficult than those for Snotflogga, which in turn are more difficult than those for Tan.
Hit count is a bit more niche, but can be vital in battles that have a 1 Hit Maximum restriction.
This restriction only applies to characters and not their summons, so the fact that Tan and Abraxas summon in units that deal 3-4 hits per attack can make all the difference in fights against swarm enemies like ripper swarms and scarabs.
A summony summary
Overall, I’d say that the best summons for LREs are Skitarii and Inceptors or, alternatively, whatever you’ve ranked up the highest.
Necron Warriors deserve an honourable mention as they are tanky, deal good damage, self-heal and can resurrect, but cannot be spawned in infinitely like their close rivals, the Skitarii.
Another advantage of Skitarii is that two can be spawned per turn right out of the gate if you are able to combine Actus and Tan in a single team.
As mentioned, one of the important factors in choosing good summons is their attack range, and characters are no different in this regard.
3 Hex Range
Characters having a high range is useful in protecting them from retaliation when moving forward to attack, and overwatch on top is even better because it allows you to kill enemies whilst they advance towards you, potentially allowing you to kite enemies and kill them without retaliation for a while.
In a turtle formation, range 3 characters serve a very important role when hiding in the back.
The following map is gamma 11 from Ragnar’s LRE, and it will serve as a good example of the utility of having characters with a 3-hex range.
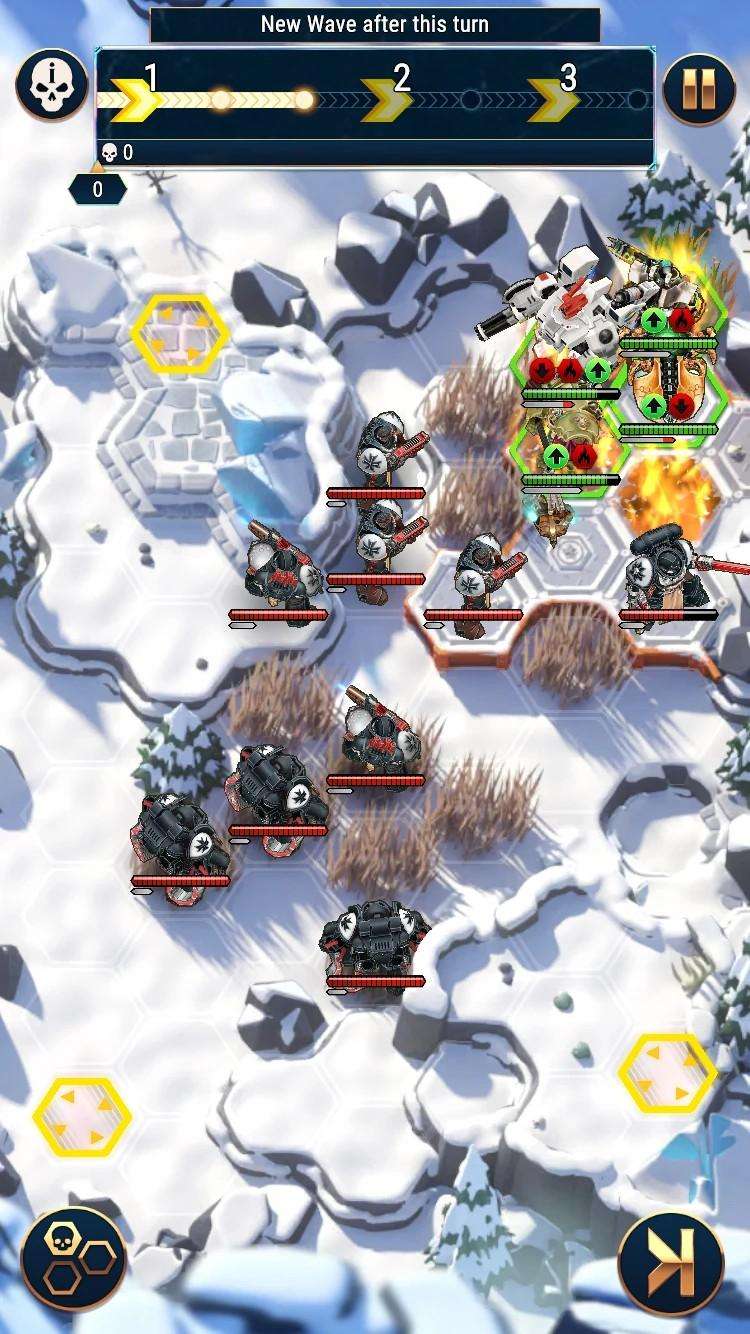
I beat this level with Makhotep occupying the hex in the top left corner and Aleph and Re’vas forming a wall directly in front of him.
In one of the later waves on this map, a high-level Sword Brother Godswyl spawns in and cannot be allowed to close into melee range of the characters, as his passive ability removes armour and would make my characters easy pickings for the horde of Black Templars waiting to murder them.
By using Makhotep to fire over the shoulders of Aleph and Re’vas to hit targets two hexes away from my front line, I kept clearing out those hexes until Godswyl moved into one of them, blocked from advancing any further by two of his doofus allies. I then sniped Godswyl with Makhotep, killing him before it was possible for him to become a threat.
The takeaway lesson from this is that some enemies are far more dangerous at certain ranges than at others, and being able to reach out three hexes with ranged attacks lets you control the flow of enemies into disadvantageous positions far better than if you are only able to hit ones on the front line.
Makhotep also being a healer is just icing on the cake – I rate him very highly for LREs.
There is one thing that Makhotep sadly can’t do, however, but can be achieved by…
Damage Buffers
Are you disappointed in your Incisus’ measly healing output? Did your Imospekh’s enmitic pistols get swapped out for nerf guns?
Just add a dash of Ultramarines™ Marneus Calgar and watch your lowly apothecary stitch sundered body halves back together!
Turn your Hexmark “destroyer” into a Re’vas clone EVERY SINGLE TURN!
Damage buffers are undeniably amazing in that they drag up everyone around them, boost healing output of healers and turn multi-hit characters into killing machines.
The limiting factor here is availability, with Aethana and Eldryon being the most realistic options for most players when it comes to buffing your characters/debuffing enemies passively.
If you can get your hands on a good buffer, however, you will be all the better off for it both defensively and offensively.
Eldryon can be used as a shock troop to enable his allies to kill high-priority targets like Eliminators or lascannons that they otherwise wouldn’t be able to scratch.
Burn his candle at both ends and you may be able to take out enough nasty enemies to then fall back and turtle with your remaining characters against weaker enemies that are incapable of breaking through your defences.
A risky strategy, but one that can pay off big time if it comes together.
In a turtle formation, hidden in the backline, he can make enemies engaged in melee with your frontline tank characters extremely vulnerable to damage.
Buffers are definitely not to be casually overlooked. Despite this, however, there can be such a thing as too much damage – in a certain sense.
Low Damage!?
Low damage is good, is it now? In a way, yes. Every character in Tacticus has three base stats; health, armour and damage. Generally, a high damage stat (or a high product of damage and hits) will come at the expense of armour and health.
You can get a precise idea of how a character ranks in terms of base stats by looking at the StatChart page on the Tacticus wiki.
The main thing you have to ask yourself is: “Is it worth spending resources to rank this character up for a fairly insignificant increase in survivability?”
Thaddeus Noble will nuke more or less any enemy that a tanky teammate of similar rank to him will be able to resist.
This is good, because you could potentially have an under-levelled Thad who can still wreak havoc on the enemy provided he is safely tucked away.
It’s probably not worth focusing too hard on levelling him up for the sake of an LRE, however, because his damage will likely already be more than sufficient whilst his health and armour will barely increase in comparison to a character like Re’vas, Angrax or Maladus as he is ranked up.
Knowing when to stop ranking up a raw damage character will come with a bit of experience and will depend on the ranks of their teammates.
I hope the guide was helpful.


Be the first to comment