
Contents
Guide to Salvation’s Edge Raid
By Whiz!
Substratum
Goal: Dunk resonance into the box in the middle room to complete the encounter and enter the Monolith.
Teams: 2 Teams of 3.
Notable Supers: Orpheus Rigs Tether, Song of Flame, other ad clear supers.
Notable Weapons: LMGs, Divinity for Tormentors and Subjugators, Overload weapons for champions, Rocket Sidearms.
Notable Wipes / Deaths: Running out of time, picking up too many Resonance Shapes.

- Pick up the first resonance and dunk it in the box. Note that this resonance is in the shape of a Pyramid. This will be useful for later.
- Split up into teams and go into 1 door each. Kill all enemies in there, especially the hydras and minotaurs.
- When the other team kills their minotaur, your team’s next door will open, and vice versa. Continue through the rooms.
- Repeat this process until an Overload Minotaur spawns. Kill it and go to the middle.
- Kill a Tormentor.
- Repeat steps 2-5.
- After the second Tormentor dies, both teams find a glowing plate and stand on it. One person will stay near the plate. The other two can follow the line to find where your conduit and connecting plate is.
- Once the conduits and second plate have been found, the person near the glowing plate will step on the plate again, sending the pulse. Once the pulse reaches the second plate, stand on that plate to send back the pulse and spawn Resonance symbols. Continue this pattern until you see the text “All resonance has been called forth”.
- While you’re pulsing the plates, everyone should be picking up resonance symbols. You can hold up to 3 per person.
- Once everyone has their resonance, the person near the conduit should shoot the middle of the conduit, then stand on the plate the next time the pulse reaches the plate. If done correctly, the conduit will close and glow a bright yellow.
- Once both conduits are closed, everyone should go to the middle room and kill all enemies in that room.
- Deposit your resonance in the box that spawns to increase your wipe timer.
- Do steps 2-12 two more times to complete the encounter.
Herald of Finality
Goal: Kill the Herald of Finality and proceed further into the Monolith.
Teams: 3 teams of 2.
Notable Supers: Well of Radiance, Celestial Nighthawk Golden Gun, Tcrash, Needlestorm.
Notable Weapons: Swords and Tractor Cannon, but most DPS options will do.
Notable Wipes / Deaths: Running out of time, picking up too many Resonance shapes.
- Split into your teams of 2, one on left, one in center, one on right. Each side will have a set of 2 plates and a conduit.
- Kill ads and a miniboss taken.
- The boss will choose one person on each side for battle, which will give them a buff, “Call to Reckoning”. If chosen, go into the middle arena and shoot the boss’ head until a taken orb appears above his head.
- The remaining people on the sides should look for taken blights around the arena and destroy them. Note that one can spawn in the middle as well. This will make the taken orb above the boss’ head disappear when the taken orb is broken.
- Repeat steps 3 and 4 until the boss’ head pops, and the 3 chosen people in the middle receive a buff called “Stolen Favor”. This will allow you to see a shape in the middle of the conduits. This shape indicates what Shape of Resonance you need to have picked up last before you shoot the conduit to charge it.
- Charge the conduit like you did in the first encounter and pick up resonance. In this encounter, there will be two shapes that resonance can be: a Sphere and a Pyramid.
- When your team is ready to shoot the conduit, make sure that the last resonance you pick up is the same symbol as what is showing on the middle of the conduit for the people with “Stolen Favor”. Note that if you do not have the “Stolen Favor buff, you will not see any symbol in the middle of the Conduit. When you’re ready, shoot the conduit to charge it.
- Once all 3 conduits are charged, dunk your remaining resonance in the box near the witness hand to regain time on the wipe timer.
- Go into the arena and damage the boss.
- Rinse and repeat this process until the final stand.
- There is nothing different with the final stand, other than the 3 big taken minibosses from earlier in the encounter spawning in the arena with the boss. You can largely ignore them. You have about 30 seconds to kill the boss in his final stand.
Repository
Goal: Complete 3 Conduits in each room, for a total of 3 rooms to proceed deeper into the Monolith.
Teams: 3 loose teams of 2.
Notable Supers: Well of Radiance, Song of Flame, Orpheus Rigs, Berserker, other Ad Clear supers.
Notable weapons: LMGs, Rocket Sidearms, Unstoppable Champion Weapons.
Notable Wipes / Deaths: Running out of time, picking up too many Resonance shapes.
- Dunk the first resonance in the box. Note that this Resonance is a cube, introducing a new shape.
- Kill 3 Tormentors. The people who dealt the final blow to each Tormentor will get the buff, “Stolen Favor”. This buff does the same thing as the Previous Encounter.
- Destroy the Turrets that spawn.
- Call out the 3 symbols in the pillars from left to right.
- Split into your teams and pulse the plates 2 times per person, then intentionally do not pulse again.
- Collect your resonance, taking note of what shape it is.
- Once resonance has been collected, everyone group up on the left side and kill the subjugators that spawn from left to right.
- Once the Subjugators are dead, The players who were at the conduits should NOT go back to the conduit they were at previously, but rather go to the conduit that corresponds to their shape. The players who were at the starting plates can go back to their original plate.
- Once everyone is at the right plates, pulse each plate one more time, with the conduit people shooting their conduit before stepping on the plate.
- Once all 3 conduits are charged, Destroy another wave of turrets and deposit your resonance in the box. Go to door and kill the remaining enemies.
- The door will open. Go to the next room.
- Repeat steps 2-11 until you complete the encounter. Note that in subsequent rooms, the plates will criss-cross each other. As long as you communicate when everyone is ready and pulse all together, this should not be an issue.
Verity
Goal: Avoid your Imminent Demise, and open a door to the Witness.
Teams: 1 team of 3 (The OUTSIDE Team), 3 solo players chosen at random (The INSIDE Team).
Notable Supers: Song of Flame, Orpheus Rigs, other ad clear supers.
Notable Weapons: LMGs, Rocket Sidearms, unstoppable champion weapons.
Notable Wipes / Deaths: Running out of time, Not completing the mechanics correctly, Putting the Wrong Ghost at a Pedestal.
Prework:
- Before starting this encounter, make sure you can distinguish your ghost and character from other players. If you can’t, this encounter becomes much harder.
Inside:
- Call out the symbols each statue is holding, from left to right.
- Give everyone two of the symbol their statue is holding by killing the knight, picking up the symbol it drops, and depositing it into their statue.
- Once everyone has two of the symbols their statue is holding, give one of your symbols to each of the other two statues/players that are not you, starting on the left-most statue that isn’t you to the right-most.
- After ghosts, finish step 3.
- Pick up your two new symbols (they should be 1 symbol each that you are NOT holding) and wait for Outside team to be done
- Once outside team is done, exit the mirror wall
Outside:
- Wait for symbol call out
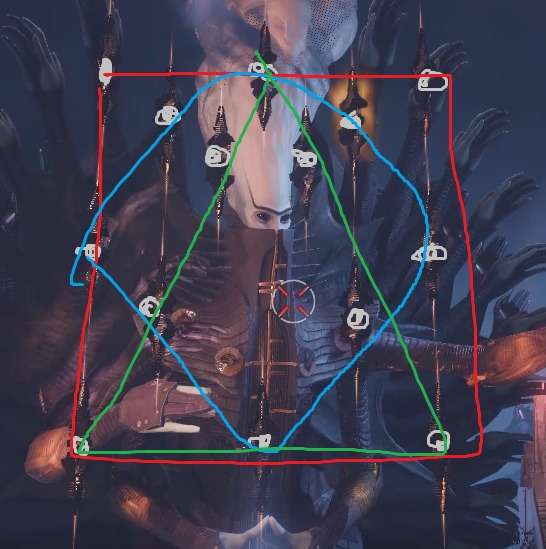
- Make a 3D shape that does NOT consist of the 2D shape the player/statue is holding in the Inside room. Here is the easiest way I’ve found to do this.
- Find a statue that already has 1 of the correct symbols. If there are none, do the following step twice.
- Kill the knights to spawn symbols, then trade the symbol that the statue is not supposed to have to any statue you can, in exchange for the symbol that it is supposed to have, but doesn’t currently have.
- Once the first statue is done, look at the other 2 statues and swap out the two symbols that they should NOT have.
- Complete ghosts phase when that happens, and then once all of step 2 is done, wait for the Inside team.
Circle + Circle = Sphere
Square + Square = Cube
Triangle + Triangle = Tetrahedron / Pyramid
Circle + Square = Cylinder
Circle + Triangle = Cone
Square + Triangle = (Triangular) Prism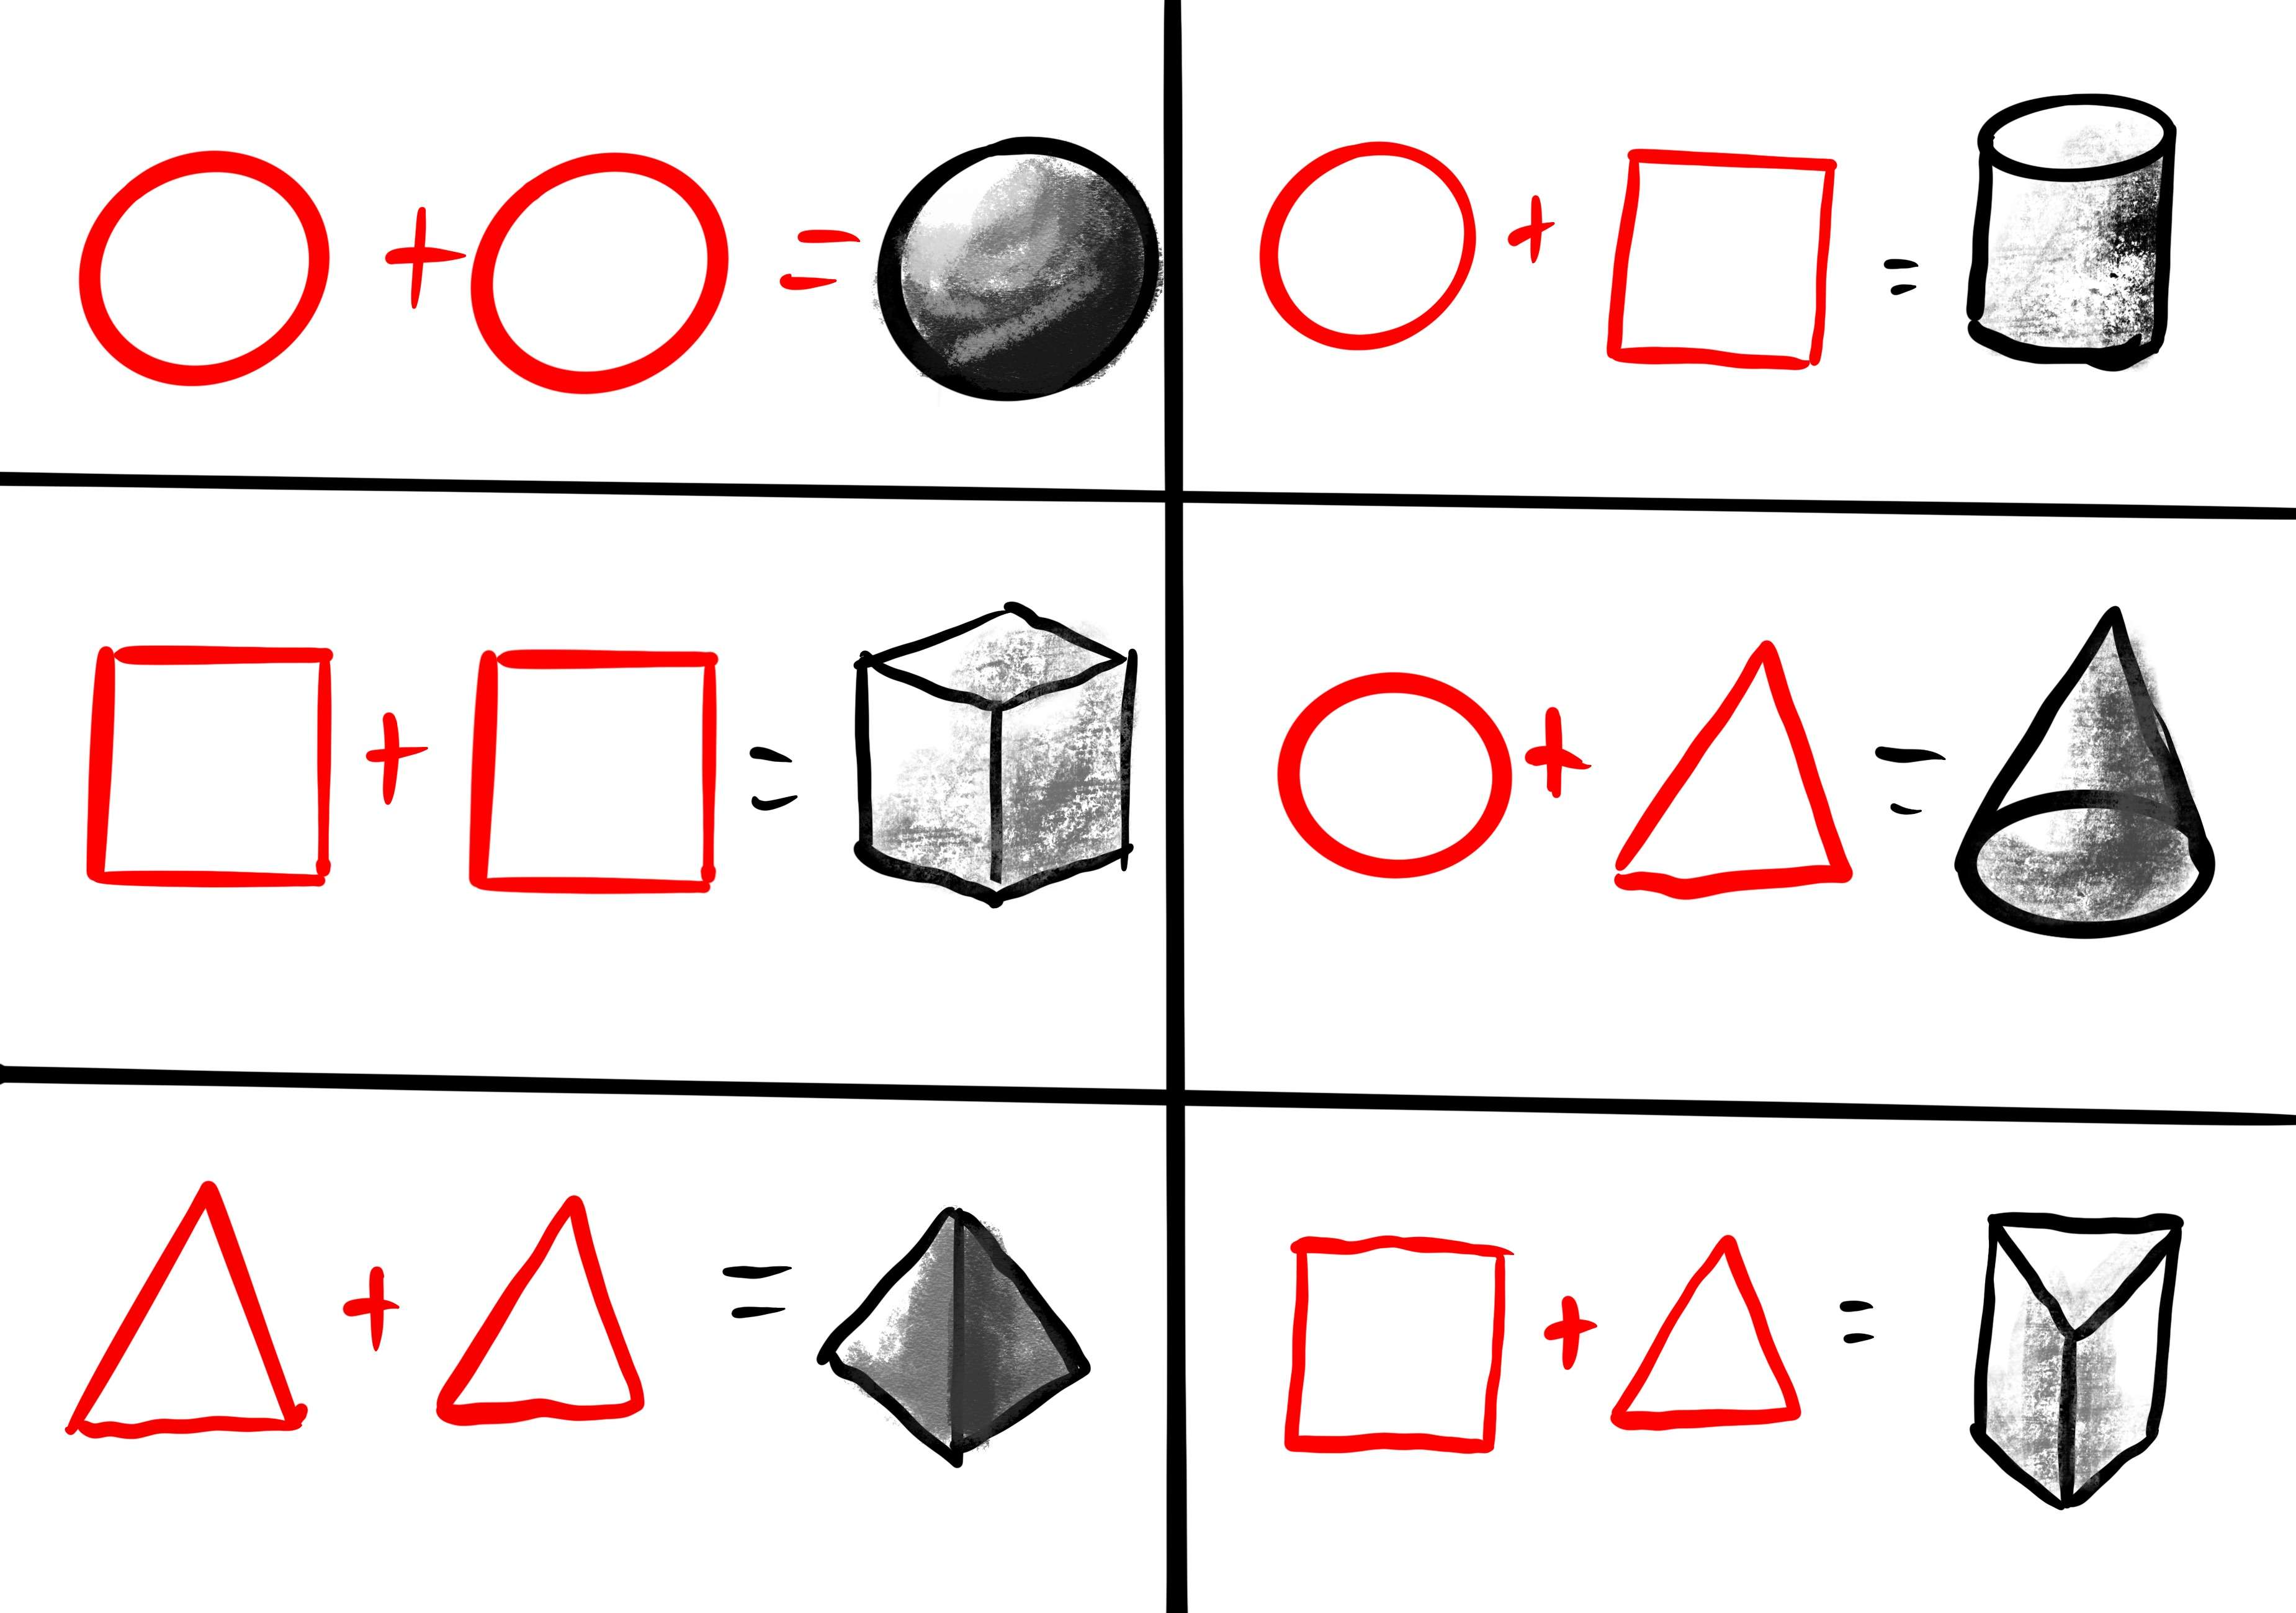
Ghosts:
- Halfway through step 3 of the INSIDE people’s job, the 3 people inside will be frozen and “die” (you will be at the death screen but the rez timer will not start), and their ghosts will spawn in the OUTSIDE room. The “dead” players will be able to spectate the players in the OUTSIDE room.
- The OUTSIDE room players need to pick up the ghosts, communicate which ghost they picked up, and place them on the pedestal at the spawn of the room corresponding to the player the ghost belongs to.
- The “dead” players need to communicate where each player’s statue is standing, as the OUTSIDE room players cannot see any of the “dead” players statues.
- From left to right, order the pedestals 1-6. Once the INSIDE team knows where a ghost goes, they should call out the number of the pedestal associated with the guardian and ghost.
- Doing this correctly will unfreeze the INSIDE players and allow them to continue with their tasks.
Everyone:
- Once everyone is out, kill ads and wait for ghosts.
- When you are revived from ghosts, pick up the ghost of the player you were able to see and dunk the ghost at the correct statue.
- Once everyone is alive, Rinse and repeat all of the above 2 more times
TLDR:
Inside:
- Get the two of the symbol that your statue is holding
- Give those two symbols (one each) to the other player’s statues.
- Once all symbols have been swapped, wait for outside team.
Outside:
- Make the left statue have the correct 3D symbol.
- Make 1 more swap between the 2 remaining statues so they are correct
- Once all symbols are swapped and correct, wait for Inside team
The Witness
Goal: Deal a devastating blow to the Witness, leaving them extremely vulnerable.
Teams: 2 Teams of 2 Ad Clearers (Left and Right).. 2 Mechanic people.
Notable Supers: Song of Flame, Celestial Nighthawk Golden Gun.
Notable Weapons: STILL HUNT OH MY GOD, Divinity, LMGs.
Notable Wipes / Deaths: Running out of time, Failing the Witness Test, Failing to Jump after the Witness Test, Picking up too many Resonance, Dying to Witness Hand attacks, Dying during DPS attacks.
Note: I would HEAVILY recommend practicing Witness damage in the Excision mission, unless you are ADAMANT about not doing Excision before the Raid. The damage phase in Excision is almost IDENTICAL to the one in the raid.
Patterns:
Mechanics:
- The witness has 3 different types of arms that do 3 different types of attacks: a hand that does a triangle attack, a hand that does a circle attack, and a hand that does a rectangular beam attack. Standing in the resonance poll that denotes the attacks will allow you to do two things.
- You will immediately be able to shoot the wristband on the hand that corresponds to the attack you are standing in. Shoot the wristband while inside the attack will reveal a symbol where the wristband was, with each symbol being paired with a specific color. A Triangle symbol is a Green wristband, a Circle symbol is a Yellow one, a Square symbol is a Red one.
- If you stand in the attack for 2 seconds, you will be given a Resonance that corresponds to the shape of the attack that you are standing in. So for example, if you were standing in a Triangle attack, you would receive the “Pyramidal Resonance” buff.
- You must destroy 6 hands by:
- Shooting the wristband to see what symbol is on the wristband.
- Obtaining the Corresponding Resonance from another hand’s attack.
- Going back to the original hand with the Resonance, getting in the attack, and shooting the wristband with the correct Resonance.
- Destroying a hand will give you the “Glyphkeeper” buff, which will allow you to break 1 of the 6 weak spots on the Witness’ chest.
- Once per phase, when you destroy a hand, the Witness will decide to test you.
- The Witness will create a bunch of glyphs in front of it.
- Your team must create the shape of the buff that corresponds to the hand you just destroyed by shooting the glyphs correctly.
- So for example, if you just destroyed a hand that does a Triangle attack, you would need to make a triangle.
- To make the shape, you will ALWAYS shoot 6 glyphs. No more, no less.
- If you do this correctly, text will appear that says, “The Witness’ trap is foiled”. The Witness will then do a slam attack that will kill anyone on the ground when it hits. To prevent yourself from dying, jump off the ground when the Witness’ eyes turn yellow, and stay in the air as long as you can.
- If during the encounter, you accidentally get a resonance buff, or if you are at 2x or 3x for your resonance buffs, you can go to the middle of the arena where the Pool of Light is. Breaking a weak spot while inside the Pool of Light will remove all Resonance buffs from you and anyone else in the Pool of Light.
- When you have the last Glyphbreaker buff, everyone will go to the Pool of Light for DPS. Break the last Glyph on their chest and the Damage phase will start. Be very aware of the lasers, and be ready to jump if you hear the jump sound effect or see the Witness’ eyes light up.
- Repeat steps 1-6 until you reach Final Stand.
- The Final Stand is just another damage phase.
Congratulations, you have beaten Salvation’s Edge!
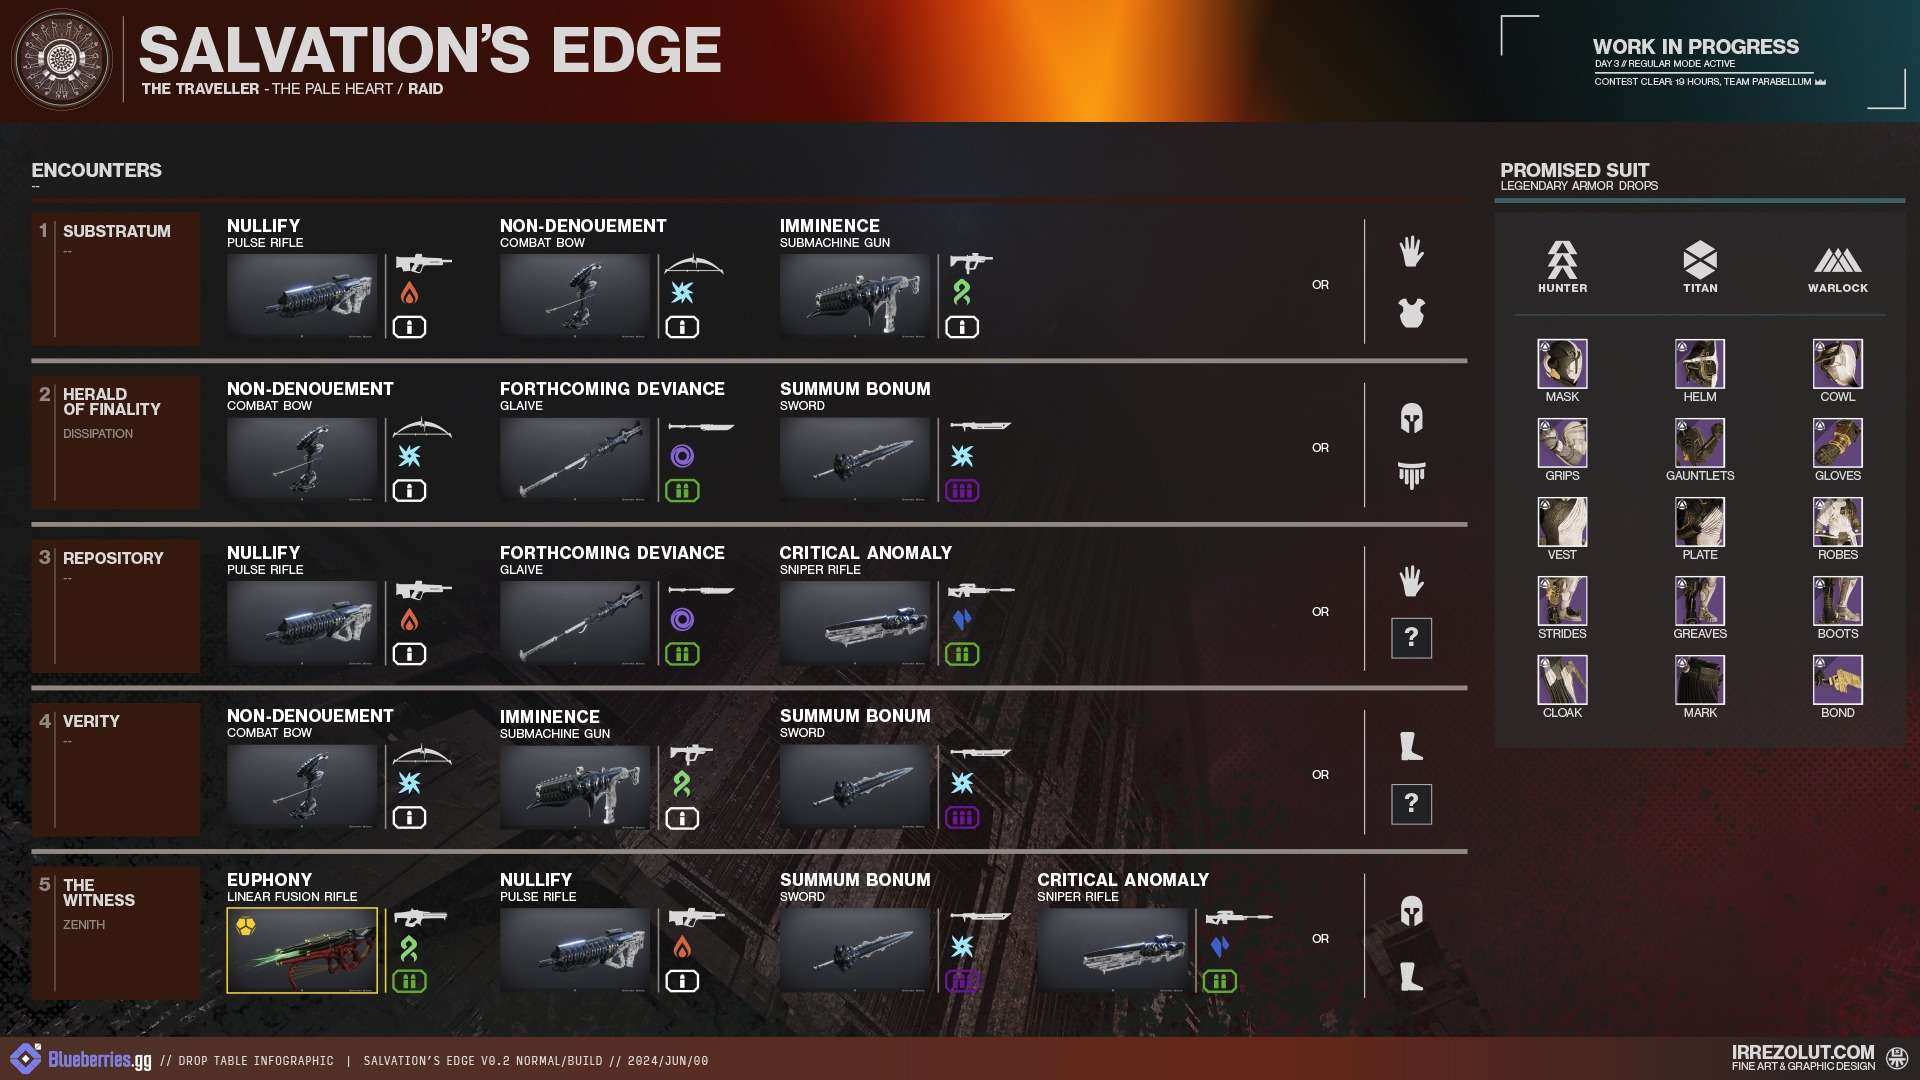
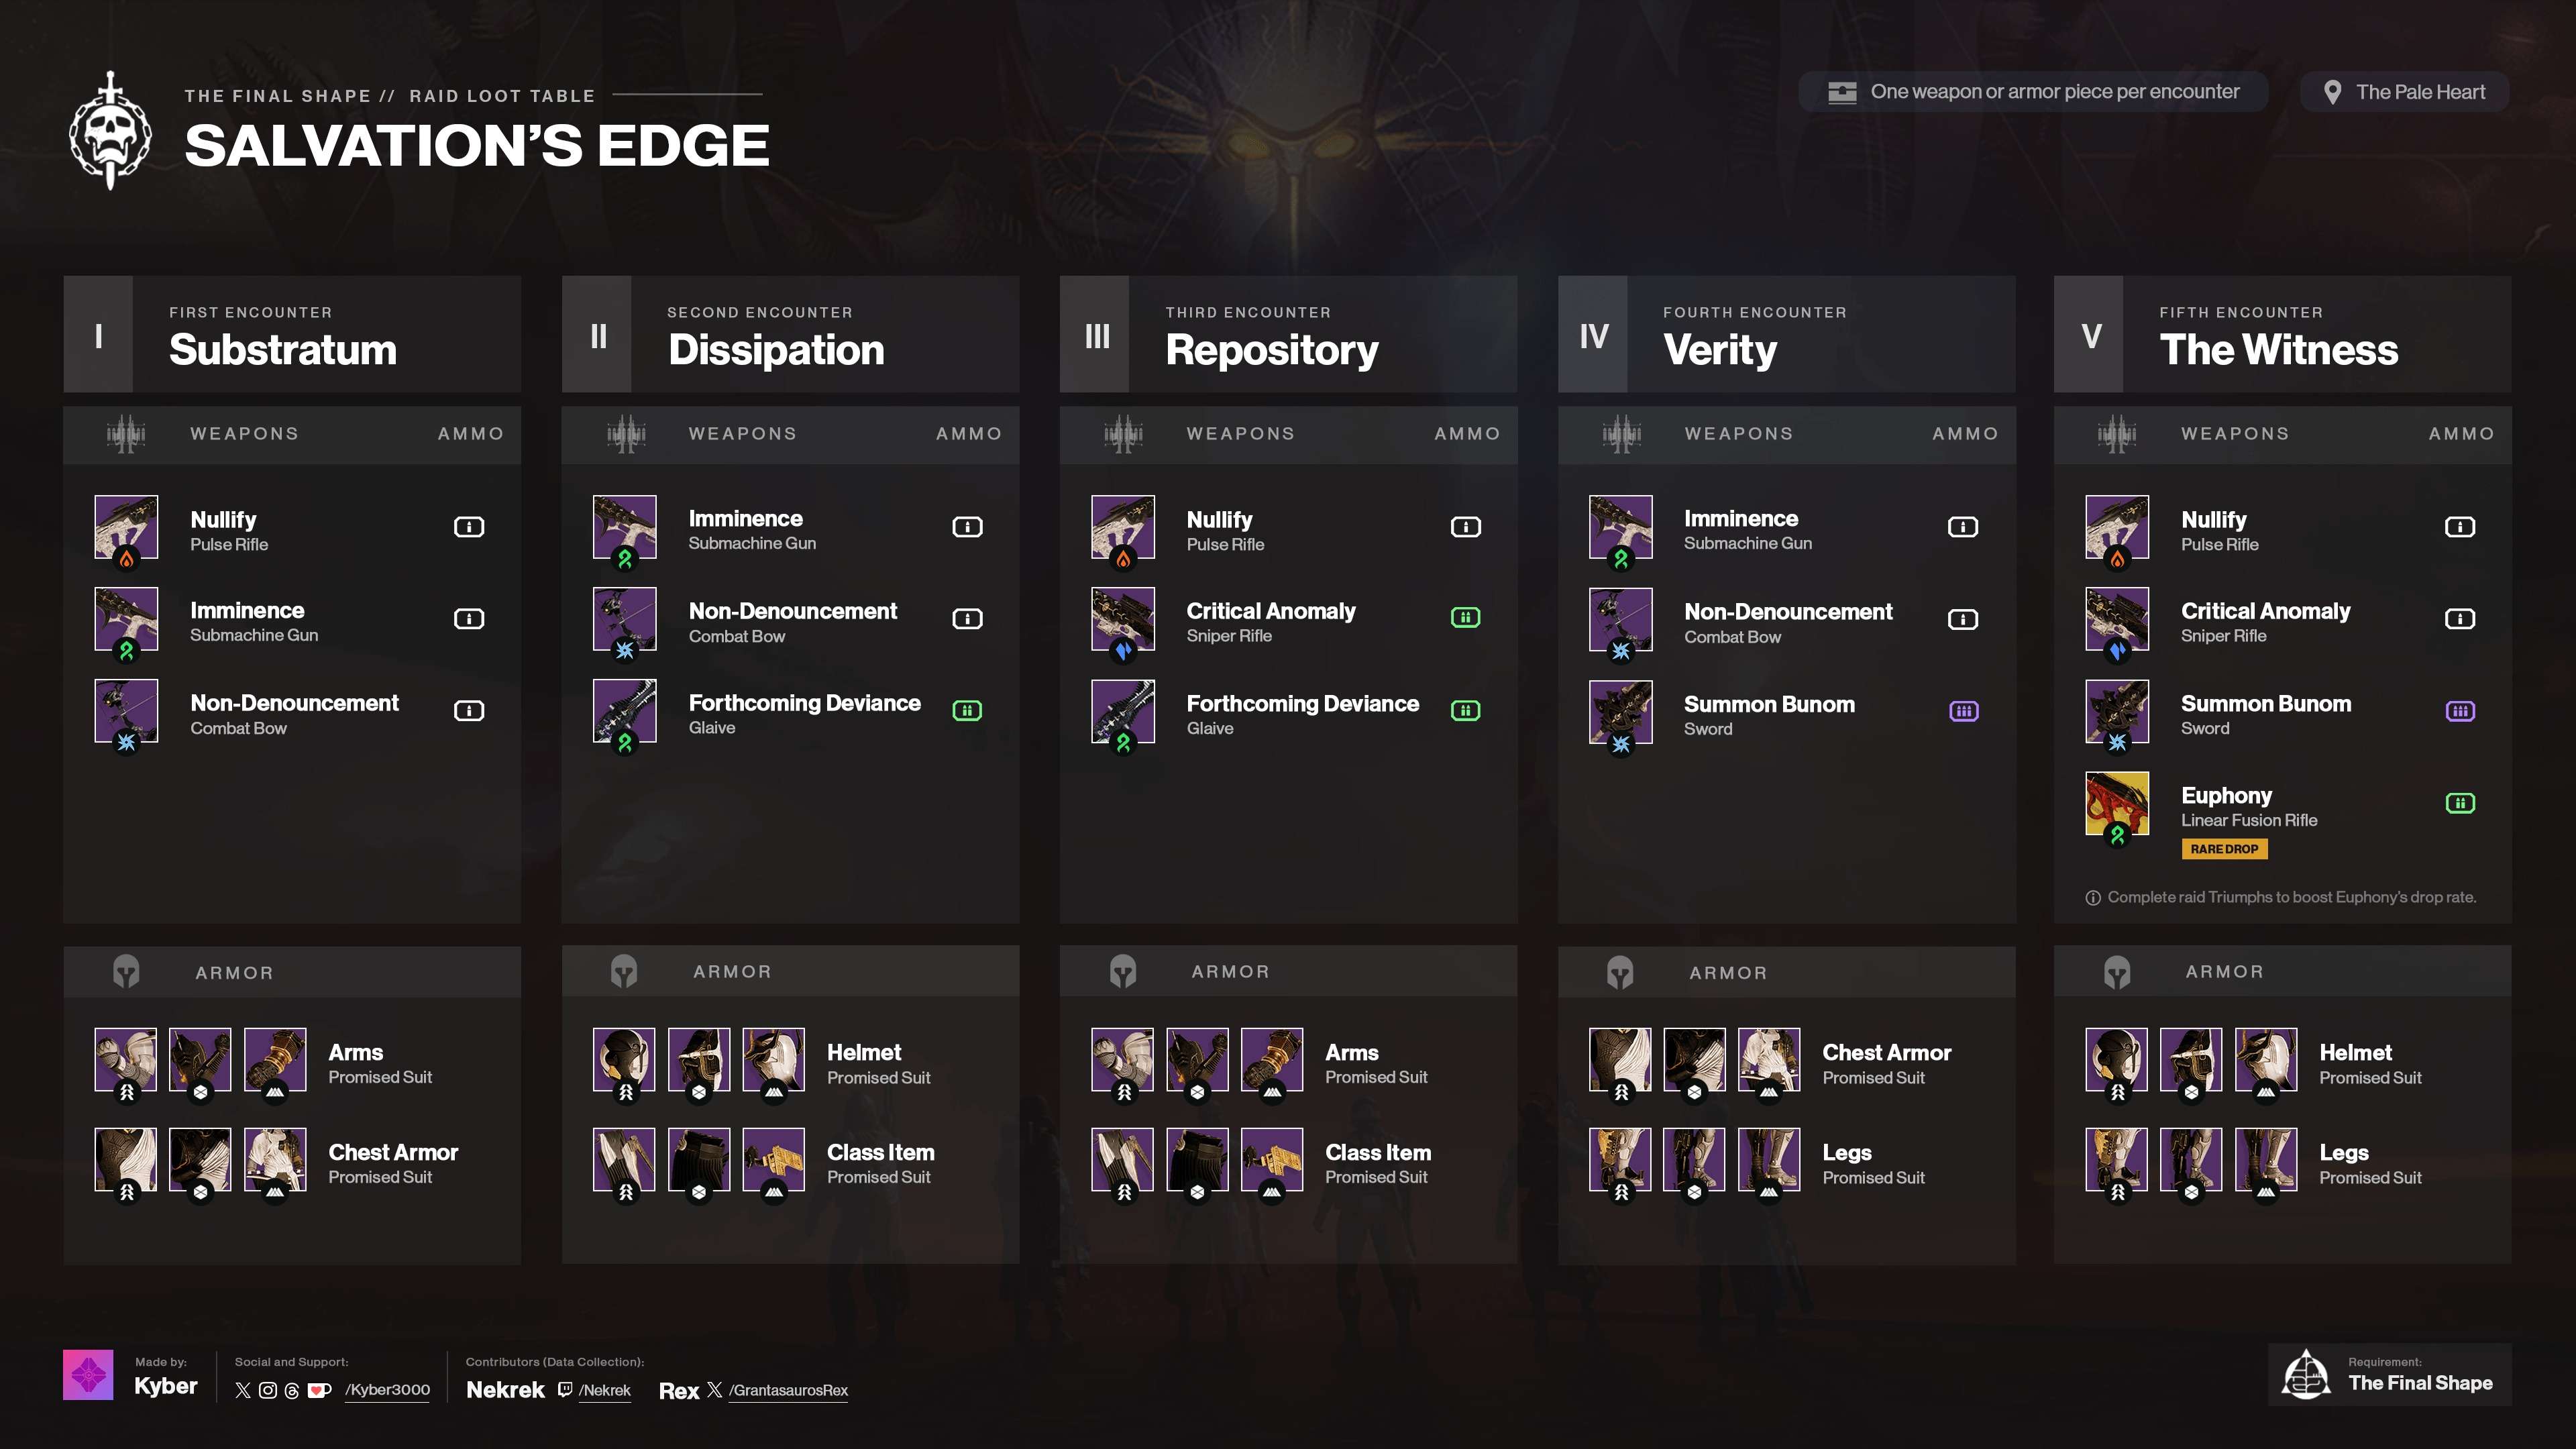
Loot Table
Click to enlarge…
Thank you for your time and I hope this little tutorial was helpful to you.


In encounter four, you need to know that you can’t break the mirror if any knights are still alive. If you put in the right symbols but can’t walk through the mirror, it means you killed an ogre and made the knights respawn. To fix this, you just have to kill all the knights again. After that, you’ll be able to walk through the mirror.
There’s a secret room in the beginning area before the first fight. You can step on pressure plates there to make enemies appear, but I don’t know the right order yet. More hidden rooms exist – one on the way to the second fight, and another heading to the third fight. Not sure if there are other secrets on those paths.