
Contents
- Getting Started
- Growing Weed
- Dress Up
- Listen to the Recorded Message
- Visit the Botanist
- Amber Stones
- Meet Llanzo in His Office
- Create an Offer on the Archipelago
- Deliver Product to Llanzo and Gain Llanzo’s Trust
- Retrieve the Repaired Motorboat Engine
- Find Casual Clients
- Land Vehicles
- Bandits
- Visit the Mechanic
- Use Quick Travel to Get Back
- We Gonna Need a Better Boat
- Work on Obtaining Better Lab Equipment
- Gather Cash to Fix the Lab
- Gain Information on the Available Hideouts
- Obtain a New Hideout
- Visit the Furniture Store
- Meet Jamal on the Beach
- Visit the Local Bar
- Visit Llanzo
- Craft and Deliver the Joints
- Create a DIY Table
- Create a Dealer’s Cabinet
- Provide the Dealer with Dope
- Assign a Dealer to a Terrain Spot
- Locate 5 Dead Drops
- Collect the Sales Money
- Arrange a Meeting with Llanzo
- Visit the Clothing Store
- Visit Llanzo
- Improve Your Staff
- Visit Marcus
- Attend the Meeting with Pedro
Getting Started
By PizzaInTheHood.
This is the first mission you’re introduced to in the game. The lab is on fire, and you need to put the fire out. You’ll see a hole in the ground with a ladder, climb down. On the left side of the mixing tray, you’ll see a fire extinguisher. Pick that up by pressing “F” on your keyboard. Once you have it, press “1” on your keyboard, and walk towards the flames. Then you simply press F again, and the fire is put out.
Walk over to Marcus (the blonde guy) and speak to him. Now you’re told to retrieve a package for Marcus, and checking the fuse box. Before we do anything crazy, we’ll go check on that fuse box.
Head over to where you found the fire extinguisher, and make your way into the next room. It’s somewhat dark in there, so if you’d like, you can press “L” to enable your flashlight. Walk to the end of that room, and open the door on your right side. Walk into that room, and you’ll see a fuse box on your left side blinking. Press F on the fuse box, and you’ve successfully turned on the light.
Next, we’re going to retrieve the package. Head outside by using the door next to the fuse box. Once outside, you’ll see a yellow marker on your map. That’s where you’ll find the package. If you’re still unsure on where to go, press “M” to view the map.
Once you make it over there, you’ll be greeted by a woman named Helen Rodriguez. Press F on your keyboard to talk to her. Give her the envelope.
Once you’re done talking to her, you may see a new item in your inventory (press TAB to open). You’ll need to deliver the package to Marcus. Again, check your map by pressing M if you’re unsure on where it is, and head over to the yellow marker.
When you get back to the bunker/your safehouse, go into the same room where you first met him, and talk to him. Give him the package with the envelope. From here, you can hold down TAB to see your current progress, but try not to get distracted. We will be focusing on harvesting the cannabis first of all.
So, make your way over to the room with the growboxes, and press F to open them. Drag both of them over to the inventory called “handy space”. From here, you’ll need to put them into the hybrid dryer. They can be found hanging on the wall beside you. Open one of them up. Here you have 2 options. Split the weed to make them dry faster, or put them all in one dryer. I’m going to do the fastest way, which is splitting them. Use your right mouse clicker, and drag them to the side in your handy space. If done correctly, you’ll get a menu saying “choose amount”. Here we’ll use the default (25), as it divides them in 2 equal amounts. Click confirm.
From here, drag one of the stacks from your handy space, into your inventory. This way we make sure that one dryer won’t take both halfs. If done correctly, you should have x25 in your inventory, and x25 in your handy space. Now, either hit the “max” button, to craft the maximum of what you have in your handy space, or put in the number “25”. This is optional. Each dryer will take 12 minutes and 50 seconds (real time) with the amount we’ve now put in. So in the meantime, let’s use some of the weed we already have.
Hold TAB to see the current orders we have, and remember those numbers. (or cheat and use this guide as you’re already doing, who am I to judge). The numbers will be random, but follow the things on your screen and weigh it out from there. These are the grams of your orders.
Head over to the Laboratory tray seen earlier, and open it. Once you’ve opened it, click the yellow + (plus) sign. Here you have 2 options, but for now, we’ll only focus on the drugs, not the substances. Click on “select substance”, and choose the “Cannabis Indica”. You should have a decent amount already. Now, as stated, we need to package these lovely orders.
This is how we’ll do it:
- Weight: 2g
- Quantity: 4
Then simply click “add”. Now you should have 2g x4 in your inventory, NOT your handy space. Click ESC to exit the tray, and do the following.
Head outside the bunker, and go to any client. There will be 3 clients in total. Again, use your map if you’re unsure on where to go.
When you get to a client, press F to interact with them. This will bring up an overlay of your inventory, and the client’s order. In this case, the client is requesting 2 grams of weed, so simply drag it to the middle of your screen where it says “drop the dope here” and let go. Set the value to 1, and confirm. Now go to the other 2 clients and do the same thing.
Congratulations you absolute drug lord, you have now completed your first few sales. Keep in mind though, not all clients will stand exactly on the green marker, so you may have to walk around a bit to see where they are, but they’re never too far away.
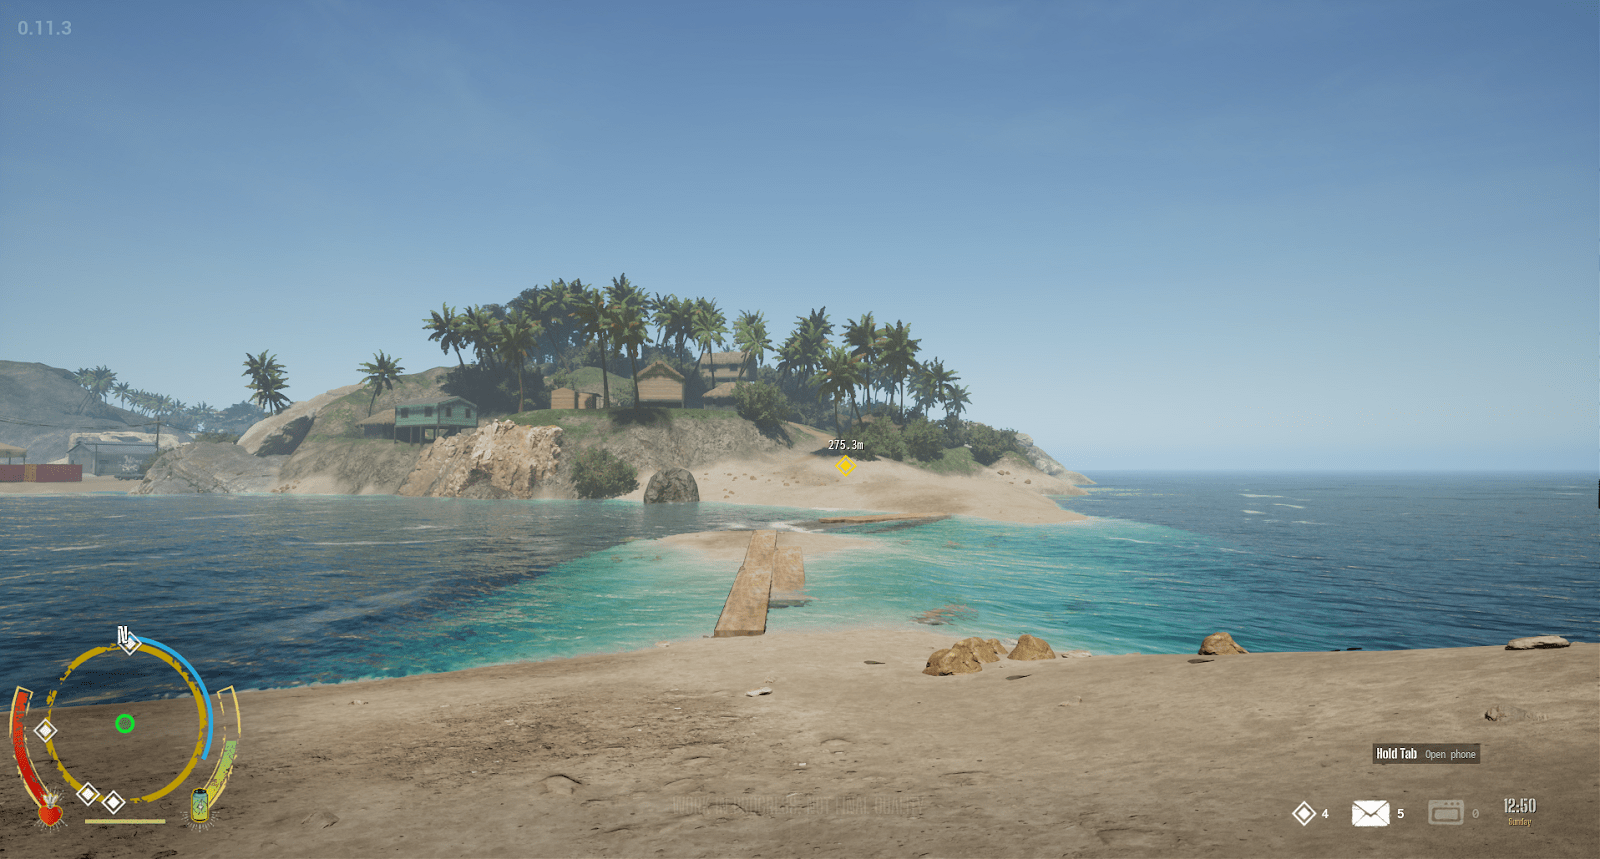
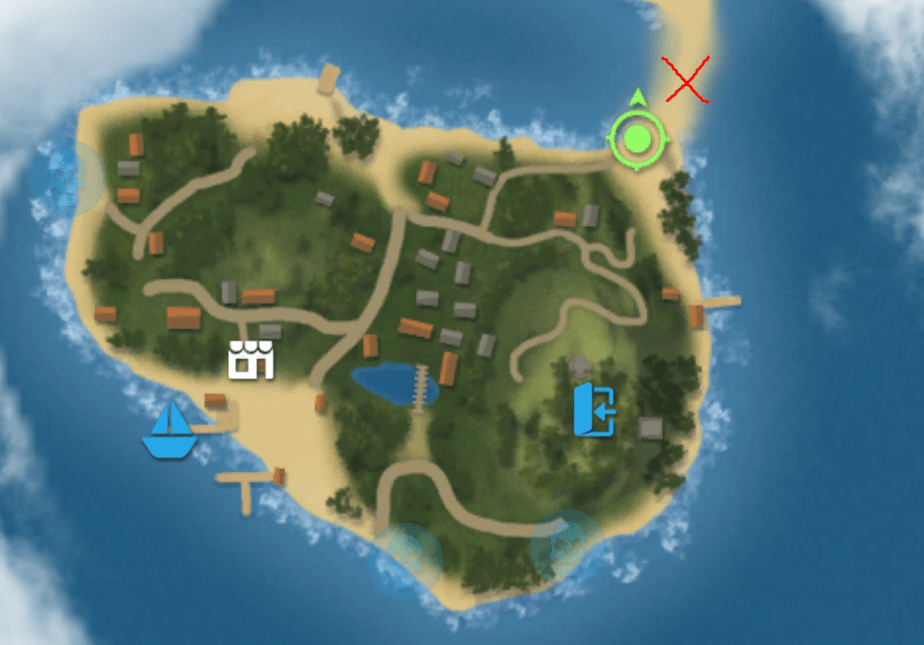
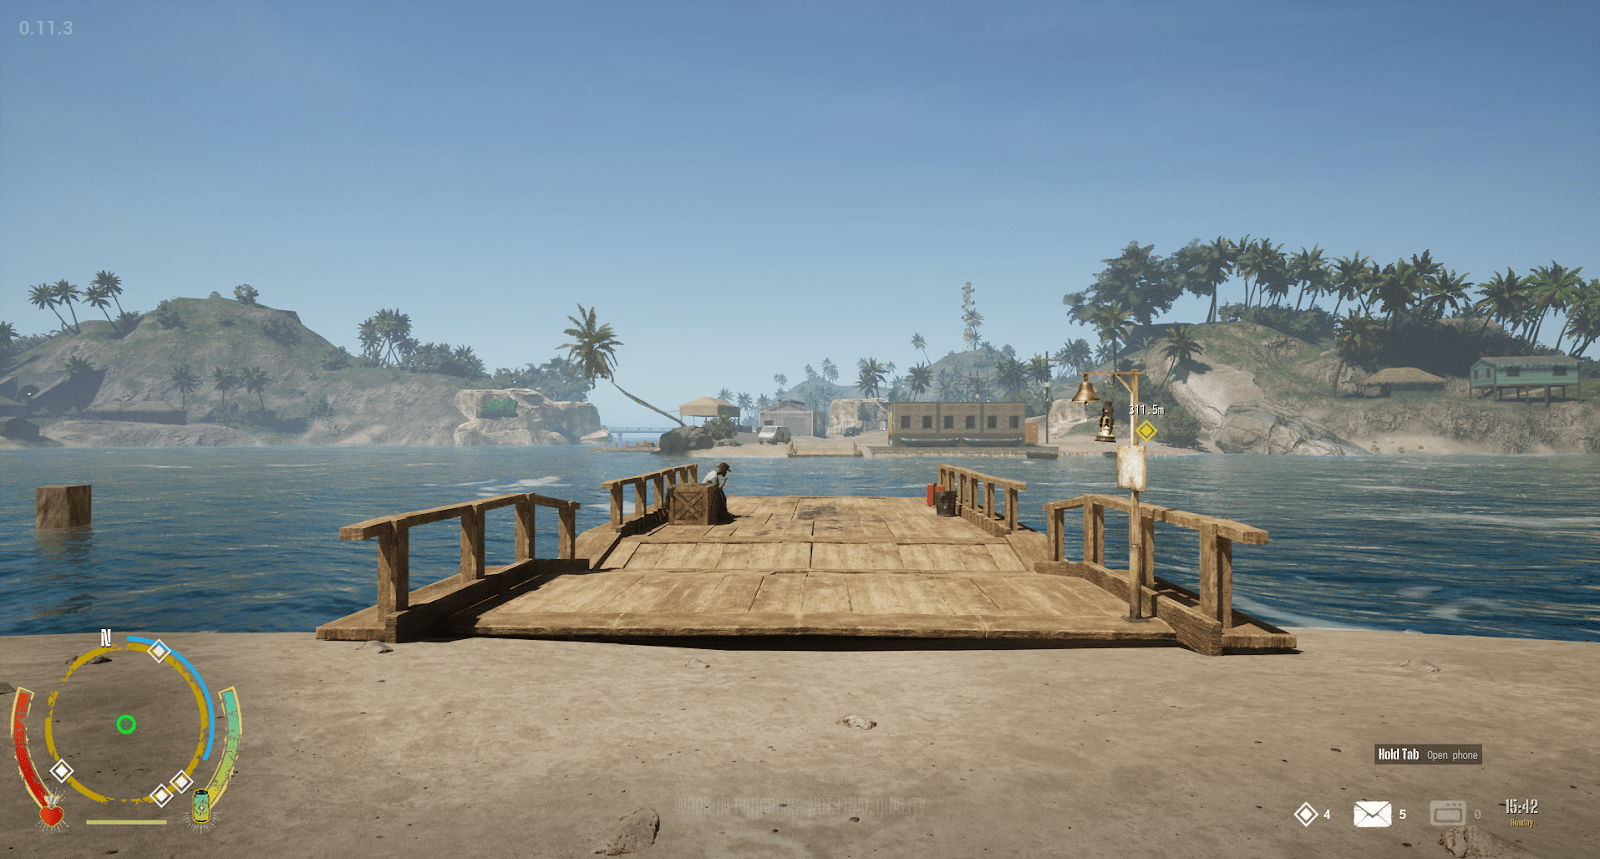
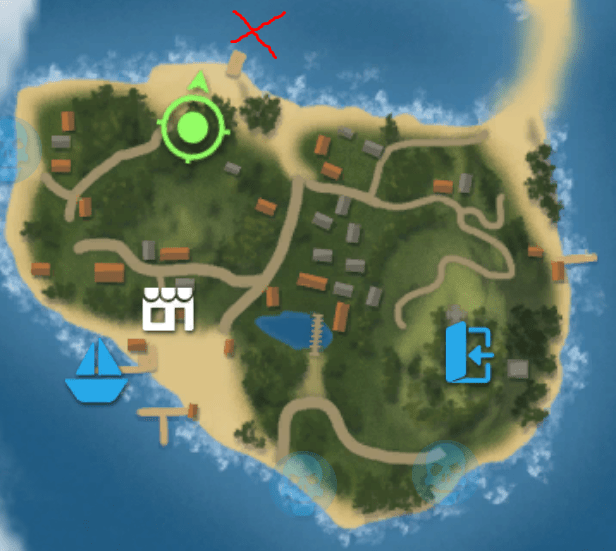
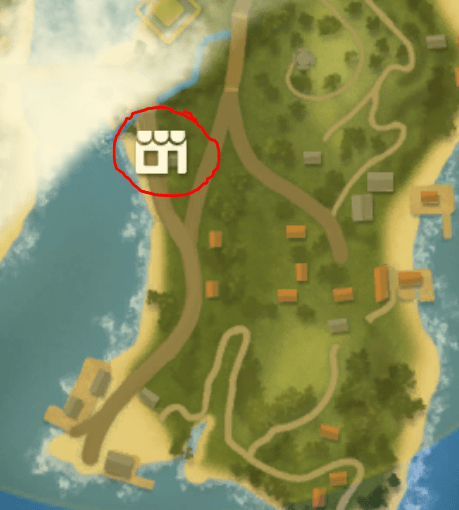
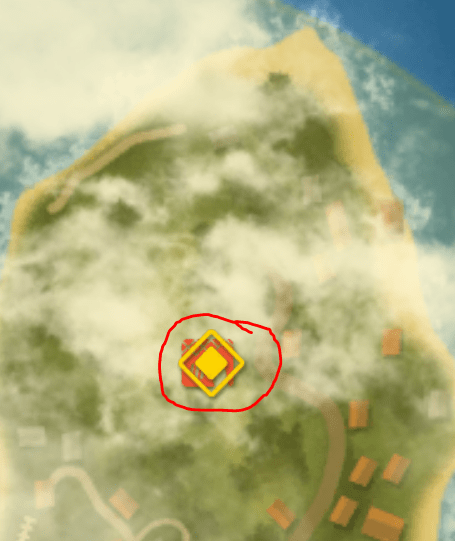
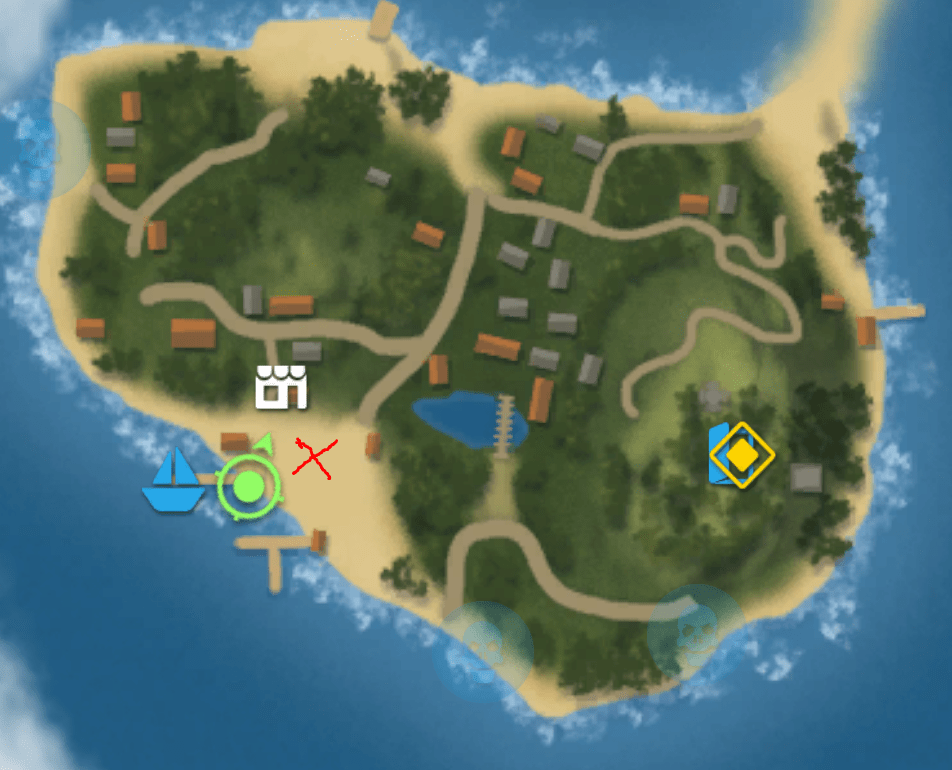
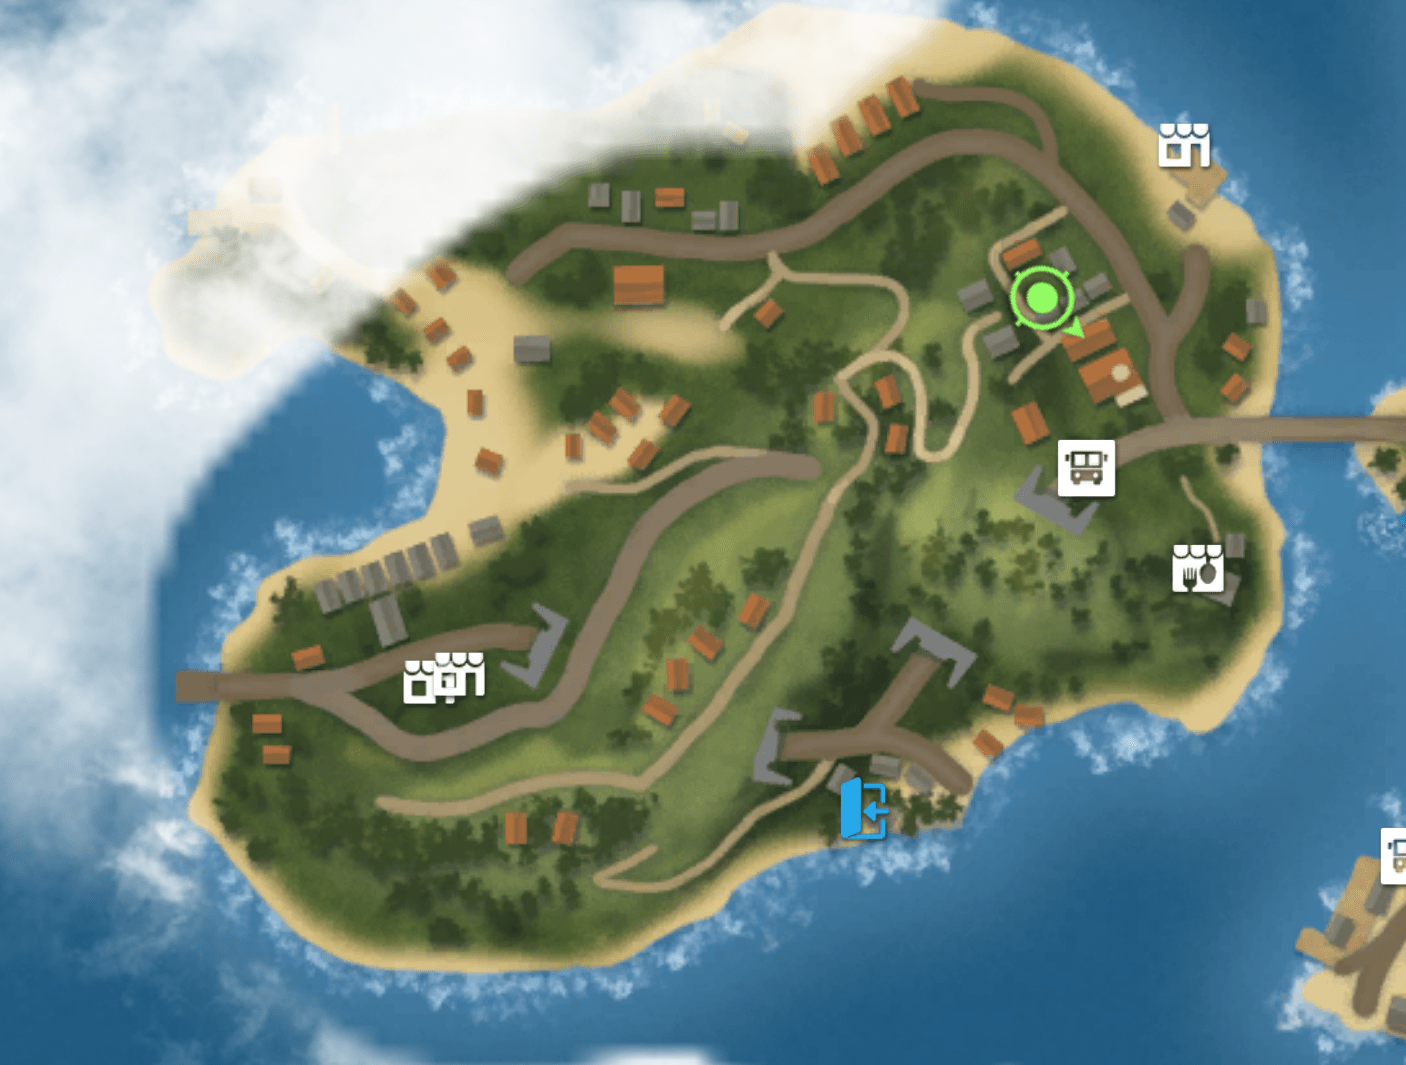
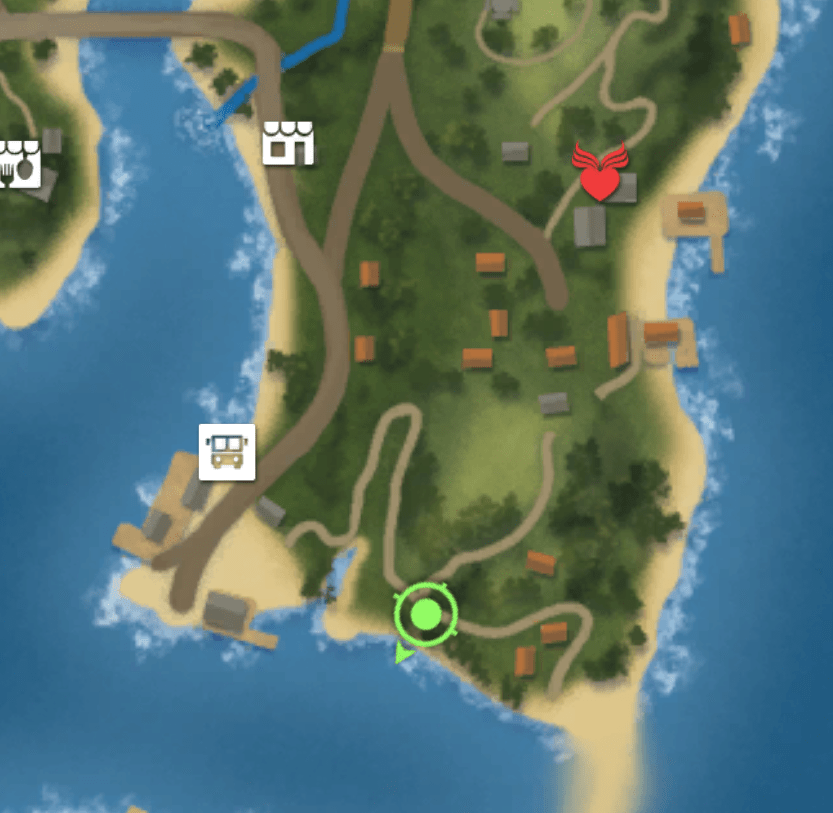
Now, let’s meet this Llanzo guy in his office. If you check your map, you can see that it’s slightly far, so you have 2 options here aswell. The first one is free, and that would be to use the beach area to walk across (see pictures below), or, use the ferry. The ferry will cost you $50 for each trip, and if it’s not on your side of the island you’re on, you’d have to call for it, which also costs $50. Again, see pictures below for both locations.
- Location #1: The beach (look where I put the red X symbol).
- Location #2: The ferry (look where I put the red X symbol).
Continue to the next page: Once you get to the location where Llanzo is located, just walk through the door, talk to him after Eddie is done yapping. Once done, you can either use the free phone in one of the rooms in his office, or you can take the long road by heading back to the area where you first met Helen Rodriguez (the store on the first island). Go “behind” the store and go to one of these phones. Look at the picture below.

Now, set the value to 1 or 2. That should be plenty of time. Click “add”. Listen to Marcus voice message. He’ll tell you that you need $50 000 to repair the lab, but we can worry about that later. Keep in mind, the phone booths are regularly used to unlock new missions, listen to voice messages, and so on. So make sure to check in once in a while.
For now, we’ll head back to the bunker/hideout. Once there, head to the room with the ladder, and climb up. Look up and press your spacebar. Here you can find your wardrobe, and a few beds for you and your companions if you’re playing in coop. If it’s night, feel free to sleep, if not, head to the wardrobe and open it. Take off your old clothes, and put on some new ones. Now, head downstairs again. Let’s learn how to do more orders. Keep in mind though, that the regular clients won’t be patient as Eddie’s friends, who you have already served, so remember that before accepting any orders.
Alright, hold down TAB and hover over the names on the bottom right corner of your screen. here you’ll see a bunch of different names. These are your new clients. You’ll be able to see their location, and their “patient meter”. The meter will slowly decrease, but not to worry, we’re on it now. I usually hover over them, and try to memorize the orders BEFORE accepting them. In my case, and this may be different from your clients, there are 3 clients that wants 5 grams each. Then you’ll do as before, go to your mixing tray, and weigh it out. In this case, I’ll do 5×3 (weight 5g and quantity 3), but make sure you follow the orders you have. Then, I have 2 other people that wants 2 grams each, which will of course be 2×2.
Once you have scaled everything up, press TAB again, hover over the clients, and hold F to accept the orders now. This will arrange a meeting with your client(s) instantly, so I suggest you use this option if you’re ready to deliver, and have everything set. You can also just press F if you want to schedule another time to deliver, if you feel like you have some other things to do first, or not ready just yet, but I won’t do that. Now you can just run and deliver your orders as we did before.
Growing Weed
Once you’re done selling your product, we should consider growing some more. Make your way over to the 2nd island, and go to this store.
See the picture below as always:
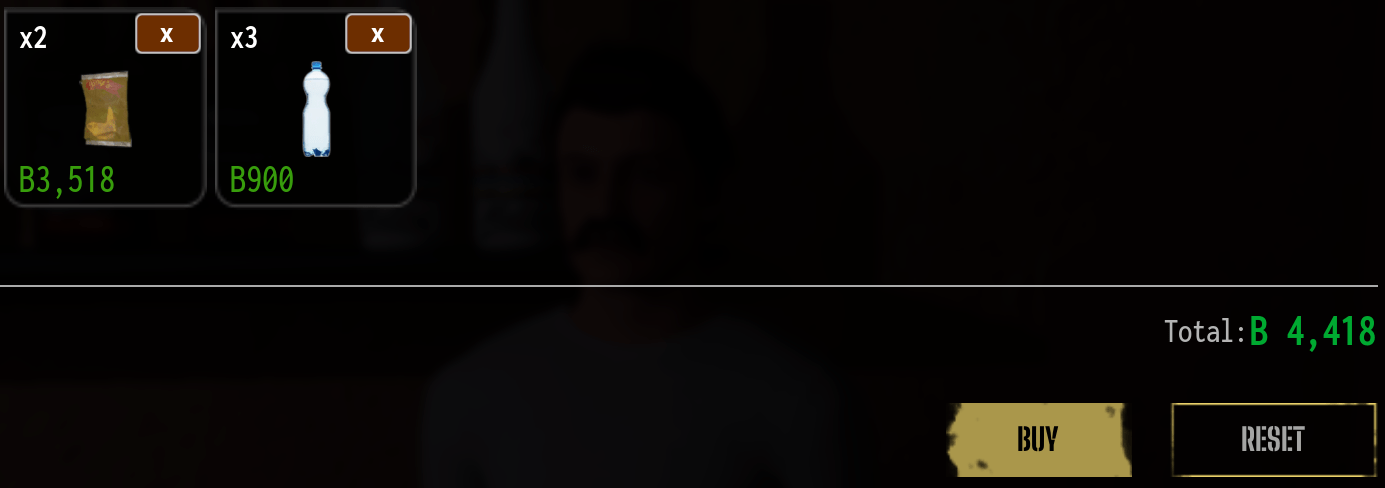
Once you arrive at the store, go ahead and buy 2kg fertilizer, and 3 water bottles. It should look like this.
Continue on the next site: Go ahead and purchase that with your hard earned money, and go back to the bunker. I forgot to tell you this earlier (that’s my bad), but you can open the metal cabinet in the bunker, and equip a backpack for more inventory space. You must do it at the wardrobe to put it on, so go ahead and store your other items in the meantime in the cabinet, and drag the backpack to your inventory. Open the wardrobe located upstairs, and click “add” on the backpack. Then go ahead and drag it into the backpack slot on your character.
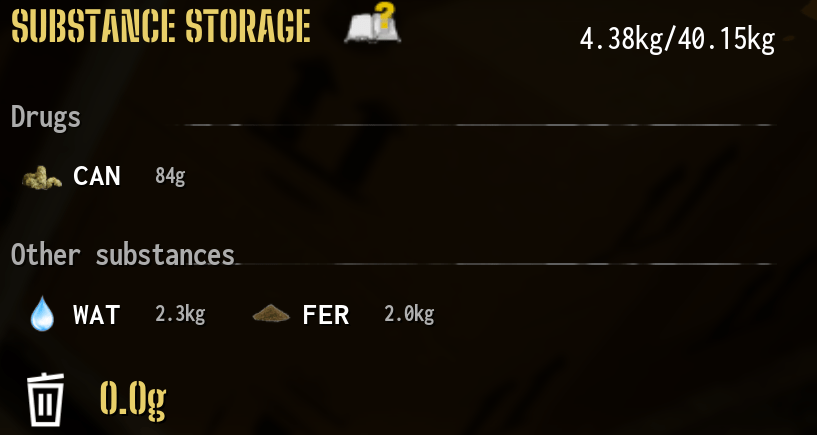
Alright, sorry. Growing weed! Go ahead and get the supplies you stored in the cabinet downstairs for starters. Drag them to your handy space or inventory. Once done, go to the tray and open it. Now, drag and drop the fertilizer where it says “drop items here to unpack”. Do the same with the water. Now don’t freak out, it’s still there, but it’s stored in something called “Substance Storage”. You can see this on the right side of your screen when you’re in the tray. It should look like this now:
Head over to your grow boxes, and interact with one of them. When you’re in there, you can see your inventory, growbox, and handy space. The seeds must stay in the handy space to be able to grow. Click “craft”. This process will take around 17 minutes in total, and will give you 35 indica flower from each growbox. Once done, do as we did before.
Split them in half after grabbing both, add them to the hybrid dryer, and wait 12 minutes and 50 seconds more. The time it takes will obviously change, depending on how much you have in each growbox/dryer. Once the weed is done drying, it’s automatically stored in your substance storage, waiting for you to package. Larger packages will require stretch foil and/or duct tape, so stock up on some of that aswell for larger orders. It’ll tell you what is needed when you start packaging. An example can be seen here:
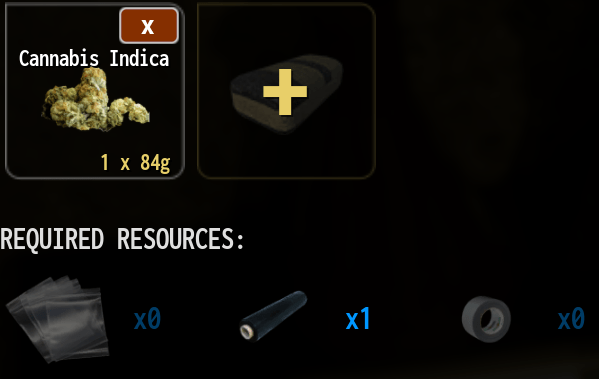
This is an example package of 84 grams of cannabis. It tells me I need:
- 0 plastic bags
- 1 stretch foil
- 0 duct tape
Now you know how to deliver, weigh out, deliver, grow, and dry your weed, so I won’t go into further detail on that before we need something else related to it later in the game. What we can do, is figure out where to buy seeds for future growing.
Dress Up
Here you pretty much just head upstairs in the bunker, and go to your wardrobe. Get rid of your old clothes, and put on new ones by dragging and dropping them into the closet, and on your character.
Listen to the Recorded Message
Make your way over to the yellow marker on the map, or head behind the store on the first island. From there, pick up a payphone, and listen to the instructions Marcus gives you.
Visit the Botanist
So find the mission saying “visit the Botanist” on your map, or look at the picture below.
Head to this location on the map. It’s on the 2nd island. Eddie may warn you on your way there, telling you it’s a bad area bla bla bla, but ignore that (for now). We’ll get back to that later on.
Once you’re there, go instead the house and head upstairs. Talk to the first guy you see named Elvin Garcia. He will tell you that his brother is sitting right next to you. Turn your head a bit and you’ll see Emilio Garcia. Talk to him aswell. Once done, you’ll be able to see what they have in stock. Elvin will have growing equipment and such, and Emilio will have the seeds, along with a few other useful items. For now, we’ll only focus on the seeds. You can buy as many as you’d like (meaning until he runs out), so I’m going to buy 5. That’s all he has in stock as of now. You can also ask everyone that’s selling stuff when they restock the next time to prevent you going there every few minutes to check for yourself.
Anyway, you now have the seeds, and know where to buy them, along with growing equipment. Awesome.
Amber Stones
Now, this one may be a bit tricky, but I’ll help you out. So first of all, make your way over to the first island near the shop. When you arrive, go to this location. The stones may be a bit tricky to see, so I marked a few of them for you to get a better idea of what they look like, and where some of them are.
Tip: You can also use your middle mouse button to get a better idea of where they are located.

These stones can be sold to Helen Rodriguez at the store on the first island for $1800 a piece. To sell them, go to her, and choose the “I want to buy something” option. Click on “sell”, then “max” and sell all the stones you have. She also buys other junk you can make or get throughout the game, so keep that in mind aswell. You can find more stones scattered around the islands, but I’m not going to spend 3 years of finding each and everyone for you, so that’s on you if you decide to put yourself through that.
Meet Llanzo in His Office
Llanzo has requested to see you in his office. Head over there and see what he wants. He can be found on the second island. Follow the yellow marker, and head through the door.
Create an Offer on the Archipelago
Go back to your bunker, and make a package. I suggest not going under 10 grams, but you can do as you want. How to make the packages and stuff can be found under “getting started”. Then head back to Llanzo and deliver it to him.
Deliver Product to Llanzo and Gain Llanzo’s Trust
So, let’s deliver some samples to Llanzo to grow our clientele. If you’re not there already, head back to the bunker. Go to your tray, and make a package. I’m going to go with 10 grams of weed, but you can probably go higher or lower if you wish to do so. Once you get to Llanzo’s office, interact with him, and choose the option “I have a package for you”. Later on, you can pick up a % of the money at his office. Keep a look out for what the town demands, and try to follow up the best you can with that.
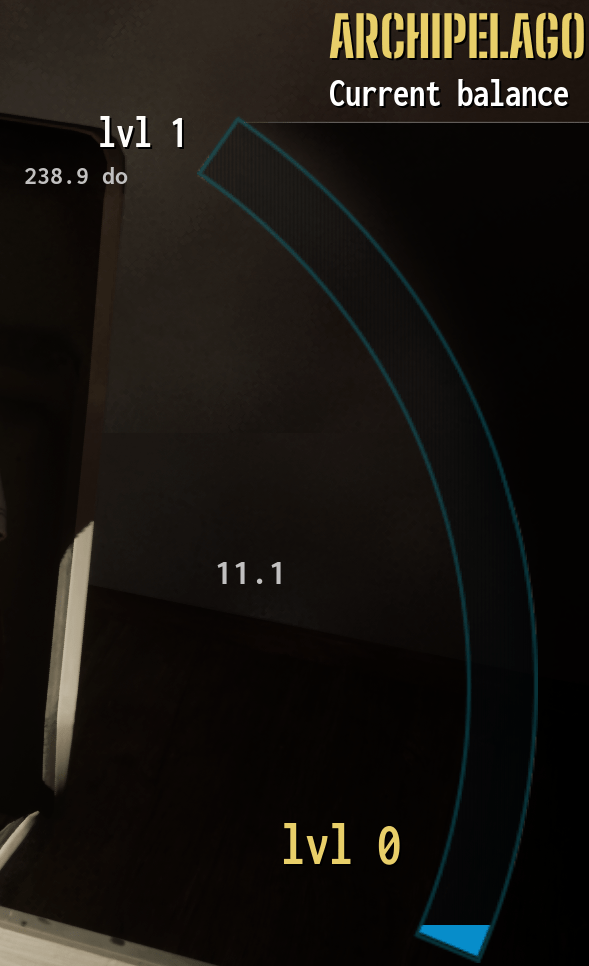
To build your reputation with Llanzo, you’ll need to deliver a few packages for him to trust you. Your reputation level can be seen here:
Retrieve the Repaired Motorboat Engine
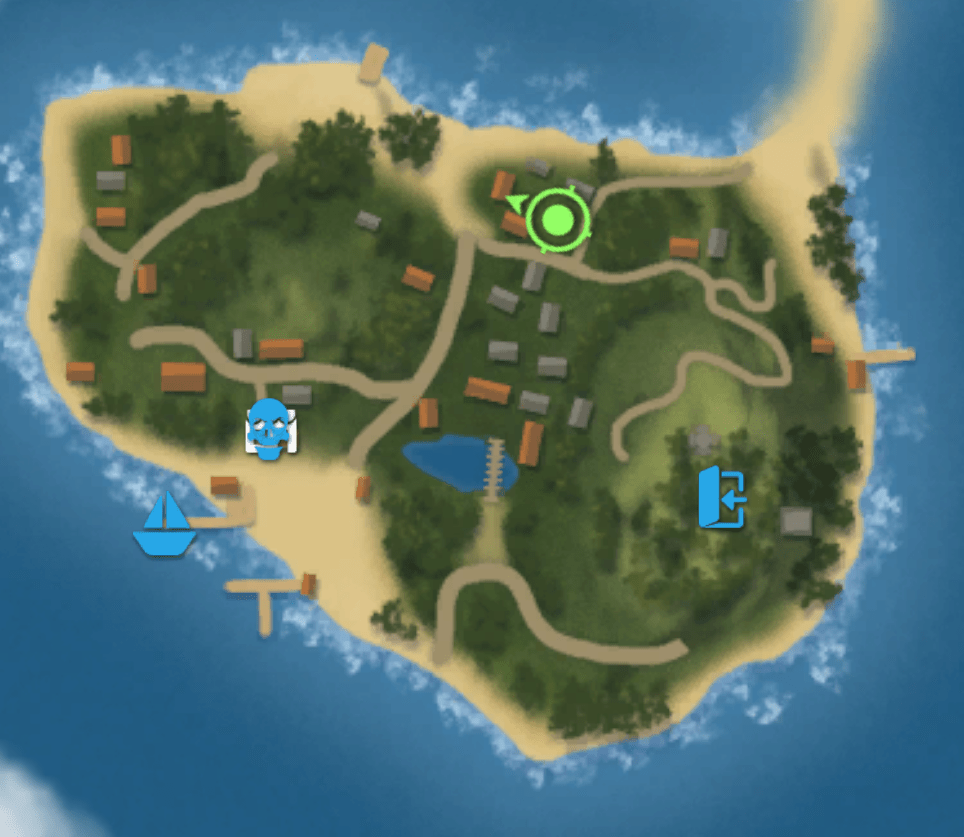
Before you go completely crazy, make sure to have the required amount of money on you to do complete this mission. This costs $30 000. Once you’ve made sure of that, head over to the blue skull on your map on the 3rd island. You really can’t miss it.
Once there, interact with the guy named Jairo Herrera and click on “yes”. Then listen to his life story and whatnot, then pay the $30 000. Now, head over to the first island, once you arrive, you’ll see a small boat. Jump into the water, and press F to install the engine. Keep in mind you’ll need to buy some more fuel eventually if you haven’t already. You cannot get out of the boat anywhere, only certain docks. You can also purchase other boats where you met Jairo Herrera/fuel depot.
Find Casual Clients
This mission is simple enough. Have a look around the island, and look for people that are waving their hands at you. If you see someone doing that, go ahead and make your way over to them, and talk to them. I found mine at the gas station on the 2nd island, but locating them shouldn’t be too hard to figure out.
Land Vehicles
Just to make it clear right away, yes, you can purchase cars and mopeds, although they are fast travel only, and cannot be driven like the boat freely on the water. However, you can purchase a bus ticket at the stores, and fast travel to different locations if you don’t feel like running. Keep in mind that the bus tickets are a one time use only, so you’d have to buy several tickets if you want to get yourself around. Price per ticket is $20.
Bandits
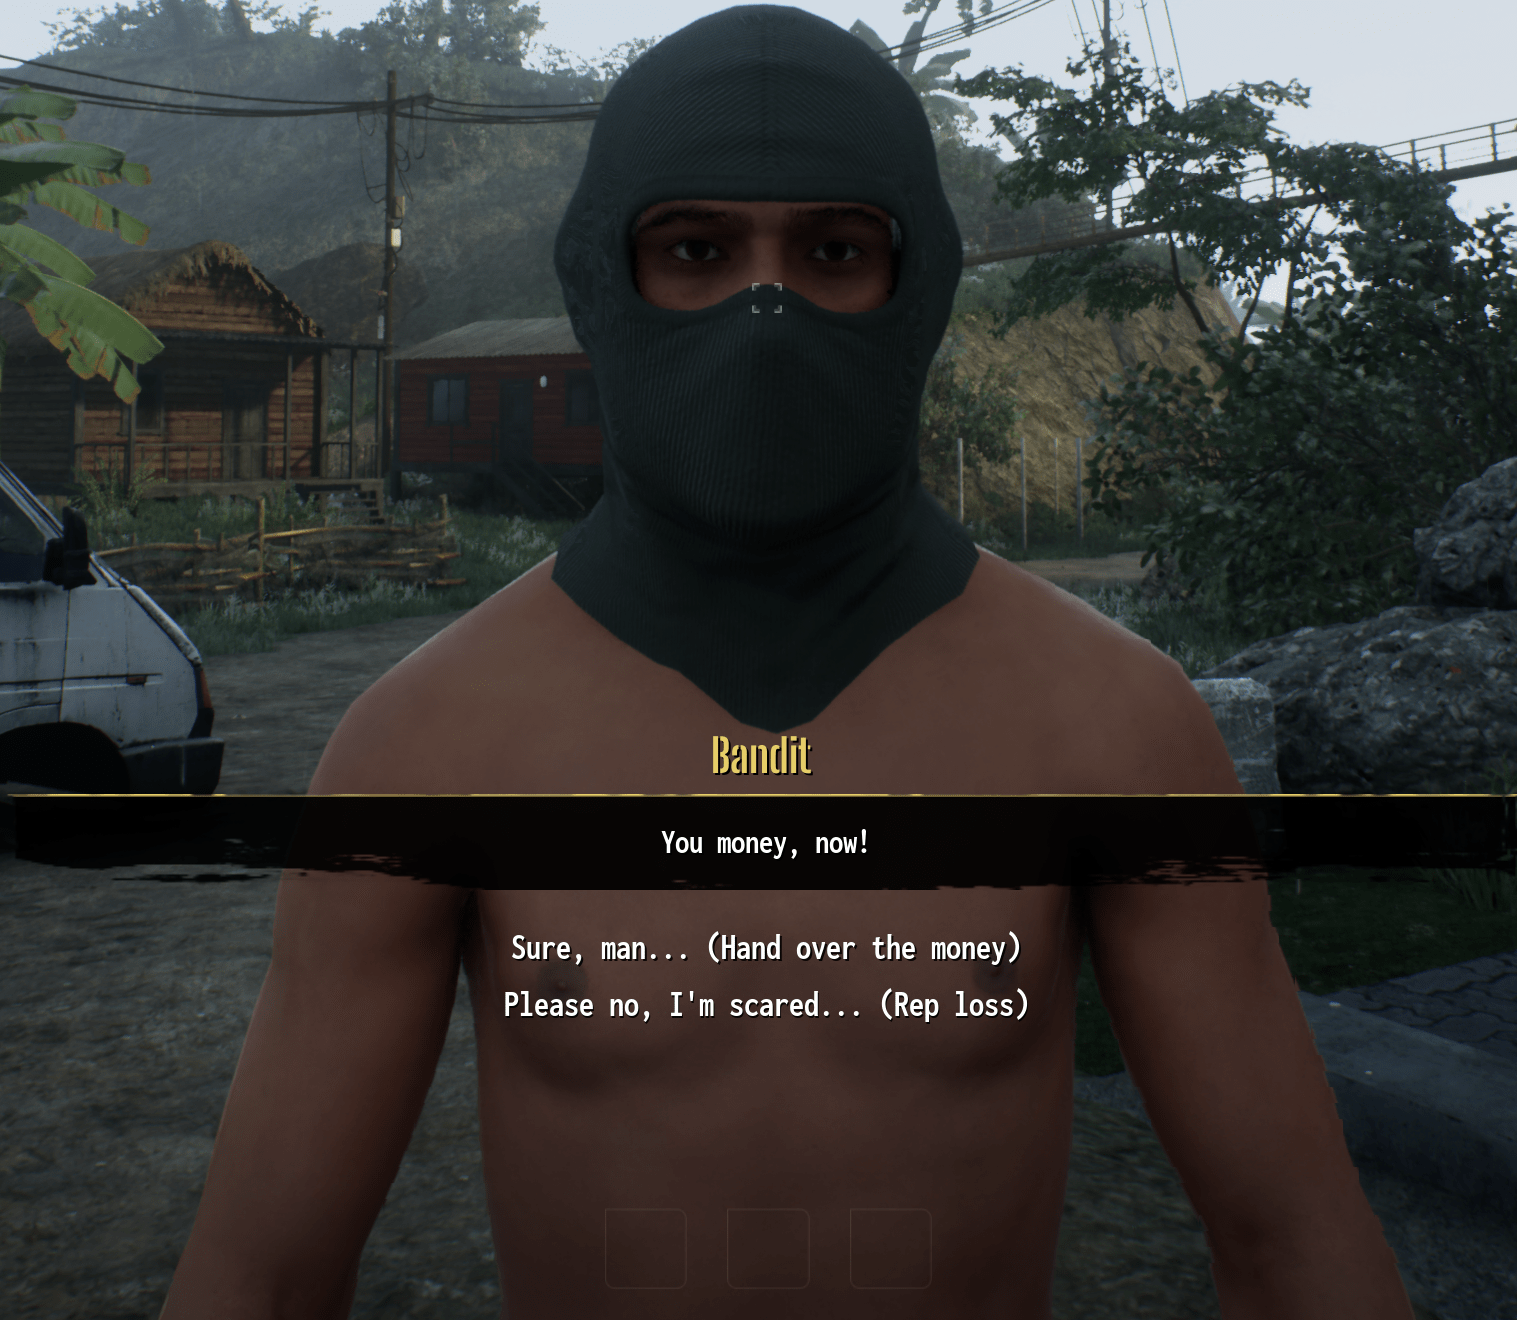
Ah, yes. The bandits… If you are unfortunate, you may run into one of these guys, and let me tell you, they do not mess around. As you can see in the picture below, you have 2 options here. First option is to give him your money, which is a pretty big chunk of what you have on you, or the second option, tell him that you’re scared and lose reputation.
It all comes down to how far you’ve progressed in the game, but if you barely have any money on you, then you might aswell give it to him, and
He’ll go away. They look like these, and can stand in groups:
Visit the Mechanic
In this mission you’ll need to visit the mechanic, which is simple enough. Make your over to the location marked on your map, and interact with the man named Ezequiel Ramos. Here you can buy gasoline and different items depending on your needs, aswell as a car and a moped.
Use Quick Travel to Get Back
If you don’t have some already, go ahead and make your way to a store. Buy a few bus tickets, but keep in mind it’s a one time use only, so you’re probably gonna need a few. If you’re not sure where to find a bus station, it’s one very close to the ferry dock on the 2nd island. It should look like this:
Interact with the sign, and choose a location to travel to. Keep in mind, you cannot take the bus during night. Only during these times – 6:00 – 22:00 aka 6 AM to 10 PM.
We Gonna Need a Better Boat
Is that so? Ok. Let’s go! Head over to the fuel depot, talk to Jairo Herrera, and and check out his offers. There you’ll find a Rib Motorboat for $165 000. Go ahead and purchase that, and you’re all set!
Work on Obtaining Better Lab Equipment
Make your way over to the one and only Elvin Garcia at the weed and equipment store. Here you’ll find all the equipment you’ll ever need. To finish this mission, you need to buy for example the hybrid dryer or growbox.
Gather Cash to Fix the Lab
Ok, so this is kinda pricy, but you should have some cash from sales and $150 000 stored if you haven’t spent them already. So if/when you have the money, make your way back to the bunker, once you arrive, go to Marcus. Interact with him, then choose the option “yeah, here it is man”. You can come back to him after a while, and buy different things that will come in handy down the road.
Gain Information on the Available Hideouts
Go to the yellow marker on your map, and you’ll find a cowboy looking guy that goes by the name Pedro Alvarez. Interact with him, and hear what he has to say. From here you have 4 options. A hideout near the church (which I personally don’t enjoy, as the bells are really loud) and a hideout right by the tunnel on the third island. Those are on the 3rd island.
Then there are 2 more on the 2nd island that you can purchase if you wish to do so. Go ahead and view them, and decide for yourself which one you’d like to purchase. Once you’re set on one of them, talk to the real estate guy that’s in the house you’re looking at. His name is Miroslaw “Stefano” Jalapeno. Man, that’s a mouthful. Anyway, interact with him, and buy the house. From here you can decorate your house by holding spacebar.
Obtain a New Hideout
Go to any of the 4 blue skull symbols on your map to purchase a hideout. There are in total 4 houses, 2 on island 3, and 2 on island 2. Choose the house that you think suits you the best for your needs.
Visit the Furniture Store
Head over to the furniture store marked on your map. It should be a blue skull on the third island on your map. Take a look at the picture below if you’re still unsure on where it is/what it looks like.

From here, talk to the cashier Diego Alvarez. Then you’re pretty much done. You can of course purchase any furniture to your liking aswell.
Meet Jamal on the Beach
Eventually you’ll get a voice message left by Jamal Thompson, telling you that he’s interested in a special delivery. After the call ends, you’ll see a “green man” icon on your map, on the 3rd island. Head over there. You’ll find him in front of a house with a cowboy hat and blue shorts, proceed to talk to him.
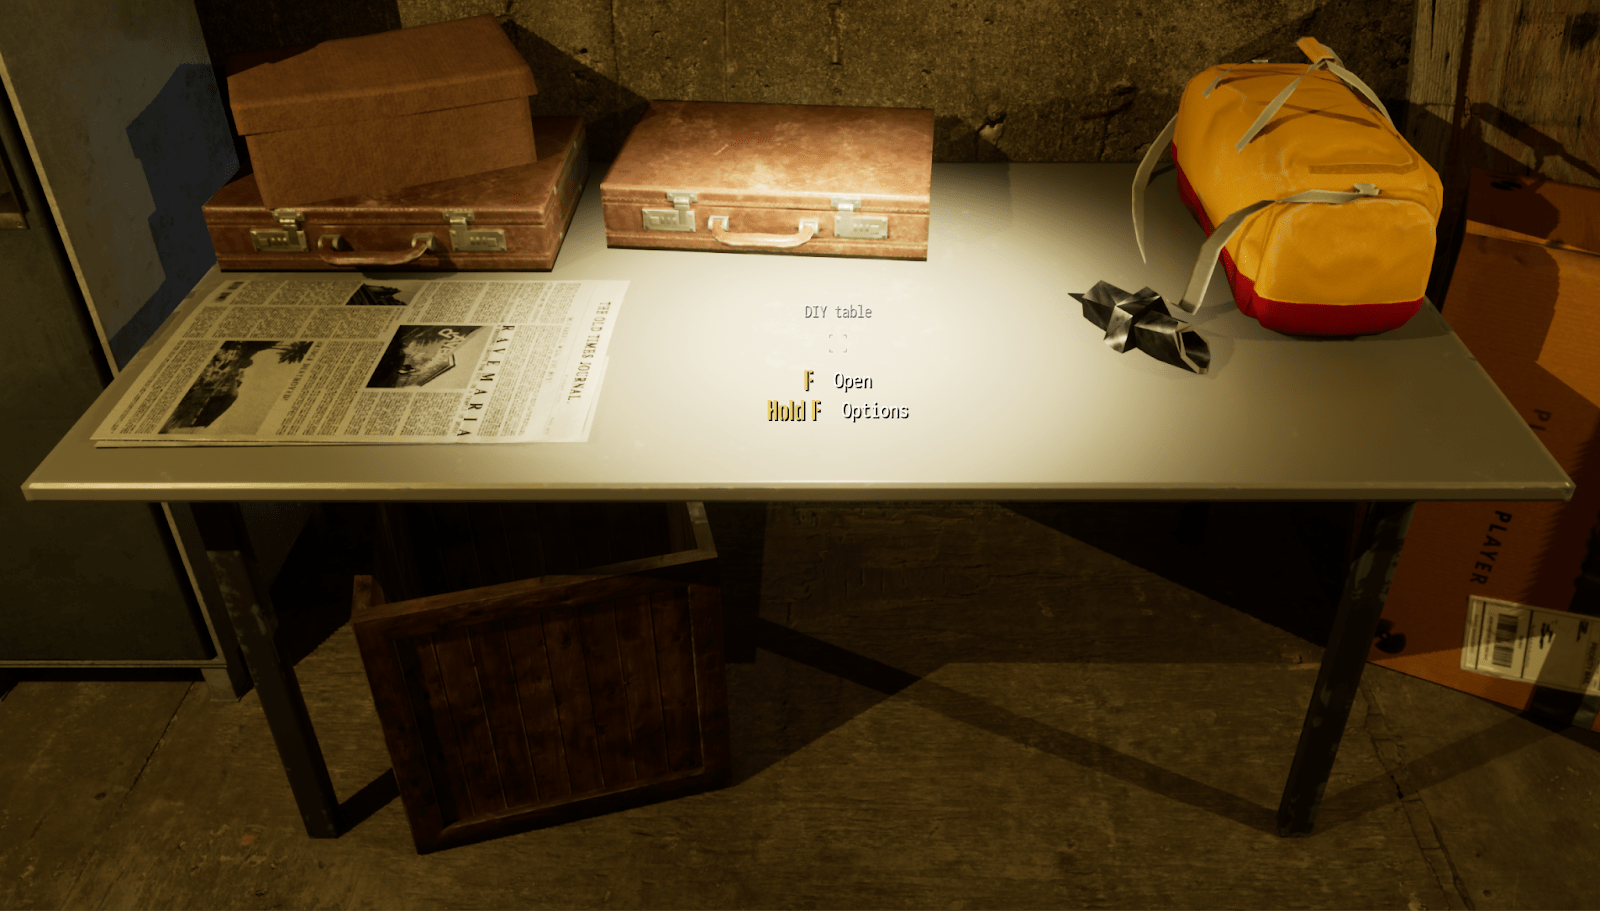
He’s requesting 15 pre rolled blunts/joints. He offers $15 000 for the joints. Proceed to accept his offer. Now we’ll head over to a gas station/store. Once you’re there, go ahead and buy 1 or 2 cigarette packs, and rolling papers. I’m buying 2 packs of cigarettes just to make sure I have enough. I’m also buying 15 rolling papers. This is required. You’ll see why later. Once you’ve bought them, head to the mechanic, and purchase a tool box. This costs $8000 so, so make sure to bring some money with you. Then, head back to your bunker/safehouse. When you’re at the bunker, or where you have all your stuff set up, and find your industrial table. Open it up, then drag and drop the tool box in the cogwheel slot. The cogwheel slot is in the top right corner when you’ve interacted with the industrial table. Here:

If done correctly, your table should now look like this:
Now, interact with your upgraded table (now called DIY table). Click on the blunt, and the button that says “show details”. That’s the required items/materials for each blunt. Click on the “hull out tobacco” and max it out, then click craft. Make sure that your cigarettes and rolling papers are in your handy space as I stated at the start of this guide. Wait for it to finish, then click on the blunt again, and make AT LEAST 15 blunts for your client. You can make more if you want, but for now, this is good enough.

Once it’s finished making the blunts, head over to meet Jamal again. Give him the blunts you just made, and you’re done!
Visit the Local Bar
Head over to the location showcased on your map. If you see this place, you’ve come to the right place. Go inside and interact with a woman named Camille Brun. There you can buy some extra water, or other supplies if needed.
Visit Llanzo
Llanzo has some business he wants to discuss with you. Check your map and head over to his office. Once you get there, chat him up, and more tasks will be given.
Craft and Deliver the Joints
When you have the 15 joints crafted, go meet up with Jamal again. He will pay you $15 000 in total. Look for a “green man” icon on your map on the 3rd island.
Create a DIY Table
To make a DIY table, you need a tool box. This can be purchased at the mechanic for $8000. Once you have that, head back to the bunker, open the industrial table, and drag and drop the tool box to the cogwheel slot.
Create a Dealer’s Cabinet
A dealers cabinet is used to keep your dealers in check, and have everything sorted out. To make this, you’ll need a few things, and they obviously come with a cost, so make sure to bring your wallet with you. Also, make sure to empty your metal cabinet first, otherwise you won’t be able to upgrade it to a dealer’s cabinet.
You can get everything you need at the mechanic or the fuel depot. Look at the picture below for the following things you need:
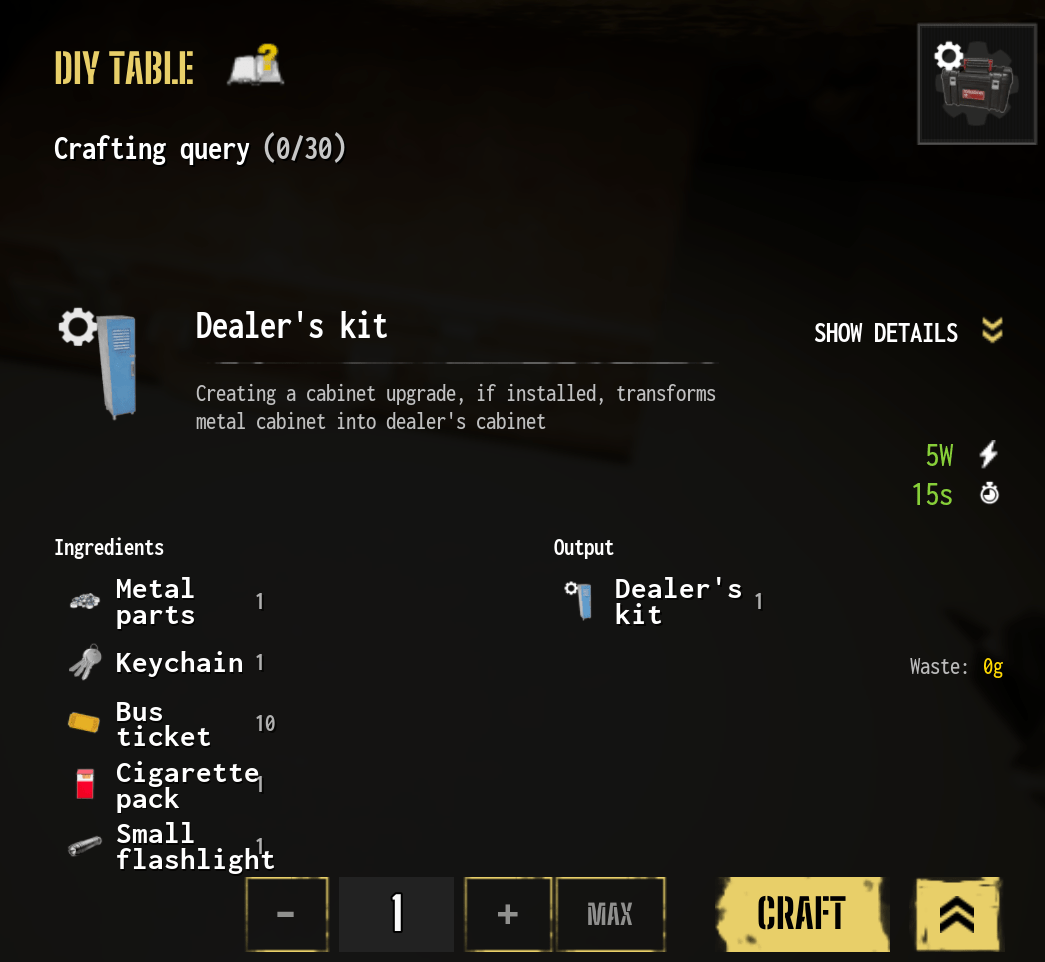
Do as I explained earlier with the DIY table, drag and drop the Dealer’s kit to the cogwheel slot in your metal cabinet to upgrade it.
Now, once it’s upgraded, interact with it, and assign a dealer. Click the white + sign, click on the dealer, then click the second + sign, and add the clients there.
Once done, it should look like this:
- Hit confirm and you’re done.

Provide the Dealer with Dope
Alright, so now we have to assign the dealer with some dope to make everything work. Pack your weed as we did earlier. You can decide how much weed you’ll give him yourself, but I suggest giving him at least 50 grams for starters. I only have 16 grams, so that’s what he’s getting. Go to the location shown on the map. Once there, you should see a couch. Click your middle mouse button/scroll wheel and drop the package. Make sure you’re close enough to touch the couch. From there, you drag
and drop the package you want to deliver, and click confirm. It’s that easy! But before you can collect the money from your dealer, you need to assign them. Read below on how to do that if you’re unsure.
Assign a Dealer to a Terrain Spot
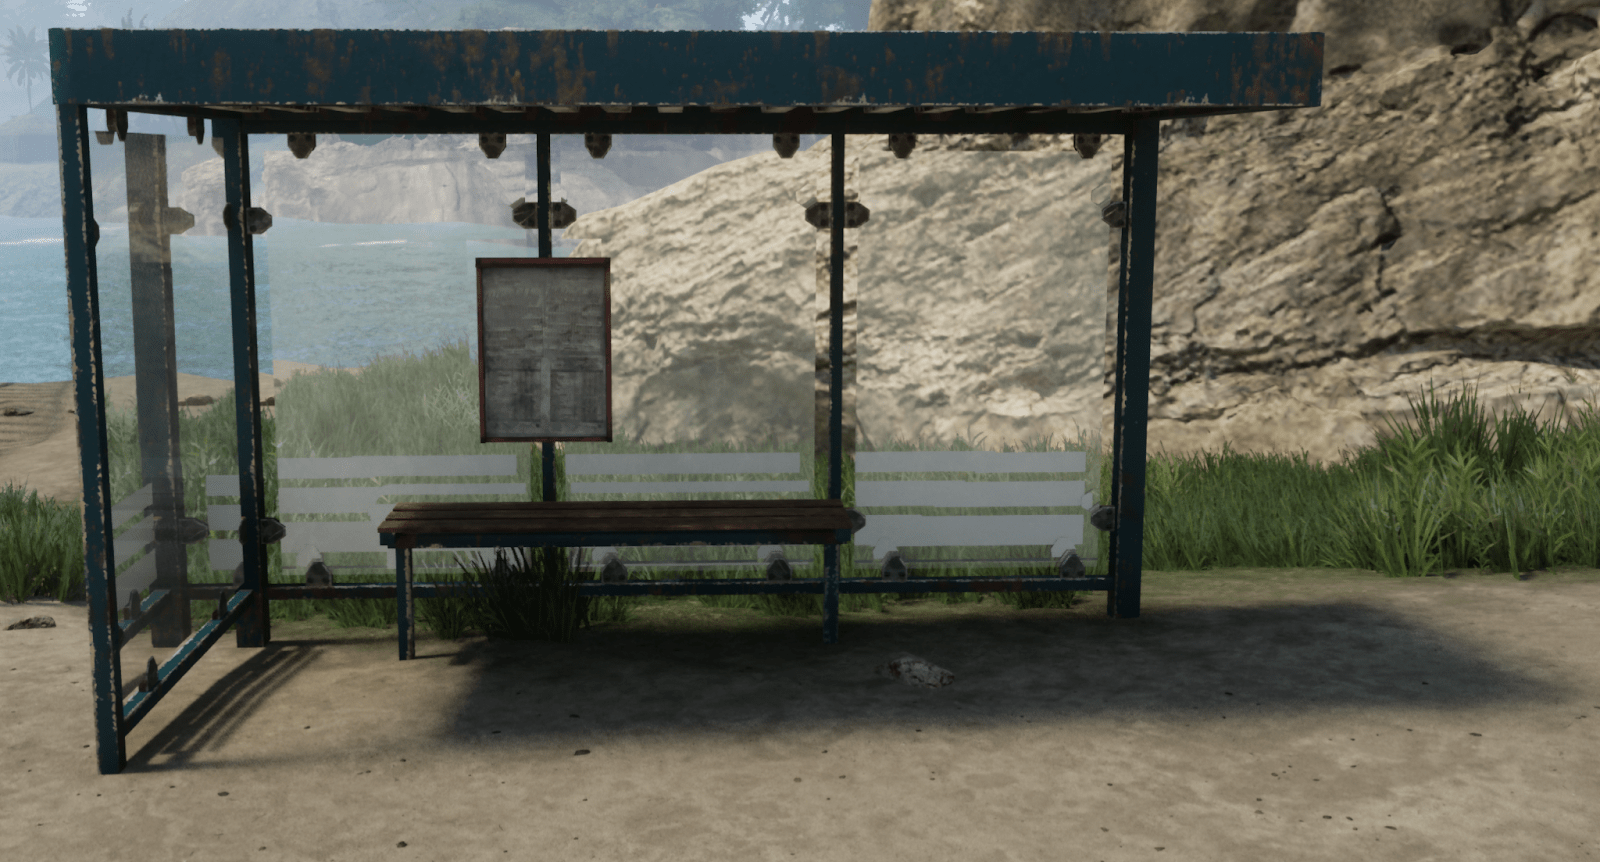
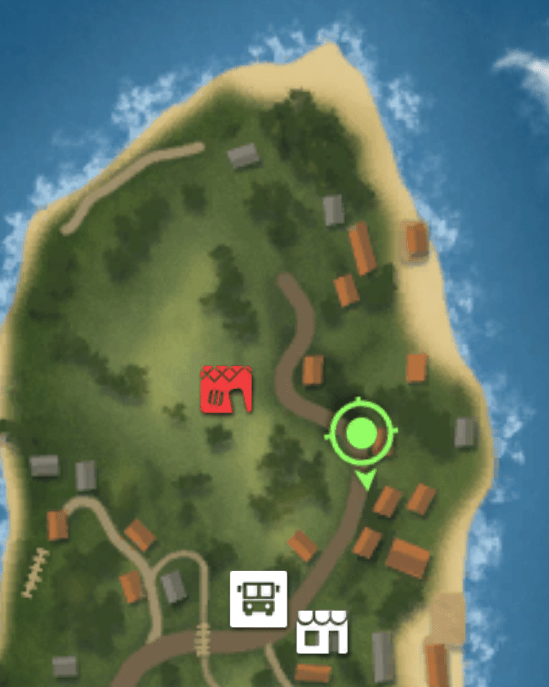
So this mission, it tells you to look around for hanging shoes. It may sound hard, but it’s actually relatively easy. Follow along, and I’ll show you a spot.
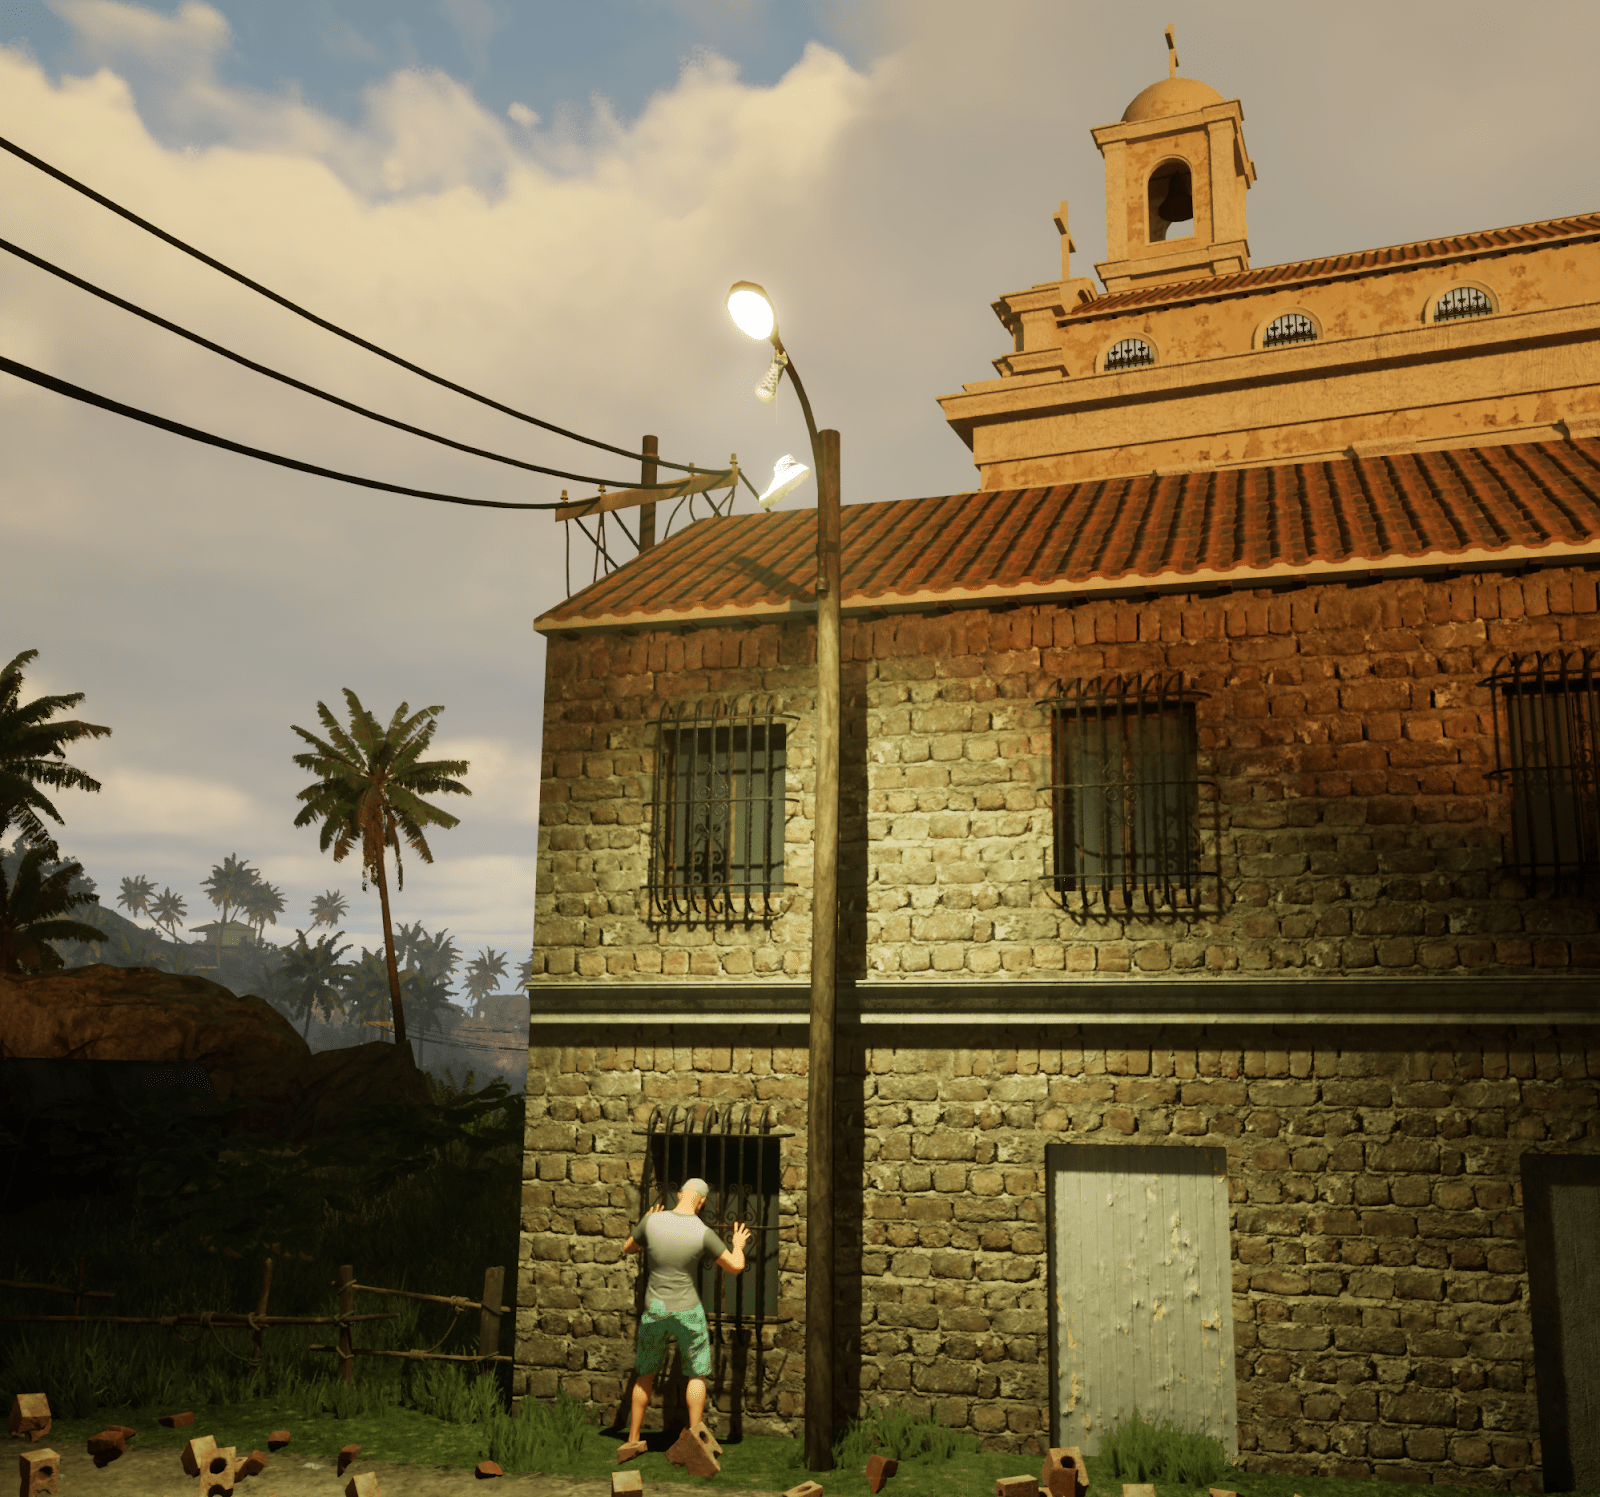
You can find this spot on the third island, right by the church. I’ve found it to work really well. There are more spots like these around the islands that you can find for future dealers aswell. But now you know what to look for, so it shouldn’t be too hard for you to find the rest if you wish to do so. Anyway, here’s the map location if you find it tough to find it from the picture.
From here, just press your middle mouse button, then hold space to manage worker spot. Click the + sign and add your dealer and hit confirm. You’re done!
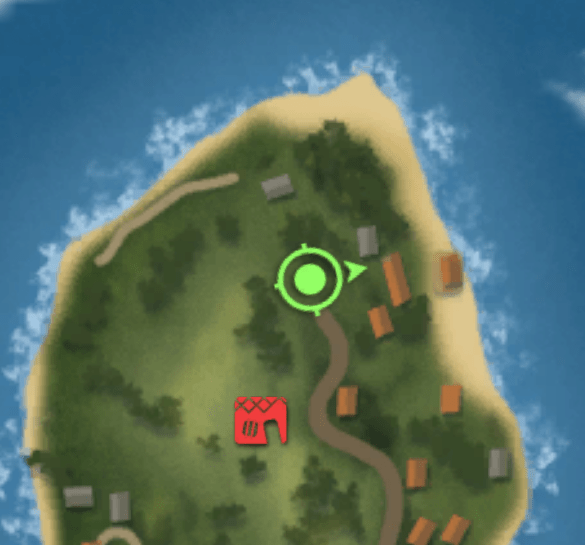
Locate 5 Dead Drops
This was probably the hardest mission for me to do as I wasn’t really sure what to look for, but don’t worry. I know now, and here to help you learn aswell. So let’s do it together! So, what we’re looking for are couches scattered around the islands. I will show you all the locations below, so make sure to look at the pictures.
- Location #1:
- Location #2:
- Location #3:
- Location #4:

- Location #5:
There you go. Those are all the locations for the dead drops. Make sure to use your middle mouse button to find them easier to find. Good luck!
Collect the Sales Money
This one is really really simple. If you want the sales money from your dealer, you either have to go to the spot that you assigned him earlier, or purchase a safe, and place it in your safehouse.
Arrange a Meeting with Llanzo
Again, pretty straight forward. Use one of the phones that I’ve explained earlier, near the store at the first island. Interact with the phone, And schedule a place to meet. Choose the “Bar in Archipelago” and press the “schedule” button. Now look at your map, and head over to the marker (the bar). Head inside, and sit down with Llanzo Jean-Louis and chat him up. Once you’re done talking to him, you will be assigned a new dealer.
Visit the Clothing Store
Yeahh, I’m not gonna bother adding a picture for this, as I literally did that with the furniture store. Anyway, just go to the clothing store marked on your map on the third island, talk to the cashier, and you’re good to go. Buy some new clothes if you’d like, you bum.
Visit Llanzo
Llanzo has another business offer for you. Pay him a visit and hear what he has to say. Once the conversation is over, he’ll assign you another dealer.
Improve Your Staff
Keep working on growing your empire by working with Llanzo. This task will eventually go away once you’ve done enough work for him.
Visit Marcus
Go back to the bunker, and check on the lab upgrade that Marcus is working on. See what he has to offer while you’re there, maybe even buy some?
Attend the Meeting with Pedro
Oh no! I’m afraid we’ve reached the end of our little demo guide… well, it was fun while it lasted. Anyway, head over to the meeting marked on your map. If you don’t attend to the meeting in time, you will be forced to go there (at least in the demo). I suggest you listen to the dialogue for that one.
I hope this was helpful to you!


Be the first to comment